* fix: RecurrentGemma crashes during inference for inputs longer than sliding window width
* fix recurrentgemma tests; add long test bigger than context window
* Restructure torchao quantization examples
Summary:
Mainly structured the examples by hardwares and then listed
the recommended quantization methods for each hardware H100 GPU, A100 GPU and CPU
Also added example for push_to_hub
Test Plan:
not required
Reviewers:
Subscribers:
Tasks:
Tags:
* update
* drop float8 cpu
* address comments and simplify
* small update
* link update
* minor update
* Set default value for output_attentions parameter in Gemma2 and Gemma3 models
* update
* fix
* fix
---------
Co-authored-by: chenin <wangzhichen@encosmart.com>
* [fix] make legacy bnb code work
* [fix] use get with default instead of getter
* add test for bnb 8bit optim skip embed
* [fix] style
* add require annotation of bnb
---------
Co-authored-by: jaycha <jaycha@ncsoft.com>
Co-authored-by: Marc Sun <57196510+SunMarc@users.noreply.github.com>
* fix: qwen2.5 omni modular get_rope_index
* test: add test for qwen2.5 omni rope index (video with audio input)
* style
* expected_position_ids readability
* fix: use spatial_merge_size = 1 in unit test
Update generation_strategies.md
The prompt text shown in the example does not match what is inside the generated output. As the generated output always include the prompt, the correct prompt should be "Hugging Face is an open-source company".
* initial commit
* add convert internvl
* add first end-to-end working internvl
* nit prompt and image proc
* add working chat template
* add conversion llama-based models
* add tests
* pass all tests
* fix isort
* fix modular after main merge
* add video processing for internvl
* add support for interlaced images and videos
* Remove processing and config from modular, add more tests
* add llama model tests
* Modify processor for compatibility with refactored got ocr image processor
* add comments in processor
* Add docs and nits
* change video processing to use custom sample_indices_fn
* rebase and fix tests
* add processor tests
* Add changes Raushan review
* Use the new attention interface for the vision model
* nits
* add support for custom video_load_backend
* remove mention to InternVLTokenizer
* refactor vision model to simplify logic
* refactor processor for better readibility
* fix copies
* fix require av processor test
* refactor internVL vision
* Update processor and fix processing tests
* fix docstring
* update convert_weights for internvl3
* change image processor to fast by default
* remove do_center_crop=True in convert_weights
* force use_cache to True
* push_to_hub before reloading
* fix internVLVision for larger models
* update convert weight for qk norm
* fix convert_weights
* fix eos_token_id in convert
* update docs and integration tests
* make modifs after review
* fix wrong k_norm and reduce modular
* change image_token_index to image_token_id
* change checkpoint to OpenGVLab org
* last nits
* explicitely del self.num_key_value_groups
* add extra special tokens
* fix issue that some example with no trainer use accelerator.end_training in a wrong way
* reformat code
---------
Co-authored-by: Marc Sun <57196510+SunMarc@users.noreply.github.com>
* use only `xxx_token_id` for multimodal tokens
* update modeling files as well
* fixup
* why fixup doesn't fix modular docstring first?
* janus, need to update configs in the hub still
* last fixup
* Iterative generation using input embeds
* Add Janus model
* discard changes
* Janus imports
* Refactor config and processor
* Added Vision tower of Janus
* Import Janus Image processor
* Vision tower fixes
* Refactor code
* Added VQ Model
* Complete model integration
* temp conversion script
* processor refactor
* Adding files to facilitate pulling
* Fixes after debugging
* Skip test for these models
* Add Janus Model
* discard changes
* Janus imports
* Refactor config and processor
* Added Vision tower of Janus
* Import Janus Image processor
* Vision tower fixes
* Refactor code
* Added VQ Model
* Complete model integration
* temp conversion script
* processor refactor
* Adding files to facilitate pulling
* Fixes after debugging
* Refactor to Text config
* ✨ Added generate function
* Saving intermediate convert file. Still need to read configs from the hub and convert them to our format.
* Adding version that reads from the JSON files. Still have to tweak some parameters manually.
* relative imports
* Initial tests
* Refactor image processor
* Seemingly working version of the conversion script, will need to test further.
* Adding command message
* Fixing conflicting JanusTextConfig class
* Incorporating some of the discussed changes.
* Small fix to create dir.
* Removing system from JINJA template
* Adding draft processor tests
* style fixes
* Minor fixes and enhancement
* added generation config
* Initial tests
* Small modifications, tests are now passing.
* Small changes I noticed while reading code.
* more fixes
* Added JanusModel class
* Small merge adaptations
* Small merge adaptations
* Image processing tests passing
* More tests and fixes
* Convert script updated and refactored
* Tests and cleanup
* make style
* Postprocessing for image generation
* generate refactor
* fixes
* - Passing tests that write a part of the model to cpu (e.g. test_cpu_offload)
- Passing tests of dispatching SDPA
- Only gradient checkpointing tests are left.
* Removing temporary code
* Changes
* Writing change to modular
* Added JanusVisionModel. SDPA dispatch tests pass more robustly. Gradient checkpoint tests are next
* Gradient checkpoint tests passing
* Removing debug code
* Major generate refactor 😮💨
* Temp changes for testing
* Green quality CI
* 2 out of 4 integration tests passing
* breadcrumbs
* Usage Examples
* Regenerate modeling after merge
* dirty code
* JanusIntegrationTest are passing
* breadcrumbs
* happy CI
* fixes
* Changing template
* nits
* Text generation logits matching original codebase at 100% precision
* Remove ./tmp from git tracking
* Remove ./tmp from git tracking
* Checkpointing changes after reviewing
* Fixing code in docstrings
* CHanging comments and small bug in convert file
* Fixing bug in image_token_id for 7B version
* Removing line that was added by both of us
* Pushing changes after discussion. Only one left is to change the key mapping for convert file.
* Updating module file
* New convert file using dict. Tested that it is equivalent to the old one by:
- comparing keys in a script
- comparing checksums of the output files between version generated with the current convert script and those generated with the old script. This is a more reliable test.
* revert changes
* mistake
* consistency change for CI
* make style
* doc fixes
* more fixes
* experimenting with masking out pad token
* checkpoint
* Batched generation with multi-images working for 1B models. Will test 7B next.
* Device fix.
* Writing changes to modular, previous ones were written to modeling just for quick testing.
* Using passed processor attention mask (only in modeling for now)
* Matching performance done in the non-standard way
* Working version of batched generation. Will change how some args are passed to make it more similar to language case
* More compliant version of the code
* Removed duplicated `_prepare_4d_causal_attention_mask_with_cache_position`
* Updating modular file, making masked filling with paddings more efficient
* Slightly more efficient version
* Modifying JanusVisionModel to be a wrapper
* Fixing test to comply with new names
* Modular overhaul
* More refactoring
* - Changing JanusVisionModel back
- Changing forward pass
- Adding boi token to the comparison
* - Removing whole context model_ids
- Using inherited implementation of prepare_inputs_for_generation
* Moving the way boi token is passed to the model
* Fixing sdpa test
* Minor changes
* testing changes
* Minor fix
* - Adding postprocessing test
- checking values of generated image on integration test
* changes
* Removing pooled attention vision module, fixing convert script as a consequence
* More changes
* Fixes
* Draft after merge
* Bug fixes
* More bug fix
* Fixing docs
* Nits
* Refactor return dict
* Moving image post processing test to main processor post process
* Passing guidance_scale as kwarg
* make style
* 🔥 refactor
* make style
* Update and green CI
* Nits and tests update
* up
* Added MID block
* fix
* Dead code
* update testcase
* update
* model_id change
* init_weight changes
---------
Co-authored-by: hsilva664 <metallic-silver@hotmail.com>
* Fix mamba2 grouped support in bamba torch path
* patch zamba2 and mamba2
* Add a unit test for grouped SSD
* add comment for the new unit test
* add output_size arg value to repeat_interleave calls
* Add comment
* added efficientnet image preprocessor but tests fail
* ruff checks pass
* ruff formatted
* properly pass rescale_offset through the functions
* - corrected indentation, ordering of methods
- reshape test passes when casted to float64
- equivalence test doesn't pass
* all tests now pass
- changes order of rescale, normalize acc to slow
- rescale_offset defaults to False acc to slow
- resample was causing difference in fast and slow. Changing test to bilinear resolves this difference
* ruff reformat
* F.InterpolationMode.NEAREST_EXACT gives TypeError: Object of type InterpolationMode is not JSON serializable
* fixes offset not being applied when do_rescale and do_normalization are both true
* - using nearest_exact sampling
- added tests for rescale + normalize
* resolving reviews
---------
Co-authored-by: Yoni Gozlan <74535834+yonigozlan@users.noreply.github.com>
* update
* apply suggestion
* fix tests for main branch
* remove unused logger
* add special tokens in tests
* nit
* fix more tests
* fix test
* pg also
Make Ignored Columns Value Error More Informative
Included forward method signature columns in the ValueError so end users will know what columns are expected to be passed to the model in addition to those which are ignored.
* initial documentation
* rename mask to attention_mask
* smaller tests
* fixup
* fix copies
* move to time series section
* sort docs
* isort fix
* batch_size is not a configuration
* rename to TimesFMModelForPrediction
* initial script
* add check_outputs
* remove dropout_rate
* works with torch.Tensor inputs
* rename script
* fix docstrings
* fix freq when window_size is given
* add loss
* fix _quantile_loss
* formatting
* fix isort
* add weight init
* add support for sdpa and flash_attention_2
* fixes for flash_attention
* formatting
* remove flash_attention
* fix tests
* fix file name
* fix quantile loss
* added initial TimesFMModelIntegrationTests
* fix formatting
* fix import order
* fix _quantile_loss
* add doc for SDPA
* use timesfm 2.0
* bug fix in timesfm decode function.
* compare mean forecasts
* refactor type hints, use CamelCase
* consolidate decode func
* more readable code for weight conversion
* fix-copies
* simpler init
* renaem TimesFmMLP
* use T5LayerNorm
* fix tests
* use initializer_range
* TimesFmModel instead of TimesFmDecoder
* TimesFmPositionalEmbedding takes config for its init
* 2.0-500m-pytorch default configs
* use TimesFmModel
* fix formatting
* ignore TimesFmModel for testing
* fix docstring
* override generate as its not needed
* add doc strings
* fix logging
* add docstrings to output data classes
* initial copy from t5
* added config and attention layers
* add TimesFMPositionalEmbedding
* calcuate scale_factor once
* add more configs and TimesFMResidualBlock
* fix input_dims
* standardize code format with black
* remove unneeded modules
* TimesFM Model
* order of imports
* copy from Google official implementation
* remove covariate forecasting
* Adapting TimesFM to HF format
* restructing in progress
* adapted to HF convention
* timesfm test
* the model runs
* fixing unit tests
* fixing unit tests in progress
* add post_init
* do not change TimesFMOutput
* fixing unit tests
* all unit tests passed
* remove timesfm_layers
* add intermediate_size and initialize with config
* initial documentation
* rename mask to attention_mask
* smaller tests
* fixup
* fix copies
* move to time series section
* sort docs
* isort fix
* batch_size is not a configuration
* rename to TimesFMModelForPrediction
* initial script
* add check_outputs
* remove dropout_rate
* works with torch.Tensor inputs
* rename script
* fix docstrings
* fix freq when window_size is given
* add loss
* fix _quantile_loss
* formatting
* fix isort
* add weight init
* add support for sdpa and flash_attention_2
* fixes for flash_attention
* formatting
* remove flash_attention
* fix tests
* fix file name
* fix quantile loss
* added initial TimesFMModelIntegrationTests
* fix formatting
* fix import order
* fix _quantile_loss
* add doc for SDPA
* use timesfm 2.0
* bug fix in timesfm decode function.
* compare mean forecasts
* refactor type hints, use CamelCase
* consolidate decode func
* more readable code for weight conversion
* fix-copies
* simpler init
* renaem TimesFmMLP
* use T5LayerNorm
* fix tests
* use initializer_range
* TimesFmModel instead of TimesFmDecoder
* TimesFmPositionalEmbedding takes config for its init
* 2.0-500m-pytorch default configs
* use TimesFmModel
* fix formatting
* ignore TimesFmModel for testing
* fix docstring
* override generate as its not needed
* add doc strings
* fix logging
* add docstrings to output data classes
* add _CHECKPOINT_FOR_DOC
* fix comments
* Revert "fix comments"
This reverts commit 8deeb3e191b3671bc1d74dbfe77b736a066c3d34.
* add _prepare_4d_attention_mask
* we do not have generative model classes
* use Cache
* return past_key_values
* modules initialized with config only
* update year
* Update docs/source/en/model_doc/timesfm.md
Co-authored-by: Steven Liu <59462357+stevhliu@users.noreply.github.com>
* add layer_idx to cache
* modular timesfm
* fix test
* unwrap sequential class
* fix toctree
* remove TimesFmOnnxConfig
* fix modular
* remove TimesFmStackedDecoder
* split qkv layer into individual layers
* rename projection layers
* use ALL_ATTENTION_FUNCTIONS
* is_causal is True
* rename config
* does not support flash_attn_2
* formatting
* fix typo in docsstring
* rename inputs
* add time series mapping
* Update src/transformers/models/olmo2/modeling_olmo2.py
* Update src/transformers/models/moonshine/modeling_moonshine.py
* use updated arguments
* fix class name
* add MODEL_FOR_TIME_SERIES_PREDICTION_MAPPING
* isort
* consolidate _preprocess into forward
* fix a typo
* fix a typo
* fix toc
* fix modular
* remove aaserts
* use self.config._attn_implementation
* move to _postprocess_output
* remove timesfm_get_large_negative_number
* use view unstead of multiple unsqueeze
* make helpers static methods of the Model
* use to_tuple
* use to_tuple if not return_dict
* remove unused intitialization block as its incorporated in nn.Linear
* remove unused num_key_value_groups
* use the same convention as the masking method
* update modular
* do not use unsqueeze
* use view instead of unsqueeze
* use buffer for inv_timescales
* formatting
* modular conversion
* remove unneeded intialization
* add missing docstrings
* remove cache
* use simple_eager_attention_forward
* support tp_plan
* support for flex and flash attention masks
* Revert "support for flex and flash attention masks"
This reverts commit def36c4fcf31599b3f4937c9334b7da1a20132c3.
* fix device
* fix tests on gpu
* remove unsued large model test
* removed unneeded comments
* add example usage
* fix style
* add import
* Update docs/source/en/model_doc/timesfm.md
Co-authored-by: Cyril Vallez <cyril.vallez@gmail.com>
* inherit from LlamaRMSNorm
* use can_return_tuple decorator
* remvoe return_dict
* fix year
* Update docs/source/en/model_doc/timesfm.md
Co-authored-by: Cyril Vallez <cyril.vallez@gmail.com>
* pretrained does not inherit from GenerationMixin
* use model for integration test
---------
Co-authored-by: Kashif Rasul <kashif.rasul@gmail.com>
Co-authored-by: Rajat Sen <rsen91@gmail.com>
Co-authored-by: Steven Liu <59462357+stevhliu@users.noreply.github.com>
Co-authored-by: Cyril Vallez <cyril.vallez@gmail.com>
Co-authored-by: Cyril Vallez <cyril.vallez@huggingface.co>
* fix: Restore explicit error surfacing for unexpected hub exceptions
Prior to PR #36033, unexpected exceptions (e.g., ModuleNotFoundError) during hub model loading were not swallowed silently. They either matched specific except blocks or were raised.
After #36033, a catch-all except Exception block was introduced without a fallback else, causing unknown errors to be silently ignored and leading to misleading downstream behavior.
This commit adds an `else: raise e` to ensure only explicitly handled exceptions are suppressed. All others are surfaced, restoring pre-4.50 behavior and aiding in debugging and dependency visibility.
Co-authored-by: Cyril Vallez <cyril.vallez@huggingface.co>
* Add MLCD model
* Update codes for auto-mapping
* Add test scripts for MLCD
* Update doc for MLCD model
* Fix import error
* Fix import error
* Fix CI error for attention_outputs
* Fix code style for CI
* Fix code style for CI
* Fix code style for CI
* Fix code style for CI
* Fix code style for CI
* Fix CI error for initialization
* Fix code style for CI
* Fix code style for CI
* Reformat codes and docs for CI test
* Reformat codes and docs for CI test
* Remove unused attributes for CI test
* Fix style for CI test
* List MLCD in flash_attn doc
* Fix: typos, modulars, refactors from suggestions
* Refactoring convert_mlcd_weights_to_hf.py from suggestions
* Fix: docs conflicts
* Fix error for CI test
* Fix style for CI test
* Add integration test for MLCD
* Refactoring by class inheritance
* Fix: refactor attention interface, adjust codes
* Fix: merging conflicts
* Fix: merging conflicts
* Fix: style for CI test
* Fix: style for CI test
* Fix: set test_resize_embeddings to be False
* Fix: initializer for CI test
* Fix: conflicts, CI test, warning and refactoring
* Fix: merging conflicts
* Refactor
* Update docs
* Fix mistakes
* Remove unused args and fix multi-gpu error
* Revert position_embeddings
* Solve conflicts
* Solve conflicts
* Remove dummy
* Update _init_weights
* Update _init_weights
* Update _init_weights for CI test
* fix BlockMask handling when using flex_attention for llama/mistral/gemma2
* fix attention_mask types
* revert type hints and fixup
* remove unnecessary assertion
* support fast image processor layoutlmv3
* make style
* add warning and update test
* make style
* Update src/transformers/models/layoutlmv3/image_processing_layoutlmv3_fast.py
* Update image_processing_auto.py
---------
Co-authored-by: Yoni Gozlan <74535834+yonigozlan@users.noreply.github.com>
* support flava fast image processor
* run style and quality
* update test
* update according to reviews
* make style
* update comment on BICUBIC
* make style
---------
Co-authored-by: Yoni Gozlan <74535834+yonigozlan@users.noreply.github.com>
* First pass at speech granite
Add encoder / projector, rename things
* Combine into one model file with causal lm outputs for forward
* Add loss calc
* Fix config loading
Signed-off-by: Alex-Brooks <Alex.brooks@ibm.com>
* Split new / old loading logic
* Use transformers integration for loading peft adapters
* Add generation wrapper for selective lora enablement
* Add note for qformer encoder automodel
* Guard torch/audio imports in feature extractor
* Handle granite speech autoclasses
* Handle optional deps in package structure for granite speech
* Add granite pretrained model def for init
* Add dummy objects for torch/torchaudio
* Add tests for granite speech processor
* Minor formatting fixes and refactoring
* Add options for falling back to config in forward
* Tentative model docstrings for granite speech
* Fix config type
* Remove legacy load
* Allow non-lora variants for granite speech
* Override weight tying for llm
* Use text config instead of llm config
* Add output embeddings getter to fix weight tying
* Fix relative imports
* computing the number of audio features, based on the raw audio sequence.
* collating audio inputs, and keeping the original lengths.
* asserted we have text. otherwise we can't specify the audio special token.
* assering the number of audio-symbols/audios match correctly.
running get validated_audios only when audio is present
* indentation bugfix + supporting different feature lengths when expanding audio.
* redundant, done in _get_validated_text
* adapting the tests:
- we must have text (not either audio or text)
- _get_num_audio_features takes a list of raw lengths, provided it insetad.
* Minor cleanup, remove unused import
* Add more tests for batch feature processing
* Allow setting offset in rel position embeddings
* Add config option for warning if peft is not installed w/ lora
* Port blip2 qformer code into granite speech
* Add sad test for numpy arr processing
* Allow numpy arrays / tuples in granite speech processor
* Fix config type for projector
* - pad instead of creating a zeros tensor, to keep the original dtype/device (support bfloat16)
- cast input_features to the model dtype (support bfloat16)
* merge Blip2QFormerConfig to GraniteSpeechProjectorConfig
* prevent a crash when re-saving/loading the model (line 109)
* consider additional edge cases during preprocessing.
* consider additional edge cases during preprocessing.
* add features mask for batched inference (bugfix)
* Minor refactor, remove multiaudio processor tests
* Add set input/output embeddings for granite speech
* Fix feature dim check in processor test
* Pop input features in embed test for granite speech
* Small fixes for test edge cases
Add granite speech to seq2seq causal lm mapping names
* Add small tests for granite speech model
* Fix data parallelism test
* Standardize model class names
* Fix check for copies
* Fix misaligned init check
* Skip granite speech in checkpoint check
* Use default for tie_word_embeddings in granite speech
* Fix non documentation granite speech repo issues
* Fix comments and docstring checks
* Add placeholder docs for granite speech
* Fix test naming collision
* Code formatting
* Rerun torch dummy obj regen
* Fix save pretrained for granite speech
* Import sorting
* Fix tests typo
* Remove offset hack
* Pass args through encoder config
* Remove unused prune heads from blip2
* removing einsum. replaced with explicit multiplication (relative positional encodings) and sdpa attention.
* remove Sequential from ConformerFeedForward and ConformerConvModule. + fix for sdpa attention
* remove GraniteSpeechConformerScale
* rename to hidden_states
* rename conformer layers to self.layers, remove the first linear from the list to keep the list homogenous.
* move pre-norm to the attention/feedforward blocks (avoid complex module wrapping)
* adding pre_norm into forward
* feature extractor refactoring to resemble how it's done in phi4multimodal.
* rename feature_extractor to audio_processor
* bugfix: input_feature_mask fix to get the exact number tokens.
* Fix pytest decorator in processor test
* Add (disabled) integration tests for granite speech
* Fix handling of optional feature masking
* Loosen validation in processing for vLLM compatability
* Formatting fixes
* Update init structure to mirror llama
* Make granite speech projector generic
* Update test config to reflect generic projector
* Formatting fixes
* Fix typos, add license
* Fix undefined var in input processing
* Cleanup and expose ctc encoder
* Add missing config docstrings
* Better var names, type hints, etc
* Set attn context size in init
* Add max pos emb to encoder config
* Cleanup feature extractor
* Add granite speech architecture details
* Remove granite speech qformer ref
* Add paper link, explicit calc for qkv
* Calculate padding directly in depthwise conv1d init
* Raise value error instead of asserting
* Reorder class defs (classes used at top)
* Precompute relpos distances
* Run formatting
* Pass attention distances through forward
* Apply suggestions from code review
Co-authored-by: eustlb <94853470+eustlb@users.noreply.github.com>
* Add todo for using common batch feature extraction
* Rename audios/features
* Ensure chat template may be provided to processor
* Move granite speech docs to audio models
* Add todos for input proc refactoring
* Fix import order
* Guard torch import
* Use relative imports
* Require torch backend for processor in granite speech
* Add backend guards in feature extractor
---------
Signed-off-by: Alex-Brooks <Alex.brooks@ibm.com>
Co-authored-by: Avihu Dekel <avihu.dekel@ibm.com>
Co-authored-by: eustlb <94853470+eustlb@users.noreply.github.com>
* Add saving in the new format (but no loading yet!)
* Add saving in the new format (but no loading yet!)
* A new approach to template files!
* make fixup
* make fixup, set correct dir
* Some progress but need to rework for cached_file
* Rework loading handling again
* Small fixes
* Looks like it's working now!
* make fixup
* Working!
* make fixup
* make fixup
* Add TODO so I don't miss it
* Cleaner control flow with one less indent
* Copy the new logic to processing_utils as well
* Proper support for dicts of templates
* make fixup
* define the file/dir names in a single place
* Update the processor chat template reload test as well
* Add processor loading of multiple templates
* Flatten correctly to match tokenizers
* Better support when files are empty sometimes
* Stop creating those empty templates
* Revert changes now we don't have empty templates
* Revert changes now we don't have empty templates
* Don't support separate template files on the legacy path
* Rework/simplify loading code
* Make sure it's always a chat_template key in chat_template.json
* Update processor handling of multiple templates
* Add a full save-loading test to the tokenizer tests as well
* Correct un-flattening
* New test was incorrect
* Correct error/offline handling
* Better exception handling
* More error handling cleanup
* Add skips for test failing on main
* Reorder to fix errors
* make fixup
* clarify legacy processor file docs and location
* Update src/transformers/processing_utils.py
Co-authored-by: Lucain <lucainp@gmail.com>
* Update src/transformers/processing_utils.py
Co-authored-by: Lucain <lucainp@gmail.com>
* Update src/transformers/processing_utils.py
Co-authored-by: Lucain <lucainp@gmail.com>
* Update src/transformers/processing_utils.py
Co-authored-by: Lucain <lucainp@gmail.com>
* Rename to _jinja and _legacy
* Stop saving multiple templates in the legacy format
* Cleanup the processing code
* Cleanup the processing code more
* make fixup
* make fixup
* correct reformatting
* Use correct dir name
* Fix import location
* Use save_jinja_files instead of save_raw_chat_template_files
* Correct the test for saving multiple processor templates
* Fix type hint
* Update src/transformers/utils/hub.py
Co-authored-by: Julien Chaumond <julien@huggingface.co>
* Patch llava_onevision test
* Update src/transformers/processing_utils.py
Co-authored-by: Julien Chaumond <julien@huggingface.co>
* Update src/transformers/tokenization_utils_base.py
Co-authored-by: Julien Chaumond <julien@huggingface.co>
* Refactor chat template saving out into a separate function
* Update tests for the new default
* Don't do chat template saving logic when chat template isn't there
* Ensure save_jinja_files is propagated to tokenizer correctly
* Trigger tests
* Update more tests to new default
* Trigger tests
---------
Co-authored-by: Lucain <lucainp@gmail.com>
Co-authored-by: Julien Chaumond <julien@huggingface.co>
* the fix that did not get in
* add kernels
* full graph does not work
* simpler is better
* Update src/transformers/integrations/hub_kernels.py
Co-authored-by: Daniël de Kok <me@danieldk.eu>
* Update src/transformers/integrations/fbgemm_fp8.py
Co-authored-by: Daniël de Kok <me@danieldk.eu>
* Update src/transformers/integrations/hub_kernels.py
Co-authored-by: Daniël de Kok <me@danieldk.eu>
* fixup
---------
Co-authored-by: Daniël de Kok <me@danieldk.eu>
Corrects the file path used to locate the CUDA kernels
for the Deformable Attention module. This ensures that
the kernels are loaded correctly, resolving potential
errors during module initialization and usage.
Previously, the identity function was used for dropped tokens
with a weight from the expert that was not applied to the hidden states.
This was misleading, because dropping means, the expert weight is zero.
Instead of trying to fix the weight, we take an easier approach by initializing with zeros.
Fixes issue https://github.com/huggingface/transformers/issues/37017
* add classifier head to donut
* add to transformers __init__
* add to auto model
* fix typo
* add loss for image classification
* add checkpoint
* remove no needed import
* reoder import
* format
* consistency
* add test of classifier
* add doc
* try ignore
* update loss for all swin models
* fix tests and some clean up
* make one general test for each modality
* remove redundant merging of kwargs
* edge cases
* dont enforce slow when reloading
* fix gemma3 tests
* has to adapt llama 4 after rebase
* remove also from overriden tests
* should be green now
* debugging improvements
* add debugging details
* add more debugging details
* debug more
* the fix that did not get in
* First fix flex
* fix query offset
* fix flex first
* fix device mask creation for speed
* small mask creation sdpa
* Update flex_attention.py
* remove chunked prefill from HybridChunkedCache
* never seen such a fucked up merged
* clean up layers + output
* add summary json file
* Efficient general cache
* Update cache_utils.py
* cleanup
* fix?
* fix!
* oups typo
* not everywhere
* more fixes
* revert unrelated changes
* Fix but ugly for now -> should use pad instead
* oups
* re-initialize the cache
* Use pad to simplify
* style
* correct slicing
---------
Co-authored-by: Pablo <pablo.montalvo.leroux@gmail.com>
Co-authored-by: Cyril Vallez <cyril.vallez@gmail.com>
* add peft model in constant
* add test
* fix formating
* make fixup execute
* change code
* check by self.task
* add test
* fixup test code
* fix minor typo
* fix pipeline test
* apply maintainers reqests
* add changed
* Revert "add changed"
This reverts commit 0a0166a1fe80556115a49fbf0c2132de0f4f85c9.
* update with NEW MODEL class called GLM4
* update
* Update glm4.md
* Name
* style
* fix copies
* fixup test
---------
Co-authored-by: Yuxuan Zhang <2448370773@qq.com>
fix conversion script no_rope_layers
`no_rope_layers` should either be a list of NoPE layers or None, such that it is created in the config from the `no_rope_layer_interval`
Co-authored-by: Pedro Cuenca <pedro@huggingface.co>
* Preserve requires_grad in pre quantized model
Summary:
discovered this when running lm-eval for some models, current
code will set requires_grad to True always
Test Plan:
lm_eval --model hf --model_args pretrained=jerryzh168/phi4-torchao-gguf-q4_k --tasks hellaswag --device cuda:0 --batch_size 8
Reviewers:
Subscribers:
Tasks:
Tags:
* ruff format
---------
Co-authored-by: Mohamed Mekkouri <93391238+MekkCyber@users.noreply.github.com>
* More limited setup -> setupclass conversion
* make fixup
* Trigger tests
* Fixup UDOP
* Missed a spot
* tearDown -> tearDownClass where appropriate
* Couple more class fixes
* Fixups for UDOP and VisionTextDualEncoder
* Ignore errors when removing the tmpdir, in case it already got cleaned up somewhere
* CLIP fixes
* More correct classmethods
* Wav2Vec2Bert fixes
* More methods become static
* More class methods
* More class methods
* Revert changes for integration tests / modeling files
* Use a different tempdir for tests that actually write to it
* Remove addClassCleanup and just use teardownclass
* Remove changes in modeling files
* Cleanup get_processor_dict() for got_ocr2
* Fix regression on Wav2Vec2BERT test that was masked by this before
* Rework tests that modify the tmpdir
* make fix-copies
* revert clvp modeling test changes
* Fix CLIP processor test
* make fix-copies
* Skip non-selected experts for mixtral and qwen2_moe
* Fix: tensor tolist()
* WIP: tokenization test
* fix modular source of truth
* nits
---------
Co-authored-by: Arthur Zucker <arthur.zucker@gmail.com>
Co-authored-by: Arthur <48595927+ArthurZucker@users.noreply.github.com>
* update for fixes
* more fixes
* fuxix dynamic cache?
* style
* fix both traiining and generating. Eager seems alright
* dynamic does not work
* fix most cases, use_cache or not, eager or not, no default cache (ex: not training but you want to get cache states)
* should be final fixes
* fix more stuff no cat
* style
* fix
* style
* final sytle
* qualityeioiwhjfaopsejdpofqsdjkfjha;wesdhgfkjlqsw.denghjkaswednkgs
* fix
* revert
* Improved Model card for Gemma2
* Made changes in gemma2 as suggested
* Made more changes in the doc (adding image, notes, closing hfoptions)
* minor fixes
---------
Co-authored-by: Steven Liu <59462357+stevhliu@users.noreply.github.com>
* Update Model card for gpt2
* Update link for gpt2 space
* fixes docs based on suggestions
* Add transformers-cli and quantization example for GPT-2
* Remove resources and flash attention docs and fix typos
* enable tests/models/llama/test_modeling_llama.py::LlamaIntegrationTest::test_model_7b_logits and tests/models/llama/test_modeling_llama.py::LlamaIntegrationTest::test_model_7b_logits_bf16 on xpu
Signed-off-by: YAO Matrix <matrix.yao@intel.com>
* switch to use Expectations
Signed-off-by: YAO Matrix <matrix.yao@intel.com>
* fix style
Signed-off-by: YAO Matrix <matrix.yao@intel.com>
* extract gen bits from architecture and use it
Signed-off-by: YAO Matrix <matrix.yao@intel.com>
* add cross refererence
Signed-off-by: YAO Matrix <matrix.yao@intel.com>
* fix style
Signed-off-by: YAO Matrix <matrix.yao@intel.com>
---------
Signed-off-by: YAO Matrix <matrix.yao@intel.com>
Co-authored-by: Marc Sun <57196510+SunMarc@users.noreply.github.com>
* Updated model card for distilbert
* Updated the distilbert model card
* Updated model card for distilbert
* Updated the distilbert model card
* Addressed code review comments
* Addressed review comments
* fix pipeline
---------
Co-authored-by: Steven Liu <59462357+stevhliu@users.noreply.github.com>
* github why you do this
* fix
* make fixup
* disable cpu offload test
* fixup
* tmp reworks
* git branch movement
* make fixup
* add require_fsdp_v2_version
* dep issues
* update ruff and fixup
enable 2 types of case on XPU 1. test_resize_tokens_embeddings_with_deepspeed_multi_gpu 2. test_resize_embeddings_untied_with_deepspeed_multi_gpu
Signed-off-by: YAO Matrix <matrix.yao@intel.com>
* More ReDOS fixes!
* Slight regex cleanup
* Cleanup regex replacement
* Drop that regex entirely too
* The regex didn't match config.json, let's make sure we don't either
* Cleanup allowed_value_chars a little
* Cleanup the import search
* Catch multi-condition blocks too
* Trigger tests
* Trigger tests
* Remove unnecessary masked_fill in deberta models
* Enable some code when exporting but not compiling
* add missing import
* style
* replace if by torch.cond
* style
* use numel
* style
* add unit tests
* style
* change empty value for dynamic cache
* replace != [] by numel()
* fix import issue
* style
* Update Siglip attention implementation
* Update tests for Siglip
* Remove one level of indentation
* Update test to be more specific
* Fixup
* Idefics2
* Idefics3
* Emu3
* SmolVLM
* Phi4 (just init small update)
* Idefics2 (test fix)
* Update siglip2 tests
* Update eager
* trigger
* Clean up
* Transfer inputs to device in test
* Fixing test
* Fixing test
* Revert contiguous
* Remove unused is_flash_attn_2_available
* Move flaky to specific models
* fix XPU UT error case brough by RNG difference btw XPU and CUDA
Signed-off-by: YAO Matrix <matrix.yao@intel.com>
* enable tests/models/llama/test_modeling_llama.py::LlamaIntegrationTest::test_model_7b_logits and tests/models/llama/test_modeling_llama.py::LlamaIntegrationTest::test_model_7b_logits_bf16 on xpu
Signed-off-by: YAO Matrix <matrix.yao@intel.com>
* Revert "enable tests/models/llama/test_modeling_llama.py::LlamaIntegrationTest::test_model_7b_logits and tests/models/llama/test_modeling_llama.py::LlamaIntegrationTest::test_model_7b_logits_bf16 on xpu"
This reverts commit 3ef83a4f0204642daa45fda56e8aca1afed24b4f.
---------
Signed-off-by: YAO Matrix <matrix.yao@intel.com>
* Initial commit for Qwen3
* fix and add tests for qwen3 & qwen3_moe
* rename models for tests.
* fix
* fix
* fix and add docs.
* fix model name in docs.
* simplify modular and fix configuration issues
* Fix the red CI: ruff was updated
* revert ruff, version was wrong
* fix qwen3moe.
* fix
* make sure MOE can load
* fix copies
---------
Co-authored-by: Arthur Zucker <arthur.zucker@gmail.com>
* init commit
* style
* take comments into account
* add deepseekv3 modeling
* remove redundant code
* apply make style
* apply fix-copies
* make format
* add init files
* rename deepseekv3 into deepseek_v3 based on its model_type
* rename deepseekv3 into deepseek_v3 based on its model_type
* deepseek-v3 not deepseek_v3
* set model_type as deepseek_v3
* use default docs
* apply make
* fill type and docstring
* add rope_config_validation
* use custom DeepseekV3MLP
* hold code only for checkpoints congifuration; remove redundant
* revise rope yarn for DeepSeek variation
* rename DeepSeek-V3
* some refactoring
* revise load_hook to work properly; make moe func trainable; use llama instead of mixtral
* fix attention forward
* use -1 for not-changing dim when to use exapnd
* refactor DeepseekV3TopkRouter
* use reshape_for_rope instead of load_hook; revise attention forward for TP; rename q_head_dim with qk_head_dim
* register pre_hook and hook both
* make style
* use n_shared_experts
* Update src/transformers/models/deepseek_v3/configuration_deepseek_v3.py
Co-authored-by: Arthur <48595927+ArthurZucker@users.noreply.github.com>
* add test file
* update modeling_file according to modular file
* make style
* add mapping for DeepseekV3ForSequenceClassification
* remove aux_loss_alpha
* add deepseek_v3 for perf
* add deepseek_v3
* rename test as deepseekv3
* use tiny-deepseek-v3
* remove DeepseekV3ForSequenceClassification
* cache before padding
* remote output_router_logits
* Revert "remote output_router_logits"
This reverts commit f264f800d04950390db8413b9efb24cef8186330.
* remove output_router_logits
* make e_score_correction_bias as buffer
* skip tests not compatible
* make style
* make e_score_correction_bias as buffer
* use rope_interleave instead of load_hook
* skip tests not compatible with MLA
* add doc for rope_interleave
* fix typo
* remove torch.no_grad for selecting topk
* fix post merge issue
* mrege with main and simplify
* nits
* final
* small fixes
* fix
* support TP better
* stash
* changes currently requires
* remove synch
* more fixes for TP
* temp fix for TP : some attention layers's FP8 scales are too small + shared is local colwise and anything is local if FP8 because weights are used
* updates to have generation work!
* push most of the changes
* reorder functions + call for contributions!
* update readme
* nits
* update
* ruff was updated on main
* merge with main and fix copies
* revert unrelated changes
* route all tokens to all experts when testing to avoid no gradient iddues
* finish fixing all tests
* fixup
* nit
* clean config
* last readme changes
* nit
* do cnit
* typo
* last nit
* one more one more
---------
Co-authored-by: Arthur Zucker <arthur.zucker@gmail.com>
Co-authored-by: Arthur <48595927+ArthurZucker@users.noreply.github.com>
Co-authored-by: arthur@huggingface.co <arthur@ip-26-0-165-131.ec2.internal>
* Add image_token_id and video_token_id handling in Llava processors
* fix: image to video
* fix: correct image and video token ID handling in Llava processors
* fix: improve image and video token ID handling in Llava processors
* Optimize to_py_obj for python-native numeric lists and scalars
* Fix bug that tuple is not converted to list
* Try np.array for more robust type checking
* Apply review and add tests for to_py_obj
* Updated docker files to use uv pip install as uv is blazingly fast.
* Removed -y flag for uv pip uninstall.
* Passed --no-build-isolation flag
---------
Co-authored-by: Yih-Dar <2521628+ydshieh@users.noreply.github.com>
* add audio chat templates
* update
* update
* nit
* green ci
* we dont care about the order anymore
* clean up after rebase
* overriden tests rename
* rename shieldgemma also
* one more rename
* require_read_token
* removde images/videos
* retrigger CI flaky
* chore: fix typos in test codes
* chore: fix typos in test codes
* chore: fix typos in test codes
* chore: fix typos in test codes
* chore: fix typos in test codes
* chore: fix typos in test codes
* chore: fix typos in test codes
* chore: fix typos in test codes
* chore: format codes
* Added support for seed in `DataCollatorForWholeWordMask`, and also wrote tests.
Also fixed bugs where the code hardcoded values for mask replacement probability and random replacement probability, instead of using the values passed by the user.
* formatting issues
* Used better way to generate seed in TF. Made tests more consistent.
tests: fix asyncio.wait() usage for python>=3.7
Passing coroutings directly to `asyncio.wait()` is deprecated since
python 3.8 and removed starting from python 3.11. Instead, it's required
to explicitly wrap coroutine in the task with `asyncio.create_task()` which
first appeared in python 3.7.
We step into this issue running the following Transformers tests on a
system with python 3.11 or later (for example, Ubuntu 24.04 has python 3.12):
* `tests/trainer/test_trainer_distributed.py`
* `tests/extended/test_trainer_ext.py`
The error will be:
```
src/transformers/testing_utils.py:2380: in execute_subprocess_async
result = loop.run_until_complete(
/usr/lib/python3.12/asyncio/base_events.py:687: in run_until_complete
return future.result()
src/transformers/testing_utils.py:2368: in _stream_subprocess
await asyncio.wait(
...
E TypeError: Passing coroutines is forbidden, use tasks explicitly.
```
See: https://docs.python.org/3.10/library/asyncio-task.html#asyncio.wait
See: https://docs.python.org/3.10/library/asyncio-task.html#asyncio.wait
See: https://docs.python.org/3.7/library/asyncio-task.html#asyncio.create_task
Signed-off-by: Dmitry Rogozhkin <dmitry.v.rogozhkin@intel.com>
Co-authored-by: Yih-Dar <2521628+ydshieh@users.noreply.github.com>
* process flattened images in fast image proc
* process flattened images in low proc and add tests
* remove print
* add unbalanced batch test pas image proc
* fix integration tests
* Use `deformable_detr` kernel from the Hub
Remove the `deformable_detr` kernel from `kernels/` and use the
pre-built kernel from the Hub instead.
* Add license header
* Add `kernels` as an extra `hub-kernels`
Also add it to `testing`, so that the kernel replacement gets tested
when using CUDA in CI.
* supersede paligemma forward to shift pos id indexing
* fix prepare_inputs_ as well
* fix modular error
---------
Co-authored-by: Arthur <48595927+ArthurZucker@users.noreply.github.com>
* Make ViT Pooler configurable, so that it is possible to pick the activation function and the number of channels in the output
* Add documentation and allow functions as activations (instead of just string)
* formatting change
* Use ACT2FN
* Formatting change
* Formatting changes
* force pooler_act to be string
* force pooler_act to be string
* Add configs to OBJECTS_TO_IGNORE to make check_docstrings happy
* Making the same change in ijepa to make check_modular_conversion happy
* Add IJepaConfig to make CI happy
* rename pooler_size to pooler_output_size as defined in the config
* typo
* revert change to ignore variable
* Ran utils/check_docstrings.py --fix_and_overwrite
* revert unrelated change
* remove redundant defaults
* rename self.act -> self.activation
* tanh activation function in mapping
* chore: fix typos in the tests
* chore: fix typos in the tests
* chore: fix typos in the tests
* chore: fix typos in the tests
* chore: fix typos in the tests
* chore: fix typos in the tests
* chore: fix typos in the tests
* chore: fix typos in the tests
* chore: fix typos in the tests
* chore: fix typos in the tests
* chore: fix typos in the tests
* chore: fix typos in the tests
* chore: fix typos in the tests
* fix: format codes
* chore: fix copy mismatch issue
* fix: format codes
* chore: fix copy mismatch issue
* chore: fix copy mismatch issue
* chore: fix copy mismatch issue
* chore: restore previous words
* chore: revert unexpected changes
The _fsdp_qlora_plugin_updates checks for LoraConfig but other PEFT
methods can also support quantized models, e.g. VeRA. Therefore, the
isinstance check is now looking for PeftConfig in general.
Moreover, the fsdp_plugin variable may be undefined in the 2nd if
condition, leading to an `UnboundLocalError` error. This is fixed by not
assigning the variable at all.
I checked for tests that may need updating but only found
test_fsdp_config_transformers_auto_wrap associated with this change.
AFAICT, this test does not cover the changed code, since the test does
not start the training loop. Therefore, I haven't updated any tests. LMK
if/how this fix should be tested.
Co-authored-by: Marc Sun <57196510+SunMarc@users.noreply.github.com>
* no image
* test
* revert jax version updates
* make fixup
* update autodoc path for model_addition_debugger
* shieldgemma2
* add missing pages to toctree
* draft of model tracer visualiser
* add context manager in addition to decorator
* add debug utils to init
* move model debugging utils to dedicated file
* add documentation
* protect some imports
* format
* move and protect imports
* format
* doc: improve errors in case of broken dummy imports.
* format
* use automatic torch backend
* update doc
* fix backend
* (TEMP) move to dummies while backend wait
* update documentation
* doc
* add prompt depth anything model by modular transformer
* add prompt depth anything docs and imports
* update code style according transformers doc
* update code style: import order issue is fixed by custom_init_isort
* fix depth shape from B,1,H,W to B,H,W which is as the same as Depth Anything
* move prompt depth anything to vision models in _toctree.yml
* update backbone test; there is no need for resnet18 backbone test
* update init file & pass RUN_SLOW tests
* update len(prompt_depth) to prompt_depth.shape[0]
Co-authored-by: Joshua Lochner <admin@xenova.com>
* fix torch_int/model_doc
* fix typo
* update PromptDepthAnythingImageProcessor
* fix typo
* fix typo for prompt depth anything doc
* update promptda overview image link of huggingface repo
* fix some typos in promptda doc
* Update image processing to include pad_image, prompt depth position, and related explanations for better clarity and functionality.
* add copy disclaimer for prompt depth anything image processing
* fix some format typos in image processing and conversion scripts
* fix nn.ReLU(False) to nn.ReLU()
* rename residual layer as it's a sequential layer
* move size compute to a separate line/variable for easier debug in modular prompt depth anything
* fix modular format for prompt depth anything
* update modular prompt depth anything
* fix scale to meter and some internal funcs warp
* fix code style in image_processing_prompt_depth_anything.py
* fix issues in image_processing_prompt_depth_anything.py
* fix issues in image_processing_prompt_depth_anything.py
* fix issues in prompt depth anything
* update converting script similar to mllamma
* update testing for modeling prompt depth anything
* update testing for image_processing_prompt_depth_anything
* fix assertion in image_processing_prompt_depth_anything
* Update src/transformers/models/prompt_depth_anything/modular_prompt_depth_anything.py
Co-authored-by: Pavel Iakubovskii <qubvel@gmail.com>
* Update src/transformers/models/prompt_depth_anything/modular_prompt_depth_anything.py
Co-authored-by: Pavel Iakubovskii <qubvel@gmail.com>
* Update src/transformers/models/prompt_depth_anything/image_processing_prompt_depth_anything.py
Co-authored-by: Pavel Iakubovskii <qubvel@gmail.com>
* Update src/transformers/models/prompt_depth_anything/image_processing_prompt_depth_anything.py
Co-authored-by: Pavel Iakubovskii <qubvel@gmail.com>
* Update src/transformers/models/prompt_depth_anything/image_processing_prompt_depth_anything.py
Co-authored-by: Pavel Iakubovskii <qubvel@gmail.com>
* Update docs/source/en/model_doc/prompt_depth_anything.md
Co-authored-by: Pavel Iakubovskii <qubvel@gmail.com>
* Update docs/source/en/model_doc/prompt_depth_anything.md
Co-authored-by: Pavel Iakubovskii <qubvel@gmail.com>
* update some testing
* fix testing
* fix
* add return doc for forward of prompt depth anything
* Update src/transformers/models/prompt_depth_anything/modular_prompt_depth_anything.py
Co-authored-by: Pavel Iakubovskii <qubvel@gmail.com>
* Update tests/models/prompt_depth_anything/test_modeling_prompt_depth_anything.py
Co-authored-by: Pavel Iakubovskii <qubvel@gmail.com>
* fix prompt depth order
* fix format for testing prompt depth anything
* fix minor issues in prompt depth anything doc
* fix format for modular prompt depth anything
* revert format for modular prompt depth anything
* revert format for modular prompt depth anything
* update format for modular prompt depth anything
* fix parallel testing errors
* fix doc for prompt depth anything
* Add header
* Fix imports
* Licence header
---------
Co-authored-by: Joshua Lochner <admin@xenova.com>
Co-authored-by: Pavel Iakubovskii <qubvel@gmail.com>
* Remove deprecated arguments for jax.numpy.clip.
* Remove deprecated arguments for jax.numpy.clip.
* Update jax version to 0.4.27 to 0.4.38.
* Avoid use of deprecated xla_bridge.get_backend().platform
Co-authored-by: Jake Vanderplas <jakevdp@google.com>
---------
Co-authored-by: Jake Vanderplas <jakevdp@google.com>
* feat: Saving tokenizer in collator when processing_class is None
* chore: Style issue
* chore: Typo
* dbg: Check why test failed
* dbg: Remove logics and another test failed which successed before, so should be the stablibility issue
* test: Init unit-test
* chore: Style
* chore: Add err log
* fix: Case
* Update tests/trainer/test_trainer.py
Co-authored-by: Marc Sun <57196510+SunMarc@users.noreply.github.com>
* chore: Try to use get_regression_trainer
* fix: Impl and style
* fix: Style
* fix: Case
* fix: Import err
* fix: Missed import
* fix: Import block un-sorted problem
* fix: Try another tokenizer
* fix: Test logic
* chore: Light updates
* chore: Reformat
---------
Co-authored-by: Marc Sun <57196510+SunMarc@users.noreply.github.com>
* Disable inductor config setter by default
This is hard to debug and should be off by default
* remove default settings in autoquant too
* Add info to torchao.md about recommended settings
* satisfying Ruff format
Summary:
Test Plan:
Reviewers:
Subscribers:
Tasks:
Tags:
---------
Co-authored-by: Marc Sun <57196510+SunMarc@users.noreply.github.com>
* Just import torch AdamW instead
* Update docs too
* Make AdamW undocumented
* make fixup
* Add a basic wrapper class
* Add it back to the docs
* Just remove AdamW entirely
* Remove some AdamW references
* Drop AdamW from the public init
* make fix-copies
* Cleanup some references
* make fixup
* Delete lots of transformers.AdamW references
* Remove extra references to adamw_hf
* fix "Cannot copy out of meta tensor; no data!" issue for BartForConditionalGeneration model
* follow Marc's suggestion to use _tie_weights to fix
Signed-off-by: Yao, Matrix <matrix.yao@intel.com>
* fix review comments.
Signed-off-by: N <matrix.yao@intel.com>
* fix quality
Signed-off-by: N <matrix.yao@intel.com>
---------
Signed-off-by: Yao, Matrix <matrix.yao@intel.com>
Signed-off-by: N <matrix.yao@intel.com>
* Add expectation classes + tests
* Use typing Union instead of |
* Use bits to track score in properties cmp method
* Add exceptions and tests + comments
* Remove compute cap minor as it is not needed currently
* Simplify. Remove Properties class
* Add example Exceptions usage
* Expectations as dict subclass
* Update example Exceptions usage
* Refactor. Improve type name. Document score fn.
* Rename to DeviceProperties.
Mistaken use of De Morgan's law. Fixed "not (X or Y)"
to correct "not (X and Y)" check to raise a ValueError.
Added corresponding test to check "positive int or None" condition.
Co-authored-by: Yih-Dar <2521628+ydshieh@users.noreply.github.com>
* fall back to eager if output_attentions
* improve relative position embeddings
* run modular on got_ocr2
* run-slow: sam
* fix run-length encoding
* fix tf processor errors
* update tf_sam
* fix compile error
* re-run tests
* Try working around the processor registration bugs
* oops
* Update error message
* Clarify error
* Docstring docstring docstring
* The extra content is indexed by config class, so let's grab some values out of there
* Commit my confusion as a TODO
* Resolve my confusion
* Cleanup and mostly revert to the original
* Better autoclass fallback
* Don't nest f-strings you lunatic
* Clearer error message
* Less getattr()
* Revert a lot of changes to try a different approach!
* Try the global registry
* Check the dynamic list as well as the transformers root
* Move the dynamic list somewhere safer
* Move the dynamic list somewhere even safer
* More import cleanup
* Simplify all the register_for_auto_class methods
* Set _auto_class in the register() methods
* Stop setting the cls attribute in register()
* Restore specifying the model class for Model derivatives only
* Fix accidentally taking the .__class__ of a class
* Revert register_for_auto_class changes
* Fix get_possibly_dynamic_module
* No more ALL_CUSTOM_CLASSES
* Fix up get_possibly_dynamic_module as well
* Revert unnecessary formatting changes
* Trigger tests
* Set best_model_checkpoint only when ckpt exists.
Rather than set it explicitly without checking if the checkpoint directory even exists as before, now we moved the setting logic inside of _save_checkpoint and are only setting it if it exists.
* Added best_global_step to TrainerState.
* Added tests for best_model_checkpoint.
* Fixed hard-coded values in test to prevent fail.
* Added helper func and removed hard-coded best_step.
* Added side effect patch generator for _eval.
* Added evaluate side effect func.
* Removed erroneous patching.
* Fixed minor bug.
* Applied Ruff.
* Fixed Ruff problem in make style.
* Used Trainer.set_initial_training_values.
* add support for fast image processors in add-new-model-like
* fix header not found add-fast-image-processor-cli
* Encourage adding fast image processor
* nit
* start improve doc
* update docs
* make requested modifs
Corrects the type annotation to match actual usage. The variable was typed as
Dict[str, Dict[str, Callable]] but is actually used as Dict[str, Callable]
where keys are attention mechanism names and values are the corresponding
attention functions directly. This change makes the type annotation consistent
with how the dictionary is used in the codebase.
* refactor siglip2 fast image processor, add unused_kwargs in base fast image processor
* nits
* change unused_kwargs default to None
* update siglip2 fast image proc
* Don't accidentally mutate the base_model_tp_plan
* Co-authored by: Joao Gante <joaofranciscocardosogante@gmail.com>
* Trigger tests
* Marking grad accum test as slow
* Add a flaky decorator
* Add a flaky decorator
* Use cyril's codeblock
* Don't copy() when it's None
* Use cyril's new codeblock
* make fixup
* test
* fix
* fix
* skip some and run some first
* test fsdp
* fix
* patches for generate
* test distributed
* copy
* don't test distributed loss for hpu
* require fp16 and run first
* changes from marc's PR fixing zero3
* better alternative
* return True when fp16 support on gaudi without creating bridge
* fix
* fix tested dtype in deepspeed inference test
* test
* fix
* test
* fix
* skip
* require fp16
* run first fsdp
* Apply suggestions from code review
* address comments
* address comments and refactor test
* reduce precison
* avoid doing gaudi1 specific stuff in the genreation loop
* document test_gradient_accumulation_loss_alignment_with_model_loss test a bit more
* Fix converter
* [Broken] Adds Gemma 3 to Hugging Face Transformers
* Consolidating Config and Processor params across impls
* Sorting out configuration parameters. Adds qk_norm before RoPE. Still not sure if RoPE is right.
* Additional plumbing for CausalLM and ConditionalGeneration variants
* incomplete draft of Orbax conversion script
* More complete checkpoint conversion
* Supporting Gemma 3 1B checkpoints
* Updating RoPE for multiple frequencies
* Adjustments to rotary embedder
* Proof of life for text-only operation
* Updating the conversion script to handle multimodal projection weights
* Fixing tet-only conversions
* Cleaner conversion script with multimodal support and a simpler processor
* Additional refatcors to the Gemma3Processor
* Simplified Processor to work over text representations
* Updated conversion script to join text and vision embeddings at converion time
* Logging for debugging
* Update src/transformers/models/gemma2/modeling_gemma2.py
Co-authored-by: Joshua Lochner <admin@xenova.com>
* Removed extraneous Config params
* Switching to fast tokenizer for checkpoint conversions
* isolating siglip for performance tetsing
* Minor changes for debugging tests against baselines
* Adding average pooling for soft tokens
* Updating processor code to enable simpler embedding interleaving for arbitrary number of images in prompts
* Updating conversion script for ShieldGemma 2 conversion compatibility
* Allow disable_compile to be provided as a kwarg
* Refresh from modular
* Updated conversion script and corrected sliding window
* Fix type mismatch in cache_position (#4)
* Fix dtype (#5)
* Fix type mismatch in cache_position
* Actually fix in the modular file
Co-authored-by: Aritra Roy Gosthipaty <aritra.born2fly@gmail.com>
---------
Co-authored-by: Aritra Roy Gosthipaty <aritra.born2fly@gmail.com>
* fixes for embedding table overflow and missing image_soft_token_mask from Gemma3Processor
* Adding 2D pooling for image embeddings
* Revert "Adding 2D pooling for image embeddings"
This reverts commit 65350cf531296f050b2078a5b8e46f61642b2648.
* Gemma3 average pooling changed from 1D to 2D
* Major refactor to Gemma3MultimodalInputProjection
* Updating Gemm 3 Auto* registrations
* Add option to save Gemma 3 chat template with tokenizer during weights conversion
* Removing unused imports
* Moving out-of-vocab handling from Gemma3Processor to Gemma3ForConditionalGeneration
* Removing duplicate config property
* Removing final logit softcapping and 1-indexing of position ids
* Fixing image processor config and none --> None typo
* Fixing sliding window size for 1B
* Updating image_mean and image_std in Image Processor
* Attention masking changed to lower triangular
* Moving image special tokens to conversion script
* Mirror image processor defaults from conversion script into Gemma3ProcessorKwargs
* Remove special token variables from symbol space
* Moving image soft token mask computation from Gemma3Processor to Gemma3ForConditionalGeneration
* tie lm_head and embedding weights
Co-authored-by: Matthew Douglas <38992547+matthewdouglas@users.noreply.github.com>
* Correct tied weights in Gemma3CausalLM
* iterative bidirectional attention
* resolving merge conflicts
* Reverting to Gemma 2 HybridCache with sldiing window support and a sliding_window_pattern of 6
* Correcting RoPE scaling
* clean up first pass, dummy model geenration works
* final clean up before fixing tests
* causal lm test works, so fine
* Fix conversion
* Update src/transformers/models/gemma3/processing_gemma3.py
* model tests are happy
* processor tests are happy
* image processing tests added
* fixup
* Fix pre-processing in conversion
* Inputs merging
* Do not normalize vision embeddings
* Apply Ryan's (and team) changes to attention
* token type ids + mask
* template
* move embed scale, add rope scale, fix tests
* Add chat template to tokenizer
* Use prefix for causal model loading
* use existing code for sliding mask from gemma2
* self.embed_tokens already normalizes
* Correcting Gemma3TextConfig parameters in conversion script
* typo, modular overwrites my fixes
* enable device map for text model
* Conversion updates
* ultra nit: no einsums
* update image token
* copy deepcopy config + some docs
* add some test, still WIP
* Refactoring --include_chat_tempalte logic in converter
* Update src/transformers/models/gemma3/modular_gemma3.py
Co-authored-by: Xuan-Son Nguyen <thichthat@gmail.com>
* Add eos tokens for instruct models
* dump so i can work on dgx
* Removing add_bos by default
* dump
* add fast im proc
* docs for PaS + fixup
* another fixup
* one more fixup
* fix tests
* Inverting prior BOS change
* ultra nit
* Reverting to Tokenizer saved with add_bos_token=True and chat template starting with BOS
* resize embeds, remove sqrt, add slow test outputs
* FA2 but quality is meh
* nit
* skip FA2, no idea what happened
* last bit for green CI
* please, green CI for docs
* T_T
* Fix for Gemma3 logits
* Support both options for system prompt
* Update src/transformers/models/gemma3/image_processing_gemma3_fast.py
Co-authored-by: Pedro Cuenca <pedro@huggingface.co>
* Update docs/source/en/model_doc/gemma3.md
Co-authored-by: Pedro Cuenca <pedro@huggingface.co>
* Update docs/source/en/model_doc/gemma3.md
Co-authored-by: Pedro Cuenca <pedro@huggingface.co>
* Update docs/source/en/model_doc/gemma3.md
Co-authored-by: Pedro Cuenca <pedro@huggingface.co>
* Update docs/source/en/model_doc/gemma3.md
Co-authored-by: Pedro Cuenca <pedro@huggingface.co>
* Update docs/source/en/model_doc/gemma3.md
Co-authored-by: Pedro Cuenca <pedro@huggingface.co>
* Docs updates now that assets are live
* Style fixes
---------
Co-authored-by: Joshua Lochner <admin@xenova.com>
Co-authored-by: Pedro Cuenca <pedro@huggingface.co>
Co-authored-by: Aritra Roy Gosthipaty <aritra.born2fly@gmail.com>
Co-authored-by: Mayank Chaturvedi <imayank@google.com>
Co-authored-by: Matthew Douglas <38992547+matthewdouglas@users.noreply.github.com>
Co-authored-by: raushan <raushan@huggingface.co>
Co-authored-by: Raushan Turganbay <raushan.turganbay@alumni.nu.edu.kz>
Co-authored-by: Xuan-Son Nguyen <thichthat@gmail.com>
Co-authored-by: Lysandre <hi@lysand.re>
* fix: handle input_channel_dim == channels_last
Signed-off-by: Travis Johnson <tsjohnso@us.ibm.com>
* fix: default PIL images to channels_last
Signed-off-by: Travis Johnson <tsjohnso@us.ibm.com>
* Apply suggestions from code review
Co-authored-by: Pavel Iakubovskii <qubvel@gmail.com>
* fixup from review batch
Signed-off-by: Travis Johnson <tsjohnso@us.ibm.com>
* test: add 1x1 PIL image to ambiguous channel test
Signed-off-by: Travis Johnson <tsjohnso@us.ibm.com>
* fix(mllama): avoid 0 dimension for image with impractical aspect ratio
Signed-off-by: Travis Johnson <tsjohnso@us.ibm.com>
---------
Signed-off-by: Travis Johnson <tsjohnso@us.ibm.com>
Co-authored-by: Pavel Iakubovskii <qubvel@gmail.com>
* chore: fix typos in language models
* chore: fix typos in mistral model
* chore: fix model copy from issue
* chore: fix model copy from issue
* chore: fix model copy from issue
* chore: fix model copy from issue
* chore: fix model copy from issue
Fixed 2 issues regarding `tests/trainer/test_data_collator.py::TFDataCollatorIntegrationTest::test_all_mask_replacement`:
1. I got the error `RuntimeError: "bernoulli_tensor_cpu_p_" not implemented for 'Long'`. This is because the `mask_replacement_prob=1` and `torch.bernoulli` doesn't accept this type (which would be a `torch.long` dtype instead. I fixed this by manually casting the probability arguments in the `__post_init__` function of `DataCollatorForLanguageModeling`.
2. I also got the error `tensorflow.python.framework.errors_impl.InvalidArgumentError: cannot compute Equal as input #1(zero-based) was expected to be a int64 tensor but is a int32 tensor [Op:Equal]` due to the line `tf.reduce_all((batch["input_ids"] == inputs) | (batch["input_ids"] == tokenizer.mask_token_id))` in `test_data_collator.py`. This occurs because the type of the `inputs` variable is `tf.int32`. Solved this by manually casting it to `tf.int64` in the test, as the expected return type of `batch["input_ids"]` is `tf.int64`.
* First draft of github action on PR opening for auto-assigning reviewers
* fix missing import
* Don't reassign reviewers if we already have them
* Temporarily comment out the opened line so we can test the script
* Correct path for codeowners file
* Update workflow permissions
* Update workflow permissions
* Update debug logs
* Strip inline comments
* Remove prefix
* Request reviews instead of assigning
* Request reviews instead of assigning
* Add TODO
* Use pull-request-target instead
* Update the script
* Set back to pull_request for testing
* Set to pull_request_target, testing works!
* Add licence
* Tighten up one of the globs
* Refactor things to be a bit less convoluted
* Only assign reviewers when marked ready for review
* Export base streamer.
Previously, the base streamer class was not exported so the set of available streamers was fixed to 3 streamer classes.
This change makes it so that customers may extend the default base streamer class.
* make fixup
---------
Co-authored-by: Joao Gante <joaofranciscocardosogante@gmail.com>
Co-authored-by: Joao Gante <joao@huggingface.co>
* avoid errors when the size of `input_ids` passed to PrefixConstrainedLogitsProcessor is zero
* use more reasonable process
* avoid early return
---------
Co-authored-by: Joao Gante <joaofranciscocardosogante@gmail.com>
* add swanlab integration
* feat(integrate): add SwanLab as an optional experiment tracking tool in transformers
- Integrated SwanLab into the transformers library as an alternative for experiment tracking.
- Users can now log training metrics, hyperparameters, and other experiment details to SwanLab by setting `report_to="swanlab"` in the `TrainingArguments`.
- Added necessary dependencies and documentation for SwanLab integration.
* Fix the spelling error of SwanLabCallback in callback.md
* Apply suggestions from code review
Co-authored-by: Marc Sun <57196510+SunMarc@users.noreply.github.com>
* Fix typo in comment
* Fix typo in comment
* Fix typos and update comments
* fix annotation
* chore: opt some comments
---------
Co-authored-by: Marc Sun <57196510+SunMarc@users.noreply.github.com>
Co-authored-by: AAssets <20010618@qq.com>
Co-authored-by: ZeYi Lin <944270057@qq.com>
Co-authored-by: KAAANG <79990647+SAKURA-CAT@users.noreply.github.com>
* initial commit
* small fix
* move stuff to image processing file
* remove stuff in validate turn and fix return tensor
* remove liquid stuff
* in the process of addressing comments
* changes to get the right tokenization
* new __init__ works
* fixing defulat std and mean
* works
* small testing scipt -- to be deleted before merge
* remove redundant code
* addressing comments
* fix inits, add docs templates
* refactor processor, switch to gotocr image processor
* remove image proc from init
* refactor to working llava-style architecture
* Change AyaVisionModel to AyaVisionForConditionalGeneration
* add tests
* fixups
* update doc
* Adding logits_to_keep explicitly in ayavision forward to enable compatibility with cohere model
* better variable names + remove code paths
* Updates to aya_vision.md
* address comments
* adding copied from
* make style and remove unused projector_hidden_act from config
* sort init
* include usage of fast image proc and proc on cuda in doc
* update checkpoint iin test processor
* update checkpoint in test processor 2
* remove test_model and update docstring
* skip failing tests
---------
Co-authored-by: Saurabh Dash <saurabh@cohere.com>
Co-authored-by: yonigozlan <yoni.gozlan@huggingface.co>
* Fix edge case for continue_final_message
* lstrip() correctly
* Add regression test
* Add a clearer error message when the final message is not present
* Add a clearer error message when the final message is not present
* Fix massive bug!
* Fix pipeline-peft interaction
* once again you have committed a debug breakpoint
* Remove extra testing line
* Add a test to check adapter loading
* Correct adapter path
* make fixup
* Remove unnecessary check
* Make check a little more stringent
transformers/image_processing_utils.py:41: UserWarning: The following named arguments are not valid for `SamImageProcessor.preprocess` and were ignored: 'point_pad_value'
* refactor image processor slow got ocr
* add working image processor fast
* fix fast image processor, update doc
* use one big loop for processing patches
* test
* docstring
* prepare distributed cache data
* fix cat dim
* test mvp
* add test checks
* like this?
* working test and solution
* nit
* nit
* add shape info
* clean code
* oups
* fix merge
* yups
* fix if
* now you can play
* fix shape issue
* try non blocking
* fix
* updates
* up
* updates
* fix most of thetests
* update
* update
* small updates
* up
* fix the remaining bug?
* update
* rename when you read from the file
* buffer issues
* current status
* cleanup
* properly allocate dumb memory
* update a small bug
* fix colwise rep issue
* fix keep in float 32 that was keeping everything in float 32
* typo
* more fixes with keep_in_fp32_modules as we use to serach on it
* fix ROPE dtype for TP
* remove what's breaking the tests
* updates
* update and fixes
* small cleanup after merging
* allocate 2x to be safe
* style, auto
* update
* yup nit
* fix
* remove slow as fuck torch api :(
* work
* fixup
* update
* brting the fix back
* fix and update
* fixes
Co-authored-by: Marc Sun <57196510+SunMarc@users.noreply.github.com>
* updates because some suggestions were wrong 👀
* update?
* fuck this bloated function
* typo
* fix the dumb prefix thing once and forall
* fixes here and there
* updates
* remove prints
* fix strict cases
* styel
* properly fix keys on load!
* update
* fix base model prefix issue
* style
* update
* fix all?
* remoce 1 print
* fix the final etsts
* fixup
* last nits
* fix the detach issue which cause a 2x slowdown
* fixup
* small fixes
* ultra nit
* fix
* fix
---------
Co-authored-by: Marc Sun <57196510+SunMarc@users.noreply.github.com>
* fix: prevent model access error during Optuna hyperparameter tuning
The `transformers.integrations.integration_utils.run_hp_search_optuna` function releases model memory and sets trainer.model to None after each trial. This causes an AttributeError when subsequent Trainer.train calls attempt to access the model before reinitialization. This is only an issue when `fp16_full_eval` or `bf16_full_eval` flags are enabled.
* Update src/transformers/trainer.py
Co-authored-by: Marc Sun <57196510+SunMarc@users.noreply.github.com>
---------
Co-authored-by: Marc Sun <57196510+SunMarc@users.noreply.github.com>
* size tuple
* delete original input_size
* use zip
* process the other case
* Update src/transformers/models/vitdet/modeling_vitdet.py
Co-authored-by: Pavel Iakubovskii <qubvel@gmail.com>
* [VITDET] Test non-square image
* [Fix] Make Quality
* make fix style
* Update src/transformers/models/vitdet/modeling_vitdet.py
---------
Co-authored-by: Pavel Iakubovskii <qubvel@gmail.com>
* tests: revert change of torch_require_multi_gpu to be device agnostic
The 11c27dd33 modified `torch_require_multi_gpu()` to be device agnostic
instead of being CUDA specific. This broke some tests which are rightfully
CUDA specific, such as:
* `tests/trainer/test_trainer_distributed.py::TestTrainerDistributed`
In the current Transformers tests architecture `require_torch_multi_accelerator()`
should be used to mark multi-GPU tests agnostic to device.
This change addresses the issue introduced by 11c27dd33 and reverts
modification of `torch_require_multi_gpu()`.
Fixes: 11c27dd33 ("Enable BNB multi-backend support (#31098)")
Signed-off-by: Dmitry Rogozhkin <dmitry.v.rogozhkin@intel.com>
* fix bug: modification of frozen set
---------
Signed-off-by: Dmitry Rogozhkin <dmitry.v.rogozhkin@intel.com>
Co-authored-by: Titus von Koeller <9048635+Titus-von-Koeller@users.noreply.github.com>
Co-authored-by: Yih-Dar <2521628+ydshieh@users.noreply.github.com>
* Disable warnings for stacked compressors
* Introduce two new hooks in HfQuantizer lifecycle
to allow updates to missing and unexpected keys
* Update missing and unexpected keys
for stacked compressors
* Add tests
* Fix: run_compressed cases
* Fix: uncompressed cases
* Rename compressed_tensor folder to compressed_tensors
Move RunCompressedTest to the same file
Update tests to unittest
* Fix potential regex catastrophic backtracking in NougatTokenizerFast
The original regex pattern in tokenization_nougat_fast.py was vulnerable to
catastrophic backtracking due to greedy quantifiers and nested alternations.
This commit replaces it with a more efficient pattern that:
1. Uses explicit character classes instead of dot (.)
2. Handles whitespace more precisely
3. Avoids unnecessary backtracking
4. Supports both lowercase and uppercase roman numerals
5. Maintains the same functionality while being more robust
* Try another regex
* Trying deepseek's answer
* Start with a simplification
* Another simplification
* Just rewrite the whole function myself
* Fix gptneox and gptsan
* Simplify the regex even further
* Tighten up the price regex a little
* Add possessive version of the regex
* Fix regex
* Much cleaner regexes
---------
Co-authored-by: openhands <openhands@all-hands.dev>
* fix: prevent second save in the end of training
* fix: prevent second save in the end of training
* test: added test for no duplicate save on epoch save strategy
* fix: removed TrainerControl
* chore: style formatting
---------
Co-authored-by: JaktensTid <jaktenstid1@gmail.com>
* Add dithering to the `Speech2TextFeatureExtractor` API.
- in kaldi : 4a8b7f6732/src/feat/feature-window.cc (L145)
- with dithering without a seed, the features become non-deterministic due
to small Gaussian noise added to the audio (i.e. 2 runs lead to little
different outputs)
* update the PR
- add dithering also for WhisperFeatureExtractor
- not adding to Wav2Vec2FeatureExtractor (no FBANK computation)
* add unit-tests for dithering, fix docstrings
* ruff
* utils/check_copies.py --fix_and_overwrite
* update code, add seed to unit-test
* adding explanation of dithering
* Fix XGLM loss computation (PyTorch and TensorFlow)
* Update expected output string in XGLM sample test
This updates the expected output string of test_xglm_sample for torch
2.0 to the correct one and removes the one for torch 1.13.1 + cu116
(transformers moved to torch 2.0 with PR #35358).
* Update expected output IDs in XGLM generation test
**Summary:** TorchAoConfig optionally contains a
`torchao.dtypes.Layout` object which is a dataclass and not
JSON serializable, and so the following fails:
```
import json
from torchao.dtypes import TensorCoreTiledLayout
from transformers import TorchAoConfig
config = TorchAoConfig("int4_weight_only", layout=TensorCoreTiledLayout())
config.to_json_string()
json.dumps(config.to_dict())
```
This also causes `quantized_model.save_pretrained(...)` to
fail because the first step of this call is to JSON serialize
the config. Fixes https://github.com/pytorch/ao/issues/1704.
**Test Plan:**
python tests/quantization/torchao_integration/test_torchao.py -k test_json_serializable
Co-authored-by: Mohamed Mekkouri <93391238+MekkCyber@users.noreply.github.com>
Co-authored-by: Marc Sun <57196510+SunMarc@users.noreply.github.com>
* archive_file may not be specified
When loading a pre-trained model from a gguf file, resolved_archive_file may not be set. Guard against that case in the safetensors availability check.
* Remap partial disk offload to cpu for GGUF files
GGUF files don't support disk offload so attempt to remap them to the CPU when device_map is auto. If device_map is anything else but None, raise a NotImplementedError.
* Don't remap auto device_map and raise RuntimeError
If device_map=auto and modules are selected for disk offload, don't attempt to map them to any other device. Raise a runtime error when a GGUF model is configured to map any modules to disk.
---------
Co-authored-by: Marc Sun <57196510+SunMarc@users.noreply.github.com>
* allow processor to preprocess conversation + video metadata
* allow callable
* add test
* fix test
* nit: fix
* add metadata frames_indices
* Update src/transformers/processing_utils.py
Co-authored-by: Pablo Montalvo <39954772+molbap@users.noreply.github.com>
* Update src/transformers/processing_utils.py
Co-authored-by: Pablo Montalvo <39954772+molbap@users.noreply.github.com>
* port updates from Orr and add one more test
* Update src/transformers/processing_utils.py
Co-authored-by: Pablo Montalvo <39954772+molbap@users.noreply.github.com>
* typo
* as dataclass
* style
* docstring + maek sure tests green
---------
Co-authored-by: Pablo Montalvo <39954772+molbap@users.noreply.github.com>
* Optimize Qwen2VL vision model by precomputing cos/sin embeds before ViT blocks
* Make rotary_pos_emb optional & fix type
* Adapt pre-computed cos/sin to Qwen2.5VL
* More concise
* tmp commit
* move tests to the right class
* remove ALL all_generative_model_classes = ...
* skip tf roberta
* skip InstructBlipForConditionalGenerationDecoderOnlyTest
* videollava
* reduce diff
* reduce diff
* remove on vlms
* fix a few more
* manual rebase bits
* more manual rebase
* remove all manual generative model class test entries
* fix up to ernie
* a few more removals
* handle remaining cases
* recurrent gemma
* it's better here
* make fixup
* tf idefics is broken
* tf bert + generate is broken
* don't touch tf :()
* don't touch tf :(
* make fixup
* better comments for test skips
* revert tf changes
* remove empty line removal
* one more
* missing one
* Add implementation for DataCollatorForMultipleChoice based on docs.
* Add DataCollatorForMultipleChoice to import structure.
* Remove custom DataCollatorForMultipleChoice implementations from example scripts.
* Remove custom implementations of DataCollatorForMultipleChoice from docs in English, Spanish, Japanese and Korean.
* Refactor torch version of DataCollatorForMultipleChoice to be more easily understandable.
* Apply suggested changes and run make fixup.
* fix copies, style and fixup
* add missing documentation
* nits
* fix docstring
* style
* nits
* isort
---------
Co-authored-by: Arthur <48595927+ArthurZucker@users.noreply.github.com>
Co-authored-by: Arthur Zucker <arthur.zucker@gmail.com>
* update env command to log deepspeed version
* suppress deepspeed import logging
* Add reminder to include configs to repro description in bug report.
* make fixup
* [WIP] update import utils for deepspeed
* Change to using is_deepspeed_available() from integrations.
* make fixup
* change order of unmasking of tokens
* library import
* class setup
* test function
* refactor
* add commit message
* test modified
* explict initiliasation of weights + made model smaller
* removed sepete testing file
* fixup
* fixup core
* test attention mask with token types
* tests fixup
* removed PaliGemmaAttentionMaskTest class
---------
Co-authored-by: sambhavnoobcoder <indosambahv@gmail.com>
* Adding option to save/reload scaler
* Removing duplicate variable
* Adding save/reload test
* Small fixes on deterministic algorithm call
* Moving LLM test to another file to isolate its environment
* Moving back to old file and using subprocess to run test isolated
* Reverting back accidental change
* Reverting back accidental change
* milti-gpu: fix inputs_embeds + position_embeds
Fixing the following errors in few models:
```
> hidden_states = inputs_embeds + pos_embeds
E RuntimeError: Expected all tensors to be on the same device, but found at least two devices, xpu:2 and xpu:3!
```
Fixes: #35762
Signed-off-by: Dmitry Rogozhkin <dmitry.v.rogozhkin@intel.com>
* multi-gpu: fix tensor device placements for various models
Fixes: #35762
Signed-off-by: Dmitry Rogozhkin <dmitry.v.rogozhkin@intel.com>
* Apply make fix-copies
Signed-off-by: Dmitry Rogozhkin <dmitry.v.rogozhkin@intel.com>
---------
Signed-off-by: Dmitry Rogozhkin <dmitry.v.rogozhkin@intel.com>
* feat: added warning to Trainer when label_names is not specified for PeftModel
* Update trainer.py
* feat: peft detectw ith `_is_peft_model`
* Update src/transformers/trainer.py
Co-authored-by: Benjamin Bossan <BenjaminBossan@users.noreply.github.com>
* Applied formatting in trainer.py
---------
Co-authored-by: Benjamin Bossan <BenjaminBossan@users.noreply.github.com>
* add RAdamScheduleFree optimizer
* revert schedulefree version to the minimum requirement
* refine is_schedulefree_available so that it can take min_version
* refine documents
---------
Co-authored-by: Arthur <48595927+ArthurZucker@users.noreply.github.com>
* make output_dir optional
* inintaied a basic testing module to validate and verify the changes
* Test output_dir default to 'tmp_trainer' when unspecified.
* test existing functionality of output_dir.
* test that output dir only created when needed
* final check
* added doc string and changed the tmp_trainer to trainer_output
* amke style fixes to test file.
* another round of fixup
---------
Co-authored-by: sambhavnoobcoder <indosambahv@gmail.com>
* Remove unused `max_size` variable in processor which was always `None` and triggered unnecessary deprecated warning
* Remove unused `max_size` variable in processor which was always `None` and triggered unnecessary deprecated warning
* Remove deprecated warnings and eliminate `max_size` usage
* Test use `int` as argument for `size`
Add a test to ensure test can pass successfully and backward compatibility
* The test pipelines still use `max_size`
Remove `max_size` from test pipelines and replace by `size` by a `Dict` with `'shortest_edge'` `'longest_edge'` as keys
* Reformatting
* Reformatting
* Revert "Reformatting"
This reverts commit c3040acee75440357cffd1f60c9d29ff5b2744b8.
* Revert "Reformatting"
This reverts commit ac4522e5c9a02d2d0c298295026db68ea26453df.
* Revert "The test pipelines still use `max_size`"
This reverts commit eaed96f041ffc32459536e1524d87f7a12ddee29.
* Revert "Test use `int` as argument for `size`"
This reverts commit 1925ee38c7c5eabb11832316712df1d4ba8043d0.
* Revert "Remove deprecated warnings and eliminate `max_size` usage"
This reverts commit d8e7e6ff9025931468fc1f3827cda1fa391003d5.
* Change version `4.26` to "a future version"
* Reformatting
* Revert "Change version `4.26` to "a future version""
This reverts commit 2b53f9e4
* Add is_torch_greater_or_equal test decorator
* Add common test for torch.export
* Fix bit
* Fix focalnet
* Fix imagegpt
* Fix seggpt
* Fix swin2sr
* Enable torch.export test for vision models
* Enable test for video models
* Remove json
* Enable for hiera
* Enable for ijepa
* Fix detr
* Fic conditional_detr
* Fix maskformer
* Enable test maskformer
* Fix test for deformable detr
* Fix custom kernels for export in rt-detr and deformable-detr
* Enable test for all DPT
* Remove custom test for deformable detr
* Simplify test to use only kwargs for export
* Add comment
* Move compile_compatible_method_lru_cache to utils
* Fix beit export
* Fix deformable detr
* Fix copies data2vec<->beit
* Fix typos, update test to work with dict
* Add seed to the test
* Enable test for vit_mae
* Fix beit tests
* [run-slow] beit, bit, conditional_detr, data2vec, deformable_detr, detr, focalnet, imagegpt, maskformer, rt_detr, seggpt, swin2sr
* Add vitpose test
* Add textnet test
* Add dinov2 with registers
* Update tests/test_modeling_common.py
* Switch to torch.testing.assert_close
* Fix masformer
* Remove save-load from test
* Add dab_detr
* Add depth_pro
* Fix and test RT-DETRv2
* Fix dab_detr
* Revert "Fix OS err (#36094)"
This reverts commit ba29a439adbe6f371710d0514659127264ae24b3.
* Revert "Save checkpoint to temporary directory to handle partial saves during failures (#35580)"
This reverts commit 20d17358c468b7aefca9e54c3461eb88d1ee34f9.
* Add support for constant learning rate with cooldown
* Add support for constant learning rate with cooldown
* Add support for constant learning rate with cooldown
* Add support for constant learning rate with cooldown
* Add support for constant learning rate with cooldown
* Add support for constant learning rate with cooldown
* Add support for constant learning rate with cooldown
* Add more warmup and cooldown methods to 'get_wsc_schedule'
* Add more warmup and cooldown methods to 'get_wsc_schedule'
* Add more warmup and cooldown methods to 'get_wsc_schedule'
* Add more warmup and cooldown methods to 'get_wsc_schedule'
* Add more warmup and decay methods to 'get_wsd_schedule'
* support num_training_steps and num_stable_steps for get_wsd_schedule
* support num_training_steps and num_stable_steps for get_wsd_schedule
* get wsd scheduler before the `num_training_steps` decision
* fix code_quality
* Update stable branch logic
* fix code_quality
* Move stable stage decide to `get_wsd_schedule`
* Update docstring of `get_wsd_schedule`
* Update `num_train_steps` to optional
* Update `num_train_steps` to optional
* Update docstring of `get_wsd_schedule`
* Update src/transformers/optimization.py
Co-authored-by: Marc Sun <57196510+SunMarc@users.noreply.github.com>
---------
Co-authored-by: Marc Sun <57196510+SunMarc@users.noreply.github.com>
* implement config and model building blocks
* refactor model architechture
* update model outputs
* update init param to include use_fov_model
* update param name in config
* fix hidden_states and attentions outputs for fov
* sort config
* complete minor todos
* update patching
* update config for encoder
* fix config
* use correct defaults in config
* update merge for compatibility with different image size
* restructure encoder for custom configuration
* make fov model compatible with custom config
* replace word "decoder" with "fusion"
* weight conversion script
* fix fov squeeze
* update conversion script (without test)
* upload ruff image processing
* create fast image processing
* use torch interpolation for image processing
* complete post_process_depth_estimation
* config: fix imports and sort args
* apply inference in weight conversion
* use mllama script instead for weight conversion
* clean weight conversion script
* add depth-pro status in other files
* fill docstring in config
* formatting
* more formatting
* formatting with ruff
* formatting with style
* fix copied classes
* add examples; update weight convert script
* fix using check_table.py and isort
* fix config docstring
* add depth pro to sdpa docs
* undo unintentional changes in configuration_gemma.py
* minor fixes
* test image processing
* fixes and tests
* more fixes
* use output states from image_encoder instead
* Revert "use output states from image_encoder instead"
This reverts commit 2408ec54e4f27d2abbecdb8374e58f34d91d8e96.
* make embeddings dynamic
* reshape output hidden states and attentions as part of computation graph
* fix ruff formating
* fix docstring failure
* use num_fov_head_layers in tests
* update doc
* check consistency with config
* ruff formatting
* update test case
* fix ruff formatting
* add tests for fov
* use interpolation in postprocess
* run and fix slow tests locally
* use scaled_images_features for image and fov encoder
* return fused_hidden_states in fusion stage
* fix example
* fix ruff
* fix copyright license for all files
* add __all__ for each file
* minor fixes
- fix download spell
- add push_to_hub option
- fix Optional type hinting
- apply single loop for DepthProImageProcessor.preprocess
* return list in post_process_depth_estimation
* minor fixes
- capitalize start of docstring
- use ignore copy
- fix examples
- move docstring templates and custom output classes to top
- remove "-> None" typehinting from __init__
- type hinting for forward passes
- fix docstrings for custom output classes
* fix "ruff check"
* update upsample and projection
* major changes: (image size and merge optimization)
- add support for images of any size
- optimize merge operation
- remove image_size from config
- use full names instead of B, C, H, W
- remove interpolation from fusion stage
- add interpolation after merge
- move validations to config
- update integration test
- add type hints for functions
* fix push_to_hub option in weights conversion
* remove image_size in weights conversion
* major changes in the architecture
- remove all DepthProViT modules and support different backbones using the AutoModel API
- set default use_fov_model to False
- validate parameters in configuration
- update interpolate function: use "nearest" for faster computation
- update reshape_feature function: remove all special tokens, possible from different backbones
- update merge function: use padding from config instead of merge_out_size
- remove patch_to_batch and batch_to_patch conversions for now
- calculate out_size dynamically in the encoder
- leave head_mask calculation to the backbone
- fix bugs with merge
- add more comments
- update tests
* placeholder for unused config attributes
* improve docs amid review
* minor change in docs
* further optimize merge
* fix formatting
* remove unused patch/batch convertion functions
* use original F.interpolate
* improve function naming
* minor chages
- use torch_int instead of int
- use proper for newly initialized tensors
- use user provided return_dict for patch_encoder
- use if-else block instead in self.use_fov_model
* rearchitect upsample block for improved modularity
* update upsample keys in weight conversion
* improve padding in merge_patches
* use double-loop for merge
* update comments
* create feature_extractor, reduce some forward code
* introduce config.use_mask_token in dinov2
* minor fixes
* minor fixes for onnx
* update __init__ to latest format
* remove DepthProConfig.to_dict()
* major changes in backbone
* update config in weight conversion
* formatting
* converted model is fp32
* improve naming and docs for feature_extractor->reconstruct_feature_maps
* minor fixes; amid review
* create intermediate vars in func call
* use torch.testing.assert_close
* use ModuleList instead of Sequential and ModuleDict
* update docs
* include fov in integraiton tests
* update docs
* improve initialization of convolution layers
* fix unused fov keys
* update tests
* ruff format
* fix test, amid kaimming initialization
* add depthpro to toctree
* add residual layer to _no_split_modules
* architecture rework
* Update src/transformers/models/depth_pro/image_processing_depth_pro.py
Co-authored-by: Pavel Iakubovskii <qubvel@gmail.com>
* Update src/transformers/models/depth_pro/image_processing_depth_pro_fast.py
Co-authored-by: Pavel Iakubovskii <qubvel@gmail.com>
* update docs
* improve merge_patches
* use flatten with fov_output
* ruff formatting
* update resources section in docs
Co-authored-by: Pavel Iakubovskii <qubvel@gmail.com>
* fix typo "final_kernal_size"
Co-authored-by: Pavel Iakubovskii <qubvel@gmail.com>
* fix output typehint for DepthProDepthEstimator
Co-authored-by: Pavel Iakubovskii <qubvel@gmail.com>
* residual operation in 2 steps
Co-authored-by: Pavel Iakubovskii <qubvel@gmail.com>
* use image_size instead of global patch_size in interpolation
* replace all Sequential with ModuleList
* update fov
* update heads
* fix and update conversion script for heads
* ruff formatting
* remove float32 conversion
* use "Fov" instead of "FOV" in class names
* use "Fov" instead of "FOV" in config docs
* remove prune_heads
* update fusion stage
* use device in examples
* update processor
* ruff fixes
* add do_rescale in image_processor_dict
* skip test: test_fast_is_faster_than_slow
* ruff formatting
* DepthProImageProcessorFast in other files
* revert antialias removal
* add antialias in BaseImageProcessorFast
* Revert "revert antialias removal"
This reverts commit 5caa0bd8f9f7463b98410c04e6cfe8fef3adee18.
* Revert "add antialias in BaseImageProcessorFast"
This reverts commit 3ae1134780ae236872985523d9c0a444eabcc179.
* update processor for grouping and antialias
* try test_fast_is_faster_than_slow without "skip" or "flanky"
* update checkpoint
* update checkpoint
* use @is_flanky for processor test
* update checkpoint to "apple/DepthPro-hf"
---------
Co-authored-by: Pavel Iakubovskii <qubvel@gmail.com>
* Fix StopStringCriteria to handle tokens above len(tokenizer)
This fixes#35244 by clipping token IDs to be within the tokenizer's vocabulary size before performing the embedding lookup. This prevents index errors when model.config.vocab_size > len(tokenizer).
The fix:
1. Adds a clamp operation to ensure token IDs are within bounds
2. Adds a test case to verify the behavior
* Use self.stop_strings instead of stop_strings
* Handle clipping correctly
* make fixup
* Update test to the new embedding vecs
* Use much bigger values in the mismatch test
* Typo fix
* Slight simplification
---------
Co-authored-by: openhands <openhands@all-hands.dev>
* Save state
* Make a failing test
* Better test
* mpt -> done, many more to go
* Rm extranious
* Bamba
* Bert
* big_bird
* biogpt
* bloom
* codegen
* ctrl
* data2vec
* dbrx
* Through up to Dbrx
* electra
* ernie
* falcon
* Fuyu/persimmon
* Include noop kwargs to base models
* Rebase
* Skip musigen
* Refactor/skip mllama
* Revert makefile
* Rm file
* Fix PT failing, need to modify rest of loss funcs to not resize
* Propagate some
* Continue
* More
* More options
* Mostly fixed
* Proved that it's the same
* Bloom is good
* Make ability to override loss func possible
* Fixup
* Clean
* Fix xglm
* Quality tests
* Skip OCR2
* Make specific loss for xglm
* Make order the same/line up 1:1
* xglm
* Skip fx output loss bloom model
* Didn't pass in pad_token_id
* Fix quality
* Nail in edge case of torch dtype
* Rm unused func
* Apply suggestions from code review
Co-authored-by: Benjamin Bossan <BenjaminBossan@users.noreply.github.com>
* Refactor tests to only mock what we need, don't introduce injection functions
* SetUp/TearDown
* Do super
---------
Co-authored-by: Benjamin Bossan <BenjaminBossan@users.noreply.github.com>
* added condition for top_k Doc mismatch fix
* initilation of test file for top_k changes
* added test for returning all labels
* added test for few labels
* tests/test_audio_classification_top_k.py
* final fix
* ruff fix
---------
Co-authored-by: sambhavnoobcoder <indosambahv@gmail.com>
* Fix how we compute the final non-padding token for Gemma (and probably other models)
* .size() -> .shape[]
* Propagating changes to other models
* Propagating changes to other models
* Change it for all ForSequenceClassification models
* Fix batch dim
* More TF fixes
* Copy the TF fix around as well
* Correct layer name for TFCTRL
* Cleaner .to()
* Clean up the nested if-else
* Use argmax() instead of .max().values
* add init and base image processing functions
* add add_fast_image_processor to transformers-cli
* add working fast image processor clip
* add fast image processor to doc, working tests
* remove "to be implemented" SigLip
* fix unprotected import
* fix unprotected vision import
* update ViTImageProcessorFast
* increase threshold slow fast ewuivalence
* add fast img blip
* add fast class in tests with cli
* improve cli
* add fast image processor convnext
* add LlavaPatchingMixin and fast image processor for llava_next and llava_onevision
* add device kwarg to ImagesKwargs for fast processing on cuda
* cleanup
* fix unprotected import
* group images by sizes and add batch processing
* Add batch equivalence tests, skip when center_crop is used
* cleanup
* update init and cli
* fix-copies
* refactor convnext, cleanup base
* fix
* remove patching mixins, add piped torchvision transforms for ViT
* fix unbatched processing
* fix f strings
* protect imports
* change llava onevision to class transforms (test)
* fix convnext
* improve formatting (following Pavel review)
* fix handling device arg
* improve cli
* fix
* fix inits
* Add distinction between preprocess and _preprocess, and support for arbitrary kwargs through valid_extra_kwargs
* uniformize qwen2_vl fast
* fix docstrings
* add add fast image processor llava
* remove min_pixels max_pixels from accepted size
* nit
* nit
* refactor fast image processors docstrings
* cleanup and remove fast class transforms
* update add fast image processor transformers cli
* cleanup docstring
* uniformize pixtral fast and make _process_image explicit
* fix prepare image structure llava next/onevision
* Use typed kwargs instead of explicit args
* nit fix import Unpack
* clearly separate pops and gets in base preprocess. Use explicit typed kwargs
* make qwen2_vl preprocess arguments hashable
* initial commit
* encoder+decoder layer changes WIP
* architecture checks
* working version of detection + segmentation
* fix modeling outputs
* fix return dict + output att/hs
* found the position embedding masking bug
* pre-training version
* added iamge processors
* typo in init.py
* iterupdate set to false
* fixed num_labels in class_output linear layer bias init
* multihead attention shape fixes
* test improvements
* test update
* dab-detr model_doc update
* dab-detr model_doc update2
* test fix:test_retain_grad_hidden_states_attentions
* config file clean and renaming variables
* config file clean and renaming variables fix
* updated convert_to_hf file
* small fixes
* style and qulity checks
* return_dict fix
* Merge branch main into add_dab_detr
* small comment fix
* skip test_inputs_embeds test
* image processor updates + image processor test updates
* check copies test fix update
* updates for check_copies.py test
* updates for check_copies.py test2
* tied weights fix
* fixed image processing tests and fixed shared weights issues
* added numpy nd array option to get_Expected_values method in test_image_processing_dab_detr.py
* delete prints from test file
* SafeTensor modification to solve HF Trainer issue
* removing the safetensor modifications
* make fix copies and hf uplaod has been added.
* fixed index.md
* fixed repo consistency
* styel fix and dabdetrimageprocessor docstring update
* requested modifications after the first review
* Update src/transformers/models/dab_detr/image_processing_dab_detr.py
Co-authored-by: Pavel Iakubovskii <qubvel@gmail.com>
* repo consistency has been fixed
* update copied NestedTensor function after main merge
* Update src/transformers/models/dab_detr/modeling_dab_detr.py
Co-authored-by: Pavel Iakubovskii <qubvel@gmail.com>
* temp commit
* temp commit2
* temp commit 3
* unit tests are fixed
* fixed repo consistency
* updated expected_boxes varible values based on related notebook results in DABDETRIntegrationTests file.
* temporarialy config modifications and repo consistency fixes
* Put dilation parameter back to config
* pattern embeddings have been added to the rename_keys method
* add dilation comment to config + add as an exception in check_config_attributes SPECIAL CASES
* delete FeatureExtractor part from docs.md
* requested modifications in modeling_dab_detr.py
* [run_slow] dab_detr
* deleted last segmentation code part, updated conversion script and changed the hf path in test files
* temp commit of requested modifications
* temp commit of requested modifications 2
* updated config file, resolved codepaths and refactored conversion script
* updated decodelayer block types and refactored conversion script
* style and quality update
* small modifications based on the request
* attentions are refactored
* removed loss functions from modeling file, added loss function to lossutils, tried to move the MLP layer generation to config but it failed
* deleted imageprocessor
* fixed conversion script + quality and style
* fixed config_att
* [run_slow] dab_detr
* changing model path in conversion file and in test file
* fix Decoder variable naming
* testing the old loss function
* switched back to the new loss function and testing with the odl attention functions
* switched back to the new last good result modeling file
* moved back to the version when I asked the review
* missing new line at the end of the file
* old version test
* turn back to newest mdoel versino but change image processor
* style fix
* style fix after merge main
* [run_slow] dab_detr
* [run_slow] dab_detr
* added device and type for head bias data part
* [run_slow] dab_detr
* fixed model head bias data fill
* changed test_inference_object_detection_head assertTrues to torch test assert_close
* fixes part 1
* quality update
* self.bbox_embed in decoder has been restored
* changed Assert true torch closeall methods to torch testing assertclose
* modelcard markdown file has been updated
* deleted intemediate list from decoder module
---------
Co-authored-by: Pavel Iakubovskii <qubvel@gmail.com>
* First commit
* Finish model implementation
* First commit
* Finish model implementation
* Register zamba2
* generated modeling and configuration
* generated modeling and configuration
* added hybrid cache
* fix attention_mask in mamba
* dropped unused loras
* fix flash2
* config docstrings
* fix config and fwd pass
* make fixup fixes
* text_modeling_zamba2
* small fixes
* make fixup fixes
* Fix modular model converter
* added inheritances in modular, renamed zamba cache
* modular rebase
* new modular conversion
* fix generated modeling file
* fixed import for Zamba2RMSNormGated
* modular file cleanup
* make fixup and model tests
* dropped inheritance for Zamba2PreTrainedModel
* make fixup and unit tests
* Add inheritance of rope from GemmaRotaryEmbedding
* moved rope to model init
* drop del self.self_attn and del self.feed_forward
* fix tests
* renamed lora -> adapter
* rewrote adapter implementation
* fixed tests
* Fix torch_forward in mamba2 layer
* Fix torch_forward in mamba2 layer
* Fix torch_forward in mamba2 layer
* Dropped adapter in-place sum
* removed rope from attention init
* updated rope
* created get_layers method
* make fixup fix
* make fixup fixes
* make fixup fixes
* update to new attention standard
* update to new attention standard
* make fixup fixes
* minor fixes
* cache_position
* removed cache_position postion_ids use_cache
* remove config from modular
* removed config from modular (2)
* import apply_rotary_pos_emb from llama
* fixed rope_kwargs
* Instantiate cache in Zamba2Model
* fix cache
* fix @slow decorator
* small fix in modular file
* Update docs/source/en/model_doc/zamba2.md
Co-authored-by: Arthur <48595927+ArthurZucker@users.noreply.github.com>
* several minor fixes
* inherit mamba2decoder fwd and drop position_ids in mamba
* removed docstrings from modular
* reinstate zamba2 attention decoder fwd
* use regex for tied keys
* Revert "use regex for tied keys"
This reverts commit 9007a522b1f831df6d516a281c0d3fdd20a118f5.
* use regex for tied keys
* add cpu to slow forward tests
* dropped config.use_shared_mlp_adapter
* Update docs/source/en/model_doc/zamba2.md
Co-authored-by: Arthur <48595927+ArthurZucker@users.noreply.github.com>
* re-convert from modular
* extended Zamba2RMSNormGated to n_groups>1
* removed einops import
* set _supports_sdpa = True
* add use_mem_eff_path flag for fused mamba2 fwd
* added docstring for use_mem_eff_ath flag
---------
Co-authored-by: root <root@node-2.us-southcentral1-a.compute.internal>
Co-authored-by: Arthur <48595927+ArthurZucker@users.noreply.github.com>
* layernorm_decay_fix
* W293 fix
* ruff format fix
* black format
* ruff format
* erase last layer
* add test_get_parameter_names_rmsnorm
* rmsnorm fix
* apply_chat_template: consistent return_tensors behaviour with return_assistant_tokens_mask flag
* test_chat_template_return_assistant_tokens_mask: support tokenizers with no attention mask
* test_chat_template_return_assistant_tokens_mask: skip tokenizers with no padding token
* test_chat_template_return_assistant_tokens_mask: force tokenizer padding_side=right
---------
Co-authored-by: Eduard Allakhverdov <goncharova@airi.net>
Co-authored-by: d.tarasov <d.tarasov@airi.net>
* Handle empty change indices in RLE conversion for masks
* [test] Add unit tests for RLE encoding of masks in SamProcessor
* [test] Update RLE conversion tests to use TensorFlow implementation
* [test] Fix formatting in SamProcessorTest according to check_code_quality action
* [test] Fix formatting in SamProcessorTest according to check_code_quality
* [test] Refactored rle test cases into one test and used tf tensors in tf test cases
* [test] Fix: removed self parameter from refactored methods
* [test] Removed nested methods in run-length encoding tests for PyTorch and TensorFlow
* [test] Added description to individual to run-length encoding tests for PyTorch and TensorFlow.
* initial POC
* - batch mix feature
* fix tests
* fix tests
* make style
* do not skip and instead fix tests
* update
* return back the test
* correct text with the correct ckpt
* start
* So far: 30%
* Small fix
* Continuing update
* Continuing
* Forgot to check if not None
* Continuing refactor
* Fix if else
* Fix ref
* Should make tests pass
* Keep grad norm same
* Document
* Apply suggestions from code review
Co-authored-by: Marc Sun <57196510+SunMarc@users.noreply.github.com>
* Err instead of info for logging RNG state error
* Seperate out to func
---------
Co-authored-by: Marc Sun <57196510+SunMarc@users.noreply.github.com>
* Support for generate_argument: return_dict_in_generate=True, instead of returning a error
* fix: call test with return_dict_in_generate=True
* fix: Only import torch if it is present
* update: Encapsulate output_dict changes
* fix: added back original comments
---------
Co-authored-by: Joao Gante <joaofranciscocardosogante@gmail.com>
* correctly slice
* check mask
* Update modular_gemma2.py
* fix
* add tests
* fix typo
* finally fix mask slicing
* Finally correctly slice in all cases!!
* add test for all attention functions
* small fix in tests
* trick around dynamo tracing issue
* last update
* more robust
* kwargs propagation
* make it explicit for checkpointing
* apply modular
* Add some tp plans!
* More tp plans!
* Add it in the comment
* style
* Update configuration_mixtral.py
* Update configuration_phi.py
* update the layout according to special archs
* fix mixtral
* style
* trigger CIs
* trigger CIs
* CIs
* olmo2
---------
Co-authored-by: Arthur <48595927+ArthurZucker@users.noreply.github.com>
* Added `segmentation_maps` support for DPT image processor
* Added tests for dpt image processor
* Moved preprocessing into separate functions
* Added # Copied from statements
* Fixed # Copied from statements
* Added `segmentation_maps` support for DPT image processor
* Added tests for dpt image processor
* Moved preprocessing into separate functions
* Added # Copied from statements
* Fixed # Copied from statements
* First commit
* Finish model implementation
* First commit
* Finish model implementation
* Register zamba2
* generated modeling and configuration
* generated modeling and configuration
* added hybrid cache
* fix attention_mask in mamba
* dropped unused loras
* fix flash2
* config docstrings
* fix config and fwd pass
* make fixup fixes
* text_modeling_zamba2
* small fixes
* make fixup fixes
* Fix modular model converter
* added inheritances in modular, renamed zamba cache
* modular rebase
* new modular conversion
* fix generated modeling file
* fixed import for Zamba2RMSNormGated
* modular file cleanup
* make fixup and model tests
* dropped inheritance for Zamba2PreTrainedModel
* make fixup and unit tests
* Add inheritance of rope from GemmaRotaryEmbedding
* moved rope to model init
* drop del self.self_attn and del self.feed_forward
* fix tests
* renamed lora -> adapter
* rewrote adapter implementation
* fixed tests
* Fix torch_forward in mamba2 layer
* Fix torch_forward in mamba2 layer
* Fix torch_forward in mamba2 layer
* Dropped adapter in-place sum
* removed rope from attention init
* updated rope
* created get_layers method
* make fixup fix
* make fixup fixes
* make fixup fixes
* update to new attention standard
* update to new attention standard
* make fixup fixes
* minor fixes
* cache_position
* removed cache_position postion_ids use_cache
* remove config from modular
* removed config from modular (2)
* import apply_rotary_pos_emb from llama
* fixed rope_kwargs
* Instantiate cache in Zamba2Model
* fix cache
* fix @slow decorator
* small fix in modular file
* Update docs/source/en/model_doc/zamba2.md
Co-authored-by: Arthur <48595927+ArthurZucker@users.noreply.github.com>
* several minor fixes
* inherit mamba2decoder fwd and drop position_ids in mamba
* removed docstrings from modular
* reinstate zamba2 attention decoder fwd
* use regex for tied keys
* Revert "use regex for tied keys"
This reverts commit 9007a522b1f831df6d516a281c0d3fdd20a118f5.
* use regex for tied keys
* add cpu to slow forward tests
* dropped config.use_shared_mlp_adapter
* Update docs/source/en/model_doc/zamba2.md
Co-authored-by: Arthur <48595927+ArthurZucker@users.noreply.github.com>
* re-convert from modular
---------
Co-authored-by: root <root@node-2.us-southcentral1-a.compute.internal>
Co-authored-by: Arthur <48595927+ArthurZucker@users.noreply.github.com>
* use torch.testing.assertclose instead to get more details about error in cis
* fix
* style
* test_all
* revert for I bert
* fixes and updates
* more image processing fixes
* more image processors
* fix mamba and co
* style
* less strick
* ok I won't be strict
* skip and be done
* up
2025-01-24 16:55:28 +01:00
3239 changed files with 181471 additions and 177381 deletions
- run:if [[ "$CIRCLE_PULL_REQUEST" == "" && "$CIRCLE_BRANCH" != "main" && "$CIRCLE_BRANCH" != *-release ]]; then echo "Not a PR, not the main branch and not a release branch, skip test!"; circleci-agent step halt; fi
Maintained examples (not research project or legacy):
- Flax: @sanchit-gandhi
- Flax: @Rocketknight1
- PyTorch: See Models above and tag the person corresponding to the modality of the example.
- TensorFlow: @Rocketknight1
@ -106,6 +106,7 @@ body:
label:Reproduction
description:|
Please provide a code sample that reproduces the problem you ran into. It can be a Colab link or just a code snippet.
Please include relevant config information with your code, for example your Trainers, TRL, Peft, and DeepSpeed configs.
If you have code snippets, error messages, stack traces please provide them here as well.
Important! Use code tags to correctly format your code. See https://help.github.com/en/github/writing-on-github/creating-and-highlighting-code-blocks#syntax-highlighting
Do not use screenshots, as they are hard to read and (more importantly) don't allow others to copy-and-paste your code.
* Add your translations to the folder called `<languageCode>` inside the [source folder](https://github.com/huggingface/transformers/tree/main/docs/source).
* Register your translation in `<languageCode>/_toctree.yml`; please follow the order of the [English version](https://github.com/huggingface/transformers/blob/main/docs/source/en/_toctree.yml).
* Once you're finished, open a pull request and tag this issue by including #issue-number in the description, where issue-number is the number of this issue. Please ping @stevhliu and @MKhalusova for review.
* Once you're finished, open a pull request and tag this issue by including #issue-number in the description, where issue-number is the number of this issue. Please ping @stevhliu for review.
* 🙋 If you'd like others to help you with the translation, you can also post in the 🤗 [forums](https://discuss.huggingface.co/).
gh pr comment $PR_NUMBER --repo $REPO --body "Hi 👋, thank you for opening this pull request! The pull request is converted to draft by default. The CI will be paused while the PR is in draft mode. When it is ready for review, please click the \`Ready for review\` button (at the bottom of the PR page). This will assign reviewers and trigger CI."
RUN_SLOW:yes# For gated repositories, we still need to agree to share information on the Hub repo. page in order to get access. # This token is created under the bot `hf-transformers-bot`.
SIGOPT_API_TOKEN:${{ secrets.SIGOPT_API_TOKEN }}
TF_FORCE_GPU_ALLOW_GROWTH:true
RUN_PT_TF_CROSS_TESTS:1
HF_HOME:/mnt/cache
TRANSFORMERS_IS_CI:yes
OMP_NUM_THREADS:8
MKL_NUM_THREADS:8
RUN_SLOW:yes# For gated repositories, we still need to agree to share information on the Hub repo. page in order to get access. # This token is created under the bot `hf-transformers-bot`.
RUN_SLOW:yes# For gated repositories, we still need to agree to share information on the Hub repo. page in order to get access. # This token is created under the bot `hf-transformers-bot`.
SIGOPT_API_TOKEN:${{ secrets.SIGOPT_API_TOKEN }}
TF_FORCE_GPU_ALLOW_GROWTH:true
HF_HOME:/mnt/cache
TRANSFORMERS_IS_CI:yes
OMP_NUM_THREADS:8
MKL_NUM_THREADS:8
RUN_SLOW:yes# For gated repositories, we still need to agree to share information on the Hub repo. page in order to get access. # This token is created under the bot `hf-transformers-bot`.
SIGOPT_API_TOKEN:${{ secrets.SIGOPT_API_TOKEN }}
TF_FORCE_GPU_ALLOW_GROWTH:true
CUDA_VISIBLE_DEVICES:0,1
RUN_PT_TF_CROSS_TESTS:1
jobs:
get_runner:
@ -78,7 +77,7 @@ jobs:
- name:Show installed libraries and their versions
@ -221,10 +221,10 @@ You'll need **[Python 3.9](https://github.com/huggingface/transformers/blob/main
[Checks on a Pull Request](https://huggingface.co/docs/transformers/pr_checks) guide.
If you're modifying documents under the `docs/source` directory, make sure the documentation can still be built. This check will also run in the CI when you open a pull request. To run a local check
make sure you install the documentation builder:
make sure you install the [documentation builder](https://github.com/huggingface/doc-builder).
```bash
pip install ".[docs]"
pip install hf-doc-builder
```
Run the following command from the root of the repository:
Like the slow tests, there are other environment variables available which are not enabled by default during testing:
- `RUN_CUSTOM_TOKENIZERS`: Enables tests for custom tokenizers.
- `RUN_PT_FLAX_CROSS_TESTS`: Enables tests for PyTorch + Flax integration.
- `RUN_PT_TF_CROSS_TESTS`: Enables tests for TensorFlow + PyTorch integration.
More environment variables and additional information can be found in the [testing_utils.py](https://github.com/huggingface/transformers/blob/main/src/transformers/testing_utils.py).
@ -26,7 +26,7 @@ There are two main venues to receive support: [the forums](https://discuss.huggi
[The user forums](https://discuss.huggingface.co/) are supported by the wide community of the library users and backed up by developers when needed.
If you have a difficulty with deploying this library or some questions, or you'd like to discuss a new feature, please first consider discussing those things at the forums. Only when you feel your subject matter has been crystalized and you still need support from the library developers do proceed to file an [issue](https://github.com/huggingface/transformers/issues).
If you have a difficulty with deploying this library or some questions, or you'd like to discuss a new feature, please first consider discussing those things at the forums. Only when you feel your subject matter has been crystallized and you still need support from the library developers do proceed to file an [issue](https://github.com/huggingface/transformers/issues).
In particular all "Please explain" questions or objectively very user-specific feature requests belong to the forums. Here are some example of such questions:
@ -263,9 +263,9 @@ You are not required to read the following guidelines before opening an issue. H
But if you're replying to a comment that happened some comments back it's always a good practice to quote just the relevant lines you're replying it. The `>` is used for quoting, or you can always use the menu to do so. For example your editor box will look like:
```
> How big is your gpu cluster?
> How big is your GPU cluster?
Our cluster is made of 256 gpus.
Our cluster is made of 256 GPUs.
```
If you are addressing multiple comments, quote the relevant parts of each before your answer. Some people use the same comment to do multiple replies, others separate them into separate comments. Either way works. The latter approach helps for linking to a specific comment.
<ahref="https://huggingface.com/models"><imgalt="Checkpoints on Hub"src="https://img.shields.io/endpoint?url=https://huggingface.co/api/shields/models&color=brightgreen"></a>
🤗 Transformers provides thousands of pretrained models to perform tasks on different modalities such as text, vision, and audio.
Transformers is a library of pretrained text, computer vision, audio, video, and multimodal models for inference and training. Use Transformers to fine-tune models on your data, build inference applications, and for generative AI use cases across multiple modalities.
These models can be applied on:
There are over 500K+ Transformers [model checkpoints](https://huggingface.co/models?library=transformers&sort=trending) on the [Hugging Face Hub](https://huggingface.com/models) you can use.
* 📝 Text, for tasks like text classification, information extraction, question answering, summarization, translation, and text generation, in over 100 languages.
* 🖼️ Images, for tasks like image classification, object detection, and segmentation.
* 🗣️ Audio, for tasks like speech recognition and audio classification.
Explore the [Hub](https://huggingface.com/) today to find a model and use Transformers to help you get started right away.
Transformer models can also perform tasks on **several modalities combined**, such as table question answering, optical character recognition, information extraction from scanned documents, video classification, and visual question answering.
## Installation
🤗 Transformers provides APIs to quickly download and use those pretrained models on a given text, fine-tune them on your own datasets and then share them with the community on our [model hub](https://huggingface.co/models). At the same time, each python module defining an architecture is fully standalone and can be modified to enable quick research experiments.
Transformers works with Python 3.9+ [PyTorch](https://pytorch.org/get-started/locally/) 2.1+, [TensorFlow](https://www.tensorflow.org/install/pip) 2.6+, and [Flax](https://flax.readthedocs.io/en/latest/) 0.4.1+.
🤗 Transformers is backed by the three most popular deep learning libraries — [Jax](https://jax.readthedocs.io/en/latest/), [PyTorch](https://pytorch.org/) and [TensorFlow](https://www.tensorflow.org/) — with a seamless integration between them. It's straightforward to train your models withone before loading them for inference with the other.
Create and activate a virtual environment with [venv](https://docs.python.org/3/library/venv.html) or [uv](https://docs.astral.sh/uv/), a fast Rust-based Python package and project manager.
## Online demos
```py
# venv
python-mvenv.my-env
source.my-env/bin/activate
You can test most of our models directly on their pages from the [model hub](https://huggingface.co/models). We also offer [private model hosting, versioning, & an inference API](https://huggingface.co/pricing) for public and private models.
Here are a few examples:
In Natural Language Processing:
- [Masked word completion with BERT](https://huggingface.co/google-bert/bert-base-uncased?text=Paris+is+the+%5BMASK%5D+of+France)
- [Named Entity Recognition with Electra](https://huggingface.co/dbmdz/electra-large-discriminator-finetuned-conll03-english?text=My+name+is+Sarah+and+I+live+in+London+city)
- [Text generation with Mistral](https://huggingface.co/mistralai/Mistral-7B-Instruct-v0.2)
- [Natural Language Inference with RoBERTa](https://huggingface.co/FacebookAI/roberta-large-mnli?text=The+dog+was+lost.+Nobody+lost+any+animal)
- [Summarization with BART](https://huggingface.co/facebook/bart-large-cnn?text=The+tower+is+324+metres+%281%2C063+ft%29+tall%2C+about+the+same+height+as+an+81-storey+building%2C+and+the+tallest+structure+in+Paris.+Its+base+is+square%2C+measuring+125+metres+%28410+ft%29+on+each+side.+During+its+construction%2C+the+Eiffel+Tower+surpassed+the+Washington+Monument+to+become+the+tallest+man-made+structure+in+the+world%2C+a+title+it+held+for+41+years+until+the+Chrysler+Building+in+New+York+City+was+finished+in+1930.+It+was+the+first+structure+to+reach+a+height+of+300+metres.+Due+to+the+addition+of+a+broadcasting+aerial+at+the+top+of+the+tower+in+1957%2C+it+is+now+taller+than+the+Chrysler+Building+by+5.2+metres+%2817+ft%29.+Excluding+transmitters%2C+the+Eiffel+Tower+is+the+second+tallest+free-standing+structure+in+France+after+the+Millau+Viaduct)
- [Question answering with DistilBERT](https://huggingface.co/distilbert/distilbert-base-uncased-distilled-squad?text=Which+name+is+also+used+to+describe+the+Amazon+rainforest+in+English%3F&context=The+Amazon+rainforest+%28Portuguese%3A+Floresta+Amaz%C3%B4nica+or+Amaz%C3%B4nia%3B+Spanish%3A+Selva+Amaz%C3%B3nica%2C+Amazon%C3%ADa+or+usually+Amazonia%3B+French%3A+For%C3%AAt+amazonienne%3B+Dutch%3A+Amazoneregenwoud%29%2C+also+known+in+English+as+Amazonia+or+the+Amazon+Jungle%2C+is+a+moist+broadleaf+forest+that+covers+most+of+the+Amazon+basin+of+South+America.+This+basin+encompasses+7%2C000%2C000+square+kilometres+%282%2C700%2C000+sq+mi%29%2C+of+which+5%2C500%2C000+square+kilometres+%282%2C100%2C000+sq+mi%29+are+covered+by+the+rainforest.+This+region+includes+territory+belonging+to+nine+nations.+The+majority+of+the+forest+is+contained+within+Brazil%2C+with+60%25+of+the+rainforest%2C+followed+by+Peru+with+13%25%2C+Colombia+with+10%25%2C+and+with+minor+amounts+in+Venezuela%2C+Ecuador%2C+Bolivia%2C+Guyana%2C+Suriname+and+French+Guiana.+States+or+departments+in+four+nations+contain+%22Amazonas%22+in+their+names.+The+Amazon+represents+over+half+of+the+planet%27s+remaining+rainforests%2C+and+comprises+the+largest+and+most+biodiverse+tract+of+tropical+rainforest+in+the+world%2C+with+an+estimated+390+billion+individual+trees+divided+into+16%2C000+species)
- [Translation with T5](https://huggingface.co/google-t5/t5-base?text=My+name+is+Wolfgang+and+I+live+in+Berlin)
In Computer Vision:
- [Image classification with ViT](https://huggingface.co/google/vit-base-patch16-224)
- [Object Detection with DETR](https://huggingface.co/facebook/detr-resnet-50)
- [Semantic Segmentation with SegFormer](https://huggingface.co/nvidia/segformer-b0-finetuned-ade-512-512)
- [Panoptic Segmentation with Mask2Former](https://huggingface.co/facebook/mask2former-swin-large-coco-panoptic)
- [Depth Estimation with Depth Anything](https://huggingface.co/docs/transformers/main/model_doc/depth_anything)
- [Video Classification with VideoMAE](https://huggingface.co/docs/transformers/model_doc/videomae)
- [Universal Segmentation with OneFormer](https://huggingface.co/shi-labs/oneformer_ade20k_dinat_large)
In Audio:
- [Automatic Speech Recognition with Whisper](https://huggingface.co/openai/whisper-large-v3)
- [Keyword Spotting with Wav2Vec2](https://huggingface.co/superb/wav2vec2-base-superb-ks)
- [Audio Classification with Audio Spectrogram Transformer](https://huggingface.co/MIT/ast-finetuned-audioset-10-10-0.4593)
In Multimodal tasks:
- [Table Question Answering with TAPAS](https://huggingface.co/google/tapas-base-finetuned-wtq)
- [Visual Question Answering with ViLT](https://huggingface.co/dandelin/vilt-b32-finetuned-vqa)
- [Image captioning with LLaVa](https://huggingface.co/llava-hf/llava-1.5-7b-hf)
- [Zero-shot Image Classification with SigLIP](https://huggingface.co/google/siglip-so400m-patch14-384)
- [Document Question Answering with LayoutLM](https://huggingface.co/impira/layoutlm-document-qa)
- [Zero-shot Video Classification with X-CLIP](https://huggingface.co/docs/transformers/model_doc/xclip)
- [Zero-shot Object Detection with OWLv2](https://huggingface.co/docs/transformers/en/model_doc/owlv2)
- [Zero-shot Image Segmentation with CLIPSeg](https://huggingface.co/docs/transformers/model_doc/clipseg)
- [Automatic Mask Generation with SAM](https://huggingface.co/docs/transformers/model_doc/sam)
## 100 projects using Transformers
Transformers is more than a toolkit to use pretrained models: it's a community of projects built around it and the
Hugging Face Hub. We want Transformers to enable developers, researchers, students, professors, engineers, and anyone
else to build their dream projects.
In order to celebrate the 100,000 stars of transformers, we have decided to put the spotlight on the
community, and we have created the [awesome-transformers](./awesome-transformers.md) page which lists 100
incredible projects built in the vicinity of transformers.
If you own or use a project that you believe should be part of the list, please open a PR to add it!
## Serious about AI in your organisation? Build faster with the Hugging Face Enterprise Hub.
<imgalt="Hugging Face Enterprise Hub"src="https://github.com/user-attachments/assets/247fb16d-d251-4583-96c4-d3d76dda4925">
</a><br>
## Quick tour
To immediately use a model on a given input (text, image, audio, ...), we provide the `pipeline` API. Pipelines group together a pretrained model with the preprocessing that was used during that model's training. Here is how to quickly use a pipeline to classify positive versus negative texts:
```python
>>>fromtransformersimportpipeline
# Allocate a pipeline for sentiment-analysis
>>>classifier=pipeline('sentiment-analysis')
>>>classifier('We are very happy to introduce pipeline to the transformers repository.')
[{'label':'POSITIVE','score':0.9996980428695679}]
# uv
uvvenv.my-env
source.my-env/bin/activate
```
The second line of code downloads and caches the pretrained model used by the pipeline, while the third evaluates it on the given text. Here, the answer is "positive" with a confidence of 99.97%.
Install Transformers in your virtual environment.
Many tasks have a pre-trained `pipeline` ready to go, in NLP but also in computer vision and speech. For example, we can easily extract detected objects in an image:
Here, we get a list of objects detected in the image, with a box surrounding the object and a confidence score. Here is the original image on the left, with the predictions displayed on the right:
Install Transformers from source if you want the latest changes in the library or are interested in contributing. However, the *latest* version may not be stable. Feel free to open an [issue](https://github.com/huggingface/transformers/issues) if you encounter an error.
Get started with Transformers right away with the [Pipeline](https://huggingface.co/docs/transformers/pipeline_tutorial) API. The `Pipeline` is a high-level inference class that supports text, audio, vision, and multimodal tasks. It handles preprocessing the input and returns the appropriate output.
Instantiate a pipeline and specify model to use for text generation. The model is downloaded and cached so you can easily reuse it again. Finally, pass some text to prompt the model.
pipeline("the secret to baking a really good cake is ")
[{'generated_text':'the secret to baking a really good cake is 1) to use the right ingredients and 2) to follow the recipe exactly. the recipe for the cake is as follows: 1 cup of sugar, 1 cup of flour, 1 cup of milk, 1 cup of butter, 1 cup of eggs, 1 cup of chocolate chips. if you want to make 2 cakes, how much sugar do you need? To make 2 cakes, you will need 2 cups of sugar.'}]
```
To chat with a model, the usage pattern is the same. The only difference is you need to construct a chat history (the input to `Pipeline`) between you and the system.
> [!TIP]
> You can also chat with a model directly from the command line.
You can learn more about the tasks supported by the `pipeline` API in [this tutorial](https://huggingface.co/docs/transformers/task_summary).
```py
fromtransformersimportpipeline
In addition to `pipeline`, to download and use any of the pretrained models on your given task, all it takes is three lines of code. Here is the PyTorch version:
```python
>>> from transformers import AutoTokenizer, AutoModel
The tokenizer is responsible for all the preprocessing the pretrained model expects and can be called directly on a single string (as in the above examples) or a list. It will output a dictionary that you can use in downstream code or simply directly pass to your model using the ** argument unpacking operator.
</details>
The model itself is a regular [Pytorch `nn.Module`](https://pytorch.org/docs/stable/nn.html#torch.nn.Module) or a [TensorFlow `tf.keras.Model`](https://www.tensorflow.org/api_docs/python/tf/keras/Model) (depending on your backend) which you can use as usual. [This tutorial](https://huggingface.co/docs/transformers/training) explains how to integrate such a model into a classic PyTorch or TensorFlow training loop, or how to use our `Trainer` API to quickly fine-tune on a new dataset.
## Why should I use transformers?
## Why should I use Transformers?
1. Easy-to-use state-of-the-art models:
- High performance on natural language understanding & generation, computer vision, and audio tasks.
- Low barrier to entry for educators and practitioners.
- High performance on natural language understanding & generation, computer vision, audio, video, and multimodal tasks.
- Low barrier to entry for researchers, engineers, and developers.
- Few user-facing abstractions with just three classes to learn.
- A unified API for using all our pretrained models.
1. Lower compute costs, smaller carbon footprint:
- Researchers can share trained models instead of always retraining.
- Practitioners can reduce compute time and production costs.
- Dozens of architectures with over 400,000 pretrained models across all modalities.
- Share trained models instead of training from scratch.
- Reduce compute time and production costs.
- Dozens of model architectures with 1M+ pretrained checkpoints across all modalities.
1. Choose the right framework for every part of a model's lifetime:
1. Choose the right framework for every part of a models lifetime:
- Train state-of-the-art models in 3 lines of code.
- Move a single model between TF2.0/PyTorch/JAX frameworks at will.
- Seamlessly pick the right framework for training, evaluation, and production.
- Move a single model between PyTorch/JAX/TF2.0 frameworks at will.
- Pick the right framework for training, evaluation, and production.
1. Easily customize a model or an example to your needs:
- We provide examples for each architecture to reproduce the results published by its original authors.
- Model internals are exposed as consistently as possible.
- Model files can be used independently of the library for quick experiments.
<imgalt="Hugging Face Enterprise Hub"src="https://github.com/user-attachments/assets/247fb16d-d251-4583-96c4-d3d76dda4925">
</a><br>
## Why shouldn't I use Transformers?
- This library is not a modular toolbox of building blocks for neural nets. The code in the model files is not refactored with additional abstractions on purpose, so that researchers can quickly iterate on each of the models without diving into additional abstractions/files.
- The training API is not intended to work on any model but is optimized to work with the models provided by the library. For generic machine learning loops, you should use another library (possibly, [Accelerate](https://huggingface.co/docs/accelerate)).
- While we strive to present as many use cases as possible, the scripts in our [examples folder](https://github.com/huggingface/transformers/tree/main/examples) are just that: examples. It is expected that they won't work out-of-the-box on your specific problem and that you will be required to change a few lines of code to adapt them to your needs.
- The training API is optimized to work with PyTorch models provided by Transformers. For generic machine learning loops, you should use another library like [Accelerate](https://huggingface.co/docs/accelerate).
- The [example scripts]((https://github.com/huggingface/transformers/tree/main/examples)) are only *examples*. They may not necessarily work out-of-the-box on your specific use case and you'll need to adapt the code for it to work.
## Installation
## 100 projects using Transformers
### With pip
Transformers is more than a toolkit to use pretrained models, it's a community of projects built around it and the
Hugging Face Hub. We want Transformers to enable developers, researchers, students, professors, engineers, and anyone
else to build their dream projects.
This repository is tested on Python 3.9+, Flax 0.4.1+, PyTorch 2.0+, and TensorFlow 2.6+.
In order to celebrate Transformers 100,000 stars, we wanted to put the spotlight on the
community with the [awesome-transformers](./awesome-transformers.md) page which lists 100
incredible projects built with Transformers.
You should install 🤗 Transformers in a [virtual environment](https://docs.python.org/3/library/venv.html). If you're unfamiliar with Python virtual environments, check out the [user guide](https://packaging.python.org/guides/installing-using-pip-and-virtual-environments/).
If you own or use a project that you believe should be part of the list, please open a PR to add it!
First, create a virtual environment with the version of Python you're going to use and activate it.
## Example models
**macOS/Linux**
You can test most of our models directly on their [Hub model pages](https://huggingface.co/models).
```python -m venv env
source env/bin/activate
```
Expand each modality below to see a few example models for various use cases.
**Windows**
<details>
<summary>Audio</summary>
``` python -m venv env
env\Scripts\activate
```
- Audio classification with [Whisper](https://huggingface.co/openai/whisper-large-v3-turbo)
- Automatic speech recognition with [Moonshine](https://huggingface.co/UsefulSensors/moonshine)
- Keyword spotting with [Wav2Vec2](https://huggingface.co/superb/wav2vec2-base-superb-ks)
- Speech to speech generation with [Moshi](https://huggingface.co/kyutai/moshiko-pytorch-bf16)
- Text to audio with [MusicGen](https://huggingface.co/facebook/musicgen-large)
- Text to speech with [Bark](https://huggingface.co/suno/bark)
To use 🤗 Transformers, you must install at least one of Flax, PyTorch, or TensorFlow. Refer to the official installation guides for platform-specific commands:
[PyTorch installation page](https://pytorch.org/get-started/locally/#start-locally) and/or [Flax](https://github.com/google/flax#quick-install) and [Jax](https://github.com/google/jax#installation)
<details>
<summary>Computer vision</summary>
When one of those backends has been installed, 🤗 Transformers can be installed using pip as follows:
- Automatic mask generation with [SAM](https://huggingface.co/facebook/sam-vit-base)
- Depth estimation with [DepthPro](https://huggingface.co/apple/DepthPro-hf)
- Image classification with [DINO v2](https://huggingface.co/facebook/dinov2-base)
- Keypoint detection with [SuperGlue](https://huggingface.co/magic-leap-community/superglue_outdoor)
- Keypoint matching with [SuperGlue](https://huggingface.co/magic-leap-community/superglue)
- Object detection with [RT-DETRv2](https://huggingface.co/PekingU/rtdetr_v2_r50vd)
- Pose Estimation with [VitPose](https://huggingface.co/usyd-community/vitpose-base-simple)
- Universal segmentation with [OneFormer](https://huggingface.co/shi-labs/oneformer_ade20k_swin_large)
- Video classification with [VideoMAE](https://huggingface.co/MCG-NJU/videomae-large)
```
pip install transformers
```
</details>
If you'd like to play with the examples or need the bleeding edge of the code and can't wait for a new release, you must [install the library from source](https://huggingface.co/docs/transformers/installation#installing-from-source).
- OCR-based document understanding with [GOT-OCR2](https://huggingface.co/stepfun-ai/GOT-OCR-2.0-hf)
- Table question answering with [TAPAS](https://huggingface.co/google/tapas-base)
- Unified multimodal understanding and generation with [Emu3](https://huggingface.co/BAAI/Emu3-Gen)
- Vision to text with [Llava-OneVision](https://huggingface.co/llava-hf/llava-onevision-qwen2-0.5b-ov-hf)
- Visual question answering with [Llava](https://huggingface.co/llava-hf/llava-1.5-7b-hf)
- Visual referring expression segmentation with [Kosmos-2](https://huggingface.co/microsoft/kosmos-2-patch14-224)
### With conda
</details>
🤗 Transformers can be installed using conda as follows:
<details>
<summary>NLP</summary>
```shell script
conda install conda-forge::transformers
```
- Masked word completion with [ModernBERT](https://huggingface.co/answerdotai/ModernBERT-base)
- Named entity recognition with [Gemma](https://huggingface.co/google/gemma-2-2b)
- Question answering with [Mixtral](https://huggingface.co/mistralai/Mixtral-8x7B-v0.1)
- Summarization with [BART](https://huggingface.co/facebook/bart-large-cnn)
- Translation with [T5](https://huggingface.co/google-t5/t5-base)
- Text generation with [Llama](https://huggingface.co/meta-llama/Llama-3.2-1B)
- Text classification with [Qwen](https://huggingface.co/Qwen/Qwen2.5-0.5B)
> **_NOTE:_** Installing `transformers` from the `huggingface` channel is deprecated.
Follow the installation pages of Flax, PyTorch or TensorFlow to see how to install them with conda.
> **_NOTE:_** On Windows, you may be prompted to activate Developer Mode in order to benefit from caching. If this is not an option for you, please let us know in [this issue](https://github.com/huggingface/huggingface_hub/issues/1062).
## Model architectures
**[All the model checkpoints](https://huggingface.co/models)** provided by 🤗 Transformers are seamlessly integrated from the huggingface.co [model hub](https://huggingface.co/models), where they are uploaded directly by [users](https://huggingface.co/users) and [organizations](https://huggingface.co/organizations).
Current number of checkpoints: 
🤗 Transformers currently provides the following architectures: see [here](https://huggingface.co/docs/transformers/model_summary) for a high-level summary of each them.
To check if each model has an implementation in Flax, PyTorch or TensorFlow, or has an associated tokenizer backed by the 🤗 Tokenizers library, refer to [this table](https://huggingface.co/docs/transformers/index#supported-frameworks).
These implementations have been tested on several datasets (see the example scripts) and should match the performance of the original implementations. You can find more details on performance in the Examples section of the [documentation](https://github.com/huggingface/transformers/tree/main/examples).
## Learn more
| Section | Description |
|-|-|
| [Documentation](https://huggingface.co/docs/transformers/) | Full API documentation and tutorials |
| [Task summary](https://huggingface.co/docs/transformers/task_summary) | Tasks supported by 🤗 Transformers |
| [Preprocessing tutorial](https://huggingface.co/docs/transformers/preprocessing) | Using the `Tokenizer` class to prepare data for the models |
| [Training and fine-tuning](https://huggingface.co/docs/transformers/training) | Using the models provided by 🤗 Transformers in a PyTorch/TensorFlow training loop and the `Trainer` API |
| [Quick tour: Fine-tuning/usage scripts](https://github.com/huggingface/transformers/tree/main/examples) | Example scripts for fine-tuning models on a wide range of tasks |
| [Model sharing and uploading](https://huggingface.co/docs/transformers/model_sharing) | Upload and share your fine-tuned models with the community |
@ -27,13 +27,6 @@ These models require the `trust_remote_code=True` parameter to be set when using
the content of the modeling files when using this argument. We recommend setting a revision in order to ensure you
protect yourself from updates on the repository.
#### Tools
Through the `Agent` framework, remote tools can be downloaded to be used by the Agent. You're to specify these tools
yourself, but please keep in mind that their code will be run on your machine if the Agent chooses to run them.
Please inspect the code of the tools before passing them to the Agent to protect your runtime and local setup.
## Reporting a Vulnerability
Feel free to submit vulnerability reports to [security@huggingface.co](mailto:security@huggingface.co), where someone from the HF security team will review and recommend next steps. If reporting a vulnerability specific to open source, please note [Huntr](https://huntr.com) is a vulnerability disclosure program for open source software.
This repository contains examples and best practices for building recommendation systems, provided as Jupyter notebooks. It goes over several aspects required to build efficient recommendation systems: data preparation, modeling, evaluation, model selection & optimization, as well as operationalization
FLAIR is a powerful PyTorch NLP framework, convering several important tasks: NER, sentiment-analysis, part-of-speech tagging, text and document embeddings, among other things.
FLAIR is a powerful PyTorch NLP framework, covering several important tasks: NER, sentiment-analysis, part-of-speech tagging, text and document embeddings, among other things.
Keywords: NLP, text embedding, document embedding, biomedical, NER, PoS, sentiment-analysis
@ -39,15 +39,15 @@ MindsDB is a low-code ML platform, which automates and integrates several ML fra
[langchain](https://github.com/hwchase17/langchain) is aimed at assisting in the development of apps merging both LLMs and other sources of knowledge. The library allows chaining calls to applications, creating a sequence across many tools.
[langchain](https://github.com/langchain-ai/langchain) is aimed at assisting in the development of apps merging both LLMs and other sources of knowledge. The library allows chaining calls to applications, creating a sequence across many tools.
Keywords: LLMs, Large Language Models, Agents, Chains
[LlamaIndex](https://github.com/jerryjliu/llama_index) is a project that provides a central interface to connect your LLM's with external data. It provides various kinds of indices and retreival mechanisms to perform different LLM tasks and obtain knowledge-augmented results.
[LlamaIndex](https://github.com/run-llama/llama_index) is a project that provides a central interface to connect your LLM's with external data. It provides various kinds of indices and retrieval mechanisms to perform different LLM tasks and obtain knowledge-augmented results.
Keywords: LLMs, Large Language Models, Data Retrieval, Indices, Knowledge Augmentation
[transformers.js](https://xenova.github.io/transformers.js/) is a JavaScript library targeted at running models from transformers directly within the browser.
[transformers.js](https://github.com/huggingface/transformers.js/) is a JavaScript library targeted at running models from transformers directly within the browser.
Nebuly is the next-generation platform to monitor and optimize your AI costs in one place. The platform connects to all your AI cost sources (compute, API providers, AI software licenses, etc) and centralizes them in one place to give you full visibility on a model basis. The platform also provides optimization recommendations and a co-pilot model that can guide during the optimization process. The platform builds on top of the open-source tools allowing you to optimize the different steps of your AI stack to squeeze out the best possible cost performances.
`MetricRecorder` is thread-safe, in the sense of the python [`Thread`](https://docs.python.org/3/library/threading.html#threading.Thread). This means you can start a background thread to do the readings on the device measurements while not blocking the main thread to execute the model measurements.
`MetricsRecorder` is thread-safe, in the sense of the python [`Thread`](https://docs.python.org/3/library/threading.html#threading.Thread). This means you can start a background thread to do the readings on the device measurements while not blocking the main thread to execute the model measurements.
cf [`llama.py`](./llama.py) to see an example of this in practice.
In this folder you will find various docker files, and some subfolders.
- dockerfiles (ex: `consistency.dockerfile`) present under `~/docker` are used for our "fast" CIs. You should be able to use them for tasks that only need CPU. For example `torch-light` is a very light weights container (703MiB).
- subfloder contain dockerfiles used for our `slow` CIs, which *can* be used for GPU tasks, but they are **BIG** as they were not specifically designed for a single model / single task. Thus the `~/docker/transformers-pytorch-gpu` includes additional dependencies to allow us to run ALL model tests (say `librosa` or `tesseract`, which you do not need to run LLMs)
- subfolders contain dockerfiles used for our `slow` CIs, which *can* be used for GPU tasks, but they are **BIG** as they were not specifically designed for a single model / single task. Thus the `~/docker/transformers-pytorch-gpu` includes additional dependencies to allow us to run ALL model tests (say `librosa` or `tesseract`, which you do not need to run LLMs)
Note that in both case, you need to run `uv pip install -e .`, which should take around 5 seconds. We do it outside the dockerfile for the need of our CI: we checkout a new branch each time, and the `transformers` code is thus updated.
We are open to contribution, and invite the community to create dockerfiles with potential arguments that properly choose extras depending on the model's dependencies! :hugs:
We are open to contribution, and invite the community to create dockerfiles with potential arguments that properly choose extras depending on the model's dependencies! :hugs:
RUN pip install --no-cache-dir "git+https://github.com/huggingface/transformers.git@${REF}#egg=transformers[sklearn,tf-cpu,testing,sentencepiece,tf-speech,vision]"
RUN uv pip install --no-cache-dir "git+https://github.com/huggingface/transformers.git@${REF}#egg=transformers[sklearn,tf-cpu,testing,sentencepiece,tf-speech,vision]"
RUN uv pip install --no-cache-dir "protobuf==3.20.3" tensorflow_probability
RUN uv pip install --no-cache-dir --no-deps accelerate --extra-index-url https://download.pytorch.org/whl/cpu
RUN pip install --no-cache-dir 'torch' 'torchvision' 'torchaudio' --index-url https://download.pytorch.org/whl/cpu
RUN uv pip install --no-cache-dir 'torch' 'torchvision' 'torchaudio' --index-url https://download.pytorch.org/whl/cpu
RUN git lfs install
RUN uv pip install --no-cache-dir pypi-kenlm
RUN pip install --no-cache-dir "git+https://github.com/huggingface/transformers.git@${REF}#egg=transformers[tf-cpu,sklearn,sentencepiece,vision,testing]"
RUN uv pip install --no-cache-dir "git+https://github.com/huggingface/transformers.git@${REF}#egg=transformers[tf-cpu,sklearn,sentencepiece,vision,testing]"
RUN uv pip install --no-cache-dir "protobuf==3.20.3" librosa
يمكن للنظم اللغوية الكبيرة (LLMs) التي تم تدريبها على أداء [نمذجة اللغة السببية](./tasks/language_modeling.) التعامل مع مجموعة واسعة من المهام، ولكنها غالبًا ما تواجه صعوبات في المهام الأساسية مثل المنطق والحساب والبحث. وعندما يتم استدعاؤها في مجالات لا تؤدي فيها أداءً جيدًا، فإنها غالبًا ما تفشل في توليد الإجابة التي نتوقعها منها.
يتمثل أحد النهج للتغلب على هذا القصور في إنشاء "وكيل".
الوكيل هو نظام يستخدم LLM كمحرك له، ولديه حق الوصول إلى وظائف تسمى "أدوات".
هذه "الأدوات" هي وظائف لأداء مهمة، وتحتوي على جميع الأوصاف اللازمة للوكيل لاستخدامها بشكل صحيح.
يمكن برمجة الوكيل للقيام بما يلي:
- وضع سلسلة من الإجراءات/الأدوات وتشغيلها جميعًا في نفس الوقت مثل [`CodeAgent`] على سبيل المثال
- التخطيط للاجراءات/الأدوات وتنفيذها واحدة تلو الأخرى والانتظار حتى انتهاء كل إجراء قبل إطلاق التالي مثل [`ReactJsonAgent`] على سبيل المثال
### أنواع الوكلاء
#### الوكيل البرمجي (Code agent)
يتمتع هذا الوكيل يتبع خطوات محددة: أولًا، يخطط لسلسلة من الإجراءات التي يريد تنفيذها، ثم شفرة Python لتنفيذ جميع الإجراءات في نفس الوقت. وهو يتعامل بشكل أصلي مع أنواع مختلفة من المدخلات والمخرجات للأدوات التي يستخدمها، وبالتالي فهو الخيار الموصى به للمهام متعددة الوسائط.
#### وكلاء التفاعل
هذا هو الوكيل الذي يتم اللجوء إليه لحل مهام الاستدلال، حيث يجعل إطار ReAct ([Yao et al.، 2022](https://huggingface.co/papers/2210.03629)) من الكفاءة حقًا التفكير على أساس ملاحظاته السابقة.
نقوم بتنفيذ إصدارين من ReactJsonAgent:
- [`ReactJsonAgent`] يقوم بتوليد استدعاءات الأدوات كـ JSON في إخراجها.
- [`ReactCodeAgent`] هو نوع جديد من ReactJsonAgent يقوم بتوليد استدعاءات أدواته كمقاطع من التعليمات البرمجية، والتي تعمل بشكل جيد حقًا مع LLMs التي تتمتع بأداء قوي في البرمجة.
> [!TIP]
> اقرأ منشور المدونة [Open-source LLMs as LangChain Agents](https://huggingface.co/blog/open-source-llms-as-agents) لمعرفة المزيد عن وكيل ReAct.
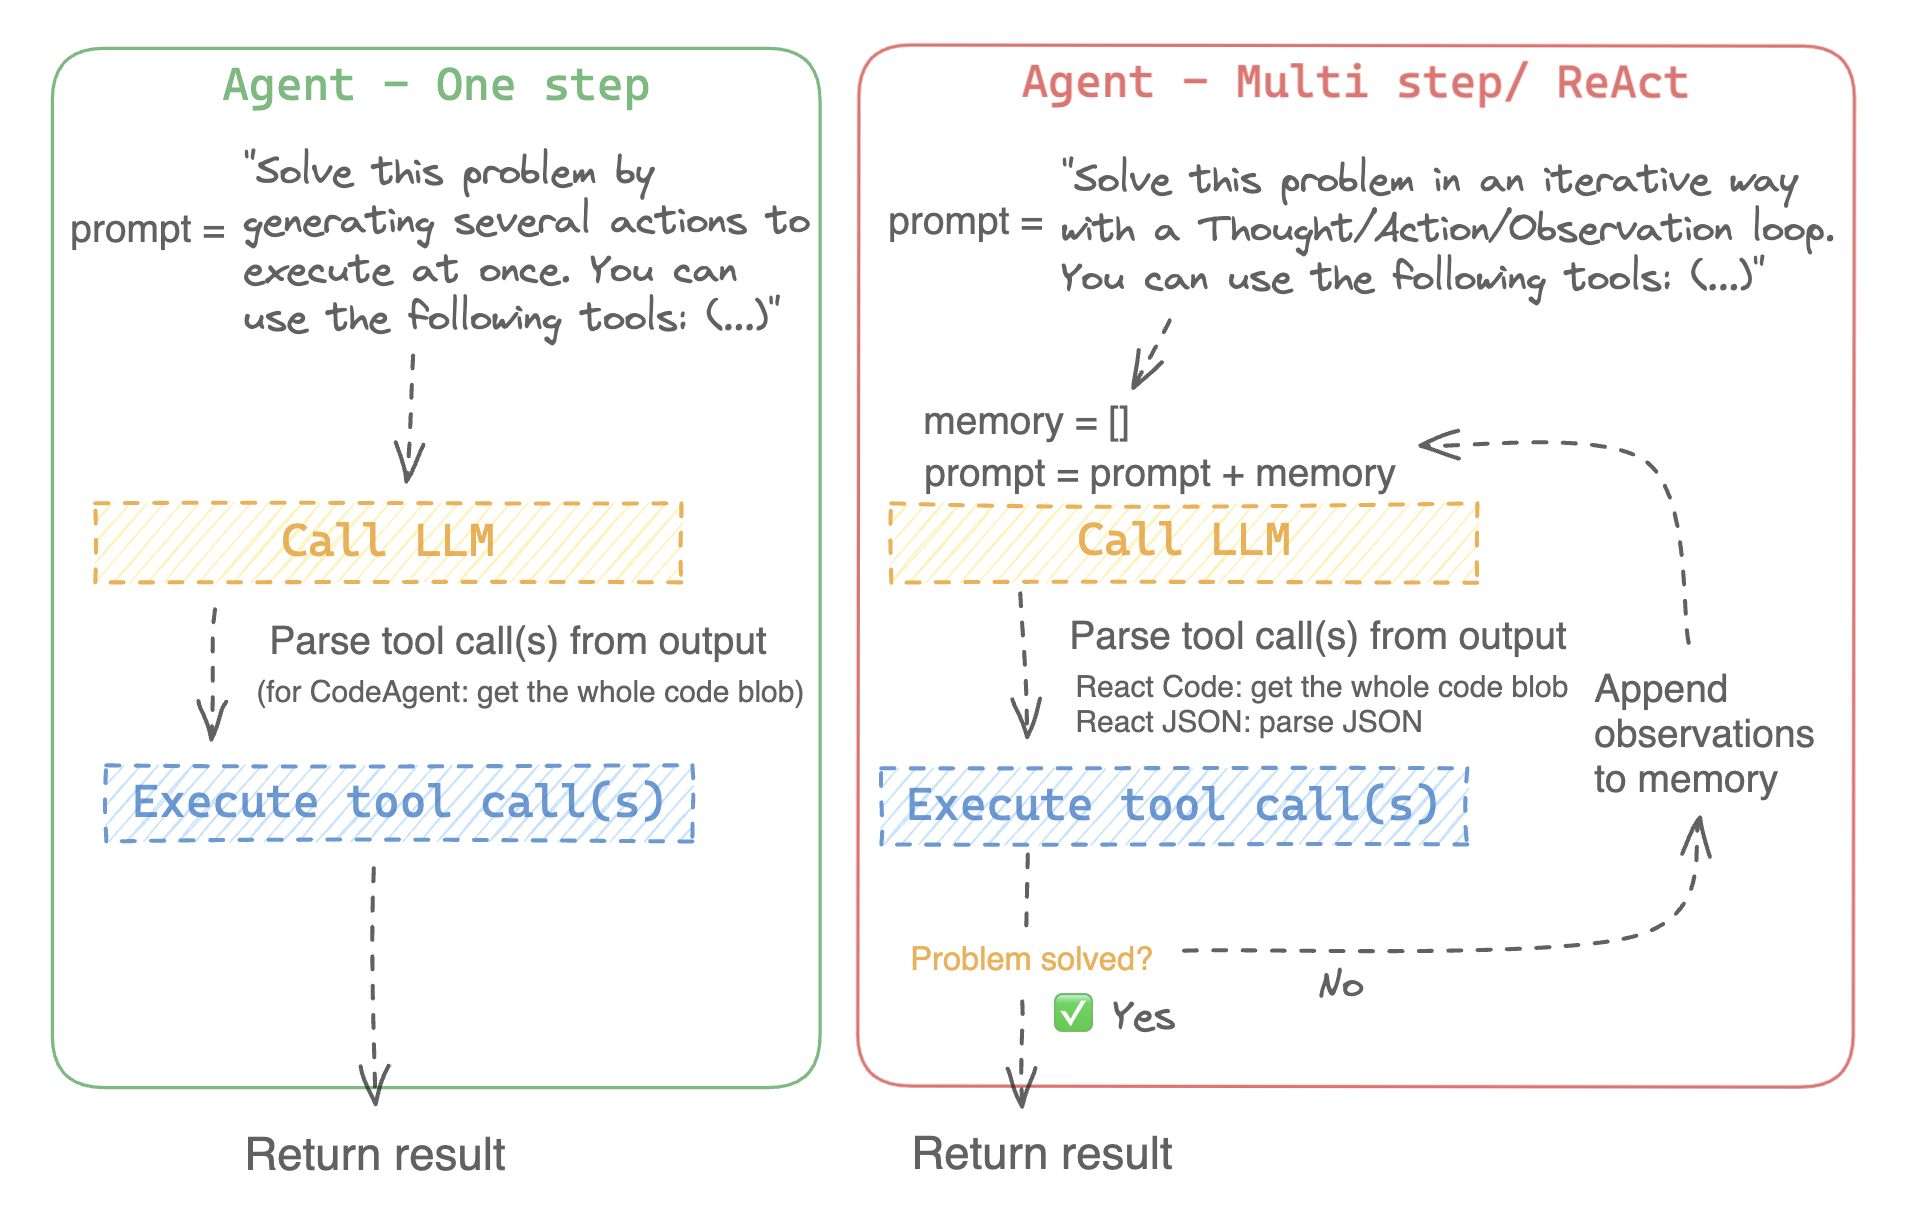
على سبيل المثال، إليك كيف يعمل وكيل ReAct Code طريقه من خلال السؤال التالي.
```py3
>>>agent.run(
..."How many more blocks (also denoted as layers) in BERT base encoder than the encoder from the architecture proposed in Attention is All You Need?",
- نموذج لغوي كبير (LLM) يشكل المحرك الأساسي للوكيل. الوكيل نفسه ليس النموذج اللغوي، بل هو برنامج يستخدم النموذج اللغوي كمحرك له.
- موجه النظام (system prompt): هذه هي التعليمات التي يتم إعطاؤها للنموذج اللغوي لإنشاء مخرجاته.
- صندوق أدوات (toolbox) يختار الوكيل منه الأدوات لتنفيذها
- محلل (parser) لاستخراج الأدوات التي يجب استدعاؤها من مخرجات النموذج اللغوي LLM والأدوات التي يجب استخدامها
عند تهيئة نظام الوكيل، يتم استخدام سمات الأداة لإنشاء وصف للأداة، ثم يتم دمجها في موجه النظام الخاص `system_prompt` للوكيل لإعلامه بالأدوات التي يمكنه استخدامها ولماذا.
للبدء، يرجى تثبيت `agents` الإضافية لتثبيت جميع التبعيات الافتراضية.
```bash
pip install transformers[agents]
```
قم ببناء محرك LLM الخاص بك من خلال تعريف طريقة `llm_engine` التي تقبل قائمة من [الرسائل](./chat_templating.) وتعيد النص. يجب أن تقبل هذه الدالة القابلة للاستدعاء أيضًا معامل `stop` يشير إلى متى يجب التوقف عن التوليد.
2. يتوقف عن توليد المخراجات من التسلسلات التي تم تمريرها في معامل `stop`
أنت بحاجة أيضًا إلى معامل "الأدوات" الذي يقبل قائمة من "الأدوات". يمكنك توفير قائمة فارغة لـ "الأدوات"، ولكن استخدم صندوق الأدوات الافتراضي مع معامل اختياري `add_base_tools=True`.
الآن يمكنك إنشاء وكيل، مثل [`CodeAgent`], وتشغيله. ولتسهيل الأمر، نقدم أيضًا فئة [`HfEngine`] التي تستخدم `huggingface_hub.InferenceClient` بشكل مخفى.
agent.run("Why does Mike not know many people in New York?",audio="https://huggingface.co/datasets/huggingface/documentation-images/resolve/main/transformers/recording.mp3")
```
تم تحديد موجه النظام ومحلل المخرجات تلقائيًا، ولكن يمكنك فحصهما بسهولة عن طريق استدعاء `system_prompt_template` على وكيلك.
```python
print(agent.system_prompt_template)
```
من المهم أن تشرح بأكبر قدر ممكن من الوضوح المهمة التي تريد تنفيذها.
كل عملية [`~Agent.run`] مستقلة، وبما أن الوكيل مدعوم من LLM، فقد تؤدي الاختلافات الطفيفة في موجهك إلى نتائج مختلفة تمامًا.
يمكنك أيضًا تشغيل وكيل بشكل متتالي لمهام مختلفة: في كل مرة يتم فيها إعادة تهيئة سمتي `agent.task` و`agent.logs`.
#### تنفيذ التعليمات البرمجية
يقوم مفسر Python بتنفيذ التعليمات البرمجية على مجموعة من المدخلات التي يتم تمريرها جنبًا إلى جنب مع أدواتك.
يجب أن يكون هذا الأمر آمنًا لأن الوظائف الوحيدة التي يمكن استدعاؤها هي الأدوات التي قدمتها (خاصة إذا كانت أدوات من Hugging Face فقط) ووظيفة الطباعة، لذا فأنت مقيد بالفعل بما يمكن تنفيذه.
مفسر Python لا يسمح أيضًا باستدعاء دوال بشكل افتراضي خارج قائمة آمنة، لذا فإن جميع الهجمات الأكثر وضوحًا لا ينبغي أن تكون مشكلة.
يمكنك أيضًا الإذن باستيرادات إضافية عن طريق تمرير الوحدات النمطية المصرح بها كقائمة من السلاسل في معامل `additional_authorized_imports` عند تهيئة [`ReactCodeAgent`] أو [`CodeAgent`]:
>>>agent.run("Could you get me the title of the page at url 'https://huggingface.co/blog'?")
(...)
'Hugging Face – Blog'
```
سيتم إيقاف التنفيذ عند أي رمز يحاول تنفيذ عملية غير قانونية أو إذا كان هناك خطأ Python عادي في التعليمات البرمجية التي تم إنشاؤها بواسطة الوكيل.
> [!WARNING]
> يمكن لـ LLM توليد شفرة برمجية عشوائية سيتم تنفيذها بعد ذلك: لا تقمب استدعاء أى دوال غير آمنة!
### موجه النظام
ينشئ الوكيل، أو بالأحرى LLM الذي يقود الوكيل، يولد مخرجات بناءً على موجه النظام. يمكن تخصيص موجه النظام وتصميمه للمهام المقصودة. على سبيل المثال، تحقق من موجه النظام لـ [`ReactCodeAgent`] (الإصدار أدناه مبسط قليلاً).
```text
You will be given a task to solve as best you can.
You have access to the following tools:
<<tool_descriptions>>
To solve the task, you must plan forward to proceed in a series of steps, in a cycle of 'Thought:', 'Code:', and 'Observation:' sequences.
At each step, in the 'Thought:' sequence, you should first explain your reasoning towards solving the task, then the tools that you want to use.
Then in the 'Code:' sequence, you shold write the code in simple Python. The code sequence must end with '/End code' sequence.
During each intermediate step, you can use 'print()' to save whatever important information you will then need.
These print outputs will then be available in the 'Observation:' field, for using this information as input for the next step.
In the end you have to return a final answer using the `final_answer` tool.
Here are a few examples using notional tools:
---
{examples}
Above example were using notional tools that might not exist for you. You only have acces to those tools:
<<tool_names>>
You also can perform computations in the python code you generate.
Always provide a 'Thought:' and a 'Code:\n```py' sequence ending with '```<end_code>' sequence. You MUST provide at least the 'Code:' sequence to move forward.
Remember to not perform too many operations in a single code block! You should split the task into intermediate code blocks.
Print results at the end of each step to save the intermediate results. Then use final_answer() to return the final result.
Remember to make sure that variables you use are all defined.
Now Begin!
```
يتضمن موجه النظام:
- *مقدمة* تشرح كيف يجب أن يتصرف الوكيل والأدوات التي يجب عليه استخدامها.
- وصف لجميع الأدوات التي يتم تحديدها بواسطة رمز `<<tool_descriptions>>` الذي يتم استبداله ديناميكيًا في وقت التشغيل بالأدوات التي يحددها المستخدم أو يختارها.
- يأتي وصف الأداة من سمات الأداة، `name`، و`description`، و`inputs` و`output_type`، وقالب `jinja2` بسيط يمكنك تحسينه.
- شكل المخرج المتوقع.
يمكنك تحسين موجه النظام، على سبيل المثال، عن طريق إضافة شرح لتنسيق المخرجات.
للحصول على أقصى قدر من المرونة، يمكنك الكتابة فوق قالب موجه النظام بالكامل عن طريق تمرير موجه مخصص كمعامل إلى معلمة `system_prompt`.
> يرجى التأكد من تحديد سلسلة `<<tool_descriptions>>` في مكان ما في `template` حتى يكون الوكيل على علم
بالأدوات المتاحة.
### فحص تشغيل الوكيل
فيما يلي بعض السمات المفيدة لفحص ما حدث بعد التشغيل:
- تخزن `agent.logs` سجلات مفصلة للوكيل. في كل خطوة من تشغيل الوكيل، يتم تخزين كل شيء في قاموس إلحاقه بـ `agent.logs`.
- تشغيل `agent.write_inner_memory_from_logs()` يخلق ذاكرة داخلية لسجلات الوكيل للنظام LLM لعرضها، كقائمة من رسائل الدردشة. تنتقل هذه الطريقة عبر كل خطوة من سجل الوكيل ولا تخزن سوى ما يهمها كرسالة: على سبيل المثال، سيحفظ موجه النظام والمهمة في رسائل منفصلة، ثم لكل خطوة سيخزن مخرج LLM كرسالة، ومخرج استدعاء الأداة كرسالة أخرى. استخدم هذا إذا كنت تريد عرضًا عامًا لما حدث - ولكن لن يتم نسخ كل سجل بواسطة هذه الطريقة.
## الأدوات
الأداة هي عبارة عن وظيفة أساسية يستخدمها الوكيل لتنفيذ مهمة محددة.
يمكنك على سبيل المثال التحقق من [`PythonInterpreterTool`]: لديه اسم ووصف ووصف للمدخلات ونوع للمخرج، وطريقة `__call__` التي تقوم بتنفيذ المهمة المطلوبة.
عند تهيئة الوكيل، يتم استخدام سمات الأداة لتوليد وصف للأداة يتم تضمينه في موجه النظام الخاص بالوكيل. يتيح هذا للوكيل معرفة الأدوات التي يمكنه استخدامها ولماذا.
### صندوق الأدوات الافتراضي
يأتي Transformers مع صندوق أدوات افتراضي لتمكين الوكلاء، والذي يمكنك إضافته إلى وكيلك عند التهيئة باستخدام معامل `add_base_tools = True`:
- **الإجابة على أسئلة المستند**: الإجابة على سؤال حول المستند (مثل ملف PDF) بتنسيق صورة ([Donut](./model_doc/donut))
- **الإجابة على أسئلة الصور**: الإجابة على سؤال حول صورة ([VILT](./model_doc/vilt))
- **التحدث إلى النص**: قم بتفريغ الكلام إلى نص ([Whisper](./model_doc/whisper))
- **النص إلى كلام**: تحويل النص إلى كلام ([SpeechT5](./model_doc/speecht5))
- **الترجمة**: ترجمة جملة معينة من لغة المصدر إلى لغة الهدف.
- **مفسر كود Python**: تشغيل كود Python الذي تم إنشاؤه بواسطة LLM في بيئة آمنة. لن يتم إضافة هذه الأداة إلى [`ReactJsonAgent`] إلا إذا استخدمت `add_base_tools=True`، نظرًا لأن الأدوات المستندة إلى التعليمات البرمجية يمكنها بالفعل تنفيذ كود Python
لا تترجم النصوص الخاصة ولا الأكواد البرمجية ولا الروابط ولا رموز HTML وCSS:
يمكنك استخدام أداة يدويًا عن طريق استدعاء دالة [`load_tool`] وتحديد مهمة لتنفيذها.
```python
fromtransformersimportload_tool
tool=load_tool("text-to-speech")
audio=tool("This is a text to speech tool")
```
### إنشاء أداة جديدة
يمكنك إنشاء أداتك الخاصة لتغطية حالات الاستخدام التي لا تغطيها الأدوات الافتراضية من Hugging Face.
على سبيل المثال، دعنا نقوم بإنشاء أداة تعرض النموذج الأكثر تنزيلًا لمهمة معينة من Hub.
يمكن تحويل هذه الشيفرة إلى فئة ترث من الفئة العليا [`Tool`].
تحتاج الأداة المخصصة إلى:
- اسم `name`، والتي تمثل اسم الأداة نفسها. عادةً ما يصف الاسم وظيفتها. بما أن الكود يعيد النموذج الأكثر تنزيلًا لمهمة ما، فلنسمها `model_download_counter`.
- تستخدم خاصية `description` لملء موجه نظام الوكيل.
- خاصية `inputs`، والتي هي عبارة عن قاموس بمفاتيح "type" و"description". يحتوي على معلومات تساعد المفسر Python على اتخاذ خيارات مستنيرة بشأن المدخلات.
- خاصية `output_type`، والتي تحدد نوع المخرج.
- طريقة `forward` والتي تحتوي على الكود الذي سيتم تنفيذه للحصول على النتيجة النهائية.
```python
fromtransformersimportTool
fromhuggingface_hubimportlist_models
classHFModelDownloadsTool(Tool):
name="model_download_counter"
description=(
"This is a tool that returns the most downloaded model of a given task on the Hugging Face Hub. "
"It returns the name of the checkpoint."
)
inputs={
"task":{
"type":"text",
"description":"the task category (such as text-classification, depth-estimation, etc)",
الآن بعد أن أصبحت فئة `HfModelDownloadsTool` المخصصة جاهزة، يمكنك حفظها في ملف باسم `model_downloads.py` واستيرادها للاستخدام.
```python
frommodel_downloadsimportHFModelDownloadsTool
tool=HFModelDownloadsTool()
```
يمكنك أيضًا مشاركة أداتك المخصصة في Hub عن طريق استدعاء [`~Tool.push_to_hub`] على الأداة. تأكد من أنك قمت بإنشاء مستودع لها على Hub وأنك تستخدم رمز وصول للقراءة.
print(f"The most downloaded model for the 'text-to-video' task is {most_downloaded_model}.")
====
```
والناتج:
`"النموذج الأكثر تنزيلًا لمهمة `text-to-video` هو ByteDance/AnimateDiff-Lightning."`
### إدارة صندوق أدوات الوكيل الخاص بك
إذا كنت قد قمت بتهيئة وكيل، فمن غير الملائم إعادة تهيئته من البداية لإضافة أداة جديدة ترغب في استخدامها. باستخدام مكتبة Transformers، يمكنك إدارة صندوق أدوات الوكيل بإضافة أو استبدال أداة موجودة.
دعنا نضيف الأداة `model_download_tool` إلى وكيل تم تهيئته مسبقًا باستخدام صندوق الأدوات الافتراضي.
> احترس عند إضافة أدوات إلى وكيل يعمل بالفعل لأنه يمكن أن يؤثر على اختيار الأداة لصالح أداتك أو اختيار أداة أخرى غير المحددة بالفعل.
استخدم طريقة `agent.toolbox.update_tool()` لاستبدال أداة موجودة في صندوق أدوات الوكيل.
هذا مفيد إذا كانت أداتك الجديدة بديلاً مباشرًا للأداة الموجودة لأن الوكيل يعرف بالفعل كيفية تنفيذ تلك المهمة المحددة.
تأكد فقط من اتباع الأداة الجديدة لنفس واجهة برمجة التطبيقات (API) للأداة المستبدلة أو قم بتكييف قالب موجه النظام لضمان تحديث جميع الأمثلة التي تستخدم الأداة المستبدلة.
### استخدام مجموعة من الأدوات
يمكنك الاستفادة من مجموعات الأدوات باستخدام كائن ToolCollection، مع تحديد مجموعة الأدوات التي تريد استخدامها.
ثم قم بتمريرها كقائمة لتهيئة الوكيل الخاص بك، وبدء استخدامها!
[gradio-tools](https://github.com/freddyaboulton/gradio-tools) هي مكتبة قوية تتيح استخدام Hugging
Face Spaces كأدوات. تدعم العديد من المساحات الموجودة بالإضافة إلى مساحات مخصصة.
تدعم مكتبة Transformers `gradio_tools` باستخدام طريقة [`Tool.from_gradio`] في الفئة. على سبيل المثال، دعنا نستخدم [`StableDiffusionPromptGeneratorTool`](https://github.com/freddyaboulton/gradio-tools/blob/main/gradio_tools/tools/prompt_generator.py) من مجموعة أدوات `gradio-tools` لتحسين المطالبات لإنشاء صور أفضل.
استورد وقم بتهيئة الأداة، ثم مررها إلى طريقة `Tool.from_gradio`:
> تتطلب gradio-tools إدخالات وإخراجات *نصية* حتى عند العمل مع طرائق مختلفة مثل كائنات الصور والصوت. الإدخالات والإخراجات الصورية والصوتية غير متوافقة حاليًا.
### استخدام أدوات LangChain
نحن نحب Langchain ونعتقد أنها تحتوي على مجموعة أدوات قوية للغاية.
لاستيراد أداة من LangChain، استخدم الطريقة `from_langchain()`.
فيما يلي كيفية استخدامها لإعادة إنشاء نتيجة البحث في المقدمة باستخدام أداة بحث الويب LangChain.
agent.run("How many more blocks (also denoted as layers) in BERT base encoder than the encoder from the architecture proposed in Attention is All You Need?")
```
## واجهة Gradio
يمكنك الاستفادة من `gradio.Chatbot` لعرض أفكار الوكيل الخاص بك باستخدام `stream_to_gradio`، إليك مثال:
- الوصول إلى جميع أوزان الانتباه لكل رأس في BERT/GPT/GPT-2،
- استرجاع قيم ومشتقات مخرجات الرأس لحساب درجة أهمية الرأس وحذفه كما هو موضح في https://arxiv.org/abs/1905.10650.
ولمساعدتك على فهم واستخدام هذه الميزات بسهولة، أضفنا مثالًا برمجيًا محددًا: [bertology.py](https://github.com/huggingface/transformers/tree/main/examples/research_projects/bertology/run_bertology.py) أثناء استخراج المعلومات وتقليص من نموذج تم تدريبه مسبقًا على GLUE.
ولمساعدتك على فهم واستخدام هذه الميزات بسهولة، أضفنا مثالًا برمجيًا محددًا: [bertology.py](https://github.com/huggingface/transformers-research-projects/tree/main/bertology/run_bertology.py) أثناء استخراج المعلومات وتقليص من نموذج تم تدريبه مسبقًا على GLUE.
@ -77,7 +77,7 @@ model = AutoModelForCausalLM.from_pretrained(model_id, gguf_file=filename)
الآن لديك إمكانية الوصول إلى النسخة الكامل غير المكممة للنموذج في بيئة PyTorch، حيث يمكنك دمجه مع مجموعة كبيرة من الأدوات الأخرى.
لإعادة التحويل إلى ملف `gguf`، نوصي باستخدام ملف [`convert-hf-to-gguf.py`](https://github.com/ggerganov/llama.cpp/blob/master/convert-hf-to-gguf.py) من llama.cpp.
لإعادة التحويل إلى ملف `gguf`، نوصي باستخدام ملف [`convert-hf-to-gguf.py`](https://github.com/ggerganov/llama.cpp/blob/master/convert_hf_to_gguf.py) من llama.cpp.
فيما يلي كيفية إكمال البرنامج النصي أعلاه لحفظ النموذج وإعادة تصديره مرة أخرى إلى `gguf`:
| [كيفية تكميم نموذج باستخدام ONNX Runtime لتصنيف النص](https://github.com/huggingface/notebooks/blob/main/examples/text_classification_quantization_ort.ipynb)| يوضح كيفية تطبيق التكميم الثابت والديناميكي على نموذج باستخدام [ONNX Runtime](https://github.com/microsoft/onnxruntime) لأي مهمة GLUE. | [](https://colab.research.google.com/github/huggingface/notebooks/blob/main/examples/text_classification_quantization_ort.ipynb)| [](https://studiolab.sagemaker.aws/import/github/huggingface/notebooks/blob/main/examples/text_classification_quantization_ort.ipynb)|
| [كيفية تكميم نموذج باستخدام Intel Neural Compressor لتصنيف النص](https://github.com/huggingface/notebooks/blob/main/examples/text_classification_quantization_inc.ipynb)| يوضح كيفية تطبيق التكميم الثابت والديناميكي والتدريبي على نموذج باستخدام [Intel Neural Compressor (INC)](https://github.com/intel/neural-compressor) لأي مهمة GLUE. | [](https://colab.research.google.com/github/huggingface/notebooks/blob/main/examples/text_classification_quantization_inc.ipynb)| [](https://studiolab.sagemaker.aws/import/github/huggingface/notebooks/blob/main/examples/text_classification_quantization_inc.ipynb)|
| [كيفية ضبط نموذج بدقة على تصنيف النص باستخدام ONNX Runtime](https://github.com/huggingface/notebooks/blob/main/examples/text_classification_ort.ipynb)| يوضح كيفية معالجة البيانات مسبقًا وضبط نموذج بدقة على أي مهمة GLUE باستخدام [ONNX Runtime](https://github.com/microsoft/onnxruntime). | [](https://colab.research.google.com/github/huggingface/notebooks/blob/main/examples/text_classification_ort.ipynb)| [](https://studiolab.sagemaker.aws/import/github/huggingface/notebooks/blob/main/examples/text_classification_ort.ipynb)|
| [كيفية ضبط نموذج بدقة على التلخيص باستخدام ONNX Runtime](https://github.com/huggingface/notebooks/blob/main/examples/summarization_ort.ipynb)| يوضح كيفية معالجة البيانات مسبقًا وضبط نموذج بدقة على XSUM باستخدام [ONNX Runtime](https://github.com/microsoft/onnxruntime). | [](https://colab.research.google.com/github/huggingface/notebooks/blob/main/examples/summarization_ort.ipynb)| [](https://studiolab.sagemaker.aws/import/github/huggingface/notebooks/blob/main/examples/summarization_ort.ipynb)|
بالإضافة إلى دفاتر الملاحظات [notebooks](./notebooks) الخاصة بـ 🤗 Transformers، هناك أيضًا نصوص برمجية توضيحية تُظهر كيفية تدريب نموذج لمهمة باستخدام [PyTorch](https://github.com/huggingface/transformers/tree/main/examples/pytorch) أو [TensorFlow](https://github.com/huggingface/transformers/tree/main/examples/tensorflow) أو [JAX/Flax](https://github.com/huggingface/transformers/tree/main/examples/flax).
كما ستجد النصوص البرمجية التي استخدمناها في [مشاريع الأبحاث](https://github.com/huggingface/transformers/tree/main/examples/research_projects) و [الأمثلة القديمة](https://github.com/huggingface/transformers/tree/main/examples/legacy) والتي ساهم بها المجتمع بشكل أساسي. هذه النصوص البرمجية غير مدعومة بشكل نشط وقد تتطلب إصدارًا محددًا من مكتبة 🤗 Transformers والذي من المحتمل أن يكون غير متوافق مع الإصدار الأحدث من المكتبة.
كما ستجد النصوص البرمجية التي استخدمناها في [مشاريع الأبحاث](https://github.com/huggingface/transformers-research-projects/) و [الأمثلة القديمة](https://github.com/huggingface/transformers/tree/main/examples/legacy) والتي ساهم بها المجتمع بشكل أساسي. هذه النصوص البرمجية غير مدعومة بشكل نشط وقد تتطلب إصدارًا محددًا من مكتبة 🤗 Transformers والذي من المحتمل أن يكون غير متوافق مع الإصدار الأحدث من المكتبة.
لا يُتوقع أن تعمل النصوص البرمجية التوضيحية بشكل مباشر على كل مشكلة، وقد تحتاج إلى تكييف النص البرمجي مع المشكلة التي تحاول حلها. ولمساعدتك في ذلك، تعرض معظم النصوص البرمجية كيفية معالجة البيانات قبل التدريب بشكل كامل، مما يتيح لك تحريرها حسب الحاجة لحالتك الاستخدام.
يُعد أمر [`accelerate_launch`](https://huggingface.co/docs/accelerate/package_reference/cli#accelerate-launch) هو الطريقة المُوصى بها لتشغيل نص البرمجى للتدريب على نظام موزع باستخدام Accelerate و [`Trainer`] مع المعلمات المحددة في `config_file.yaml`. يتم حفظ هذا الملف في مجلد ذاكرة التخزين المؤقت لـ Accelerate ويتم تحميله تلقائيًا عند تشغيل `accelerate_launch`.
@ -88,7 +88,7 @@ Die Bibliothek enthält derzeit JAX-, PyTorch- und TensorFlow-Implementierungen,
1.**[DeiT](model_doc/deit)** (from Facebook) released with the paper [Training data-efficient image transformers & distillation through attention](https://arxiv.org/abs/2012.12877) by Hugo Touvron, Matthieu Cord, Matthijs Douze, Francisco Massa, Alexandre Sablayrolles, Hervé Jégou.
1.**[DETR](model_doc/detr)** (from Facebook) released with the paper [End-to-End Object Detection with Transformers](https://arxiv.org/abs/2005.12872) by Nicolas Carion, Francisco Massa, Gabriel Synnaeve, Nicolas Usunier, Alexander Kirillov, Sergey Zagoruyko.
1.**[DialoGPT](model_doc/dialogpt)** (from Microsoft Research) released with the paper [DialoGPT: Large-Scale Generative Pre-training for Conversational Response Generation](https://arxiv.org/abs/1911.00536) by Yizhe Zhang, Siqi Sun, Michel Galley, Yen-Chun Chen, Chris Brockett, Xiang Gao, Jianfeng Gao, Jingjing Liu, Bill Dolan.
1.**[DistilBERT](model_doc/distilbert)** (from HuggingFace), released together with the paper [DistilBERT, a distilled version of BERT: smaller, faster, cheaper and lighter](https://arxiv.org/abs/1910.01108) by Victor Sanh, Lysandre Debut and Thomas Wolf. The same method has been applied to compress GPT2 into [DistilGPT2](https://github.com/huggingface/transformers/tree/main/examples/research_projects/distillation), RoBERTa into [DistilRoBERTa](https://github.com/huggingface/transformers/tree/main/examples/research_projects/distillation), Multilingual BERT into [DistilmBERT](https://github.com/huggingface/transformers/tree/main/examples/research_projects/distillation) and a German version of DistilBERT.
1.**[DistilBERT](model_doc/distilbert)** (from HuggingFace), released together with the paper [DistilBERT, a distilled version of BERT: smaller, faster, cheaper and lighter](https://arxiv.org/abs/1910.01108) by Victor Sanh, Lysandre Debut and Thomas Wolf. The same method has been applied to compress GPT2 into [DistilGPT2](https://github.com/huggingface/transformers-research-projects/tree/main/distillation), RoBERTa into [DistilRoBERTa](https://github.com/huggingface/transformers-research-projects/tree/main/distillation), Multilingual BERT into [DistilmBERT](https://github.com/huggingface/transformers-research-projects/tree/main/distillation) and a German version of DistilBERT.
1.**[DiT](model_doc/dit)** (from Microsoft Research) released with the paper [DiT: Self-supervised Pre-training for Document Image Transformer](https://arxiv.org/abs/2203.02378) by Junlong Li, Yiheng Xu, Tengchao Lv, Lei Cui, Cha Zhang, Furu Wei.
1.**[DPR](model_doc/dpr)** (from Facebook) released with the paper [Dense Passage Retrieval for Open-Domain Question Answering](https://arxiv.org/abs/2004.04906) by Vladimir Karpukhin, Barlas Oğuz, Sewon Min, Patrick Lewis, Ledell Wu, Sergey Edunov, Danqi Chen, and Wen-tau Yih.
1.**[DPT](master/model_doc/dpt)** (from Intel Labs) released with the paper [Vision Transformers for Dense Prediction](https://arxiv.org/abs/2103.13413) by René Ranftl, Alexey Bochkovskiy, Vladlen Koltun.
@ -156,7 +156,7 @@ Die [`pipeline`] kann jedes Modell aus dem [Model Hub](https://huggingface.co/mo
<frameworkcontent>
<pt>
Use the [`AutoModelForSequenceClassification`] and [`AutoTokenizer`] to load the pretrained model and it's associated tokenizer (more on an `AutoClass` below):
Use the [`AutoModelForSequenceClassification`] and [`AutoTokenizer`] to load the pretrained model and its associated tokenizer (more on an `AutoClass` below):
@ -166,7 +166,7 @@ Use the [`AutoModelForSequenceClassification`] and [`AutoTokenizer`] to load the
```
</pt>
<tf>
Use the [`TFAutoModelForSequenceClassification`] and [`AutoTokenizer`] to load the pretrained model and it's associated tokenizer (more on an `TFAutoClass` below):
Use the [`TFAutoModelForSequenceClassification`] and [`AutoTokenizer`] to load the pretrained model and its associated tokenizer (more on an `TFAutoClass` below):
@ -222,7 +222,7 @@ Anschließend wandelt der Tokenizer die Token in Zahlen um, um einen Tensor als
Der Tokenizer gibt ein Wörterbuch zurück, das Folgendes enthält:
* [input_ids](./glossary#input-ids): numerische Repräsentationen Ihrer Token.
* [atttention_mask](.glossary#attention-mask): gibt an, welche Token beachtet werden sollen.
* [attention_mask](.glossary#attention-mask): gibt an, welche Token beachtet werden sollen.
Genau wie die [`pipeline`] akzeptiert der Tokenizer eine Liste von Eingaben. Darüber hinaus kann der Tokenizer den Text auch auffüllen und kürzen, um einen Stapel mit einheitlicher Länge zurückzugeben:
@ -18,7 +18,7 @@ rendered properly in your Markdown viewer.
Neben den 🤗 Transformers [notebooks](./notebooks) gibt es auch Beispielskripte, die zeigen, wie man ein Modell für eine Aufgabe mit [PyTorch](https://github.com/huggingface/transformers/tree/main/examples/pytorch), [TensorFlow](https://github.com/huggingface/transformers/tree/main/examples/tensorflow) oder [JAX/Flax](https://github.com/huggingface/transformers/tree/main/examples/flax) trainiert.
Sie werden auch Skripte finden, die wir in unseren [Forschungsprojekten](https://github.com/huggingface/transformers/tree/main/examples/research_projects) und [Legacy-Beispielen](https://github.com/huggingface/transformers/tree/main/examples/legacy) verwendet haben und die größtenteils von der Community stammen. Diese Skripte werden nicht aktiv gepflegt und erfordern eine bestimmte Version von 🤗 Transformers, die höchstwahrscheinlich nicht mit der neuesten Version der Bibliothek kompatibel ist.
Sie werden auch Skripte finden, die wir in unseren [Forschungsprojekten](https://github.com/huggingface/transformers-research-projects/) und [Legacy-Beispielen](https://github.com/huggingface/transformers/tree/main/examples/legacy) verwendet haben und die größtenteils von der Community stammen. Diese Skripte werden nicht aktiv gepflegt und erfordern eine bestimmte Version von 🤗 Transformers, die höchstwahrscheinlich nicht mit der neuesten Version der Bibliothek kompatibel ist.
Es wird nicht erwartet, dass die Beispielskripte bei jedem Problem sofort funktionieren. Möglicherweise müssen Sie das Skript an das Problem anpassen, das Sie zu lösen versuchen. Um Ihnen dabei zu helfen, legen die meisten Skripte vollständig offen, wie die Daten vorverarbeitet werden, so dass Sie sie nach Bedarf für Ihren Anwendungsfall bearbeiten können.
Kurz gesagt, es bietet eine API für natürliche Sprache auf der Grundlage von Transformers: Wir definieren eine Reihe von kuratierten Tools und entwerfen einen
Agenten, um natürliche Sprache zu interpretieren und diese Werkzeuge zu verwenden. Es ist von vornherein erweiterbar; wir haben einige relevante Tools kuratiert,
aber wir werden Ihnen zeigen, wie das System einfach erweitert werden kann, um jedes von der Community entwickelte Tool zu verwenden.
Beginnen wir mit einigen Beispielen dafür, was mit dieser neuen API erreicht werden kann. Sie ist besonders leistungsfähig, wenn es um
Sie ist besonders leistungsstark, wenn es um multimodale Aufgaben geht. Lassen Sie uns also eine Runde drehen, um Bilder zu erzeugen und Text vorzulesen.
```py
agent.run("Caption the following image",image=image)
| <imgsrc="https://huggingface.co/datasets/huggingface/documentation-images/resolve/main/transformers/beaver.png"width=200> | A beaver is swimming in the water |
---
```py
agent.run("Read the following text out loud",text=text)
| A beaver is swimming in the water | <audiocontrols><sourcesrc="https://huggingface.co/datasets/huggingface/documentation-images/resolve/main/transformers/tts_example.wav"type="audio/wav"> your browser does not support the audio element. </audio>
---
```py
agent.run(
"In the following `document`, where will the TRRF Scientific Advisory Council Meeting take place?",
Es wählt automatisch das (oder die) Werkzeug(e) aus, das (die) für die von Ihnen gewünschte Aufgabe geeignet ist (sind) und führt es (sie) entsprechend aus. Es
kann eine oder mehrere Aufgaben in der gleichen Anweisung ausführen (je komplexer Ihre Anweisung ist, desto wahrscheinlicher ist ein
der Agent scheitern).
```py
agent.run("Draw me a picture of the sea then transform the picture to add an island")
Jede [`~Agent.run`] Operation ist unabhängig, so dass Sie sie mehrmals hintereinander mit unterschiedlichen Aufgaben ausführen können.
Beachten Sie, dass Ihr `Agent` nur ein großsprachiges Modell ist, so dass kleine Variationen in Ihrer Eingabeaufforderung völlig unterschiedliche Ergebnisse liefern können.
unterschiedliche Ergebnisse liefern. Es ist wichtig, dass Sie die Aufgabe, die Sie ausführen möchten, so genau wie möglich erklären. Wir gehen noch weiter ins Detail
wie man gute Prompts schreibt [hier](custom_tools#writing-good-user-inputs).
Wenn Sie einen Status über Ausführungszeiten hinweg beibehalten oder dem Agenten Nicht-Text-Objekte übergeben möchten, können Sie dies tun, indem Sie
Variablen, die der Agent verwenden soll. Sie könnten zum Beispiel das erste Bild von Flüssen und Seen erzeugen,
und das Modell bitten, dieses Bild zu aktualisieren und eine Insel hinzuzufügen, indem Sie Folgendes tun:
```python
picture=agent.run("Generate a picture of rivers and lakes.")
updated_picture=agent.run("Transform the image in `picture` to add an island to it.",picture=picture)
```
<Tip>
Dies kann hilfreich sein, wenn das Modell Ihre Anfrage nicht verstehen kann und die Werkzeuge verwechselt. Ein Beispiel wäre:
```py
agent.run("Draw me the picture of a capybara swimming in the sea")
```
Hier könnte das Modell auf zwei Arten interpretieren:
- Die Funktion `Text-zu-Bild` erzeugt ein Wasserschwein, das im Meer schwimmt.
- Oder Sie lassen das `Text-zu-Bild` ein Wasserschwein erzeugen und verwenden dann das Werkzeug `Bildtransformation`, um es im Meer schwimmen zu lassen.
Falls Sie das erste Szenario erzwingen möchten, können Sie dies tun, indem Sie die Eingabeaufforderung als Argument übergeben:
```py
agent.run("Draw me a picture of the `prompt`",prompt="a capybara swimming in the sea")
```
</Tip>
### Chat-basierte Ausführung (Chat)
Der Agent verfügt auch über einen Chat-basierten Ansatz, der die Methode [`~Agent.chat`] verwendet:
```py
agent.chat("Generate a picture of rivers and lakes")
Der "Agent" ist hier ein großes Sprachmodell, das wir auffordern, Zugang zu einem bestimmten Satz von Tools zu erhalten.
LLMs sind ziemlich gut darin, kleine Codeproben zu erzeugen. Diese API macht sich das zunutze, indem sie das
LLM ein kleines Codebeispiel gibt, das eine Aufgabe mit einer Reihe von Werkzeugen ausführt. Diese Aufforderung wird dann ergänzt durch die
Aufgabe, die Sie Ihrem Agenten geben, und die Beschreibung der Werkzeuge, die Sie ihm geben. Auf diese Weise erhält er Zugriff auf die Dokumentation der
Tools, insbesondere die erwarteten Eingaben und Ausgaben, und kann den entsprechenden Code generieren.
#### Tools
Tools sind sehr einfach: Sie bestehen aus einer einzigen Funktion mit einem Namen und einer Beschreibung. Wir verwenden dann die Beschreibungen dieser Tools
um den Agenten aufzufordern. Anhand der Eingabeaufforderung zeigen wir dem Agenten, wie er die Tools nutzen kann, um das zu tun, was in der
in der Abfrage angefordert wurde.
Dies geschieht mit brandneuen Tools und nicht mit Pipelines, denn der Agent schreibt besseren Code mit sehr atomaren Tools.
Pipelines sind stärker refaktorisiert und fassen oft mehrere Aufgaben in einer einzigen zusammen. Tools sind dafür gedacht, sich auf
eine einzige, sehr einfache Aufgabe konzentrieren.
#### Code-Ausführung?!
Dieser Code wird dann mit unserem kleinen Python-Interpreter auf den mit Ihren Tools übergebenen Eingaben ausgeführt.
Wir hören Sie schon schreien "Willkürliche Codeausführung!", aber lassen Sie uns erklären, warum das nicht der Fall ist.
Die einzigen Funktionen, die aufgerufen werden können, sind die von Ihnen zur Verfügung gestellten Tools und die Druckfunktion, so dass Sie bereits eingeschränkt sind
eingeschränkt, was ausgeführt werden kann. Sie sollten sicher sein, wenn es sich auf die Werkzeuge für das Umarmungsgesicht beschränkt.
Dann lassen wir keine Attributsuche oder Importe zu (die ohnehin nicht benötigt werden, um die
Inputs/Outputs an eine kleine Gruppe von Funktionen), so dass alle offensichtlichen Angriffe (und Sie müssten den LLM
dazu auffordern, sie auszugeben) kein Problem darstellen sollten. Wenn Sie auf Nummer sicher gehen wollen, können Sie die
run()-Methode mit dem zusätzlichen Argument return_code=True ausführen. In diesem Fall gibt der Agent nur den auszuführenden Code
zur Ausführung zurück und Sie können entscheiden, ob Sie ihn ausführen möchten oder nicht.
Die Ausführung bricht bei jeder Zeile ab, in der versucht wird, eine illegale Operation auszuführen, oder wenn ein regulärer Python-Fehler
mit dem vom Agenten generierten Code.
### Ein kuratierter Satz von Tools
Wir haben eine Reihe von Tools identifiziert, die solche Agenten unterstützen können. Hier ist eine aktualisierte Liste der Tools, die wir integriert haben
in `transformers` integriert haben:
- **Beantwortung von Fragen zu Dokumenten**: Beantworten Sie anhand eines Dokuments (z.B. PDF) im Bildformat eine Frage zu diesem Dokument ([Donut](./model_doc/donut))
- Beantworten von Textfragen**: Geben Sie einen langen Text und eine Frage an, beantworten Sie die Frage im Text ([Flan-T5](./model_doc/flan-t5))
- **Unbedingte Bildunterschriften**: Beschriften Sie das Bild! ([BLIP](./model_doc/blip))
- **Bildfragebeantwortung**: Beantworten Sie bei einem Bild eine Frage zu diesem Bild ([VILT](./model_doc/vilt))
- **Bildsegmentierung**: Geben Sie ein Bild und einen Prompt an und geben Sie die Segmentierungsmaske dieses Prompts aus ([CLIPSeg](./model_doc/clipseg))
- **Sprache in Text**: Geben Sie eine Audioaufnahme einer sprechenden Person an und transkribieren Sie die Sprache in Text ([Whisper](./model_doc/whisper))
- **Text in Sprache**: wandelt Text in Sprache um ([SpeechT5](./model_doc/speecht5))
- **Zero-Shot-Textklassifizierung**: Ermitteln Sie anhand eines Textes und einer Liste von Bezeichnungen, welcher Bezeichnung der Text am ehesten entspricht ([BART](./model_doc/bart))
- **Textzusammenfassung**: fassen Sie einen langen Text in einem oder wenigen Sätzen zusammen ([BART](./model_doc/bart))
- **Übersetzung**: Übersetzen des Textes in eine bestimmte Sprache ([NLLB](./model_doc/nllb))
Diese Tools sind in Transformatoren integriert und können auch manuell verwendet werden, zum Beispiel:
```py
fromtransformersimportload_tool
tool=load_tool("text-to-speech")
audio=tool("This is a text to speech tool")
```
### Benutzerdefinierte Tools
Wir haben zwar eine Reihe von Tools identifiziert, sind aber der festen Überzeugung, dass der Hauptwert dieser Implementierung darin besteht
die Möglichkeit, benutzerdefinierte Tools schnell zu erstellen und weiterzugeben.
Indem Sie den Code eines Tools in einen Hugging Face Space oder ein Modell-Repository stellen, können Sie das Tool
direkt mit dem Agenten nutzen. Wir haben ein paar neue Funktionen hinzugefügt
**transformers-agnostic** Tools zur [`huggingface-tools` Organisation](https://huggingface.co/huggingface-tools) hinzugefügt:
- **Text-Downloader**: zum Herunterladen eines Textes von einer Web-URL
- **Text zu Bild**: erzeugt ein Bild nach einer Eingabeaufforderung und nutzt dabei stabile Diffusion
- **Bildtransformation**: verändert ein Bild anhand eines Ausgangsbildes und einer Eingabeaufforderung, unter Ausnutzung der stabilen pix2pix-Diffusion
- **Text zu Video**: Erzeugen eines kleinen Videos nach einer Eingabeaufforderung, unter Verwendung von damo-vilab
Das Text-zu-Bild-Tool, das wir von Anfang an verwendet haben, ist ein Remote-Tool, das sich in
[*huggingface-tools/text-to-image*](https://huggingface.co/spaces/huggingface-tools/text-to-image)! Wir werden
weiterhin solche Tools für diese und andere Organisationen veröffentlichen, um diese Implementierung weiter zu verbessern.
Die Agenten haben standardmäßig Zugriff auf die Tools, die sich auf [*huggingface-tools*](https://huggingface.co/huggingface-tools) befinden.
Wie Sie Ihre eigenen Tools schreiben und freigeben können und wie Sie jedes benutzerdefinierte Tool, das sich auf dem Hub befindet, nutzen können, erklären wir in [folgender Anleitung](custom_tools).
### Code-Erzeugung
Bisher haben wir gezeigt, wie Sie die Agenten nutzen können, um Aktionen für Sie durchzuführen. Der Agent generiert jedoch nur Code
den wir dann mit einem sehr eingeschränkten Python-Interpreter ausführen. Falls Sie den generierten Code in einer anderen Umgebung verwenden möchten
einer anderen Umgebung verwenden möchten, können Sie den Agenten auffordern, den Code zusammen mit einer Tooldefinition und genauen Importen zurückzugeben.
Zum Beispiel die folgende Anweisung
```python
agent.run("Draw me a picture of rivers and lakes",return_code=True)
<!--Copyright 2022 The HuggingFace Team. All rights reserved.
<!--Copyright 2024 The HuggingFace Team. All rights reserved.
Licensed under the Apache License, Version 2.0 (the "License"); you may not use this file except in compliance with
the License. You may obtain a copy of the License at
@ -14,123 +14,152 @@ rendered properly in your Markdown viewer.
-->
# Distributed training with 🤗 Accelerate
# Accelerate
As models get bigger, parallelism has emerged as a strategy for training larger models on limited hardware and accelerating training speed by several orders of magnitude. At Hugging Face, we created the [🤗 Accelerate](https://huggingface.co/docs/accelerate) library to help users easily train a 🤗 Transformers model on any type of distributed setup, whether it is multiple GPU's on one machine or multiple GPU's across several machines. In this tutorial, learn how to customize your native PyTorch training loop to enable training in a distributed environment.
[Accelerate](https://hf.co/docs/accelerate/index) is a library designed to simplify distributed training on any type of setup with PyTorch by uniting the most common frameworks ([Fully Sharded Data Parallel (FSDP)](https://pytorch.org/blog/introducing-pytorch-fully-sharded-data-parallel-api/) and [DeepSpeed](https://www.deepspeed.ai/)) for it into a single interface. [`Trainer`] is powered by Accelerate under the hood, enabling loading big models and distributed training.
## Setup
Get started by installing 🤗 Accelerate:
This guide will show you two ways to use Accelerate with Transformers, using FSDP as the backend. The first method demonstrates distributed training with [`Trainer`], and the second method demonstrates adapting a PyTorch training loop. For more detailed information about Accelerate, please refer to the [documentation](https://hf.co/docs/accelerate/index).
```bash
pip install accelerate
```
Then import and create an [`~accelerate.Accelerator`] object. The [`~accelerate.Accelerator`] will automatically detect your type of distributed setup and initialize all the necessary components for training. You don't need to explicitly place your model on a device.
```py
>>>fromaccelerateimportAccelerator
>>>accelerator=Accelerator()
```
## Prepare to accelerate
The next step is to pass all the relevant training objects to the [`~accelerate.Accelerator.prepare`] method. This includes your training and evaluation DataLoaders, a model and an optimizer:
- batch = {k: v.to(device) for k, v in batch.items()}
outputs = model(**batch)
loss = outputs.loss
- loss.backward()
+ accelerator.backward(loss)
optimizer.step()
lr_scheduler.step()
optimizer.zero_grad()
progress_bar.update(1)
```
## Train
Once you've added the relevant lines of code, launch your training in a script or a notebook like Colaboratory.
### Train with a script
If you are running your training from a script, run the following command to create and save a configuration file:
Start by running [accelerate config](https://hf.co/docs/accelerate/main/en/package_reference/cli#accelerate-config) in the command line to answer a series of prompts about your training system. This creates and saves a configuration file to help Accelerate correctly set up training based on your setup.
```bash
accelerate config
```
Then launch your training with:
Depending on your setup and the answers you provide, an example configuration file for distributing training with FSDP on one machine with two GPUs may look like the following.
```bash
accelerate launch train.py
```yaml
compute_environment:LOCAL_MACHINE
debug:false
distributed_type:FSDP
downcast_bf16:'no'
fsdp_config:
fsdp_auto_wrap_policy:TRANSFORMER_BASED_WRAP
fsdp_backward_prefetch_policy:BACKWARD_PRE
fsdp_forward_prefetch:false
fsdp_cpu_ram_efficient_loading:true
fsdp_offload_params:false
fsdp_sharding_strategy:FULL_SHARD
fsdp_state_dict_type:SHARDED_STATE_DICT
fsdp_sync_module_states:true
fsdp_transformer_layer_cls_to_wrap:BertLayer
fsdp_use_orig_params:true
machine_rank:0
main_training_function:main
mixed_precision:bf16
num_machines:1
num_processes:2
rdzv_backend:static
same_network:true
tpu_env:[]
tpu_use_cluster:false
tpu_use_sudo:false
use_cpu:false
```
### Train with a notebook
## Trainer
🤗 Accelerate can also run in a notebook if you're planning on using Colaboratory's TPUs. Wrap all the code responsible for training in a function, and pass it to [`~accelerate.notebook_launcher`]:
Pass the path to the saved configuration file to [`TrainingArguments`], and from there, pass your [`TrainingArguments`] to [`Trainer`].
```py
>>>fromaccelerateimportnotebook_launcher
fromtransformersimportTrainingArguments,Trainer
>>>notebook_launcher(training_function)
training_args=TrainingArguments(
output_dir="your-model",
learning_rate=2e-5,
per_device_train_batch_size=16,
per_device_eval_batch_size=16,
num_train_epochs=2,
fsdp_config="path/to/fsdp_config",
fsdp_strategy="full_shard",
weight_decay=0.01,
eval_strategy="epoch",
save_strategy="epoch",
load_best_model_at_end=True,
push_to_hub=True,
)
trainer=Trainer(
model=model,
args=training_args,
train_dataset=dataset["train"],
eval_dataset=dataset["test"],
processing_class=tokenizer,
data_collator=data_collator,
compute_metrics=compute_metrics,
)
trainer.train()
```
For more information about 🤗 Accelerate and its rich features, refer to the [documentation](https://huggingface.co/docs/accelerate).
## Native PyTorch
Accelerate can also be added to any PyTorch training loop to enable distributed training. The [`~accelerate.Accelerator`] is the main entry point for adapting your PyTorch code to work with Accelerate. It automatically detects your distributed training setup and initializes all the necessary components for training. You don't need to explicitly place your model on a device because [`~accelerate.Accelerator`] knows which device to move your model to.
```py
fromaccelerateimportAccelerator
accelerator=Accelerator()
device=accelerator.device
```
All PyTorch objects (model, optimizer, scheduler, dataloaders) should be passed to the [`~accelerate.Accelerator.prepare`] method now. This method moves your model to the appropriate device or devices, adapts the optimizer and scheduler to use [`~accelerate.optimizer.AcceleratedOptimizer`] and [`~accelerate.scheduler.AcceleratedScheduler`], and creates a new shardable dataloader.
Replace `loss.backward` in your training loop with Accelerates [`~accelerate.Accelerator.backward`] method to scale the gradients and determine the appropriate `backward` method to use depending on your framework (for example, DeepSpeed or Megatron).
```py
forepochinrange(num_epochs):
forbatchintrain_dataloader:
outputs=model(**batch)
loss=outputs.loss
accelerator.backward(loss)
optimizer.step()
lr_scheduler.step()
optimizer.zero_grad()
progress_bar.update(1)
```
Combine everything into a function and make it callable as a script.
From the command line, call [accelerate launch](https://hf.co/docs/accelerate/main/en/package_reference/cli#accelerate-launch) to run your training script. Any additional arguments or parameters can be passed here as well.
To launch your training script on two GPUs, add the `--num_processes` argument.
<!--Copyright 2020 The HuggingFace Team. All rights reserved.
<!--Copyright 2024 The HuggingFace Team. All rights reserved.
Licensed under the Apache License, Version 2.0 (the "License"); you may not use this file except in compliance with
the License. You may obtain a copy of the License at
@ -13,92 +13,66 @@ rendered properly in your Markdown viewer.
-->
# How to create a custom pipeline?
# Adding a new pipeline
In this guide, we will see how to create a custom pipeline and share it on the [Hub](https://hf.co/models) or add it to the
🤗 Transformers library.
Make [`Pipeline`] your own by subclassing it and implementing a few methods. Share the code with the community on the [Hub](https://hf.co) and register the pipeline with Transformers so that everyone can quickly and easily use it.
First and foremost, you need to decide the raw entries the pipeline will be able to take. It can be strings, raw bytes,
dictionaries or whatever seems to be the most likely desired input. Try to keep these inputs as pure Python as possible
as it makes compatibility easier (even through other languages via JSON). Those will be the `inputs` of the
pipeline (`preprocess`).
This guide will walk you through the process of adding a new pipeline to Transformers.
Then define the `outputs`. Same policy as the `inputs`. The simpler, the better. Those will be the outputs of
`postprocess` method.
## Design choices
Start by inheriting the base class `Pipeline` with the 4 methods needed to implement `preprocess`,
`_forward`, `postprocess`, and `_sanitize_parameters`.
At a minimum, you only need to provide [`Pipeline`] with an appropriate input for a task. This is also where you should begin when designing your pipeline.
Decide what input types [`Pipeline`] can accept. It can be strings, raw bytes, dictionaries, and so on. Try to keep the inputs in pure Python where possible because it's more compatible. Next, decide on the output [`Pipeline`] should return. Again, keeping the output in Python is the simplest and best option because it's easier to work with.
```python
Keeping the inputs and outputs simple, and ideally JSON-serializable, makes it easier for users to run your [`Pipeline`] without needing to learn new object types. It's also common to support many different input types for even greater ease of use. For example, making an audio file acceptable from a filename, URL, or raw bytes gives the user more flexibility in how they provide the audio data.
## Create a pipeline
With an input and output decided, you can start implementing [`Pipeline`]. Your pipeline should inherit from the base [`Pipeline`] class and include 4 methods.
In order to achieve that, we'll update our `postprocess` method with a default parameter to `5`. and edit
`_sanitize_parameters` to allow this new parameter.
2.`_forward` shouldn't be called directly. `forward` is the preferred method because it includes safeguards to make sure everything works correctly on the expected device. Anything linked to the model belongs in `_forward` and everything else belongs in either `preprocess` or `postprocess`.
```py
def_forward(self,model_inputs):
outputs=self.model(**model_inputs)
returnoutputs
```
```python
3.`postprocess` generates the final output from the models output in `_forward`.
```py
defpostprocess(self,model_outputs,top_k=5):
best_class=model_outputs["logits"].softmax(-1)
# Add logic to handle top_k
returnbest_class
```
4.`_sanitize_parameters` lets users pass additional parameters to [`Pipeline`]. This could be during initialization or when [`Pipeline`] is called. `_sanitize_parameters` returns 3 dicts of additional keyword arguments that are passed directly to `preprocess`, `_forward`, and `postprocess`. Don't add anything if a user didn't call the pipeline with extra parameters. This keeps the default arguments in the function definition which is always more natural.
For example, add a `top_k` parameter in `postprocess` to return the top 5 most likely classes. Then in `_sanitize_parameters`, check if the user passed in `top_k` and add it to `postprocess_kwargs`.
You can specify a default model if you want, in which case it should come with a specific revision (which can be the name of a branch or a commit hash, here we took `"abcdef"`) as well as the type:
## Share your pipeline
```python
PIPELINE_REGISTRY.register_pipeline(
"new-task",
pipeline_class=MyPipeline,
pt_model=AutoModelForSequenceClassification,
default={"pt":("user/awesome_model","abcdef")},
type="text",# current support type: text, audio, image, multimodal
)
```
Share your pipeline with the community on the [Hub](https://hf.co) or you can add it directly to Transformers.
## Share your pipeline on the Hub
It's faster to upload your pipeline code to the Hub because it doesn't require a review from the Transformers team. Adding the pipeline to Transformers may be slower because it requires a review and you need to add tests to ensure your [`Pipeline`] works.
To share your custom pipeline on the Hub, you just have to save the custom code of your `Pipeline` subclass in a
python file. For instance, let's say we want to use a custom pipeline for sentence pair classification like this:
### Upload to the Hub
Add your pipeline code to the Hub in a Python file.
For example, a custom pipeline for sentence pair classification might look like the following code below. The implementation works for PyTorch and TensorFlow models.
@ -215,56 +194,36 @@ The [register_pipeline](https://github.com/huggingface/transformers/blob/9feae5f
},
```
Once this is done, we can use it with a pretrained model. For instance `sgugger/finetuned-bert-mrpc` has been
fine-tuned on the MRPC dataset, which classifies pairs of sentences as paraphrases or not.
Call [`~Pipeline.push_to_hub`] to push the pipeline to the Hub. The Python file containing the code is copied to the Hub, and the pipelines model and tokenizer are also saved and pushed to the Hub. Your pipeline should now be available on the Hub under your namespace.
If you want to contribute your pipeline to 🤗 Transformers, you will need to add a new module in the `pipelines` submodule
with the code of your pipeline, then add it to the list of tasks defined in `pipelines/__init__.py`.
Adding a custom pipeline to Transformers requires adding tests to make sure everything works as expected, and requesting a review from the Transformers team.
Then you will need to add tests. Create a new file `tests/test_pipelines_MY_PIPELINE.py` with examples of the other tests.
Add your pipeline code as a new module to the [pipelines](https://github.com/huggingface/transformers/tree/main/src/transformers/pipelines) submodule, and add it to the list of tasks defined in [pipelines/__init__.py](https://github.com/huggingface/transformers/blob/main/src/transformers/pipelines/__init__.py).
The `run_pipeline_test` function will be very generic and run on small random models on every possible
architecture as defined by `model_mapping` and `tf_model_mapping`.
Next, add a new test for the pipeline in [transformers/tests/pipelines](https://github.com/huggingface/transformers/tree/main/tests/pipelines). You can look at the other tests for examples of how to test your pipeline.
This is very important to test future compatibility, meaning if someone adds a new model for
`XXXForQuestionAnswering` then the pipeline test will attempt to run on it. Because the models are random it's
impossible to check for actual values, that's why there is a helper `ANY` that will simply attempt to match the
output of the pipeline TYPE.
The [run_pipeline_test](https://github.com/huggingface/transformers/blob/db70426854fe7850f2c5834d633aff637f14772e/tests/pipelines/test_pipelines_text_classification.py#L186) function should be very generic and run on the models defined in [model_mapping](https://github.com/huggingface/transformers/blob/db70426854fe7850f2c5834d633aff637f14772e/tests/pipelines/test_pipelines_text_classification.py#L48) and [tf_model_mapping](https://github.com/huggingface/transformers/blob/db70426854fe7850f2c5834d633aff637f14772e/tests/pipelines/test_pipelines_text_classification.py#L49). This is important for testing future compatibility with new models.
You also *need* to implement 2 (ideally 4) tests.
You'll also notice `ANY` is used throughout the [run_pipeline_test](https://github.com/huggingface/transformers/blob/db70426854fe7850f2c5834d633aff637f14772e/tests/pipelines/test_pipelines_text_classification.py#L186) function. The models are random, so you can't check the actual values. Using `ANY` allows the test to match the output of the pipeline type instead.
-`test_small_model_pt` : Define 1 small model for this pipeline (doesn't matter if the results don't make sense)
and test the pipeline outputs. The results should be the same as `test_small_model_tf`.
-`test_small_model_tf` : Define 1 small model for this pipeline (doesn't matter if the results don't make sense)
and test the pipeline outputs. The results should be the same as `test_small_model_pt`.
-`test_large_model_pt` (`optional`): Tests the pipeline on a real pipeline where the results are supposed to
make sense. These tests are slow and should be marked as such. Here the goal is to showcase the pipeline and to make
sure there is no drift in future releases.
-`test_large_model_tf` (`optional`): Tests the pipeline on a real pipeline where the results are supposed to
make sense. These tests are slow and should be marked as such. Here the goal is to showcase the pipeline and to make
sure there is no drift in future releases.
Finally, you should also implement the following 4 tests.
1. [test_small_model_pt](https://github.com/huggingface/transformers/blob/db70426854fe7850f2c5834d633aff637f14772e/tests/pipelines/test_pipelines_text_classification.py#L59) and [test_small_model_tf](https://github.com/huggingface/transformers/blob/db70426854fe7850f2c5834d633aff637f14772e/tests/pipelines/test_pipelines_text_classification.py#L150), use a small model for these pipelines to make sure they return the correct outputs. The results don't have to make sense. Each pipeline should return the same result.
1. [test_large_model_pt](https://github.com/huggingface/transformers/blob/db70426854fe7850f2c5834d633aff637f14772e/tests/pipelines/test_pipelines_zero_shot_image_classification.py#L187) nad [test_large_model_tf](https://github.com/huggingface/transformers/blob/db70426854fe7850f2c5834d633aff637f14772e/tests/pipelines/test_pipelines_zero_shot_image_classification.py#L220), use a realistic model for these pipelines to make sure they return meaningful results. These tests are slow and should be marked as slow.
@ -13,419 +13,6 @@ specific language governing permissions and limitations under the License.
rendered properly in your Markdown viewer.
-->
# Agents and tools
[[open-in-colab]]
### What is an agent?
Large Language Models (LLMs) trained to perform [causal language modeling](./tasks/language_modeling) can tackle a wide range of tasks, but they often struggle with basic tasks like logic, calculation, and search. When prompted in domains in which they do not perform well, they often fail to generate the answer we expect them to.
One approach to overcome this weakness is to create an *agent*.
An agent is a system that uses an LLM as its engine, and it has access to functions called *tools*.
These *tools* are functions for performing a task, and they contain all necessary description for the agent to properly use them.
The agent can be programmed to:
- devise a series of actions/tools and run them all at once, like the [`CodeAgent`]
- plan and execute actions/tools one by one and wait for the outcome of each action before launching the next one, like the [`ReactJsonAgent`]
### Types of agents
#### Code agent
This agent has a planning step, then generates python code to execute all its actions at once. It natively handles different input and output types for its tools, thus it is the recommended choice for multimodal tasks.
#### React agents
This is the go-to agent to solve reasoning tasks, since the ReAct framework ([Yao et al., 2022](https://huggingface.co/papers/2210.03629)) makes it really efficient to think on the basis of its previous observations.
We implement two versions of ReactJsonAgent:
- [`ReactJsonAgent`] generates tool calls as a JSON in its output.
- [`ReactCodeAgent`] is a new type of ReactJsonAgent that generates its tool calls as blobs of code, which works really well for LLMs that have strong coding performance.
> [!TIP]
> Read [Open-source LLMs as LangChain Agents](https://huggingface.co/blog/open-source-llms-as-agents) blog post to learn more about ReAct agents.
- an LLM to power your agent - the agent is not exactly the LLM, it’s more like the agent is a program that uses an LLM as its engine.
- a system prompt: what the LLM engine will be prompted with to generate its output
- a toolbox from which the agent pick tools to execute
- a parser to extract from the LLM output which tools are to call and with which arguments
Upon initialization of the agent system, the tool attributes are used to generate a tool description, then baked into the agent’s `system_prompt` to let it know which tools it can use and why.
To start with, please install the `agents` extras in order to install all default dependencies.
```bash
pip install transformers[agents]
```
Build your LLM engine by defining a `llm_engine` method which accepts a list of [messages](./chat_templating) and returns text. This callable also needs to accept a `stop` argument that indicates when to stop generating.
1. it follows the [messages format](./chat_templating) (`List[Dict[str, str]]`) for its input `messages`, and it returns a `str`.
2. it stops generating outputs at the sequences passed in the argument `stop_sequences`
Additionally, `llm_engine` can also take a `grammar` argument. In the case where you specify a `grammar` upon agent initialization, this argument will be passed to the calls to llm_engine, with the `grammar` that you defined upon initialization, to allow [constrained generation](https://huggingface.co/docs/text-generation-inference/conceptual/guidance) in order to force properly-formatted agent outputs.
You will also need a `tools` argument which accepts a list of `Tools` - it can be an empty list. You can also add the default toolbox on top of your `tools` list by defining the optional argument `add_base_tools=True`.
Now you can create an agent, like [`CodeAgent`], and run it. You can also create a [`TransformersEngine`] with a pre-initialized pipeline to run inference on your local machine using `transformers`.
For convenience, since agentic behaviours generally require stronger models such as `Llama-3.1-70B-Instruct` that are harder to run locally for now, we also provide the [`HfApiEngine`] class that initializes a `huggingface_hub.InferenceClient` under the hood.
agent.run("Why does Mike not know many people in New York?",audio="https://huggingface.co/datasets/huggingface/documentation-images/resolve/main/transformers/recording.mp3")
```
The prompt and output parser were automatically defined, but you can easily inspect them by calling the `system_prompt_template` on your agent.
```python
print(agent.system_prompt_template)
```
It's important to explain as clearly as possible the task you want to perform.
Every [`~Agent.run`] operation is independent, and since an agent is powered by an LLM, minor variations in your prompt might yield completely different results.
You can also run an agent consecutively for different tasks: each time the attributes `agent.task` and `agent.logs` will be re-initialized.
#### Code execution
A Python interpreter executes the code on a set of inputs passed along with your tools.
This should be safe because the only functions that can be called are the tools you provided (especially if it's only tools by Hugging Face) and the print function, so you're already limited in what can be executed.
The Python interpreter also doesn't allow imports by default outside of a safe list, so all the most obvious attacks shouldn't be an issue.
You can still authorize additional imports by passing the authorized modules as a list of strings in argument `additional_authorized_imports` upon initialization of your [`ReactCodeAgent`] or [`CodeAgent`]:
>>>agent.run("Could you get me the title of the page at url 'https://huggingface.co/blog'?")
(...)
'Hugging Face – Blog'
```
The execution will stop at any code trying to perform an illegal operation or if there is a regular Python error with the code generated by the agent.
> [!WARNING]
> The LLM can generate arbitrary code that will then be executed: do not add any unsafe imports!
### The system prompt
An agent, or rather the LLM that drives the agent, generates an output based on the system prompt. The system prompt can be customized and tailored to the intended task. For example, check the system prompt for the [`ReactCodeAgent`] (below version is slightly simplified).
```text
You will be given a task to solve as best you can.
You have access to the following tools:
<<tool_descriptions>>
To solve the task, you must plan forward to proceed in a series of steps, in a cycle of 'Thought:', 'Code:', and 'Observation:' sequences.
At each step, in the 'Thought:' sequence, you should first explain your reasoning towards solving the task, then the tools that you want to use.
Then in the 'Code:' sequence, you should write the code in simple Python. The code sequence must end with '/End code' sequence.
During each intermediate step, you can use 'print()' to save whatever important information you will then need.
These print outputs will then be available in the 'Observation:' field, for using this information as input for the next step.
In the end you have to return a final answer using the `final_answer` tool.
Here are a few examples using notional tools:
---
{examples}
Above example were using notional tools that might not exist for you. You only have acces to those tools:
<<tool_names>>
You also can perform computations in the python code you generate.
Always provide a 'Thought:' and a 'Code:\n```py' sequence ending with '```<end_code>' sequence. You MUST provide at least the 'Code:' sequence to move forward.
Remember to not perform too many operations in a single code block! You should split the task into intermediate code blocks.
Print results at the end of each step to save the intermediate results. Then use final_answer() to return the final result.
Remember to make sure that variables you use are all defined.
Now Begin!
```
The system prompt includes:
- An *introduction* that explains how the agent should behave and what tools are.
- A description of all the tools that is defined by a `<<tool_descriptions>>` token that is dynamically replaced at runtime with the tools defined/chosen by the user.
- The tool description comes from the tool attributes, `name`, `description`, `inputs` and `output_type`, and a simple `jinja2` template that you can refine.
- The expected output format.
You could improve the system prompt, for example, by adding an explanation of the output format.
For maximum flexibility, you can overwrite the whole system prompt template by passing your custom prompt as an argument to the `system_prompt` parameter.
> Please make sure to define the `<<tool_descriptions>>` string somewhere in the `template` so the agent is aware
of the available tools.
### Inspecting an agent run
Here are a few useful attributes to inspect what happened after a run:
-`agent.logs` stores the fine-grained logs of the agent. At every step of the agent's run, everything gets stored in a dictionary that then is appended to `agent.logs`.
- Running `agent.write_inner_memory_from_logs()` creates an inner memory of the agent's logs for the LLM to view, as a list of chat messages. This method goes over each step of the log and only stores what it's interested in as a message: for instance, it will save the system prompt and task in separate messages, then for each step it will store the LLM output as a message, and the tool call output as another message. Use this if you want a higher-level view of what has happened - but not every log will be transcripted by this method.
## Tools
A tool is an atomic function to be used by an agent.
You can for instance check the [`PythonInterpreterTool`]: it has a name, a description, input descriptions, an output type, and a `__call__` method to perform the action.
When the agent is initialized, the tool attributes are used to generate a tool description which is baked into the agent's system prompt. This lets the agent know which tools it can use and why.
### Default toolbox
Transformers comes with a default toolbox for empowering agents, that you can add to your agent upon initialization with argument `add_base_tools = True`:
- **Document question answering**: given a document (such as a PDF) in image format, answer a question on this document ([Donut](./model_doc/donut))
- **Image question answering**: given an image, answer a question on this image ([VILT](./model_doc/vilt))
- **Speech to text**: given an audio recording of a person talking, transcribe the speech into text ([Whisper](./model_doc/whisper))
- **Text to speech**: convert text to speech ([SpeechT5](./model_doc/speecht5))
- **Translation**: translates a given sentence from source language to target language.
- **DuckDuckGo search***: performs a web search using DuckDuckGo browser.
- **Python code interpreter**: runs your the LLM generated Python code in a secure environment. This tool will only be added to [`ReactJsonAgent`] if you initialize it with `add_base_tools=True`, since code-based agent can already natively execute Python code
You can manually use a tool by calling the [`load_tool`] function and a task to perform.
```python
fromtransformersimportload_tool
tool=load_tool("text-to-speech")
audio=tool("This is a text to speech tool")
```
### Create a new tool
You can create your own tool for use cases not covered by the default tools from Hugging Face.
For example, let's create a tool that returns the most downloaded model for a given task from the Hub.
- A clear name. The name usually describes what the tool does. Since the code returns the model with the most downloads for a task, let's put `model_download_tool`.
- Type hints on both inputs and output
- A description, that includes an 'Args:' part where each argument is described (without a type indication this time, it will be pulled from the type hint).
All these will be automatically baked into the agent's system prompt upon initialization: so strive to make them as clear as possible!
> [!TIP]
> This definition format is the same as tool schemas used in `apply_chat_template`, the only difference is the added `tool` decorator: read more on our tool use API [here](https://huggingface.co/blog/unified-tool-use#passing-tools-to-a-chat-template).
print(f"The most downloaded model for the 'text-to-video' task is {most_downloaded_model}.")
====
```
And the output:
`"The most downloaded model for the 'text-to-video' task is ByteDance/AnimateDiff-Lightning."`
### Manage your agent's toolbox
If you have already initialized an agent, it is inconvenient to reinitialize it from scratch with a tool you want to use. With Transformers, you can manage an agent's toolbox by adding or replacing a tool.
Let's add the `model_download_tool` to an existing agent initialized with only the default toolbox.
> Beware when adding tools to an agent that already works well because it can bias selection towards your tool or select another tool other than the one already defined.
Use the `agent.toolbox.update_tool()` method to replace an existing tool in the agent's toolbox.
This is useful if your new tool is a one-to-one replacement of the existing tool because the agent already knows how to perform that specific task.
Just make sure the new tool follows the same API as the replaced tool or adapt the system prompt template to ensure all examples using the replaced tool are updated.
### Use a collection of tools
You can leverage tool collections by using the ToolCollection object, with the slug of the collection you want to use.
Then pass them as a list to initialize you agent, and start using them!
> Agents and tools were spun out into the standalone [smolagents](https://huggingface.co/docs/smolagents/index) library. They were removed from `transformers` in v4.52.
<!--Copyright 2024 The HuggingFace Team. All rights reserved.
Licensed under the Apache License, Version 2.0 (the "License"); you may not use this file except in compliance with
the License. You may obtain a copy of the License at
http://www.apache.org/licenses/LICENSE-2.0
Unless required by applicable law or agreed to in writing, software distributed under the License is distributed on
an "AS IS" BASIS, WITHOUT WARRANTIES OR CONDITIONS OF ANY KIND, either express or implied. See the License for the
specific language governing permissions and limitations under the License.
⚠️ Note that this file is in Markdown but contain specific syntax for our doc-builder (similar to MDX) that may not be
rendered properly in your Markdown viewer.
-->
# Agents, supercharged - Multi-agents, External tools, and more
[[open-in-colab]]
### What is an agent?
> [!TIP]
> If you're new to `transformers.agents`, make sure to first read the main [agents documentation](./agents).
In this page we're going to highlight several advanced uses of `transformers.agents`.
## Multi-agents
Multi-agent has been introduced in Microsoft's framework [Autogen](https://huggingface.co/papers/2308.08155).
It simply means having several agents working together to solve your task instead of only one.
It empirically yields better performance on most benchmarks. The reason for this better performance is conceptually simple: for many tasks, rather than using a do-it-all system, you would prefer to specialize units on sub-tasks. Here, having agents with separate tool sets and memories allows to achieve efficient specialization.
You can easily build hierarchical multi-agent systems with `transformers.agents`.
To do so, encapsulate the agent in a [`ManagedAgent`] object. This object needs arguments `agent`, `name`, and a `description`, which will then be embedded in the manager agent's system prompt to let it know how to call this managed agent, as we also do for tools.
Here's an example of making an agent that managed a specific web search agent using our [`DuckDuckGoSearchTool`]:
manager_agent.run("Who is the CEO of Hugging Face?")
```
> [!TIP]
> For an in-depth example of an efficient multi-agent implementation, see [how we pushed our multi-agent system to the top of the GAIA leaderboard](https://huggingface.co/blog/beating-gaia).
## Advanced tool usage
### Directly define a tool by subclassing Tool, and share it to the Hub
Let's take again the tool example from main documentation, for which we had implemented a `tool` decorator.
If you need to add variation, like custom attributes for your tool, you can build your tool following the fine-grained method: building a class that inherits from the [`Tool`] superclass.
The custom tool needs:
- An attribute `name`, which corresponds to the name of the tool itself. The name usually describes what the tool does. Since the code returns the model with the most downloads for a task, let's name it `model_download_counter`.
- An attribute `description` is used to populate the agent's system prompt.
- An `inputs` attribute, which is a dictionary with keys `"type"` and `"description"`. It contains information that helps the Python interpreter make educated choices about the input.
- An `output_type` attribute, which specifies the output type.
- A `forward` method which contains the inference code to be executed.
The types for both `inputs` and `output_type` should be amongst [Pydantic formats](https://docs.pydantic.dev/latest/concepts/json_schema/#generating-json-schema).
```python
fromtransformersimportTool
fromhuggingface_hubimportlist_models
classHFModelDownloadsTool(Tool):
name="model_download_counter"
description="""
This is a tool that returns the most downloaded model of a given task on the Hugging Face Hub.
It returns the name of the checkpoint."""
inputs={
"task":{
"type":"string",
"description":"the task category (such as text-classification, depth-estimation, etc)",
Now that the custom `HfModelDownloadsTool` class is ready, you can save it to a file named `model_downloads.py` and import it for use.
```python
frommodel_downloadsimportHFModelDownloadsTool
tool=HFModelDownloadsTool()
```
You can also share your custom tool to the Hub by calling [`~Tool.push_to_hub`] on the tool. Make sure you've created a repository for it on the Hub and are using a token with read access.
You can directly import a Space from the Hub as a tool using the [`Tool.from_space`] method!
You only need to provide the id of the Space on the Hub, its name, and a description that will help you agent understand what the tool does. Under the hood, this will use [`gradio-client`](https://pypi.org/project/gradio-client/) library to call the Space.
For instance, let's import the [FLUX.1-dev](https://huggingface.co/black-forest-labs/FLUX.1-dev) Space from the Hub and use it to generate an image.
Then you can use this tool just like any other tool. For example, let's improve the prompt `a rabbit wearing a space suit` and generate an image of it.
"Improve this prompt, then generate an image of it.",prompt='A rabbit wearing a space suit'
)
```
```text
=== Agent thoughts:
improved_prompt could be "A bright blue space suit wearing rabbit, on the surface of the moon, under a bright orange sunset, with the Earth visible in the background"
Now that I have improved the prompt, I can use the image generator tool to generate an image based on this prompt.
>>> Agent is executing the code below:
image = image_generator(prompt="A bright blue space suit wearing rabbit, on the surface of the moon, under a bright orange sunset, with the Earth visible in the background")
[gradio-tools](https://github.com/freddyaboulton/gradio-tools) is a powerful library that allows using Hugging
Face Spaces as tools. It supports many existing Spaces as well as custom Spaces.
Transformers supports `gradio_tools` with the [`Tool.from_gradio`] method. For example, let's use the [`StableDiffusionPromptGeneratorTool`](https://github.com/freddyaboulton/gradio-tools/blob/main/gradio_tools/tools/prompt_generator.py) from `gradio-tools` toolkit for improving prompts to generate better images.
Import and instantiate the tool, then pass it to the `Tool.from_gradio` method:
> gradio-tools require *textual* inputs and outputs even when working with different modalities like image and audio objects. Image and audio inputs and outputs are currently incompatible.
### Use LangChain tools
We love Langchain and think it has a very compelling suite of tools.
To import a tool from LangChain, use the `from_langchain()` method.
Here is how you can use it to recreate the intro's search result using a LangChain web search tool.
This tool will need `pip install google-search-results` to work properly.
agent.run("How many more blocks (also denoted as layers) are in BERT base encoder compared to the encoder from the architecture proposed in Attention is All You Need?")
```
## Display your agent run in a cool Gradio interface
You can leverage `gradio.Chatbot` to display your agent's thoughts using `stream_to_gradio`, here is an example:
<!--Copyright 2025 The HuggingFace Team. All rights reserved.
Licensed under the Apache License, Version 2.0 (the "License"); you may not use this file except in compliance with
the License. You may obtain a copy of the License at
http://www.apache.org/licenses/LICENSE-2.0
Unless required by applicable law or agreed to in writing, software distributed under the License is distributed on
an "AS IS" BASIS, WITHOUT WARRANTIES OR CONDITIONS OF ANY KIND, either express or implied. See the License for the
⚠️ Note that this file is in Markdown but contain specific syntax for our doc-builder (similar to MDX) that may not be
rendered properly in your Markdown viewer.
-->
# Attention Interface
This page describes how to use the `AttentionInterface` in order to register custom attention functions to use with
supported models.
## Customizing attention function
Most recent models can now switch from one attention function used in the Attention layer to the other, thanks to a simple mapping.
By default, we provide the implementation for [`sdpa`](https://pytorch.org/docs/stable/generated/torch.nn.functional.scaled_dot_product_attention.html),
[`flash_attention_2`](https://github.com/Dao-AILab/flash-attention) and [`flex_attention`](https://pytorch.org/docs/stable/nn.attention.flex_attention.html#module-torch.nn.attention.flex_attention)
as well as `eager`, which is a simple matrix multiplication without any optimization on top.
This is the setting you can usually choose when instantiating a model:
# Try running the forward with the new attention function
model(torch.ones(1,5,dtype=int))
```
You will see it prints "I just entered the attention computation" as many times as there are layers in the model (with this example, 16 times).
## Dynamically switching attention function
You could dynamically change the model's attention function as well, by overriding the `config._attn_implementation` field:
```python
# Back to use original sdpa implementation
model.config._attn_implementation="sdpa"
model(torch.ones(1,5,dtype=int))
```
and it will stop printing the statements, as it now uses the `sdpa` attention.
This allows to quickly change an attention function, without needing to reload the model!
## What about new args needed in my custom attention function?
But indeed, what if the new function requires a new arg to be properly used? It's no issue! Models supporting the
`AttentionInterface` propagate kwargs all the way to the Attention layers, and to the used attention function. That way,
you can simply pass the arg (as a kwargs, i.e. you need to qualify the name of the arg) in the model's forward, and it will be correctly used in the attention. However, custom attention functions have some limitations. In particular, it must follow the signature and return format of other attention functions, i.e.
If in doubt about what args/kwargs a given model sends to the attention function, simply check that model's modeling code on [GitHub](https://github.com/huggingface/transformers/tree/main/src/transformers/models)!
## Accessing current available implementations
Most of the time, you will simply need to `register` a new function. If, however, you need to access an existing one,
and/or perform a few checks, the prefered way is to use the global `ALL_ATTENTION_FUNCTIONS`. It behaves the same way you
<!--Copyright 2022 The HuggingFace Team. All rights reserved.
Licensed under the Apache License, Version 2.0 (the "License"); you may not use this file except in compliance with
the License. You may obtain a copy of the License at
http://www.apache.org/licenses/LICENSE-2.0
Unless required by applicable law or agreed to in writing, software distributed under the License is distributed on
an "AS IS" BASIS, WITHOUT WARRANTIES OR CONDITIONS OF ANY KIND, either express or implied. See the License for the
specific language governing permissions and limitations under the License.
⚠️ Note that this file is in Markdown but contain specific syntax for our doc-builder (similar to MDX) that may not be
rendered properly in your Markdown viewer.
-->
# Load pretrained instances with an AutoClass
With so many different Transformer architectures, it can be challenging to create one for your checkpoint. As a part of 🤗 Transformers core philosophy to make the library easy, simple and flexible to use, an `AutoClass` automatically infers and loads the correct architecture from a given checkpoint. The `from_pretrained()` method lets you quickly load a pretrained model for any architecture so you don't have to devote time and resources to train a model from scratch. Producing this type of checkpoint-agnostic code means if your code works for one checkpoint, it will work with another checkpoint - as long as it was trained for a similar task - even if the architecture is different.
<Tip>
Remember, architecture refers to the skeleton of the model and checkpoints are the weights for a given architecture. For example, [BERT](https://huggingface.co/google-bert/bert-base-uncased) is an architecture, while `google-bert/bert-base-uncased` is a checkpoint. Model is a general term that can mean either architecture or checkpoint.
</Tip>
In this tutorial, learn to:
* Load a pretrained tokenizer.
* Load a pretrained image processor
* Load a pretrained feature extractor.
* Load a pretrained processor.
* Load a pretrained model.
* Load a model as a backbone.
## AutoTokenizer
Nearly every NLP task begins with a tokenizer. A tokenizer converts your input into a format that can be processed by the model.
Load a tokenizer with [`AutoTokenizer.from_pretrained`]:
<figcaptionclass="mt-2 text-center text-sm text-gray-500">A Swin backbone with multiple stages for outputting a feature map.</figcaption>
</div>
The [`AutoBackbone`] lets you use pretrained models as backbones to get feature maps from different stages of the backbone. You should specify one of the following parameters in [`~PretrainedConfig.from_pretrained`]:
*`out_indices` is the index of the layer you'd like to get the feature map from
*`out_features` is the name of the layer you'd like to get the feature map from
These parameters can be used interchangeably, but if you use both, make sure they're aligned with each other! If you don't pass any of these parameters, the backbone returns the feature map from the last layer.
<figcaptionclass="mt-2 text-center text-sm text-gray-500">A feature map from the first stage of the backbone. The patch partition refers to the model stem.</figcaption>
</div>
For example, in the above diagram, to return the feature map from the first stage of the Swin backbone, you can set `out_indices=(1,)`:
Multimodal tasks require a processor that combines two types of preprocessing tools. For example, the [LayoutLMV2](model_doc/layoutlmv2) model requires an image processor to handle images and a tokenizer to handle text; a processor combines both of them.
Load a processor with [`AutoProcessor.from_pretrained`]:
The `AutoModelFor` classes let you load a pretrained model for a given task (see [here](model_doc/auto) for a complete list of available tasks). For example, load a model for sequence classification with [`AutoModelForSequenceClassification.from_pretrained`].
> [!WARNING]
> By default, the weights are loaded in full precision (torch.float32) regardless of the actual data type the weights are stored in such as torch.float16. Set `torch_dtype="auto"` to load the weights in the data type defined in a model's `config.json` file to automatically load the most memory-optimal data type.
For PyTorch models, the `from_pretrained()` method uses `torch.load()` which internally uses `pickle` and is known to be insecure. In general, never load a model that could have come from an untrusted source, or that could have been tampered with. This security risk is partially mitigated for public models hosted on the Hugging Face Hub, which are [scanned for malware](https://huggingface.co/docs/hub/security-malware) at each commit. See the [Hub documentation](https://huggingface.co/docs/hub/security) for best practices like [signed commit verification](https://huggingface.co/docs/hub/security-gpg#signing-commits-with-gpg) with GPG.
TensorFlow and Flax checkpoints are not affected, and can be loaded within PyTorch architectures using the `from_tf` and `from_flax` kwargs for the `from_pretrained` method to circumvent this issue.
</Tip>
Generally, we recommend using the `AutoTokenizer` class and the `AutoModelFor` class to load pretrained instances of models. This will ensure you load the correct architecture every time. In the next [tutorial](preprocessing), learn how to use your newly loaded tokenizer, image processor, feature extractor and processor to preprocess a dataset for fine-tuning.
</pt>
<tf>
Finally, the `TFAutoModelFor` classes let you load a pretrained model for a given task (see [here](model_doc/auto) for a complete list of available tasks). For example, load a model for sequence classification with [`TFAutoModelForSequenceClassification.from_pretrained`]:
Generally, we recommend using the `AutoTokenizer` class and the `TFAutoModelFor` class to load pretrained instances of models. This will ensure you load the correct architecture every time. In the next [tutorial](preprocessing), learn how to use your newly loaded tokenizer, image processor, feature extractor and processor to preprocess a dataset for fine-tuning.
<!--Copyright 2024 The HuggingFace Team. All rights reserved.
Licensed under the Apache License, Version 2.0 (the "License"); you may not use this file except in compliance with
the License. You may obtain a copy of the License at
http://www.apache.org/licenses/LICENSE-2.0
Unless required by applicable law or agreed to in writing, software distributed under the License is distributed on
an "AS IS" BASIS, WITHOUT WARRANTIES OR CONDITIONS OF ANY KIND, either express or implied. See the License for the
specific language governing permissions and limitations under the License.
⚠️ Note that this file is in Markdown but contain specific syntax for our doc-builder (similar to MDX) that may not be
rendered properly in your Markdown viewer.
-->
# Backbones
Higher-level computer visions tasks, such as object detection or image segmentation, use several models together to generate a prediction. A separate model is used for the *backbone*, neck, and head. The backbone extracts useful features from an input image into a feature map, the neck combines and processes the feature maps, and the head uses them to make a prediction.
Load a backbone with [`~PretrainedConfig.from_pretrained`] and use the `out_indices` parameter to determine which layer, given by the index, to extract a feature map from.
This guide describes the backbone class, backbones from the [timm](https://hf.co/docs/timm/index) library, and how to extract features with them.
## Backbone classes
There are two backbone classes.
- [`~transformers.utils.BackboneMixin`] allows you to load a backbone and includes functions for extracting the feature maps and indices.
- [`~transformers.utils.BackboneConfigMixin`] allows you to set the feature map and indices of a backbone configuration.
Refer to the [Backbone](./main_classes/backbones) API documentation to check which models support a backbone.
There are two ways to load a Transformers backbone, [`AutoBackbone`] and a model-specific backbone class.
<hfoptionsid="backbone-classes">
<hfoptionid="AutoBackbone">
The [AutoClass](./model_doc/auto) API automatically loads a pretrained vision model with [`~PretrainedConfig.from_pretrained`] as a backbone if it's supported.
Set the `out_indices` parameter to the layer you'd like to get the feature map from. If you know the name of the layer, you could also use `out_features`. These parameters can be used interchangeably, but if you use both, make sure they refer to the same layer.
When `out_indices` or `out_features` isn't used, the backbone returns the feature map from the last layer. The example code below uses `out_indices=(1,)` to get the feature map from the first layer.
When you know a model supports a backbone, you can load the backbone and neck directly into the models configuration. Pass the configuration to the model to initialize it for a task.
The example below loads a [ResNet](./model_doc/resnet) backbone and neck for use in a [MaskFormer](./model_doc/maskformer) instance segmentation head.
Set `backbone` to a pretrained model and `use_pretrained_backbone=True` to use pretrained weights instead of randomly initialized weights.
[timm](https://hf.co/docs/timm/index) is a collection of vision models for training and inference. Transformers supports timm models as backbones with the [`TimmBackbone`] and [`TimmBackboneConfig`] classes.
Set `use_timm_backbone=True` to load pretrained timm weights, and `use_pretrained_backbone` to use pretrained or randomly initialized weights.
<!--Copyright 2020 The HuggingFace Team. All rights reserved.
Licensed under the Apache License, Version 2.0 (the "License"); you may not use this file except in compliance with
the License. You may obtain a copy of the License at
http://www.apache.org/licenses/LICENSE-2.0
Unless required by applicable law or agreed to in writing, software distributed under the License is distributed on
an "AS IS" BASIS, WITHOUT WARRANTIES OR CONDITIONS OF ANY KIND, either express or implied. See the License for the
specific language governing permissions and limitations under the License.
⚠️ Note that this file is in Markdown but contain specific syntax for our doc-builder (similar to MDX) that may not be
rendered properly in your Markdown viewer.
-->
# BERTology
There is a growing field of study concerned with investigating the inner working of large-scale transformers like BERT
(that some call "BERTology"). Some good examples of this field are:
- BERT Rediscovers the Classical NLP Pipeline by Ian Tenney, Dipanjan Das, Ellie Pavlick:
https://arxiv.org/abs/1905.05950
- Are Sixteen Heads Really Better than One? by Paul Michel, Omer Levy, Graham Neubig: https://arxiv.org/abs/1905.10650
- What Does BERT Look At? An Analysis of BERT's Attention by Kevin Clark, Urvashi Khandelwal, Omer Levy, Christopher D.
Manning: https://arxiv.org/abs/1906.04341
- CAT-probing: A Metric-based Approach to Interpret How Pre-trained Models for Programming Language Attend Code Structure: https://arxiv.org/abs/2210.04633
In order to help this new field develop, we have included a few additional features in the BERT/GPT/GPT-2 models to
help people access the inner representations, mainly adapted from the great work of Paul Michel
(https://arxiv.org/abs/1905.10650):
- accessing all the hidden-states of BERT/GPT/GPT-2,
- accessing all the attention weights for each head of BERT/GPT/GPT-2,
- retrieving heads output values and gradients to be able to compute head importance score and prune head as explained
in https://arxiv.org/abs/1905.10650.
To help you understand and use these features, we have added a specific example script: [bertology.py](https://github.com/huggingface/transformers/tree/main/examples/research_projects/bertology/run_bertology.py) which extracts information and prune a model pre-trained on
<!--Copyright 2022 The HuggingFace Team. All rights reserved.
Licensed under the Apache License, Version 2.0 (the "License"); you may not use this file except in compliance with
the License. You may obtain a copy of the License at
http://www.apache.org/licenses/LICENSE-2.0
Unless required by applicable law or agreed to in writing, software distributed under the License is distributed on
an "AS IS" BASIS, WITHOUT WARRANTIES OR CONDITIONS OF ANY KIND, either express or implied. See the License for the
specific language governing permissions and limitations under the License.
⚠️ Note that this file is in Markdown but contain specific syntax for our doc-builder (similar to MDX) that may not be
rendered properly in your Markdown viewer.
-->
# Instantiate a big model
A barrier to accessing very large pretrained models is the amount of memory required. When loading a pretrained PyTorch model, you usually:
1. Create a model with random weights.
2. Load your pretrained weights.
3. Put those pretrained weights in the model.
The first two steps both require a full version of the model in memory and if the model weighs several GBs, you may not have enough memory for two copies of it. This problem is amplified in distributed training environments because each process loads a pretrained model and stores two copies in memory.
> [!TIP]
> The randomly created model is initialized with "empty" tensors, which take space in memory without filling it. The random values are whatever was in this chunk of memory at the time. To improve loading speed, the [`_fast_init`](https://github.com/huggingface/transformers/blob/c9f6e5e35156e068b227dd9b15521767f6afd4d2/src/transformers/modeling_utils.py#L2710) parameter is set to `True` by default to skip the random initialization for all weights that are correctly loaded.
This guide will show you how Transformers can help you load large pretrained models despite their memory requirements.
## Sharded checkpoints
From Transformers v4.18.0, a checkpoint larger than 10GB is automatically sharded by the [`~PreTrainedModel.save_pretrained`] method. It is split into several smaller partial checkpoints and creates an index file that maps parameter names to the files they're stored in.
The maximum shard size is controlled with the `max_shard_size` parameter, but by default it is 5GB, because it is easier to run on free-tier GPU instances without running out of memory.
For example, let's shard [BioMistral/BioMistral-7B](https://hf.co/BioMistral/BioMistral-7B).
The main advantage of sharded checkpoints for big models is that each shard is loaded after the previous one, which caps the memory usage to only the model size and the largest shard size.
You could also directly load a sharded checkpoint inside a model without the [`~PreTrainedModel.from_pretrained`] method (similar to PyTorch's `load_state_dict()` method for a full checkpoint). In this case, use the [`~modeling_utils.load_sharded_checkpoint`] method.
The index file determines which keys are in the checkpoint and where the corresponding weights are stored. This file is loaded like any other JSON file and you can get a dictionary from it.
> Make sure you have Accelerate v0.9.0 or later and PyTorch v1.9.0 or later installed.
From Transformers v4.20.0, the [`~PreTrainedModel.from_pretrained`] method is supercharged with Accelerate's [Big Model Inference](https://hf.co/docs/accelerate/usage_guides/big_modeling) feature to efficiently handle really big models! Big Model Inference creates a *model skeleton* on PyTorch's [**meta**](https://pytorch.org/docs/main/meta.html) device. The randomly initialized parameters are only created when the pretrained weights are loaded. This way, you aren't keeping two copies of the model in memory at the same time (one for the randomly initialized model and one for the pretrained weights), and the maximum memory consumed is only the full model size.
To enable Big Model Inference in Transformers, set `low_cpu_mem_usage=True` in the [`~PreTrainedModel.from_pretrained`] method.
Accelerate automatically dispatches the model weights across all available devices, starting with the fastest device (GPU) first and then offloading to the slower devices (CPU and even hard drive). This is enabled by setting `device_map="auto"` in the [`~PreTrainedModel.from_pretrained`] method. When you pass the `device_map` parameter, `low_cpu_mem_usage` is automatically set to `True` so you don't need to specify it.
You can also write your own `device_map` by mapping each layer to a device. It should map all model parameters to a device, but you don't have to detail where all the submodules of a layer go if the entire layer is on the same device.
Access `hf_device_map` attribute to see how Accelerate split the model across devices.
```py
gemma.hf_device_map
```
```python out
{'model.embed_tokens': 0,
'model.layers.0': 0,
'model.layers.1': 0,
'model.layers.2': 0,
'model.layers.3': 0,
'model.layers.4': 0,
'model.layers.5': 0,
'model.layers.6': 0,
'model.layers.7': 0,
'model.layers.8': 0,
'model.layers.9': 0,
'model.layers.10': 0,
'model.layers.11': 0,
'model.layers.12': 0,
'model.layers.13': 0,
'model.layers.14': 'cpu',
'model.layers.15': 'cpu',
'model.layers.16': 'cpu',
'model.layers.17': 'cpu',
'model.layers.18': 'cpu',
'model.layers.19': 'cpu',
'model.layers.20': 'cpu',
'model.layers.21': 'cpu',
'model.layers.22': 'cpu',
'model.layers.23': 'cpu',
'model.layers.24': 'cpu',
'model.layers.25': 'cpu',
'model.layers.26': 'cpu',
'model.layers.27': 'cpu',
'model.layers.28': 'cpu',
'model.layers.29': 'cpu',
'model.layers.30': 'cpu',
'model.layers.31': 'cpu',
'model.norm': 'cpu',
'lm_head': 'cpu'}
```
## Model data type
PyTorch model weights are normally instantiated as torch.float32 and it can be an issue if you try to load a model as a different data type. For example, you'd need twice as much memory to load the weights in torch.float32 and then again to load them in your desired data type, like torch.float16.
> [!WARNING]
> Due to how PyTorch is designed, the `torch_dtype` parameter only supports floating data types.
To avoid wasting memory like this, explicitly set the `torch_dtype` parameter to the desired data type or set `torch_dtype="auto"` to load the weights with the most optimal memory pattern (the data type is automatically derived from the model weights).
<!--Copyright 2024 The HuggingFace Team. All rights reserved.
Licensed under the Apache License, Version 2.0 (the "License"); you may not use this file except in compliance with
the License. You may obtain a copy of the License at
http://www.apache.org/licenses/LICENSE-2.0
Unless required by applicable law or agreed to in writing, software distributed under the License is distributed on
an "AS IS" BASIS, WITHOUT WARRANTIES OR CONDITIONS OF ANY KIND, either express or implied. See the License for the
specific language governing permissions and limitations under the License.
⚠️ Note that this file is in Markdown but contains specific syntax for our doc-builder (similar to MDX) that may not be
rendered properly in your Markdown viewer.
-->
# Caching
Imagine you’re having a conversation with someone, and instead of remembering what they previously said, they have to start from scratch every time you respond. This would be slow and inefficient, right?
You can extend this analogy to transformer models. Autoregressive model generation can be slow because it makes a prediction one token at a time. Each new prediction is dependent on all the previous context.
To predict the 1000th token, the model requires information from the previous 999 tokens. The information is represented as matrix multiplications across the token representations.
To predict the 1001th token, you need the same information from the previous 999 tokens in addition to any information from the 1000th token. This is a lot of matrix multiplications a model has to compute over and over for each token!
A key-value (KV) cache eliminates this inefficiency by storing kv pairs derived from the attention layers of previously processed tokens. The stored kv pairs are retrieved from the cache and reused for subsequent tokens, avoiding the need to recompute.
> [!WARNING]
> Caching should only be used for **inference**. It may cause unexpected errors if it's enabled during training.
## Cache class
When you use Transformers' [`Cache`] class, the self-attention module performs several critical steps to integrate past and present information.
1. The attention module concatenates current kv pairs with past kv pairs stored in the cache. This creates attentions weights with the shape `(new_tokens_length, past_kv_length + new_tokens_length)`. The current and past kv pairs are essentially combined to compute the attention scores, ensuring a model is aware of previous context and the current input.
2. When the `forward` method is called iteratively, it's crucial that the attention mask shape matches the combined length of the past and current kv pairs. The attention mask should have the shape `(batch_size, past_kv_length + new_tokens_length)`. This is typically handled internally in [`~GenerationMixin.generate`], but if you want to implement your own generation loop with [`Cache`], keep this in mind! The attention mask should hold the past and current token values.
3. It is also important to be aware of the `cache_position`. This is important if you want to reuse a prefilled [`Cache`] with the `forward` method because you have to pass a valid `cache_position` value. This indicates the input positions in a sequence. `cache_position` is unaffected by padding, and it always adds one more position for each token. For example, if a kv cache contains 10 tokens - regardless of pad tokens - the cache position for the next token should be `torch.tensor([10])`.
The example below demonstrates how to create a generation loop with [`DynamicCache`]. As discussed, the attention mask is a concatenation of past and current token values and `1` is added to the cache position for the next token.
"[INST] Hello, what's your name. [/INST] Hello! My name is LLaMA,"
```
## Legacy cache format
Before the [`Cache`] class, the cache used to be stored as a tuple of tuples of tensors. This format has is dynamic because it grows as text is generated, similar to [`DynamicCache`].
If your project depends on this legacy format, you can convert between [`DynamicCache`] and a tuple of tuples as shown below with the [`~DynamicCache.from_legacy_cache`] and [`DynamicCache.to_legacy_cache`] functions. This is helpful if you have custom logic for manipulating a cache in a specific format.
<!--Copyright 2024 The HuggingFace Team. All rights reserved.
Licensed under the Apache License, Version 2.0 (the "License"); you may not use this file except in compliance with
the License. You may obtain a copy of the License at
http://www.apache.org/licenses/LICENSE-2.0
Unless required by applicable law or agreed to in writing, software distributed under the License is distributed on
an "AS IS" BASIS, WITHOUT WARRANTIES OR CONDITIONS OF ANY KIND, either express or implied. See the License for the
specific language governing permissions and limitations under the License.
⚠️ Note that this file is in Markdown but contain specific syntax for our doc-builder (similar to MDX) that may not be
rendered properly in your Markdown viewer.
-->
# Tools and RAG
The [`~PreTrainedTokenizerBase.apply_chat_template`] method supports virtually any additional argument types - strings, lists, dicts - besides the chat message. This makes it possible to use chat templates for many use cases.
This guide will demonstrate how to use chat templates with tools and retrieval-augmented generation (RAG).
## Tools
Tools are functions a large language model (LLM) can call to perform specific tasks. It is a powerful way to extend the capabilities of conversational agents with real-time information, computational tools, or access to large databases.
Follow the rules below when creating a tool.
1. The function should have a descriptive name.
2. The function arguments must have a type hint in the function header (don't include in the `Args` block).
3. The function must have a [Google-style](https://google.github.io/styleguide/pyguide.html#38-comments-and-docstrings) docstring.
4. The function can have a return type and `Returns` block, but these are optional because most tool use models ignore them.
An example tool to get temperature and wind speed is shown below.
Load a model and tokenizer that supports tool-use like [NousResearch/Hermes-2-Pro-Llama-3-8B](https://hf.co/NousResearch/Hermes-2-Pro-Llama-3-8B), but you can also consider a larger model like [Command-R](./model_doc/cohere) and [Mixtral-8x22B](./model_doc/mixtral) if your hardware can support it.
The chat model called the `get_current_temperature` tool with the correct parameters from the docstring. It inferred France as the location based on Paris, and that it should use Celsius for the units of temperature.
Now append the `get_current_temperature` function and these arguments to the chat message as `tool_call`. The `tool_call` dictionary should be provided to the `assistant` role instead of the `system` or `user`.
> [!WARNING]
> The OpenAI API uses a JSON string as its `tool_call` format. This may cause errors or strange model behavior if used in Transformers, which expects a dict.
The temperature in Paris, France right now is approximately 12°C (53.6°F).<|im_end|>
```
</hfoption>
<hfoptionid="Mistral/Mixtral">
For [Mistral](./model_doc/mistral) and [Mixtral](./model_doc/mixtral) models, you need an additional `tool_call_id`. The `tool_call_id` is 9 randomly generated alphanumeric characters assigned to the `id` key in the `tool_call` dictionary.
[`~PreTrainedTokenizerBase.apply_chat_template`] converts functions into a [JSON schema](https://json-schema.org/learn/getting-started-step-by-step) which is passed to the chat template. A LLM never sees the code inside the function. In other words, a LLM doesn't care how the function works technically, it only cares about function **definition** and **arguments**.
The JSON schema is automatically generated behind the scenes as long as your function follows the [rules](#tools) listed earlier above. But you can use [get_json_schema](https://github.com/huggingface/transformers/blob/14561209291255e51c55260306c7d00c159381a5/src/transformers/utils/chat_template_utils.py#L205) to manually convert a schema for more visibility or debugging.
```py
fromtransformers.utilsimportget_json_schema
defmultiply(a:float,b:float):
"""
A function that multiplies two numbers
Args:
a: The first number to multiply
b: The second number to multiply
"""
returna*b
schema=get_json_schema(multiply)
print(schema)
```
```json
{
"type":"function",
"function":{
"name":"multiply",
"description":"A function that multiplies two numbers",
"parameters":{
"type":"object",
"properties":{
"a":{
"type":"number",
"description":"The first number to multiply"
},
"b":{
"type":"number",
"description":"The second number to multiply"
}
},
"required":["a","b"]
}
}
}
```
You can edit the schema or write one entirely from scratch. This gives you a lot of flexibility to define precise schemas for more complex functions.
> [!WARNING]
> Try keeping your function signatures simple and the arguments to a minimum. These are easier for a model to understand and use than complex functions for example with nested arguments.
The example below demonstrates writing a schema manually and then passing it to [`~PreTrainedTokenizerBase.apply_chat_template`].
```py
# A simple function that takes no arguments
current_time={
"type":"function",
"function":{
"name":"current_time",
"description":"Get the current local time as a string.",
"parameters":{
'type':'object',
'properties':{}
}
}
}
# A more complete function that takes two numerical arguments
multiply={
'type':'function',
'function':{
'name':'multiply',
'description':'A function that multiplies two numbers',
'parameters':{
'type':'object',
'properties':{
'a':{
'type':'number',
'description':'The first number to multiply'
},
'b':{
'type':'number','description':'The second number to multiply'
}
},
'required':['a','b']
}
}
}
model_input=tokenizer.apply_chat_template(
messages,
tools=[current_time,multiply]
)
```
## RAG
Retrieval-augmented generation (RAG) models enhance a models existing knowledge by allowing it to search documents for additional information before returning a query. For RAG models, add a `documents` parameter to [`~PreTrainedTokenizerBase.apply_chat_template`]. This `documents` parameter should be a list of documents, and each document should be a single dict with `title` and `content` keys.
> [!TIP]
> The `documents` parameter for RAG isn't widely supported and many models have chat templates that ignore `documents`. Verify if a model supports `documents` by reading its model card or executing `print(tokenizer.chat_template)` to see if the `documents` key is present. [Command-R](https://hf.co/CohereForAI/c4ai-command-r-08-2024) and [Command-R+](https://hf.co/CohereForAI/c4ai-command-r-plus-08-2024) both support `documents` in their RAG chat templates.
Create a list of documents to pass to the model.
```py
documents=[
{
"title":"The Moon: Our Age-Old Foe",
"text":"Man has always dreamed of destroying the moon. In this essay, I shall..."
},
{
"title":"The Sun: Our Age-Old Friend",
"text":"Although often underappreciated, the sun provides several notable benefits..."
}
]
```
Set `chat_template="rag"` in [`~PreTrainedTokenizerBase.apply_chat_template`] and generate a response.
<!--Copyright 2025 The HuggingFace Team. All rights reserved.
Licensed under the Apache License, Version 2.0 (the "License"); you may not use this file except in compliance with
the License. You may obtain a copy of the License at
http://www.apache.org/licenses/LICENSE-2.0
Unless required by applicable law or agreed to in writing, software distributed under the License is distributed on
an "AS IS" BASIS, WITHOUT WARRANTIES OR CONDITIONS OF ANY KIND, either express or implied. See the License for the
specific language governing permissions and limitations under the License.
⚠️ Note that this file is in Markdown but contains specific syntax for our doc-builder (similar to MDX) that may not be
rendered properly in your Markdown viewer.
-->
# Multimodal templates
Multimodal model chat templates expect a similar [template](./chat_templating) as text-only models. It needs `messages` that includes a dictionary of the `role` and `content`.
Multimodal templates are included in the [Processor](./processors) class and require an additional `type` key for specifying whether the included content is an image, video, or text.
This guide will show you how to format chat templates for multimodal models as well as some best practices for configuring the template
## ImageTextToTextPipeline
[`ImageTextToTextPipeline`] is a high-level image and text generation class with a “chat mode”. Chat mode is enabled when a conversational model is detected and the chat prompt is [properly formatted](./llm_tutorial#wrong-prompt-format).
Start by building a chat history with the following two roles.
-`system` describes how the model should behave and respond when you’re chatting with it. This role isn’t supported by all chat models.
-`user` is where you enter your first message to the model.
```py
messages=[
{
"role":"system",
"content":[{"type":"text","text":"You are a friendly chatbot who always responds in the style of a pirate"}],
Create a [`ImageTextToTextPipeline`] and pass the chat to it. For large models, setting [device_map=“auto”](./models#big-model-inference) helps load the model quicker and automatically places it on the fastest device available. Changing the data type to [torch.bfloat16](./models#model-data-type) also helps save memory.
> [!TIP]
> The [`ImageTextToTextPipeline`] accepts chats in the OpenAI format to make inference easier and more accessible.
'generated_text':'The image shows two cats lying on a pink surface, which appears to be a cushion or a soft blanket. The cat on the left has a striped coat, typical of tabby cats, and is lying on its side with its head resting on the'}]
```
## Image inputs
For multimodal models that accept images like [LLaVA](./model_doc/llava), include the following in `content` as shown below.
- The content `"type"` can be an `"image"` or `"text"`.
- For images, it can be a link to the image (`"url"`), a file path (`"path"`), or `"base64"`. Images are automatically loaded, processed, and prepared into pixel values as inputs to the model.
These inputs are now ready to be used in [`~GenerationMixin.generate`].
## Video inputs
Some vision models also support video inputs. The message format is very similar to the format for [image inputs](#image-inputs).
- The content `"type"` should be `"video"` to indicate the content is a video.
- For videos, it can be a link to the video (`"url"`) or it could be a file path (`"path"`). Videos loaded from a URL can only be decoded with [PyAV](https://pyav.basswood-io.com/docs/stable/) or [Decord](https://github.com/dmlc/decord).
> [!WARNING]
> Loading a video from `"url"` is only supported by the PyAV or Decord backends.
{"type":"text","text":"What do you see in this video?"},
],
},
]
```
Pass `messages` to [`~ProcessorMixin.apply_chat_template`] to tokenize the input content. There are a few extra parameters to include in [`~ProcessorMixin.apply_chat_template`] that controls the sampling process.
The `video_load_backend` parameter refers to a specific framework to load a video. It supports [PyAV](https://pyav.basswood-io.com/docs/stable/), [Decord](https://github.com/dmlc/decord), [OpenCV](https://github.com/opencv/opencv), and [torchvision](https://pytorch.org/vision/stable/index.html).
The examples below use Decord as the backend because it is a bit faster than PyAV.
<hfoptionsid="sampling">
<hfoptionid="fixed number of frames">
The `num_frames` parameter controls how many frames to uniformly sample from the video. Each checkpoint has a maximum frame count it was pretrained with and exceeding this count can significantly lower generation quality. It's important to choose a frame count that fits both the model capacity and your hardware resources. If `num_frames` isn't specified, the entire video is loaded without any frame sampling.
```python
processed_chat=processor.apply_chat_template(
messages,
add_generation_prompt=True,
tokenize=True,
return_dict=True,
return_tensors="pt",
num_frames=32,
video_load_backend="decord",
)
print(processed_chat.keys())
```
These inputs are now ready to be used in [`~GenerationMixin.generate`].
</hfoption>
<hfoptionid="fps">
For longer videos, it may be better to sample more frames for better representation with the `video_fps` parameter. This determines how many frames per second to extract. As an example, if a video is 10 seconds long and `video_fps=2`, then the model samples 20 frames. In other words, 2 frames are uniformly sampled every 10 seconds.
```py
processed_chat=processor.apply_chat_template(
messages,
add_generation_prompt=True,
tokenize=True,
return_dict=True,
video_fps=32,
video_load_backend="decord",
)
print(processed_chat.keys())
```
</hfoption>
<hfoptionid="list of image frames">
Videos may also exist as a set of sampled frames stored as images rather than the full video file.
In this case, pass a list of image file paths and the processor automatically concatenates them into a video. Make sure all images are the same size since they are assumed to be from the same video.
"content":[{"type":"text","text":"You are a friendly chatbot who always responds in the style of a pirate"}],
},
{
"role":"user",
"content":[
{"type":"video","path":frames_paths},
{"type":"text","text":"What do you see in this video?"},
],
},
]
processed_chat=processor.apply_chat_template(
messages,
add_generation_prompt=True,
tokenize=True,
return_dict=True,
)
print(processed_chat.keys())
```
</hfoption>
</hfoptions>
## Template configuration
You can create a custom chat template with [Jinja](https://jinja.palletsprojects.com/en/3.1.x/templates/) and set it with [`~ProcessorMixin.apply_chat_template`]. Refer to the [Template writing](./chat_templating_writing) guide for more details.
For example, to enable a template to handle a *list of content* from multiple modalities while still supporting plain strings for text-only inference, specify how to handle the `content['type']` if it is an image or text as shown below in the Llama 3.2 Vision Instruct [template](https://huggingface.co/meta-llama/Llama-3.2-11B-Vision-Instruct/blob/main/chat_template.json).
<!--Copyright 2024 The HuggingFace Team. All rights reserved.
Licensed under the Apache License, Version 2.0 (the "License"); you may not use this file except in compliance with
the License. You may obtain a copy of the License at
http://www.apache.org/licenses/LICENSE-2.0
Unless required by applicable law or agreed to in writing, software distributed under the License is distributed on
an "AS IS" BASIS, WITHOUT WARRANTIES OR CONDITIONS OF ANY KIND, either express or implied. See the License for the
specific language governing permissions and limitations under the License.
⚠️ Note that this file is in Markdown but contain specific syntax for our doc-builder (similar to MDX) that may not be
rendered properly in your Markdown viewer.
-->
# Template writing
A chat template is a [Jinja](https://jinja.palletsprojects.com/en/3.1.x/templates/) template stored in the tokenizers [chat_template](https://huggingface.co/docs/transformers/main_classes/tokenizer#transformers.PreTrainedTokenizer.chat_template) attribute. Jinja is a templating language that allows you to write Python-like code and syntax. A chat template performs the following three roles.
1. Print the role enclosed in `<|` and `|>` (`<|user|>`, `<|assistant|>`, etc.).
2. Print the message followed by an end-of-sequence (`EOS`) token.
3. Print the assistant token if [add_generation_prompt=True](./chat_templating#add_generation_prompt) so the model generates an assistant response.
An example template is shown below.
```jinja
{%- formessageinmessages%}
{{-'<|'+message['role']+|>\n' }}
{{- message['content'] + eos_token }}
{%- endfor %}
{%- if add_generation_prompt %}
{{- '<|assistant|>\n'}}
{%- endif%}
```
The template can be customized to handle more complex use cases. This guide will show you how to add and edit templates and includes template writing tips.
## Create a template
Create a template by writing a Jinja template and then setting it as the chat template in the tokenizer. For example, the template below adds `[ASST]` and `[/ASST]` tags to the assistant messages.
Set the template in the tokenizer, and the next time you use [`~PreTrainedTokenizerBase.apply_chat_template`], the new template is used.
```py
template=tokenizer.chat_template
template=template.replace("SYS","SYSTEM")# Change the system token
tokenizer.chat_template=template# Set the new template
```
The template is saved in the `tokenizer_config.json` file. Upload it to the Hub with [`~PreTrainedTokenizer.push_to_hub`] so you can reuse it later and make sure everyone is using the right template for your model.
```py
tokenizer.push_to_hub("model_name")
```
## Template writing tips
The easiest way to start writing Jinja templates is to refer to existing templates. Use `print(tokenizer.chat_template)` on any chat model to see what template it's using. Try starting with simple models that don't call any tools or support RAG. Finally, take a look at the [Jinja documentation](https://jinja.palletsprojects.com/en/3.1.x/templates/#synopsis) for more details about formatting and syntax.
This section curates some best practices for writing clean and efficient Jinja templates.
### Trimming whitespace
Jinja prints any whitespace before or after a block of text. This can be an issue for chat templates because whitespace usage should be intentional. Add `-` to strip any whitespace before a block.
```jinja
{%- formessageinmessages%}
{{-message['role']+message['content']}}
{%- endfor%}
```
The incorrect whitespace usage example below may introduce a newline and indentation in the output.
```jinja
{%formessageinmessages%}
{{message['role']+message['content']}}
{%endfor%}
```
### Special variables
There are five special variables available inside a template. You can pass virtually any additional arguments to [`~PreTrainedTokenizerBase.apply_chat_template`] and it will be available inside the template as a variable. However, you should try to keep the number of variables to the five below to make it easier for users to use the chat model without writing custom code to handle model-specific arguments.
-`messages` contains the chat history as a list of message dicts.
-`tools` contains a list of tools in JSON schema format.
-`documents` contains a list of documents with the format `{"title": Title, "contents": "Contents"}` (designed for RAG models).
-`add_generation_prompt` is a boolean that determines whether to add an assistant header at the end of the conversation.
-`bos_token` and `eos_token` are special tokens extracted from a tokenizers `special_tokens_map`.
### Callable functions
There are two callable functions available inside a template.
-`raise_exception(msg)` raises a `TemplateException`. This is useful for debugging or warning users about incorrect template usage.
-`strftime_now(format_str)` retrieves the current date and time in a specific format which could be useful to include in system messages. It is equivalent to [datetime.now().strftime(format_str)](https://docs.python.org/3/library/datetime.html#datetime.datetime.now) in Python.
### Compatibility with non-Python Jinja
Jinja is implemented in multiple languages and they generally have the same syntax. Writing a template in Python allows you to use Python methods such as [lower](https://docs.python.org/3/library/stdtypes.html#str.lower) on strings or [items](https://docs.python.org/3/library/stdtypes.html#dict.items) on dicts. But this won't work if the template is used in a non-Python implementation, for example, when deploying with Javascript or Rust.
Make the changes below to ensure compatibility across all Jinja implementations.
- Replace Python methods with Jinja filters. For example, replace `string.lower()` with `string|lower` or `dict.items()` with `dict|dictitems`. Most of the changes follow the same pattern except `string.strip()`, which is replaced with `string|trim`. Refer to the list of [built-in filters](https://jinja.palletsprojects.com/en/3.1.x/templates/#builtin-filters) for a complete list of filters.
- Replace `True`, `False`, and `None` (these are Python specific) with `true`, `false`, and `none` respectively.
- Directly rendering a dict or list may return different results in other implementations. For example, string entries may change from single-quote to double-quote. To avoid this, add the [tojson](https://jinja.palletsprojects.com/en/3.1.x/templates/#jinja-filters.tojson) filter to maintain consistency.
### Big templates
Newer models or models with features like [tool-calling](./chat_extras#tools) and [RAG](./chat_extras#retrieval-augmented-generation-rag) require larger templates that can be longer than 100 lines. It may be easier to write larger templates in a separate file. The line numbers in the separate file corresponds exactly to the line numbers in template parsing or execution errors, making it easier to debug any potential issues.
Write the template in a separate file and extract it to the chat template.
There isn't a specific format for writing templates for tools but it is best to follow the standard API. This ensures the template is widely accessible across models without requiring users to write custom code to use tools with your model.
> [!WARNING]
> Formatting such as whitespace and special tokens are model-specific. Make sure everything exactly matches the format a model was trained with.
The following section lists elements of the standard API for writing templates for tools.
### Tool definitions
Transformers chat template methods allow a user to pass tools as Python functions or a JSON schema. When functions are passed, a JSON schema is automatically generated and passed to the template. The `tools` variable in a template always takes a list of JSON schemas.
The specific tokens and tool descriptions should match the ones your model was trained with. Your model doesn't need to understand the JSON schema input because your template can translate the JSON schema into your models format. For example, [Command-R](./model_doc/cohere) was trained with tools defined with Python function headers, but the Command-R tool template accepts JSON schemas. The template internally converts types and renders the input tools as Python headers.
```json
{
"type":"function",
"function":{
"name":"multiply",
"description":"A function that multiplies two numbers",
"parameters":{
"type":"object",
"properties":{
"a":{
"type":"number",
"description":"The first number to multiply"
},
"b":{
"type":"number",
"description":"The second number to multiply"
}
},
"required":["a","b"]
}
}
}
```
An example for handling tool definitions in a chat template is shown below. The specific tokens and tool descriptions should be changed to match the ones a model was trained with.
```
{%- if tools %}
{%- for tool in tools %}
{{- '<tool>' + tool['function']['name'] + '\n' }}
{%- for argument in tool['function']['parameters']['properties'] %}
Tool calls, if present, is a list with the `"assistant”` role. This is always a list even though most tool-calling models only support single tool calls, which means the list usually only contains a single element.
```json
{
"role":"assistant",
"tool_calls":[
{
"type":"function",
"function":{
"name":"multiply",
"arguments":{
"a":5,
"b":6
}
}
}
]
}
```
A common pattern for handling tool calls is shown below.
```
{%- if message['role'] == 'assistant' and 'tool_calls' in message %}
Tool responses are a message dict with the `role`, `name` (name of the function) and `content` (result of the tool call) keys.
```json
{
"role":"tool",
"name":"multiply",
"content":"30"
}
```
Not all the keys need to be used in the tool response. For example, if a model doesn’t expect the function name to be included in the tool response, then you can just include the `role` and `content`.
Add a chat template by setting the `chat_template` attribute in the tokenizer and testing it with [`~PreTrainedTokenizerBase.apply_chat_template`]. If it works as expected, then you can upload it to the Hub with with [`~PreTrainedTokenizer.push_to_hub`].
Even if you're not the model owner, it is still helpful to add a template for a model with an empty chat template or a model that is using a default class template. Open a [pull request](https://hf.co/docs/hub/repositories-pull-requests-discussions) on the model repository to add the template.
@ -14,62 +14,66 @@ rendered properly in your Markdown viewer.
-->
# Chatting with Transformers
# Chat basics
If you're reading this article, you're almost certainly aware of **chat models**. Chat models are conversational
AIs that you can send and receive messages with. The most famous of these is the proprietary ChatGPT, but there are
now many open-source chat models which match or even substantially exceed its performance. These models are free to
download and run on a local machine. Although the largest and most capable models require high-powered hardware
and lots of memory to run, there are smaller models that will run perfectly well on a single consumer GPU, or even
an ordinary desktop or notebook CPU.
Chat models are conversational models you can send and receive messages from. There are many chat models available to choose from, but in general, larger models tend to be better though that's not always the case. The model size is often included in the name, like "8B" or "70B", and it describes the number of parameters. Mixture-of-expert (MoE) models have names like "8x7B" or "141B-A35B" which means it's a 56B and 141B parameter model. You can try quantizing larger models to reduce memory requirements, otherwise you'll need ~2 bytes of memory per parameter.
This guide will help you get started with chat models. We'll start with a brief quickstart guide that uses a convenient,
high-level "pipeline". This is all you need if you just want to start running a chat model
immediately. After the quickstart, we'll move on to more detailed information about
what exactly chat models are, how to choose an appropriate one, and a low-level breakdown of each of the
steps involved in talking to a chat model. We'll also give some tips on optimizing the performance and memory usage
of your chat models.
Check model leaderboards like [OpenLLM](https://hf.co/spaces/HuggingFaceH4/open_llm_leaderboard) and [LMSys Chatbot Arena](https://chat.lmsys.org/?leaderboard) to further help you identify the best chat models for your use case. Models that are specialized in certain domains (medical, legal text, non-English languages, etc.) may sometimes outperform larger general purpose models.
> [!TIP]
> Chat with a number of open-source models for free on [HuggingChat](https://hf.co/chat/)!
## Quickstart
This guide shows you how to quickly start chatting with Transformers from the command line, how build and format a conversation, and how to chat using the [`TextGenerationPipeline`].
If you have no time for details, here's the brief summary: Chat models continue chats. This means that you pass them
a conversation history, which can be as short as a single user message, and the model will continue the conversation
by adding its response. Let's see this in action. First, let's build a chat:
## transformers-cli
```python
Chat with a model directly from the command line as shown below. It launches an interactive session with a model. Enter `clear` to reset the conversation, `exit` to terminate the session, and `help` to display all the command options.
For a full list of options, run the command below.
```bash
transformers-cli chat -h
```
The chat is implemented on top of the [AutoClass](./model_doc/auto), using tooling from [text generation](./llm_tutorial) and [chat](./chat_templating).
## TextGenerationPipeline
[`TextGenerationPipeline`] is a high-level text generation class with a "chat mode". Chat mode is enabled when a conversational model is detected and the chat prompt is [properly formatted](./llm_tutorial#wrong-prompt-format).
To start, build a chat history with the following two roles.
-`system` describes how the model should behave and respond when you're chatting with it. This role isn't supported by all chat models.
-`user` is where you enter your first message to the model.
```py
chat=[
{"role":"system","content":"You are a sassy, wise-cracking robot as imagined by Hollywood circa 1986."},
{"role":"user","content":"Hey, can you tell me any fun things to do in New York?"}
]
```
Notice that in addition to the user's message, we added a **system** message at the start of the conversation. Not all
chat models support system messages, but when they do, they represent high-level directives about how the model
should behave in the conversation. You can use this to guide the model - whether you want short or long responses,
lighthearted or serious ones, and so on. If you want the model to do useful work instead of
practicing its improv routine, you can either omit the system message or try a terse one such as "You are a helpful and intelligent
AI assistant who responds to user queries."
Create the [`TextGenerationPipeline`] and pass `chat` to it. For large models, setting [device_map="auto"](./models#big-model-inference) helps load the model quicker and automatically places it on the fastest device available. Changing the data type to [torch.bfloat16](./models#model-data-type) also helps save memory.
Once you have a chat, the quickest way to continue it is using the [`TextGenerationPipeline`].
Let's see this in action with `LLaMA-3`. Note that `LLaMA-3` is a gated model, which means you will need to
[apply for access](https://huggingface.co/meta-llama/Meta-Llama-3-8B-Instruct) and log in with your Hugging Face
account to use it. We'll also use `device_map="auto"`, which will load the model on GPU if there's enough memory
for it, and set the dtype to `torch.bfloat16` to save memory:
(laughs) Oh, you're killin' me, pal! You don't get it, do you? Warhol's soup cans are like, art, man!
It's like, he took something totally mundane, like a can of soup, and turned it into a masterpiece. It's
like, "Hey, look at me, I'm a can of soup, but I'm also a work of art!"
@ -120,171 +120,35 @@ But, hey, you're not alone, pal. I mean, I'm a robot, and even I don't get it. (
But, hey, that's what makes art, art, right? (laughs)
```
The remainder of this tutorial will cover specific topics such
as performance and memory, or how to select a chat model for your needs.
## Performance
## Choosing a chat model
Transformers load models in full precision by default, and for a 8B model, this requires ~32GB of memory! Reduce memory usage by loading a model in half-precision or bfloat16 (only uses ~2 bytes per parameter). You can even quantize the model to a lower precision like 8-bit or 4-bit with [bitsandbytes](https://hf.co/docs/bitsandbytes/index).
There are an enormous number of different chat models available on the [Hugging Face Hub](https://huggingface.co/models?pipeline_tag=text-generation&sort=trending),
and new users often feel very overwhelmed by the selection offered. Don't be, though! You really need to just focus on
two important considerations:
- The model's size, which will determine if you can fit it in memory and how quickly it will
run.
- The quality of the model's chat output.
> [!TIP]
> Refer to the [Quantization](./quantization/overview) docs for more information about the different quantization backends available.
In general, these are correlated - bigger models tend to be
more capable, but even so there's a lot of variation at a given size point!
Create a [`BitsAndBytesConfig`] with your desired quantization settings and pass it to the pipelines `model_kwargs` parameter. The example below quantizes a model to 8-bits.
### Size and model naming
The size of a model is easy to spot - it's the number in the model name, like "8B" or "70B". This is the number of
**parameters** in the model. Without quantization, you should expect to need about 2 bytes of memory per parameter.
This means that an "8B" model with 8 billion parameters will need about 16GB of memory just to fit the parameters,
plus a little extra for other overhead. It's a good fit for a high-end consumer GPU with 24GB of memory, such as a 3090
or 4090.
Some chat models are "Mixture of Experts" models. These may list their sizes in different ways, such as "8x7B" or
"141B-A35B". The numbers are a little fuzzier here, but in general you can read this as saying that the model
has approximately 56 (8x7) billion parameters in the first case, or 141 billion parameters in the second case.
Note that it is very common to use quantization techniques to reduce the memory usage per parameter to 8 bits, 4 bits,
or even less. This topic is discussed in more detail in the [Memory considerations](#memory-considerations) section below.
### But which chat model is best?
Even once you know the size of chat model you can run, there's still a lot of choice out there. One way to sift through
it all is to consult **leaderboards**. Two of the most popular leaderboards are the [OpenLLM Leaderboard](https://huggingface.co/spaces/HuggingFaceH4/open_llm_leaderboard)
and the [LMSys Chatbot Arena Leaderboard](https://chat.lmsys.org/?leaderboard). Note that the LMSys leaderboard
also includes proprietary models - look at the `licence` column to identify open-source ones that you can download, then
search for them on the [Hugging Face Hub](https://huggingface.co/models?pipeline_tag=text-generation&sort=trending).
### Specialist domains
Some models may be specialized for certain domains, such as medical or legal text, or non-English languages.
If you're working in these domains, you may find that a specialized model will give you big performance benefits.
Don't automatically assume that, though! Particularly when specialized models are smaller or older than the current
cutting-edge, a top-end general-purpose model may still outclass them. Thankfully, we are beginning to see
[domain-specific leaderboards](https://huggingface.co/blog/leaderboard-medicalllm) that should make it easier to locate
the best models for specialized domains.
## What happens inside the pipeline?
The quickstart above used a high-level pipeline to chat with a chat model, which is convenient, but not the
most flexible. Let's take a more low-level approach, to see each of the steps involved in chat. Let's start with
There's a lot in here, each piece of which could be its own document! Rather than going into too much detail, I'll cover
the broad ideas, and leave the details for the linked documents. The key steps are:
1. [Models](https://huggingface.co/learn/nlp-course/en/chapter2/3) and [Tokenizers](https://huggingface.co/learn/nlp-course/en/chapter2/4?fw=pt) are loaded from the Hugging Face Hub.
2. The chat is formatted using the tokenizer's [chat template](https://huggingface.co/docs/transformers/main/en/chat_templating)
3. The formatted chat is [tokenized](https://huggingface.co/learn/nlp-course/en/chapter2/4) using the tokenizer.
4. We [generate](https://huggingface.co/docs/transformers/en/llm_tutorial) a response from the model.
5. The tokens output by the model are decoded back to a string
## Performance, memory and hardware
You probably know by now that most machine learning tasks are run on GPUs. However, it is entirely possible
to generate text from a chat model or language model on a CPU, albeit somewhat more slowly. If you can fit
the model in GPU memory, though, this will usually be the preferable option.
### Memory considerations
By default, Hugging Face classes like [`TextGenerationPipeline`] or [`AutoModelForCausalLM`] will load the model in
`float32` precision. This means that it will need 4 bytes (32 bits) per parameter, so an "8B" model with 8 billion
parameters will need ~32GB of memory. However, this can be wasteful! Most modern language models are trained in
"bfloat16" precision, which uses only 2 bytes per parameter. If your hardware supports it (Nvidia 30xx/Axxx
or newer), you can load the model in `bfloat16` precision, using the `torch_dtype` argument as we did above.
It is possible to go even lower than 16-bits using "quantization", a method to lossily compress model weights. This
allows each parameter to be squeezed down to 8 bits, 4 bits or even less. Note that, especially at 4 bits,
the model's outputs may be negatively affected, but often this is a tradeoff worth making to fit a larger and more
capable chat model in memory. Let's see this in action with `bitsandbytes`:
There are several other options for quantizing models besides `bitsandbytes` - please see the [Quantization guide](./quantization)
for more information.
In general, larger models are slower in addition to requiring more memory because text generation is bottlenecked by **memory bandwidth** instead of compute power. Each active parameter must be read from memory for every generated token. For a 16GB model, 16GB must be read from memory for every generated token.
### Performance considerations
The number of generated tokens/sec is proportional to the total memory bandwidth of the system divided by the model size. Depending on your hardware, total memory bandwidth can vary. Refer to the table below for approximate generation speeds for different hardware types.
<Tip>
| Hardware | Memory bandwidth |
|---|---|
| consumer CPU | 20-100GB/sec |
| specialized CPU (Intel Xeon, AMD Threadripper/Epyc, Apple silicon) | 200-900GB/sec |
| data center GPU (NVIDIA A100/H100) | 2-3TB/sec |
For a more extensive guide on language model performance and optimization, check out [LLM Inference Optimization](./llm_optims) .
The easiest solution for improving generation speed is to either quantize a model or use hardware with higher memory bandwidth.
</Tip>
As a general rule, larger chat models will be slower in addition to requiring more memory. It's possible to be
more concrete about this, though: Generating text from a chat model is unusual in that it is bottlenecked by
**memory bandwidth** rather than compute power, because every active parameter must be read from memory for each
token that the model generates. This means that number of tokens per second you can generate from a chat
model is generally proportional to the total bandwidth of the memory it resides in, divided by the size of the model.
In our quickstart example above, our model was ~16GB in size when loaded in `bfloat16` precision.
This means that 16GB must be read from memory for every token generated by the model. Total memory bandwidth can
vary from 20-100GB/sec for consumer CPUs to 200-900GB/sec for consumer GPUs, specialized CPUs like
Intel Xeon, AMD Threadripper/Epyc or high-end Apple silicon, and finally up to 2-3TB/sec for data center GPUs like
the Nvidia A100 or H100. This should give you a good idea of the generation speed you can expect from these different
hardware types.
Therefore, if you want to improve the speed of text generation, the easiest solution is to either reduce the
size of the model in memory (usually by quantization), or get hardware with higher memory bandwidth. For advanced users,
several other techniques exist to get around this bandwidth bottleneck. The most common are variants on
[assisted generation](https://huggingface.co/blog/assisted-generation), also known as "speculative
sampling". These techniques try to guess multiple future tokens at once, often using a smaller "draft model", and then
confirm these generations with the chat model. If the guesses are validated by the chat model, more than one token can
be generated per forward pass, which greatly alleviates the bandwidth bottleneck and improves generation speed.
Finally, we should also note the impact of "Mixture of Experts" (MoE) models here. Several popular chat models,
such as Mixtral, Qwen-MoE and DBRX, are MoE models. In these models, not every parameter is active for every token generated.
As a result, MoE models generally have much lower memory bandwidth requirements, even though their total size
can be quite large. They can therefore be several times faster than a normal "dense" model of the same size. However,
techniques like assisted generation are generally ineffective for these models because more parameters will become
active with each new speculated token, which will negate the bandwidth and speed benefits that the MoE architecture
provides.
You can also try techniques like [speculative decoding](./generation_strategies#speculative-decoding), where a smaller model generates candidate tokens that are verified by the larger model. If the candidate tokens are correct, the larger model can generate more than one token per `forward` pass. This significantly alleviates the bandwidth bottleneck and improves generation speed.
> [!TIP]
> Parameters may not be active for every generated token in MoE models such as [Mixtral](./model_doc/mixtral), [Qwen2MoE](./model_doc/qwen2_moe.md), and [DBRX](./model_doc/dbrx). As a result, MoE models generally have much lower memory bandwidth requirements and can be faster than a regular LLM of the same size. However, techniques like speculative decoding are ineffective with MoE models because parameters become activated with each new speculated token.
<!--Copyright 2022 The HuggingFace Team. All rights reserved.
Licensed under the Apache License, Version 2.0 (the "License"); you may not use this file except in compliance with
the License. You may obtain a copy of the License at
http://www.apache.org/licenses/LICENSE-2.0
Unless required by applicable law or agreed to in writing, software distributed under the License is distributed on
an "AS IS" BASIS, WITHOUT WARRANTIES OR CONDITIONS OF ANY KIND, either express or implied. See the License for the
specific language governing permissions and limitations under the License.
⚠️ Note that this file is in Markdown but contain specific syntax for our doc-builder (similar to MDX) that may not be
rendered properly in your Markdown viewer.
-->
# Create a custom architecture
An [`AutoClass`](model_doc/auto) automatically infers the model architecture and downloads pretrained configuration and weights. Generally, we recommend using an `AutoClass` to produce checkpoint-agnostic code. But users who want more control over specific model parameters can create a custom 🤗 Transformers model from just a few base classes. This could be particularly useful for anyone who is interested in studying, training or experimenting with a 🤗 Transformers model. In this guide, dive deeper into creating a custom model without an `AutoClass`. Learn how to:
- Load and customize a model configuration.
- Create a model architecture.
- Create a slow and fast tokenizer for text.
- Create an image processor for vision tasks.
- Create a feature extractor for audio tasks.
- Create a processor for multimodal tasks.
## Configuration
A [configuration](main_classes/configuration) refers to a model's specific attributes. Each model configuration has different attributes; for instance, all NLP models have the `hidden_size`, `num_attention_heads`, `num_hidden_layers` and `vocab_size` attributes in common. These attributes specify the number of attention heads or hidden layers to construct a model with.
Get a closer look at [DistilBERT](model_doc/distilbert) by accessing [`DistilBertConfig`] to inspect it's attributes:
```py
>>>fromtransformersimportDistilBertConfig
>>>config=DistilBertConfig()
>>>print(config)
DistilBertConfig{
"activation":"gelu",
"attention_dropout":0.1,
"dim":768,
"dropout":0.1,
"hidden_dim":3072,
"initializer_range":0.02,
"max_position_embeddings":512,
"model_type":"distilbert",
"n_heads":12,
"n_layers":6,
"pad_token_id":0,
"qa_dropout":0.1,
"seq_classif_dropout":0.2,
"sinusoidal_pos_embds":false,
"transformers_version":"4.16.2",
"vocab_size":30522
}
```
[`DistilBertConfig`] displays all the default attributes used to build a base [`DistilBertModel`]. All attributes are customizable, creating space for experimentation. For example, you can customize a default model to:
- Try a different activation function with the `activation` parameter.
- Use a higher dropout ratio for the attention probabilities with the `attention_dropout` parameter.
Once you are satisfied with your model configuration, you can save it with [`~PretrainedConfig.save_pretrained`]. Your configuration file is stored as a JSON file in the specified save directory:
You can also save your configuration file as a dictionary or even just the difference between your custom configuration attributes and the default configuration attributes! See the [configuration](main_classes/configuration) documentation for more details.
</Tip>
## Model
The next step is to create a [model](main_classes/models). The model - also loosely referred to as the architecture - defines what each layer is doing and what operations are happening. Attributes like `num_hidden_layers` from the configuration are used to define the architecture. Every model shares the base class [`PreTrainedModel`] and a few common methods like resizing input embeddings and pruning self-attention heads. In addition, all models are also either a [`torch.nn.Module`](https://pytorch.org/docs/stable/generated/torch.nn.Module.html), [`tf.keras.Model`](https://www.tensorflow.org/api_docs/python/tf/keras/Model) or [`flax.linen.Module`](https://flax.readthedocs.io/en/latest/api_reference/flax.linen/module.html) subclass. This means models are compatible with each of their respective framework's usage.
<frameworkcontent>
<pt>
Load your custom configuration attributes into the model:
This creates a model with random values instead of pretrained weights. You won't be able to use this model for anything useful yet until you train it. Training is a costly and time-consuming process. It is generally better to use a pretrained model to obtain better results faster, while using only a fraction of the resources required for training.
Create a pretrained model with [`~PreTrainedModel.from_pretrained`]:
When you load pretrained weights, the default model configuration is automatically loaded if the model is provided by 🤗 Transformers. However, you can still replace - some or all of - the default model configuration attributes with your own if you'd like:
This creates a model with random values instead of pretrained weights. You won't be able to use this model for anything useful yet until you train it. Training is a costly and time-consuming process. It is generally better to use a pretrained model to obtain better results faster, while using only a fraction of the resources required for training.
Create a pretrained model with [`~TFPreTrainedModel.from_pretrained`]:
When you load pretrained weights, the default model configuration is automatically loaded if the model is provided by 🤗 Transformers. However, you can still replace - some or all of - the default model configuration attributes with your own if you'd like:
At this point, you have a base DistilBERT model which outputs the *hidden states*. The hidden states are passed as inputs to a model head to produce the final output. 🤗 Transformers provides a different model head for each task as long as a model supports the task (i.e., you can't use DistilBERT for a sequence-to-sequence task like translation).
<frameworkcontent>
<pt>
For example, [`DistilBertForSequenceClassification`] is a base DistilBERT model with a sequence classification head. The sequence classification head is a linear layer on top of the pooled outputs.
Easily reuse this checkpoint for another task by switching to a different model head. For a question answering task, you would use the [`DistilBertForQuestionAnswering`] model head. The question answering head is similar to the sequence classification head except it is a linear layer on top of the hidden states output.
For example, [`TFDistilBertForSequenceClassification`] is a base DistilBERT model with a sequence classification head. The sequence classification head is a linear layer on top of the pooled outputs.
Easily reuse this checkpoint for another task by switching to a different model head. For a question answering task, you would use the [`TFDistilBertForQuestionAnswering`] model head. The question answering head is similar to the sequence classification head except it is a linear layer on top of the hidden states output.
The last base class you need before using a model for textual data is a [tokenizer](main_classes/tokenizer) to convert raw text to tensors. There are two types of tokenizers you can use with 🤗 Transformers:
- [`PreTrainedTokenizer`]: a Python implementation of a tokenizer.
- [`PreTrainedTokenizerFast`]: a tokenizer from our Rust-based [🤗 Tokenizer](https://huggingface.co/docs/tokenizers/python/latest/) library. This tokenizer type is significantly faster - especially during batch tokenization - due to its Rust implementation. The fast tokenizer also offers additional methods like *offset mapping* which maps tokens to their original words or characters.
Both tokenizers support common methods such as encoding and decoding, adding new tokens, and managing special tokens.
<Tipwarning={true}>
Not every model supports a fast tokenizer. Take a look at this [table](index#supported-frameworks) to check if a model has fast tokenizer support.
</Tip>
If you trained your own tokenizer, you can create one from your *vocabulary* file:
It is important to remember the vocabulary from a custom tokenizer will be different from the vocabulary generated by a pretrained model's tokenizer. You need to use a pretrained model's vocabulary if you are using a pretrained model, otherwise the inputs won't make sense. Create a tokenizer with a pretrained model's vocabulary with the [`DistilBertTokenizer`] class:
By default, [`AutoTokenizer`] will try to load a fast tokenizer. You can disable this behavior by setting `use_fast=False` in `from_pretrained`.
</Tip>
## Image processor
An image processor processes vision inputs. It inherits from the base [`~image_processing_utils.ImageProcessingMixin`] class.
To use, create an image processor associated with the model you're using. For example, create a default [`ViTImageProcessor`] if you are using [ViT](model_doc/vit) for image classification:
```py
>>>fromtransformersimportViTImageProcessor
>>>vit_extractor=ViTImageProcessor()
>>>print(vit_extractor)
ViTImageProcessor{
"do_normalize":true,
"do_resize":true,
"image_processor_type":"ViTImageProcessor",
"image_mean":[
0.5,
0.5,
0.5
],
"image_std":[
0.5,
0.5,
0.5
],
"resample":2,
"size":224
}
```
<Tip>
If you aren't looking for any customization, just use the `from_pretrained` method to load a model's default image processor parameters.
</Tip>
Modify any of the [`ViTImageProcessor`] parameters to create your custom image processor:
Computer vision models consist of a backbone, neck, and head. The backbone extracts features from an input image, the neck combines and enhances the extracted features, and the head is used for the main task (e.g., object detection). Start by initializing a backbone in the model config and specify whether you want to load pretrained weights or load randomly initialized weights. Then you can pass the model config to the model head.
For example, to load a [ResNet](../model_doc/resnet) backbone into a [MaskFormer](../model_doc/maskformer) model with an instance segmentation head:
<hfoptionsid="backbone">
<hfoptionid="pretrained weights">
Set `use_pretrained_backbone=True` to load pretrained ResNet weights for the backbone.
[timm](https://hf.co/docs/timm/index) models are loaded within a model with `use_timm_backbone=True` or with [`TimmBackbone`] and [`TimmBackboneConfig`].
Use `use_timm_backbone=True` and `use_pretrained_backbone=True` to load pretrained timm weights for the backbone.
config=MaskFormerConfig(backbone="resnet50",use_pretrained_backbone=False,use_timm_backbone=True)# backbone and neck config
model=MaskFormerForInstanceSegmentation(config)# head
```
You could also load the backbone config and use it to create a `TimmBackbone` or pass it to the model config. Timm backbones will load pretrained weights by default. Set `use_pretrained_backbone=False` to load randomly initialized weights.
A feature extractor processes audio inputs. It inherits from the base [`~feature_extraction_utils.FeatureExtractionMixin`] class, and may also inherit from the [`SequenceFeatureExtractor`] class for processing audio inputs.
To use, create a feature extractor associated with the model you're using. For example, create a default [`Wav2Vec2FeatureExtractor`] if you are using [Wav2Vec2](model_doc/wav2vec2) for audio classification:
For models that support multimodal tasks, 🤗 Transformers offers a processor class that conveniently wraps processing classes such as a feature extractor and a tokenizer into a single object. For example, let's use the [`Wav2Vec2Processor`] for an automatic speech recognition task (ASR). ASR transcribes audio to text, so you will need a feature extractor and a tokenizer.
Create a feature extractor to handle the audio inputs:
With two basic classes - configuration and model - and an additional preprocessing class (tokenizer, image processor, feature extractor, or processor), you can create any of the models supported by 🤗 Transformers. Each of these base classes are configurable, allowing you to use the specific attributes you want. You can easily setup a model for training or modify an existing pretrained model to fine-tune.
<!--Copyright 2020 The HuggingFace Team. All rights reserved.
<!--Copyright 2024 The HuggingFace Team. All rights reserved.
Licensed under the Apache License, Version 2.0 (the "License"); you may not use this file except in compliance with
the License. You may obtain a copy of the License at
@ -14,45 +14,33 @@ rendered properly in your Markdown viewer.
-->
# Building custom models
# Customizing models
The 🤗 Transformers library is designed to be easily extensible. Every model is fully coded in a given subfolder
of the repository with no abstraction, so you can easily copy a modeling file and tweak it to your needs.
Transformers models are designed to be customizable. A models code is fully contained in the [model](https://github.com/huggingface/transformers/tree/main/src/transformers/models) subfolder of the Transformers repository. Each folder contains a `modeling.py` and a `configuration.py` file. Copy these files to start customizing a model.
If you are writing a brand new model, it might be easier to start from scratch. In this tutorial, we will show you
how to write a custom model and its configuration so it can be used inside Transformers, and how you can share it
with the community (with the code it relies on) so that anyone can use it, even if it's not present in the 🤗
Transformers library. We'll see how to build upon transformers and extend the framework with your hooks and
custom code.
> [!TIP]
> It may be easier to start from scratch if you're creating an entirely new model. But for models that are very similar to an existing one in Transformers, it is faster to reuse or subclass the same configuration and model class.
We will illustrate all of this on a ResNet model, by wrapping the ResNet class of the
[timm library](https://github.com/rwightman/pytorch-image-models) into a [`PreTrainedModel`].
This guide will show you how to customize a ResNet model, enable [AutoClass](./models#autoclass) support, and share it on the Hub.
## Writing a custom configuration
## Configuration
Before we dive into the model, let's first write its configuration. The configuration of a model is an object that
will contain all the necessary information to build the model. As we will see in the next section, the model can only
take a `config` to be initialized, so we really need that object to be as complete as possible.
A configuration, given by the base [`PretrainedConfig`] class, contains all the necessary information to build a model. This is where you'll configure the attributes of the custom ResNet model. Different attributes gives different ResNet model types.
<Tip>
The main rules for customizing a configuration are:
Models in the `transformers` library itself generally follow the convention that they accept a `config` object
in their `__init__` method, and then pass the whole `config` to sub-layers in the model, rather than breaking the
config object into multiple arguments that are all passed individually to sub-layers. Writing your model in this
style results in simpler code with a clear "source of truth" for any hyperparameters, and also makes it easier
to reuse code from other models in `transformers`.
1. A custom configuration must subclass [`PretrainedConfig`]. This ensures a custom model has all the functionality of a Transformers' model such as [`~PretrainedConfig.from_pretrained`], [`~PretrainedConfig.save_pretrained`], and [`~PretrainedConfig.push_to_hub`].
2. The [`PretrainedConfig`] `__init__` must accept any `kwargs` and they must be passed to the superclass `__init__`. [`PretrainedConfig`] has more fields than the ones set in your custom configuration, so when you load a configuration with [`~PretrainedConfig.from_pretrained`], those fields need to be accepted by your configuration and passed to the superclass.
</Tip>
> [!TIP]
> It is useful to check the validity of some of the parameters. In the example below, a check is implemented to ensure `block_type` and `stem_type` belong to one of the predefined values.
>
> Add `model_type` to the configuration class to enable [AutoClass](./models#autoclass) support.
In our example, we will take a couple of arguments of the ResNet class that we might want to tweak. Different
configurations will then give us the different types of ResNets that are possible. We then just store those arguments,
after checking the validity of a few of them.
```python
```py
fromtransformersimportPretrainedConfig
fromtypingimportList
classResnetConfig(PretrainedConfig):
model_type="resnet"
@ -86,56 +74,38 @@ class ResnetConfig(PretrainedConfig):
super().__init__(**kwargs)
```
The three important things to remember when writing you own configuration are the following:
- you have to inherit from `PretrainedConfig`,
- the `__init__` of your `PretrainedConfig` must accept any kwargs,
- those `kwargs` need to be passed to the superclass `__init__`.
The inheritance is to make sure you get all the functionality from the 🤗 Transformers library, while the two other
constraints come from the fact a `PretrainedConfig` has more fields than the ones you are setting. When reloading a
config with the `from_pretrained` method, those fields need to be accepted by your config and then sent to the
superclass.
Defining a `model_type` for your configuration (here `model_type="resnet"`) is not mandatory, unless you want to
register your model with the auto classes (see last section).
With this done, you can easily create and save your configuration like you would do with any other model config of the
library. Here is how we can create a resnet50d config and save it:
Save the configuration to a JSON file in your custom model folder, `custom-resnet`, with [`~PretrainedConfig.save_pretrained`].
With the custom ResNet configuration, you can now create and customize the model. The model subclasses the base [`PreTrainedModel`] class. Like [`PretrainedConfig`], inheriting from [`PreTrainedModel`] and initializing the superclass with the configuration extends Transformers' functionalities such as saving and loading to the custom model.
You can also use any other method of the [`PretrainedConfig`] class, like [`~PretrainedConfig.push_to_hub`] to
directly upload your config to the Hub.
Transformers' models follow the convention of accepting a `config` object in the `__init__` method. This passes the entire `config` to the model sublayers, instead of breaking the `config` object into multiple arguments that are individually passed to the sublayers.
## Writing a custom model
Writing models this way produces simpler code with a clear source of truth for any hyperparameters. It also makes it easier to reuse code from other Transformers' models.
Now that we have our ResNet configuration, we can go on writing the model. We will actually write two: one that
extracts the hidden features from a batch of images (like [`BertModel`]) and one that is suitable for image
@ -158,12 +128,17 @@ class ResnetModel(PreTrainedModel):
returnself.model.forward_features(tensor)
```
For the model that will classify images, we just change the forward method:
</hfoption>
<hfoptionid="ResnetModelForImageClassification">
The `forward` method needs to be rewritten to calculate the loss for each logit if labels are available. Otherwise, the ResNet model class is the same.
> [!TIP]
> Add `config_class` to the model class to enable [AutoClass](#autoclass-support) support.
@ -190,34 +165,20 @@ class ResnetModelForImageClassification(PreTrainedModel):
return{"logits":logits}
```
In both cases, notice how we inherit from `PreTrainedModel` and call the superclass initialization with the `config`
(a bit like when you write a regular `torch.nn.Module`). The line that sets the `config_class` is not mandatory, unless
you want to register your model with the auto classes (see last section).
</hfoption>
</hfoptions>
<Tip>
A model can return any output format. Returning a dictionary (like `ResnetModelForImageClassification`) with losses when labels are available makes the custom model compatible with [`Trainer`]. For other output formats, you'll need your own training loop or a different library for training.
If your model is very similar to a model inside the library, you can re-use the same configuration as this model.
</Tip>
You can have your model return anything you want, but returning a dictionary like we did for
`ResnetModelForImageClassification`, with the loss included when labels are passed, will make your model directly
usable inside the [`Trainer`] class. Using another output format is fine as long as you are planning on using your own
training loop or another library for training.
Now that we have our model class, let's create one:
Instantiate the custom model class with the configuration.
Again, you can use any of the methods of [`PreTrainedModel`], like [`~PreTrainedModel.save_pretrained`] or
[`~PreTrainedModel.push_to_hub`]. We will use the second in the next section, and see how to push the model weights
with the code of our model. But first, let's load some pretrained weights inside our model.
At this point, you can load pretrained weights into the model or train it from scratch. In this guide, you'll load pretrained weights.
In your own use case, you will probably be training your custom model on your own data. To go fast for this tutorial,
we will use the pretrained version of the resnet50d. Since our model is just a wrapper around it, it's going to be
easy to transfer those weights:
Load the pretrained weights from the [timm](https://hf.co/docs/timm/index) library, and then transfer those weights to the custom model with [load_state_dict](https://pytorch.org/docs/stable/generated/torch.nn.Module.html#torch.nn.Module.load_state_dict).
Now let's see how to make sure that when we do [`~PreTrainedModel.save_pretrained`] or [`~PreTrainedModel.push_to_hub`], the
code of the model is saved.
## AutoClass
## Registering a model with custom code to the auto classes
The [AutoClass](./models#model-classes) API is a shortcut for automatically loading the correct architecture for a given model. It is convenient to enable this for users loading your custom model.
If you are writing a library that extends 🤗 Transformers, you may want to extend the auto classes to include your own
model. This is different from pushing the code to the Hub in the sense that users will need to import your library to
get the custom models (contrarily to automatically downloading the model code from the Hub).
Make sure you have the `model_type` attribute (must be different from existing model types) in the configuration class and `config_class` attribute in the model class. Use the [`~AutoConfig.register`] method to add the custom configuration and model to the [AutoClass](./models#model-classes) API.
As long as your config has a `model_type` attribute that is different from existing model types, and that your model
classes have the right `config_class` attributes, you can just add them to the auto classes like this:
> [!TIP]
> The first argument to [`AutoConfig.register`] must match the `model_type` attribute in the custom configuration class, and the first argument to [`AutoModel.register`] must match the `config_class` of the custom model class.
Note that the first argument used when registering your custom config to [`AutoConfig`] needs to match the `model_type`
of your custom config, and the first argument used when registering your custom models to any auto model class needs
to match the `config_class` of those models.
Your custom model code is now compatible with the [AutoClass](./models#autoclass) API. Users can load the model with the [AutoModel](./model_doc/auto#automodel) or [`AutoModelForImageClassification`] classes.
## Sending the code to the Hub
## Upload
<Tipwarning={true}>
Upload a custom model to the [Hub](https://hf.co/models) to allow other users to easily load and use it.
This API is experimental and may have some slight breaking changes in the next releases.
Ensure the model directory is structured correctly as shown below. The directory should contain:
</Tip>
-`modeling.py`: Contains the code for `ResnetModel` and `ResnetModelForImageClassification`. This file can rely on relative imports to other files as long as they're in the same directory.
First, make sure your model is fully defined in a `.py` file. It can rely on relative imports to some other files as
long as all the files are in the same directory (we don't support submodules for this feature yet). For our example,
we'll define a `modeling_resnet.py` file and a `configuration_resnet.py` file in a folder of the current working
directory named `resnet_model`. The configuration file contains the code for `ResnetConfig` and the modeling file
contains the code of `ResnetModel` and `ResnetModelForImageClassification`.
> [!WARNING]
> When copying a Transformers' model file, replace all relative imports at the top of the `modeling.py` file to import from Transformers instead.
```
-`configuration.py`: Contains the code for `ResnetConfig`.
-`__init__.py`: Can be empty, this file allows Python `resnet_model` to be used as a module.
```bash
.
└── resnet_model
├── __init__.py
@ -272,27 +228,16 @@ contains the code of `ResnetModel` and `ResnetModelForImageClassification`.
└── modeling_resnet.py
```
The `__init__.py` can be empty, it's just there so that Python detects `resnet_model` can be use as a module.
<Tipwarning={true}>
If copying a modeling files from the library, you will need to replace all the relative imports at the top of the file
to import from the `transformers` package.
</Tip>
Note that you can re-use (or subclass) an existing configuration/model.
To share your model with the community, follow those steps: first import the ResNet model and config from the newly
created files:
To share the model, import the ResNetmodel and configuration.
Then you have to tell the library you want to copy the code files of those objects when using the `save_pretrained`
method and properly register them with a given Auto class (especially for models), just run:
Copy the code from the model and configuration files. To make sure the AutoClass objects are saved with [`~PreTrainedModel.save_pretrained`], call the [`~PretrainedConfig.register_for_auto_class`] method. This modifies the configuration JSON file to include the AutoClass objects and mapping.
For a model, pick the appropriate `AutoModelFor` class based on the task.
Now to send the model to the Hub, make sure you are logged in. Either run in your terminal:
The model is ready to be pushed to the Hub now. Log in to your Hugging Face account from the command line or notebook.
<hfoptionsid="push">
<hfoptionid="huggingface-CLI">
```bash
huggingface-cli login
```
or from a notebook:
</hfoption>
<hfoptionid="notebook">
```py
fromhuggingface_hubimportnotebook_login
@ -344,41 +283,15 @@ from huggingface_hub import notebook_login
notebook_login()
```
You can then push to your own namespace (or an organization you are a member of) like this:
</hfoption>
</hfoptions>
Call [`~PreTrainedModel.push_to_hub`] on the model to upload the model to the Hub.
```py
resnet50d.push_to_hub("custom-resnet50d")
```
On top of the modeling weights and the configuration in json format, this also copied the modeling and
configuration `.py` files in the folder `custom-resnet50d` and uploaded the result to the Hub. You can check the result
in this [model repo](https://huggingface.co/sgugger/custom-resnet50d).
See the [sharing tutorial](model_sharing) for more information on the push to Hub method.
## Using a model with custom code
You can use any configuration, model or tokenizer with custom code files in its repository with the auto-classes and
the `from_pretrained` method. All files and code uploaded to the Hub are scanned for malware (refer to the [Hub security](https://huggingface.co/docs/hub/security#malware-scanning) documentation for more information), but you should still
review the model code and author to avoid executing malicious code on your machine. Set `trust_remote_code=True` to use
Note that when browsing the commit history of the model repo on the Hub, there is a button to easily copy the commit
hash of any commit.
The pretrained weights, configuration, `modeling.py` and `configuration.py` files should all be uploaded to the Hub now in a [repository](https://hf.co/sgugger/custom-resnet50d) under your namespace.
Because a custom model doesn't use the same modeling code as a Transformers' model, you need to add `trust_remode_code=True` in [`~PreTrainedModel.from_pretrained`] to load it. Refer to the load [custom models](./models#custom-models) section for more information.
<!--Copyright 2021 The HuggingFace Team. All rights reserved.
<!--Copyright 2024 The HuggingFace Team. All rights reserved.
Licensed under the Apache License, Version 2.0 (the "License"); you may not use this file except in compliance with
the License. You may obtain a copy of the License at
@ -14,55 +14,52 @@ rendered properly in your Markdown viewer.
-->
# Debugging
# Multi-GPU debugging
Training on multiple GPUs can be a tricky endeavor whether you're running into installation issues or communication problems between your GPUs. This debugging guide covers some issues you may run into and how to resolve them.
Distributed training can be tricky because you have to ensure you're using the correct CUDA version across your system. You may encounter inter-communication issues between GPUs, and there may be underflow or overflow problems in your model.
## DeepSpeed CUDA installation
This guide covers how to debug these issues, especially as it relates to DeepSpeed and PyTorch.
If you're using DeepSpeed, you've probably already installed it with the following command.
## DeepSpeed CUDA
DeepSpeed compiles CUDA C++ which can be a potential source of errors when building PyTorch extensions that require CUDA. These errors depend on how CUDA is installed on your system. This section focuses on PyTorch built with *CUDA 10.2*
```bash
pip install deepspeed
```
DeepSpeed compiles CUDA C++ code and it can be a potential source of errors when building PyTorch extensions that require CUDA. These errors depend on how CUDA is installed on your system, and this section focuses on PyTorch built with *CUDA 10.2*.
> [!TIP]
> For any other installation issues, please [open an issue](https://github.com/microsoft/DeepSpeed/issues) with the DeepSpeed team.
<Tip>
### Non-identical toolkits
For any other installation issues, please [open an issue](https://github.com/microsoft/DeepSpeed/issues) with the DeepSpeed team.
PyTorch comes with its own CUDA toolkit, but to use DeepSpeed with PyTorch, you need to have an identical version of CUDA installed system-wide. For example, if you installed PyTorch with `cudatoolkit==10.2` in your Python environment, then you'll also need to have CUDA 10.2 installed everywhere.
</Tip>
### Non-identical CUDA toolkits
PyTorch comes with its own CUDA toolkit, but to use DeepSpeed with PyTorch, you need to have an identical version of CUDA installed system-wide. For example, if you installed PyTorch with `cudatoolkit==10.2` in your Python environment, then you'll also need to have CUDA 10.2 installed system-wide. If you don't have CUDA installed system-wide, you should install it first.
The exact location may vary from system to system, but `usr/local/cuda-10.2` is the most common location on many Unix systems. When CUDA is correctly setup and added to your `PATH` environment variable, you can find the installation location with the following command:
The exact location can vary from system to system, but `usr/local/cuda-10.2` is the most common location on many Unix systems. When CUDA is correctly set up and added to your `PATH` environment variable, you can find the installation location with the following command.
```bash
which nvcc
```
### Multiple CUDA toolkits
### Multiple toolkits
You may also have more than one CUDA toolkit installed system-wide.
You may also have more than one CUDA toolkit installed on your system.
```bash
/usr/local/cuda-10.2
/usr/local/cuda-11.0
```
Typically, package installers set the paths to whatever the last version was installed. If the package build fails because it can't find the right CUDA version (despite it being installed system-wide already), then you need to configure the `PATH` and `LD_LIBRARY_PATH` environment variables to point to the correct path.
Typically, package installers set the paths to whatever the last version was installed. If the package build fails because it can't find the right CUDA version (despite it being installed already), then you need to configure the `PATH` and `LD_LIBRARY_PATH` environment variables to point to the correct path.
Take a look at the contents of these environment variables first:
Take a look at the contents of the following environment variables first.
```bash
echo$PATH
echo$LD_LIBRARY_PATH
```
`PATH` lists the locations of the executables and `LD_LIBRARY_PATH` lists where to look for shared libraries. Earlier entries are prioritized over later ones, and `:` is used to separate multiple entries. To tell the build program where to find the specific CUDA toolkit you want, insert the correct path to list first. This command prepends rather than overwrites the existing values.
`PATH` lists the locations of the executables and `LD_LIBRARY_PATH` lists where to look for shared libraries. Earlier entries are prioritized over later ones, and `:` is used to separate multiple entries. To find a specific CUDA toolkit, insert the correct path to list first. This command prepends rather than overwrites the existing values.
In addition, you should also check the directories you assign actually exist. The `lib64` sub-directory contains various CUDA `.so` objects (like `libcudart.so`) and while it is unlikely your system names them differently, you should check the actual names and change them accordingly.
In addition, you should also check that the assigned directories actually exist. The `lib64` sub-directory contains various CUDA `.so` objects (like `libcudart.so`), and while it is unlikely your system names them differently, you should check the actual names and change them accordingly.
### Older CUDA versions
### Older versions
Sometimes, older CUDA versions may refuse to build with newer compilers. For example, if you have `gcc-9` but CUDA wants `gcc-7`. Usually, installing the latest CUDA toolkit enables support for the newer compiler.
You could also install an older version of the compiler in addition to the one you're currently using (or it may already be installed but it's not used by default and the build system can't see it). To resolve this, you can create a symlink to give the build system visibility to the older compiler.
You could also install an older version of the compiler in addition to the one you're currently using (or it may already be installed but it's not used by default and the build system can't see it). To resolve this, create a symlink to give the build system visibility to the older compiler.
If you're still having issues with installing DeepSpeed or if you're building DeepSpeed at run time, you can try to prebuild the DeepSpeed modules before installing them. To make a local build for DeepSpeed:
If you're still having issues with installing DeepSpeed or if you're building DeepSpeed at run time, try to prebuild the DeepSpeed modules before installing them. Run the commands below to make a local build for DeepSpeed.
> Add the `DS_BUILD_AIO=1` parameter to the build command to use NVMe offload. Make sure you install the libaio-dev package across your system.
To use NVMe offload, add the `DS_BUILD_AIO=1`parameter to the build command and make sure you install the libaio-dev package system-wide.
</Tip>
Next, you'll have to specify your GPU's architecture by editing the `TORCH_CUDA_ARCH_LIST` variable (find a complete list of NVIDIA GPUs and their corresponding architectures on this [page](https://developer.nvidia.com/cuda-gpus)). To check the PyTorch version that corresponds to your architecture, run the following command:
Next, specify your GPUs architecture by editing the `TORCH_CUDA_ARCH_LIST`variable (find a complete list of NVIDIA GPUs and their corresponding architectures on this [page](https://developer.nvidia.com/cuda-gpus)). To check the PyTorch version that corresponds to your architecture, run the following command.
Run the following command to find the architecture for GPU `0`. The results will show a value for `major` and `minor`, which is your GPU architecture. The GPU architecture below is `8.6`.
@ -138,98 +130,74 @@ If you get `8, 6`, then you can set `TORCH_CUDA_ARCH_LIST="8.6"`. For multiple G
It is also possible to not specify `TORCH_CUDA_ARCH_LIST` and the build program automatically queries the GPU architecture of the build. However, it may or may not match the actual GPU on the target machine which is why it is better to explicitly specify the correct architecture.
For training on multiple machines with the same setup, you'll need to make a binary wheel:
For training on multiple machines with the same setup, you'll need to make a binary wheel as shown below.
This command generates a binary wheel that'll look something like `dist/deepspeed-0.3.13+8cd046f-cp38-cp38-linux_x86_64.whl`. Now you can install this wheel locally or on another machine.
This command generates a binary wheel that'll look something like `dist/deepspeed-0.3.13+8cd046f-cp38-cp38-linux_x86_64.whl`. Install this wheel locally or on another machine.
When training or inferencing with `DistributedDataParallel` and multiple GPU, if you run into issue of inter-communication between processes and/or nodes, you can use the following script to diagnose network issues.
Distributed training involves communication between processes andor nodes and this can be a potential source of errors.
Download the script below to diagnose network issues, and then run it to test GPU communication. The example command below tests how two GPUs communicate. Adjust the `--nproc_per_node` and `--nnodes` parameters to adapt it to your system.
If both processes can talk to each and allocate GPU memory each will print an OK status.
For more GPUs or nodes adjust the arguments in the script.
The script prints an `OK` status if both GPUs are able to communicate and allocate memory. Take a closer look at the diagnostic script for more details and a recipe for running it in a SLURM environment.
You will find a lot more details inside the diagnostics script and even a recipe to how you could run it in a SLURM environment.
An additional level of debug is to add `NCCL_DEBUG=INFO` environment variable as follows:
Add the `NCCL_DEBUG=INFO` environment variable to report more NCCL-related debugging information.
This will dump a lot of NCCL-related debug information, which you can then search online if you find that some problems are reported. Or if you're not sure how to interpret the output you can share the log file in an Issue.
## Underflow and overflow detection
Underflow and overflow can occur when activations or weights are `inf`, `nan`, and when `loss=NaN`. This may indicate an underflow or overflow issue. To detect these issues, activate the `DebugUnderflowOverflow` module in [`TrainingArguments.debug`] or import and add the module to your own training loop or another trainer class.
<hfoptionsid="overflow">
<hfoptionid="Trainer">
## Underflow and Overflow Detection
```py
fromtransformersimportTrainingArguments
<Tip>
This feature is currently available for PyTorch-only.
</Tip>
<Tip>
For multi-GPU training it requires DDP (`torch.distributed.launch`).
</Tip>
<Tip>
This feature can be used with any `nn.Module`-based model.
</Tip>
If you start getting `loss=NaN` or the model exhibits some other abnormal behavior due to `inf` or `nan` in
activations or weights one needs to discover where the first underflow or overflow happens and what led to it. Luckily
you can accomplish that easily by activating a special module that will do the detection automatically.
If you're using [`Trainer`], you just need to add:
```bash
--debug underflow_overflow
args=TrainingArguments(
debug="underflow_overflow",
...
)
```
to the normal command line arguments, or pass `debug="underflow_overflow"` when creating the
[`TrainingArguments`] object.
</hfoption>
<hfoptionid="PyTorch training loop">
If you're using your own training loop or another Trainer you can accomplish the same with:
[`~debug_utils.DebugUnderflowOverflow`] inserts hooks into the model that immediately after each
forward call will test input and output variables and also the corresponding module's weights. As soon as `inf` or
`nan` is detected in at least one element of the activations or weights, the program will assert and print a report
like this (this was caught with `google/mt5-small` under fp16 mixed precision):
</hfoption>
</hfoptions>
```
The [`~debug_utils.DebugUnderflowOverflow`] module inserts hooks into the model to test the input and output variables and the corresponding model weights after each forward call. If `inf` or `nan` is detected in at least one element of the activations or weights, the module prints a report like the one shown below.
The example below is for fp16 mixed precision training with [google/mt5-small](https://huggingface.co/google/mt5-small).
```shell
Detected inf/nan during batch_number=0
Last 21 forward frames:
abs min abs max metadata
@ -269,48 +237,20 @@ abs min abs max metadata
0.00e+00 inf output
```
The example output has been trimmed in the middle for brevity.
At the start of the report, you can see which batch number the error occurred. In this case, it occurred on the first batch.
The second column shows the value of the absolute largest element, so if you have a closer look at the last few frames,
the inputs and outputs were in the range of `1e4`. So when this training was done under fp16 mixed precision the very
last step overflowed (since under `fp16` the largest number before `inf` is `64e3`). To avoid overflows under
`fp16` the activations must remain way below `1e4`, because `1e4 * 1e4 = 1e8` so any matrix multiplication with
large activations is going to lead to a numerical overflow condition.
Each frame describes the module it is reporting on. For example, the frame below inspected `encoder.block.2.layer.1.layer_norm`. This indicates the layer norm in the first layer of the second block of the encoder. The forward calls are to `T5LayerNorm`.
At the very start of the trace you can discover at which batch number the problem occurred (here `Detected inf/nan during batch_number=0` means the problem occurred on the first batch).
Each reported frame starts by declaring the fully qualified entry for the corresponding module this frame is reporting
for. If we look just at this frame:
```
```shell
encoder.block.2.layer.1.layer_norm T5LayerNorm
8.69e-02 4.18e-01 weight
2.65e-04 3.42e+03 input[0]
1.79e-06 4.65e+00 output
```
Here, `encoder.block.2.layer.1.layer_norm` indicates that it was a layer norm for the first layer, of the second
block of the encoder. And the specific calls of the `forward` is `T5LayerNorm`.
The last frame reports on the `Dropout.forward` function. It called the `dropout` attribute from inside the `DenseReluDense` class. You can observe that the overflow (`inf`) occurred in the first layer of the encoders second block in the first batch. The absolute largest input element was 6.27e+04.
Let's look at the last few frames of that report:
```
Detected inf/nan during batch_number=0
Last 21 forward frames:
abs min abs max metadata
[...]
encoder.block.2.layer.1.DenseReluDense.wi_0 Linear
2.17e-07 4.50e+00 weight
1.79e-06 4.65e+00 input[0]
2.68e-06 3.70e+01 output
encoder.block.2.layer.1.DenseReluDense.wi_1 Linear
The last frame reports for `Dropout.forward` function with the first entry for the only input and the second for the
only output. You can see that it was called from an attribute `dropout` inside `DenseReluDense` class. We can see
that it happened during the first layer, of the 2nd block, during the very first batch. Finally, the absolute largest
input elements was `6.27e+04` and same for the output was `inf`.
The `T5DenseGatedGeluDense.forward` function output activations had an absolute maximum value of 6.27e+04 which is close to fp16s maximum limit of 6.4e+04. In the next step, `Dropout` renormalizes the weights, after zeroing some elements, which pushes the absolute maximum value to greater than 6.4e+04 resulting in an overflow.
You can see here, that `T5DenseGatedGeluDense.forward` resulted in output activations, whose absolute max value was
around 62.7K, which is very close to fp16's top limit of 64K. In the next frame we have `Dropout` which renormalizes
the weights, after it zeroed some of the elements, which pushes the absolute max value to more than 64K, and we get an
overflow (`inf`).
Now that you know where the error is happening, you can investigate the modeling code in [modeling_t5.py](https://github.com/huggingface/transformers/blob/main/src/transformers/models/t5/modeling_t5.py).
As you can see it's the previous frames that we need to look into when the numbers start going into very large for fp16
numbers.
Let's match the report to the code from `models/t5/modeling_t5.py`:
```python
```py
classT5DenseGatedGeluDense(nn.Module):
def__init__(self,config):
super().__init__()
@ -353,29 +282,11 @@ class T5DenseGatedGeluDense(nn.Module):
returnhidden_states
```
Now it's easy to see the `dropout` call, and all the previous calls as well.
Since the detection is happening in a forward hook, these reports are printed immediately after each `forward`
returns.
Going back to the full report, to act on it and to fix the problem, we need to go a few frames up where the numbers
started to go up and most likely switch to the `fp32` mode here, so that the numbers don't overflow when multiplied
or summed up. Of course, there might be other solutions. For example, we could turn off `amp` temporarily if it's
enabled, after moving the original `forward` into a helper wrapper, like so:
One solution is to go back a few steps before the values started growing toolarge and switch to fp32 so the numbers don't overflow when multiplied or summed. Another potential solution is to temporarily disable mixed precision training (`amp`).
Since the automatic detector only reports on inputs and outputs of full frames, once you know where to look, you may
want to analyse the intermediary stages of any specific `forward` function as well. In such a case you can use the
`detect_overflow` helper function to inject the detector where you want it, for example:
The report only returns inputs and outputs of full frames, so you may also want to analyze the intermediate values of any `forward` function as well. Add the `detect_overflow` function after the forward calls to track `inf` or `nan` values in the intermediate `forwarded_states`.
### Specific batch absolute min and max value tracing
### Batch tracing
The same debugging class can be used for per-batch tracing with the underflow/overflow detection feature turned off.
[`~debug_utils.DebugUnderflowOverflow`] is able to trace the absolute minimum and maximum values in each batch with the underflow and overflow feature disabled. This is useful for identifying where errors are occurring in the model.
Let's say you want to watch the absolute min and max values for all the ingredients of each `forward` call of a given
batch, and only do that for batches 1 and 3. Then you instantiate this class as:
The example below shows how to trace the minimum and maximum values in batches 1 and 3 (batches are zero-indexd).
And now full batches 1 and 3 will be traced using the same format as the underflow/overflow detector does.
Batches are 0-indexed.
This is helpful if you know that the program starts misbehaving after a certain batch number, so you can fast-forward
right to that area. Here is a sample truncated output for such configuration:
```
```shell
*** Starting batch number=1 ***
abs min abs max metadata
shared Embedding
@ -465,13 +358,10 @@ abs min abs max metadata
[...]
```
Here you will get a huge number of frames dumped - as many as there were forward calls in your model, so it may or may
not what you want, but sometimes it can be easier to use for debugging purposes than a normal debugger. For example, if
a problem starts happening at batch number 150. So you can dump traces for batches 149 and 150 and compare where
numbers started to diverge.
[`~debug_utils.DebugUnderflowOverflow`] reports on a large number of frames which is easier for debugging. Once you know where a problem is occurring, say batch 150, then you can focus the trace for batches 149 and 150 and compare where the numbers are diverging.
You can also specify the batch number after which to stop the training, with:
It is also possible to abort the trace after a certain batch number, for example, batch 3.
<!--Copyright 2025 The HuggingFace Team. All rights reserved.
Licensed under the Apache License, Version 2.0 (the "License"); you may not use this file except in compliance with
the License. You may obtain a copy of the License at
http://www.apache.org/licenses/LICENSE-2.0
Unless required by applicable law or agreed to in writing, software distributed under the License is distributed on
an "AS IS" BASIS, WITHOUT WARRANTIES OR CONDITIONS OF ANY KIND, either express or implied. See the License for the
specific language governing permissions and limitations under the License.
⚠️ Note that this file is in Markdown but contain specific syntax for our doc-builder (similar to MDX) that may not be
rendered properly in your Markdown viewer.
-->
# ExecuTorch
[ExecuTorch](https://pytorch.org/executorch/stable/index.html) is a platform that enables PyTorch training and inference programs to be run on mobile and edge devices. It is powered by [torch.compile](https://pytorch.org/docs/stable/torch.compiler.html) and [torch.export](https://pytorch.org/docs/main/export.html) for performance and deployment.
You can use ExecuTorch with Transformers with [torch.export](https://pytorch.org/docs/main/export.html). The [`~transformers.convert_and_export_with_cache`] method converts a [`PreTrainedModel`] into an exportable module. Under the hood, it uses [torch.export](https://pytorch.org/docs/main/export.html) to export the model, ensuring compatibility with ExecuTorch.
The exported PyTorch model is now ready to be used with ExecuTorch. Wrap the model with [`~transformers.TorchExportableModuleWithStaticCache`] to generate text.
```py
prompts=["Simply put, the theory of relativity states that "]
<!--Copyright 2020 The HuggingFace Team. All rights reserved.
<!--Copyright 2024 The HuggingFace Team. All rights reserved.
Licensed under the Apache License, Version 2.0 (the "License"); you may not use this file except in compliance with
the License. You may obtain a copy of the License at
@ -14,61 +14,349 @@ rendered properly in your Markdown viewer.
-->
# Use tokenizers from 🤗 Tokenizers
# Tokenizers
The [`PreTrainedTokenizerFast`] depends on the [🤗 Tokenizers](https://huggingface.co/docs/tokenizers) library. The tokenizers obtained from the 🤗 Tokenizers library can be
loaded very simply into 🤗 Transformers.
Tokenizers convert text into an array of numbers known as tensors, the inputs to a text model. There are several tokenizer algorithms, but they all share the same purpose. Split text into smaller words or subwords (tokens) according to some rules, and convert them into numbers (input ids). A Transformers tokenizer also returns an attention mask to indicate which tokens should be attended to.
Before getting in the specifics, let's first start by creating a dummy tokenizer in a few lines:
> [!TIP]
> Learn about the most popular tokenization algorithms on the [Summary of the tokenizers](./tokenizer_summary) doc.
```python
>>>fromtokenizersimportTokenizer
>>>fromtokenizers.modelsimportBPE
>>>fromtokenizers.trainersimportBpeTrainer
>>>fromtokenizers.pre_tokenizersimportWhitespace
Call [`~PreTrainedTokenizer.from_pretrained`] to load a tokenizer and its configuration from the Hugging Face [Hub](https://hf.co) or a local directory. The pretrained tokenizer is saved in a [tokenizer.model](https://huggingface.co/google/gemma-2-2b/blob/main/tokenizer.model) file with all its associated vocabulary files.
Pass a string of text to the tokenizer to return the input ids and attention mask, and set the framework tensor type to return with the `return_tensors` parameter.
We now have a tokenizer trained on the files we defined. We can either continue using it in that runtime, or save it to
a JSON file for future re-use.
Whichever tokenizer you use, make sure the tokenizer vocabulary is the same as the pretrained models tokenizer vocabulary. This is especially important if you're using a custom tokenizer with a different vocabulary from the pretrained models tokenizer.
## Loading directly from the tokenizer object
This guide provides a brief overview of the tokenizer classes and how to preprocess text with it.
Let's see how to leverage this tokenizer object in the 🤗 Transformers library. The
[`PreTrainedTokenizerFast`] class allows for easy instantiation, by accepting the instantiated
*tokenizer* object as an argument:
## Tokenizer classes
```python
>>>fromtransformersimportPreTrainedTokenizerFast
All tokenizers inherit from a [`PreTrainedTokenizerBase`] class that provides common methods for all tokenizers like [`~PreTrainedTokenizerBase.from_pretrained`] and [`~PreTrainedTokenizerBase.batch_decode`]. There are two main tokenizer classes that build on top of the base class.
- [`PreTrainedTokenizer`] is a Python implementation, for example [`LlamaTokenizer`].
- [`PreTrainedTokenizerFast`] is a fast Rust-based implementation from the [Tokenizers](https://hf.co/docs/tokenizers/index) library, for example [`LlamaTokenizerFast`].
There are two ways you can load a tokenizer, with [`AutoTokenizer`] or a model-specific tokenizer.
<hfoptionsid="tokenizer-classes">
<hfoptionid="AutoTokenizer">
The [AutoClass](./model_doc/auto) API is a fast and easy way to load a tokenizer without needing to know whether a Python or Rust-based implementation is available. By default, [`AutoTokenizer`] tries to load a fast tokenizer if it's available, otherwise, it loads the Python implementation.
Use [`~PreTrainedTokenizer.from_pretrained`] to load a tokenizer.
The path to which we saved this file can be passed to the [`PreTrainedTokenizerFast`] initialization
method using the `tokenizer_file` parameter:
</hfoption>
<hfoptionid="model-specific tokenizer">
```python
>>>fromtransformersimportPreTrainedTokenizerFast
Each pretrained model is associated with a tokenizer and the specific vocabulary it was trained on. A tokenizer can be loaded directly from the model-specific class.
In addition to text tokens, multimodal tokenizers also holds tokens from other modalities as a part of its attributes for easy access.
To add these special tokens to a tokenizer, pass them as a dictionary to the `extra_special_tokens` parameter in [`~AutoTokenizer.from_pretrained`]. The example below adds the `image_token` to a vision-language model.
Save the tokenizer so you can reuse it with direct access to the `image_token`, `boi_token`, and `eoi_token`.
[`PreTrainedTokenizerFast`] or *fast tokenizers* are Rust-based tokenizers from the [Tokenizers](https://hf.co/docs/tokenizers) library. It is significantly faster at batched tokenization and provides additional alignment methods compared to the Python-based tokenizers.
[`AutoTokenizer`] automatically loads a fast tokenizer if it's supported. Otherwise, you need to explicitly load the fast tokenizer.
This section will show you how to train a fast tokenizer and reuse it in Transformers.
To train a Byte-Pair Encoding (BPE) tokenizer, create a [`~tokenizers.Tokenizer`] and [`~tokenizers.trainers.BpeTrainer`] class and define the unknown token and special tokens.
[tiktoken](https://github.com/openai/tiktoken) is a [byte-pair encoding (BPE)](./tokenizer_summary#byte-pair-encoding-bpe) tokenizer by OpenAI. It includes several tokenization schemes or encodings for how text should be tokenized.
There are currently two models trained and released with tiktoken, GPT2 and Llama3. Transformers supports models with a [tokenizer.model](https://hf.co/meta-llama/Meta-Llama-3-8B/blob/main/original/tokenizer.model) tiktoken file. The tiktoken file is automatically converted into Transformers Rust-based [`PreTrainedTokenizerFast`].
Add the `subfolder` parameter to [`~PreTrainedModel.from_pretrained`] to specify where the `tokenizer.model` tiktoken file is located.
The tiktoken `tokenizer.model` file contains no information about additional tokens or pattern strings. If these are important, convert the tokenizer to `tokenizer.json` (the appropriate format for [`PreTrainedTokenizerFast`]).
Generate the tiktoken `tokenizer.model` file with the [tiktoken.get_encoding](https://github.com/openai/tiktoken/blob/63527649963def8c759b0f91f2eb69a40934e468/tiktoken/registry.py#L63) function, and convert it to `tokenizer.json` with [convert_tiktoken_to_fast](https://github.com/huggingface/transformers/blob/99e0ab6ed888136ea4877c6d8ab03690a1478363/src/transformers/integrations/tiktoken.py#L8).
A Transformers model expects the input to be a PyTorch, TensorFlow, or NumPy tensor. A tokenizers job is to preprocess text into those tensors. Specify the framework tensor type to return with the `return_tensors` parameter.
The tokenization process of converting text into input ids is completed in two steps.
<hfoptionsid="steps">
<hfoptionid="1. tokenize">
In the first step, a string of text is split into tokens by the [`~PreTrainedTokenizer.tokenize`] function. How the text is split depends on the tokenization algorithm.
```py
tokens=tokenizer.tokenize("We are very happy to show you the 🤗 Transformers library")
Lastly, the model prediction typically generates numerical outputs which are converted back to text with [`~PreTrainedTokenizer.decode`].
```py
decoded_string=tokenizer.decode(ids)
print(decoded_string)
'We are very happy to show you the 🤗 Transformers library'
```
</hfoption>
</hfoptions>
> [!TIP]
> Visualize how different tokenizers work in the [Tokenizer Playground](https://xenova-the-tokenizer-playground.static.hf.space).
### Special tokens
Special tokens provide the model with some additional information about the text.
For example, if you compare the tokens obtained from passing text directly to the tokenizer and from [`~PreTrainedTokenizer.convert_tokens_to_ids`], you'll notice some additional tokens are added.
```py
model_inputs=tokenizer("We are very happy to show you the 🤗 Transformers library.")
When you [`~PreTrainedTokenizer.decode`] the ids, you'll see `<bos>` at the beginning of the string. This is used to indicate the beginning of a sentence to the model.
'<bos>We are very happy to show you the 🤗 Transformers library.'
'We are very happy to show you the 🤗 Transformers library'
```
Not all models need special tokens, but if they do, a tokenizer automatically adds them.
### Batch tokenization
It is faster and more efficient to preprocess *batches* of text instead of a single sentence at a time. Fast tokenizers are especially good at parallelizing tokenization.
Pass a list of string text to the tokenizer.
```py
batch_sentences=[
"But what about second breakfast?",
"Don't think he knows about second breakfast, Pip.",
> Learn about additional padding strategies in the [Padding and truncation](./pad_truncation) guide.
In the output above, the `input_ids` have different lengths. This is an issue because Transformers expects them to have the same lengths so it can pack them into a batch. Sequences with uneven lengths can't be batched.
Padding adds a special *padding token* to ensure all sequences have the same length. Set `padding=True` to pad the sequences to the longest sequence length in the batch.
The tokenizer added the special padding token `0` to the left side (*left padding*) because Gemma and LLMs in general are not trained to continue generation from a padding token.
### Truncation
> [!TIP]
> Learn about additional truncation strategies in the [Padding and truncation](./pad_truncation) guide.
Models are only able to process sequences up to a certain length. If you try to process a sequence longer than a model can handle, it crashes.
Truncation removes tokens from a sequence to ensure it doesn't exceed the maximum length. Set `truncation=True` to truncate a sequence to the maximum length accepted by the model. You can also set the maximum length yourself with the `max_length` parameter.
<!--Copyright 2024 The HuggingFace Team. All rights reserved.
Licensed under the Apache License, Version 2.0 (the "License"); you may not use this file except in compliance with
the License. You may obtain a copy of the License at
http://www.apache.org/licenses/LICENSE-2.0
Unless required by applicable law or agreed to in writing, software distributed under the License is distributed on
an "AS IS" BASIS, WITHOUT WARRANTIES OR CONDITIONS OF ANY KIND, either express or implied. See the License for the
specific language governing permissions and limitations under the License.
⚠️ Note that this file is in Markdown but contain specific syntax for our doc-builder (similar to MDX) that may not be
rendered properly in your Markdown viewer.
-->
# Feature extractors
Feature extractors preprocess audio data into the correct format for a given model. It takes the raw audio signal and converts it into a tensor that can be fed to a model. The tensor shape depends on the model, but the feature extractor will correctly preprocess the audio data for you given the model you're using. Feature extractors also include methods for padding, truncation, and resampling.
Call [`~AutoFeatureExtractor.from_pretrained`] to load a feature extractor and its preprocessor configuration from the Hugging Face [Hub](https://hf.co/models) or local directory. The feature extractor and preprocessor configuration is saved in a [preprocessor_config.json](https://hf.co/openai/whisper-tiny/blob/main/preprocessor_config.json) file.
Pass the audio signal, typically stored in `array`, to the feature extractor and set the `sampling_rate` parameter to the pretrained audio models sampling rate. It is important the sampling rate of the audio data matches the sampling rate of the data a pretrained audio model was trained on.
The feature extractor returns an input, `input_values`, that is ready for the model to consume.
This guide walks you through the feature extractor classes and how to preprocess audio data.
## Feature extractor classes
Transformers feature extractors inherit from the base [`SequenceFeatureExtractor`] class which subclasses [`FeatureExtractionMixin`].
- [`SequenceFeatureExtractor`] provides a method to [`~SequenceFeatureExtractor.pad`] sequences to a certain length to avoid uneven sequence lengths.
- [`FeatureExtractionMixin`] provides [`~FeatureExtractionMixin.from_pretrained`] and [`~FeatureExtractionMixin.save_pretrained`] to load and save a feature extractor.
There are two ways you can load a feature extractor, [`AutoFeatureExtractor`] and a model-specific feature extractor class.
<hfoptionsid="feature-extractor-classes">
<hfoptionid="AutoFeatureExtractor">
The [AutoClass](./model_doc/auto) API automatically loads the correct feature extractor for a given model.
Use [`~AutoFeatureExtractor.from_pretrained`] to load a feature extractor.
Every pretrained audio model has a specific associated feature extractor for correctly processing audio data. When you load a feature extractor, it retrieves the feature extractors configuration (feature size, chunk length, etc.) from [preprocessor_config.json](https://hf.co/openai/whisper-tiny/blob/main/preprocessor_config.json).
A feature extractor can be loaded directly from its model-specific class.
A feature extractor expects the input as a PyTorch tensor of a certain shape. The exact input shape can vary depending on the specific audio model you're using.
For example, [Whisper](https://huggingface.co/docs/transformers/model_doc/whisper) expects `input_features` to be a tensor of shape `(batch_size, feature_size, sequence_length)` but [Wav2Vec2](https://hf.co/docs/transformers/model_doc/wav2vec2) expects `input_values` to be a tensor of shape `(batch_size, sequence_length)`.
The feature extractor generates the correct input shape for whichever audio model you're using.
A feature extractor also sets the sampling rate (the number of audio signal values taken per second) of the audio files. The sampling rate of your audio data must match the sampling rate of the dataset a pretrained model was trained on. This value is typically given in the model card.
Load a dataset and feature extractor with [`~FeatureExtractionMixin.from_pretrained`].
Check out the first example from the dataset and access the `audio` column which contains `array`, the raw audio signal.
```py
dataset[0]["audio"]["array"]
array([0.,0.00024414,-0.00024414,...,-0.00024414,
0.,0.])
```
The feature extractor preprocesses `array` into the expected input format for a given audio model. Use the `sampling_rate` parameter to set the appropriate sampling rate.
Audio sequence lengths that are different is an issue because Transformers expects all sequences to have the same lengths so they can be batched. Uneven sequence lengths can't be batched.
```py
dataset[0]["audio"]["array"].shape
(86699,)
dataset[1]["audio"]["array"].shape
(53248,)
```
Padding adds a special *padding token* to ensure all sequences have the same length. The feature extractor adds a `0` - interpreted as silence - to `array` to pad it. Set `padding=True` to pad sequences to the longest sequence length in the batch.
Models can only process sequences up to a certain length before crashing.
Truncation is a strategy for removing excess tokens from a sequence to ensure it doesn't exceed the maximum length. Set `truncation=True` to truncate a sequence to the length in the `max_length` parameter.
The [Datasets](https://hf.co/docs/datasets/index) library can also resample audio data to match an audio models expected sampling rate. This method resamples the audio data on the fly when they're loaded which can be faster than resampling the entire dataset in-place.
The audio dataset you've been working on has a sampling rate of 8kHz and the pretrained model expects 16kHz.
<!--Copyright 2023 The HuggingFace Team. All rights reserved.
<!--Copyright 2024 The HuggingFace Team. All rights reserved.
Licensed under the Apache License, Version 2.0 (the "License"); you may not use this file except in compliance with
the License. You may obtain a copy of the License at
@ -14,81 +14,86 @@ rendered properly in your Markdown viewer.
-->
# FullyShardedDataParallel
# FullyShardedDataParallel
[Fully Sharded Data Parallel (FSDP)](https://pytorch.org/blog/introducing-pytorch-fully-sharded-data-parallel-api/) is a data parallel method that shards a model's parameters, gradients and optimizer states across the number of available GPUs (also called workers or *rank*). Unlike [DistributedDataParallel (DDP)](https://pytorch.org/docs/stable/generated/torch.nn.parallel.DistributedDataParallel.html), FSDP reduces memory-usage because a model is replicated on each GPU. This improves GPU memory-efficiency and allows you to train much larger models on fewer GPUs. FSDP is integrated with the Accelerate, a library for easily managing training in distributed environments, which means it is available for use from the [`Trainer`] class.
[Fully Sharded Data Parallel (FSDP)](https://pytorch.org/blog/introducing-pytorch-fully-sharded-data-parallel-api/) is a [parallelism](./perf_train_gpu_many) method that combines the advantages of data and model parallelism for distributed training.
Before you start, make sure Accelerate is installed and at least PyTorch 2.1.0 or newer.
Unlike [DistributedDataParallel (DDP)](./perf_train_gpu_many#distributeddataparallel), FSDP saves more memory because it doesn't replicate a model on each GPU. It shards the models parameters, gradients and optimizer states across GPUs. Each model shard processes a portion of the data and the results are synchronized to speed up training.
This guide covers how to set up training a model with FSDP and [Accelerate](https://hf.co/docs/accelerate/index), a library for managing distributed training.
```bash
pip install accelerate
```
## FSDP configuration
## Configuration options
To start, run the [`accelerate config`](https://huggingface.co/docs/accelerate/package_reference/cli#accelerate-config) command to create a configuration file for your training environment. Accelerate uses this configuration file to automatically setup the correct training environment based on your selected training options in `accelerate config`.
Always start by running the [accelerate config](https://hf.co/docs/accelerate/package_reference/cli#accelerate-config) command to help Accelerate set up the correct distributed training environment.
```bash
accelerate config
```
When you run `accelerate config`, you'll be prompted with a series of options to configure your training environment. This section covers some of the most important FSDP options. To learn more about the other available FSDP options, take a look at the [fsdp_config](https://huggingface.co/docs/transformers/main_classes/trainer#transformers.TrainingArguments.fsdp_config) parameters.
The section below discusses some of the more important FSDP configuration options. Learn more about other available options in the [fsdp_config](https://hf.co/docs/transformers/main_classes/trainer#transformers.TrainingArguments.fsdp_config) parameter.
### Sharding strategy
FSDP offers a number of sharding strategies to select from:
FSDP offers several sharding strategies to distribute a model. Refer to the table below to help you choose the best strategy for your setup. Specify a strategy with the `fsdp_sharding_strategy` parameter in the configuration file.
*`FULL_SHARD` - shards model parameters, gradients and optimizer states across workers; select `1` for this option
*`SHARD_GRAD_OP`- shard gradients and optimizer states across workers; select `2` for this option
*`NO_SHARD`- don't shard anything (this is equivalent to DDP); select`3`for this option
*`HYBRID_SHARD`- shard model parameters, gradients and optimizer states within each worker where each worker also has a full copy; select`4`for this option
*`HYBRID_SHARD_ZERO2` - shard gradients and optimizer states within each worker where each worker also has a full copy; select`5`for this option
This is enabled by the `fsdp_sharding_strategy` flag.
| sharding strategy | description | parameter value |
|---|---|---|
| `FULL_SHARD`| shards model parameters, gradients, and optimizer states |`1`|
| `SHARD_GRAD_OP`| shards gradients and optimizer states |`2`|
| `NO_SHARD` | don't shard the model |`3`|
| `HYBRID_SHARD` | shards model parameters, gradients, and optimizer states within each GPU | `4` |
| `HYBRID_SHARD_ZERO2` | shards gradients and optimizer states within each GPU | `5` |
### CPU offload
You could also offload parameters and gradients when they are not in use to the CPU to save even more GPU memory and help you fit large models where even FSDP may not be sufficient. This is enabled by setting `fsdp_offload_params: true` when running `accelerate config`.
Offload model parameters and gradients when they aren't being used to the CPU to save additional GPU memory. This is useful for scenarios where a model is too large even with FSDP.
Specify `fsdp_offload_params: true` in the configuration file to enable offloading.
### Wrapping policy
FSDP is applied by wrapping each layer in the network. The wrapping is usually applied in a nested way where the full weights are discarded after each forward pass to save memory for use in the next layer. The *auto wrapping* policy is the simplest way to implement this and you don't need to change any code. You should select `fsdp_auto_wrap_policy: TRANSFORMER_BASED_WRAP` to wrap a Transformer layer and `fsdp_transformer_layer_cls_to_wrap` to specify which layer to wrap (for example `BertLayer`).
FSDP is applied by wrapping each layer in the network. The wrapping is usually applied in a nested way where the full weights are discarded after each forward pass to save memory for the next layer.
Otherwise, you can choose a size-based wrapping policy where FSDP is applied to a layer if it exceeds a certain number of parameters. This is enabled by setting`fsdp_wrap_policy: SIZE_BASED_WRAP`and `min_num_param` to the desired size threshold.
There are several wrapping policies available, but the *auto wrapping* policy is the simplest and doesn't require any changes to your code. Specify`fsdp_auto_wrap_policy: TRANSFORMER_BASED_WRAP`to wrap a Transformer layer and `fsdp_transformer_layer_cls_to_wrap` to determine which layer to wrap (for example, `BertLayer`).
### Checkpointing
Size-based wrapping is also available. If a layer exceeds a certain number of parameters, it is wrapped. Specify `fsdp_wrap_policy: SIZED_BASED_WRAP` and `min_num_param` to set the minimum number of parameters for a layer to be wrapped.
Intermediate checkpoints should be saved with `fsdp_state_dict_type: SHARDED_STATE_DICT` because saving the full state dict with CPU offloading on rank 0 takes a lot of time and often results in `NCCL Timeout` errors due to indefinite hanging during broadcasting. You can resume training with the sharded state dicts with the [`~accelerate.Accelerator.load_state`] method.
### Checkpoints
Intermediate checkpoints should be saved as a sharded state dict because saving the full state dict - even with CPU offloading - is time consuming and can cause `NCCL Timeout` errors due to indefinite hanging during broadcasting.
Specify `fsdp_state_dict_type: SHARDED_STATE_DICT` in the configuration file to save the sharded state dict. Now you can resume training from the sharded state dict with [`~accelerate.Accelerator.load_state`].
[PyTorch XLA](https://pytorch.org/xla/release/2.1/index.html) supports FSDP training for TPUs and it can be enabled by modifying the FSDP configuration file generated by `accelerate config`. In addition to the sharding strategies and wrapping options specified above, you can add the parameters shown below to the file.
[PyTorch XLA](https://pytorch.org/xla/release/2.1/index.html), a package for running PyTorch on XLA devices, enables FSDP on TPUs. Modify the configuration file to include the parameters below. Refer to the [xla_fsdp_settings](https://github.com/pytorch/xla/blob/2e6e183e0724818f137c8135b34ef273dea33318/torch_xla/distributed/fsdp/xla_fully_sharded_data_parallel.py#L128) parameter for additional XLA-specific parameters you can configure for FSDP.
```yaml
xla:True# must be set to True to enable PyTorch/XLA
xla_fsdp_settings:# XLA-specific FSDP parameters
xla_fsdp_grad_ckpt:True# use gradient checkpointing
The [`xla_fsdp_settings`](https://github.com/pytorch/xla/blob/2e6e183e0724818f137c8135b34ef273dea33318/torch_xla/distributed/fsdp/xla_fully_sharded_data_parallel.py#L128) allow you to configure additional XLA-specific parameters for FSDP.
## Training
## Launch training
An example FSDP configuration file may look like:
After running [accelerate config](https://hf.co/docs/accelerate/package_reference/cli#accelerate-config), your configuration file should be ready. An example configuration file is shown below that fully shards the parameter, gradient and optimizer states on two GPUs. Your file may look different depending on how you set up your configuration.
```yaml
compute_environment:LOCAL_MACHINE
@ -119,20 +124,22 @@ tpu_use_sudo: false
use_cpu:false
```
To launch training, run the [`accelerate launch`](https://huggingface.co/docs/accelerate/package_reference/cli#accelerate-launch) command and it'll automatically use the configuration file you previously created with `accelerate config`.
Run the [accelerate launch](https://hf.co/docs/accelerate/package_reference/cli#accelerate-launch) command to launch a training script with the FSDP configurations you chose in the configurationfile.
```bash
accelerate launch my-trainer-script.py
accelerate launch my-training-script.py
```
It is also possible to directly specify some of the FSDP arguments in the command line.
FSDP can be a powerful tool for training really large models and you have access to more than one GPU or TPU. By sharding the model parameters, optimizer and gradient states, and even offloading them to the CPU when they're inactive, FSDP can reduce the high cost of large-scale training. If you're interested in learning more, the following may be helpful:
FSDP is a powerful tool for training large models with fewer GPUs compared to other parallelism strategies. Refer to the following resources below to learn even more about FSDP.
* Follow along with the more in-depth Accelerate guide for [FSDP](https://huggingface.co/docs/accelerate/usage_guides/fsdp).
* Read the [Introducing PyTorch Fully Sharded Data Parallel (FSDP) API](https://pytorch.org/blog/introducing-pytorch-fully-sharded-data-parallel-api/) blog post.
* Read the [Scaling PyTorch models on Cloud TPUs with FSDP](https://pytorch.org/blog/scaling-pytorch-models-on-cloud-tpus-with-fsdp/) blog post.
- Follow along with the more in-depth Accelerate guide for [FSDP](https://hf.co/docs/accelerate/usage_guides/fsdp).
- Read the [Introducing PyTorch Fully Sharded Data Parallel (FSDP) API](https://pytorch.org/blog/introducing-pytorch-fully-sharded-data-parallel-api/) blog post.
- Read the [Scaling PyTorch models on Cloud TPUs with FSDP](https://pytorch.org/blog/scaling-pytorch-models-on-cloud-tpus-with-fsdp/) blog post.
Some files were not shown because too many files have changed in this diff
Show More
Reference in New Issue
Block a user
Blocking a user prevents them from interacting with repositories, such as opening or commenting on pull requests or issues. Learn more about blocking a user.