mirror of
https://github.com/huggingface/transformers.git
synced 2025-10-30 08:34:36 +08:00
Compare commits
1 Commits
ssh_new_cl
...
default-fa
| Author | SHA1 | Date | |
|---|---|---|---|
| d58107a32b |
@ -34,44 +34,64 @@ jobs:
|
||||
- run: echo 'export "GIT_COMMIT_MESSAGE=$(git show -s --format=%s)"' >> "$BASH_ENV" && source "$BASH_ENV"
|
||||
- run: mkdir -p test_preparation
|
||||
- run: python utils/tests_fetcher.py | tee tests_fetched_summary.txt
|
||||
- store_artifacts:
|
||||
path: ~/transformers/tests_fetched_summary.txt
|
||||
- run: |
|
||||
if [ -f test_list.txt ]; then
|
||||
cp test_list.txt test_preparation/test_list.txt
|
||||
else
|
||||
touch test_preparation/test_list.txt
|
||||
fi
|
||||
- run: |
|
||||
if [ -f examples_test_list.txt ]; then
|
||||
mv examples_test_list.txt test_preparation/examples_test_list.txt
|
||||
else
|
||||
touch test_preparation/examples_test_list.txt
|
||||
fi
|
||||
- run: |
|
||||
if [ -f filtered_test_list_cross_tests.txt ]; then
|
||||
mv filtered_test_list_cross_tests.txt test_preparation/filtered_test_list_cross_tests.txt
|
||||
else
|
||||
touch test_preparation/filtered_test_list_cross_tests.txt
|
||||
fi
|
||||
- run: |
|
||||
if [ -f doctest_list.txt ]; then
|
||||
cp doctest_list.txt test_preparation/doctest_list.txt
|
||||
else
|
||||
touch test_preparation/doctest_list.txt
|
||||
fi
|
||||
- run: |
|
||||
if [ -f test_repo_utils.txt ]; then
|
||||
mv test_repo_utils.txt test_preparation/test_repo_utils.txt
|
||||
else
|
||||
touch test_preparation/test_repo_utils.txt
|
||||
fi
|
||||
- run: python utils/tests_fetcher.py --filter_tests
|
||||
- run: |
|
||||
if [ -f test_list.txt ]; then
|
||||
mv test_list.txt test_preparation/filtered_test_list.txt
|
||||
else
|
||||
touch test_preparation/filtered_test_list.txt
|
||||
fi
|
||||
- store_artifacts:
|
||||
path: test_preparation/test_list.txt
|
||||
- store_artifacts:
|
||||
path: test_preparation/doctest_list.txt
|
||||
- store_artifacts:
|
||||
path: ~/transformers/test_preparation/filtered_test_list.txt
|
||||
- store_artifacts:
|
||||
path: test_preparation/examples_test_list.txt
|
||||
- run: export "GIT_COMMIT_MESSAGE=$(git show -s --format=%s)" && echo $GIT_COMMIT_MESSAGE && python .circleci/create_circleci_config.py --fetcher_folder test_preparation
|
||||
- run: |
|
||||
if [ ! -s test_preparation/generated_config.yml ]; then
|
||||
echo "No tests to run, exiting early!"
|
||||
circleci-agent step halt
|
||||
fi
|
||||
|
||||
if [ ! -s test_preparation/generated_config.yml ]; then
|
||||
echo "No tests to run, exiting early!"
|
||||
circleci-agent step halt
|
||||
fi
|
||||
- store_artifacts:
|
||||
path: test_preparation
|
||||
|
||||
- run:
|
||||
name: "Retrieve Artifact Paths"
|
||||
env:
|
||||
CIRCLE_TOKEN: ${{ secrets.CI_ARTIFACT_TOKEN }}
|
||||
command: |
|
||||
project_slug="gh/${CIRCLE_PROJECT_USERNAME}/${CIRCLE_PROJECT_REPONAME}"
|
||||
job_number=${CIRCLE_BUILD_NUM}
|
||||
url="https://circleci.com/api/v2/project/${project_slug}/${job_number}/artifacts"
|
||||
curl -o test_preparation/artifacts.json ${url}
|
||||
- run:
|
||||
name: "Prepare pipeline parameters"
|
||||
command: |
|
||||
python utils/process_test_artifacts.py
|
||||
|
||||
# To avoid too long generated_config.yaml on the continuation orb, we pass the links to the artifacts as parameters.
|
||||
# Otherwise the list of tests was just too big. Explicit is good but for that it was a limitation.
|
||||
# We used:
|
||||
|
||||
# https://circleci.com/docs/api/v2/index.html#operation/getJobArtifacts : to get the job artifacts
|
||||
# We could not pass a nested dict, which is why we create the test_file_... parameters for every single job
|
||||
|
||||
path: test_preparation/generated_config.yml
|
||||
- store_artifacts:
|
||||
path: test_preparation/transformed_artifacts.json
|
||||
- store_artifacts:
|
||||
path: test_preparation/artifacts.json
|
||||
path: test_preparation/filtered_test_list_cross_tests.txt
|
||||
- continuation/continue:
|
||||
parameters: test_preparation/transformed_artifacts.json
|
||||
configuration_path: test_preparation/generated_config.yml
|
||||
|
||||
# To run all tests for the nightly build
|
||||
@ -122,7 +142,6 @@ jobs:
|
||||
- run: python utils/custom_init_isort.py --check_only
|
||||
- run: python utils/sort_auto_mappings.py --check_only
|
||||
- run: python utils/check_doc_toc.py
|
||||
- run: python utils/check_docstrings.py --check_all
|
||||
|
||||
check_repository_consistency:
|
||||
working_directory: ~/transformers
|
||||
@ -171,4 +190,4 @@ workflows:
|
||||
- check_circleci_user
|
||||
- check_code_quality
|
||||
- check_repository_consistency
|
||||
- fetch_all_tests
|
||||
- fetch_all_tests
|
||||
@ -32,7 +32,7 @@ COMMON_ENV_VARIABLES = {
|
||||
"RUN_PT_FLAX_CROSS_TESTS": False,
|
||||
}
|
||||
# Disable the use of {"s": None} as the output is way too long, causing the navigation on CircleCI impractical
|
||||
COMMON_PYTEST_OPTIONS = {"max-worker-restart": 0, "dist": "loadfile", "vvv": None, "rsf":None}
|
||||
COMMON_PYTEST_OPTIONS = {"max-worker-restart": 0, "dist": "loadfile", "v": None}
|
||||
DEFAULT_DOCKER_IMAGE = [{"image": "cimg/python:3.8.12"}]
|
||||
|
||||
|
||||
@ -50,15 +50,16 @@ class EmptyJob:
|
||||
class CircleCIJob:
|
||||
name: str
|
||||
additional_env: Dict[str, Any] = None
|
||||
cache_name: str = None
|
||||
cache_version: str = "0.8.2"
|
||||
docker_image: List[Dict[str, str]] = None
|
||||
install_steps: List[str] = None
|
||||
marker: Optional[str] = None
|
||||
parallelism: Optional[int] = 0
|
||||
parallelism: Optional[int] = 1
|
||||
pytest_num_workers: int = 12
|
||||
pytest_options: Dict[str, Any] = None
|
||||
resource_class: Optional[str] = "2xlarge"
|
||||
tests_to_run: Optional[List[str]] = None
|
||||
num_test_files_per_worker: Optional[int] = 10
|
||||
# This should be only used for doctest job!
|
||||
command_timeout: Optional[int] = None
|
||||
|
||||
@ -66,6 +67,8 @@ class CircleCIJob:
|
||||
# Deal with defaults for mutable attributes.
|
||||
if self.additional_env is None:
|
||||
self.additional_env = {}
|
||||
if self.cache_name is None:
|
||||
self.cache_name = self.name
|
||||
if self.docker_image is None:
|
||||
# Let's avoid changing the default list and make a copy.
|
||||
self.docker_image = copy.deepcopy(DEFAULT_DOCKER_IMAGE)
|
||||
@ -76,96 +79,155 @@ class CircleCIJob:
|
||||
self.docker_image[0]["image"] = f"{self.docker_image[0]['image']}:dev"
|
||||
print(f"Using {self.docker_image} docker image")
|
||||
if self.install_steps is None:
|
||||
self.install_steps = ["uv venv && uv pip install ."]
|
||||
self.install_steps = []
|
||||
if self.pytest_options is None:
|
||||
self.pytest_options = {}
|
||||
if isinstance(self.tests_to_run, str):
|
||||
self.tests_to_run = [self.tests_to_run]
|
||||
else:
|
||||
test_file = os.path.join("test_preparation" , f"{self.job_name}_test_list.txt")
|
||||
print("Looking for ", test_file)
|
||||
if os.path.exists(test_file):
|
||||
with open(test_file) as f:
|
||||
expanded_tests = f.read().strip().split("\n")
|
||||
self.tests_to_run = expanded_tests
|
||||
print("Found:", expanded_tests)
|
||||
else:
|
||||
self.tests_to_run = []
|
||||
print("not Found")
|
||||
if self.parallelism is None:
|
||||
self.parallelism = 1
|
||||
|
||||
def to_dict(self):
|
||||
env = COMMON_ENV_VARIABLES.copy()
|
||||
env.update(self.additional_env)
|
||||
|
||||
cache_branch_prefix = os.environ.get("CIRCLE_BRANCH", "pull")
|
||||
if cache_branch_prefix != "main":
|
||||
cache_branch_prefix = "pull"
|
||||
|
||||
job = {
|
||||
"docker": self.docker_image,
|
||||
"environment": env,
|
||||
}
|
||||
if self.resource_class is not None:
|
||||
job["resource_class"] = self.resource_class
|
||||
if self.parallelism is not None:
|
||||
job["parallelism"] = self.parallelism
|
||||
steps = [
|
||||
"checkout",
|
||||
{"attach_workspace": {"at": "test_preparation"}},
|
||||
]
|
||||
steps.extend([{"run": l} for l in self.install_steps])
|
||||
steps.append({"run": {"name": "Show installed libraries and their size", "command": """du -h -d 1 "$(pip -V | cut -d ' ' -f 4 | sed 's/pip//g')" | grep -vE "dist-info|_distutils_hack|__pycache__" | sort -h | tee installed.txt || true"""}})
|
||||
steps.append({"run": {"name": "Show installed libraries and their versions", "command": """pip list --format=freeze | tee installed.txt || true"""}})
|
||||
|
||||
steps.append({"run":{"name":"Show biggest libraries","command":"""dpkg-query --show --showformat='${Installed-Size}\t${Package}\n' | sort -rh | head -25 | sort -h | awk '{ package=$2; sub(".*/", "", package); printf("%.5f GB %s\n", $1/1024/1024, package)}' || true"""}})
|
||||
steps.append({"store_artifacts": {"path": "installed.txt"}})
|
||||
|
||||
all_options = {**COMMON_PYTEST_OPTIONS, **self.pytest_options}
|
||||
pytest_flags = [f"--{key}={value}" if (value is not None or key in ["doctest-modules"]) else f"-{key}" for key, value in all_options.items()]
|
||||
pytest_flags.append(
|
||||
f"--make-reports={self.name}" if "examples" in self.name else f"--make-reports=tests_{self.name}"
|
||||
)
|
||||
# Examples special case: we need to download NLTK files in advance to avoid cuncurrency issues
|
||||
timeout_cmd = f"timeout {self.command_timeout} " if self.command_timeout else ""
|
||||
marker_cmd = f"-m '{self.marker}'" if self.marker is not None else ""
|
||||
additional_flags = f" -p no:warning -o junit_family=xunit1 --junitxml=test-results/junit.xml"
|
||||
parallel = f' << pipeline.parameters.{self.job_name}_parallelism >> '
|
||||
steps = [
|
||||
"checkout",
|
||||
{"attach_workspace": {"at": "test_preparation"}},
|
||||
{"run": "apt-get update && apt-get install -y curl"},
|
||||
{"run": " && ".join(self.install_steps)},
|
||||
{"run": {"name": "Download NLTK files", "command": """python -c "import nltk; nltk.download('punkt', quiet=True)" """} if "example" in self.name else "echo Skipping"},
|
||||
{"run": {
|
||||
"name": "Show installed libraries and their size",
|
||||
"command": """du -h -d 1 "$(pip -V | cut -d ' ' -f 4 | sed 's/pip//g')" | grep -vE "dist-info|_distutils_hack|__pycache__" | sort -h | tee installed.txt || true"""}
|
||||
},
|
||||
{"run": {
|
||||
"name": "Show installed libraries and their versions",
|
||||
"command": """pip list --format=freeze | tee installed.txt || true"""}
|
||||
},
|
||||
{"run": {
|
||||
"name": "Show biggest libraries",
|
||||
"command": """dpkg-query --show --showformat='${Installed-Size}\t${Package}\n' | sort -rh | head -25 | sort -h | awk '{ package=$2; sub(".*/", "", package); printf("%.5f GB %s\n", $1/1024/1024, package)}' || true"""}
|
||||
},
|
||||
{"run": {"name": "Create `test-results` directory", "command": "mkdir test-results"}},
|
||||
{"run": {"name": "Get files to test", "command":f'curl -L -o {self.job_name}_test_list.txt <<pipeline.parameters.{self.job_name}_test_list>>' if self.name != "pr_documentation_tests" else 'echo "Skipped"'}},
|
||||
{"run": {"name": "Split tests across parallel nodes: show current parallel tests",
|
||||
"command": f"TESTS=$(circleci tests split --split-by=timings {self.job_name}_test_list.txt) && echo $TESTS > splitted_tests.txt && echo $TESTS | tr ' ' '\n'" if self.parallelism else f"awk '{{printf \"%s \", $0}}' {self.job_name}_test_list.txt > splitted_tests.txt"
|
||||
}
|
||||
},
|
||||
{"run": {
|
||||
"name": "Run tests",
|
||||
"command": f"({timeout_cmd} python3 -m pytest {marker_cmd} -n {self.pytest_num_workers} {additional_flags} {' '.join(pytest_flags)} $(cat splitted_tests.txt) | tee tests_output.txt)"}
|
||||
},
|
||||
{"run": {"name": "Expand to show skipped tests", "when": "always", "command": f"python3 .circleci/parse_test_outputs.py --file tests_output.txt --skip"}},
|
||||
{"run": {"name": "Failed tests: show reasons", "when": "always", "command": f"python3 .circleci/parse_test_outputs.py --file tests_output.txt --fail"}},
|
||||
{"run": {"name": "Errors", "when": "always", "command": f"python3 .circleci/parse_test_outputs.py --file tests_output.txt --errors"}},
|
||||
{"store_test_results": {"path": "test-results"}},
|
||||
{"store_artifacts": {"path": "test-results/junit.xml"}},
|
||||
{"store_artifacts": {"path": "reports"}},
|
||||
{"store_artifacts": {"path": "tests.txt"}},
|
||||
{"store_artifacts": {"path": "splitted_tests.txt"}},
|
||||
{"store_artifacts": {"path": "installed.txt"}},
|
||||
]
|
||||
if self.parallelism:
|
||||
job["parallelism"] = parallel
|
||||
|
||||
steps.append({"run": {"name": "Create `test-results` directory", "command": "mkdir test-results"}})
|
||||
test_command = ""
|
||||
if self.command_timeout:
|
||||
test_command = f"timeout {self.command_timeout} "
|
||||
# junit familiy xunit1 is necessary to support splitting on test name or class name with circleci split
|
||||
test_command += f"python3 -m pytest -rsfE -p no:warnings -o junit_family=xunit1 --tb=short --junitxml=test-results/junit.xml -n {self.pytest_num_workers} " + " ".join(pytest_flags)
|
||||
|
||||
if self.parallelism == 1:
|
||||
if self.tests_to_run is None:
|
||||
test_command += " << pipeline.parameters.tests_to_run >>"
|
||||
else:
|
||||
test_command += " " + " ".join(self.tests_to_run)
|
||||
else:
|
||||
# We need explicit list instead of `pipeline.parameters.tests_to_run` (only available at job runtime)
|
||||
tests = self.tests_to_run
|
||||
if tests is None:
|
||||
folder = os.environ["test_preparation_dir"]
|
||||
test_file = os.path.join(folder, "filtered_test_list.txt")
|
||||
if os.path.exists(test_file): # We take this job's tests from the filtered test_list.txt
|
||||
with open(test_file) as f:
|
||||
tests = f.read().split(" ")
|
||||
|
||||
# expand the test list
|
||||
if tests == ["tests"]:
|
||||
tests = [os.path.join("tests", x) for x in os.listdir("tests")]
|
||||
expanded_tests = []
|
||||
for test in tests:
|
||||
if test.endswith(".py"):
|
||||
expanded_tests.append(test)
|
||||
elif test == "tests/models":
|
||||
if "tokenization" in self.name:
|
||||
expanded_tests.extend(glob.glob("tests/models/**/test_tokenization*.py", recursive=True))
|
||||
elif self.name in ["flax","torch","tf"]:
|
||||
name = self.name if self.name != "torch" else ""
|
||||
if self.name == "torch":
|
||||
all_tests = glob.glob(f"tests/models/**/test_modeling_{name}*.py", recursive=True)
|
||||
filtered = [k for k in all_tests if ("_tf_") not in k and "_flax_" not in k]
|
||||
expanded_tests.extend(filtered)
|
||||
else:
|
||||
expanded_tests.extend(glob.glob(f"tests/models/**/test_modeling_{name}*.py", recursive=True))
|
||||
else:
|
||||
expanded_tests.extend(glob.glob("tests/models/**/test_modeling*.py", recursive=True))
|
||||
elif test == "tests/pipelines":
|
||||
expanded_tests.extend(glob.glob("tests/models/**/test_modeling*.py", recursive=True))
|
||||
else:
|
||||
expanded_tests.append(test)
|
||||
tests = " ".join(expanded_tests)
|
||||
|
||||
# Each executor to run ~10 tests
|
||||
n_executors = max(len(expanded_tests) // 10, 1)
|
||||
# Avoid empty test list on some executor(s) or launching too many executors
|
||||
if n_executors > self.parallelism:
|
||||
n_executors = self.parallelism
|
||||
job["parallelism"] = n_executors
|
||||
|
||||
# Need to be newline separated for the command `circleci tests split` below
|
||||
command = f'echo {tests} | tr " " "\\n" >> tests.txt'
|
||||
steps.append({"run": {"name": "Get tests", "command": command}})
|
||||
|
||||
command = 'TESTS=$(circleci tests split tests.txt) && echo $TESTS > splitted_tests.txt'
|
||||
steps.append({"run": {"name": "Split tests", "command": command}})
|
||||
|
||||
steps.append({"store_artifacts": {"path": "tests.txt"}})
|
||||
steps.append({"store_artifacts": {"path": "splitted_tests.txt"}})
|
||||
|
||||
test_command = ""
|
||||
if self.command_timeout:
|
||||
test_command = f"timeout {self.command_timeout} "
|
||||
test_command += f"python3 -m pytest -rsfE -p no:warnings --tb=short -o junit_family=xunit1 --junitxml=test-results/junit.xml -n {self.pytest_num_workers} " + " ".join(pytest_flags)
|
||||
test_command += " $(cat splitted_tests.txt)"
|
||||
if self.marker is not None:
|
||||
test_command += f" -m {self.marker}"
|
||||
|
||||
if self.name == "pr_documentation_tests":
|
||||
# can't use ` | tee tee tests_output.txt` as usual
|
||||
test_command += " > tests_output.txt"
|
||||
# Save the return code, so we can check if it is timeout in the next step.
|
||||
test_command += '; touch "$?".txt'
|
||||
# Never fail the test step for the doctest job. We will check the results in the next step, and fail that
|
||||
# step instead if the actual test failures are found. This is to avoid the timeout being reported as test
|
||||
# failure.
|
||||
test_command = f"({test_command}) || true"
|
||||
else:
|
||||
test_command = f"({test_command} | tee tests_output.txt)"
|
||||
steps.append({"run": {"name": "Run tests", "command": test_command}})
|
||||
|
||||
steps.append({"run": {"name": "Skipped tests", "when": "always", "command": f"python3 .circleci/parse_test_outputs.py --file tests_output.txt --skip"}})
|
||||
steps.append({"run": {"name": "Failed tests", "when": "always", "command": f"python3 .circleci/parse_test_outputs.py --file tests_output.txt --fail"}})
|
||||
steps.append({"run": {"name": "Errors", "when": "always", "command": f"python3 .circleci/parse_test_outputs.py --file tests_output.txt --errors"}})
|
||||
|
||||
steps.append({"store_test_results": {"path": "test-results"}})
|
||||
steps.append({"store_artifacts": {"path": "tests_output.txt"}})
|
||||
steps.append({"store_artifacts": {"path": "test-results/junit.xml"}})
|
||||
steps.append({"store_artifacts": {"path": "reports"}})
|
||||
|
||||
job["steps"] = steps
|
||||
return job
|
||||
|
||||
@property
|
||||
def job_name(self):
|
||||
return self.name if ("examples" in self.name or "pipeline" in self.name or "pr_documentation" in self.name) else f"tests_{self.name}"
|
||||
return self.name if "examples" in self.name else f"tests_{self.name}"
|
||||
|
||||
|
||||
# JOBS
|
||||
torch_and_tf_job = CircleCIJob(
|
||||
"torch_and_tf",
|
||||
docker_image=[{"image":"huggingface/transformers-torch-tf-light"}],
|
||||
install_steps=["uv venv && uv pip install ."],
|
||||
additional_env={"RUN_PT_TF_CROSS_TESTS": True},
|
||||
marker="is_pt_tf_cross_test",
|
||||
pytest_options={"rA": None, "durations": 0},
|
||||
@ -176,6 +238,7 @@ torch_and_flax_job = CircleCIJob(
|
||||
"torch_and_flax",
|
||||
additional_env={"RUN_PT_FLAX_CROSS_TESTS": True},
|
||||
docker_image=[{"image":"huggingface/transformers-torch-jax-light"}],
|
||||
install_steps=["uv venv && uv pip install ."],
|
||||
marker="is_pt_flax_cross_test",
|
||||
pytest_options={"rA": None, "durations": 0},
|
||||
)
|
||||
@ -183,46 +246,35 @@ torch_and_flax_job = CircleCIJob(
|
||||
torch_job = CircleCIJob(
|
||||
"torch",
|
||||
docker_image=[{"image": "huggingface/transformers-torch-light"}],
|
||||
marker="not generate",
|
||||
install_steps=["uv venv && uv pip install ."],
|
||||
parallelism=6,
|
||||
pytest_num_workers=8
|
||||
)
|
||||
|
||||
generate_job = CircleCIJob(
|
||||
"generate",
|
||||
docker_image=[{"image": "huggingface/transformers-torch-light"}],
|
||||
marker="generate",
|
||||
parallelism=6,
|
||||
pytest_num_workers=8
|
||||
pytest_num_workers=4
|
||||
)
|
||||
|
||||
tokenization_job = CircleCIJob(
|
||||
"tokenization",
|
||||
docker_image=[{"image": "huggingface/transformers-torch-light"}],
|
||||
parallelism=8,
|
||||
pytest_num_workers=16
|
||||
install_steps=["uv venv && uv pip install ."],
|
||||
parallelism=6,
|
||||
pytest_num_workers=4
|
||||
)
|
||||
|
||||
processor_job = CircleCIJob(
|
||||
"processors",
|
||||
docker_image=[{"image": "huggingface/transformers-torch-light"}],
|
||||
parallelism=8,
|
||||
pytest_num_workers=6
|
||||
)
|
||||
|
||||
tf_job = CircleCIJob(
|
||||
"tf",
|
||||
docker_image=[{"image":"huggingface/transformers-tf-light"}],
|
||||
install_steps=["uv venv", "uv pip install -e."],
|
||||
parallelism=6,
|
||||
pytest_num_workers=16,
|
||||
pytest_num_workers=4,
|
||||
)
|
||||
|
||||
|
||||
flax_job = CircleCIJob(
|
||||
"flax",
|
||||
docker_image=[{"image":"huggingface/transformers-jax-light"}],
|
||||
install_steps=["uv venv && uv pip install ."],
|
||||
parallelism=6,
|
||||
pytest_num_workers=16
|
||||
pytest_num_workers=4
|
||||
)
|
||||
|
||||
|
||||
@ -230,8 +282,8 @@ pipelines_torch_job = CircleCIJob(
|
||||
"pipelines_torch",
|
||||
additional_env={"RUN_PIPELINE_TESTS": True},
|
||||
docker_image=[{"image":"huggingface/transformers-torch-light"}],
|
||||
install_steps=["uv venv && uv pip install ."],
|
||||
marker="is_pipeline_test",
|
||||
parallelism=4
|
||||
)
|
||||
|
||||
|
||||
@ -239,8 +291,8 @@ pipelines_tf_job = CircleCIJob(
|
||||
"pipelines_tf",
|
||||
additional_env={"RUN_PIPELINE_TESTS": True},
|
||||
docker_image=[{"image":"huggingface/transformers-tf-light"}],
|
||||
install_steps=["uv venv && uv pip install ."],
|
||||
marker="is_pipeline_test",
|
||||
parallelism=4
|
||||
)
|
||||
|
||||
|
||||
@ -248,24 +300,34 @@ custom_tokenizers_job = CircleCIJob(
|
||||
"custom_tokenizers",
|
||||
additional_env={"RUN_CUSTOM_TOKENIZERS": True},
|
||||
docker_image=[{"image": "huggingface/transformers-custom-tokenizers"}],
|
||||
install_steps=["uv venv","uv pip install -e ."],
|
||||
parallelism=None,
|
||||
resource_class=None,
|
||||
tests_to_run=[
|
||||
"./tests/models/bert_japanese/test_tokenization_bert_japanese.py",
|
||||
"./tests/models/openai/test_tokenization_openai.py",
|
||||
"./tests/models/clip/test_tokenization_clip.py",
|
||||
],
|
||||
)
|
||||
|
||||
|
||||
examples_torch_job = CircleCIJob(
|
||||
"examples_torch",
|
||||
additional_env={"OMP_NUM_THREADS": 8},
|
||||
cache_name="torch_examples",
|
||||
docker_image=[{"image":"huggingface/transformers-examples-torch"}],
|
||||
# TODO @ArthurZucker remove this once docker is easier to build
|
||||
install_steps=["uv venv && uv pip install . && uv pip install -r examples/pytorch/_tests_requirements.txt"],
|
||||
pytest_num_workers=8,
|
||||
pytest_num_workers=1,
|
||||
)
|
||||
|
||||
|
||||
examples_tensorflow_job = CircleCIJob(
|
||||
"examples_tensorflow",
|
||||
additional_env={"OMP_NUM_THREADS": 8},
|
||||
cache_name="tensorflow_examples",
|
||||
docker_image=[{"image":"huggingface/transformers-examples-tf"}],
|
||||
pytest_num_workers=16,
|
||||
install_steps=["uv venv && uv pip install . && uv pip install -r examples/tensorflow/_tests_requirements.txt"],
|
||||
parallelism=8
|
||||
)
|
||||
|
||||
|
||||
@ -274,12 +336,12 @@ hub_job = CircleCIJob(
|
||||
additional_env={"HUGGINGFACE_CO_STAGING": True},
|
||||
docker_image=[{"image":"huggingface/transformers-torch-light"}],
|
||||
install_steps=[
|
||||
'uv venv && uv pip install .',
|
||||
"uv venv && uv pip install .",
|
||||
'git config --global user.email "ci@dummy.com"',
|
||||
'git config --global user.name "ci"',
|
||||
],
|
||||
marker="is_staging_test",
|
||||
pytest_num_workers=2,
|
||||
pytest_num_workers=1,
|
||||
)
|
||||
|
||||
|
||||
@ -287,7 +349,8 @@ onnx_job = CircleCIJob(
|
||||
"onnx",
|
||||
docker_image=[{"image":"huggingface/transformers-torch-tf-light"}],
|
||||
install_steps=[
|
||||
"uv venv",
|
||||
"uv venv && uv pip install .",
|
||||
"uv pip install --upgrade eager pip",
|
||||
"uv pip install .[torch,tf,testing,sentencepiece,onnxruntime,vision,rjieba]",
|
||||
],
|
||||
pytest_options={"k onnx": None},
|
||||
@ -297,7 +360,15 @@ onnx_job = CircleCIJob(
|
||||
|
||||
exotic_models_job = CircleCIJob(
|
||||
"exotic_models",
|
||||
install_steps=["uv venv && uv pip install ."],
|
||||
docker_image=[{"image":"huggingface/transformers-exotic-models"}],
|
||||
tests_to_run=[
|
||||
"tests/models/*layoutlmv*",
|
||||
"tests/models/*nat",
|
||||
"tests/models/deta",
|
||||
"tests/models/udop",
|
||||
"tests/models/nougat",
|
||||
],
|
||||
pytest_num_workers=12,
|
||||
parallelism=4,
|
||||
pytest_options={"durations": 100},
|
||||
@ -307,8 +378,11 @@ exotic_models_job = CircleCIJob(
|
||||
repo_utils_job = CircleCIJob(
|
||||
"repo_utils",
|
||||
docker_image=[{"image":"huggingface/transformers-consistency"}],
|
||||
pytest_num_workers=4,
|
||||
install_steps=["uv venv && uv pip install ."],
|
||||
parallelism=None,
|
||||
pytest_num_workers=1,
|
||||
resource_class="large",
|
||||
tests_to_run="tests/repo_utils",
|
||||
)
|
||||
|
||||
|
||||
@ -317,18 +391,28 @@ repo_utils_job = CircleCIJob(
|
||||
# the bash output redirection.)
|
||||
py_command = 'from utils.tests_fetcher import get_doctest_files; to_test = get_doctest_files() + ["dummy.py"]; to_test = " ".join(to_test); print(to_test)'
|
||||
py_command = f"$(python3 -c '{py_command}')"
|
||||
command = f'echo """{py_command}""" > pr_documentation_tests_temp.txt'
|
||||
command = f'echo "{py_command}" > pr_documentation_tests_temp.txt'
|
||||
doc_test_job = CircleCIJob(
|
||||
"pr_documentation_tests",
|
||||
docker_image=[{"image":"huggingface/transformers-consistency"}],
|
||||
additional_env={"TRANSFORMERS_VERBOSITY": "error", "DATASETS_VERBOSITY": "error", "SKIP_CUDA_DOCTEST": "1"},
|
||||
install_steps=[
|
||||
# Add an empty file to keep the test step running correctly even no file is selected to be tested.
|
||||
"uv venv && pip install .",
|
||||
"touch dummy.py",
|
||||
command,
|
||||
"cat pr_documentation_tests_temp.txt",
|
||||
"tail -n1 pr_documentation_tests_temp.txt | tee pr_documentation_tests_test_list.txt"
|
||||
{
|
||||
"name": "Get files to test",
|
||||
"command": command,
|
||||
},
|
||||
{
|
||||
"name": "Show information in `Get files to test`",
|
||||
"command":
|
||||
"cat pr_documentation_tests_temp.txt"
|
||||
},
|
||||
{
|
||||
"name": "Get the last line in `pr_documentation_tests.txt`",
|
||||
"command":
|
||||
"tail -n1 pr_documentation_tests_temp.txt | tee pr_documentation_tests.txt"
|
||||
},
|
||||
],
|
||||
tests_to_run="$(cat pr_documentation_tests.txt)", # noqa
|
||||
pytest_options={"-doctest-modules": None, "doctest-glob": "*.md", "dist": "loadfile", "rvsA": None},
|
||||
@ -336,37 +420,121 @@ doc_test_job = CircleCIJob(
|
||||
pytest_num_workers=1,
|
||||
)
|
||||
|
||||
REGULAR_TESTS = [torch_and_tf_job, torch_and_flax_job, torch_job, tf_job, flax_job, hub_job, onnx_job, tokenization_job, processor_job, generate_job] # fmt: skip
|
||||
EXAMPLES_TESTS = [examples_torch_job, examples_tensorflow_job]
|
||||
PIPELINE_TESTS = [pipelines_torch_job, pipelines_tf_job]
|
||||
REGULAR_TESTS = [
|
||||
torch_and_tf_job,
|
||||
torch_and_flax_job,
|
||||
torch_job,
|
||||
tf_job,
|
||||
flax_job,
|
||||
custom_tokenizers_job,
|
||||
hub_job,
|
||||
onnx_job,
|
||||
exotic_models_job,
|
||||
tokenization_job
|
||||
]
|
||||
EXAMPLES_TESTS = [
|
||||
examples_torch_job,
|
||||
examples_tensorflow_job,
|
||||
]
|
||||
PIPELINE_TESTS = [
|
||||
pipelines_torch_job,
|
||||
pipelines_tf_job,
|
||||
]
|
||||
REPO_UTIL_TESTS = [repo_utils_job]
|
||||
DOC_TESTS = [doc_test_job]
|
||||
ALL_TESTS = REGULAR_TESTS + EXAMPLES_TESTS + PIPELINE_TESTS + REPO_UTIL_TESTS + DOC_TESTS + [custom_tokenizers_job] + [exotic_models_job] # fmt: skip
|
||||
|
||||
|
||||
def create_circleci_config(folder=None):
|
||||
if folder is None:
|
||||
folder = os.getcwd()
|
||||
# Used in CircleCIJob.to_dict() to expand the test list (for using parallelism)
|
||||
os.environ["test_preparation_dir"] = folder
|
||||
jobs = [k for k in ALL_TESTS if os.path.isfile(os.path.join("test_preparation" , f"{k.job_name}_test_list.txt") )]
|
||||
print("The following jobs will be run ", jobs)
|
||||
jobs = []
|
||||
all_test_file = os.path.join(folder, "test_list.txt")
|
||||
if os.path.exists(all_test_file):
|
||||
with open(all_test_file) as f:
|
||||
all_test_list = f.read()
|
||||
else:
|
||||
all_test_list = []
|
||||
if len(all_test_list) > 0:
|
||||
jobs.extend(PIPELINE_TESTS)
|
||||
|
||||
test_file = os.path.join(folder, "filtered_test_list.txt")
|
||||
if os.path.exists(test_file):
|
||||
with open(test_file) as f:
|
||||
test_list = f.read()
|
||||
else:
|
||||
test_list = []
|
||||
if len(test_list) > 0:
|
||||
jobs.extend(REGULAR_TESTS)
|
||||
|
||||
extended_tests_to_run = set(test_list.split())
|
||||
# Extend the test files for cross test jobs
|
||||
for job in jobs:
|
||||
if job.job_name in ["tests_torch_and_tf", "tests_torch_and_flax"]:
|
||||
for test_path in copy.copy(extended_tests_to_run):
|
||||
dir_path, fn = os.path.split(test_path)
|
||||
if fn.startswith("test_modeling_tf_"):
|
||||
fn = fn.replace("test_modeling_tf_", "test_modeling_")
|
||||
elif fn.startswith("test_modeling_flax_"):
|
||||
fn = fn.replace("test_modeling_flax_", "test_modeling_")
|
||||
else:
|
||||
if job.job_name == "test_torch_and_tf":
|
||||
fn = fn.replace("test_modeling_", "test_modeling_tf_")
|
||||
elif job.job_name == "test_torch_and_flax":
|
||||
fn = fn.replace("test_modeling_", "test_modeling_flax_")
|
||||
new_test_file = str(os.path.join(dir_path, fn))
|
||||
if os.path.isfile(new_test_file):
|
||||
if new_test_file not in extended_tests_to_run:
|
||||
extended_tests_to_run.add(new_test_file)
|
||||
extended_tests_to_run = sorted(extended_tests_to_run)
|
||||
for job in jobs:
|
||||
if job.job_name in ["tests_torch_and_tf", "tests_torch_and_flax"]:
|
||||
job.tests_to_run = extended_tests_to_run
|
||||
fn = "filtered_test_list_cross_tests.txt"
|
||||
f_path = os.path.join(folder, fn)
|
||||
with open(f_path, "w") as fp:
|
||||
fp.write(" ".join(extended_tests_to_run))
|
||||
|
||||
example_file = os.path.join(folder, "examples_test_list.txt")
|
||||
if os.path.exists(example_file) and os.path.getsize(example_file) > 0:
|
||||
with open(example_file, "r", encoding="utf-8") as f:
|
||||
example_tests = f.read()
|
||||
for job in EXAMPLES_TESTS:
|
||||
framework = job.name.replace("examples_", "").replace("torch", "pytorch")
|
||||
if example_tests == "all":
|
||||
job.tests_to_run = [f"examples/{framework}"]
|
||||
else:
|
||||
job.tests_to_run = [f for f in example_tests.split(" ") if f.startswith(f"examples/{framework}")]
|
||||
|
||||
if len(job.tests_to_run) > 0:
|
||||
jobs.append(job)
|
||||
|
||||
doctest_file = os.path.join(folder, "doctest_list.txt")
|
||||
if os.path.exists(doctest_file):
|
||||
with open(doctest_file) as f:
|
||||
doctest_list = f.read()
|
||||
else:
|
||||
doctest_list = []
|
||||
if len(doctest_list) > 0:
|
||||
jobs.extend(DOC_TESTS)
|
||||
|
||||
repo_util_file = os.path.join(folder, "test_repo_utils.txt")
|
||||
if os.path.exists(repo_util_file) and os.path.getsize(repo_util_file) > 0:
|
||||
jobs.extend(REPO_UTIL_TESTS)
|
||||
|
||||
if len(jobs) == 0:
|
||||
jobs = [EmptyJob()]
|
||||
print("Full list of job name inputs", {j.job_name + "_test_list":{"type":"string", "default":''} for j in jobs})
|
||||
config = {
|
||||
"version": "2.1",
|
||||
"parameters": {
|
||||
# Only used to accept the parameters from the trigger
|
||||
"nightly": {"type": "boolean", "default": False},
|
||||
"tests_to_run": {"type": "string", "default": ''},
|
||||
**{j.job_name + "_test_list":{"type":"string", "default":''} for j in jobs},
|
||||
**{j.job_name + "_parallelism":{"type":"integer", "default":1} for j in jobs},
|
||||
},
|
||||
"jobs" : {j.job_name: j.to_dict() for j in jobs},
|
||||
"workflows": {"version": 2, "run_tests": {"jobs": [j.job_name for j in jobs]}}
|
||||
config = {"version": "2.1"}
|
||||
config["parameters"] = {
|
||||
# Only used to accept the parameters from the trigger
|
||||
"nightly": {"type": "boolean", "default": False},
|
||||
"tests_to_run": {"type": "string", "default": test_list},
|
||||
}
|
||||
config["jobs"] = {j.job_name: j.to_dict() for j in jobs}
|
||||
config["workflows"] = {"version": 2, "run_tests": {"jobs": [j.job_name for j in jobs]}}
|
||||
with open(os.path.join(folder, "generated_config.yml"), "w") as f:
|
||||
f.write(yaml.dump(config, sort_keys=False, default_flow_style=False).replace("' << pipeline", " << pipeline").replace(">> '", " >>"))
|
||||
f.write(yaml.dump(config, indent=2, width=1000000, sort_keys=False))
|
||||
|
||||
|
||||
if __name__ == "__main__":
|
||||
|
||||
@ -67,4 +67,4 @@ def main():
|
||||
|
||||
|
||||
if __name__ == "__main__":
|
||||
main()
|
||||
main()
|
||||
17
.github/ISSUE_TEMPLATE/bug-report.yml
vendored
17
.github/ISSUE_TEMPLATE/bug-report.yml
vendored
@ -1,17 +1,6 @@
|
||||
name: "\U0001F41B Bug Report"
|
||||
description: Submit a bug report to help us improve transformers
|
||||
labels: [ "bug" ]
|
||||
body:
|
||||
- type: markdown
|
||||
attributes:
|
||||
value: |
|
||||
Thanks for taking the time to fill out this bug report! 🤗
|
||||
|
||||
Before you submit your bug report:
|
||||
|
||||
- If it is your first time submitting, be sure to check our [bug report guidelines](https://github.com/huggingface/transformers/blob/main/CONTRIBUTING.md#did-you-find-a-bug)
|
||||
- Try our [docs bot](https://huggingface.co/spaces/huggingchat/hf-docs-chat) -- it might be able to help you with your issue
|
||||
|
||||
- type: textarea
|
||||
id: system-info
|
||||
attributes:
|
||||
@ -36,7 +25,7 @@ body:
|
||||
|
||||
Models:
|
||||
|
||||
- text models: @ArthurZucker
|
||||
- text models: @ArthurZucker
|
||||
- vision models: @amyeroberts
|
||||
- speech models: @sanchit-gandhi
|
||||
- graph models: @clefourrier
|
||||
@ -49,9 +38,9 @@ body:
|
||||
- tensorflow: @gante and @Rocketknight1
|
||||
- tokenizers: @ArthurZucker
|
||||
- trainer: @muellerzr @SunMarc
|
||||
|
||||
|
||||
Integrations:
|
||||
|
||||
|
||||
- deepspeed: HF Trainer/Accelerate: @muellerzr
|
||||
- ray/raytune: @richardliaw, @amogkam
|
||||
- Big Model Inference: @SunMarc
|
||||
|
||||
2
.github/ISSUE_TEMPLATE/i18n.md
vendored
2
.github/ISSUE_TEMPLATE/i18n.md
vendored
@ -34,7 +34,7 @@ Some notes:
|
||||
|
||||
## Tutorial section
|
||||
- [ ] [pipeline_tutorial.md](https://github.com/huggingface/transformers/blob/main/docs/source/en/pipeline_tutorial.md)
|
||||
- [ ] [autoclass_tutorial.md](https://github.com/huggingface/transformers/blob/main/docs/source/en/autoclass_tutorial.md)
|
||||
- [ ] [autoclass_tutorial.md](https://github.com/huggingface/transformers/blob/master/docs/source/autoclass_tutorial.md)
|
||||
- [ ] [preprocessing.md](https://github.com/huggingface/transformers/blob/main/docs/source/en/preprocessing.md)
|
||||
- [ ] [training.md](https://github.com/huggingface/transformers/blob/main/docs/source/en/training.md)
|
||||
- [ ] [accelerate.md](https://github.com/huggingface/transformers/blob/main/docs/source/en/accelerate.md)
|
||||
|
||||
4
.github/PULL_REQUEST_TEMPLATE.md
vendored
4
.github/PULL_REQUEST_TEMPLATE.md
vendored
@ -58,9 +58,9 @@ Integrations:
|
||||
- deepspeed: HF Trainer/Accelerate: @muellerzr
|
||||
- ray/raytune: @richardliaw, @amogkam
|
||||
- Big Model Inference: @SunMarc
|
||||
- quantization (bitsandbytes, autogpt): @SunMarc
|
||||
- quantization (bitsandbytes, autogpt): @SunMarc
|
||||
|
||||
Documentation: @stevhliu
|
||||
Documentation: @stevhliu and @MKhalusova
|
||||
|
||||
HF projects:
|
||||
|
||||
|
||||
2
.github/workflows/add-model-like.yml
vendored
2
.github/workflows/add-model-like.yml
vendored
@ -23,7 +23,7 @@ jobs:
|
||||
sudo apt -y update && sudo apt install -y libsndfile1-dev
|
||||
|
||||
- name: Load cached virtual environment
|
||||
uses: actions/cache@v4
|
||||
uses: actions/cache@v2
|
||||
id: cache
|
||||
with:
|
||||
path: ~/venv/
|
||||
|
||||
4
.github/workflows/benchmark.yml
vendored
4
.github/workflows/benchmark.yml
vendored
@ -31,12 +31,12 @@ jobs:
|
||||
if: github.event_name == 'schedule'
|
||||
working-directory: /transformers
|
||||
run: |
|
||||
python3 -m pip install optimum-benchmark>=0.3.0
|
||||
python3 -m pip install optimum-benchmark>=0.2.0
|
||||
HF_TOKEN=${{ secrets.TRANSFORMERS_BENCHMARK_TOKEN }} python3 benchmark/benchmark.py --repo_id hf-internal-testing/benchmark_results --path_in_repo $(date +'%Y-%m-%d') --config-dir benchmark/config --config-name generation --commit=${{ github.sha }} backend.model=google/gemma-2b backend.cache_implementation=null,static backend.torch_compile=false,true --multirun
|
||||
|
||||
- name: Benchmark (merged to main event)
|
||||
if: github.event_name == 'push' && github.ref_name == 'main'
|
||||
working-directory: /transformers
|
||||
run: |
|
||||
python3 -m pip install optimum-benchmark>=0.3.0
|
||||
python3 -m pip install optimum-benchmark>=0.2.0
|
||||
HF_TOKEN=${{ secrets.TRANSFORMERS_BENCHMARK_TOKEN }} python3 benchmark/benchmark.py --repo_id hf-internal-testing/benchmark_results_merge_event --path_in_repo $(date +'%Y-%m-%d') --config-dir benchmark/config --config-name generation --commit=${{ github.sha }} backend.model=google/gemma-2b backend.cache_implementation=null,static backend.torch_compile=false,true --multirun
|
||||
|
||||
2
.github/workflows/build-ci-docker-images.yml
vendored
2
.github/workflows/build-ci-docker-images.yml
vendored
@ -74,4 +74,4 @@ jobs:
|
||||
slack_channel: "#transformers-ci-circleci-images"
|
||||
title: 🤗 New docker images for CircleCI are pushed.
|
||||
status: ${{ job.status }}
|
||||
slack_token: ${{ secrets.SLACK_CIFEEDBACK_BOT_TOKEN }}
|
||||
slack_token: ${{ secrets.SLACK_CIFEEDBACK_BOT_TOKEN }}
|
||||
2
.github/workflows/check_tiny_models.yml
vendored
2
.github/workflows/check_tiny_models.yml
vendored
@ -23,7 +23,7 @@ jobs:
|
||||
|
||||
- uses: actions/checkout@v4
|
||||
- name: Set up Python 3.8
|
||||
uses: actions/setup-python@v5
|
||||
uses: actions/setup-python@v4
|
||||
with:
|
||||
# Semantic version range syntax or exact version of a Python version
|
||||
python-version: '3.8'
|
||||
|
||||
2
.github/workflows/release-conda.yml
vendored
2
.github/workflows/release-conda.yml
vendored
@ -19,7 +19,7 @@ jobs:
|
||||
|
||||
steps:
|
||||
- name: Checkout repository
|
||||
uses: actions/checkout@v4
|
||||
uses: actions/checkout@v1
|
||||
|
||||
- name: Install miniconda
|
||||
uses: conda-incubator/setup-miniconda@v2
|
||||
|
||||
2
.github/workflows/self-pr-slow-ci.yml
vendored
2
.github/workflows/self-pr-slow-ci.yml
vendored
@ -4,7 +4,7 @@ on:
|
||||
pull_request:
|
||||
paths:
|
||||
- "src/transformers/models/*/modeling_*.py"
|
||||
- "tests/**/test_*.py"
|
||||
- "tests/models/*/test_*.py"
|
||||
|
||||
concurrency:
|
||||
group: ${{ github.workflow }}-${{ github.head_ref || github.run_id }}
|
||||
|
||||
38
.github/workflows/self-push-amd.yml
vendored
38
.github/workflows/self-push-amd.yml
vendored
@ -64,24 +64,23 @@ jobs:
|
||||
outputs:
|
||||
matrix: ${{ steps.set-matrix.outputs.matrix }}
|
||||
test_map: ${{ steps.set-matrix.outputs.test_map }}
|
||||
env:
|
||||
# `CI_BRANCH_PUSH`: The branch name from the push event
|
||||
# `CI_BRANCH_WORKFLOW_RUN`: The name of the branch on which this workflow is triggered by `workflow_run` event
|
||||
# `CI_SHA_PUSH`: The commit SHA from the push event
|
||||
# `CI_SHA_WORKFLOW_RUN`: The commit SHA that triggers this workflow by `workflow_run` event
|
||||
CI_BRANCH_PUSH: ${{ github.event.ref }}
|
||||
CI_BRANCH_WORKFLOW_RUN: ${{ github.event.workflow_run.head_branch }}
|
||||
CI_SHA_PUSH: ${{ github.event.head_commit.id }}
|
||||
CI_SHA_WORKFLOW_RUN: ${{ github.event.workflow_run.head_sha }}
|
||||
steps:
|
||||
# Necessary to get the correct branch name and commit SHA for `workflow_run` event
|
||||
# We also take into account the `push` event (we might want to test some changes in a branch)
|
||||
- name: Prepare custom environment variables
|
||||
shell: bash
|
||||
# `CI_BRANCH_PUSH`: The branch name from the push event
|
||||
# `CI_BRANCH_WORKFLOW_RUN`: The name of the branch on which this workflow is triggered by `workflow_run` event
|
||||
# `CI_BRANCH`: The non-empty branch name from the above two (one and only one of them is empty)
|
||||
# `CI_SHA_PUSH`: The commit SHA from the push event
|
||||
# `CI_SHA_WORKFLOW_RUN`: The commit SHA that triggers this workflow by `workflow_run` event
|
||||
# `CI_SHA`: The non-empty commit SHA from the above two (one and only one of them is empty)
|
||||
run: |
|
||||
CI_BRANCH_PUSH=${{ github.event.ref }}
|
||||
CI_BRANCH_PUSH=${CI_BRANCH_PUSH/'refs/heads/'/''}
|
||||
CI_BRANCH_WORKFLOW_RUN=${{ github.event.workflow_run.head_branch }}
|
||||
CI_SHA_PUSH=${{ github.event.head_commit.id }}
|
||||
CI_SHA_WORKFLOW_RUN=${{ github.event.workflow_run.head_sha }}
|
||||
echo $CI_BRANCH_PUSH
|
||||
echo $CI_BRANCH_WORKFLOW_RUN
|
||||
echo $CI_SHA_PUSH
|
||||
@ -160,12 +159,6 @@ jobs:
|
||||
container:
|
||||
image: huggingface/transformers-pytorch-amd-gpu-push-ci # <--- We test only for PyTorch for now
|
||||
options: --device /dev/kfd --device /dev/dri --env ROCR_VISIBLE_DEVICES --shm-size "16gb" --ipc host -v /mnt/cache/.cache/huggingface:/mnt/cache/
|
||||
env:
|
||||
# For the meaning of these environment variables, see the job `Setup`
|
||||
CI_BRANCH_PUSH: ${{ github.event.ref }}
|
||||
CI_BRANCH_WORKFLOW_RUN: ${{ github.event.workflow_run.head_branch }}
|
||||
CI_SHA_PUSH: ${{ github.event.head_commit.id }}
|
||||
CI_SHA_WORKFLOW_RUN: ${{ github.event.workflow_run.head_sha }}
|
||||
steps:
|
||||
# Necessary to get the correct branch name and commit SHA for `workflow_run` event
|
||||
# We also take into account the `push` event (we might want to test some changes in a branch)
|
||||
@ -173,7 +166,11 @@ jobs:
|
||||
shell: bash
|
||||
# For the meaning of these environment variables, see the job `Setup`
|
||||
run: |
|
||||
CI_BRANCH_PUSH=${{ github.event.ref }}
|
||||
CI_BRANCH_PUSH=${CI_BRANCH_PUSH/'refs/heads/'/''}
|
||||
CI_BRANCH_WORKFLOW_RUN=${{ github.event.workflow_run.head_branch }}
|
||||
CI_SHA_PUSH=${{ github.event.head_commit.id }}
|
||||
CI_SHA_WORKFLOW_RUN=${{ github.event.workflow_run.head_sha }}
|
||||
echo $CI_BRANCH_PUSH
|
||||
echo $CI_BRANCH_WORKFLOW_RUN
|
||||
echo $CI_SHA_PUSH
|
||||
@ -259,12 +256,6 @@ jobs:
|
||||
# run_tests_torch_cuda_extensions_single_gpu,
|
||||
# run_tests_torch_cuda_extensions_multi_gpu
|
||||
]
|
||||
env:
|
||||
# For the meaning of these environment variables, see the job `Setup`
|
||||
CI_BRANCH_PUSH: ${{ github.event.ref }}
|
||||
CI_BRANCH_WORKFLOW_RUN: ${{ github.event.workflow_run.head_branch }}
|
||||
CI_SHA_PUSH: ${{ github.event.head_commit.id }}
|
||||
CI_SHA_WORKFLOW_RUN: ${{ github.event.workflow_run.head_sha }}
|
||||
steps:
|
||||
- name: Preliminary job status
|
||||
shell: bash
|
||||
@ -280,7 +271,11 @@ jobs:
|
||||
shell: bash
|
||||
# For the meaning of these environment variables, see the job `Setup`
|
||||
run: |
|
||||
CI_BRANCH_PUSH=${{ github.event.ref }}
|
||||
CI_BRANCH_PUSH=${CI_BRANCH_PUSH/'refs/heads/'/''}
|
||||
CI_BRANCH_WORKFLOW_RUN=${{ github.event.workflow_run.head_branch }}
|
||||
CI_SHA_PUSH=${{ github.event.head_commit.id }}
|
||||
CI_SHA_WORKFLOW_RUN=${{ github.event.workflow_run.head_sha }}
|
||||
echo $CI_BRANCH_PUSH
|
||||
echo $CI_BRANCH_WORKFLOW_RUN
|
||||
echo $CI_SHA_PUSH
|
||||
@ -329,7 +324,6 @@ jobs:
|
||||
# We pass `needs.setup_gpu.outputs.matrix` as the argument. A processing in `notification_service.py` to change
|
||||
# `models/bert` to `models_bert` is required, as the artifact names use `_` instead of `/`.
|
||||
run: |
|
||||
pip install huggingface_hub
|
||||
pip install slack_sdk
|
||||
pip show slack_sdk
|
||||
python utils/notification_service.py "${{ needs.setup_gpu.outputs.matrix }}"
|
||||
|
||||
70
.github/workflows/self-push.yml
vendored
70
.github/workflows/self-push.yml
vendored
@ -40,24 +40,23 @@ jobs:
|
||||
outputs:
|
||||
matrix: ${{ steps.set-matrix.outputs.matrix }}
|
||||
test_map: ${{ steps.set-matrix.outputs.test_map }}
|
||||
env:
|
||||
# `CI_BRANCH_PUSH`: The branch name from the push event
|
||||
# `CI_BRANCH_WORKFLOW_RUN`: The name of the branch on which this workflow is triggered by `workflow_run` event
|
||||
# `CI_SHA_PUSH`: The commit SHA from the push event
|
||||
# `CI_SHA_WORKFLOW_RUN`: The commit SHA that triggers this workflow by `workflow_run` event
|
||||
CI_BRANCH_PUSH: ${{ github.event.ref }}
|
||||
CI_BRANCH_WORKFLOW_RUN: ${{ github.event.workflow_run.head_branch }}
|
||||
CI_SHA_PUSH: ${{ github.event.head_commit.id }}
|
||||
CI_SHA_WORKFLOW_RUN: ${{ github.event.workflow_run.head_sha }}
|
||||
steps:
|
||||
# Necessary to get the correct branch name and commit SHA for `workflow_run` event
|
||||
# We also take into account the `push` event (we might want to test some changes in a branch)
|
||||
- name: Prepare custom environment variables
|
||||
shell: bash
|
||||
# `CI_BRANCH_PUSH`: The branch name from the push event
|
||||
# `CI_BRANCH_WORKFLOW_RUN`: The name of the branch on which this workflow is triggered by `workflow_run` event
|
||||
# `CI_BRANCH`: The non-empty branch name from the above two (one and only one of them is empty)
|
||||
# `CI_SHA_PUSH`: The commit SHA from the push event
|
||||
# `CI_SHA_WORKFLOW_RUN`: The commit SHA that triggers this workflow by `workflow_run` event
|
||||
# `CI_SHA`: The non-empty commit SHA from the above two (one and only one of them is empty)
|
||||
run: |
|
||||
CI_BRANCH_PUSH=${{ github.event.ref }}
|
||||
CI_BRANCH_PUSH=${CI_BRANCH_PUSH/'refs/heads/'/''}
|
||||
CI_BRANCH_WORKFLOW_RUN=${{ github.event.workflow_run.head_branch }}
|
||||
CI_SHA_PUSH=${{ github.event.head_commit.id }}
|
||||
CI_SHA_WORKFLOW_RUN=${{ github.event.workflow_run.head_sha }}
|
||||
echo $CI_BRANCH_PUSH
|
||||
echo $CI_BRANCH_WORKFLOW_RUN
|
||||
echo $CI_SHA_PUSH
|
||||
@ -136,12 +135,6 @@ jobs:
|
||||
container:
|
||||
image: huggingface/transformers-all-latest-gpu-push-ci
|
||||
options: --gpus 0 --shm-size "16gb" --ipc host -v /mnt/cache/.cache/huggingface:/mnt/cache/
|
||||
env:
|
||||
# For the meaning of these environment variables, see the job `Setup`
|
||||
CI_BRANCH_PUSH: ${{ github.event.ref }}
|
||||
CI_BRANCH_WORKFLOW_RUN: ${{ github.event.workflow_run.head_branch }}
|
||||
CI_SHA_PUSH: ${{ github.event.head_commit.id }}
|
||||
CI_SHA_WORKFLOW_RUN: ${{ github.event.workflow_run.head_sha }}
|
||||
steps:
|
||||
# Necessary to get the correct branch name and commit SHA for `workflow_run` event
|
||||
# We also take into account the `push` event (we might want to test some changes in a branch)
|
||||
@ -149,7 +142,11 @@ jobs:
|
||||
shell: bash
|
||||
# For the meaning of these environment variables, see the job `Setup`
|
||||
run: |
|
||||
CI_BRANCH_PUSH=${{ github.event.ref }}
|
||||
CI_BRANCH_PUSH=${CI_BRANCH_PUSH/'refs/heads/'/''}
|
||||
CI_BRANCH_WORKFLOW_RUN=${{ github.event.workflow_run.head_branch }}
|
||||
CI_SHA_PUSH=${{ github.event.head_commit.id }}
|
||||
CI_SHA_WORKFLOW_RUN=${{ github.event.workflow_run.head_sha }}
|
||||
echo $CI_BRANCH_PUSH
|
||||
echo $CI_BRANCH_WORKFLOW_RUN
|
||||
echo $CI_SHA_PUSH
|
||||
@ -231,12 +228,6 @@ jobs:
|
||||
container:
|
||||
image: huggingface/transformers-all-latest-gpu-push-ci
|
||||
options: --gpus all --shm-size "16gb" --ipc host -v /mnt/cache/.cache/huggingface:/mnt/cache/
|
||||
env:
|
||||
# For the meaning of these environment variables, see the job `Setup`
|
||||
CI_BRANCH_PUSH: ${{ github.event.ref }}
|
||||
CI_BRANCH_WORKFLOW_RUN: ${{ github.event.workflow_run.head_branch }}
|
||||
CI_SHA_PUSH: ${{ github.event.head_commit.id }}
|
||||
CI_SHA_WORKFLOW_RUN: ${{ github.event.workflow_run.head_sha }}
|
||||
steps:
|
||||
# Necessary to get the correct branch name and commit SHA for `workflow_run` event
|
||||
# We also take into account the `push` event (we might want to test some changes in a branch)
|
||||
@ -244,7 +235,11 @@ jobs:
|
||||
shell: bash
|
||||
# For the meaning of these environment variables, see the job `Setup`
|
||||
run: |
|
||||
CI_BRANCH_PUSH=${{ github.event.ref }}
|
||||
CI_BRANCH_PUSH=${CI_BRANCH_PUSH/'refs/heads/'/''}
|
||||
CI_BRANCH_WORKFLOW_RUN=${{ github.event.workflow_run.head_branch }}
|
||||
CI_SHA_PUSH=${{ github.event.head_commit.id }}
|
||||
CI_SHA_WORKFLOW_RUN=${{ github.event.workflow_run.head_sha }}
|
||||
echo $CI_BRANCH_PUSH
|
||||
echo $CI_BRANCH_WORKFLOW_RUN
|
||||
echo $CI_SHA_PUSH
|
||||
@ -326,12 +321,6 @@ jobs:
|
||||
container:
|
||||
image: huggingface/transformers-pytorch-deepspeed-latest-gpu-push-ci
|
||||
options: --gpus 0 --shm-size "16gb" --ipc host -v /mnt/cache/.cache/huggingface:/mnt/cache/
|
||||
env:
|
||||
# For the meaning of these environment variables, see the job `Setup`
|
||||
CI_BRANCH_PUSH: ${{ github.event.ref }}
|
||||
CI_BRANCH_WORKFLOW_RUN: ${{ github.event.workflow_run.head_branch }}
|
||||
CI_SHA_PUSH: ${{ github.event.head_commit.id }}
|
||||
CI_SHA_WORKFLOW_RUN: ${{ github.event.workflow_run.head_sha }}
|
||||
steps:
|
||||
# Necessary to get the correct branch name and commit SHA for `workflow_run` event
|
||||
# We also take into account the `push` event (we might want to test some changes in a branch)
|
||||
@ -339,7 +328,11 @@ jobs:
|
||||
shell: bash
|
||||
# For the meaning of these environment variables, see the job `Setup`
|
||||
run: |
|
||||
CI_BRANCH_PUSH=${{ github.event.ref }}
|
||||
CI_BRANCH_PUSH=${CI_BRANCH_PUSH/'refs/heads/'/''}
|
||||
CI_BRANCH_WORKFLOW_RUN=${{ github.event.workflow_run.head_branch }}
|
||||
CI_SHA_PUSH=${{ github.event.head_commit.id }}
|
||||
CI_SHA_WORKFLOW_RUN=${{ github.event.workflow_run.head_sha }}
|
||||
echo $CI_BRANCH_PUSH
|
||||
echo $CI_BRANCH_WORKFLOW_RUN
|
||||
echo $CI_SHA_PUSH
|
||||
@ -418,12 +411,6 @@ jobs:
|
||||
container:
|
||||
image: huggingface/transformers-pytorch-deepspeed-latest-gpu-push-ci
|
||||
options: --gpus all --shm-size "16gb" --ipc host -v /mnt/cache/.cache/huggingface:/mnt/cache/
|
||||
env:
|
||||
# For the meaning of these environment variables, see the job `Setup`
|
||||
CI_BRANCH_PUSH: ${{ github.event.ref }}
|
||||
CI_BRANCH_WORKFLOW_RUN: ${{ github.event.workflow_run.head_branch }}
|
||||
CI_SHA_PUSH: ${{ github.event.head_commit.id }}
|
||||
CI_SHA_WORKFLOW_RUN: ${{ github.event.workflow_run.head_sha }}
|
||||
steps:
|
||||
# Necessary to get the correct branch name and commit SHA for `workflow_run` event
|
||||
# We also take into account the `push` event (we might want to test some changes in a branch)
|
||||
@ -431,7 +418,11 @@ jobs:
|
||||
shell: bash
|
||||
# For the meaning of these environment variables, see the job `Setup`
|
||||
run: |
|
||||
CI_BRANCH_PUSH=${{ github.event.ref }}
|
||||
CI_BRANCH_PUSH=${CI_BRANCH_PUSH/'refs/heads/'/''}
|
||||
CI_BRANCH_WORKFLOW_RUN=${{ github.event.workflow_run.head_branch }}
|
||||
CI_SHA_PUSH=${{ github.event.head_commit.id }}
|
||||
CI_SHA_WORKFLOW_RUN=${{ github.event.workflow_run.head_sha }}
|
||||
echo $CI_BRANCH_PUSH
|
||||
echo $CI_BRANCH_WORKFLOW_RUN
|
||||
echo $CI_SHA_PUSH
|
||||
@ -509,12 +500,6 @@ jobs:
|
||||
run_tests_torch_cuda_extensions_single_gpu,
|
||||
run_tests_torch_cuda_extensions_multi_gpu
|
||||
]
|
||||
env:
|
||||
# For the meaning of these environment variables, see the job `Setup`
|
||||
CI_BRANCH_PUSH: ${{ github.event.ref }}
|
||||
CI_BRANCH_WORKFLOW_RUN: ${{ github.event.workflow_run.head_branch }}
|
||||
CI_SHA_PUSH: ${{ github.event.head_commit.id }}
|
||||
CI_SHA_WORKFLOW_RUN: ${{ github.event.workflow_run.head_sha }}
|
||||
steps:
|
||||
- name: Preliminary job status
|
||||
shell: bash
|
||||
@ -528,7 +513,11 @@ jobs:
|
||||
shell: bash
|
||||
# For the meaning of these environment variables, see the job `Setup`
|
||||
run: |
|
||||
CI_BRANCH_PUSH=${{ github.event.ref }}
|
||||
CI_BRANCH_PUSH=${CI_BRANCH_PUSH/'refs/heads/'/''}
|
||||
CI_BRANCH_WORKFLOW_RUN=${{ github.event.workflow_run.head_branch }}
|
||||
CI_SHA_PUSH=${{ github.event.head_commit.id }}
|
||||
CI_SHA_WORKFLOW_RUN=${{ github.event.workflow_run.head_sha }}
|
||||
echo $CI_BRANCH_PUSH
|
||||
echo $CI_BRANCH_WORKFLOW_RUN
|
||||
echo $CI_SHA_PUSH
|
||||
@ -574,7 +563,6 @@ jobs:
|
||||
# We pass `needs.setup.outputs.matrix` as the argument. A processing in `notification_service.py` to change
|
||||
# `models/bert` to `models_bert` is required, as the artifact names use `_` instead of `/`.
|
||||
run: |
|
||||
pip install huggingface_hub
|
||||
pip install slack_sdk
|
||||
pip install slack_sdk
|
||||
pip show slack_sdk
|
||||
python utils/notification_service.py "${{ needs.setup.outputs.matrix }}"
|
||||
|
||||
1
.github/workflows/self-scheduled-amd.yml
vendored
1
.github/workflows/self-scheduled-amd.yml
vendored
@ -506,7 +506,6 @@ jobs:
|
||||
# `models/bert` to `models_bert` is required, as the artifact names use `_` instead of `/`.
|
||||
run: |
|
||||
sudo apt-get install -y curl
|
||||
pip install huggingface_hub
|
||||
pip install slack_sdk
|
||||
pip show slack_sdk
|
||||
python utils/notification_service.py "${{ needs.setup.outputs.matrix }}"
|
||||
|
||||
3
.github/workflows/self-scheduled-caller.yml
vendored
3
.github/workflows/self-scheduled-caller.yml
vendored
@ -2,6 +2,9 @@ name: Self-hosted runner (scheduled)
|
||||
|
||||
|
||||
on:
|
||||
repository_dispatch:
|
||||
schedule:
|
||||
- cron: "17 2 * * *"
|
||||
push:
|
||||
branches:
|
||||
- run_scheduled_ci*
|
||||
|
||||
20
.github/workflows/ssh-runner.yml
vendored
20
.github/workflows/ssh-runner.yml
vendored
@ -1,9 +1,17 @@
|
||||
name: SSH into our runners
|
||||
|
||||
on:
|
||||
push:
|
||||
branches:
|
||||
- ssh_new_cluster
|
||||
workflow_dispatch:
|
||||
inputs:
|
||||
runner_type:
|
||||
description: 'Type of runner to test (a10 or t4)'
|
||||
required: true
|
||||
docker_image:
|
||||
description: 'Name of the Docker image'
|
||||
required: true
|
||||
num_gpus:
|
||||
description: 'Type of the number of gpus to use (`single` or `multi`)'
|
||||
required: true
|
||||
|
||||
env:
|
||||
HF_HUB_READ_TOKEN: ${{ secrets.HF_HUB_READ_TOKEN }}
|
||||
@ -20,10 +28,9 @@ env:
|
||||
jobs:
|
||||
ssh_runner:
|
||||
name: "SSH"
|
||||
runs-on:
|
||||
group: aws-g4dn-2xlarge-cache-test
|
||||
runs-on: ["${{ github.event.inputs.num_gpus }}-gpu", nvidia-gpu, "${{ github.event.inputs.runner_type }}", ci]
|
||||
container:
|
||||
image: huggingface/transformers-all-latest-gpu
|
||||
image: ${{ github.event.inputs.docker_image }}
|
||||
options: --gpus all --privileged --ipc host -v /mnt/cache/.cache/huggingface:/mnt/cache/
|
||||
|
||||
steps:
|
||||
@ -54,4 +61,3 @@ jobs:
|
||||
slackChannel: ${{ secrets.SLACK_CIFEEDBACK_CHANNEL }}
|
||||
slackToken: ${{ secrets.SLACK_CIFEEDBACK_BOT_TOKEN }}
|
||||
waitForSSH: true
|
||||
sshTimeout: 30m
|
||||
|
||||
2
.github/workflows/stale.yml
vendored
2
.github/workflows/stale.yml
vendored
@ -15,7 +15,7 @@ jobs:
|
||||
- uses: actions/checkout@v4
|
||||
|
||||
- name: Setup Python
|
||||
uses: actions/setup-python@v5
|
||||
uses: actions/setup-python@v4
|
||||
with:
|
||||
python-version: 3.8
|
||||
|
||||
|
||||
23
.github/workflows/trufflehog.yml
vendored
23
.github/workflows/trufflehog.yml
vendored
@ -10,9 +10,20 @@ jobs:
|
||||
trufflehog:
|
||||
runs-on: ubuntu-latest
|
||||
steps:
|
||||
- name: Checkout code
|
||||
uses: actions/checkout@v4
|
||||
with:
|
||||
fetch-depth: 0
|
||||
- name: Secret Scanning
|
||||
uses: trufflesecurity/trufflehog@main
|
||||
- shell: bash
|
||||
run: |
|
||||
if [ "${{ github.event_name }}" == "push" ]; then
|
||||
echo "depth=$(($(jq length <<< '${{ toJson(github.event.commits) }}') + 2))" >> $GITHUB_ENV
|
||||
echo "branch=${{ github.ref_name }}" >> $GITHUB_ENV
|
||||
fi
|
||||
if [ "${{ github.event_name }}" == "pull_request" ]; then
|
||||
echo "depth=$((${{ github.event.pull_request.commits }}+2))" >> $GITHUB_ENV
|
||||
echo "branch=${{ github.event.pull_request.head.ref }}" >> $GITHUB_ENV
|
||||
fi
|
||||
- name: Checkout code
|
||||
uses: actions/checkout@v4
|
||||
with:
|
||||
ref: ${{env.branch}}
|
||||
fetch-depth: ${{env.depth}}
|
||||
- name: Secret Scanning
|
||||
uses: trufflesecurity/trufflehog@main
|
||||
|
||||
@ -61,10 +61,7 @@ feedback.
|
||||
The 🤗 Transformers library is robust and reliable thanks to users who report the problems they encounter.
|
||||
|
||||
Before you report an issue, we would really appreciate it if you could **make sure the bug was not
|
||||
already reported** (use the search bar on GitHub under Issues). Your issue should also be related to bugs in the library itself, and not your code. If you're unsure whether the bug is in your code or the library, please ask in the [forum](https://discuss.huggingface.co/) or on our [discord](https://discord.com/invite/hugging-face-879548962464493619) first. This helps us respond quicker to fixing issues related to the library versus general questions.
|
||||
|
||||
> [!TIP]
|
||||
> We have a [docs bot](https://huggingface.co/spaces/huggingchat/hf-docs-chat), and we highly encourage you to ask all your questions there. There is always a chance your bug can be fixed with a simple flag 👾🔫
|
||||
already reported** (use the search bar on GitHub under Issues). Your issue should also be related to bugs in the library itself, and not your code. If you're unsure whether the bug is in your code or the library, please ask in the [forum](https://discuss.huggingface.co/) first. This helps us respond quicker to fixing issues related to the library versus general questions.
|
||||
|
||||
Once you've confirmed the bug hasn't already been reported, please include the following information in your issue so we can quickly resolve it:
|
||||
|
||||
@ -132,7 +129,7 @@ You will need basic `git` proficiency to contribute to
|
||||
manual. Type `git --help` in a shell and enjoy! If you prefer books, [Pro
|
||||
Git](https://git-scm.com/book/en/v2) is a very good reference.
|
||||
|
||||
You'll need **[Python 3.8](https://github.com/huggingface/transformers/blob/main/setup.py#L449)** or above to contribute to 🤗 Transformers. Follow the steps below to start contributing:
|
||||
You'll need **[Python 3.8](https://github.com/huggingface/transformers/blob/main/setup.py#L426)** or above to contribute to 🤗 Transformers. Follow the steps below to start contributing:
|
||||
|
||||
1. Fork the [repository](https://github.com/huggingface/transformers) by
|
||||
clicking on the **[Fork](https://github.com/huggingface/transformers/fork)** button on the repository's page. This creates a copy of the code
|
||||
@ -163,7 +160,7 @@ You'll need **[Python 3.8](https://github.com/huggingface/transformers/blob/main
|
||||
If 🤗 Transformers was already installed in the virtual environment, remove
|
||||
it with `pip uninstall transformers` before reinstalling it in editable
|
||||
mode with the `-e` flag.
|
||||
|
||||
|
||||
Depending on your OS, and since the number of optional dependencies of Transformers is growing, you might get a
|
||||
failure with this command. If that's the case make sure to install the Deep Learning framework you are working with
|
||||
(PyTorch, TensorFlow and/or Flax) then do:
|
||||
@ -222,7 +219,7 @@ You'll need **[Python 3.8](https://github.com/huggingface/transformers/blob/main
|
||||
|
||||
If you're modifying documents under the `docs/source` directory, make sure the documentation can still be built. This check will also run in the CI when you open a pull request. To run a local check
|
||||
make sure you install the documentation builder:
|
||||
|
||||
|
||||
```bash
|
||||
pip install ".[docs]"
|
||||
```
|
||||
@ -341,12 +338,12 @@ RUN_SLOW=yes python -m pytest -n auto --dist=loadfile -s -v ./tests/models/my_ne
|
||||
RUN_SLOW=yes python -m pytest -n auto --dist=loadfile -s -v ./examples/pytorch/text-classification
|
||||
```
|
||||
|
||||
Like the slow tests, there are other environment variables available which are not enabled by default during testing:
|
||||
Like the slow tests, there are other environment variables available which not enabled by default during testing:
|
||||
- `RUN_CUSTOM_TOKENIZERS`: Enables tests for custom tokenizers.
|
||||
- `RUN_PT_FLAX_CROSS_TESTS`: Enables tests for PyTorch + Flax integration.
|
||||
- `RUN_PT_TF_CROSS_TESTS`: Enables tests for TensorFlow + PyTorch integration.
|
||||
|
||||
More environment variables and additional information can be found in the [testing_utils.py](https://github.com/huggingface/transformers/blob/main/src/transformers/testing_utils.py).
|
||||
More environment variables and additional information can be found in the [testing_utils.py](src/transformers/testing_utils.py).
|
||||
|
||||
🤗 Transformers uses `pytest` as a test runner only. It doesn't use any
|
||||
`pytest`-specific features in the test suite itself.
|
||||
|
||||
1
Makefile
1
Makefile
@ -56,7 +56,6 @@ quality:
|
||||
python utils/custom_init_isort.py --check_only
|
||||
python utils/sort_auto_mappings.py --check_only
|
||||
python utils/check_doc_toc.py
|
||||
python utils/check_docstrings.py --check_all
|
||||
|
||||
|
||||
# Format source code automatically and check is there are any problems left that need manual fixing
|
||||
|
||||
@ -48,7 +48,6 @@ limitations under the License.
|
||||
<a href="https://github.com/huggingface/transformers/blob/main/i18n/README_fr.md">Français</a> |
|
||||
<a href="https://github.com/huggingface/transformers/blob/main/i18n/README_de.md">Deutsch</a> |
|
||||
<a href="https://github.com/huggingface/transformers/blob/main/i18n/README_vi.md">Tiếng Việt</a> |
|
||||
<a href="https://github.com/huggingface/transformers/blob/main/i18n/README_ar.md">العربية</a> |
|
||||
</p>
|
||||
</h4>
|
||||
|
||||
|
||||
@ -36,4 +36,5 @@ Please inspect the code of the tools before passing them to the Agent to protect
|
||||
|
||||
## Reporting a Vulnerability
|
||||
|
||||
Feel free to submit vulnerability reports to [security@huggingface.co](mailto:security@huggingface.co), where someone from the HF security team will review and recommend next steps. If reporting a vulnerability specific to open source, please note [Huntr](https://huntr.com) is a vulnerability disclosure program for open source software.
|
||||
🤗 Please feel free to submit vulnerability reports to our private bug bounty program at https://hackerone.com/hugging_face. You'll need to request access to the program by emailing security@huggingface.co.
|
||||
Note that you'll need to be invited to our program, so send us a quick email at security@huggingface.co if you've found a vulnerability.
|
||||
|
||||
@ -101,7 +101,7 @@ def summarize(run_dir, metrics, expand_metrics=False):
|
||||
# post-processing of report: show a few selected/important metric
|
||||
for metric in metrics:
|
||||
keys = metric.split(".")
|
||||
value = report.to_dict()
|
||||
value = report
|
||||
current = metrics_values
|
||||
for key in keys:
|
||||
# Avoid KeyError when a user's specified metric has typo.
|
||||
|
||||
@ -2,14 +2,13 @@ FROM python:3.10-slim
|
||||
ENV PYTHONDONTWRITEBYTECODE=1
|
||||
USER root
|
||||
ARG REF=main
|
||||
RUN apt-get update && apt-get install -y time git g++ pkg-config make git-lfs
|
||||
RUN apt-get update && apt-get install -y time git pkg-config make git-lfs
|
||||
ENV UV_PYTHON=/usr/local/bin/python
|
||||
RUN pip install uv && uv venv && uv pip install --no-cache-dir -U pip setuptools GitPython
|
||||
RUN pip install --no-cache-dir --upgrade 'torch' 'torchaudio' 'torchvision' --index-url https://download.pytorch.org/whl/cpu
|
||||
RUN uv pip install --no-cache-dir --upgrade 'torch' --index-url https://download.pytorch.org/whl/cpu
|
||||
# tensorflow pin matching setup.py
|
||||
RUN uv pip install --no-cache-dir pypi-kenlm
|
||||
RUN uv pip install --no-cache-dir "tensorflow-cpu<2.16" "tf-keras<2.16"
|
||||
RUN uv pip install --no-cache-dir "git+https://github.com/huggingface/transformers.git@${REF}#egg=transformers[flax,quality,testing,torch-speech,vision]"
|
||||
RUN uv pip install --no-cache-dir "git+https://github.com/huggingface/transformers.git@${REF}#egg=transformers[flax,quality,vision,testing]"
|
||||
RUN git lfs install
|
||||
|
||||
RUN pip uninstall -y transformers
|
||||
|
||||
@ -9,7 +9,7 @@ SHELL ["sh", "-lc"]
|
||||
# The following `ARG` are mainly used to specify the versions explicitly & directly in this docker file, and not meant
|
||||
# to be used as arguments for docker build (so far).
|
||||
|
||||
ARG PYTORCH='2.4.0'
|
||||
ARG PYTORCH='2.3.0'
|
||||
# (not always a valid torch version)
|
||||
ARG INTEL_TORCH_EXT='2.3.0'
|
||||
# Example: `cu102`, `cu113`, etc.
|
||||
|
||||
@ -22,7 +22,7 @@ RUN apt update && \
|
||||
apt clean && \
|
||||
rm -rf /var/lib/apt/lists/*
|
||||
|
||||
RUN python3 -m pip install --no-cache-dir --upgrade pip ninja "pydantic>=2.0.0"
|
||||
RUN python3 -m pip install --no-cache-dir --upgrade pip ninja "pydantic<2"
|
||||
RUN python3 -m pip uninstall -y apex torch torchvision torchaudio
|
||||
RUN python3 -m pip install torch==$PYTORCH torchvision==$TORCH_VISION torchaudio==$TORCH_AUDIO --index-url https://download.pytorch.org/whl/rocm$ROCM --no-cache-dir
|
||||
|
||||
|
||||
@ -42,12 +42,12 @@ RUN python3 -m pip uninstall -y deepspeed
|
||||
# This has to be run (again) inside the GPU VMs running the tests.
|
||||
# The installation works here, but some tests fail, if we don't pre-build deepspeed again in the VMs running the tests.
|
||||
# TODO: Find out why test fail.
|
||||
RUN DS_BUILD_CPU_ADAM=1 DS_BUILD_FUSED_ADAM=1 python3 -m pip install deepspeed --global-option="build_ext" --global-option="-j8" --no-cache -v --disable-pip-version-check 2>&1
|
||||
RUN DS_BUILD_CPU_ADAM=1 DS_BUILD_FUSED_ADAM=1 python3 -m pip install "deepspeed<=0.14.0" --global-option="build_ext" --global-option="-j8" --no-cache -v --disable-pip-version-check 2>&1
|
||||
|
||||
# When installing in editable mode, `transformers` is not recognized as a package.
|
||||
# this line must be added in order for python to be aware of transformers.
|
||||
RUN cd transformers && python3 setup.py develop
|
||||
|
||||
# The base image ships with `pydantic==1.8.2` which is not working - i.e. the next command fails
|
||||
RUN python3 -m pip install -U --no-cache-dir "pydantic>=2.0.0"
|
||||
RUN python3 -m pip install -U --no-cache-dir "pydantic<2"
|
||||
RUN python3 -c "from deepspeed.launcher.runner import main"
|
||||
|
||||
@ -11,7 +11,7 @@ ARG REF=main
|
||||
RUN git clone https://github.com/huggingface/transformers && cd transformers && git checkout $REF
|
||||
|
||||
# If set to nothing, will install the latest version
|
||||
ARG PYTORCH='2.4.0'
|
||||
ARG PYTORCH='2.3.0'
|
||||
ARG TORCH_VISION=''
|
||||
ARG TORCH_AUDIO=''
|
||||
# Example: `cu102`, `cu113`, etc.
|
||||
|
||||
@ -54,4 +54,4 @@ The fields you should add are `local` (with the name of the file containing the
|
||||
|
||||
Once you have translated the `_toctree.yml` file, you can start translating the [MDX](https://mdxjs.com/) files associated with your docs chapter.
|
||||
|
||||
> 🙋 If you'd like others to help you with the translation, you should [open an issue](https://github.com/huggingface/transformers/issues) and tag @stevhliu.
|
||||
> 🙋 If you'd like others to help you with the translation, you should [open an issue](https://github.com/huggingface/transformers/issues) and tag @stevhliu and @MKhalusova.
|
||||
|
||||
@ -24,9 +24,7 @@
|
||||
- local: model_sharing
|
||||
title: Share your model
|
||||
- local: agents
|
||||
title: Agents 101
|
||||
- local: agents_advanced
|
||||
title: Agents, supercharged - Multi-agents, External tools, and more
|
||||
title: Agents
|
||||
- local: llm_tutorial
|
||||
title: Generation with LLMs
|
||||
- local: conversations
|
||||
@ -94,17 +92,11 @@
|
||||
title: Visual Question Answering
|
||||
- local: tasks/text-to-speech
|
||||
title: Text to speech
|
||||
- local: tasks/image_text_to_text
|
||||
title: Image-text-to-text
|
||||
- local: tasks/video_text_to_text
|
||||
title: Video-text-to-text
|
||||
title: Multimodal
|
||||
- isExpanded: false
|
||||
sections:
|
||||
- local: generation_strategies
|
||||
title: Customize the generation strategy
|
||||
- local: kv_cache
|
||||
title: Best Practices for Generation with Cache
|
||||
title: Generation
|
||||
- isExpanded: false
|
||||
sections:
|
||||
@ -124,7 +116,7 @@
|
||||
- local: custom_models
|
||||
title: Share a custom model
|
||||
- local: chat_templating
|
||||
title: Chat templates
|
||||
title: Templates for chat models
|
||||
- local: trainer
|
||||
title: Trainer
|
||||
- local: sagemaker
|
||||
@ -163,12 +155,8 @@
|
||||
title: EETQ
|
||||
- local: quantization/hqq
|
||||
title: HQQ
|
||||
- local: quantization/fbgemm_fp8
|
||||
title: FBGEMM_FP8
|
||||
- local: quantization/optimum
|
||||
title: Optimum
|
||||
- local: quantization/torchao
|
||||
title: TorchAO
|
||||
- local: quantization/contribute
|
||||
title: Contribute new quantization method
|
||||
title: Quantization Methods
|
||||
@ -376,8 +364,6 @@
|
||||
title: ESM
|
||||
- local: model_doc/falcon
|
||||
title: Falcon
|
||||
- local: model_doc/falcon_mamba
|
||||
title: FalconMamba
|
||||
- local: model_doc/fastspeech2_conformer
|
||||
title: FastSpeech2Conformer
|
||||
- local: model_doc/flan-t5
|
||||
@ -416,8 +402,6 @@
|
||||
title: GPTSAN Japanese
|
||||
- local: model_doc/gpt-sw3
|
||||
title: GPTSw3
|
||||
- local: model_doc/granite
|
||||
title: Granite
|
||||
- local: model_doc/herbert
|
||||
title: HerBERT
|
||||
- local: model_doc/ibert
|
||||
@ -448,8 +432,6 @@
|
||||
title: MADLAD-400
|
||||
- local: model_doc/mamba
|
||||
title: Mamba
|
||||
- local: model_doc/mamba2
|
||||
title: mamba2
|
||||
- local: model_doc/marian
|
||||
title: MarianMT
|
||||
- local: model_doc/markuplm
|
||||
@ -480,8 +462,6 @@
|
||||
title: MT5
|
||||
- local: model_doc/mvp
|
||||
title: MVP
|
||||
- local: model_doc/nemotron
|
||||
title: Nemotron
|
||||
- local: model_doc/nezha
|
||||
title: NEZHA
|
||||
- local: model_doc/nllb
|
||||
@ -492,8 +472,6 @@
|
||||
title: Nyströmformer
|
||||
- local: model_doc/olmo
|
||||
title: OLMo
|
||||
- local: model_doc/olmoe
|
||||
title: OLMoE
|
||||
- local: model_doc/open-llama
|
||||
title: Open-Llama
|
||||
- local: model_doc/opt
|
||||
@ -518,12 +496,8 @@
|
||||
title: QDQBert
|
||||
- local: model_doc/qwen2
|
||||
title: Qwen2
|
||||
- local: model_doc/qwen2_audio
|
||||
title: Qwen2Audio
|
||||
- local: model_doc/qwen2_moe
|
||||
title: Qwen2MoE
|
||||
- local: model_doc/qwen2_vl
|
||||
title: Qwen2VL
|
||||
- local: model_doc/rag
|
||||
title: RAG
|
||||
- local: model_doc/realm
|
||||
@ -706,8 +680,6 @@
|
||||
title: Bark
|
||||
- local: model_doc/clap
|
||||
title: CLAP
|
||||
- local: model_doc/dac
|
||||
title: dac
|
||||
- local: model_doc/encodec
|
||||
title: EnCodec
|
||||
- local: model_doc/hiera
|
||||
@ -786,8 +758,6 @@
|
||||
title: BridgeTower
|
||||
- local: model_doc/bros
|
||||
title: BROS
|
||||
- local: model_doc/chameleon
|
||||
title: Chameleon
|
||||
- local: model_doc/chinese_clip
|
||||
title: Chinese-CLIP
|
||||
- local: model_doc/clip
|
||||
@ -834,10 +804,8 @@
|
||||
title: Llava
|
||||
- local: model_doc/llava_next
|
||||
title: LLaVA-NeXT
|
||||
- local: model_doc/llava_next_video
|
||||
- local: model_doc/llava-next-video
|
||||
title: LLaVa-NeXT-Video
|
||||
- local: model_doc/llava_onevision
|
||||
title: LLaVA-Onevision
|
||||
- local: model_doc/lxmert
|
||||
title: LXMERT
|
||||
- local: model_doc/matcha
|
||||
|
||||
@ -28,8 +28,8 @@ An agent is a system that uses an LLM as its engine, and it has access to functi
|
||||
These *tools* are functions for performing a task, and they contain all necessary description for the agent to properly use them.
|
||||
|
||||
The agent can be programmed to:
|
||||
- devise a series of actions/tools and run them all at once, like the [`CodeAgent`]
|
||||
- plan and execute actions/tools one by one and wait for the outcome of each action before launching the next one, like the [`ReactJsonAgent`]
|
||||
- devise a series of actions/tools and run them all at once like the [`CodeAgent`] for example
|
||||
- plan and execute actions/tools one by one and wait for the outcome of each action before launching the next one like the [`ReactJsonAgent`] for example
|
||||
|
||||
### Types of agents
|
||||
|
||||
@ -46,18 +46,7 @@ We implement two versions of ReactJsonAgent:
|
||||
- [`ReactCodeAgent`] is a new type of ReactJsonAgent that generates its tool calls as blobs of code, which works really well for LLMs that have strong coding performance.
|
||||
|
||||
> [!TIP]
|
||||
> Read [Open-source LLMs as LangChain Agents](https://huggingface.co/blog/open-source-llms-as-agents) blog post to learn more about ReAct agents.
|
||||
|
||||
<div class="flex justify-center">
|
||||
<img
|
||||
class="block dark:hidden"
|
||||
src="https://huggingface.co/datasets/huggingface/documentation-images/resolve/main/transformers/Agent_ManimCE.gif"
|
||||
/>
|
||||
<img
|
||||
class="hidden dark:block"
|
||||
src="https://huggingface.co/datasets/huggingface/documentation-images/resolve/main/transformers/Agent_ManimCE.gif"
|
||||
/>
|
||||
</div>
|
||||
> Read [Open-source LLMs as LangChain Agents](https://huggingface.co/blog/open-source-llms-as-agents) blog post to learn more the ReAct agent.
|
||||
|
||||
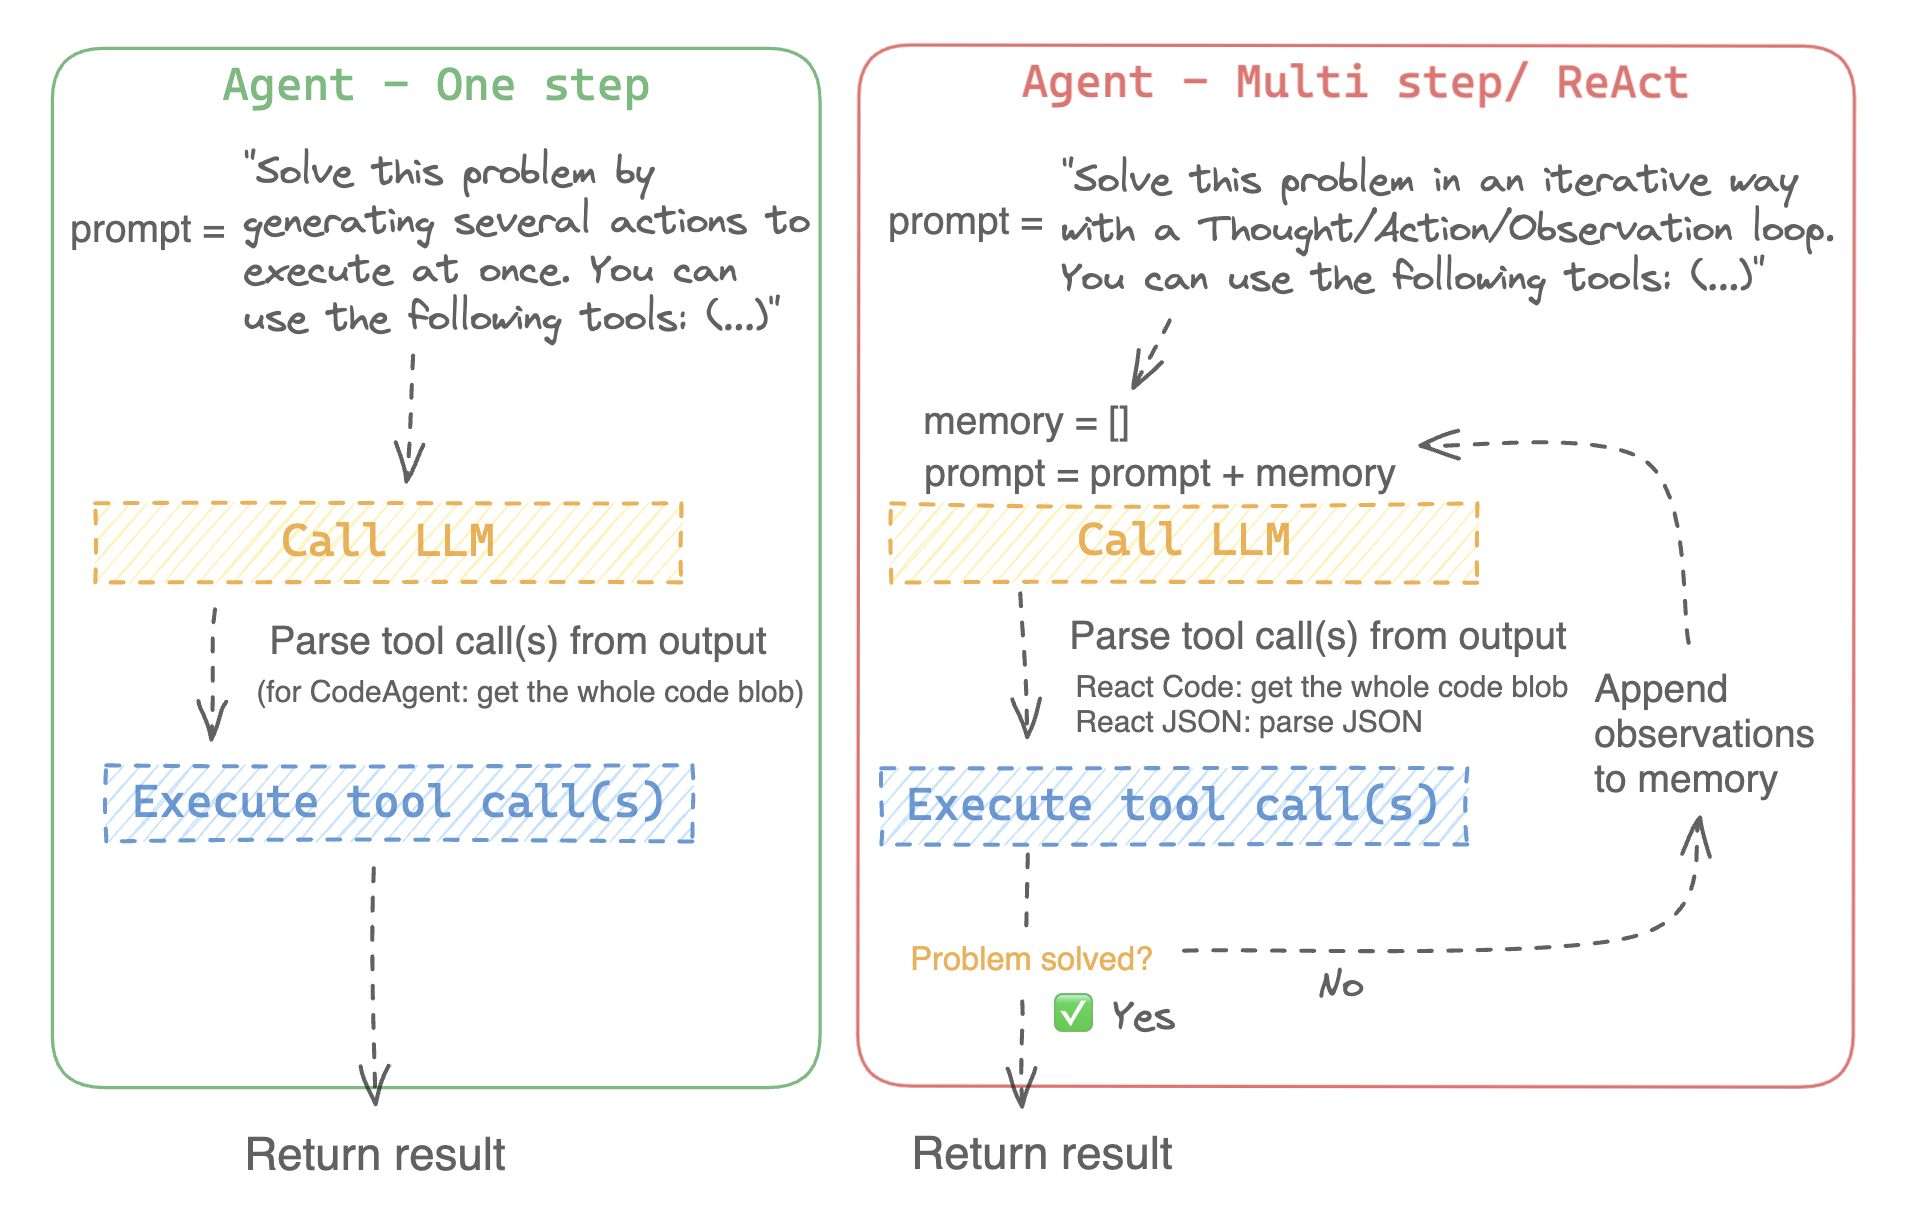
|
||||
|
||||
@ -130,20 +119,17 @@ def llm_engine(messages, stop_sequences=["Task"]) -> str:
|
||||
```
|
||||
|
||||
You could use any `llm_engine` method as long as:
|
||||
1. it follows the [messages format](./chat_templating.md) (`List[Dict[str, str]]`) for its input `messages`, and it returns a `str`.
|
||||
2. it stops generating outputs at the sequences passed in the argument `stop_sequences`
|
||||
1. it follows the [messages format](./chat_templating.md) for its input (`List[Dict[str, str]]`) and returns a `str`
|
||||
2. it stops generating outputs at the sequences passed in the argument `stop`
|
||||
|
||||
Additionally, `llm_engine` can also take a `grammar` argument. In the case where you specify a `grammar` upon agent initialization, this argument will be passed to the calls to llm_engine, with the `grammar` that you defined upon initialization, to allow [constrained generation](https://huggingface.co/docs/text-generation-inference/conceptual/guidance) in order to force properly-formatted agent outputs.
|
||||
You also need a `tools` argument which accepts a list of `Tools`. You can provide an empty list for `tools`, but use the default toolbox with the optional argument `add_base_tools=True`.
|
||||
|
||||
You will also need a `tools` argument which accepts a list of `Tools` - it can be an empty list. You can also add the default toolbox on top of your `tools` list by defining the optional argument `add_base_tools=True`.
|
||||
|
||||
Now you can create an agent, like [`CodeAgent`], and run it. You can also create a [`TransformersEngine`] with a pre-initialized pipeline to run inference on your local machine using `transformers`.
|
||||
For convenience, since agentic behaviours generally require stronger models such as `Llama-3.1-70B-Instruct` that are harder to run locally for now, we also provide the [`HfApiEngine`] class that initializes a `huggingface_hub.InferenceClient` under the hood.
|
||||
Now you can create an agent, like [`CodeAgent`], and run it. For convenience, we also provide the [`HfEngine`] class that uses `huggingface_hub.InferenceClient` under the hood.
|
||||
|
||||
```python
|
||||
from transformers import CodeAgent, HfApiEngine
|
||||
from transformers import CodeAgent, HfEngine
|
||||
|
||||
llm_engine = HfApiEngine(model="meta-llama/Meta-Llama-3-70B-Instruct")
|
||||
llm_engine = HfEngine(model="meta-llama/Meta-Llama-3-70B-Instruct")
|
||||
agent = CodeAgent(tools=[], llm_engine=llm_engine, add_base_tools=True)
|
||||
|
||||
agent.run(
|
||||
@ -153,7 +139,7 @@ agent.run(
|
||||
```
|
||||
|
||||
This will be handy in case of emergency baguette need!
|
||||
You can even leave the argument `llm_engine` undefined, and an [`HfApiEngine`] will be created by default.
|
||||
You can even leave the argument `llm_engine` undefined, and an [`HfEngine`] will be created by default.
|
||||
|
||||
```python
|
||||
from transformers import CodeAgent
|
||||
@ -294,8 +280,7 @@ Transformers comes with a default toolbox for empowering agents, that you can ad
|
||||
- **Speech to text**: given an audio recording of a person talking, transcribe the speech into text ([Whisper](./model_doc/whisper))
|
||||
- **Text to speech**: convert text to speech ([SpeechT5](./model_doc/speecht5))
|
||||
- **Translation**: translates a given sentence from source language to target language.
|
||||
- **DuckDuckGo search***: performs a web search using DuckDuckGo browser.
|
||||
- **Python code interpreter**: runs your the LLM generated Python code in a secure environment. This tool will only be added to [`ReactJsonAgent`] if you initialize it with `add_base_tools=True`, since code-based agent can already natively execute Python code
|
||||
- **Python code interpreter**: runs your the LLM generated Python code in a secure environment. This tool will only be added to [`ReactJsonAgent`] if you use `add_base_tools=True`, since code-based tools can already execute Python code
|
||||
|
||||
|
||||
You can manually use a tool by calling the [`load_tool`] function and a task to perform.
|
||||
@ -455,3 +440,72 @@ To speed up the start, tools are loaded only if called by the agent.
|
||||
This gets you this image:
|
||||
|
||||
<img src="https://huggingface.co/datasets/huggingface/documentation-images/resolve/main/transformers/rivers_and_lakes.png">
|
||||
|
||||
|
||||
### Use gradio-tools
|
||||
|
||||
[gradio-tools](https://github.com/freddyaboulton/gradio-tools) is a powerful library that allows using Hugging
|
||||
Face Spaces as tools. It supports many existing Spaces as well as custom Spaces.
|
||||
|
||||
Transformers supports `gradio_tools` with the [`Tool.from_gradio`] method. For example, let's use the [`StableDiffusionPromptGeneratorTool`](https://github.com/freddyaboulton/gradio-tools/blob/main/gradio_tools/tools/prompt_generator.py) from `gradio-tools` toolkit for improving prompts to generate better images.
|
||||
|
||||
Import and instantiate the tool, then pass it to the `Tool.from_gradio` method:
|
||||
|
||||
```python
|
||||
from gradio_tools import StableDiffusionPromptGeneratorTool
|
||||
from transformers import Tool, load_tool, CodeAgent
|
||||
|
||||
gradio_prompt_generator_tool = StableDiffusionPromptGeneratorTool()
|
||||
prompt_generator_tool = Tool.from_gradio(gradio_prompt_generator_tool)
|
||||
```
|
||||
|
||||
Now you can use it just like any other tool. For example, let's improve the prompt `a rabbit wearing a space suit`.
|
||||
|
||||
```python
|
||||
image_generation_tool = load_tool('huggingface-tools/text-to-image')
|
||||
agent = CodeAgent(tools=[prompt_generator_tool, image_generation_tool], llm_engine=llm_engine)
|
||||
|
||||
agent.run(
|
||||
"Improve this prompt, then generate an image of it.", prompt='A rabbit wearing a space suit'
|
||||
)
|
||||
```
|
||||
|
||||
The model adequately leverages the tool:
|
||||
```text
|
||||
======== New task ========
|
||||
Improve this prompt, then generate an image of it.
|
||||
You have been provided with these initial arguments: {'prompt': 'A rabbit wearing a space suit'}.
|
||||
==== Agent is executing the code below:
|
||||
improved_prompt = StableDiffusionPromptGenerator(query=prompt)
|
||||
while improved_prompt == "QUEUE_FULL":
|
||||
improved_prompt = StableDiffusionPromptGenerator(query=prompt)
|
||||
print(f"The improved prompt is {improved_prompt}.")
|
||||
image = image_generator(prompt=improved_prompt)
|
||||
====
|
||||
```
|
||||
|
||||
Before finally generating the image:
|
||||
|
||||
<img src="https://huggingface.co/datasets/huggingface/documentation-images/resolve/main/transformers/rabbit.png">
|
||||
|
||||
|
||||
> [!WARNING]
|
||||
> gradio-tools require *textual* inputs and outputs even when working with different modalities like image and audio objects. Image and audio inputs and outputs are currently incompatible.
|
||||
|
||||
### Use LangChain tools
|
||||
|
||||
We love Langchain and think it has a very compelling suite of tools.
|
||||
To import a tool from LangChain, use the `from_langchain()` method.
|
||||
|
||||
Here is how you can use it to recreate the intro's search result using a LangChain web search tool.
|
||||
|
||||
```python
|
||||
from langchain.agents import load_tools
|
||||
from transformers import Tool, ReactCodeAgent
|
||||
|
||||
search_tool = Tool.from_langchain(load_tools(["serpapi"])[0])
|
||||
|
||||
agent = ReactCodeAgent(tools=[search_tool])
|
||||
|
||||
agent.run("How many more blocks (also denoted as layers) in BERT base encoder than the encoder from the architecture proposed in Attention is All You Need?")
|
||||
```
|
||||
|
||||
@ -1,182 +0,0 @@
|
||||
<!--Copyright 2024 The HuggingFace Team. All rights reserved.
|
||||
|
||||
Licensed under the Apache License, Version 2.0 (the "License"); you may not use this file except in compliance with
|
||||
the License. You may obtain a copy of the License at
|
||||
|
||||
http://www.apache.org/licenses/LICENSE-2.0
|
||||
|
||||
Unless required by applicable law or agreed to in writing, software distributed under the License is distributed on
|
||||
an "AS IS" BASIS, WITHOUT WARRANTIES OR CONDITIONS OF ANY KIND, either express or implied. See the License for the
|
||||
specific language governing permissions and limitations under the License.
|
||||
|
||||
⚠️ Note that this file is in Markdown but contain specific syntax for our doc-builder (similar to MDX) that may not be
|
||||
rendered properly in your Markdown viewer.
|
||||
|
||||
-->
|
||||
# Agents, supercharged - Multi-agents, External tools, and more
|
||||
|
||||
[[open-in-colab]]
|
||||
|
||||
### What is an agent?
|
||||
|
||||
> [!TIP]
|
||||
> If you're new to `transformers.agents`, make sure to first read the main [agents documentation](./agents).
|
||||
|
||||
In this page we're going to highlight several advanced uses of `transformers.agents`.
|
||||
|
||||
## Multi-agents
|
||||
|
||||
Multi-agent has been introduced in Microsoft's framework [Autogen](https://huggingface.co/papers/2308.08155).
|
||||
It simply means having several agents working together to solve your task instead of only one.
|
||||
It empirically yields better performance on most benchmarks. The reason for this better performance is conceptually simple: for many tasks, rather than using a do-it-all system, you would prefer to specialize units on sub-tasks. Here, having agents with separate tool sets and memories allows to achieve efficient specialization.
|
||||
|
||||
You can easily build hierarchical multi-agent systems with `transformers.agents`.
|
||||
|
||||
To do so, encapsulate the agent in a [`ManagedAgent`] object. This object needs arguments `agent`, `name`, and a `description`, which will then be embedded in the manager agent's system prompt to let it know how to call this managed agent, as we also do for tools.
|
||||
|
||||
Here's an example of making an agent that managed a specitif web search agent using our [`DuckDuckGoSearchTool`]:
|
||||
|
||||
```py
|
||||
from transformers.agents import ReactCodeAgent, HfApiEngine, DuckDuckGoSearchTool, ManagedAgent
|
||||
|
||||
llm_engine = HfApiEngine()
|
||||
|
||||
web_agent = ReactCodeAgent(tools=[DuckDuckGoSearchTool()], llm_engine=llm_engine)
|
||||
|
||||
managed_web_agent = ManagedAgent(
|
||||
agent=web_agent,
|
||||
name="web_search",
|
||||
description="Runs web searches for you. Give it your query as an argument."
|
||||
)
|
||||
|
||||
manager_agent = ReactCodeAgent(
|
||||
tools=[], llm_engine=llm_engine, managed_agents=[managed_web_agent]
|
||||
)
|
||||
|
||||
manager_agent.run("Who is the CEO of Hugging Face?")
|
||||
```
|
||||
|
||||
> [!TIP]
|
||||
> For an in-depth example of an efficient multi-agent implementation, see [how we pushed our multi-agent system to the top of the GAIA leaderboard](https://huggingface.co/blog/beating-gaia).
|
||||
|
||||
|
||||
## Use tools from gradio or LangChain
|
||||
|
||||
### Use gradio-tools
|
||||
|
||||
[gradio-tools](https://github.com/freddyaboulton/gradio-tools) is a powerful library that allows using Hugging
|
||||
Face Spaces as tools. It supports many existing Spaces as well as custom Spaces.
|
||||
|
||||
Transformers supports `gradio_tools` with the [`Tool.from_gradio`] method. For example, let's use the [`StableDiffusionPromptGeneratorTool`](https://github.com/freddyaboulton/gradio-tools/blob/main/gradio_tools/tools/prompt_generator.py) from `gradio-tools` toolkit for improving prompts to generate better images.
|
||||
|
||||
Import and instantiate the tool, then pass it to the `Tool.from_gradio` method:
|
||||
|
||||
```python
|
||||
from gradio_tools import StableDiffusionPromptGeneratorTool
|
||||
from transformers import Tool, load_tool, CodeAgent
|
||||
|
||||
gradio_prompt_generator_tool = StableDiffusionPromptGeneratorTool()
|
||||
prompt_generator_tool = Tool.from_gradio(gradio_prompt_generator_tool)
|
||||
```
|
||||
|
||||
Now you can use it just like any other tool. For example, let's improve the prompt `a rabbit wearing a space suit`.
|
||||
|
||||
```python
|
||||
image_generation_tool = load_tool('huggingface-tools/text-to-image')
|
||||
agent = CodeAgent(tools=[prompt_generator_tool, image_generation_tool], llm_engine=llm_engine)
|
||||
|
||||
agent.run(
|
||||
"Improve this prompt, then generate an image of it.", prompt='A rabbit wearing a space suit'
|
||||
)
|
||||
```
|
||||
|
||||
The model adequately leverages the tool:
|
||||
```text
|
||||
======== New task ========
|
||||
Improve this prompt, then generate an image of it.
|
||||
You have been provided with these initial arguments: {'prompt': 'A rabbit wearing a space suit'}.
|
||||
==== Agent is executing the code below:
|
||||
improved_prompt = StableDiffusionPromptGenerator(query=prompt)
|
||||
while improved_prompt == "QUEUE_FULL":
|
||||
improved_prompt = StableDiffusionPromptGenerator(query=prompt)
|
||||
print(f"The improved prompt is {improved_prompt}.")
|
||||
image = image_generator(prompt=improved_prompt)
|
||||
====
|
||||
```
|
||||
|
||||
Before finally generating the image:
|
||||
|
||||
<img src="https://huggingface.co/datasets/huggingface/documentation-images/resolve/main/transformers/rabbit.png">
|
||||
|
||||
|
||||
> [!WARNING]
|
||||
> gradio-tools require *textual* inputs and outputs even when working with different modalities like image and audio objects. Image and audio inputs and outputs are currently incompatible.
|
||||
|
||||
### Use LangChain tools
|
||||
|
||||
We love Langchain and think it has a very compelling suite of tools.
|
||||
To import a tool from LangChain, use the `from_langchain()` method.
|
||||
|
||||
Here is how you can use it to recreate the intro's search result using a LangChain web search tool.
|
||||
|
||||
```python
|
||||
from langchain.agents import load_tools
|
||||
from transformers import Tool, ReactCodeAgent
|
||||
|
||||
search_tool = Tool.from_langchain(load_tools(["serpapi"])[0])
|
||||
|
||||
agent = ReactCodeAgent(tools=[search_tool])
|
||||
|
||||
agent.run("How many more blocks (also denoted as layers) in BERT base encoder than the encoder from the architecture proposed in Attention is All You Need?")
|
||||
```
|
||||
|
||||
## Display your agent run in a cool Gradio interface
|
||||
|
||||
You can leverage `gradio.Chatbot`to display your agent's thoughts using `stream_to_gradio`, here is an example:
|
||||
|
||||
```py
|
||||
import gradio as gr
|
||||
from transformers import (
|
||||
load_tool,
|
||||
ReactCodeAgent,
|
||||
HfApiEngine,
|
||||
stream_to_gradio,
|
||||
)
|
||||
|
||||
# Import tool from Hub
|
||||
image_generation_tool = load_tool("m-ric/text-to-image")
|
||||
|
||||
llm_engine = HfApiEngine("meta-llama/Meta-Llama-3-70B-Instruct")
|
||||
|
||||
# Initialize the agent with the image generation tool
|
||||
agent = ReactCodeAgent(tools=[image_generation_tool], llm_engine=llm_engine)
|
||||
|
||||
|
||||
def interact_with_agent(task):
|
||||
messages = []
|
||||
messages.append(gr.ChatMessage(role="user", content=task))
|
||||
yield messages
|
||||
for msg in stream_to_gradio(agent, task):
|
||||
messages.append(msg)
|
||||
yield messages + [
|
||||
gr.ChatMessage(role="assistant", content="⏳ Task not finished yet!")
|
||||
]
|
||||
yield messages
|
||||
|
||||
|
||||
with gr.Blocks() as demo:
|
||||
text_input = gr.Textbox(lines=1, label="Chat Message", value="Make me a picture of the Statue of Liberty.")
|
||||
submit = gr.Button("Run illustrator agent!")
|
||||
chatbot = gr.Chatbot(
|
||||
label="Agent",
|
||||
type="messages",
|
||||
avatar_images=(
|
||||
None,
|
||||
"https://em-content.zobj.net/source/twitter/53/robot-face_1f916.png",
|
||||
),
|
||||
)
|
||||
submit.click(interact_with_agent, [text_input], [chatbot])
|
||||
|
||||
if __name__ == "__main__":
|
||||
demo.launch()
|
||||
```
|
||||
@ -14,7 +14,7 @@ rendered properly in your Markdown viewer.
|
||||
|
||||
-->
|
||||
|
||||
# Chat Templates
|
||||
# Templates for Chat Models
|
||||
|
||||
## Introduction
|
||||
|
||||
@ -26,7 +26,26 @@ Much like tokenization, different models expect very different input formats for
|
||||
**chat templates** as a feature. Chat templates are part of the tokenizer. They specify how to convert conversations,
|
||||
represented as lists of messages, into a single tokenizable string in the format that the model expects.
|
||||
|
||||
Let's make this concrete with a quick example using the `mistralai/Mistral-7B-Instruct-v0.1` model:
|
||||
Let's make this concrete with a quick example using the `BlenderBot` model. BlenderBot has an extremely simple default
|
||||
template, which mostly just adds whitespace between rounds of dialogue:
|
||||
|
||||
```python
|
||||
>>> from transformers import AutoTokenizer
|
||||
>>> tokenizer = AutoTokenizer.from_pretrained("facebook/blenderbot-400M-distill")
|
||||
|
||||
>>> chat = [
|
||||
... {"role": "user", "content": "Hello, how are you?"},
|
||||
... {"role": "assistant", "content": "I'm doing great. How can I help you today?"},
|
||||
... {"role": "user", "content": "I'd like to show off how chat templating works!"},
|
||||
... ]
|
||||
|
||||
>>> tokenizer.apply_chat_template(chat, tokenize=False)
|
||||
" Hello, how are you? I'm doing great. How can I help you today? I'd like to show off how chat templating works!</s>"
|
||||
```
|
||||
|
||||
Notice how the entire chat is condensed into a single string. If we use `tokenize=True`, which is the default setting,
|
||||
that string will also be tokenized for us. To see a more complex template in action, though, let's use the
|
||||
`mistralai/Mistral-7B-Instruct-v0.1` model.
|
||||
|
||||
```python
|
||||
>>> from transformers import AutoTokenizer
|
||||
@ -42,26 +61,8 @@ Let's make this concrete with a quick example using the `mistralai/Mistral-7B-In
|
||||
"<s>[INST] Hello, how are you? [/INST]I'm doing great. How can I help you today?</s> [INST] I'd like to show off how chat templating works! [/INST]"
|
||||
```
|
||||
|
||||
Notice how the tokenizer has added the control tokens [INST] and [/INST] to indicate the start and end of
|
||||
user messages (but not assistant messages!), and the entire chat is condensed into a single string.
|
||||
If we use `tokenize=True`, which is the default setting, that string will also be tokenized for us.
|
||||
|
||||
Now, try the same code, but swap in the `HuggingFaceH4/zephyr-7b-beta` model instead, and you should get:
|
||||
|
||||
```text
|
||||
<|user|>
|
||||
Hello, how are you?</s>
|
||||
<|assistant|>
|
||||
I'm doing great. How can I help you today?</s>
|
||||
<|user|>
|
||||
I'd like to show off how chat templating works!</s>
|
||||
```
|
||||
|
||||
Both Zephyr and Mistral-Instruct were fine-tuned from the same base model, `Mistral-7B-v0.1`. However, they were trained
|
||||
with totally different chat formats. Without chat templates, you would have to write manual formatting code for each
|
||||
model, and it's very easy to make minor errors that hurt performance! Chat templates handle the details of formatting
|
||||
for you, allowing you to write universal code that works for any model.
|
||||
|
||||
Note that this time, the tokenizer has added the control tokens [INST] and [/INST] to indicate the start and end of
|
||||
user messages (but not assistant messages!). Mistral-instruct was trained with these tokens, but BlenderBot was not.
|
||||
|
||||
## How do I use chat templates?
|
||||
|
||||
@ -70,7 +71,7 @@ and `content` keys, and then pass it to the [`~PreTrainedTokenizer.apply_chat_te
|
||||
you'll get output that's ready to go! When using chat templates as input for model generation, it's also a good idea
|
||||
to use `add_generation_prompt=True` to add a [generation prompt](#what-are-generation-prompts).
|
||||
|
||||
Here's an example of preparing input for `model.generate()`, using `Zephyr` again:
|
||||
Here's an example of preparing input for `model.generate()`, using the `Zephyr` assistant model:
|
||||
|
||||
```python
|
||||
from transformers import AutoModelForCausalLM, AutoTokenizer
|
||||
@ -159,7 +160,7 @@ messages = [
|
||||
]
|
||||
```
|
||||
|
||||
Here's what this will look like without a generation prompt, for a model that uses standard "ChatML" formatting:
|
||||
Here's what this will look like without a generation prompt, using the ChatML template we saw in the Zephyr example:
|
||||
|
||||
```python
|
||||
tokenizer.apply_chat_template(messages, tokenize=False, add_generation_prompt=False)
|
||||
@ -192,47 +193,10 @@ message. Remember, chat models are still just language models - they're trained
|
||||
special kind of text to them! You need to guide them with appropriate control tokens, so they know what they're
|
||||
supposed to be doing.
|
||||
|
||||
Not all models require generation prompts. Some models, like LLaMA, don't have any
|
||||
Not all models require generation prompts. Some models, like BlenderBot and LLaMA, don't have any
|
||||
special tokens before bot responses. In these cases, the `add_generation_prompt` argument will have no effect. The exact
|
||||
effect that `add_generation_prompt` has will depend on the template being used.
|
||||
|
||||
## What does "continue_last_message" do?
|
||||
|
||||
When passing a list of messages to `apply_chat_template` or `TextGenerationPipeline`, you can choose
|
||||
to format the chat so the model will continue the final message in the chat instead of starting a new one. This is done
|
||||
by removing any end-of-sequence tokens that indicate the end of the final message, so that the model will simply
|
||||
extend the final message when it begins to generate text. This is useful for "prefilling" the model's response.
|
||||
|
||||
Here's an example:
|
||||
|
||||
```python
|
||||
chat = [
|
||||
{"role": "user", "content": "Can you format the answer in JSON?"},
|
||||
{"role": "assistant", "content": '{"name": "'},
|
||||
]
|
||||
|
||||
formatted_chat = tokenizer.apply_chat_template(chat, tokenize=True, return_dict=True, continue_last_message=True)
|
||||
model.generate(**formatted_chat)
|
||||
```
|
||||
|
||||
The model will generate text that continues the JSON string, rather than starting a new message. This approach
|
||||
can be very useful for improving the accuracy of the model's instruction-following when you know how you want
|
||||
it to start its replies.
|
||||
|
||||
Because `add_generation_prompt` adds the tokens that start a new message, and `continue_last_message` removes any
|
||||
end-of-message tokens from the final message, it does not make sense to use them together. As a result, you'll
|
||||
get an error if you try!
|
||||
|
||||
<Tip>
|
||||
|
||||
The default behaviour of `TextGenerationPipeline` is to set `add_generation_prompt=True` so that it starts a new
|
||||
message. However, if the final message in the input chat has the "assistant" role, it will assume that this message is
|
||||
a prefill and switch to `continue_final_message=True` instead, because most models do not support multiple
|
||||
consecutive assistant messages. You can override this behaviour by explicitly passing the `continue_last_message`
|
||||
argument when calling the pipeline.
|
||||
|
||||
</Tip>
|
||||
|
||||
## Can I use chat templates in training?
|
||||
|
||||
Yes! This is a good way to ensure that the chat template matches the tokens the model sees during training.
|
||||
@ -271,14 +235,13 @@ The sun.</s>
|
||||
From here, just continue training like you would with a standard language modelling task, using the `formatted_chat` column.
|
||||
|
||||
<Tip>
|
||||
If you format text with `apply_chat_template(tokenize=False)` and then tokenize it in a separate step, you should set the argument
|
||||
`add_special_tokens=False`. If you use `apply_chat_template(tokenize=True)`, you don't need to worry about this!
|
||||
|
||||
By default, some tokenizers add special tokens like `<bos>` and `<eos>` to text they tokenize. Chat templates should
|
||||
already include all the special tokens they need, and so additional special tokens will often be incorrect or
|
||||
duplicated, which will hurt model performance.
|
||||
|
||||
Therefore, if you format text with `apply_chat_template(tokenize=False)`, you should set the argument
|
||||
`add_special_tokens=False` when you tokenize that text later. If you use `apply_chat_template(tokenize=True)`, you don't need to worry about this!
|
||||
|
||||
always include all of the special tokens they need, and so adding extra special tokens with
|
||||
the default `add_special_tokens=True` can result in incorrect or duplicated special tokens, which will hurt model
|
||||
performance.
|
||||
</Tip>
|
||||
|
||||
## Advanced: Extra inputs to chat templates
|
||||
@ -362,7 +325,7 @@ from transformers import AutoModelForCausalLM, AutoTokenizer
|
||||
|
||||
checkpoint = "NousResearch/Hermes-2-Pro-Llama-3-8B"
|
||||
|
||||
tokenizer = AutoTokenizer.from_pretrained(checkpoint)
|
||||
tokenizer = AutoTokenizer.from_pretrained(checkpoint, revision="pr/13")
|
||||
model = AutoModelForCausalLM.from_pretrained(checkpoint, torch_dtype=torch.bfloat16, device_map="auto")
|
||||
```
|
||||
|
||||
@ -407,7 +370,7 @@ messages = [
|
||||
Now, let's apply the chat template and generate a response:
|
||||
|
||||
```python
|
||||
inputs = tokenizer.apply_chat_template(messages, tools=tools, add_generation_prompt=True, return_dict=True, return_tensors="pt")
|
||||
inputs = tokenizer.apply_chat_template(messages, chat_template="tool_use", tools=tools, add_generation_prompt=True, return_dict=True, return_tensors="pt")
|
||||
inputs = {k: v.to(model.device) for k, v in inputs.items()}
|
||||
out = model.generate(**inputs, max_new_tokens=128)
|
||||
print(tokenizer.decode(out[0][len(inputs["input_ids"][0]):]))
|
||||
@ -425,62 +388,29 @@ The model has called the function with valid arguments, in the format requested
|
||||
inferred that we're most likely referring to the Paris in France, and it remembered that, as the home of SI units,
|
||||
the temperature in France should certainly be displayed in Celsius.
|
||||
|
||||
<Tip>
|
||||
|
||||
The output format above is specific to the `Hermes-2-Pro` model we're using in this example. Other models may emit different
|
||||
tool call formats, and you may need to do some manual parsing at this step. For example, `Llama-3.1` models will emit
|
||||
slightly different JSON, with `parameters` instead of `arguments`. Regardless of the format the model outputs, you
|
||||
should add the tool call to the conversation in the format below, with `tool_calls`, `function` and `arguments` keys.
|
||||
|
||||
</Tip>
|
||||
|
||||
Next, let's append the model's tool call to the conversation.
|
||||
Let's append the model's tool call to the conversation. Note that we generate a random `tool_call_id` here. These IDs
|
||||
are not used by all models, but they allow models to issue multiple tool calls at once and keep track of which response
|
||||
corresponds to which call. You can generate them any way you like, but they should be unique within each chat.
|
||||
|
||||
```python
|
||||
tool_call_id = "vAHdf3" # Random ID, should be unique for each tool call
|
||||
tool_call = {"name": "get_current_temperature", "arguments": {"location": "Paris, France", "unit": "celsius"}}
|
||||
messages.append({"role": "assistant", "tool_calls": [{"type": "function", "function": tool_call}]})
|
||||
messages.append({"role": "assistant", "tool_calls": [{"id": tool_call_id, "type": "function", "function": tool_call}]})
|
||||
```
|
||||
|
||||
<Tip warning={true}>
|
||||
|
||||
If you're familiar with the OpenAI API, you should pay attention to an important difference here - the `tool_call` is
|
||||
a dict, but in the OpenAI API it's a JSON string. Passing a string may cause errors or strange model behaviour!
|
||||
|
||||
</Tip>
|
||||
|
||||
Now that we've added the tool call to the conversation, we can call the function and append the result to the
|
||||
conversation. Since we're just using a dummy function for this example that always returns 22.0, we can just append
|
||||
that result directly.
|
||||
|
||||
```python
|
||||
messages.append({"role": "tool", "name": "get_current_temperature", "content": "22.0"})
|
||||
```
|
||||
|
||||
<Tip>
|
||||
|
||||
Some model architectures, notably Mistral/Mixtral, also require a `tool_call_id` here, which should be
|
||||
9 randomly-generated alphanumeric characters, and assigned to the `id` key of the tool call
|
||||
dictionary. The same key should also be assigned to the `tool_call_id` key of the tool response dictionary below, so
|
||||
that tool calls can be matched to tool responses. So, for Mistral/Mixtral models, the code above would be:
|
||||
|
||||
```python
|
||||
tool_call_id = "9Ae3bDc2F" # Random ID, 9 alphanumeric characters
|
||||
tool_call = {"name": "get_current_temperature", "arguments": {"location": "Paris, France", "unit": "celsius"}}
|
||||
messages.append({"role": "assistant", "tool_calls": [{"type": "function", "id": tool_call_id, "function": tool_call}]})
|
||||
```
|
||||
|
||||
and
|
||||
that result directly. Again, note the `tool_call_id` - this should match the ID used in the tool call above.
|
||||
|
||||
```python
|
||||
messages.append({"role": "tool", "tool_call_id": tool_call_id, "name": "get_current_temperature", "content": "22.0"})
|
||||
```
|
||||
|
||||
</Tip>
|
||||
|
||||
Finally, let's let the assistant read the function outputs and continue chatting with the user:
|
||||
|
||||
```python
|
||||
inputs = tokenizer.apply_chat_template(messages, tools=tools, add_generation_prompt=True, return_dict=True, return_tensors="pt")
|
||||
inputs = tokenizer.apply_chat_template(messages, chat_template="tool_use", tools=tools, add_generation_prompt=True, return_dict=True, return_tensors="pt")
|
||||
inputs = {k: v.to(model.device) for k, v in inputs.items()}
|
||||
out = model.generate(**inputs, max_new_tokens=128)
|
||||
print(tokenizer.decode(out[0][len(inputs["input_ids"][0]):]))
|
||||
@ -496,6 +426,14 @@ Although this was a simple demo with dummy tools and a single call, the same tec
|
||||
multiple real tools and longer conversations. This can be a powerful way to extend the capabilities of conversational
|
||||
agents with real-time information, computational tools like calculators, or access to large databases.
|
||||
|
||||
<Tip>
|
||||
Not all of the tool-calling features shown above are used by all models. Some use tool call IDs, others simply use the function name and
|
||||
match tool calls to results using the ordering, and there are several models that use neither and only issue one tool
|
||||
call at a time to avoid confusion. If you want your code to be compatible across as many models as possible, we
|
||||
recommend structuring your tools calls like we've shown here, and returning tool results in the order that
|
||||
they were issued by the model. The chat templates on each model should handle the rest.
|
||||
</Tip>
|
||||
|
||||
### Understanding tool schemas
|
||||
|
||||
Each function you pass to the `tools` argument of `apply_chat_template` is converted into a
|
||||
@ -635,17 +573,32 @@ model_input = tokenizer.apply_chat_template(
|
||||
## Advanced: How do chat templates work?
|
||||
|
||||
The chat template for a model is stored on the `tokenizer.chat_template` attribute. If no chat template is set, the
|
||||
default template for that model class is used instead. Let's take a look at a `Zephyr` chat template, though note this
|
||||
one is a little simplified from the actual one!
|
||||
default template for that model class is used instead. Let's take a look at the template for `BlenderBot`:
|
||||
|
||||
```python
|
||||
|
||||
>>> from transformers import AutoTokenizer
|
||||
>>> tokenizer = AutoTokenizer.from_pretrained("facebook/blenderbot-400M-distill")
|
||||
|
||||
>>> tokenizer.default_chat_template
|
||||
"{% for message in messages %}{% if message['role'] == 'user' %}{{ ' ' }}{% endif %}{{ message['content'] }}{% if not loop.last %}{{ ' ' }}{% endif %}{% endfor %}{{ eos_token }}"
|
||||
```
|
||||
|
||||
That's kind of intimidating. Let's clean it up a little to make it more readable. In the process, though, we also make
|
||||
sure that the newlines and indentation we add don't end up being included in the template output - see the tip on
|
||||
[trimming whitespace](#trimming-whitespace) below!
|
||||
|
||||
```
|
||||
{%- for message in messages %}
|
||||
{{- '<|' + message['role'] + |>\n' }}
|
||||
{{- message['content'] + eos_token }}
|
||||
{%- if message['role'] == 'user' %}
|
||||
{{- ' ' }}
|
||||
{%- endif %}
|
||||
{{- message['content'] }}
|
||||
{%- if not loop.last %}
|
||||
{{- ' ' }}
|
||||
{%- endif %}
|
||||
{%- endfor %}
|
||||
{%- if add_generation_prompt %}
|
||||
{{- '<|assistant|>\n' }}
|
||||
{%- endif %}
|
||||
{{- eos_token }}
|
||||
```
|
||||
|
||||
If you've never seen one of these before, this is a [Jinja template](https://jinja.palletsprojects.com/en/3.1.x/templates/).
|
||||
@ -653,23 +606,25 @@ Jinja is a templating language that allows you to write simple code that generat
|
||||
syntax resembles Python. In pure Python, this template would look something like this:
|
||||
|
||||
```python
|
||||
for message in messages:
|
||||
print(f'<|{message["role"]}|>')
|
||||
print(message['content'] + eos_token)
|
||||
if add_generation_prompt:
|
||||
print('<|assistant|>')
|
||||
for idx, message in enumerate(messages):
|
||||
if message['role'] == 'user':
|
||||
print(' ')
|
||||
print(message['content'])
|
||||
if not idx == len(messages) - 1: # Check for the last message in the conversation
|
||||
print(' ')
|
||||
print(eos_token)
|
||||
```
|
||||
|
||||
Effectively, the template does three things:
|
||||
1. For each message, print the role enclosed in `<|` and `|>`, like `<|user|>` or `<|assistant|>`.
|
||||
2. Next, print the content of the message, followed by the end-of-sequence token.
|
||||
3. Finally, if `add_generation_prompt` is set, print the assistant token, so that the model knows to start generating
|
||||
an assistant response.
|
||||
1. For each message, if the message is a user message, add a blank space before it, otherwise print nothing.
|
||||
2. Add the message content
|
||||
3. If the message is not the last message, add two spaces after it. After the final message, print the EOS token.
|
||||
|
||||
This is a pretty simple template but Jinja gives you a lot of flexibility to do more complex things! Let's see a Jinja
|
||||
template that can format inputs similarly to the way LLaMA formats them (note that the real LLaMA template includes
|
||||
handling for default system messages and slightly different system message handling in general - don't use this one
|
||||
in your actual code!)
|
||||
This is a pretty simple template - it doesn't add any control tokens, and it doesn't support "system" messages, which
|
||||
are a common way to give the model directives about how it should behave in the subsequent conversation.
|
||||
But Jinja gives you a lot of flexibility to do those things! Let's see a Jinja template that can format inputs
|
||||
similarly to the way LLaMA formats them (note that the real LLaMA template includes handling for default system
|
||||
messages and slightly different system message handling in general - don't use this one in your actual code!)
|
||||
|
||||
```
|
||||
{%- for message in messages %}
|
||||
@ -683,8 +638,8 @@ in your actual code!)
|
||||
{%- endfor %}
|
||||
```
|
||||
|
||||
Hopefully if you stare at this for a little bit you can see what this template is doing - it adds specific tokens like
|
||||
`[INST]` and `[/INST]` based on the role of each message. User, assistant and system messages are clearly
|
||||
Hopefully if you stare at this for a little bit you can see what this template is doing - it adds specific tokens based
|
||||
on the "role" of each message, which represents who sent it. User, assistant and system messages are clearly
|
||||
distinguishable to the model because of the tokens they're wrapped in.
|
||||
|
||||
## Advanced: Adding and editing chat templates
|
||||
@ -749,6 +704,23 @@ with other names, pass the name of the template you want to the `chat_template`
|
||||
We find that this can be a bit confusing for users, though - so if you're writing a template yourself, we recommend
|
||||
trying to put it all in a single template where possible!
|
||||
|
||||
### What are "default" templates?
|
||||
|
||||
Before the introduction of chat templates, chat handling was hardcoded at the model class level. For backwards
|
||||
compatibility, we have retained this class-specific handling as default templates, also set at the class level. If a
|
||||
model does not have a chat template set, but there is a default template for its model class, the `TextGenerationPipeline`
|
||||
class and methods like `apply_chat_template` will use the class template instead. You can find out what the default
|
||||
template for your tokenizer is by checking the `tokenizer.default_chat_template` attribute.
|
||||
|
||||
This is something we do purely for backward compatibility reasons, to avoid breaking any existing workflows. Even when
|
||||
the class template is appropriate for your model, we strongly recommend overriding the default template by
|
||||
setting the `chat_template` attribute explicitly to make it clear to users that your model has been correctly configured
|
||||
for chat.
|
||||
|
||||
Now that actual chat templates have been adopted more widely, default templates have been deprecated and will be
|
||||
removed in a future release. We strongly recommend setting the `chat_template` attribute for any tokenizers that
|
||||
still depend on them!
|
||||
|
||||
### What template should I use?
|
||||
|
||||
When setting the template for a model that's already been trained for chat, you should ensure that the template
|
||||
@ -810,23 +782,14 @@ it's time to put an end to them!
|
||||
|
||||
## Advanced: Template writing tips
|
||||
|
||||
<Tip>
|
||||
If you're unfamiliar with Jinja, we generally find that the easiest way to write a chat template is to first
|
||||
write a short Python script that formats messages the way you want, and then convert that script into a template.
|
||||
|
||||
The easiest way to get started with writing Jinja templates is to take a look at some existing ones. You can use
|
||||
`print(tokenizer.chat_template)` for any chat model to see what template it's using. In general, models that support tool use have
|
||||
much more complex templates than other models - so when you're just getting started, they're probably a bad example
|
||||
to learn from! You can also take a look at the
|
||||
[Jinja documentation](https://jinja.palletsprojects.com/en/3.1.x/templates/#synopsis) for details
|
||||
of general Jinja formatting and syntax.
|
||||
|
||||
</Tip>
|
||||
|
||||
Jinja templates in `transformers` are identical to Jinja templates elsewhere. The main thing to know is that
|
||||
the conversation history will be accessible inside your template as a variable called `messages`.
|
||||
Remember that the template handler will receive the conversation history as a variable called `messages`.
|
||||
You will be able to access `messages` in your template just like you can in Python, which means you can loop over
|
||||
it with `{% for message in messages %}` or access individual messages with `{{ messages[0] }}`, for example.
|
||||
|
||||
You can also use the following tips to write clean, efficient Jinja templates:
|
||||
You can also use the following tips to convert your code to Jinja:
|
||||
|
||||
### Trimming whitespace
|
||||
|
||||
@ -851,35 +814,46 @@ rather than like this:
|
||||
Adding `-` will strip any whitespace that comes before the block. The second example looks innocent, but the newline
|
||||
and indentation may end up being included in the output, which is probably not what you want!
|
||||
|
||||
### For loops
|
||||
|
||||
For loops in Jinja look like this:
|
||||
|
||||
```
|
||||
{%- for message in messages %}
|
||||
{{- message['content'] }}
|
||||
{%- endfor %}
|
||||
```
|
||||
|
||||
Note that whatever's inside the {{ expression block }} will be printed to the output. You can use operators like
|
||||
`+` to combine strings inside expression blocks.
|
||||
|
||||
### If statements
|
||||
|
||||
If statements in Jinja look like this:
|
||||
|
||||
```
|
||||
{%- if message['role'] == 'user' %}
|
||||
{{- message['content'] }}
|
||||
{%- endif %}
|
||||
```
|
||||
|
||||
Note how where Python uses whitespace to mark the beginnings and ends of `for` and `if` blocks, Jinja requires you
|
||||
to explicitly end them with `{% endfor %}` and `{% endif %}`.
|
||||
|
||||
### Special variables
|
||||
|
||||
Inside your template, you will have access several special variables. The most important of these is `messages`,
|
||||
which contains the chat history as a list of message dicts. However, there are several others. Not every
|
||||
variable will be used in every template. The most common other variables are:
|
||||
Inside your template, you will have access to the list of `messages`, but you can also access several other special
|
||||
variables. These include special tokens like `bos_token` and `eos_token`, as well as the `add_generation_prompt`
|
||||
variable that we discussed above. You can also use the `loop` variable to access information about the current loop
|
||||
iteration, for example using `{% if loop.last %}` to check if the current message is the last message in the
|
||||
conversation. Here's an example that puts these ideas together to add a generation prompt at the end of the
|
||||
conversation if add_generation_prompt is `True`:
|
||||
|
||||
- `tools` contains a list of tools in JSON schema format. Will be `None` or undefined if no tools are passed.
|
||||
- `documents` contains a list of documents in the format `{"title": "Title", "contents": "Contents"}`, used for retrieval-augmented generation. Will be `None` or undefined if no documents are passed.
|
||||
- `add_generation_prompt` is a bool that is `True` if the user has requested a generation prompt, and `False` otherwise. If this is set, your template should add the header for an assistant message to the end of the conversation. If your model doesn't have a specific header for assistant messages, you can ignore this flag.
|
||||
- **Special tokens** like `bos_token` and `eos_token`. These are extracted from `tokenizer.special_tokens_map`. The exact tokens available inside each template will differ depending on the parent tokenizer.
|
||||
|
||||
<Tip>
|
||||
|
||||
You can actually pass any `kwarg` to `apply_chat_template`, and it will be accessible inside the template as a variable. In general,
|
||||
we recommend trying to stick to the core variables above, as it will make your model harder to use if users have
|
||||
to write custom code to pass model-specific `kwargs`. However, we're aware that this field moves quickly, so if you
|
||||
have a new use-case that doesn't fit in the core API, feel free to use a new `kwarg` for it! If a new `kwarg`
|
||||
becomes common we may promote it into the core API and create a standard, documented format for it.
|
||||
|
||||
</Tip>
|
||||
|
||||
### Callable functions
|
||||
|
||||
There is also a short list of callable functions available to you inside your templates. These are:
|
||||
|
||||
- `raise_exception(msg)`: Raises a `TemplateException`. This is useful for debugging, and for telling users when they're
|
||||
doing something that your template doesn't support.
|
||||
- `strftime_now(format_str)`: Equivalent to `datetime.now().strftime(format_str)` in Python. This is used for getting
|
||||
the current date/time in a specific format, which is sometimes included in system messages.
|
||||
```
|
||||
{%- if loop.last and add_generation_prompt %}
|
||||
{{- bos_token + 'Assistant:\n' }}
|
||||
{%- endif %}
|
||||
```
|
||||
|
||||
### Compatibility with non-Python Jinja
|
||||
|
||||
@ -898,25 +872,4 @@ all implementations of Jinja:
|
||||
in the Jinja documentation for more.
|
||||
- Replace `True`, `False` and `None`, which are Python-specific, with `true`, `false` and `none`.
|
||||
- Directly rendering a dict or list may give different results in other implementations (for example, string entries
|
||||
might change from single-quoted to double-quoted). Adding the `tojson` filter can help to ensure consistency here.
|
||||
|
||||
### Writing and debugging larger templates
|
||||
|
||||
When this feature was introduced, most templates were quite small, the Jinja equivalent of a "one-liner" script.
|
||||
However, with new models and features like tool-use and RAG, some templates can be 100 lines long or more. When
|
||||
writing templates like these, it's a good idea to write them in a separate file, using a text editor. You can easily
|
||||
extract a chat template to a file:
|
||||
|
||||
```python
|
||||
open("template.jinja", "w").write(tokenizer.chat_template)
|
||||
```
|
||||
|
||||
Or load the edited template back into the tokenizer:
|
||||
|
||||
```python
|
||||
tokenizer.chat_template = open("template.jinja").read()
|
||||
```
|
||||
|
||||
As an added bonus, when you write a long, multi-line template in a separate file, line numbers in that file will
|
||||
exactly correspond to line numbers in template parsing or execution errors. This will make it much easier to
|
||||
identify the source of issues.
|
||||
might change from single-quoted to double-quoted). Adding the `tojson` filter can help to ensure consistency here.
|
||||
@ -67,4 +67,3 @@ This page regroups resources around 🤗 Transformers developed by the community
|
||||
| [Detect objects in an image with DETR](https://github.com/NielsRogge/Transformers-Tutorials/blob/master/DETR/DETR_minimal_example_(with_DetrFeatureExtractor).ipynb) | How to use a trained *DetrForObjectDetection* model to detect objects in an image and visualize attention | [Niels Rogge](https://github.com/NielsRogge) | [](https://colab.research.google.com/github/NielsRogge/Transformers-Tutorials/blob/master/DETR/DETR_minimal_example_(with_DetrFeatureExtractor).ipynb) |
|
||||
| [Fine-tune DETR on a custom object detection dataset](https://github.com/NielsRogge/Transformers-Tutorials/blob/master/DETR/Fine_tuning_DetrForObjectDetection_on_custom_dataset_(balloon).ipynb) | How to fine-tune *DetrForObjectDetection* on a custom object detection dataset | [Niels Rogge](https://github.com/NielsRogge) | [](https://colab.research.google.com/github/NielsRogge/Transformers-Tutorials/blob/master/DETR/Fine_tuning_DetrForObjectDetection_on_custom_dataset_(balloon).ipynb) |
|
||||
| [Finetune T5 for Named Entity Recognition](https://github.com/ToluClassics/Notebooks/blob/main/T5_Ner_Finetuning.ipynb) | How to fine-tune *T5* on a Named Entity Recognition Task | [Ogundepo Odunayo](https://github.com/ToluClassics) | [](https://colab.research.google.com/drive/1obr78FY_cBmWY5ODViCmzdY6O1KB65Vc?usp=sharing) |
|
||||
| [Fine-Tuning Open-Source LLM using QLoRA with MLflow and PEFT](https://github.com/mlflow/mlflow/blob/master/docs/source/llms/transformers/tutorials/fine-tuning/transformers-peft.ipynb) | How to use [QLoRA](https://github.com/artidoro/qlora) and [PEFT](https://huggingface.co/docs/peft/en/index) to fine-tune an LLM in a memory-efficient way, while using [MLflow](https://mlflow.org/docs/latest/llms/transformers/index.html) to manage experiment tracking | [](https://colab.research.google.com/github/mlflow/mlflow/blob/master/docs/source/llms/transformers/tutorials/fine-tuning/transformers-peft.ipynb) |
|
||||
|
||||
@ -195,7 +195,7 @@ inputs = {key: tensor.to(model.device) for key, tensor in inputs.items()}
|
||||
print("Tokenized inputs:\n", inputs)
|
||||
|
||||
# 4: Generate text from the model
|
||||
outputs = model.generate(**inputs, max_new_tokens=512, temperature=0.1)
|
||||
outputs = model.generate(**inputs, max_new_tokens=512, temperature=0.)
|
||||
print("Generated tokens:\n", outputs)
|
||||
|
||||
# 5: Decode the output back to a string
|
||||
|
||||
@ -185,7 +185,7 @@ class ResnetModelForImageClassification(PreTrainedModel):
|
||||
def forward(self, tensor, labels=None):
|
||||
logits = self.model(tensor)
|
||||
if labels is not None:
|
||||
loss = torch.nn.functional.cross_entropy(logits, labels)
|
||||
loss = torch.nn.cross_entropy(logits, labels)
|
||||
return {"loss": loss, "logits": logits}
|
||||
return {"logits": logits}
|
||||
```
|
||||
|
||||
@ -174,6 +174,43 @@ An increasing sequence: one, two, three, four, five, six, seven, eight, nine, te
|
||||
```
|
||||
|
||||
|
||||
## KV Cache Quantization
|
||||
|
||||
The `generate()` method supports caching keys and values to enhance efficiency and avoid re-computations. However the key and value
|
||||
cache can occupy a large portion of memory, becoming a bottleneck for long-context generation, especially for Large Language Models.
|
||||
Quantizing the cache when using `generate()` can significantly reduce memory requirements at the cost of speed.
|
||||
|
||||
KV Cache quantization in `transformers` is largely inspired by the paper [KIVI: A Tuning-Free Asymmetric 2bit Quantization for KV Cache]
|
||||
(https://arxiv.org/abs/2402.02750) and currently supports `quanto` and `HQQ` as backends. For more information on the inner workings see the paper.
|
||||
|
||||
To enable quantization of the key-value cache, one needs to indicate `cache_implementation="quantized"` in the `generation_config`.
|
||||
Quantization related arguments should be passed to the `generation_config` either as a `dict` or an instance of a [`QuantizedCacheConfig`] class.
|
||||
One has to indicate which quantization backend to use in the [`QuantizedCacheConfig`], the default is `quanto`.
|
||||
|
||||
<Tip warning={true}>
|
||||
|
||||
Cache quantization can be detrimental if the context length is short and there is enough GPU VRAM available to run without cache quantization.
|
||||
|
||||
</Tip>
|
||||
|
||||
|
||||
```python
|
||||
>>> import torch
|
||||
>>> from transformers import AutoTokenizer, AutoModelForCausalLM
|
||||
|
||||
>>> tokenizer = AutoTokenizer.from_pretrained("meta-llama/Llama-2-7b-chat-hf")
|
||||
>>> model = AutoModelForCausalLM.from_pretrained("meta-llama/Llama-2-7b-chat-hf", torch_dtype=torch.float16).to("cuda:0")
|
||||
>>> inputs = tokenizer("I like rock music because", return_tensors="pt").to(model.device)
|
||||
|
||||
>>> out = model.generate(**inputs, do_sample=False, max_new_tokens=20, cache_implementation="quantized", cache_config={"nbits": 4, "backend": "quanto"})
|
||||
>>> print(tokenizer.batch_decode(out, skip_special_tokens=True)[0])
|
||||
I like rock music because it's loud and energetic. It's a great way to express myself and rel
|
||||
|
||||
>>> out = model.generate(**inputs, do_sample=False, max_new_tokens=20)
|
||||
>>> print(tokenizer.batch_decode(out, skip_special_tokens=True)[0])
|
||||
I like rock music because it's loud and energetic. I like to listen to it when I'm feeling
|
||||
```
|
||||
|
||||
## Watermarking
|
||||
|
||||
The `generate()` supports watermarking the generated text by randomly marking a portion of tokens as "green".
|
||||
@ -225,21 +262,10 @@ array([True, True])
|
||||
## Decoding strategies
|
||||
|
||||
Certain combinations of the `generate()` parameters, and ultimately `generation_config`, can be used to enable specific
|
||||
decoding strategies. If you are new to this concept, we recommend reading
|
||||
[this blog post that illustrates how common decoding strategies work](https://huggingface.co/blog/how-to-generate).
|
||||
decoding strategies. If you are new to this concept, we recommend reading [this blog post that illustrates how common decoding strategies work](https://huggingface.co/blog/how-to-generate).
|
||||
|
||||
Here, we'll show some of the parameters that control the decoding strategies and illustrate how you can use them.
|
||||
|
||||
<Tip>
|
||||
|
||||
Selecting a given decoding strategy is not the only way you can influence the outcome of `generate()` with your model.
|
||||
The decoding strategies act based (mostly) on the logits, the distribution of probabilities for the next token, and
|
||||
thus selecting a good logits manipulation strategy can go a long way! In other words, manipulating the logits is another
|
||||
dimension you can act upon, in addition to selecting a decoding strategy. Popular logits manipulation strategies include
|
||||
`top_p`, `min_p`, and `repetition_penalty` -- you can check the full list in the [`GenerationConfig`] class.
|
||||
|
||||
</Tip>
|
||||
|
||||
### Greedy Search
|
||||
|
||||
[`generate`] uses greedy search decoding by default so you don't have to pass any parameters to enable it. This means the parameters `num_beams` is set to 1 and `do_sample=False`.
|
||||
|
||||
@ -46,30 +46,16 @@ The initial supported quantization types are decided according to the popular qu
|
||||
on the Hub.
|
||||
|
||||
- F32
|
||||
- F16
|
||||
- BF16
|
||||
- Q4_0
|
||||
- Q4_1
|
||||
- Q5_0
|
||||
- Q5_1
|
||||
- Q8_0
|
||||
- Q2_K
|
||||
- Q3_K
|
||||
- Q4_0
|
||||
- Q4_K
|
||||
- Q5_K
|
||||
- Q6_K
|
||||
- IQ1_S
|
||||
- IQ1_M
|
||||
- IQ2_XXS
|
||||
- IQ2_XS
|
||||
- IQ2_S
|
||||
- IQ3_XXS
|
||||
- IQ3_S
|
||||
- IQ4_XS
|
||||
- IQ4_NL
|
||||
- Q8_0
|
||||
|
||||
> [!NOTE]
|
||||
> To support gguf dequantization, `gguf>=0.10.0` installation is required.
|
||||
We take example from the excellent [99991/pygguf](https://github.com/99991/pygguf) Python parser to dequantize the
|
||||
weights.
|
||||
|
||||
### Supported model architectures
|
||||
|
||||
@ -78,7 +64,6 @@ For now the supported model architectures are the architectures that have been v
|
||||
- LLaMa
|
||||
- Mistral
|
||||
- Qwen2
|
||||
- Qwen2Moe
|
||||
|
||||
## Example usage
|
||||
|
||||
|
||||
@ -88,7 +88,6 @@ Flax), PyTorch, and/or TensorFlow.
|
||||
| [ByT5](model_doc/byt5) | ✅ | ✅ | ✅ |
|
||||
| [CamemBERT](model_doc/camembert) | ✅ | ✅ | ❌ |
|
||||
| [CANINE](model_doc/canine) | ✅ | ❌ | ❌ |
|
||||
| [Chameleon](model_doc/chameleon) | ✅ | ❌ | ❌ |
|
||||
| [Chinese-CLIP](model_doc/chinese_clip) | ✅ | ❌ | ❌ |
|
||||
| [CLAP](model_doc/clap) | ✅ | ❌ | ❌ |
|
||||
| [CLIP](model_doc/clip) | ✅ | ✅ | ✅ |
|
||||
@ -105,7 +104,6 @@ Flax), PyTorch, and/or TensorFlow.
|
||||
| [CPM-Ant](model_doc/cpmant) | ✅ | ❌ | ❌ |
|
||||
| [CTRL](model_doc/ctrl) | ✅ | ✅ | ❌ |
|
||||
| [CvT](model_doc/cvt) | ✅ | ✅ | ❌ |
|
||||
| [DAC](model_doc/dac) | ✅ | ❌ | ❌ |
|
||||
| [Data2VecAudio](model_doc/data2vec) | ✅ | ❌ | ❌ |
|
||||
| [Data2VecText](model_doc/data2vec) | ✅ | ❌ | ❌ |
|
||||
| [Data2VecVision](model_doc/data2vec) | ✅ | ✅ | ❌ |
|
||||
@ -121,7 +119,7 @@ Flax), PyTorch, and/or TensorFlow.
|
||||
| [DETR](model_doc/detr) | ✅ | ❌ | ❌ |
|
||||
| [DialoGPT](model_doc/dialogpt) | ✅ | ✅ | ✅ |
|
||||
| [DiNAT](model_doc/dinat) | ✅ | ❌ | ❌ |
|
||||
| [DINOv2](model_doc/dinov2) | ✅ | ❌ | ✅ |
|
||||
| [DINOv2](model_doc/dinov2) | ✅ | ❌ | ❌ |
|
||||
| [DistilBERT](model_doc/distilbert) | ✅ | ✅ | ✅ |
|
||||
| [DiT](model_doc/dit) | ✅ | ❌ | ✅ |
|
||||
| [DonutSwin](model_doc/donut) | ✅ | ❌ | ❌ |
|
||||
@ -137,7 +135,6 @@ Flax), PyTorch, and/or TensorFlow.
|
||||
| [ESM](model_doc/esm) | ✅ | ✅ | ❌ |
|
||||
| [FairSeq Machine-Translation](model_doc/fsmt) | ✅ | ❌ | ❌ |
|
||||
| [Falcon](model_doc/falcon) | ✅ | ❌ | ❌ |
|
||||
| [FalconMamba](model_doc/falcon_mamba) | ✅ | ❌ | ❌ |
|
||||
| [FastSpeech2Conformer](model_doc/fastspeech2_conformer) | ✅ | ❌ | ❌ |
|
||||
| [FLAN-T5](model_doc/flan-t5) | ✅ | ✅ | ✅ |
|
||||
| [FLAN-UL2](model_doc/flan-ul2) | ✅ | ✅ | ✅ |
|
||||
@ -158,7 +155,6 @@ Flax), PyTorch, and/or TensorFlow.
|
||||
| [GPT-Sw3](model_doc/gpt-sw3) | ✅ | ✅ | ✅ |
|
||||
| [GPTBigCode](model_doc/gpt_bigcode) | ✅ | ❌ | ❌ |
|
||||
| [GPTSAN-japanese](model_doc/gptsan-japanese) | ✅ | ❌ | ❌ |
|
||||
| [Granite](model_doc/granite) | ✅ | ❌ | ❌ |
|
||||
| [Graphormer](model_doc/graphormer) | ✅ | ❌ | ❌ |
|
||||
| [Grounding DINO](model_doc/grounding-dino) | ✅ | ❌ | ❌ |
|
||||
| [GroupViT](model_doc/groupvit) | ✅ | ✅ | ❌ |
|
||||
@ -188,8 +184,7 @@ Flax), PyTorch, and/or TensorFlow.
|
||||
| [Llama3](model_doc/llama3) | ✅ | ❌ | ✅ |
|
||||
| [LLaVa](model_doc/llava) | ✅ | ❌ | ❌ |
|
||||
| [LLaVA-NeXT](model_doc/llava_next) | ✅ | ❌ | ❌ |
|
||||
| [LLaVa-NeXT-Video](model_doc/llava_next_video) | ✅ | ❌ | ❌ |
|
||||
| [LLaVA-Onevision](model_doc/llava_onevision) | ✅ | ❌ | ❌ |
|
||||
| [LLaVa-NeXT-Video](model_doc/llava-next-video) | ✅ | ❌ | ❌ |
|
||||
| [Longformer](model_doc/longformer) | ✅ | ✅ | ❌ |
|
||||
| [LongT5](model_doc/longt5) | ✅ | ❌ | ✅ |
|
||||
| [LUKE](model_doc/luke) | ✅ | ❌ | ❌ |
|
||||
@ -198,7 +193,6 @@ Flax), PyTorch, and/or TensorFlow.
|
||||
| [M2M100](model_doc/m2m_100) | ✅ | ❌ | ❌ |
|
||||
| [MADLAD-400](model_doc/madlad-400) | ✅ | ✅ | ✅ |
|
||||
| [Mamba](model_doc/mamba) | ✅ | ❌ | ❌ |
|
||||
| [mamba2](model_doc/mamba2) | ✅ | ❌ | ❌ |
|
||||
| [Marian](model_doc/marian) | ✅ | ✅ | ✅ |
|
||||
| [MarkupLM](model_doc/markuplm) | ✅ | ❌ | ❌ |
|
||||
| [Mask2Former](model_doc/mask2former) | ✅ | ❌ | ❌ |
|
||||
@ -227,14 +221,12 @@ Flax), PyTorch, and/or TensorFlow.
|
||||
| [MusicGen Melody](model_doc/musicgen_melody) | ✅ | ❌ | ❌ |
|
||||
| [MVP](model_doc/mvp) | ✅ | ❌ | ❌ |
|
||||
| [NAT](model_doc/nat) | ✅ | ❌ | ❌ |
|
||||
| [Nemotron](model_doc/nemotron) | ✅ | ❌ | ❌ |
|
||||
| [Nezha](model_doc/nezha) | ✅ | ❌ | ❌ |
|
||||
| [NLLB](model_doc/nllb) | ✅ | ❌ | ❌ |
|
||||
| [NLLB-MOE](model_doc/nllb-moe) | ✅ | ❌ | ❌ |
|
||||
| [Nougat](model_doc/nougat) | ✅ | ✅ | ✅ |
|
||||
| [Nyströmformer](model_doc/nystromformer) | ✅ | ❌ | ❌ |
|
||||
| [OLMo](model_doc/olmo) | ✅ | ❌ | ❌ |
|
||||
| [OLMoE](model_doc/olmoe) | ✅ | ❌ | ❌ |
|
||||
| [OneFormer](model_doc/oneformer) | ✅ | ❌ | ❌ |
|
||||
| [OpenAI GPT](model_doc/openai-gpt) | ✅ | ✅ | ❌ |
|
||||
| [OpenAI GPT-2](model_doc/gpt2) | ✅ | ✅ | ✅ |
|
||||
@ -261,9 +253,7 @@ Flax), PyTorch, and/or TensorFlow.
|
||||
| [PVTv2](model_doc/pvt_v2) | ✅ | ❌ | ❌ |
|
||||
| [QDQBert](model_doc/qdqbert) | ✅ | ❌ | ❌ |
|
||||
| [Qwen2](model_doc/qwen2) | ✅ | ❌ | ❌ |
|
||||
| [Qwen2Audio](model_doc/qwen2_audio) | ✅ | ❌ | ❌ |
|
||||
| [Qwen2MoE](model_doc/qwen2_moe) | ✅ | ❌ | ❌ |
|
||||
| [Qwen2VL](model_doc/qwen2_vl) | ✅ | ❌ | ❌ |
|
||||
| [RAG](model_doc/rag) | ✅ | ✅ | ❌ |
|
||||
| [REALM](model_doc/realm) | ✅ | ❌ | ❌ |
|
||||
| [RecurrentGemma](model_doc/recurrent_gemma) | ✅ | ❌ | ❌ |
|
||||
|
||||
@ -140,6 +140,9 @@ generation.
|
||||
[[autodoc]] ForcedEOSTokenLogitsProcessor
|
||||
- __call__
|
||||
|
||||
[[autodoc]] ForceTokensLogitsProcessor
|
||||
- __call__
|
||||
|
||||
[[autodoc]] HammingDiversityLogitsProcessor
|
||||
- __call__
|
||||
|
||||
@ -155,6 +158,9 @@ generation.
|
||||
[[autodoc]] LogitsProcessorList
|
||||
- __call__
|
||||
|
||||
[[autodoc]] LogitsWarper
|
||||
- __call__
|
||||
|
||||
[[autodoc]] MinLengthLogitsProcessor
|
||||
- __call__
|
||||
|
||||
@ -380,30 +386,11 @@ A [`Constraint`] can be used to force the generation to include specific tokens
|
||||
- get_seq_length
|
||||
- reorder_cache
|
||||
|
||||
[[autodoc]] OffloadedCache
|
||||
- update
|
||||
- prefetch_layer
|
||||
- evict_previous_layer
|
||||
|
||||
[[autodoc]] StaticCache
|
||||
- update
|
||||
- get_seq_length
|
||||
- reset
|
||||
|
||||
[[autodoc]] OffloadedStaticCache
|
||||
- update
|
||||
- get_seq_length
|
||||
- reset
|
||||
|
||||
[[autodoc]] HybridCache
|
||||
- update
|
||||
- get_seq_length
|
||||
- reset
|
||||
|
||||
[[autodoc]] SlidingWindowCache
|
||||
- update
|
||||
- reset
|
||||
|
||||
[[autodoc]] EncoderDecoderCache
|
||||
- get_seq_length
|
||||
- to_legacy_cache
|
||||
@ -411,12 +398,8 @@ A [`Constraint`] can be used to force the generation to include specific tokens
|
||||
- reset
|
||||
- reorder_cache
|
||||
|
||||
[[autodoc]] MambaCache
|
||||
- update_conv_state
|
||||
- update_ssm_state
|
||||
- reset
|
||||
|
||||
## Watermark Utils
|
||||
|
||||
[[autodoc]] WatermarkDetector
|
||||
- __call__
|
||||
|
||||
|
||||
@ -1,403 +0,0 @@
|
||||
<!--Copyright 2024 The HuggingFace Team. All rights reserved.
|
||||
|
||||
Licensed under the Apache License, Version 2.0 (the "License"); you may not use this file except in compliance with
|
||||
the License. You may obtain a copy of the License at
|
||||
|
||||
http://www.apache.org/licenses/LICENSE-2.0
|
||||
|
||||
Unless required by applicable law or agreed to in writing, software distributed under the License is distributed on
|
||||
an "AS IS" BASIS, WITHOUT WARRANTIES OR CONDITIONS OF ANY KIND, either express or implied. See the License for the
|
||||
specific language governing permissions and limitations under the License.
|
||||
|
||||
⚠️ Note that this file is in Markdown but contain specific syntax for our doc-builder (similar to MDX) that may not be
|
||||
rendered properly in your Markdown viewer.
|
||||
|
||||
-->
|
||||
|
||||
# Best Practices for Generation with Cache
|
||||
|
||||
Efficient caching is crucial for optimizing the performance of models in various generative tasks,
|
||||
including text generation, translation, summarization and other transformer-based applications.
|
||||
Effective caching helps reduce computation time and improve response rates, especially in real-time or resource-intensive applications.
|
||||
|
||||
Transformers support various caching methods, leveraging "Cache" classes to abstract and manage the caching logic.
|
||||
This document outlines best practices for using these classes to maximize performance and efficiency.
|
||||
Check out all the available `Cache` classes in the [API documentation](./internal/generation_utils).
|
||||
|
||||
## What is Cache and why we should care?
|
||||
|
||||
Imagine you’re having a conversation with someone, and instead of remembering what was said previously, you have to start from scratch every time you respond. This would be slow and inefficient, right? In the world of Transformer models, a similar concept applies, and that's where Caching keys and values come into play. From now on, I'll refer to the concept as KV Cache.
|
||||
|
||||
KV cache is needed to optimize the generation in autoregressive models, where the model predicts text token by token. This process can be slow since the model can generate only one token at a time, and each new prediction is dependent on the previous context. That means, to predict token number 1000 in the generation, you need information from the previous 999 tokens, which comes in the form of some matrix multiplications across the representations of those tokens. But to predict token number 1001, you also need the same information from the first 999 tokens, plus additional information from token number 1000. That is where key-value cache is used to optimize the sequential generation process by storing previous calculations to reuse in subsequent tokens, so they don't need to be computed again.
|
||||
|
||||
More concretely, key-value cache acts as a memory bank for these generative models, where the model stores key-value pairs derived from self-attention layers for previously processed tokens. By storing this information, the model can avoid redundant computations and instead retrieve keys and values of previous tokens from the cache. Note that caching can be used only in inference and should be disabled when training, otherwise it might cause unexpected errors.
|
||||
|
||||
<details>
|
||||
<summary><em>For the Curious Minds Who Like to Dive Deep</em></summary>
|
||||
|
||||
### Under the Hood: How Cache Object Works in Attention Mechanism
|
||||
|
||||
When utilizing a cache object in the input, the Attention module performs several critical steps to integrate past and present information seamlessly.
|
||||
|
||||
The Attention module concatenates the current key-values with the past key-values stored in the cache. This results in attention weights of shape `(new_tokens_length, past_kv_length + new_tokens_length)`. Essentially, the past and current key-values are combined to compute attention scores, ensuring that the model considers both previous context and new input. The concatenated key-values are used to compute the attention scores resulting in attention weights of shape `(new_tokens_length, past_kv_length + new_tokens_length)`.
|
||||
|
||||
Therefore, when iteratively calling `forward()` instead of the `generate()` method, it’s crucial to ensure that the attention mask shape matches the combined length of past and current key-values. The attention mask should have the shape `(batch_size, past_kv_length + new_tokens_length)`. This is usually handled internally when you call `generate()` method. If you want to implement your own generation loop with Cache classes, take this into consideration and prepare the attention mask to hold values to current and past tokens.
|
||||
|
||||
<Tip warning={true}>
|
||||
|
||||
One important concept you need to know when writing your own generation loop, is `cache_position`. In case you want to reuse an already filled Cache object by calling `forward()`, you have to pass in a valid `cache_position` which will indicate the positions of inputs in the sequence. Note that `cache_position` is not affected by padding, and always adds one more position for each token. For example, if key/value cache contains 10 tokens (no matter how many of it is a pad token), the cache position for the next token should be `torch.tensor([10])`.
|
||||
|
||||
</Tip>
|
||||
|
||||
|
||||
See an example below for how to implement your own generation loop.
|
||||
|
||||
```python
|
||||
>>> import torch
|
||||
>>> from transformers import AutoTokenizer, AutoModelForCausalLM, DynamicCache
|
||||
|
||||
>>> model_id = "meta-llama/Llama-2-7b-chat-hf"
|
||||
>>> model = AutoModelForCausalLM.from_pretrained(model_id, torch_dtype=torch.bfloat16, device_map="cuda:0")
|
||||
>>> tokenizer = AutoTokenizer.from_pretrained(model_id)
|
||||
|
||||
>>> past_key_values = DynamicCache()
|
||||
>>> messages = [{"role": "user", "content": "Hello, what's your name."}]
|
||||
>>> inputs = tokenizer.apply_chat_template(messages, add_generation_prompt=True, return_tensors="pt", return_dict=True).to("cuda:0")
|
||||
|
||||
>>> generated_ids = inputs.input_ids
|
||||
>>> cache_position = torch.arange(inputs.input_ids.shape[1], dtype=torch.int64, device="cuda:0")
|
||||
>>> max_new_tokens = 10
|
||||
|
||||
>>> for _ in range(max_new_tokens):
|
||||
... outputs = model(**inputs, cache_position=cache_position, past_key_values=past_key_values, use_cache=True)
|
||||
... # Greedily sample one next token
|
||||
... next_token_ids = outputs.logits[:, -1:].argmax(-1)
|
||||
... generated_ids = torch.cat([generated_ids, next_token_ids], dim=-1)
|
||||
...
|
||||
... # Prepare inputs for the next generation step by leaaving unprocessed tokens, in our case we have only one new token
|
||||
... # and expanding attn mask for the new token, as explained above
|
||||
... attention_mask = inputs["attention_mask"]
|
||||
... attention_mask = torch.cat([attention_mask, attention_mask.new_ones((attention_mask.shape[0], 1))], dim=-1)
|
||||
... inputs = {"input_ids": next_token_ids, "attention_mask": attention_mask}
|
||||
... cache_position = cache_position[-1:] + 1 # add one more position for the next token
|
||||
|
||||
>>> print(tokenizer.batch_decode(generated_ids, skip_special_tokens=True)[0])
|
||||
"[INST] Hello, what's your name. [/INST] Hello! My name is LLaMA,"
|
||||
```
|
||||
|
||||
</details>
|
||||
|
||||
|
||||
|
||||
## Generate with Cache
|
||||
|
||||
In 🤗 Transformers, we support various Cache types to optimize the performance across different models and tasks. By default, all models generate with caching,
|
||||
with the [`~DynamicCache`] class being the default cache for most models. It allows us to dynamically grow cache size, by saving more and more keys and values as we generate. If for some reason you don't want to use caches, you can pass `use_cache=False` into the `generate()` method.
|
||||
|
||||
Refer to the table below to see the difference between cache types and choose the one that suits best for your use-case. Models for which initialization is recommended should be initialized before calling the model and passed to model as a kwarg. In all other cases you can simply define desired `cache_implementation` and we take care of the rest for you.
|
||||
|
||||
| Cache Type | Memory Efficient | Supports torch.compile() | Initialization Recommended | Latency | Long Context Generation |
|
||||
|------------------------|------------------|--------------------------|----------------------------|---------|-------------------------|
|
||||
| Dynamic Cache | No | No | No | Mid | No |
|
||||
| Static Cache | No | Yes | Yes | High | No |
|
||||
| Offloaded Cache | Yes | No | No | Low | Yes |
|
||||
| Offloaded Static Cache | No | Yes | Yes | High | Yes |
|
||||
| Quantized Cache | Yes | No | No | Low | Yes |
|
||||
| Sliding Window Cache | No | Yes | Yes | High | No |
|
||||
| Sink Cache | Yes | No | Yes | Mid | Yes |
|
||||
|
||||
|
||||
These cache classes can be set with a `cache_implementation` argument when generating. To learn about the available options for the cache_implementation flag, please refer to the [API Documentation](./main_classes/text_generation#transformers.GenerationConfig). Now, let's explore each cache type in detail and see how to use them. Note that the below examples are for decoder-only Tranformer-based models. We also support ["Model-Specific Cache"] classes for models such as Mamba or Jamba, keep reading for more details.
|
||||
|
||||
### Quantized Cache
|
||||
|
||||
The key and value cache can occupy a large portion of memory, becoming a [bottleneck for long-context generation](https://huggingface.co/blog/llama31#inference-memory-requirements), especially for Large Language Models.
|
||||
Quantizing the cache when using `generate()` can significantly reduce memory requirements at the cost of speed.
|
||||
|
||||
KV Cache quantization in `transformers` is largely inspired by the paper ["KIVI: A Tuning-Free Asymmetric 2bit Quantization for KV Cache"](https://arxiv.org/abs/2402.02750) and currently supports [`~QuantoQuantizedCache`] and [`~HQQQuantizedCache`] classes. For more information on the inner workings see the paper.
|
||||
|
||||
To enable quantization of the key-value cache, one needs to indicate `cache_implementation="quantized"` in the `generation_config`.
|
||||
Quantization related arguments should be passed to the `generation_config` either as a `dict` or an instance of a [`~QuantizedCacheConfig`] class.
|
||||
One has to indicate which quantization backend to use in the [`~QuantizedCacheConfig`], the default is `quanto`.
|
||||
|
||||
It is recommended to set `axis-key/axis-value` parameters in the cache config to `0` if you're using the `quanto` backend and to `1` if you're using the `HQQ` backend. For other config values, please use the defaults unless you're running out of memory. In that case, you may consider decreasing the residual length.
|
||||
|
||||
<Tip warning={true}>
|
||||
|
||||
Cache quantization can be detrimental in terms of latency if the context length is short and there is enough GPU VRAM available to run without cache quantization. It is recommended to seek balance between memory efficiency and latency.
|
||||
</Tip>
|
||||
|
||||
|
||||
```python
|
||||
>>> import torch
|
||||
>>> from transformers import AutoTokenizer, AutoModelForCausalLM
|
||||
|
||||
>>> tokenizer = AutoTokenizer.from_pretrained("meta-llama/Llama-2-7b-chat-hf")
|
||||
>>> model = AutoModelForCausalLM.from_pretrained("meta-llama/Llama-2-7b-chat-hf", torch_dtype=torch.float16).to("cuda:0")
|
||||
>>> inputs = tokenizer("I like rock music because", return_tensors="pt").to(model.device)
|
||||
|
||||
>>> out = model.generate(**inputs, do_sample=False, max_new_tokens=20, cache_implementation="quantized", cache_config={"nbits": 4, "backend": "quanto"})
|
||||
>>> print(tokenizer.batch_decode(out, skip_special_tokens=True)[0])
|
||||
I like rock music because it's loud and energetic. It's a great way to express myself and rel
|
||||
|
||||
>>> out = model.generate(**inputs, do_sample=False, max_new_tokens=20)
|
||||
>>> print(tokenizer.batch_decode(out, skip_special_tokens=True)[0])
|
||||
I like rock music because it's loud and energetic. I like to listen to it when I'm feeling
|
||||
```
|
||||
|
||||
### Offloaded Cache
|
||||
|
||||
Similarly to KV cache quantization, [`~OffloadedCache`] strategy aims to reduce GPU VRAM usage.
|
||||
It does so by moving the KV cache for most layers to the CPU.
|
||||
As the model's `forward()` method iterates over the layers, this strategy maintains the current layer cache on the GPU.
|
||||
At the same time it asynchronously prefetches the next layer cache as well as sending the previous layer cache back to the CPU.
|
||||
Unlike KV cache quantization, this strategy always produces the same result as the default KV cache implementation.
|
||||
Thus, it can serve as a drop-in replacement or a fallback for it.
|
||||
|
||||
Depending on your model and the characteristics of your generation task (size of context, number of generated tokens, number of beams, etc.)
|
||||
you may notice a small degradation in generation throughput compared to the default KV cache implementation.
|
||||
|
||||
To enable KV cache offloading, pass `cache_implementation="offloaded"` in the `generation_config` or directly to the `generate()` call.
|
||||
Use `cache_implementation="offloaded_static"` for an offloaded static cache (see also [Offloaded Static Cache](#offloaded-static-cache) below).
|
||||
|
||||
```python
|
||||
>>> import torch
|
||||
>>> from transformers import AutoTokenizer, AutoModelForCausalLM
|
||||
>>> ckpt = "microsoft/Phi-3-mini-4k-instruct"
|
||||
|
||||
>>> tokenizer = AutoTokenizer.from_pretrained(ckpt)
|
||||
>>> model = AutoModelForCausalLM.from_pretrained(ckpt, torch_dtype=torch.float16).to("cuda:0")
|
||||
>>> inputs = tokenizer("Fun fact: The shortest", return_tensors="pt").to(model.device)
|
||||
|
||||
>>> out = model.generate(**inputs, do_sample=False, max_new_tokens=23, cache_implementation="offloaded")
|
||||
>>> print(tokenizer.batch_decode(out, skip_special_tokens=True)[0])
|
||||
Fun fact: The shortest war in history was between Britain and Zanzibar on August 27, 1896.
|
||||
|
||||
>>> out = model.generate(**inputs, do_sample=False, max_new_tokens=23)
|
||||
>>> print(tokenizer.batch_decode(out, skip_special_tokens=True)[0])
|
||||
Fun fact: The shortest war in history was between Britain and Zanzibar on August 27, 1896.
|
||||
```
|
||||
|
||||
<Tip warning={true}>
|
||||
|
||||
Cache offloading requires a GPU and can be slower than dynamic KV cache. Use it if you are getting CUDA out of memory errors.
|
||||
|
||||
</Tip>
|
||||
|
||||
The example below shows how KV cache offloading can be used as a fallback strategy.
|
||||
```python
|
||||
>>> import torch
|
||||
>>> from transformers import AutoTokenizer, AutoModelForCausalLM
|
||||
>>> def resilient_generate(model, *args, **kwargs):
|
||||
... oom = False
|
||||
... try:
|
||||
... return model.generate(*args, **kwargs)
|
||||
... except torch.cuda.OutOfMemoryError as e:
|
||||
... print(e)
|
||||
... print("retrying with cache_implementation='offloaded'")
|
||||
... oom = True
|
||||
... if oom:
|
||||
... torch.cuda.empty_cache()
|
||||
... kwargs["cache_implementation"] = "offloaded"
|
||||
... return model.generate(*args, **kwargs)
|
||||
...
|
||||
...
|
||||
>>> ckpt = "microsoft/Phi-3-mini-4k-instruct"
|
||||
>>> tokenizer = AutoTokenizer.from_pretrained(ckpt)
|
||||
>>> model = AutoModelForCausalLM.from_pretrained(ckpt, torch_dtype=torch.float16).to("cuda:0")
|
||||
>>> prompt = ["okay "*1000 + "Fun fact: The most"]
|
||||
>>> inputs = tokenizer(prompt, return_tensors="pt").to(model.device)
|
||||
>>> beams = { "num_beams": 40, "num_beam_groups": 40, "num_return_sequences": 40, "diversity_penalty": 1.0, "max_new_tokens": 23, "early_stopping": True, }
|
||||
>>> out = resilient_generate(model, **inputs, **beams)
|
||||
>>> responses = tokenizer.batch_decode(out[:,-28:], skip_special_tokens=True)
|
||||
```
|
||||
|
||||
On a GPU with 50 GB of RAM, running this code will print
|
||||
```
|
||||
CUDA out of memory. Tried to allocate 4.83 GiB. GPU
|
||||
retrying with cache_implementation='offloaded'
|
||||
```
|
||||
before successfully generating 40 beams.
|
||||
|
||||
|
||||
### Static Cache
|
||||
|
||||
Since the "DynamicCache" dynamically grows with each generation step, it prevents you from taking advantage of JIT optimizations. The [`~StaticCache`] pre-allocates
|
||||
a specific maximum size for the keys and values, allowing you to generate up to the maximum length without having to modify cache size. Check the below usage example.
|
||||
|
||||
For more examples with Static Cache and JIT compilation, take a look at [StaticCache & torchcompile](./llm_optims#static-kv-cache-and-torchcompile)
|
||||
|
||||
```python
|
||||
>>> import torch
|
||||
>>> from transformers import AutoTokenizer, AutoModelForCausalLM
|
||||
|
||||
>>> tokenizer = AutoTokenizer.from_pretrained("meta-llama/Llama-2-7b-chat-hf")
|
||||
>>> model = AutoModelForCausalLM.from_pretrained("meta-llama/Llama-2-7b-chat-hf", torch_dtype=torch.float16, device_map="auto")
|
||||
>>> inputs = tokenizer("Hello, my name is", return_tensors="pt").to(model.device)
|
||||
|
||||
>>> # simply pass the cache implementation="static"
|
||||
>>> out = model.generate(**inputs, do_sample=False, max_new_tokens=20, cache_implementation="static")
|
||||
>>> tokenizer.batch_decode(out, skip_special_tokens=True)[0]
|
||||
"Hello, my name is [Your Name], and I am a [Your Profession] with [Number of Years] of"
|
||||
```
|
||||
|
||||
|
||||
## Offloaded Static Cache
|
||||
|
||||
Like [`~OffloadedCache`] exists for offloading a "DynamicCache", there is also an offloaded static cache. It fully supports
|
||||
JIT optimizations. Just pass `cache_implementation="offloaded_static"` in the `generation_config` or directly to the `generate()` call.
|
||||
This will use the [`~OffloadedStaticCache`] implementation instead.
|
||||
|
||||
```python
|
||||
>>> import torch
|
||||
>>> from transformers import AutoTokenizer, AutoModelForCausalLM
|
||||
|
||||
>>> tokenizer = AutoTokenizer.from_pretrained("meta-llama/Llama-2-7b-chat-hf")
|
||||
>>> model = AutoModelForCausalLM.from_pretrained("meta-llama/Llama-2-7b-chat-hf", torch_dtype=torch.float16, device_map="auto")
|
||||
>>> inputs = tokenizer("Hello, my name is", return_tensors="pt").to(model.device)
|
||||
|
||||
>>> # simply pass the cache implementation="static"
|
||||
>>> out = model.generate(**inputs, do_sample=False, max_new_tokens=20, cache_implementation="offloaded_static")
|
||||
>>> tokenizer.batch_decode(out, skip_special_tokens=True)[0]
|
||||
"Hello, my name is [Your Name], and I am a [Your Profession] with [Number of Years] of"
|
||||
```
|
||||
|
||||
|
||||
### Sliding Window Cache
|
||||
|
||||
As the name suggests, this cache type implements a sliding window over previous keys and values, retaining only the last `sliding_window` tokens. It should be used with models like Mistral that support sliding window attention. Additionally, similar to Static Cache, this one is JIT-friendly and can be used with the same compile tecniques as Static Cache.
|
||||
|
||||
Note that you can use this cache only for models that support sliding window, e.g. Mistral models.
|
||||
|
||||
|
||||
```python
|
||||
>>> import torch
|
||||
>>> from transformers import AutoTokenizer, AutoModelForCausalLM, SinkCache
|
||||
|
||||
>>> tokenizer = AutoTokenizer.from_pretrained("mistralai/Mistral-7B-v0.1")
|
||||
>>> model = AutoModelForCausalLM.from_pretrained("mistralai/Mistral-7B-v0.1", torch_dtype=torch.float16).to("cuda:0")
|
||||
>>> inputs = tokenizer("Yesterday I was on a rock concert and.", return_tensors="pt").to(model.device)
|
||||
|
||||
>>> # can be used by passing in cache implementation
|
||||
>>> out = model.generate(**inputs, do_sample=False, max_new_tokens=30, cache_implementation="sliding_window")
|
||||
>>> tokenizer.batch_decode(out, skip_special_tokens=True)[0]
|
||||
"Yesterday I was on a rock concert and. I was so excited to see my favorite band. I was so excited that I was jumping up and down and screaming. I was so excited that I"
|
||||
```
|
||||
|
||||
### Sink Cache
|
||||
|
||||
Sink Cache was introduced in ["Efficient Streaming Language Models with Attention Sinks"](https://arxiv.org/abs/2309.17453). It allows you to generate long sequences of text ("infinite length" according to the paper) without any fine-tuning. That is achieved by smart handling of previous keys and values, specifically it retains a few initial tokens from the sequence, called "sink tokens". This is based on the observation that these initial tokens attract a significant portion of attention scores during the generation process. Tokens that come after "sink tokens" are discarded on a sliding windowed basis, keeping only the latest `window_size` tokens. By keeping these initial tokens as "attention sinks," the model maintains stable performance even when dealing with very long texts, thus discarding most of the previous knowledge.
|
||||
|
||||
Unlike other cache classes, this one can't be used directly by indicating a `cache_implementation`. You have to initialize the Cache before calling on `generate()` as follows.
|
||||
|
||||
```python
|
||||
>>> import torch
|
||||
>>> from transformers import AutoTokenizer, AutoModelForCausalLM, SinkCache
|
||||
|
||||
>>> tokenizer = AutoTokenizer.from_pretrained("meta-llama/Llama-2-7b-chat-hf")
|
||||
>>> model = AutoModelForCausalLM.from_pretrained("meta-llama/Llama-2-7b-chat-hf", torch_dtype=torch.float16).to("cuda:0")
|
||||
>>> inputs = tokenizer("This is a long story about unicorns, fairies and magic.", return_tensors="pt").to(model.device)
|
||||
|
||||
>>> # get our cache, specify number of sink tokens and window size
|
||||
>>> # Note that window size already includes sink tokens, so has to be larger
|
||||
>>> past_key_values = SinkCache(window_length=256, num_sink_tokens=4)
|
||||
>>> out = model.generate(**inputs, do_sample=False, max_new_tokens=30, past_key_values=past_key_values)
|
||||
>>> tokenizer.batch_decode(out, skip_special_tokens=True)[0]
|
||||
"This is a long story about unicorns, fairies and magic. It is a fantasy world where unicorns and fairies live together in harmony. The story follows a young girl named Lily"
|
||||
```
|
||||
|
||||
### Encoder-Decoder Cache
|
||||
|
||||
The [`~EncoderDecoderCache`] is a wrapper designed to handle the caching needs of encoder-decoder models. This cache type is specifically built to manage both self-attention and cross-attention caches, ensuring storage and retrieval of past key/values required for these complex models. Cool thing about Encoder-Decoder Cache is that you can set different cache types for the encoder and for the decoder, depending on your use case. Currently this cache is only supported in [Whisper](./model_doc/whisper) models but we will be adding more models soon.
|
||||
|
||||
In terms of usage, there is nothing special to be done and calling `generate()` or `forward()` will handle everything for you.
|
||||
|
||||
|
||||
### Model-specific Cache Classes
|
||||
|
||||
Some models require storing previous keys, values, or states in a specific way, and the above cache classes cannot be used. For such cases, we have several specialized cache classes that are designed for specific models. These models only accept their own dedicated cache classes and do not support using any other cache types. Some examples include [`~HybridCache`] for [Gemma2](./model_doc/gemma2) series models or [`~MambaCache`] for [Mamba](./model_doc/mamba) architecture models.
|
||||
|
||||
|
||||
## Iterative Generation with Cache
|
||||
|
||||
We have seen how to use each of the cache types when generating. What if you want to use cache in iterative generation setting, for example in applications like chatbots, where interactions involve multiple turns and continuous back-and-forth exchanges. Iterative generation with cache allows these systems to handle ongoing conversations effectively without reprocessing the entire context at each step. But there are some tips that you should know before you start implementing:
|
||||
|
||||
The general format when doing iterative generation is as below. First you have to initialize an empty cache of the type you want, and you can start feeding in new prompts iteratively. Keeping track of dialogues history and formatting can be done with chat templates, read more on that in [chat_templating](./chat_templating)
|
||||
|
||||
In case you are using Sink Cache, you have to crop your inputs to that maximum length because Sink Cache can generate text longer than its maximum window size, but it expects the first input to not exceed the maximum cache length.
|
||||
|
||||
|
||||
```python
|
||||
>>> import torch
|
||||
>>> from transformers import AutoTokenizer,AutoModelForCausalLM
|
||||
>>> from transformers.cache_utils import (
|
||||
>>> DynamicCache,
|
||||
>>> SinkCache,
|
||||
>>> StaticCache,
|
||||
>>> SlidingWindowCache,
|
||||
>>> QuantoQuantizedCache,
|
||||
>>> QuantizedCacheConfig,
|
||||
>>> )
|
||||
|
||||
>>> model_id = "meta-llama/Llama-2-7b-chat-hf"
|
||||
>>> model = AutoModelForCausalLM.from_pretrained(model_id, torch_dtype=torch.bfloat16, device_map='auto')
|
||||
>>> tokenizer = AutoTokenizer.from_pretrained(model_id)
|
||||
|
||||
>>> user_prompts = ["Hello, what's your name?", "Btw, yesterday I was on a rock concert."]
|
||||
|
||||
>>> past_key_values = DynamicCache()
|
||||
>>> max_cache_length = past_key_values.get_max_length()
|
||||
|
||||
>>> messages = []
|
||||
>>> for prompt in user_prompts:
|
||||
... messages.append({"role": "user", "content": prompt})
|
||||
... inputs = tokenizer.apply_chat_template(messages, add_generation_prompt=True, return_tensors="pt", return_dict=True).to(model.device)
|
||||
... if isinstance(past_key_values, SinkCache):
|
||||
... inputs = {k: v[:, -max_cache_length:] for k, v in inputs.items()}
|
||||
...
|
||||
... input_length = inputs["input_ids"].shape[1]
|
||||
...
|
||||
... outputs = model.generate(**inputs, do_sample=False, max_new_tokens=256, past_key_values=past_key_values)
|
||||
... completion = tokenizer.decode(outputs[0, input_length: ], skip_special_tokens=True)
|
||||
... messages.append({"role": "assistant", "content": completion})
|
||||
|
||||
print(messages)
|
||||
[{'role': 'user', 'content': "Hello, what's your name?"}, {'role': 'assistant', 'content': " Hello! My name is LLaMA, I'm a large language model trained by a team of researcher at Meta AI. 😊"}, {'role': 'user', 'content': 'Btw, yesterday I was on a rock concert.'}, {'role': 'assistant', 'content': ' Oh, cool! That sounds like a lot of fun! 🎉 Did you enjoy the concert? What was the band like? 🤔'}]
|
||||
```
|
||||
|
||||
|
||||
## Re-use Cache to continue generation
|
||||
|
||||
Sometimes you would want to first fill-in cache object with key/values for certain prefix prompt and re-use it several times to generate different sequences from it. In that case you can construct a `Cache` object that will hold the instruction prompt, and re-use it several times with different text sequences.
|
||||
|
||||
```python
|
||||
>>> import copy
|
||||
>>> import torch
|
||||
>>> from transformers import AutoModelForCausalLM, AutoTokenizer, DynamicCache, StaticCache
|
||||
|
||||
>>> model_id = "meta-llama/Llama-2-7b-chat-hf"
|
||||
>>> model = AutoModelForCausalLM.from_pretrained(model_id, torch_dtype=torch.bfloat16, device_map="cuda")
|
||||
>>> tokenizer = AutoTokenizer.from_pretrained(model_id)
|
||||
|
||||
>>> # Init StaticCache with big enough max-length (1024 tokens for the below example)
|
||||
>>> # You can also init a DynamicCache, if that suits you better
|
||||
>>> prompt_cache = StaticCache(config=model.config, max_batch_size=1, max_cache_len=1024, device="cuda", dtype=torch.bfloat16)
|
||||
|
||||
>>> INITIAL_PROMPT = "You are a helpful assistant. "
|
||||
>>> inputs_initial_prompt = tokenizer(INITIAL_PROMPT, return_tensors="pt").to("cuda")
|
||||
>>> # This is the common prompt cached, we need to run forward without grad to be abel to copy
|
||||
>>> with torch.no_grad():
|
||||
... prompt_cache = model(**inputs_initial_prompt, past_key_values = prompt_cache).past_key_values
|
||||
|
||||
>>> prompts = ["Help me to write a blogpost about travelling.", "What is the capital of France?"]
|
||||
>>> responses = []
|
||||
>>> for prompt in prompts:
|
||||
... new_inputs = tokenizer(INITIAL_PROMPT + prompt, return_tensors="pt").to("cuda")
|
||||
... past_key_values = copy.deepcopy(prompt_cache)
|
||||
... outputs = model.generate(**new_inputs, past_key_values=past_key_values,max_new_tokens=20)
|
||||
... response = tokenizer.batch_decode(outputs)[0]
|
||||
... responses.append(response)
|
||||
|
||||
>>> print(responses)
|
||||
['<s> You are a helpful assistant. Help me to write a blogpost about travelling.\n\nTitle: The Ultimate Guide to Travelling: Tips, Tricks, and', '<s> You are a helpful assistant. What is the capital of France?\n\nYes, the capital of France is Paris.</s>']
|
||||
```
|
||||
@ -18,109 +18,59 @@ Basic inference is slow because LLMs have to be called repeatedly to generate th
|
||||
This guide will show you how to use the optimization techniques available in Transformers to accelerate LLM inference.
|
||||
|
||||
> [!TIP]
|
||||
> Hugging Face also provides [Text Generation Inference (TGI)](https://hf.co/docs/text-generation-inference), a library dedicated to deploying and serving highly optimized LLMs for inference. It includes deployment-oriented optimization features not included in Transformers, such as continuous batching for increasing throughput and tensor parallelism for multi-GPU inference.
|
||||
> Hugging Face also provides [Text Generation Inference (TGI)](https://hf.co/docs/text-generation-inference), a library dedicated to deploying and serving highly optimized LLMs for inference. It includes more optimization features not included in Transformers, such as continuous batching for increasing throughput and tensor parallelism for multi-GPU inference.
|
||||
|
||||
## Static kv-cache and `torch.compile`
|
||||
## Static kv-cache and torch.compile
|
||||
|
||||
During decoding, a LLM computes the key-value (kv) values for each input token and since it is autoregressive, it computes the same kv values each time because the generated output becomes part of the input now. This is not very efficient because you're recomputing the same kv values each time.
|
||||
|
||||
To optimize this, you can use a kv-cache to store the past keys and values instead of recomputing them each time. However, since the kv-cache grows with each generation step and is dynamic, it prevents you from taking advantage of [`torch.compile`](./perf_torch_compile), a powerful optimization tool that fuses PyTorch code into fast and optimized kernels. We have an entire guide dedicated to kv-caches [here](./kv_cache).
|
||||
To optimize this, you can use a kv-cache to store the past keys and values instead of recomputing them each time. However, since the kv-cache grows with each generation step and is dynamic, it prevents you from taking advantage of [torch.compile](./perf_torch_compile), a powerful optimization tool that fuses PyTorch code into fast and optimized kernels.
|
||||
|
||||
The *static kv-cache* solves this issue by pre-allocating the kv-cache size to a maximum value which allows you to combine it with `torch.compile` for up to a 4x speed up. Your speed up may vary depending on the model size (larger models have a smaller speed up) and hardware.
|
||||
The *static kv-cache* solves this issue by pre-allocating the kv-cache size to a maximum value which allows you to combine it with torch.compile for up to a 4x speed up.
|
||||
|
||||
> [!WARNING]
|
||||
> Currently, only [Llama](./model_doc/llama2) and a few other models support static kv-cache and `torch.compile`. Check [this issue](https://github.com/huggingface/transformers/issues/28981) for a live model compatibility list.
|
||||
> Currently, only [Llama](./model_doc/llama2) and a few other models support static kv-cache and torch.compile. Check [this issue](https://github.com/huggingface/transformers/issues/28981) for a live model compatibility list.
|
||||
|
||||
There are three flavors of static kv-cache usage, depending on the complexity of your task:
|
||||
1. Basic usage: simply set a flag in `generation_config` (recommended);
|
||||
2. Advanced usage: handle a cache object for multi-turn generation or a custom generation loop;
|
||||
3. Advanced usage: compile the entire `generate` function into a single graph, if having a single graph is relevant for you.
|
||||
|
||||
Select the correct tab below for further instructions on each of these flavors.
|
||||
|
||||
> [!TIP]
|
||||
> Regardless of the strategy used with `torch.compile`, you can avoid shape-related recompilations if you left-pad your LLM inputs to a limited set of values. The [`pad_to_multiple_of` tokenizer flag](https://huggingface.co/docs/transformers/main_classes/tokenizer#transformers.PreTrainedTokenizer.__call__.pad_to_multiple_of) is your friend!
|
||||
|
||||
<hfoptions id="static-kv">
|
||||
<hfoption id="basic usage: generation_config">
|
||||
|
||||
For this example, let's use the [Gemma](https://hf.co/google/gemma-2b) model. All we need to do is to:
|
||||
1. Access the model's `generation_config` attribute and set the `cache_implementation` to "static";
|
||||
2. Call `torch.compile` on the model to compile the forward pass with the static kv-cache.
|
||||
|
||||
And that's it!
|
||||
For this example, let's load the [Gemma](https://hf.co/google/gemma-2b) model.
|
||||
|
||||
```py
|
||||
from transformers import AutoTokenizer, AutoModelForCausalLM
|
||||
import torch
|
||||
import os
|
||||
os.environ["TOKENIZERS_PARALLELISM"] = "false" # To prevent long warnings :)
|
||||
|
||||
tokenizer = AutoTokenizer.from_pretrained("google/gemma-2b")
|
||||
model = AutoModelForCausalLM.from_pretrained("google/gemma-2b", device_map="auto")
|
||||
model = AutoModelForCausalLM.from_pretrained(
|
||||
"google/gemma-2b", device_map="auto"
|
||||
)
|
||||
```
|
||||
|
||||
There are two ways you can configure the model to use a static kv-cache. For a 7B model on an A100, both methods get a 4x speed up in the forward pass. Your speed up may vary depending on the model size (larger models have a smaller speed up) and hardware. If you're using the [`~GenerationMixin.generate`] method, the speed up is ~3x. The forward pass (which still gets 4x speed up) is only a part of the whole [`~GenerationMixin.generate`] code.
|
||||
|
||||
<hfoptions id="static-kv">
|
||||
<hfoption id="generation_config">
|
||||
|
||||
Access the model's `generation_config` attribute and set the `cache_implementation` to "static".
|
||||
|
||||
```py
|
||||
model.generation_config.cache_implementation = "static"
|
||||
```
|
||||
|
||||
model.forward = torch.compile(model.forward, mode="reduce-overhead", fullgraph=True)
|
||||
Call torch.compile on the model to compile the forward pass with the static kv-cache.
|
||||
|
||||
```py
|
||||
compiled_model = torch.compile(model, mode="reduce-overhead", fullgraph=True)
|
||||
input_text = "The theory of special relativity states "
|
||||
input_ids = tokenizer(input_text, return_tensors="pt").to("cuda")
|
||||
|
||||
outputs = model.generate(**input_ids)
|
||||
print(tokenizer.batch_decode(outputs, skip_special_tokens=True))
|
||||
outputs = compiled_model.generate(**input_ids)
|
||||
tokenizer.batch_decode(outputs, skip_special_tokens=True)
|
||||
['The theory of special relativity states 1. The speed of light is constant in all inertial reference']
|
||||
```
|
||||
|
||||
Under the hood, `generate` will attempt to reuse the same cache object, removing the need for re-compilation at each call. Avoiding re-compilation is critical to get the most out of `torch.compile`, and you should be aware of the following:
|
||||
1. If the batch size changes or the maximum output length increases between calls, the cache will have to be reinitialized, triggering a new compilation;
|
||||
2. The first couple of calls of the compiled function are slower, as the function is being compiled.
|
||||
|
||||
> [!WARNING]
|
||||
> For a more advanced usage of the static cache, such as multi-turn conversations, we recommend instantiating and manipulating the cache object outside [`~GenerationMixin.generate`]. See the advanced usage tab.
|
||||
Under the hood, `generate` will attempt to reuse the same cache object, removing the need for re-compilation at each call. However, if the batch size or the maximum output length increase between calls, the cache will have to be reinitialized, triggering a new compilation.
|
||||
|
||||
</hfoption>
|
||||
<hfoption id="advanced usage: control Static Cache">
|
||||
<hfoption id="Static Cache">
|
||||
|
||||
A [`StaticCache`] object can be passed to the model's [`~GenerationMixin.generate`] under the `past_key_values` argument. The object will retain the cache contents, so you can pass it to a new [`~GenerationMixin.generate`] call to continue generation, like you would do with a dynamic cache.
|
||||
|
||||
```py
|
||||
from transformers import AutoTokenizer, AutoModelForCausalLM, StaticCache
|
||||
import torch
|
||||
import os
|
||||
os.environ["TOKENIZERS_PARALLELISM"] = "false" # To prevent long warnings :)
|
||||
|
||||
tokenizer = AutoTokenizer.from_pretrained("google/gemma-2b")
|
||||
model = AutoModelForCausalLM.from_pretrained("google/gemma-2b", device_map="auto")
|
||||
|
||||
model.forward = torch.compile(model.forward, mode="reduce-overhead", fullgraph=True)
|
||||
input_text = "The theory of special relativity states "
|
||||
input_ids = tokenizer(input_text, return_tensors="pt").to("cuda")
|
||||
prompt_length = input_ids.input_ids.shape[1]
|
||||
model.generation_config.max_new_tokens = 16
|
||||
|
||||
past_key_values = StaticCache(
|
||||
config=model.config,
|
||||
batch_size=1,
|
||||
# If you plan to reuse the cache, make sure the cache length is large enough for all cases
|
||||
max_cache_len=prompt_length+(model.generation_config.max_new_tokens*2),
|
||||
device=model.device,
|
||||
dtype=model.dtype
|
||||
)
|
||||
outputs = model.generate(**input_ids, past_key_values=past_key_values)
|
||||
print(tokenizer.batch_decode(outputs, skip_special_tokens=True))
|
||||
['The theory of special relativity states 1. The speed of light is constant in all inertial reference frames. 2']
|
||||
|
||||
# pass in the generated text and the same cache object to continue generation from where it left off. Optionally, in a
|
||||
# multi-turn conversation, append the new user input to the generated text.
|
||||
new_input_ids = outputs
|
||||
outputs = model.generate(new_input_ids, past_key_values=past_key_values)
|
||||
print(tokenizer.batch_decode(outputs, skip_special_tokens=True))
|
||||
['The theory of special relativity states 1. The speed of light is constant in all inertial reference frames. 2. The speed of light is constant in all inertial reference frames. 3.']
|
||||
```
|
||||
|
||||
> [!TIP]
|
||||
> If you want to reuse the same [`StaticCache`] object on a new prompt, be sure to reset its contents with the `.reset()` method between calls
|
||||
|
||||
If you want to go further down a level, the [`StaticCache`] object can also be passed to the model's forward pass under the same `past_key_values` argument. Using this strategy, you can write your own function to decode the next token given the current token and position and cache position of previously generated tokens.
|
||||
A [`StaticCache`] object can be passed to the model's forward pass under the `past_key_values` argument, enabling the use of this object as a static kv-cache. Using this strategy, you can write your own function to decode the next token given the current token and position and cache position of previously generated tokens. You can also pass the [`StaticCache`] object to [`~GenerationMixin.generate`] and use it across calls, like you would do with a dynamic cache.
|
||||
|
||||
```py
|
||||
from transformers import LlamaTokenizer, LlamaForCausalLM, StaticCache, logging
|
||||
@ -152,16 +102,19 @@ def decode_one_tokens(model, cur_token, input_pos, cache_position, past_key_valu
|
||||
return new_token
|
||||
```
|
||||
|
||||
There are a few important things you must do to enable static kv-cache and `torch.compile` with the `StaticCache` method:
|
||||
There are a few important things you must do to enable static kv-cache and torch.compile with the `StaticCache` method:
|
||||
|
||||
1. Initialize the [`StaticCache`] instance before using the model for inference. There you can configure parameters like the maximum batch size and sequence length.
|
||||
2. Call `torch.compile` on the model to compile the forward pass with the static kv-cache.
|
||||
|
||||
2. Call torch.compile on the model to compile the forward pass with the static kv-cache.
|
||||
|
||||
3. Set `enable_math=True` in the [torch.backends.cuda.sdp_kernel](https://pytorch.org/docs/master/generated/torch.nn.functional.scaled_dot_product_attention.html) context manager to enable the native PyTorch C++ implementation of scaled dot product attention to speed up inference even more.
|
||||
|
||||
```py
|
||||
batch_size, seq_length = inputs["input_ids"].shape
|
||||
with torch.no_grad():
|
||||
past_key_values = StaticCache(
|
||||
config=model.config, batch_size=2, max_cache_len=4096, device=torch_device, dtype=model.dtype
|
||||
config=model.config, max_batch_size=2, max_cache_len=4096, device=torch_device, dtype=model.dtype
|
||||
)
|
||||
cache_position = torch.arange(seq_length, device=torch_device)
|
||||
generated_ids = torch.zeros(
|
||||
@ -189,34 +142,8 @@ text
|
||||
'My favorite all time favorite condiment is ketchup. I love it on everything. I love it on my eggs, my fries, my chicken, my burgers, my hot dogs, my sandwiches, my salads, my p']
|
||||
```
|
||||
|
||||
</hfoption>
|
||||
<hfoption id="advanced usage: end-to-end generate compilation">
|
||||
|
||||
Compiling the entire `generate` function, in terms of code, is even simpler than in the basic usage: call `torch.compile` on `generate` to compile the entire function. No need to specify the use of the static cache: although it is compatible, dynamic cache (default) was faster in our benchmarks.
|
||||
|
||||
```py
|
||||
from transformers import AutoTokenizer, AutoModelForCausalLM
|
||||
import torch
|
||||
import os
|
||||
os.environ["TOKENIZERS_PARALLELISM"] = "false" # To prevent long warnings :)
|
||||
|
||||
tokenizer = AutoTokenizer.from_pretrained("google/gemma-2b")
|
||||
model = AutoModelForCausalLM.from_pretrained("google/gemma-2b", device_map="auto")
|
||||
|
||||
model.generate = torch.compile(model.generate, mode="reduce-overhead", fullgraph=True)
|
||||
input_text = "The theory of special relativity states "
|
||||
input_ids = tokenizer(input_text, return_tensors="pt").to("cuda")
|
||||
|
||||
outputs = model.generate(**input_ids)
|
||||
print(tokenizer.batch_decode(outputs, skip_special_tokens=True))
|
||||
['The theory of special relativity states 1. The speed of light is constant in all inertial reference']
|
||||
```
|
||||
|
||||
As a result, we compile not only the model forward pass, but also all input preparation, logit processor operations, and so on. The result should be a slightly `generate` call, compared to the basic usage example, and the compiled graph may be better suited to more exotic hardware devices or use cases. However, there are severe drawbacks in using this approach:
|
||||
1. Compilation is much slower;
|
||||
2. All parameterization of `generate` must be done through `generation_config`;
|
||||
3. Many warnings and exceptions are suppressed -- we suggest testing with its uncompiled form first;
|
||||
4. Although we are working on it, it is heavily feature restricted (for instance, at the time of writing, generation does not stop if an EOS token is selected).
|
||||
> [!TIP]
|
||||
> If you want to reuse the [`StaticCache`] object on a new prompt, be sure to reset its contents with the `.reset()` method
|
||||
|
||||
</hfoption>
|
||||
</hfoptions>
|
||||
|
||||
@ -267,6 +267,5 @@ While the autoregressive generation process is relatively straightforward, makin
|
||||
|
||||
1. [`optimum`](https://github.com/huggingface/optimum), an extension of 🤗 Transformers that optimizes for specific hardware devices.
|
||||
2. [`outlines`](https://github.com/outlines-dev/outlines), a library where you can constrain text generation (e.g. to generate JSON files);
|
||||
3. [`SynCode`](https://github.com/uiuc-focal-lab/syncode), a library for context-free grammar guided generation. (e.g. JSON, SQL, Python)
|
||||
4. [`text-generation-inference`](https://github.com/huggingface/text-generation-inference), a production-ready server for LLMs;
|
||||
5. [`text-generation-webui`](https://github.com/oobabooga/text-generation-webui), a UI for text generation;
|
||||
3. [`text-generation-inference`](https://github.com/huggingface/text-generation-inference), a production-ready server for LLMs;
|
||||
4. [`text-generation-webui`](https://github.com/oobabooga/text-generation-webui), a UI for text generation;
|
||||
|
||||
@ -662,7 +662,7 @@ Using the key-value cache has two advantages:
|
||||
- Significant increase in computational efficiency as less computations are performed compared to computing the full \\( \mathbf{QK}^T \\) matrix. This leads to an increase in inference speed
|
||||
- The maximum required memory is not increased quadratically with the number of generated tokens, but only increases linearly.
|
||||
|
||||
> One should *always* make use of the key-value cache as it leads to identical results and a significant speed-up for longer input sequences. Transformers has the key-value cache enabled by default when making use of the text pipeline or the [`generate` method](https://huggingface.co/docs/transformers/main_classes/text_generation). We have an entire guide dedicated to caches [here](./kv_cache).
|
||||
> One should *always* make use of the key-value cache as it leads to identical results and a significant speed-up for longer input sequences. Transformers has the key-value cache enabled by default when making use of the text pipeline or the [`generate` method](https://huggingface.co/docs/transformers/main_classes/text_generation).
|
||||
|
||||
<Tip warning={true}>
|
||||
|
||||
|
||||
@ -72,10 +72,6 @@ We provide two types of agents, based on the main [`Agent`] class:
|
||||
|
||||
[[autodoc]] launch_gradio_demo
|
||||
|
||||
### stream_to_gradio
|
||||
|
||||
[[autodoc]] stream_to_gradio
|
||||
|
||||
### ToolCollection
|
||||
|
||||
[[autodoc]] ToolCollection
|
||||
@ -87,33 +83,12 @@ These engines have the following specification:
|
||||
1. Follow the [messages format](../chat_templating.md) for its input (`List[Dict[str, str]]`) and return a string.
|
||||
2. Stop generating outputs *before* the sequences passed in the argument `stop_sequences`
|
||||
|
||||
### TransformersEngine
|
||||
### HfEngine
|
||||
|
||||
For convenience, we have added a `TransformersEngine` that implements the points above, taking a pre-initialized `Pipeline` as input.
|
||||
For convenience, we have added a `HfEngine` that implements the points above and uses an inference endpoint for the execution of the LLM.
|
||||
|
||||
```python
|
||||
>>> from transformers import AutoModelForCausalLM, AutoTokenizer, pipeline, TransformersEngine
|
||||
|
||||
>>> model_name = "HuggingFaceTB/SmolLM-135M-Instruct"
|
||||
>>> tokenizer = AutoTokenizer.from_pretrained(model_name)
|
||||
>>> model = AutoModelForCausalLM.from_pretrained(model_name)
|
||||
|
||||
>>> pipe = pipeline("text-generation", model=model, tokenizer=tokenizer)
|
||||
|
||||
>>> engine = TransformersEngine(pipe)
|
||||
>>> engine([{"role": "user", "content": "Ok!"}], stop_sequences=["great"])
|
||||
|
||||
"What a "
|
||||
```
|
||||
|
||||
[[autodoc]] TransformersEngine
|
||||
|
||||
### HfApiEngine
|
||||
|
||||
The `HfApiEngine` is an engine that wraps an [HF Inference API](https://huggingface.co/docs/api-inference/index) client for the execution of the LLM.
|
||||
|
||||
```python
|
||||
>>> from transformers import HfApiEngine
|
||||
>>> from transformers import HfEngine
|
||||
|
||||
>>> messages = [
|
||||
... {"role": "user", "content": "Hello, how are you?"},
|
||||
@ -121,12 +96,12 @@ The `HfApiEngine` is an engine that wraps an [HF Inference API](https://huggingf
|
||||
... {"role": "user", "content": "No need to help, take it easy."},
|
||||
... ]
|
||||
|
||||
>>> HfApiEngine()(messages, stop_sequences=["conversation"])
|
||||
>>> HfEngine()(messages, stop_sequences=["conversation"])
|
||||
|
||||
"That's very kind of you to say! It's always nice to have a relaxed "
|
||||
```
|
||||
|
||||
[[autodoc]] HfApiEngine
|
||||
[[autodoc]] HfEngine
|
||||
|
||||
|
||||
## Agent Types
|
||||
|
||||
@ -25,11 +25,11 @@ A backbone is a model used for feature extraction for higher level computer visi
|
||||
|
||||
Backbones are supported for the following models:
|
||||
|
||||
* [BEiT](../model_doc/beit)
|
||||
* [BEiT](..model_doc/beit)
|
||||
* [BiT](../model_doc/bit)
|
||||
* [ConvNext](../model_doc/convnext)
|
||||
* [ConvNet](../model_doc/convnext)
|
||||
* [ConvNextV2](../model_doc/convnextv2)
|
||||
* [DiNAT](../model_doc/dinat)
|
||||
* [DiNAT](..model_doc/dinat)
|
||||
* [DINOV2](../model_doc/dinov2)
|
||||
* [FocalNet](../model_doc/focalnet)
|
||||
* [MaskFormer](../model_doc/maskformer)
|
||||
|
||||
@ -66,8 +66,3 @@ Examples of use can be found in the [example scripts](../examples) or [example n
|
||||
- numpy_mask_tokens
|
||||
- tf_mask_tokens
|
||||
- torch_mask_tokens
|
||||
|
||||
## DataCollatorWithFlattening
|
||||
|
||||
[[autodoc]] data.data_collator.DataCollatorWithFlattening
|
||||
|
||||
|
||||
@ -56,12 +56,3 @@ Learn how to quantize models in the [Quantization](../quantization) guide.
|
||||
## HqqConfig
|
||||
|
||||
[[autodoc]] HqqConfig
|
||||
|
||||
## FbgemmFp8Config
|
||||
|
||||
[[autodoc]] FbgemmFp8Config
|
||||
|
||||
## TorchAoConfig
|
||||
|
||||
[[autodoc]] TorchAoConfig
|
||||
|
||||
|
||||
@ -59,52 +59,7 @@ This model was contributed by [lysandre](https://huggingface.co/lysandre). This
|
||||
- Layers are split in groups that share parameters (to save memory).
|
||||
Next sentence prediction is replaced by a sentence ordering prediction: in the inputs, we have two sentences A and B (that are consecutive) and we either feed A followed by B or B followed by A. The model must predict if they have been swapped or not.
|
||||
|
||||
### Using Scaled Dot Product Attention (SDPA)
|
||||
|
||||
PyTorch includes a native scaled dot-product attention (SDPA) operator as part of `torch.nn.functional`. This function
|
||||
encompasses several implementations that can be applied depending on the inputs and the hardware in use. See the
|
||||
[official documentation](https://pytorch.org/docs/stable/generated/torch.nn.functional.scaled_dot_product_attention.html)
|
||||
or the [GPU Inference](https://huggingface.co/docs/transformers/main/en/perf_infer_gpu_one#pytorch-scaled-dot-product-attention)
|
||||
page for more information.
|
||||
|
||||
SDPA is used by default for `torch>=2.1.1` when an implementation is available, but you may also set
|
||||
`attn_implementation="sdpa"` in `from_pretrained()` to explicitly request SDPA to be used.
|
||||
|
||||
```
|
||||
from transformers import AlbertModel
|
||||
model = AlbertModel.from_pretrained("albert/albert-base-v1", torch_dtype=torch.float16, attn_implementation="sdpa")
|
||||
...
|
||||
```
|
||||
|
||||
For the best speedups, we recommend loading the model in half-precision (e.g. `torch.float16` or `torch.bfloat16`).
|
||||
|
||||
On a local benchmark (GeForce RTX 2060-8GB, PyTorch 2.3.1, OS Ubuntu 20.04) with `float16`, we saw the
|
||||
following speedups during training and inference.
|
||||
|
||||
#### Training for 100 iterations
|
||||
|
||||
|batch_size|seq_len|Time per batch (eager - s)| Time per batch (sdpa - s)| Speedup (%)| Eager peak mem (MB)| sdpa peak mem (MB)| Mem saving (%)|
|
||||
|----------|-------|--------------------------|--------------------------|------------|--------------------|-------------------|---------------|
|
||||
|2 |256 |0.028 |0.024 |14.388 |358.411 |321.088 |11.624 |
|
||||
|2 |512 |0.049 |0.041 |17.681 |753.458 |602.660 |25.022 |
|
||||
|4 |256 |0.044 |0.039 |12.246 |679.534 |602.660 |12.756 |
|
||||
|4 |512 |0.090 |0.076 |18.472 |1434.820 |1134.140 |26.512 |
|
||||
|8 |256 |0.081 |0.072 |12.664 |1283.825 |1134.140 |13.198 |
|
||||
|8 |512 |0.170 |0.143 |18.957 |2820.398 |2219.695 |27.062 |
|
||||
|
||||
#### Inference with 50 batches
|
||||
|
||||
|batch_size|seq_len|Per token latency eager (ms)|Per token latency SDPA (ms)|Speedup (%) |Mem eager (MB)|Mem BT (MB)|Mem saved (%)|
|
||||
|----------|-------|----------------------------|---------------------------|------------|--------------|-----------|-------------|
|
||||
|4 |128 |0.083 |0.071 |16.967 |48.319 |48.45 |-0.268 |
|
||||
|4 |256 |0.148 |0.127 |16.37 |63.4 |63.922 |-0.817 |
|
||||
|4 |512 |0.31 |0.247 |25.473 |110.092 |94.343 |16.693 |
|
||||
|8 |128 |0.137 |0.124 |11.102 |63.4 |63.66 |-0.409 |
|
||||
|8 |256 |0.271 |0.231 |17.271 |91.202 |92.246 |-1.132 |
|
||||
|8 |512 |0.602 |0.48 |25.47 |186.159 |152.564 |22.021 |
|
||||
|16 |128 |0.252 |0.224 |12.506 |91.202 |91.722 |-0.567 |
|
||||
|16 |256 |0.526 |0.448 |17.604 |148.378 |150.467 |-1.388 |
|
||||
|16 |512 |1.203 |0.96 |25.365 |338.293 |271.102 |24.784 |
|
||||
|
||||
This model was contributed by [lysandre](https://huggingface.co/lysandre). This model jax version was contributed by
|
||||
[kamalkraj](https://huggingface.co/kamalkraj). The original code can be found [here](https://github.com/google-research/ALBERT).
|
||||
|
||||
@ -87,17 +87,4 @@ If you're interested in submitting a resource to be included here, please feel f
|
||||
|
||||
[[autodoc]] Blip2ForConditionalGeneration
|
||||
- forward
|
||||
- generate
|
||||
|
||||
## Blip2ForImageTextRetrieval
|
||||
|
||||
[[autodoc]] Blip2ForImageTextRetrieval
|
||||
- forward
|
||||
|
||||
## Blip2TextModelWithProjection
|
||||
|
||||
[[autodoc]] Blip2TextModelWithProjection
|
||||
|
||||
## Blip2VisionModelWithProjection
|
||||
|
||||
[[autodoc]] Blip2VisionModelWithProjection
|
||||
- generate
|
||||
@ -1,192 +0,0 @@
|
||||
<!--Copyright 2024 The HuggingFace Team. All rights reserved.
|
||||
|
||||
Licensed under the Apache License, Version 2.0 (the "License"); you may not use this file except in compliance with
|
||||
the License. You may obtain a copy of the License at
|
||||
|
||||
http://www.apache.org/licenses/LICENSE-2.0
|
||||
|
||||
Unless required by applicable law or agreed to in writing, software distributed under the License is distributed on
|
||||
an "AS IS" BASIS, WITHOUT WARRANTIES OR CONDITIONS OF ANY KIND, either express or implied. See the License for the
|
||||
specific language governing permissions and limitations under the License.
|
||||
|
||||
⚠️ Note that this file is in Markdown but contain specific syntax for our doc-builder (similar to MDX) that may not be
|
||||
rendered properly in your Markdown viewer.
|
||||
|
||||
-->
|
||||
|
||||
# Chameleon
|
||||
|
||||
## Overview
|
||||
|
||||
The Chameleon model was proposed in [Chameleon: Mixed-Modal Early-Fusion Foundation Models
|
||||
](https://arxiv.org/abs/2405.09818v1) by META AI Chameleon Team. Chameleon is a Vision-Language Model that use vector quantization to tokenize images which enables the model to generate multimodal output. The model takes images and texts as input, including an interleaved format, and generates textual response. Image generation module is not released yet.
|
||||
|
||||
|
||||
The abstract from the paper is the following:
|
||||
|
||||
*We present Chameleon, a family of early-fusion token-based mixed-modal models capable of understanding and generating images and text in any arbitrary sequence. We outline a stable training
|
||||
approach from inception, an alignment recipe, and an architectural parameterization tailored for the
|
||||
early-fusion, token-based, mixed-modal setting. The models are evaluated on a comprehensive range
|
||||
of tasks, including visual question answering, image captioning, text generation, image generation, and
|
||||
long-form mixed modal generation. Chameleon demonstrates broad and general capabilities, including
|
||||
state-of-the-art performance in image captioning tasks, outperforms Llama-2 in text-only tasks while
|
||||
being competitive with models such as Mixtral 8x7B and Gemini-Pro, and performs non-trivial image
|
||||
generation, all in a single model. It also matches or exceeds the performance of much larger models,
|
||||
including Gemini Pro and GPT-4V, according to human judgments on a new long-form mixed-modal
|
||||
generation evaluation, where either the prompt or outputs contain mixed sequences of both images and
|
||||
text. Chameleon marks a significant step forward in unified modeling of full multimodal documents*
|
||||
|
||||
|
||||
<img src="https://huggingface.co/datasets/huggingface/documentation-images/resolve/main/transformers/model_doc/chameleon_arch.png"
|
||||
alt="drawing" width="600"/>
|
||||
|
||||
<small> Chameleon incorporates a vector quantizer module to transform images into discrete tokens. That also enables image generation using an auto-regressive transformer. Taken from the <a href="https://arxiv.org/abs/2405.09818v1">original paper.</a> </small>
|
||||
|
||||
This model was contributed by [joaogante](https://huggingface.co/joaogante) and [RaushanTurganbay](https://huggingface.co/RaushanTurganbay).
|
||||
The original code can be found [here](https://github.com/facebookresearch/chameleon).
|
||||
|
||||
|
||||
## Usage tips
|
||||
|
||||
- We advise users to use `padding_side="left"` when computing batched generation as it leads to more accurate results. Simply make sure to set `processor.tokenizer.padding_side = "left"` before generating.
|
||||
|
||||
- Note that Chameleon was tuned for safety alignment. If the model is refusing to answer, consider asking a more concrete question, instead of an open question.
|
||||
|
||||
- Chameleon generates in chat format which means that the generated text will always be the "assistant's turn". You can enable a text completion generation by passing `return_for_text_completion=True` when calling the processor.
|
||||
|
||||
> [!NOTE]
|
||||
> Chameleon implementation in Transformers uses a special image token to indicate where to merge image embeddings. For special image token we didn't add a new one but used one of the reserved tokens: `<reserved08707>`. You have to add `<image>` to your prompt in the place where the image should be embedded for correct generation.
|
||||
|
||||
## Usage example
|
||||
|
||||
### Single image inference
|
||||
|
||||
Chameleon is a gated model so make sure to have access and login to Hugging Face Hub using a token.
|
||||
Here's how to load the model and perform inference in half-precision (`torch.bfloat16`):
|
||||
|
||||
```python
|
||||
from transformers import ChameleonProcessor, ChameleonForConditionalGeneration
|
||||
import torch
|
||||
from PIL import Image
|
||||
import requests
|
||||
|
||||
processor = ChameleonProcessor.from_pretrained("facebook/chameleon-7b")
|
||||
model = ChameleonForConditionalGeneration.from_pretrained("facebook/chameleon-7b", torch_dtype=torch.bfloat16, device_map="cuda")
|
||||
|
||||
# prepare image and text prompt
|
||||
url = 'http://images.cocodataset.org/val2017/000000039769.jpg'
|
||||
image = Image.open(requests.get(url, stream=True).raw)
|
||||
prompt = "What do you see in this image?<image>"
|
||||
|
||||
inputs = processor(prompt, image, return_tensors="pt").to(model.device)
|
||||
|
||||
# autoregressively complete prompt
|
||||
output = model.generate(**inputs, max_new_tokens=50)
|
||||
print(processor.decode(output[0], skip_special_tokens=True))
|
||||
```
|
||||
|
||||
### Multi image inference
|
||||
|
||||
Chameleon can perform inference with multiple images as input, where images either belong to the same prompt or different prompts (in batched inference). Here is how you can do it:
|
||||
|
||||
```python
|
||||
from transformers import ChameleonProcessor, ChameleonForConditionalGeneration
|
||||
import torch
|
||||
from PIL import Image
|
||||
import requests
|
||||
|
||||
processor = ChameleonProcessor.from_pretrained("facebook/chameleon-7b")
|
||||
|
||||
model = ChameleonForConditionalGeneration.from_pretrained("facebook/chameleon-7b", torch_dtype=torch.bfloat16, device_map="cuda")
|
||||
|
||||
# Get three different images
|
||||
url = "https://www.ilankelman.org/stopsigns/australia.jpg"
|
||||
image_stop = Image.open(requests.get(url, stream=True).raw)
|
||||
|
||||
url = "http://images.cocodataset.org/val2017/000000039769.jpg"
|
||||
image_cats = Image.open(requests.get(url, stream=True).raw)
|
||||
|
||||
url = "https://huggingface.co/microsoft/kosmos-2-patch14-224/resolve/main/snowman.jpg"
|
||||
image_snowman = Image.open(requests.get(url, stream=True).raw)
|
||||
|
||||
# Prepare a batched prompt, where the first one is a multi-image prompt and the second is not
|
||||
prompts = [
|
||||
"What do these images have in common?<image><image>",
|
||||
"<image>What is shown in this image?"
|
||||
]
|
||||
|
||||
# We can simply feed images in the order they have to be used in the text prompt
|
||||
# Each "<image>" token uses one image leaving the next for the subsequent "<image>" tokens
|
||||
inputs = processor(text=prompts, images=[image_stop, image_cats, image_snowman], padding=True, return_tensors="pt").to(device="cuda", dtype=torch.bfloat16)
|
||||
|
||||
# Generate
|
||||
generate_ids = model.generate(**inputs, max_new_tokens=50)
|
||||
processor.batch_decode(generate_ids, skip_special_tokens=True, clean_up_tokenization_spaces=False)
|
||||
```
|
||||
|
||||
## Model optimization
|
||||
|
||||
### Quantization using Bitsandbytes
|
||||
|
||||
The model can be loaded in 8 or 4 bits, greatly reducing the memory requirements while maintaining the performance of the original model. First make sure to install bitsandbytes, `pip install bitsandbytes` and make sure to have access to a CUDA compatible GPU device. Simply change the snippet above with:
|
||||
|
||||
```python
|
||||
from transformers import ChameleonForConditionalGeneration, BitsAndBytesConfig
|
||||
|
||||
# specify how to quantize the model
|
||||
quantization_config = BitsAndBytesConfig(
|
||||
load_in_4bit=True,
|
||||
bnb_4bit_quant_type="nf4",
|
||||
bnb_4bit_compute_dtype=torch.bfloat16,
|
||||
)
|
||||
|
||||
model = ChameleonForConditionalGeneration.from_pretrained("facebook/chameleon-7b", quantization_config=quantization_config, device_map="cuda")
|
||||
```
|
||||
|
||||
### Use Flash-Attention 2 and SDPA to further speed-up generation
|
||||
|
||||
The models supports both, Flash-Attention 2 and PyTorch's [`torch.nn.functional.scaled_dot_product_attention`](https://pytorch.org/docs/master/generated/torch.nn.functional.scaled_dot_product_attention.html) which can be enables for optimization. SDPA is the default options when you load the model, If you want to switch for Flash Attention 2, first make sure to install flash-attn. Refer to the [original repository](https://github.com/Dao-AILab/flash-attention) regarding that package installation. Simply change the snippet above with:
|
||||
|
||||
```python
|
||||
from transformers import ChameleonForConditionalGeneration
|
||||
|
||||
model_id = "facebook/chameleon-7b"
|
||||
model = ChameleonForConditionalGeneration.from_pretrained(
|
||||
model_id,
|
||||
torch_dtype=torch.bfloat16,
|
||||
low_cpu_mem_usage=True,
|
||||
attn_implementation="flash_attention_2"
|
||||
).to(0)
|
||||
```
|
||||
|
||||
## ChameleonConfig
|
||||
|
||||
[[autodoc]] ChameleonConfig
|
||||
|
||||
## ChameleonVQVAEConfig
|
||||
|
||||
[[autodoc]] ChameleonVQVAEConfig
|
||||
|
||||
## ChameleonProcessor
|
||||
|
||||
[[autodoc]] ChameleonProcessor
|
||||
|
||||
## ChameleonImageProcessor
|
||||
|
||||
[[autodoc]] ChameleonImageProcessor
|
||||
- preprocess
|
||||
|
||||
## ChameleonVQVAE
|
||||
|
||||
[[autodoc]] ChameleonVQVAE
|
||||
- forward
|
||||
|
||||
## ChameleonModel
|
||||
|
||||
[[autodoc]] ChameleonModel
|
||||
- forward
|
||||
|
||||
## ChameleonForConditionalGeneration
|
||||
|
||||
[[autodoc]] ChameleonForConditionalGeneration
|
||||
- forward
|
||||
@ -79,123 +79,6 @@ encode the text and prepare the images. The following example shows how to get t
|
||||
>>> probs = logits_per_image.softmax(dim=1) # we can take the softmax to get the label probabilities
|
||||
```
|
||||
|
||||
|
||||
### Combining CLIP and Flash Attention 2
|
||||
|
||||
First, make sure to install the latest version of Flash Attention 2.
|
||||
|
||||
```bash
|
||||
pip install -U flash-attn --no-build-isolation
|
||||
```
|
||||
|
||||
Make also sure that you have a hardware that is compatible with Flash-Attention 2. Read more about it in the official documentation of flash-attn repository. Make also sure to load your model in half-precision (e.g. `torch.float16`)
|
||||
|
||||
<Tip warning={true}>
|
||||
|
||||
For small batch sizes, you might notice a slowdown in your model when using flash attention. Refer to the section [Expected speedups with Flash Attention and SDPA](#Expected-speedups-with-Flash-Attention-and-SDPA) below and select an appropriate attention implementation.
|
||||
|
||||
</Tip>
|
||||
|
||||
To load and run a model using Flash Attention 2, refer to the snippet below:
|
||||
|
||||
```python
|
||||
>>> import torch
|
||||
>>> import requests
|
||||
>>> from PIL import Image
|
||||
|
||||
>>> from transformers import CLIPProcessor, CLIPModel
|
||||
|
||||
>>> device = "cuda"
|
||||
>>> torch_dtype = torch.float16
|
||||
|
||||
>>> model = CLIPModel.from_pretrained(
|
||||
... "openai/clip-vit-base-patch32",
|
||||
... attn_implementation="flash_attention_2",
|
||||
... device_map=device,
|
||||
... torch_dtype=torch_dtype,
|
||||
... )
|
||||
>>> processor = CLIPProcessor.from_pretrained("openai/clip-vit-base-patch32")
|
||||
|
||||
>>> url = "http://images.cocodataset.org/val2017/000000039769.jpg"
|
||||
>>> image = Image.open(requests.get(url, stream=True).raw)
|
||||
|
||||
>>> inputs = processor(text=["a photo of a cat", "a photo of a dog"], images=image, return_tensors="pt", padding=True)
|
||||
>>> inputs.to(device)
|
||||
|
||||
>>> with torch.no_grad():
|
||||
... with torch.autocast(device):
|
||||
... outputs = model(**inputs)
|
||||
|
||||
>>> logits_per_image = outputs.logits_per_image # this is the image-text similarity score
|
||||
>>> probs = logits_per_image.softmax(dim=1) # we can take the softmax to get the label probabilities
|
||||
>>> print(probs)
|
||||
tensor([[0.9946, 0.0052]], device='cuda:0', dtype=torch.float16)
|
||||
```
|
||||
|
||||
|
||||
### Using Scaled Dot Product Attention (SDPA)
|
||||
|
||||
PyTorch includes a native scaled dot-product attention (SDPA) operator as part of `torch.nn.functional`. This function
|
||||
encompasses several implementations that can be applied depending on the inputs and the hardware in use. See the
|
||||
[official documentation](https://pytorch.org/docs/stable/generated/torch.nn.functional.scaled_dot_product_attention.html)
|
||||
or the [GPU Inference](https://huggingface.co/docs/transformers/main/en/perf_infer_gpu_one#pytorch-scaled-dot-product-attention)
|
||||
page for more information.
|
||||
|
||||
SDPA is used by default for `torch>=2.1.1` when an implementation is available, but you may also set
|
||||
`attn_implementation="sdpa"` in `from_pretrained()` to explicitly request SDPA to be used.
|
||||
|
||||
```python
|
||||
from transformers import CLIPModel
|
||||
|
||||
model = CLIPModel.from_pretrained("openai/clip-vit-base-patch32", torch_dtype=torch.float16, attn_implementation="sdpa")
|
||||
```
|
||||
|
||||
For the best speedups, we recommend loading the model in half-precision (e.g. `torch.float16` or `torch.bfloat16`).
|
||||
|
||||
### Expected speedups with Flash Attention and SDPA
|
||||
|
||||
On a local benchmark (NVIDIA A10G, PyTorch 2.3.1+cu121) with `float16`, we saw the following speedups during inference for `"openai/clip-vit-large-patch14"` checkpoint ([code](https://gist.github.com/qubvel/ac691a54e54f9fae8144275f866a7ff8)):
|
||||
|
||||
#### CLIPTextModel
|
||||
|
||||
| Num text labels | Eager (s/iter) | FA2 (s/iter) | FA2 speedup | SDPA (s/iter) | SDPA speedup |
|
||||
|------------------:|-----------------:|---------------:|--------------:|----------------:|---------------:|
|
||||
| 4 | 0.009 | 0.012 | 0.737 | 0.007 | 1.269 |
|
||||
| 16 | 0.009 | 0.014 | 0.659 | 0.008 | 1.187 |
|
||||
| 32 | 0.018 | 0.021 | 0.862 | 0.016 | 1.142 |
|
||||
| 64 | 0.034 | 0.034 | 1.001 | 0.03 | 1.163 |
|
||||
| 128 | 0.063 | 0.058 | 1.09 | 0.054 | 1.174 |
|
||||
|
||||

|
||||
|
||||
#### CLIPVisionModel
|
||||
|
||||
| Image batch size | Eager (s/iter) | FA2 (s/iter) | FA2 speedup | SDPA (s/iter) | SDPA speedup |
|
||||
|-------------------:|-----------------:|---------------:|--------------:|----------------:|---------------:|
|
||||
| 1 | 0.016 | 0.013 | 1.247 | 0.012 | 1.318 |
|
||||
| 4 | 0.025 | 0.021 | 1.198 | 0.021 | 1.202 |
|
||||
| 16 | 0.093 | 0.075 | 1.234 | 0.075 | 1.24 |
|
||||
| 32 | 0.181 | 0.147 | 1.237 | 0.146 | 1.241 |
|
||||
|
||||

|
||||
|
||||
#### CLIPModel
|
||||
|
||||
| Image batch size | Num text labels | Eager (s/iter) | FA2 (s/iter) | FA2 speedup | SDPA (s/iter) | SDPA speedup |
|
||||
|-------------------:|------------------:|-----------------:|---------------:|--------------:|----------------:|---------------:|
|
||||
| 1 | 4 | 0.025 | 0.026 | 0.954 | 0.02 | 1.217 |
|
||||
| 1 | 16 | 0.026 | 0.028 | 0.918 | 0.02 | 1.287 |
|
||||
| 1 | 64 | 0.042 | 0.046 | 0.906 | 0.036 | 1.167 |
|
||||
| 4 | 4 | 0.028 | 0.033 | 0.849 | 0.024 | 1.189 |
|
||||
| 4 | 16 | 0.034 | 0.035 | 0.955 | 0.029 | 1.169 |
|
||||
| 4 | 64 | 0.059 | 0.055 | 1.072 | 0.05 | 1.179 |
|
||||
| 16 | 4 | 0.096 | 0.088 | 1.091 | 0.078 | 1.234 |
|
||||
| 16 | 16 | 0.102 | 0.09 | 1.129 | 0.083 | 1.224 |
|
||||
| 16 | 64 | 0.127 | 0.11 | 1.157 | 0.105 | 1.218 |
|
||||
| 32 | 4 | 0.185 | 0.159 | 1.157 | 0.149 | 1.238 |
|
||||
| 32 | 16 | 0.19 | 0.162 | 1.177 | 0.154 | 1.233 |
|
||||
| 32 | 64 | 0.216 | 0.181 | 1.19 | 0.176 | 1.228 |
|
||||
|
||||
## Resources
|
||||
|
||||
A list of official Hugging Face and community (indicated by 🌎) resources to help you get started with CLIP.
|
||||
|
||||
@ -1,80 +0,0 @@
|
||||
<!--Copyright 2024 The HuggingFace Team. All rights reserved.
|
||||
|
||||
Licensed under the Apache License, Version 2.0 (the "License"); you may not use this file except in compliance with
|
||||
the License. You may obtain a copy of the License at
|
||||
|
||||
http://www.apache.org/licenses/LICENSE-2.0
|
||||
|
||||
Unless required by applicable law or agreed to in writing, software distributed under the License is distributed on
|
||||
an "AS IS" BASIS, WITHOUT WARRANTIES OR CONDITIONS OF ANY KIND, either express or implied. See the License for the
|
||||
specific language governing permissions and limitations under the License.
|
||||
|
||||
⚠️ Note that this file is in Markdown but contain specific syntax for our doc-builder (similar to MDX) that may not be
|
||||
rendered properly in your Markdown viewer.
|
||||
|
||||
-->
|
||||
|
||||
# DAC
|
||||
|
||||
## Overview
|
||||
|
||||
|
||||
The DAC model was proposed in [Descript Audio Codec: High-Fidelity Audio Compression with Improved RVQGAN](https://arxiv.org/abs/2306.06546) by Rithesh Kumar, Prem Seetharaman, Alejandro Luebs, Ishaan Kumar, Kundan Kumar.
|
||||
|
||||
The Descript Audio Codec (DAC) model is a powerful tool for compressing audio data, making it highly efficient for storage and transmission. By compressing 44.1 KHz audio into tokens at just 8kbps bandwidth, the DAC model enables high-quality audio processing while significantly reducing the data footprint. This is particularly useful in scenarios where bandwidth is limited or storage space is at a premium, such as in streaming applications, remote conferencing, and archiving large audio datasets.
|
||||
|
||||
The abstract from the paper is the following:
|
||||
|
||||
*Language models have been successfully used to model natural signals, such as images, speech, and music. A key component of these models is a high quality neural compression model that can compress high-dimensional natural signals into lower dimensional discrete tokens. To that end, we introduce a high-fidelity universal neural audio compression algorithm that achieves ~90x compression of 44.1 KHz audio into tokens at just 8kbps bandwidth. We achieve this by combining advances in high-fidelity audio generation with better vector quantization techniques from the image domain, along with improved adversarial and reconstruction losses. We compress all domains (speech, environment, music, etc.) with a single universal model, making it widely applicable to generative modeling of all audio. We compare with competing audio compression algorithms, and find our method outperforms them significantly. We provide thorough ablations for every design choice, as well as open-source code and trained model weights. We hope our work can lay the foundation for the next generation of high-fidelity audio modeling.*
|
||||
|
||||
This model was contributed by [Kamil Akesbi](https://huggingface.co/kamilakesbi).
|
||||
The original code can be found [here](https://github.com/descriptinc/descript-audio-codec/tree/main?tab=readme-ov-file).
|
||||
|
||||
|
||||
## Model structure
|
||||
|
||||
The Descript Audio Codec (DAC) model is structured into three distinct stages:
|
||||
|
||||
1. Encoder Model: This stage compresses the input audio, reducing its size while retaining essential information.
|
||||
2. Residual Vector Quantizer (RVQ) Model: Working in tandem with the encoder, this model quantizes the latent codes of the audio, refining the compression and ensuring high-quality reconstruction.
|
||||
3. Decoder Model: This final stage reconstructs the audio from its compressed form, restoring it to a state that closely resembles the original input.
|
||||
|
||||
## Usage example
|
||||
|
||||
Here is a quick example of how to encode and decode an audio using this model:
|
||||
|
||||
```python
|
||||
>>> from datasets import load_dataset, Audio
|
||||
>>> from transformers import DacModel, AutoProcessor
|
||||
>>> librispeech_dummy = load_dataset("hf-internal-testing/librispeech_asr_dummy", "clean", split="validation")
|
||||
|
||||
>>> model = DacModel.from_pretrained("descript/dac_16khz")
|
||||
>>> processor = AutoProcessor.from_pretrained("descript/dac_16khz")
|
||||
>>> librispeech_dummy = librispeech_dummy.cast_column("audio", Audio(sampling_rate=processor.sampling_rate))
|
||||
>>> audio_sample = librispeech_dummy[-1]["audio"]["array"]
|
||||
>>> inputs = processor(raw_audio=audio_sample, sampling_rate=processor.sampling_rate, return_tensors="pt")
|
||||
|
||||
>>> encoder_outputs = model.encode(inputs["input_values"])
|
||||
>>> # Get the intermediate audio codes
|
||||
>>> audio_codes = encoder_outputs.audio_codes
|
||||
>>> # Reconstruct the audio from its quantized representation
|
||||
>>> audio_values = model.decode(encoder_outputs.quantized_representation)
|
||||
>>> # or the equivalent with a forward pass
|
||||
>>> audio_values = model(inputs["input_values"]).audio_values
|
||||
```
|
||||
|
||||
## DacConfig
|
||||
|
||||
[[autodoc]] DacConfig
|
||||
|
||||
## DacFeatureExtractor
|
||||
|
||||
[[autodoc]] DacFeatureExtractor
|
||||
- __call__
|
||||
|
||||
## DacModel
|
||||
|
||||
[[autodoc]] DacModel
|
||||
- decode
|
||||
- encode
|
||||
- forward
|
||||
@ -153,7 +153,7 @@ In short, one should prepare the data either in COCO detection or COCO panoptic
|
||||
[`~transformers.DetrImageProcessor`] to create `pixel_values`, `pixel_mask` and optional
|
||||
`labels`, which can then be used to train (or fine-tune) a model. For evaluation, one should first convert the
|
||||
outputs of the model using one of the postprocessing methods of [`~transformers.DetrImageProcessor`]. These can
|
||||
be provided to either `CocoEvaluator` or `PanopticEvaluator`, which allow you to calculate metrics like
|
||||
be be provided to either `CocoEvaluator` or `PanopticEvaluator`, which allow you to calculate metrics like
|
||||
mean Average Precision (mAP) and Panoptic Quality (PQ). The latter objects are implemented in the [original repository](https://github.com/facebookresearch/detr). See the [example notebooks](https://github.com/NielsRogge/Transformers-Tutorials/tree/master/DETR) for more info regarding evaluation.
|
||||
|
||||
## Resources
|
||||
|
||||
@ -57,7 +57,7 @@ print((last_hidden_states - traced_outputs[0]).abs().max())
|
||||
|
||||
## Resources
|
||||
|
||||
A list of official Hugging Face and community (indicated by 🌎) resources to help you get started with DINOv2.
|
||||
A list of official Hugging Face and community (indicated by 🌎) resources to help you get started with DPT.
|
||||
|
||||
- Demo notebooks for DINOv2 can be found [here](https://github.com/NielsRogge/Transformers-Tutorials/tree/master/DINOv2). 🌎
|
||||
|
||||
@ -72,9 +72,6 @@ If you're interested in submitting a resource to be included here, please feel f
|
||||
|
||||
[[autodoc]] Dinov2Config
|
||||
|
||||
<frameworkcontent>
|
||||
<pt>
|
||||
|
||||
## Dinov2Model
|
||||
|
||||
[[autodoc]] Dinov2Model
|
||||
@ -84,20 +81,3 @@ If you're interested in submitting a resource to be included here, please feel f
|
||||
|
||||
[[autodoc]] Dinov2ForImageClassification
|
||||
- forward
|
||||
|
||||
</pt>
|
||||
<jax>
|
||||
|
||||
## FlaxDinov2Model
|
||||
|
||||
[[autodoc]] FlaxDinov2Model
|
||||
- __call__
|
||||
|
||||
|
||||
## FlaxDinov2ForImageClassification
|
||||
|
||||
[[autodoc]] FlaxDinov2ForImageClassification
|
||||
- __call__
|
||||
|
||||
</jax>
|
||||
</frameworkcontent>
|
||||
|
||||
@ -1,116 +0,0 @@
|
||||
<!--Copyright 2024 The HuggingFace Team. All rights reserved.
|
||||
|
||||
Licensed under the Apache License, Version 2.0 (the "License"); you may not use this file except in compliance with
|
||||
the License. You may obtain a copy of the License at
|
||||
|
||||
http://www.apache.org/licenses/LICENSE-2.0
|
||||
|
||||
Unless required by applicable law or agreed to in writing, software distributed under the License is distributed on
|
||||
an "AS IS" BASIS, WITHOUT WARRANTIES OR CONDITIONS OF ANY KIND, either express or implied. See the License for the
|
||||
specific language governing permissions and limitations under the License.
|
||||
|
||||
⚠️ Note that this file is in Markdown but contain specific syntax for our doc-builder (similar to MDX) that may not be
|
||||
rendered properly in your Markdown viewer.
|
||||
|
||||
-->
|
||||
|
||||
# FalconMamba
|
||||
|
||||
## Overview
|
||||
|
||||
The FalconMamba model was proposed by TII UAE (Technology Innovation Institute) in their release.
|
||||
|
||||
The abstract from the paper is the following:
|
||||
|
||||
*We present FalconMamba, a new base large language model based on the novel Mamba architecture. FalconMamba is trained on 5.8 trillion tokens with carefully selected data mixtures. As a pure Mamba-based model, FalconMamba surpasses leading open-weight models based on Transformers, such as Mistral 7B, Llama3 8B, and Falcon2 11B. It is on par with Gemma 7B and outperforms models with different architecture designs, such as RecurrentGemma 9B. Currently, FalconMamba is the best-performing Mamba model in the literature at this scale, surpassing both existing Mamba and hybrid Mamba-Transformer models.
|
||||
Due to its architecture, FalconMamba is significantly faster at inference and requires substantially less memory for long sequence generation. Despite recent studies suggesting that hybrid Mamba-Transformer models outperform pure architecture designs, we argue and demonstrate that the pure Mamba design can achieve similar, even superior results compared to the hybrid design. We make the weights of our implementation of FalconMamba publicly available under a permissive license.*
|
||||
|
||||
Tips:
|
||||
|
||||
- FalconMamba is mostly based on Mamba architecutre, the same [tips and best practices](./mamba) would be relevant here.
|
||||
|
||||
The model has been trained on approximtely 6T tokens consisting a mixture of many data sources such as RefineWeb, Cosmopedia and Math data.
|
||||
|
||||
For more details about the training procedure and the architecture, have a look at [the technical paper of FalconMamba]() (coming soon).
|
||||
|
||||
# Usage
|
||||
|
||||
Below we demonstrate how to use the model:
|
||||
|
||||
```python
|
||||
from transformers import FalconMambaForCausalLM, AutoTokenizer
|
||||
import torch
|
||||
|
||||
tokenizer = AutoTokenizer.from_pretrained("tiiuae/falcon-mamba-7b")
|
||||
model = FalconMambaForCausalLM.from_pretrained("tiiuae/falcon-mamba-7b")
|
||||
|
||||
input_ids = tokenizer("Hey how are you doing?", return_tensors= "pt")["input_ids"]
|
||||
|
||||
out = model.generate(input_ids, max_new_tokens=10)
|
||||
print(tokenizer.batch_decode(out))
|
||||
```
|
||||
|
||||
The architecture is also compatible with `torch.compile` for faster generation:
|
||||
|
||||
```python
|
||||
from transformers import FalconMambaForCausalLM, AutoTokenizer
|
||||
import torch
|
||||
|
||||
tokenizer = AutoTokenizer.from_pretrained("tiiuae/falcon-mamba-7b")
|
||||
model = FalconMambaForCausalLM.from_pretrained("tiiuae/falcon-mamba-7b", torch_dtype=torch.bfloat16).to(0)
|
||||
model = torch.compile(model)
|
||||
|
||||
input_ids = tokenizer("Hey how are you doing?", return_tensors= "pt")["input_ids"]
|
||||
|
||||
out = model.generate(input_ids, max_new_tokens=10)
|
||||
print(tokenizer.batch_decode(out))
|
||||
```
|
||||
|
||||
If you have access to a GPU that is compatible with `bitsandbytes`, you can also quantize the model in 4-bit precision:
|
||||
|
||||
```python
|
||||
from transformers import FalconMambaForCausalLM, AutoTokenizer, BitsAndBytesConfig
|
||||
import torch
|
||||
|
||||
tokenizer = AutoTokenizer.from_pretrained("tiiuae/falcon-mamba-7b")
|
||||
quantization_config = BitsAndBytesConfig(load_in_4bit=True)
|
||||
model = FalconMambaForCausalLM.from_pretrained("tiiuae/falcon-mamba-7b", quantization_config=quantization_config)
|
||||
|
||||
input_ids = tokenizer("Hey how are you doing?", return_tensors= "pt")["input_ids"]
|
||||
|
||||
out = model.generate(input_ids, max_new_tokens=10)
|
||||
print(tokenizer.batch_decode(out))
|
||||
```
|
||||
|
||||
You can also play with the instruction fine-tuned model:
|
||||
|
||||
```python
|
||||
from transformers import FalconMambaForCausalLM, AutoTokenizer
|
||||
import torch
|
||||
|
||||
tokenizer = AutoTokenizer.from_pretrained("tiiuae/falcon-mamba-7b-instruct")
|
||||
model = FalconMambaForCausalLM.from_pretrained("tiiuae/falcon-mamba-7b-instruct")
|
||||
|
||||
# We use the tokenizer's chat template to format each message - see https://huggingface.co/docs/transformers/main/en/chat_templating
|
||||
messages = [
|
||||
{"role": "user", "content": "How many helicopters can a human eat in one sitting?"},
|
||||
]
|
||||
input_ids = tokenizer.apply_chat_template(messages, tokenize=False, add_generation_prompt=True).input_ids
|
||||
|
||||
outputs = model.generate(input_ids)
|
||||
print(tokenizer.decode(outputs[0]))
|
||||
```
|
||||
|
||||
## FalconMambaConfig
|
||||
|
||||
[[autodoc]] FalconMambaConfig
|
||||
|
||||
## FalconMambaModel
|
||||
|
||||
[[autodoc]] FalconMambaModel
|
||||
- forward
|
||||
|
||||
## FalconMambaLMHeadModel
|
||||
|
||||
[[autodoc]] FalconMambaForCausalLM
|
||||
- forward
|
||||
@ -30,12 +30,6 @@ Tips:
|
||||
|
||||
- The original checkpoints can be converted using the conversion script `src/transformers/models/Gemma2/convert_Gemma2_weights_to_hf.py`
|
||||
|
||||
<Tip warning={true}>
|
||||
|
||||
- Gemma2 uses sliding window attention every second layer, which makes it unsuitable for typical kv caching with [`~DynamicCache`] or tuples of tensors. To enable caching in Gemma2 forward call, you must initialize a [`~HybridCache`] instance and pass it as `past_key_values` to the forward call. Note, that you also have to prepare `cache_position` if the `past_key_values` already contains previous keys and values.
|
||||
|
||||
</Tip>
|
||||
|
||||
This model was contributed by [Arthur Zucker](https://huggingface.co/ArthurZ), [Pedro Cuenca](https://huggingface.co/pcuenq) and [Tom Arsen]().
|
||||
|
||||
|
||||
|
||||
@ -1,74 +0,0 @@
|
||||
<!--Copyright 2024 The HuggingFace Team. All rights reserved.
|
||||
|
||||
Licensed under the Apache License, Version 2.0 (the "License"); you may not use this file except in compliance with
|
||||
the License. You may obtain a copy of the License at
|
||||
|
||||
http://www.apache.org/licenses/LICENSE-2.0
|
||||
|
||||
Unless required by applicable law or agreed to in writing, software distributed under the License is distributed on
|
||||
an "AS IS" BASIS, WITHOUT WARRANTIES OR CONDITIONS OF ANY KIND, either express or implied. See the License for the
|
||||
specific language governing permissions and limitations under the License.
|
||||
|
||||
⚠️ Note that this file is in Markdown but contain specific syntax for our doc-builder (similar to MDX) that may not be
|
||||
rendered properly in your Markdown viewer.
|
||||
|
||||
-->
|
||||
|
||||
# Granite
|
||||
|
||||
## Overview
|
||||
|
||||
The Granite model was proposed in [Power Scheduler: A Batch Size and Token Number Agnostic Learning Rate Scheduler](https://arxiv.org/abs/2408.13359) by Yikang Shen, Matthew Stallone, Mayank Mishra, Gaoyuan Zhang, Shawn Tan, Aditya Prasad, Adriana Meza Soria, David D. Cox and Rameswar Panda.
|
||||
|
||||
PowerLM-3B is a 3B state-of-the-art small language model trained with the Power learning rate scheduler. It is trained on a wide range of open-source and synthetic datasets with permissive licenses. PowerLM-3B has shown promising results compared to other models in the size categories across various benchmarks, including natural language multi-choices, code generation, and math reasoning.
|
||||
|
||||
The abstract from the paper is the following:
|
||||
|
||||
*Finding the optimal learning rate for language model pretraining is a challenging task.
|
||||
This is not only because there is a complicated correlation between learning rate, batch size, number of training tokens, model size, and other hyperparameters but also because it is prohibitively expensive to perform a hyperparameter search for large language models with Billions or Trillions of parameters. Recent studies propose using small proxy models and small corpus to perform hyperparameter searches and transposing the optimal parameters to large models and large corpus. While the zero-shot transferability is theoretically and empirically proven for model size related hyperparameters, like depth and width, the zero-shot transfer from small corpus to large corpus is underexplored.
|
||||
In this paper, we study the correlation between optimal learning rate, batch size, and number of training tokens for the recently proposed WSD scheduler. After thousands of small experiments, we found a power-law relationship between variables and demonstrated its transferability across model sizes. Based on the observation, we propose a new learning rate scheduler, Power scheduler, that is agnostic about the number of training tokens and batch size. The experiment shows that combining the Power scheduler with Maximum Update Parameterization (\mup) can consistently achieve impressive performance with one set of hyperparameters regardless of the number of training tokens, batch size, model size, and even model architecture. Our 3B dense and MoE models trained with the Power scheduler achieve comparable performance as state-of-the-art small language models.
|
||||
We [open source](https://huggingface.co/collections/ibm/power-lm-66be64ae647ddf11b9808000) these pretrained models.*
|
||||
|
||||
Tips:
|
||||
|
||||
```python
|
||||
import torch
|
||||
from transformers import AutoModelForCausalLM, AutoTokenizer
|
||||
|
||||
model_path = "ibm/PowerLM-3b"
|
||||
tokenizer = AutoTokenizer.from_pretrained(model_path)
|
||||
|
||||
# drop device_map if running on CPU
|
||||
model = AutoModelForCausalLM.from_pretrained(model_path, device_map="auto")
|
||||
model.eval()
|
||||
|
||||
# change input text as desired
|
||||
prompt = "Write a code to find the maximum value in a list of numbers."
|
||||
|
||||
# tokenize the text
|
||||
input_tokens = tokenizer(prompt, return_tensors="pt")
|
||||
# generate output tokens
|
||||
output = model.generate(**input_tokens, max_new_tokens=100)
|
||||
# decode output tokens into text
|
||||
output = tokenizer.batch_decode(output)
|
||||
# loop over the batch to print, in this example the batch size is 1
|
||||
for i in output:
|
||||
print(i)
|
||||
```
|
||||
|
||||
This model was contributed by [mayank-mishra](https://huggingface.co/mayank-mishra).
|
||||
|
||||
|
||||
## GraniteConfig
|
||||
|
||||
[[autodoc]] GraniteConfig
|
||||
|
||||
## GraniteModel
|
||||
|
||||
[[autodoc]] GraniteModel
|
||||
- forward
|
||||
|
||||
## GraniteForCausalLM
|
||||
|
||||
[[autodoc]] GraniteForCausalLM
|
||||
- forward
|
||||
@ -41,40 +41,33 @@ The original code can be found [here](https://github.com/IDEA-Research/Grounding
|
||||
Here's how to use the model for zero-shot object detection:
|
||||
|
||||
```python
|
||||
>>> import requests
|
||||
import requests
|
||||
|
||||
>>> import torch
|
||||
>>> from PIL import Image
|
||||
>>> from transformers import AutoProcessor, AutoModelForZeroShotObjectDetection
|
||||
import torch
|
||||
from PIL import Image
|
||||
from transformers import AutoProcessor, AutoModelForZeroShotObjectDetection,
|
||||
|
||||
>>> model_id = "IDEA-Research/grounding-dino-tiny"
|
||||
>>> device = "cuda"
|
||||
model_id = "IDEA-Research/grounding-dino-tiny"
|
||||
|
||||
>>> processor = AutoProcessor.from_pretrained(model_id)
|
||||
>>> model = AutoModelForZeroShotObjectDetection.from_pretrained(model_id).to(device)
|
||||
processor = AutoProcessor.from_pretrained(model_id)
|
||||
model = AutoModelForZeroShotObjectDetection.from_pretrained(model_id).to(device)
|
||||
|
||||
>>> image_url = "http://images.cocodataset.org/val2017/000000039769.jpg"
|
||||
>>> image = Image.open(requests.get(image_url, stream=True).raw)
|
||||
>>> # Check for cats and remote controls
|
||||
>>> text = "a cat. a remote control."
|
||||
image_url = "http://images.cocodataset.org/val2017/000000039769.jpg"
|
||||
image = Image.open(requests.get(image_url, stream=True).raw)
|
||||
# Check for cats and remote controls
|
||||
text = "a cat. a remote control."
|
||||
|
||||
>>> inputs = processor(images=image, text=text, return_tensors="pt").to(device)
|
||||
>>> with torch.no_grad():
|
||||
... outputs = model(**inputs)
|
||||
inputs = processor(images=image, text=text, return_tensors="pt").to(device)
|
||||
with torch.no_grad():
|
||||
outputs = model(**inputs)
|
||||
|
||||
>>> results = processor.post_process_grounded_object_detection(
|
||||
... outputs,
|
||||
... inputs.input_ids,
|
||||
... box_threshold=0.4,
|
||||
... text_threshold=0.3,
|
||||
... target_sizes=[image.size[::-1]]
|
||||
... )
|
||||
>>> print(results)
|
||||
[{'boxes': tensor([[344.6959, 23.1090, 637.1833, 374.2751],
|
||||
[ 12.2666, 51.9145, 316.8582, 472.4392],
|
||||
[ 38.5742, 70.0015, 176.7838, 118.1806]], device='cuda:0'),
|
||||
'labels': ['a cat', 'a cat', 'a remote control'],
|
||||
'scores': tensor([0.4785, 0.4381, 0.4776], device='cuda:0')}]
|
||||
results = processor.post_process_grounded_object_detection(
|
||||
outputs,
|
||||
inputs.input_ids,
|
||||
box_threshold=0.4,
|
||||
text_threshold=0.3,
|
||||
target_sizes=[image.size[::-1]]
|
||||
)
|
||||
```
|
||||
|
||||
## Grounded SAM
|
||||
|
||||
@ -26,22 +26,8 @@ The abstract from the paper is the following:
|
||||
|
||||
*Modern hierarchical vision transformers have added several vision-specific components in the pursuit of supervised classification performance. While these components lead to effective accuracies and attractive FLOP counts, the added complexity actually makes these transformers slower than their vanilla ViT counterparts. In this paper, we argue that this additional bulk is unnecessary. By pretraining with a strong visual pretext task (MAE), we can strip out all the bells-and-whistles from a state-of-the-art multi-stage vision transformer without losing accuracy. In the process, we create Hiera, an extremely simple hierarchical vision transformer that is more accurate than previous models while being significantly faster both at inference and during training. We evaluate Hiera on a variety of tasks for image and video recognition. Our code and models are available at https://github.com/facebookresearch/hiera.*
|
||||
|
||||
<img src="https://huggingface.co/datasets/huggingface/documentation-images/resolve/main/transformers/model_doc/hiera_overview.png"
|
||||
alt="drawing" width="600"/>
|
||||
|
||||
<small> Hiera architecture. Taken from the <a href="https://arxiv.org/abs/2306.00989">original paper.</a> </small>
|
||||
|
||||
This model was a joint contibution by [EduardoPacheco](https://huggingface.co/EduardoPacheco) and [namangarg110](https://huggingface.co/namangarg110). The original code can be found [here] (https://github.com/facebookresearch/hiera).
|
||||
|
||||
## Resources
|
||||
|
||||
A list of official Hugging Face and community (indicated by 🌎) resources to help you get started with Hiera. If you're interested in submitting a resource to be included here, please feel free to open a Pull Request and we'll review it! The resource should ideally demonstrate something new instead of duplicating an existing resource.
|
||||
|
||||
<PipelineTag pipeline="image-classification"/>
|
||||
|
||||
- [`HieraForImageClassification`] is supported by this [example script](https://github.com/huggingface/transformers/tree/main/examples/pytorch/image-classification) and [notebook](https://colab.research.google.com/github/huggingface/notebooks/blob/main/examples/image_classification.ipynb).
|
||||
- See also: [Image classification task guide](../tasks/image_classification)
|
||||
|
||||
## HieraConfig
|
||||
|
||||
[[autodoc]] HieraConfig
|
||||
|
||||
@ -43,13 +43,6 @@ The original code can be found [here](https://github.com/LLaVA-VL/LLaVA-NeXT/tre
|
||||
|
||||
- We advise users to use `padding_side="left"` when computing batched generation as it leads to more accurate results. Simply make sure to call `processor.tokenizer.padding_side = "left"` before generating.
|
||||
|
||||
<Tip warning={true}>
|
||||
|
||||
- Llava-Next uses different number of patches for images and thus has to pad the inputs inside modeling code, aside from the padding done when processing the inputs. The default setting is "left-padding" if model is in `eval()` mode, otherwise "right-padding".
|
||||
|
||||
</Tip>
|
||||
|
||||
|
||||
- Note that each checkpoint has been trained with a specific prompt format, depending on which large language model (LLM) was used. You can use tokenizer's `apply_chat_template` to format your prompts correctly. Below is an example of how to do that.
|
||||
|
||||
We will use [LLaVA-NeXT-Video-7B-hf](https://huggingface.co/llava-hf/LLaVA-NeXT-Video-7B-hf) and a conversation history of videos and images. Each content field has to be a list of dicts, as follows:
|
||||
@ -40,42 +40,7 @@ The original code can be found [here](https://github.com/haotian-liu/LLaVA/tree/
|
||||
|
||||
- Note the model has not been explicitly trained to process multiple images in the same prompt, although this is technically possible, you may experience inaccurate results.
|
||||
|
||||
- For better results, we recommend users to use the processor's `apply_chat_template()` method to format your prompt correctly. For that you need to construct a conversation history, passing in a plain string will not format your prompt. Each message in the conversation history for chat templates is a dictionary with keys "role" and "content". The "content" should be a list of dictionaries, for "text" and "image" modalities, as follows:
|
||||
|
||||
```python
|
||||
from transformers import AutoProcessor
|
||||
|
||||
processor = AutoProcessor.from_pretrained("llava-hf/llava-1.5-7b-hf")
|
||||
|
||||
conversation = [
|
||||
{
|
||||
"role": "user",
|
||||
"content": [
|
||||
{"type": "image"},
|
||||
{"type": "text", "text": "What’s shown in this image?"},
|
||||
],
|
||||
},
|
||||
{
|
||||
"role": "assistant",
|
||||
"content": [{"type": "text", "text": "This image shows a red stop sign."},]
|
||||
},
|
||||
{
|
||||
|
||||
"role": "user",
|
||||
"content": [
|
||||
{"type": "text", "text": "Describe the image in more details."},
|
||||
],
|
||||
},
|
||||
]
|
||||
|
||||
text_prompt = processor.apply_chat_template(conversation, add_generation_prompt=True)
|
||||
|
||||
# Note that the template simply formats your prompt, you still have to tokenize it and obtain pixel values for your images
|
||||
print(text_prompt)
|
||||
>>> "USER: <image>\n<What’s shown in this image? ASSISTANT: This image shows a red stop sign.</s>USER: Describe the image in more details. ASSISTANT:"
|
||||
```
|
||||
|
||||
- If you want to construct a chat prompt yourself, below is a list of prompt formats accepted by each llava checkpoint:
|
||||
- For better results, we recommend users to prompt the model with the correct prompt format. Below is a list of prompt formats accepted by each llava checkpoint:
|
||||
|
||||
[llava-interleave models](https://huggingface.co/collections/llava-hf/llava-interleave-668e19a97da0036aad4a2f19) requires the following format:
|
||||
```bash
|
||||
@ -99,7 +64,6 @@ For multiple turns conversation:
|
||||
"USER: <image>\n<prompt1> ASSISTANT: <answer1></s>USER: <prompt2> ASSISTANT: <answer2></s>USER: <prompt3> ASSISTANT:"
|
||||
```
|
||||
|
||||
|
||||
### Using Flash Attention 2
|
||||
|
||||
Flash Attention 2 is an even faster, optimized version of the previous optimization, please refer to the [Flash Attention 2 section of performance docs](https://huggingface.co/docs/transformers/perf_infer_gpu_one).
|
||||
|
||||
@ -46,79 +46,26 @@ The original code can be found [here](https://github.com/haotian-liu/LLaVA/tree/
|
||||
|
||||
- We advise users to use `padding_side="left"` when computing batched generation as it leads to more accurate results. Simply make sure to call `processor.tokenizer.padding_side = "left"` before generating.
|
||||
|
||||
<Tip warning={true}>
|
||||
- Note that each checkpoint has been trained with a specific prompt format, depending on which large language model (LLM) was used. Below, we list the correct prompt formats to use for the text prompt "What is shown in this image?":
|
||||
|
||||
- Llava-Next uses different number of patches for images and thus has to pad the inputs inside modeling code, aside from the padding done when processing the inputs. The default setting is "left-padding" if model is in `eval()` mode, otherwise "right-padding".
|
||||
|
||||
</Tip>
|
||||
|
||||
|
||||
- Note that each checkpoint has been trained with a specific prompt format, depending on which large language model (LLM) was used. You can use the processor's `apply_chat_template` to format your prompts correctly. For that you have to construct a conversation history, passing a plain string will not format your prompt. Each message in the conversation history for chat templates is a dictionary with keys "role" and "content". The "content" should be a list of dictionaries, for "text" and "image" modalities. Below is an example of how to do that and the list of formats accepted by each checkpoint.
|
||||
|
||||
We will use [llava-v1.6-mistral-7b-hf](https://huggingface.co/llava-hf/llava-v1.6-mistral-7b-hf) and a conversation history of text and image. Each content field has to be a list of dicts, as follows:
|
||||
|
||||
```python
|
||||
from transformers import LlavaNextProcessor
|
||||
|
||||
processor = LlavaNextProcessor.from_pretrained("llava-hf/llava-v1.6-mistral-7b-hf")
|
||||
|
||||
conversation = [
|
||||
{
|
||||
"role": "user",
|
||||
"content": [
|
||||
{"type": "image"},
|
||||
{"type": "text", "text": "What’s shown in this image?"},
|
||||
],
|
||||
},
|
||||
{
|
||||
"role": "assistant",
|
||||
"content": [{"type": "text", "text": "This image shows a red stop sign."},]
|
||||
},
|
||||
{
|
||||
|
||||
"role": "user",
|
||||
"content": [
|
||||
{"type": "text", "text": "Describe the image in more details."},
|
||||
],
|
||||
},
|
||||
]
|
||||
|
||||
text_prompt = processor.apply_chat_template(conversation, add_generation_prompt=True)
|
||||
|
||||
# Note that the template simply formats your prompt, you still have to tokenize it and obtain pixel values for your images
|
||||
print(text_prompt)
|
||||
>>> "[INST] <image>\nWhat's shown in this image? [/INST] This image shows a red stop sign. [INST] Describe the image in more details. [/INST]"
|
||||
```
|
||||
|
||||
- If you want to construct a chat prompt yourself, below is a list of possible formats
|
||||
.
|
||||
[llava-v1.6-mistral-7b-hf](https://huggingface.co/llava-hf/llava-v1.6-mistral-7b-hf) requires the following format:
|
||||
|
||||
```bash
|
||||
"[INST] <image>\nWhat is shown in this image? [/INST]"
|
||||
```
|
||||
|
||||
[llava-v1.6-vicuna-7b-hf](https://huggingface.co/llava-hf/llava-v1.6-vicuna-7b-hf) and [llava-v1.6-vicuna-13b-hf](https://huggingface.co/llava-hf/llava-v1.6-vicuna-13b-hf) require the following format:
|
||||
|
||||
```bash
|
||||
"A chat between a curious human and an artificial intelligence assistant. The assistant gives helpful, detailed, and polite answers to the human's questions. USER: <image>\nWhat is shown in this image? ASSISTANT:"
|
||||
```
|
||||
|
||||
[llava-v1.6-34b-hf](https://huggingface.co/llava-hf/llava-v1.6-34b-hf) requires the following format:
|
||||
|
||||
```bash
|
||||
"<|im_start|>system\nAnswer the questions.<|im_end|><|im_start|>user\n<image>\nWhat is shown in this image?<|im_end|><|im_start|>assistant\n"
|
||||
```
|
||||
|
||||
[llama3-llava-next-8b-hf](https://huggingface.co/llava-hf/llava-next-8b-hf) requires the following format:
|
||||
|
||||
```bash
|
||||
"<|start_header_id|>system<|end_header_id|>\n\nYou are a helpful language and vision assistant. You are able to understand the visual content that the user provides, and assist the user with a variety of tasks using natural language.<|eot_id|><|start_header_id|><|start_header_id|>user<|end_header_id|>\n\n<image>\nWhat is shown in this image?<|eot_id|><|start_header_id|>assistant<|end_header_id|>\n\n"
|
||||
```
|
||||
|
||||
[llava-next-72b-hf](https://huggingface.co/llava-hf/llava-next-72b-hf) and [llava-next-110b-hf](https://huggingface.co/llava-hf/llava-next-110b-hf) require the following format:
|
||||
|
||||
```bash
|
||||
"<|im_start|>system\nYou are a helpful assistant.<|im_end|>\n<|im_start|>user\n<image>\nWhat is shown in this image?<|im_end|>\n<|im_start|>assistant\n"
|
||||
```
|
||||
|
||||
## Usage example
|
||||
|
||||
### Single image inference
|
||||
@ -139,17 +86,8 @@ model.to("cuda:0")
|
||||
# prepare image and text prompt, using the appropriate prompt template
|
||||
url = "https://github.com/haotian-liu/LLaVA/blob/1a91fc274d7c35a9b50b3cb29c4247ae5837ce39/images/llava_v1_5_radar.jpg?raw=true"
|
||||
image = Image.open(requests.get(url, stream=True).raw)
|
||||
prompt = "[INST] <image>\nWhat is shown in this image? [/INST]"
|
||||
|
||||
conversation = [
|
||||
{
|
||||
"role": "user",
|
||||
"content": [
|
||||
{"type": "image"},
|
||||
{"type": "text", "text": "What is shown in this image?"},
|
||||
],
|
||||
},
|
||||
]
|
||||
prompt = processor.apply_chat_template(conversation, add_generation_prompt=True)
|
||||
inputs = processor(prompt, image, return_tensors="pt").to("cuda:0")
|
||||
|
||||
# autoregressively complete prompt
|
||||
@ -182,47 +120,15 @@ image_cats = Image.open(requests.get(url, stream=True).raw)
|
||||
url = "https://huggingface.co/microsoft/kosmos-2-patch14-224/resolve/main/snowman.jpg"
|
||||
image_snowman = Image.open(requests.get(url, stream=True).raw)
|
||||
|
||||
# Prepare a batch of two prompts, where the first one is a multi-turn conversation and the second is not
|
||||
conversation_1 = [
|
||||
{
|
||||
"role": "user",
|
||||
"content": [
|
||||
{"type": "image"},
|
||||
{"type": "text", "text": "What is shown in this image?"},
|
||||
],
|
||||
},
|
||||
{
|
||||
"role": "assistant",
|
||||
"content": [
|
||||
{"type": "text", "text": "There is a red stop sign in the image."},
|
||||
],
|
||||
},
|
||||
{
|
||||
"role": "user",
|
||||
"content": [
|
||||
{"type": "image"},
|
||||
{"type": "text", "text": "What about this image? How many cats do you see?"},
|
||||
],
|
||||
},
|
||||
# Prepare a batched prompt, where the first one is a multi-turn conversation and the second is not
|
||||
prompt = [
|
||||
"[INST] <image>\nWhat is shown in this image? [/INST] There is a red stop sign in the image. [INST] <image>\nWhat about this image? How many cats do you see [/INST]",
|
||||
"[INST] <image>\nWhat is shown in this image? [/INST]"
|
||||
]
|
||||
|
||||
conversation_2 = [
|
||||
{
|
||||
"role": "user",
|
||||
"content": [
|
||||
{"type": "image"},
|
||||
{"type": "text", "text": "What is shown in this image?"},
|
||||
],
|
||||
},
|
||||
]
|
||||
|
||||
prompt_1 = processor.apply_chat_template(conversation_1, add_generation_prompt=True)
|
||||
prompt_2 = processor.apply_chat_template(conversation_2, add_generation_prompt=True)
|
||||
prompts = [prompt_1, prompt_2]
|
||||
|
||||
# We can simply feed images in the order they have to be used in the text prompt
|
||||
# Each "<image>" token uses one image leaving the next for the subsequent "<image>" tokens
|
||||
inputs = processor(text=prompts, images=[image_stop, image_cats, image_snowman], padding=True, return_tensors="pt").to(model.device)
|
||||
inputs = processor(text=prompt, images=[image_stop, image_cats, image_snowman], padding=True, return_tensors="pt").to(model.device)
|
||||
|
||||
# Generate
|
||||
generate_ids = model.generate(**inputs, max_new_tokens=30)
|
||||
|
||||
@ -1,319 +0,0 @@
|
||||
<!--Copyright 2024 The HuggingFace Team. All rights reserved.
|
||||
|
||||
Licensed under the Apache License, Version 2.0 (the "License"); you may not use this file except in compliance with
|
||||
the License. You may obtain a copy of the License at
|
||||
|
||||
http://www.apache.org/licenses/LICENSE-2.0
|
||||
|
||||
Unless required by applicable law or agreed to in writing, software distributed under the License is distributed on
|
||||
an "AS IS" BASIS, WITHOUT WARRANTIES OR CONDITIONS OF ANY KIND, either express or implied. See the License for the
|
||||
specific language governing permissions and limitations under the License.
|
||||
|
||||
⚠️ Note that this file is in Markdown but contain specific syntax for our doc-builder (similar to MDX) that may not be
|
||||
rendered properly in your Markdown viewer.
|
||||
|
||||
-->
|
||||
|
||||
# LLaVA-Onevision
|
||||
|
||||
## Overview
|
||||
|
||||
The LLaVA-Onevision model was proposed in [LLaVA-OneVision: Easy Visual Task Transfer](https://arxiv.org/abs/2408.03326) by <Bo Li, Yuanhan Zhang, Dong Guo, Renrui Zhang, Feng Li, Hao Zhang, Kaichen Zhang, Yanwei Li, Ziwei Liu, Chunyuan Li
|
||||
|
||||
LLaVA-Onevision is a Vision-Language Model that can generate text conditioned on one or several images/videos. The model consists of SigLIP vision encoder and a Qwen2 language backbone. The images are processed with anyres-9 technique where the image is split into 9 patches to better process high resolution images and capture as much details as possible. However, videos are pooled to a total sequence length of 196 tokens each frame for more memory efficient computation. LLaVA-Onevision is available in three sizes: 0.5B, 7B and 72B and achieves remarkable performance on benchmark evaluations.
|
||||
|
||||
The abstract from the paper is the following:
|
||||
|
||||
*We present LLaVA-OneVision, a family of open large multimodal models (LMMs)
|
||||
developed by consolidating our insights into data, models, and visual representations in the LLaVA-NeXT blog series. Our experimental results demonstrate that
|
||||
LLaVA-OneVision is the first single model that can simultaneously push the performance boundaries of open LMMs in three important computer vision scenarios:
|
||||
single-image, multi-image, and video scenarios. Importantly, the design of LLaVAOneVision allows strong transfer learning across different modalities/scenarios,
|
||||
yielding new emerging capabilities. In particular, strong video understanding and
|
||||
cross-scenario capabilities are demonstrated through task transfer from images to
|
||||
videos.*
|
||||
|
||||
|
||||
<img src="https://huggingface.co/datasets/huggingface/documentation-images/resolve/main/transformers/model_doc/llava-ov-acrhitecture.png"
|
||||
alt="drawing" width="600"/>
|
||||
|
||||
<small> LLaVA=Onevision architecture. Taken from the <a href="https://arxiv.org/abs/2408.03326">original paper.</a> </small>
|
||||
|
||||
Tips:
|
||||
|
||||
- We advise users to use `padding_side="left"` when computing batched generation as it leads to more accurate results. Simply make sure to call `processor.tokenizer.padding_side = "left"` before generating.
|
||||
|
||||
<Tip warning={true}>
|
||||
|
||||
- Llava-Onevision uses different number of patches for images and thus has to pad the inputs inside modeling code, aside from the padding done when processing the inputs. The default setting is "left-padding" if model is in `eval()` mode, otherwise "right-padding".
|
||||
|
||||
</Tip>
|
||||
|
||||
- Note that the model should use a specific prompt format, on which the large language model (LLM) was trained. You can use the processor's `apply_chat_template` to format your prompts correctly. For that you have to construct a conversation history, passing a plain string will not format your prompt. Each message in the conversation history for chat templates is a dictionary with keys "role" and "content". The "content" should be a list of dictionaries, for "text" and "image" modalities.
|
||||
|
||||
We will use [llava-onevision-qwen2-7b-si-hf](https://huggingface.co/llava-hf/llava-onevision-qwen2-7b-si-hf) and a conversation history of text and image. Each content field has to be a list of dicts, as follows:
|
||||
|
||||
```python
|
||||
from transformers import AutoProcessor
|
||||
|
||||
processor = AutoProcessor.from_pretrained("llava-hf/llava-onevision-qwen2-7b-si-hf")
|
||||
|
||||
conversation = [
|
||||
{
|
||||
"role": "user",
|
||||
"content": [
|
||||
{"type": "image"},
|
||||
{"type": "text", "text": "What’s shown in this image?"},
|
||||
],
|
||||
},
|
||||
{
|
||||
"role": "assistant",
|
||||
"content": [{"type": "text", "text": "This image shows a red stop sign."},]
|
||||
},
|
||||
{
|
||||
|
||||
"role": "user",
|
||||
"content": [
|
||||
{"type": "text", "text": "Describe the image in more details."},
|
||||
],
|
||||
},
|
||||
]
|
||||
|
||||
text_prompt = processor.apply_chat_template(conversation, add_generation_prompt=True)
|
||||
|
||||
# Note that the template simply formats your prompt, you still have to tokenize it and obtain pixel values for your images
|
||||
print(text_prompt)
|
||||
>>> "<|im_start|>user\n<image>What is shown in this image?<|im_end|>\n<|im_start|>assistant\nPage showing the list of options.<|im_end|>"
|
||||
```
|
||||
|
||||
This model was contributed by [RaushanTurganbay](https://huggingface.co/RaushanTurganbay).
|
||||
The original code can be found [here](https://github.com/LLaVA-VL/LLaVA-NeXT/tree/main).
|
||||
|
||||
|
||||
## Usage example
|
||||
|
||||
### Single image inference
|
||||
|
||||
Here's how to load the model and perform inference in half-precision (`torch.float16`):
|
||||
|
||||
```python
|
||||
from transformers import AutoProcessor, LlavaOnevisionForConditionalGeneration
|
||||
import torch
|
||||
from PIL import Image
|
||||
import requests
|
||||
|
||||
processor = AutoProcessor.from_pretrained("llava-hf/llava-onevision-qwen2-7b-ov-hf")
|
||||
model = LlavaOnevisionForConditionalGeneration.from_pretrained("llava-hf/llava-onevision-qwen2-7b-ov-hf", torch_dtype=torch.float16, low_cpu_mem_usage=True)
|
||||
model.to("cuda:0")
|
||||
|
||||
# prepare image and text prompt, using the appropriate prompt template
|
||||
url = "https://github.com/haotian-liu/LLaVA/blob/1a91fc274d7c35a9b50b3cb29c4247ae5837ce39/images/llava_v1_5_radar.jpg?raw=true"
|
||||
image = Image.open(requests.get(url, stream=True).raw)
|
||||
|
||||
conversation = [
|
||||
{
|
||||
"role": "user",
|
||||
"content": [
|
||||
{"type": "image"},
|
||||
{"type": "text", "text": "What is shown in this image?"},
|
||||
],
|
||||
},
|
||||
]
|
||||
prompt = processor.apply_chat_template(conversation, add_generation_prompt=True)
|
||||
inputs = processor(images=image, text=prompt, return_tensors="pt").to("cuda:0", torch.float16)
|
||||
|
||||
# autoregressively complete prompt
|
||||
output = model.generate(**inputs, max_new_tokens=100)
|
||||
print(processor.decode(output[0], skip_special_tokens=True))
|
||||
'user\n\nWhat is shown in this image?\nassistant\nThe image shows a radar chart, also known as a spider chart or a star chart, which is used to compare multiple quantitative variables. Each axis represents a different variable, and the chart is filled with'
|
||||
```
|
||||
|
||||
### Multi image inference
|
||||
|
||||
LLaVa-Onevision can perform inference with multiple images as input, where images either belong to the same prompt or different prompts (in batched inference). For that you have to use checkpoints with an "ov" suffix. Here is how you can do it:
|
||||
|
||||
```python
|
||||
import requests
|
||||
from PIL import Image
|
||||
import torch
|
||||
from transformers import AutoProcessor, LlavaOnevisionForConditionalGeneration
|
||||
|
||||
# Load the model in half-precision
|
||||
model = LlavaOnevisionForConditionalGeneration.from_pretrained("llava-hf/llava-onevision-qwen2-7b-ov-hf", torch_dtype=torch.float16, device_map="auto")
|
||||
processor = AutoProcessor.from_pretrained("llava-hf/llava-onevision-qwen2-7b-ov-hf")
|
||||
|
||||
# Get three different images
|
||||
url = "https://www.ilankelman.org/stopsigns/australia.jpg"
|
||||
image_stop = Image.open(requests.get(url, stream=True).raw)
|
||||
|
||||
url = "http://images.cocodataset.org/val2017/000000039769.jpg"
|
||||
image_cats = Image.open(requests.get(url, stream=True).raw)
|
||||
|
||||
url = "https://huggingface.co/microsoft/kosmos-2-patch14-224/resolve/main/snowman.jpg"
|
||||
image_snowman = Image.open(requests.get(url, stream=True).raw)
|
||||
|
||||
# Prepare a batch of two prompts, where the first one is a multi-turn conversation and the second is not
|
||||
conversation_1 = [
|
||||
{
|
||||
"role": "user",
|
||||
"content": [
|
||||
{"type": "image"},
|
||||
{"type": "text", "text": "What is shown in this image?"},
|
||||
],
|
||||
},
|
||||
{
|
||||
"role": "assistant",
|
||||
"content": [
|
||||
{"type": "text", "text": "There is a red stop sign in the image."},
|
||||
],
|
||||
},
|
||||
{
|
||||
"role": "user",
|
||||
"content": [
|
||||
{"type": "image"},
|
||||
{"type": "text", "text": "What about this image? How many cats do you see?"},
|
||||
],
|
||||
},
|
||||
]
|
||||
|
||||
conversation_2 = [
|
||||
{
|
||||
"role": "user",
|
||||
"content": [
|
||||
{"type": "image"},
|
||||
{"type": "text", "text": "What is shown in this image?"},
|
||||
],
|
||||
},
|
||||
]
|
||||
|
||||
prompt_1 = processor.apply_chat_template(conversation_1, add_generation_prompt=True)
|
||||
prompt_2 = processor.apply_chat_template(conversation_2, add_generation_prompt=True)
|
||||
prompts = [prompt_1, prompt_2]
|
||||
|
||||
# We can simply feed images in the order they have to be used in the text prompt
|
||||
inputs = processor(images=[image_stop, image_cats, image_snowman], text=prompts, padding=True, return_tensors="pt").to(model.device, torch.float16)
|
||||
|
||||
# Generate
|
||||
generate_ids = model.generate(**inputs, max_new_tokens=30)
|
||||
processor.batch_decode(generate_ids, skip_special_tokens=True, clean_up_tokenization_spaces=False)
|
||||
['user\n\nWhat is shown in this image?\nassistant\nThere is a red stop sign in the image.\nuser\n\nWhat about this image? How many cats do you see?\nassistant\ntwo', 'user\n\nWhat is shown in this image?\nassistant\n']
|
||||
```
|
||||
|
||||
### Video inference
|
||||
|
||||
LLaVa-Onevision also can perform inference with videos as input, where video frames are treated as multiple images. Here is how you can do it:
|
||||
|
||||
```python
|
||||
import av
|
||||
import numpy as np
|
||||
from huggingface_hub import hf_hub_download
|
||||
|
||||
import torch
|
||||
from transformers import AutoProcessor, LlavaOnevisionForConditionalGeneration
|
||||
|
||||
# Load the model in half-precision
|
||||
model = LlavaOnevisionForConditionalGeneration.from_pretrained("llava-hf/llava-onevision-qwen2-7b-ov-hf", torch_dtype=torch.float16, device_map="auto")
|
||||
processor = AutoProcessor.from_pretrained("llava-hf/llava-onevision-qwen2-7b-ov-hf")
|
||||
|
||||
|
||||
def read_video_pyav(container, indices):
|
||||
'''
|
||||
Decode the video with PyAV decoder.
|
||||
Args:
|
||||
container (`av.container.input.InputContainer`): PyAV container.
|
||||
indices (`List[int]`): List of frame indices to decode.
|
||||
Returns:
|
||||
result (np.ndarray): np array of decoded frames of shape (num_frames, height, width, 3).
|
||||
'''
|
||||
frames = []
|
||||
container.seek(0)
|
||||
start_index = indices[0]
|
||||
end_index = indices[-1]
|
||||
for i, frame in enumerate(container.decode(video=0)):
|
||||
if i > end_index:
|
||||
break
|
||||
if i >= start_index and i in indices:
|
||||
frames.append(frame)
|
||||
return np.stack([x.to_ndarray(format="rgb24") for x in frames])
|
||||
|
||||
# Load the video as an np.array, sampling uniformly 8 frames (can sample more for longer videos, up to 32 frames)
|
||||
video_path = hf_hub_download(repo_id="raushan-testing-hf/videos-test", filename="sample_demo_1.mp4", repo_type="dataset")
|
||||
container = av.open(video_path)
|
||||
total_frames = container.streams.video[0].frames
|
||||
indices = np.arange(0, total_frames, total_frames / 8).astype(int)
|
||||
video = read_video_pyav(container, indices)
|
||||
|
||||
# For videos we have to feed a "video" type instead of "image"
|
||||
conversation = [
|
||||
{
|
||||
|
||||
"role": "user",
|
||||
"content": [
|
||||
{"type": "video"},
|
||||
{"type": "text", "text": "Why is this video funny?"},
|
||||
],
|
||||
},
|
||||
]
|
||||
|
||||
prompt = processor.apply_chat_template(conversation, add_generation_prompt=True)
|
||||
inputs = processor(videos=list(video), text=prompt, return_tensors="pt").to("cuda:0", torch.float16)
|
||||
|
||||
out = model.generate(**inputs, max_new_tokens=60)
|
||||
processor.batch_decode(out, skip_special_tokens=True, clean_up_tokenization_spaces=True)
|
||||
["user\n\nWhy is this video funny?\nassistant\nThe video appears to be humorous because it shows a young child, who is wearing glasses and holding a book, seemingly reading with a serious and focused expression. The child's glasses are a bit oversized for their face, which adds a comical touch, as it's a common trope to see children wearing"]
|
||||
```
|
||||
|
||||
## Model optimization
|
||||
|
||||
### Quantization using Bitsandbytes
|
||||
|
||||
The model can be loaded in 8 or 4 bits, greatly reducing the memory requirements while maintaining the performance of the original model. First make sure to install bitsandbytes, `pip install bitsandbytes` and make sure to have access to a CUDA compatible GPU device. Simply change the snippet above with:
|
||||
|
||||
```python
|
||||
from transformers import LlavaOnevisionForConditionalGeneration, BitsAndBytesConfig
|
||||
|
||||
# specify how to quantize the model
|
||||
quantization_config = BitsAndBytesConfig(
|
||||
load_in_4bit=True,
|
||||
bnb_4bit_quant_type="nf4",
|
||||
bnb_4bit_compute_dtype=torch.float16,
|
||||
)
|
||||
|
||||
model = LlavaOnevisionForConditionalGeneration.from_pretrained(model_id, quantization_config=quantization_config, device_map="auto")
|
||||
```
|
||||
|
||||
### Use Flash-Attention 2 to further speed-up generation
|
||||
|
||||
First make sure to install flash-attn. Refer to the [original repository of Flash Attention](https://github.com/Dao-AILab/flash-attention) regarding that package installation. Simply change the snippet above with:
|
||||
|
||||
```python
|
||||
from transformers import LlavaOnevisionForConditionalGeneration
|
||||
|
||||
model = LlavaOnevisionForConditionalGeneration.from_pretrained(
|
||||
model_id,
|
||||
torch_dtype=torch.float16,
|
||||
low_cpu_mem_usage=True,
|
||||
use_flash_attention_2=True
|
||||
).to(0)
|
||||
```
|
||||
|
||||
|
||||
## LlavaOnevisionConfig
|
||||
|
||||
[[autodoc]] LlavaOnevisionConfig
|
||||
|
||||
## LlavaOnevisionProcessor
|
||||
|
||||
[[autodoc]] LlavaOnevisionProcessor
|
||||
|
||||
## LlavaOnevisionImageProcessor
|
||||
|
||||
[[autodoc]] LlavaOnevisionImageProcessor
|
||||
|
||||
## LlavaOnevisionVideoProcessor
|
||||
|
||||
[[autodoc]] LlavaOnevisionVideoProcessor
|
||||
|
||||
## LlavaOnevisionForConditionalGeneration
|
||||
|
||||
[[autodoc]] LlavaOnevisionForConditionalGeneration
|
||||
- forward
|
||||
@ -1,106 +0,0 @@
|
||||
<!--Copyright 2024 The HuggingFace Team. All rights reserved.
|
||||
|
||||
Licensed under the Apache License, Version 2.0 (the "License"); you may not use this file except in compliance with
|
||||
the License. You may obtain a copy of the License at
|
||||
|
||||
http://www.apache.org/licenses/LICENSE-2.0
|
||||
|
||||
Unless required by applicable law or agreed to in writing, software distributed under the License is distributed on
|
||||
an "AS IS" BASIS, WITHOUT WARRANTIES OR CONDITIONS OF ANY KIND, either express or implied. See the License for the
|
||||
specific language governing permissions and limitations under the License.
|
||||
|
||||
⚠️ Note that this file is in Markdown but contain specific syntax for our doc-builder (similar to MDX) that may not be
|
||||
rendered properly in your Markdown viewer.
|
||||
|
||||
-->
|
||||
|
||||
# Mamba 2
|
||||
|
||||
## Overview
|
||||
|
||||
The Mamba2 model was proposed in [Transformers are SSMs: Generalized Models and Efficient Algorithms Through Structured State Space Duality](https://arxiv.org/abs/2405.21060) by Tri Dao and Albert Gu. It is a State Space Model similar to Mamba 1, with better performances in a simplified architecture.
|
||||
|
||||
|
||||
The abstract from the paper is the following:
|
||||
|
||||
*While Transformers have been the main architecture behind deep learning's success in language modeling, state-space models (SSMs) such as Mamba have recently been shown to match or outperform Transformers at small to medium scale. We show that these families of models are actually quite closely related, and develop a rich framework of theoretical connections between SSMs and variants of attention, connected through various decompositions of a well-studied class of structured semiseparable matrices. Our state space duality (SSD) framework allows us to design a new architecture (Mamba-2) whose core layer is an a refinement of Mamba's selective SSM that is 2-8X faster, while continuing to be competitive with Transformers on language modeling.*
|
||||
|
||||
Tips:
|
||||
|
||||
This version should support all implementations of Mamba 2, and in particular [Mamba-2 codestral](https://huggingface.co/mistralai/Mamba-Codestral-7B-v0.1) from Mistral AI. In particular, mamba 2 codestral was released with a number of `groups` equal to 8, which can be thought intuitively as similar to the number of kv heads in an attention-based model.
|
||||
This model has two different forward passes, `torch_forward` or `cuda_kernels_forward`. The latter uses the original cuda kernels if they are found in your environment, and is slower on the prefill i.e. requires a "warmup run" due to high cpu overhead, see [here](https://github.com/state-spaces/mamba/issues/389#issuecomment-2171755306) and [also here](https://github.com/state-spaces/mamba/issues/355#issuecomment-2147597457). Without compilation, the `torch_forward` implementation is faster by a factor 3 to 4. Further, there are no positional embeddings in this model, but there is an `attention_mask` and a specific logic to mask out hidden states in two places in the case of batched generation, see [here](https://github.com/state-spaces/mamba/issues/66#issuecomment-1863563829) as well. Due to this, in addition to the reimplementation of mamba2 kernels, batched generation and cached generation are expected to have slight discrepancies. Further, the results given by the cuda kernels or the torch forward are expected to be slightly different. The SSM algorithm heavily relies on tensor contractions, which have matmul equivalents but the order of operations is slightly different, making the difference greater at smaller precisions.
|
||||
Another note, shutdown of hidden states corresponding to padding tokens is done in 2 places and mostly has been tested with left-padding. Right-padding will propagate noise down the line and is not guaranteed to yield satisfactory results. `tokenizer.padding_side = "left"` ensures you are using the correct padding side.
|
||||
|
||||
This model was contributed by [Molbap](https://huggingface.co/Molbap), with tremendous help from [Anton Vlasjuk](https://github.com/vasqu).
|
||||
The original code can be found [here](https://github.com/state-spaces/mamba).
|
||||
|
||||
|
||||
# Usage
|
||||
|
||||
### A simple generation example:
|
||||
```python
|
||||
from transformers import Mamba2Config, Mamba2ForCausalLM, AutoTokenizer
|
||||
import torch
|
||||
model_id = 'mistralai/Mamba-Codestral-7B-v0.1'
|
||||
tokenizer = AutoTokenizer.from_pretrained(model_id, revision='refs/pr/9', from_slow=True, legacy=False)
|
||||
model = Mamba2ForCausalLM.from_pretrained(model_id, revision='refs/pr/9')
|
||||
input_ids = tokenizer("Hey how are you doing?", return_tensors= "pt")["input_ids"]
|
||||
|
||||
out = model.generate(input_ids, max_new_tokens=10)
|
||||
print(tokenizer.batch_decode(out))
|
||||
```
|
||||
|
||||
Here's a draft script for finetuning:
|
||||
```python
|
||||
from trl import SFTTrainer
|
||||
from peft import LoraConfig
|
||||
from transformers import AutoTokenizer, Mamba2ForCausalLM, TrainingArguments
|
||||
model_id = 'mistralai/Mamba-Codestral-7B-v0.1'
|
||||
tokenizer = AutoTokenizer.from_pretrained(model_id, revision='refs/pr/9', from_slow=True, legacy=False)
|
||||
tokenizer.pad_token = tokenizer.eos_token
|
||||
tokenizer.padding_side = "left" #enforce padding side left
|
||||
|
||||
model = Mamba2ForCausalLM.from_pretrained(model_id, revision='refs/pr/9')
|
||||
dataset = load_dataset("Abirate/english_quotes", split="train")
|
||||
# Without CUDA kernels, batch size of 2 occupies one 80GB device
|
||||
# but precision can be reduced.
|
||||
# Experiments and trials welcome!
|
||||
training_args = TrainingArguments(
|
||||
output_dir="./results",
|
||||
num_train_epochs=3,
|
||||
per_device_train_batch_size=2,
|
||||
logging_dir='./logs',
|
||||
logging_steps=10,
|
||||
learning_rate=2e-3
|
||||
)
|
||||
lora_config = LoraConfig(
|
||||
r=8,
|
||||
target_modules=["embeddings", "in_proj", "out_proj"],
|
||||
task_type="CAUSAL_LM",
|
||||
bias="none"
|
||||
)
|
||||
trainer = SFTTrainer(
|
||||
model=model,
|
||||
tokenizer=tokenizer,
|
||||
args=training_args,
|
||||
peft_config=lora_config,
|
||||
train_dataset=dataset,
|
||||
dataset_text_field="quote",
|
||||
)
|
||||
trainer.train()
|
||||
```
|
||||
|
||||
|
||||
## Mamba2Config
|
||||
|
||||
[[autodoc]] Mamba2Config
|
||||
|
||||
## Mamba2Model
|
||||
|
||||
[[autodoc]] Mamba2Model
|
||||
- forward
|
||||
|
||||
## Mamba2LMHeadModel
|
||||
|
||||
[[autodoc]] Mamba2ForCausalLM
|
||||
- forward
|
||||
@ -105,7 +105,7 @@ from huggingface_hub import list_models
|
||||
|
||||
model_list = list_models()
|
||||
org = "Helsinki-NLP"
|
||||
model_ids = [x.id for x in model_list if x.id.startswith(org)]
|
||||
model_ids = [x.modelId for x in model_list if x.modelId.startswith(org)]
|
||||
suffix = [x.split("/")[1] for x in model_ids]
|
||||
old_style_multi_models = [f"{org}/{s}" for s in suffix if s != s.lower()]
|
||||
```
|
||||
|
||||
@ -1,148 +0,0 @@
|
||||
<!--Copyright 2024 The HuggingFace Team. All rights reserved.
|
||||
Copyright (c) 2024, NVIDIA CORPORATION. All rights reserved.
|
||||
|
||||
Licensed under the Apache License, Version 2.0 (the "License"); you may not use this file except in compliance with
|
||||
the License. You may obtain a copy of the License at
|
||||
|
||||
http://www.apache.org/licenses/LICENSE-2.0
|
||||
|
||||
Unless required by applicable law or agreed to in writing, software distributed under the License is distributed on
|
||||
an "AS IS" BASIS, WITHOUT WARRANTIES OR CONDITIONS OF ANY KIND, either express or implied. See the License for the
|
||||
specific language governing permissions and limitations under the License.
|
||||
|
||||
-->
|
||||
|
||||
# Nemotron
|
||||
|
||||
## Nemotron
|
||||
|
||||
### License
|
||||
|
||||
The use of this model is governed by the [NVIDIA AI Foundation Models Community License Agreement](https://developer.nvidia.com/downloads/nv-ai-foundation-models-license).
|
||||
|
||||
### Description
|
||||
|
||||
Nemotron-4 is a family of enterprise ready generative text models compatible with [NVIDIA NeMo Framework](https://www.nvidia.com/en-us/ai-data-science/generative-ai/nemo-framework/).
|
||||
|
||||
NVIDIA NeMo is an end-to-end, cloud-native platform to build, customize, and deploy generative AI models anywhere. It includes training and inferencing frameworks, guardrailing toolkits, data curation tools, and pretrained models, offering enterprises an easy, cost-effective, and fast way to adopt generative AI. To get access to NeMo Framework, please sign up at [this link](https://developer.nvidia.com/nemo-framework/join).
|
||||
|
||||
### References
|
||||
|
||||
[Announcement Blog](https://developer.nvidia.com/blog/nvidia-ai-foundation-models-build-custom-enterprise-chatbots-and-co-pilots-with-production-ready-llms/)
|
||||
|
||||
### Model Architecture
|
||||
|
||||
**Architecture Type:** Transformer
|
||||
|
||||
**Network Architecture:** Transformer Decoder (auto-regressive language model).
|
||||
|
||||
## Minitron
|
||||
|
||||
### Minitron 4B Base
|
||||
|
||||
Minitron is a family of small language models (SLMs) obtained by pruning NVIDIA's [Nemotron-4 15B](https://arxiv.org/abs/2402.16819) model. We prune model embedding size, attention heads, and MLP intermediate dimension, following which, we perform continued training with distillation to arrive at the final models.
|
||||
|
||||
Deriving the Minitron 8B and 4B models from the base 15B model using our approach requires up to **40x fewer training tokens** per model compared to training from scratch; this results in **compute cost savings of 1.8x** for training the full model family (15B, 8B, and 4B). Minitron models exhibit up to a 16% improvement in MMLU scores compared to training from scratch, perform comparably to other community models such as Mistral 7B, Gemma 7B and Llama-3 8B, and outperform state-of-the-art compression techniques from the literature. Please refer to our [arXiv paper](https://arxiv.org/abs/2407.14679) for more details.
|
||||
|
||||
Minitron models are for research and development only.
|
||||
|
||||
### HuggingFace Quickstart
|
||||
|
||||
The following code provides an example of how to load the Minitron-4B model and use it to perform text generation.
|
||||
|
||||
```python
|
||||
import torch
|
||||
from transformers import AutoTokenizer, AutoModelForCausalLM
|
||||
|
||||
# Load the tokenizer and model
|
||||
model_path = 'nvidia/Minitron-4B-Base'
|
||||
tokenizer = AutoTokenizer.from_pretrained(model_path)
|
||||
|
||||
device = 'cuda'
|
||||
dtype = torch.bfloat16
|
||||
model = AutoModelForCausalLM.from_pretrained(model_path, torch_dtype=dtype, device_map=device)
|
||||
|
||||
# Prepare the input text
|
||||
prompt = 'Complete the paragraph: our solar system is'
|
||||
inputs = tokenizer.encode(prompt, return_tensors='pt').to(model.device)
|
||||
|
||||
# Generate the output
|
||||
outputs = model.generate(inputs, max_length=20)
|
||||
|
||||
# Decode and print the output
|
||||
output_text = tokenizer.decode(outputs[0])
|
||||
print(output_text)
|
||||
```
|
||||
|
||||
### License
|
||||
|
||||
Minitron is released under the [NVIDIA Open Model License Agreement](https://developer.download.nvidia.com/licenses/nvidia-open-model-license-agreement-june-2024.pdf).
|
||||
|
||||
### Evaluation Results
|
||||
|
||||
*5-shot performance.* Language Understanding evaluated using [Massive Multitask Language Understanding](https://arxiv.org/abs/2009.03300):
|
||||
|
||||
| Average |
|
||||
| :---- |
|
||||
| 58.6 |
|
||||
|
||||
*Zero-shot performance.* Evaluated using select datasets from the [LM Evaluation Harness](https://github.com/EleutherAI/lm-evaluation-harness) with additions:
|
||||
|
||||
| HellaSwag | Winogrande | GSM8K| ARC-C | XLSum |
|
||||
| :------------- | :------------- | :------------- | :------------- | :------------- |
|
||||
| 75.0 | 74.0 | 24.1 | 50.9 | 29.5
|
||||
|
||||
|
||||
*Code generation performance*. Evaluated using [HumanEval](https://github.com/openai/human-eval):
|
||||
|
||||
| p@1, 0-Shot |
|
||||
| :------------- |
|
||||
| 23.3 |
|
||||
|
||||
Please refer to our [paper](https://arxiv.org/abs/2407.14679) for the full set of results.
|
||||
|
||||
### Citation
|
||||
|
||||
If you find our work helpful, please consider citing our paper:
|
||||
```
|
||||
@article{minitron2024,
|
||||
title={Compact Language Models via Pruning and Knowledge Distillation},
|
||||
author={Saurav Muralidharan and Sharath Turuvekere Sreenivas and Raviraj Joshi and Marcin Chochowski and Mostofa Patwary and Mohammad Shoeybi and Bryan Catanzaro and Jan Kautz and Pavlo Molchanov},
|
||||
journal={arXiv preprint arXiv:2407.14679},
|
||||
year={2024},
|
||||
url={https://arxiv.org/abs/2407.14679},
|
||||
}
|
||||
```
|
||||
|
||||
## NemotronConfig
|
||||
|
||||
[[autodoc]] NemotronConfig
|
||||
|
||||
|
||||
## NemotronModel
|
||||
|
||||
[[autodoc]] NemotronModel
|
||||
- forward
|
||||
|
||||
|
||||
## NemotronForCausalLM
|
||||
|
||||
[[autodoc]] NemotronForCausalLM
|
||||
- forward
|
||||
|
||||
## NemotronForSequenceClassification
|
||||
|
||||
[[autodoc]] NemotronForSequenceClassification
|
||||
- forward
|
||||
|
||||
|
||||
## NemotronForQuestionAnswering
|
||||
|
||||
[[autodoc]] NemotronForQuestionAnswering
|
||||
- forward
|
||||
|
||||
|
||||
## NemotronForTokenClassification
|
||||
|
||||
[[autodoc]] NemotronForTokenClassification
|
||||
- forward
|
||||
@ -101,7 +101,7 @@ for the list of all BCP-47 in the Flores 200 dataset.
|
||||
>>> inputs = tokenizer(article, return_tensors="pt")
|
||||
|
||||
>>> translated_tokens = model.generate(
|
||||
... **inputs, forced_bos_token_id=tokenizer.convert_tokens_to_ids("fra_Latn"), max_length=30
|
||||
... **inputs, forced_bos_token_id=tokenizer.lang_code_to_id["fra_Latn"], max_length=30
|
||||
... )
|
||||
>>> tokenizer.batch_decode(translated_tokens, skip_special_tokens=True)[0]
|
||||
Le chef de l'ONU dit qu'il n'y a pas de solution militaire en Syrie
|
||||
@ -126,7 +126,7 @@ See example below for a translation from romanian to german:
|
||||
>>> inputs = tokenizer(article, return_tensors="pt")
|
||||
|
||||
>>> translated_tokens = model.generate(
|
||||
... **inputs, forced_bos_token_id=tokenizer.convert_tokens_to_ids("deu_Latn"), max_length=30
|
||||
... **inputs, forced_bos_token_id=tokenizer.lang_code_to_id["deu_Latn"], max_length=30
|
||||
... )
|
||||
>>> tokenizer.batch_decode(translated_tokens, skip_special_tokens=True)[0]
|
||||
UN-Chef sagt, es gibt keine militärische Lösung in Syrien
|
||||
@ -175,7 +175,7 @@ To load a model using Flash Attention 2, we can pass the argument `attn_implemen
|
||||
>>> inputs = tokenizer(article, return_tensors="pt").to("cuda")
|
||||
|
||||
>>> translated_tokens = model.generate(
|
||||
... **inputs, forced_bos_token_id=tokenizer.convert_tokens_to_ids("deu_Latn"), max_length=30
|
||||
... **inputs, forced_bos_token_id=tokenizer.lang_code_to_id["deu_Latn"], max_length=30
|
||||
... )
|
||||
>>> tokenizer.batch_decode(translated_tokens, skip_special_tokens=True)[0]
|
||||
"UN-Chef sagt, es gibt keine militärische Lösung in Syrien"
|
||||
@ -187,4 +187,4 @@ Below is an expected speedup diagram that compares pure inference time between t
|
||||
|
||||
<div style="text-align: center">
|
||||
<img src="https://huggingface.co/datasets/visheratin/documentation-images/resolve/main/nllb-speedup.webp">
|
||||
</div>
|
||||
</div>
|
||||
@ -1,45 +0,0 @@
|
||||
<!--
|
||||
|
||||
Licensed under the Apache License, Version 2.0 (the "License"); you may not use this file except in compliance with
|
||||
the License. You may obtain a copy of the License at
|
||||
|
||||
http://www.apache.org/licenses/LICENSE-2.0
|
||||
|
||||
Unless required by applicable law or agreed to in writing, software distributed under the License is distributed on
|
||||
an "AS IS" BASIS, WITHOUT WARRANTIES OR CONDITIONS OF ANY KIND, either express or implied. See the License for the
|
||||
specific language governing permissions and limitations under the License.
|
||||
|
||||
⚠️ Note that this file is in Markdown but contain specific syntax for our doc-builder (similar to MDX) that may not be
|
||||
rendered properly in your Markdown viewer.
|
||||
|
||||
-->
|
||||
|
||||
# OLMoE
|
||||
|
||||
## Overview
|
||||
|
||||
The OLMoE model was proposed in [OLMoE: Open Mixture-of-Experts Language Models](https://arxiv.org/abs/2409.02060) by Niklas Muennighoff, Luca Soldaini, Dirk Groeneveld, Kyle Lo, Jacob Morrison, Sewon Min, Weijia Shi, Pete Walsh, Oyvind Tafjord, Nathan Lambert, Yuling Gu, Shane Arora, Akshita Bhagia, Dustin Schwenk, David Wadden, Alexander Wettig, Binyuan Hui, Tim Dettmers, Douwe Kiela, Ali Farhadi, Noah A. Smith, Pang Wei Koh, Amanpreet Singh, Hannaneh Hajishirzi.
|
||||
|
||||
OLMoE is a series of **O**pen **L**anguage **Mo**dels using sparse **M**ixture-**o**f-**E**xperts designed to enable the science of language models. We release all code, checkpoints, logs, and details involved in training these models.
|
||||
|
||||
The abstract from the paper is the following:
|
||||
|
||||
*We introduce OLMoE, a fully open, state-of-the-art language model leveraging sparse Mixture-of-Experts (MoE). OLMoE-1B-7B has 7 billion (B) parameters but uses only 1B per input token. We pretrain it on 5 trillion tokens and further adapt it to create OLMoE-1B-7B-Instruct. Our models outperform all available models with similar active parameters, even surpassing larger ones like Llama2-13B-Chat and DeepSeekMoE-16B. We present various experiments on MoE training, analyze routing in our model showing high specialization, and open-source all aspects of our work: model weights, training data, code, and logs.*
|
||||
|
||||
This model was contributed by [Muennighoff](https://hf.co/Muennighoff).
|
||||
The original code can be found [here](https://github.com/allenai/OLMoE).
|
||||
|
||||
|
||||
## OlmoeConfig
|
||||
|
||||
[[autodoc]] OlmoeConfig
|
||||
|
||||
## OlmoeModel
|
||||
|
||||
[[autodoc]] OlmoeModel
|
||||
- forward
|
||||
|
||||
## OlmoeForCausalLM
|
||||
|
||||
[[autodoc]] OlmoeForCausalLM
|
||||
- forward
|
||||
@ -18,7 +18,7 @@ rendered properly in your Markdown viewer.
|
||||
|
||||
## Overview
|
||||
|
||||
Qwen2 is the new model series of large language models from the Qwen team. Previously, we released the Qwen series, including Qwen2-0.5B, Qwen2-1.5B, Qwen2-7B, Qwen2-57B-A14B, Qwen2-72B, Qwen2-Audio, etc.
|
||||
Qwen2 is the new model series of large language models from the Qwen team. Previously, we released the Qwen series, including Qwen-72B, Qwen-1.8B, Qwen-VL, Qwen-Audio, etc.
|
||||
|
||||
### Model Details
|
||||
|
||||
@ -27,16 +27,16 @@ Qwen2 is a language model series including decoder language models of different
|
||||
|
||||
## Usage tips
|
||||
|
||||
`Qwen2-7B` and `Qwen2-7B-Instruct` can be found on the [Huggingface Hub](https://huggingface.co/Qwen)
|
||||
`Qwen2-7B-beta` and `Qwen2-7B-Chat-beta` can be found on the [Huggingface Hub](https://huggingface.co/Qwen)
|
||||
|
||||
In the following, we demonstrate how to use `Qwen2-7B-Instruct` for the inference. Note that we have used the ChatML format for dialog, in this demo we show how to leverage `apply_chat_template` for this purpose.
|
||||
In the following, we demonstrate how to use `Qwen2-7B-Chat-beta` for the inference. Note that we have used the ChatML format for dialog, in this demo we show how to leverage `apply_chat_template` for this purpose.
|
||||
|
||||
```python
|
||||
>>> from transformers import AutoModelForCausalLM, AutoTokenizer
|
||||
>>> device = "cuda" # the device to load the model onto
|
||||
|
||||
>>> model = AutoModelForCausalLM.from_pretrained("Qwen/Qwen2-7B-Instruct", device_map="auto")
|
||||
>>> tokenizer = AutoTokenizer.from_pretrained("Qwen/Qwen2-7B-Instruct")
|
||||
>>> model = AutoModelForCausalLM.from_pretrained("Qwen/Qwen1.5-7B-Chat", device_map="auto")
|
||||
>>> tokenizer = AutoTokenizer.from_pretrained("Qwen/Qwen1.5-7B-Chat")
|
||||
|
||||
>>> prompt = "Give me a short introduction to large language model."
|
||||
|
||||
|
||||
@ -1,198 +0,0 @@
|
||||
<!--Copyright 2024 The HuggingFace Team. All rights reserved.
|
||||
|
||||
Licensed under the Apache License, Version 2.0 (the "License"); you may not use this file except in compliance with
|
||||
the License. You may obtain a copy of the License at
|
||||
|
||||
http://www.apache.org/licenses/LICENSE-2.0
|
||||
|
||||
Unless required by applicable law or agreed to in writing, software distributed under the License is distributed on
|
||||
an "AS IS" BASIS, WITHOUT WARRANTIES OR CONDITIONS OF ANY KIND, either express or implied. See the License for the
|
||||
specific language governing permissions and limitations under the License.
|
||||
|
||||
⚠️ Note that this file is in Markdown but contain specific syntax for our doc-builder (similar to MDX) that may not be
|
||||
rendered properly in your Markdown viewer.
|
||||
|
||||
-->
|
||||
|
||||
# Qwen2Audio
|
||||
|
||||
## Overview
|
||||
|
||||
The Qwen2-Audio is the new model series of large audio-language models from the Qwen team. Qwen2-Audio is capable of accepting various audio signal inputs and performing audio analysis or direct textual responses with regard to speech instructions. We introduce two distinct audio interaction modes:
|
||||
|
||||
* voice chat: users can freely engage in voice interactions with Qwen2-Audio without text input
|
||||
* audio analysis: users could provide audio and text instructions for analysis during the interaction
|
||||
|
||||
It was proposed in [Qwen2-Audio Technical Report](https://arxiv.org/abs/2407.10759) by Yunfei Chu, Jin Xu, Qian Yang, Haojie Wei, Xipin Wei, Zhifang Guo, Yichong Leng, Yuanjun Lv, Jinzheng He, Junyang Lin, Chang Zhou, Jingren Zhou.
|
||||
|
||||
The abstract from the paper is the following:
|
||||
|
||||
*We introduce the latest progress of Qwen-Audio, a large-scale audio-language model called Qwen2-Audio, which is capable of accepting various audio signal inputs and performing audio analysis or direct textual responses with regard to speech instructions. In contrast to complex hierarchical tags, we have simplified the pre-training process by utilizing natural language prompts for different data and tasks, and have further expanded the data volume. We have boosted the instruction-following capability of Qwen2-Audio and implemented two distinct audio interaction modes for voice chat and audio analysis. In the voice chat mode, users can freely engage in voice interactions with Qwen2-Audio without text input. In the audio analysis mode, users could provide audio and text instructions for analysis during the interaction. Note that we do not use any system prompts to switch between voice chat and audio analysis modes. Qwen2-Audio is capable of intelligently comprehending the content within audio and following voice commands to respond appropriately. For instance, in an audio segment that simultaneously contains sounds, multi-speaker conversations, and a voice command, Qwen2-Audio can directly understand the command and provide an interpretation and response to the audio. Additionally, DPO has optimized the model's performance in terms of factuality and adherence to desired behavior. According to the evaluation results from AIR-Bench, Qwen2-Audio outperformed previous SOTAs, such as Gemini-1.5-pro, in tests focused on audio-centric instruction-following capabilities. Qwen2-Audio is open-sourced with the aim of fostering the advancement of the multi-modal language community. *
|
||||
|
||||
|
||||
## Usage tips
|
||||
|
||||
`Qwen2-Audio-7B` and `Qwen2-Audio-7B-Instruct` can be found on the [Huggingface Hub](https://huggingface.co/Qwen)
|
||||
|
||||
In the following, we demonstrate how to use `Qwen2-Audio-7B-Instruct` for the inference, supporting both voice chat and audio analysis modes. Note that we have used the ChatML format for dialog, in this demo we show how to leverage `apply_chat_template` for this purpose.
|
||||
|
||||
### Voice Chat Inference
|
||||
In the voice chat mode, users can freely engage in voice interactions with Qwen2-Audio without text input:
|
||||
```python
|
||||
from io import BytesIO
|
||||
from urllib.request import urlopen
|
||||
import librosa
|
||||
from transformers import Qwen2AudioForConditionalGeneration, AutoProcessor
|
||||
|
||||
processor = AutoProcessor.from_pretrained("Qwen/Qwen2-Audio-7B-Instruct")
|
||||
model = Qwen2AudioForConditionalGeneration.from_pretrained("Qwen/Qwen2-Audio-7B-Instruct", device_map="auto")
|
||||
|
||||
conversation = [
|
||||
{"role": "user", "content": [
|
||||
{"type": "audio", "audio_url": "https://qianwen-res.oss-cn-beijing.aliyuncs.com/Qwen2-Audio/audio/guess_age_gender.wav"},
|
||||
]},
|
||||
{"role": "assistant", "content": "Yes, the speaker is female and in her twenties."},
|
||||
{"role": "user", "content": [
|
||||
{"type": "audio", "audio_url": "https://qianwen-res.oss-cn-beijing.aliyuncs.com/Qwen2-Audio/audio/translate_to_chinese.wav"},
|
||||
]},
|
||||
]
|
||||
text = processor.apply_chat_template(conversation, add_generation_prompt=True, tokenize=False)
|
||||
audios = []
|
||||
for message in conversation:
|
||||
if isinstance(message["content"], list):
|
||||
for ele in message["content"]:
|
||||
if ele["type"] == "audio":
|
||||
audios.append(librosa.load(
|
||||
BytesIO(urlopen(ele['audio_url']).read()),
|
||||
sr=processor.feature_extractor.sampling_rate)[0]
|
||||
)
|
||||
|
||||
inputs = processor(text=text, audios=audios, return_tensors="pt", padding=True)
|
||||
inputs.input_ids = inputs.input_ids.to("cuda")
|
||||
|
||||
generate_ids = model.generate(**inputs, max_length=256)
|
||||
generate_ids = generate_ids[:, inputs.input_ids.size(1):]
|
||||
|
||||
response = processor.batch_decode(generate_ids, skip_special_tokens=True, clean_up_tokenization_spaces=False)[0]
|
||||
```
|
||||
|
||||
### Audio Analysis Inference
|
||||
In the audio analysis, users could provide both audio and text instructions for analysis:
|
||||
```python
|
||||
from io import BytesIO
|
||||
from urllib.request import urlopen
|
||||
import librosa
|
||||
from transformers import Qwen2AudioForConditionalGeneration, AutoProcessor
|
||||
|
||||
processor = AutoProcessor.from_pretrained("Qwen/Qwen2-Audio-7B-Instruct")
|
||||
model = Qwen2AudioForConditionalGeneration.from_pretrained("Qwen/Qwen2-Audio-7B-Instruct", device_map="auto")
|
||||
|
||||
conversation = [
|
||||
{'role': 'system', 'content': 'You are a helpful assistant.'},
|
||||
{"role": "user", "content": [
|
||||
{"type": "audio", "audio_url": "https://qianwen-res.oss-cn-beijing.aliyuncs.com/Qwen2-Audio/audio/glass-breaking-151256.mp3"},
|
||||
{"type": "text", "text": "What's that sound?"},
|
||||
]},
|
||||
{"role": "assistant", "content": "It is the sound of glass shattering."},
|
||||
{"role": "user", "content": [
|
||||
{"type": "text", "text": "What can you do when you hear that?"},
|
||||
]},
|
||||
{"role": "assistant", "content": "Stay alert and cautious, and check if anyone is hurt or if there is any damage to property."},
|
||||
{"role": "user", "content": [
|
||||
{"type": "audio", "audio_url": "https://qianwen-res.oss-cn-beijing.aliyuncs.com/Qwen2-Audio/audio/1272-128104-0000.flac"},
|
||||
{"type": "text", "text": "What does the person say?"},
|
||||
]},
|
||||
]
|
||||
text = processor.apply_chat_template(conversation, add_generation_prompt=True, tokenize=False)
|
||||
audios = []
|
||||
for message in conversation:
|
||||
if isinstance(message["content"], list):
|
||||
for ele in message["content"]:
|
||||
if ele["type"] == "audio":
|
||||
audios.append(
|
||||
librosa.load(
|
||||
BytesIO(urlopen(ele['audio_url']).read()),
|
||||
sr=processor.feature_extractor.sampling_rate)[0]
|
||||
)
|
||||
|
||||
inputs = processor(text=text, audios=audios, return_tensors="pt", padding=True)
|
||||
inputs.input_ids = inputs.input_ids.to("cuda")
|
||||
|
||||
generate_ids = model.generate(**inputs, max_length=256)
|
||||
generate_ids = generate_ids[:, inputs.input_ids.size(1):]
|
||||
|
||||
response = processor.batch_decode(generate_ids, skip_special_tokens=True, clean_up_tokenization_spaces=False)[0]
|
||||
```
|
||||
|
||||
### Batch Inference
|
||||
We also support batch inference:
|
||||
```python
|
||||
from io import BytesIO
|
||||
from urllib.request import urlopen
|
||||
import librosa
|
||||
from transformers import Qwen2AudioForConditionalGeneration, AutoProcessor
|
||||
|
||||
processor = AutoProcessor.from_pretrained("Qwen/Qwen2-Audio-7B-Instruct")
|
||||
model = Qwen2AudioForConditionalGeneration.from_pretrained("Qwen/Qwen2-Audio-7B-Instruct", device_map="auto")
|
||||
|
||||
conversation1 = [
|
||||
{"role": "user", "content": [
|
||||
{"type": "audio", "audio_url": "https://qianwen-res.oss-cn-beijing.aliyuncs.com/Qwen2-Audio/audio/glass-breaking-151256.mp3"},
|
||||
{"type": "text", "text": "What's that sound?"},
|
||||
]},
|
||||
{"role": "assistant", "content": "It is the sound of glass shattering."},
|
||||
{"role": "user", "content": [
|
||||
{"type": "audio", "audio_url": "https://qianwen-res.oss-cn-beijing.aliyuncs.com/Qwen2-Audio/audio/f2641_0_throatclearing.wav"},
|
||||
{"type": "text", "text": "What can you hear?"},
|
||||
]}
|
||||
]
|
||||
|
||||
conversation2 = [
|
||||
{"role": "user", "content": [
|
||||
{"type": "audio", "audio_url": "https://qianwen-res.oss-cn-beijing.aliyuncs.com/Qwen2-Audio/audio/1272-128104-0000.flac"},
|
||||
{"type": "text", "text": "What does the person say?"},
|
||||
]},
|
||||
]
|
||||
|
||||
conversations = [conversation1, conversation2]
|
||||
|
||||
text = [processor.apply_chat_template(conversation, add_generation_prompt=True, tokenize=False) for conversation in conversations]
|
||||
|
||||
audios = []
|
||||
for conversation in conversations:
|
||||
for message in conversation:
|
||||
if isinstance(message["content"], list):
|
||||
for ele in message["content"]:
|
||||
if ele["type"] == "audio":
|
||||
audios.append(
|
||||
librosa.load(
|
||||
BytesIO(urlopen(ele['audio_url']).read()),
|
||||
sr=processor.feature_extractor.sampling_rate)[0]
|
||||
)
|
||||
|
||||
inputs = processor(text=text, audios=audios, return_tensors="pt", padding=True)
|
||||
inputs['input_ids'] = inputs['input_ids'].to("cuda")
|
||||
inputs.input_ids = inputs.input_ids.to("cuda")
|
||||
|
||||
generate_ids = model.generate(**inputs, max_length=256)
|
||||
generate_ids = generate_ids[:, inputs.input_ids.size(1):]
|
||||
|
||||
response = processor.batch_decode(generate_ids, skip_special_tokens=True, clean_up_tokenization_spaces=False)
|
||||
```
|
||||
|
||||
## Qwen2AudioConfig
|
||||
|
||||
[[autodoc]] Qwen2AudioConfig
|
||||
|
||||
## Qwen2AudioConfig
|
||||
|
||||
[[autodoc]] Qwen2AudioEncoderConfig
|
||||
|
||||
## Qwen2AudioProcessor
|
||||
|
||||
[[autodoc]] Qwen2AudioProcessor
|
||||
|
||||
## Qwen2AudioForConditionalGeneration
|
||||
|
||||
[[autodoc]] Qwen2AudioForConditionalGeneration
|
||||
- forward
|
||||
@ -1,329 +0,0 @@
|
||||
<!--Copyright 2024 The HuggingFace Team. All rights reserved.
|
||||
|
||||
Licensed under the Apache License, Version 2.0 (the "License"); you may not use this file except in compliance with
|
||||
the License. You may obtain a copy of the License at
|
||||
|
||||
http://www.apache.org/licenses/LICENSE-2.0
|
||||
|
||||
Unless required by applicable law or agreed to in writing, software distributed under the License is distributed on
|
||||
an "AS IS" BASIS, WITHOUT WARRANTIES OR CONDITIONS OF ANY KIND, either express or implied. See the License for the
|
||||
specific language governing permissions and limitations under the License.
|
||||
|
||||
⚠️ Note that this file is in Markdown but contain specific syntax for our doc-builder (similar to MDX) that may not be
|
||||
rendered properly in your Markdown viewer.
|
||||
|
||||
-->
|
||||
|
||||
# Qwen2_VL
|
||||
|
||||
|
||||
## Overview
|
||||
|
||||
The [Qwen2_VL](https://qwenlm.github.io/blog/qwen2-vl/) is a major update to our [Qwen-VL](https://arxiv.org/pdf/2308.12966) model from the Qwen team.
|
||||
|
||||
The abstract from the blog is the following:
|
||||
|
||||
*This blog introduces Qwen2-VL, an advanced version of the Qwen-VL model that has undergone significant enhancements over the past year. Key improvements include enhanced image comprehension, advanced video understanding, integrated visual agent functionality, and expanded multilingual support. The model architecture has been optimized for handling arbitrary image resolutions through Naive Dynamic Resolution support and utilizes Multimodal Rotary Position Embedding (M-ROPE) to effectively process both 1D textual and multi-dimensional visual data. This updated model demonstrates competitive performance against leading AI systems like GPT-4o and Claude 3.5 Sonnet in vision-related tasks and ranks highly among open-source models in text capabilities. These advancements make Qwen2-VL a versatile tool for various applications requiring robust multimodal processing and reasoning abilities.*
|
||||
|
||||
|
||||
## Usage example
|
||||
|
||||
### Single Media inference
|
||||
|
||||
The model can accept both images and videos as input. Here's an example code for inference.
|
||||
|
||||
```python
|
||||
|
||||
from PIL import Image
|
||||
import requests
|
||||
import torch
|
||||
from torchvision import io
|
||||
from typing import Dict
|
||||
from transformers import Qwen2VLForConditionalGeneration, AutoTokenizer, AutoProcessor
|
||||
|
||||
# Load the model in half-precision on the available device(s)
|
||||
model = Qwen2VLForConditionalGeneration.from_pretrained("Qwen/Qwen2-VL-7B-Instruct", device_map="auto")
|
||||
processor = AutoProcessor.from_pretrained("Qwen/Qwen2-VL-7B-Instruct")
|
||||
|
||||
# Image
|
||||
url = "https://qianwen-res.oss-cn-beijing.aliyuncs.com/Qwen-VL/assets/demo.jpeg"
|
||||
image = Image.open(requests.get(url, stream=True).raw)
|
||||
|
||||
conversation = [
|
||||
{
|
||||
"role":"user",
|
||||
"content":[
|
||||
{
|
||||
"type":"image",
|
||||
},
|
||||
{
|
||||
"type":"text",
|
||||
"text":"Describe this image."
|
||||
}
|
||||
]
|
||||
}
|
||||
]
|
||||
|
||||
|
||||
# Preprocess the inputs
|
||||
text_prompt = processor.apply_chat_template(conversation, add_generation_prompt=True)
|
||||
# Excepted output: '<|im_start|>system\nYou are a helpful assistant.<|im_end|>\n<|im_start|>user\n<|vision_start|><|image_pad|><|vision_end|>Describe this image.<|im_end|>\n<|im_start|>assistant\n'
|
||||
|
||||
inputs = processor(text=[text_prompt], images=[image], padding=True, return_tensors="pt")
|
||||
inputs = inputs.to('cuda')
|
||||
|
||||
# Inference: Generation of the output
|
||||
output_ids = model.generate(**inputs, max_new_tokens=128)
|
||||
generated_ids = [output_ids[len(input_ids):] for input_ids, output_ids in zip(inputs.input_ids, output_ids)]
|
||||
output_text = processor.batch_decode(generated_ids, skip_special_tokens=True, clean_up_tokenization_spaces=True)
|
||||
print(output_text)
|
||||
|
||||
|
||||
|
||||
# Video
|
||||
def fetch_video(ele: Dict, nframe_factor=2):
|
||||
if isinstance(ele['video'], str):
|
||||
def round_by_factor(number: int, factor: int) -> int:
|
||||
return round(number / factor) * factor
|
||||
|
||||
video = ele["video"]
|
||||
if video.startswith("file://"):
|
||||
video = video[7:]
|
||||
|
||||
video, _, info = io.read_video(
|
||||
video,
|
||||
start_pts=ele.get("video_start", 0.0),
|
||||
end_pts=ele.get("video_end", None),
|
||||
pts_unit="sec",
|
||||
output_format="TCHW",
|
||||
)
|
||||
assert not ("fps" in ele and "nframes" in ele), "Only accept either `fps` or `nframes`"
|
||||
if "nframes" in ele:
|
||||
nframes = round_by_factor(ele["nframes"], nframe_factor)
|
||||
else:
|
||||
fps = ele.get("fps", 1.0)
|
||||
nframes = round_by_factor(video.size(0) / info["video_fps"] * fps, nframe_factor)
|
||||
idx = torch.linspace(0, video.size(0) - 1, nframes, dtype=torch.int64)
|
||||
return video[idx]
|
||||
|
||||
video_info = {"type": "video", "video": "/path/to/video.mp4", "fps": 1.0}
|
||||
video = fetch_video(video_info)
|
||||
conversation = [
|
||||
{
|
||||
"role": "user",
|
||||
"content": [
|
||||
{"type": "video"},
|
||||
{"type": "text", "text": "What happened in the video?"},
|
||||
],
|
||||
}
|
||||
]
|
||||
|
||||
# Preprocess the inputs
|
||||
text_prompt = processor.apply_chat_template(conversation, add_generation_prompt=True)
|
||||
# Excepted output: '<|im_start|>system\nYou are a helpful assistant.<|im_end|>\n<|im_start|>user\n<|vision_start|><|video_pad|><|vision_end|>What happened in the video?<|im_end|>\n<|im_start|>assistant\n'
|
||||
|
||||
inputs = processor(text=[text_prompt], videos=[video], padding=True, return_tensors="pt")
|
||||
inputs = inputs.to('cuda')
|
||||
|
||||
# Inference: Generation of the output
|
||||
output_ids = model.generate(**inputs, max_new_tokens=128)
|
||||
generated_ids = [output_ids[len(input_ids):] for input_ids, output_ids in zip(inputs.input_ids, output_ids)]
|
||||
output_text = processor.batch_decode(generated_ids, skip_special_tokens=True, clean_up_tokenization_spaces=True)
|
||||
print(output_text)
|
||||
|
||||
```
|
||||
|
||||
|
||||
### Batch Mixed Media Inference
|
||||
|
||||
The model can batch inputs composed of mixed samples of various types such as images, videos, and text. Here is an example.
|
||||
|
||||
```python
|
||||
|
||||
image1 = Image.open("/path/to/image1.jpg")
|
||||
image2 = Image.open("/path/to/image2.jpg")
|
||||
image3 = Image.open("/path/to/image3.jpg")
|
||||
image4 = Image.open("/path/to/image4.jpg")
|
||||
image5 = Image.open("/path/to/image5.jpg")
|
||||
video = fetch_video({
|
||||
"type": "video",
|
||||
"video": "/path/to/video.mp4",
|
||||
"fps": 1.0
|
||||
})
|
||||
|
||||
# Conversation for the first image
|
||||
conversation1 = [
|
||||
{
|
||||
"role": "user",
|
||||
"content": [
|
||||
{"type": "image"},
|
||||
{"type": "text", "text": "Describe this image."}
|
||||
]
|
||||
}
|
||||
]
|
||||
|
||||
# Conversation with two images
|
||||
conversation2 = [
|
||||
{
|
||||
"role": "user",
|
||||
"content": [
|
||||
{"type": "image"},
|
||||
{"type": "image"},
|
||||
{"type": "text", "text": "What is written in the pictures?"}
|
||||
]
|
||||
}
|
||||
]
|
||||
|
||||
# Conversation with pure text
|
||||
conversation3 = [
|
||||
{
|
||||
"role": "user",
|
||||
"content": "who are you?"
|
||||
}
|
||||
]
|
||||
|
||||
|
||||
# Conversation with mixed midia
|
||||
conversation4 = [
|
||||
{
|
||||
"role": "user",
|
||||
"content": [
|
||||
{"type": "image"},
|
||||
{"type": "image"},
|
||||
{"type": "video"},
|
||||
{"type": "text", "text": "What are the common elements in these medias?"},
|
||||
],
|
||||
}
|
||||
]
|
||||
|
||||
conversations = [conversation1, conversation2, conversation3, conversation4]
|
||||
# Preparation for batch inference
|
||||
texts = [processor.apply_chat_template(msg, add_generation_prompt=True) for msg in conversations]
|
||||
inputs = processor(
|
||||
text=texts,
|
||||
images=[image1, image2, image3, image4, image5],
|
||||
videos=[video],
|
||||
padding=True,
|
||||
return_tensors="pt",
|
||||
)
|
||||
inputs = inputs.to('cuda')
|
||||
|
||||
# Batch Inference
|
||||
output_ids = model.generate(**inputs, max_new_tokens=128)
|
||||
generated_ids = [output_ids[len(input_ids):] for input_ids, output_ids in zip(inputs.input_ids, output_ids)]
|
||||
output_text = processor.batch_decode(generated_ids, skip_special_tokens=True, clean_up_tokenization_spaces=True)
|
||||
print(output_text)
|
||||
```
|
||||
|
||||
### Usage Tips
|
||||
|
||||
#### Image Resolution for performance boost
|
||||
|
||||
The model supports a wide range of resolution inputs. By default, it uses the native resolution for input, but higher resolutions can enhance performance at the cost of more computation. Users can set the minimum and maximum number of pixels to achieve an optimal configuration for their needs.
|
||||
|
||||
```python
|
||||
|
||||
min_pixels = 224*224
|
||||
max_pixels = 2048*2048
|
||||
processor = AutoProcessor.from_pretrained("Qwen/Qwen2-VL-7B-Instruct", min_pixels=min_pixels, max_pixels=max_pixels)
|
||||
|
||||
```
|
||||
|
||||
|
||||
|
||||
#### Multiple Image Inputs
|
||||
|
||||
By default, images and video content are directly included in the conversation. When handling multiple images, it's helpful to add labels to the images and videos for better reference. Users can control this behavior with the following settings:
|
||||
|
||||
|
||||
|
||||
```python
|
||||
|
||||
conversation = [
|
||||
{
|
||||
"role": "user",
|
||||
"content": [
|
||||
{"type": "image"},
|
||||
{"type": "text", "text": "Hello, how are you?"}
|
||||
]
|
||||
},
|
||||
{
|
||||
"role": "assistant",
|
||||
"content": "I'm doing well, thank you for asking. How can I assist you today?"
|
||||
},
|
||||
{
|
||||
"role": "user",
|
||||
"content": [
|
||||
{"type": "text", "text": "Can you describe these images and video?"},
|
||||
{"type": "image"},
|
||||
{"type": "image"},
|
||||
{"type": "video"},
|
||||
{"type": "text", "text": "These are from my vacation."}
|
||||
]
|
||||
},
|
||||
{
|
||||
"role": "assistant",
|
||||
"content": "I'd be happy to describe the images and video for you. Could you please provide more context about your vacation?"
|
||||
},
|
||||
{
|
||||
"role": "user",
|
||||
"content": "It was a trip to the mountains. Can you see the details in the images and video?"
|
||||
}
|
||||
]
|
||||
|
||||
# default:
|
||||
prompt_without_id = processor.apply_chat_template(conversation, add_generation_prompt=True)
|
||||
# Excepted output: '<|im_start|>system\nYou are a helpful assistant.<|im_end|>\n<|im_start|>user\n<|vision_start|><|image_pad|><|vision_end|>Hello, how are you?<|im_end|>\n<|im_start|>assistant\nI'm doing well, thank you for asking. How can I assist you today?<|im_end|>\n<|im_start|>user\nCan you describe these images and video?<|vision_start|><|image_pad|><|vision_end|><|vision_start|><|image_pad|><|vision_end|><|vision_start|><|video_pad|><|vision_end|>These are from my vacation.<|im_end|>\n<|im_start|>assistant\nI'd be happy to describe the images and video for you. Could you please provide more context about your vacation?<|im_end|>\n<|im_start|>user\nIt was a trip to the mountains. Can you see the details in the images and video?<|im_end|>\n<|im_start|>assistant\n'
|
||||
|
||||
|
||||
# add ids
|
||||
prompt_with_id = processor.apply_chat_template(conversation, add_generation_prompt=True, add_vision_id=True)
|
||||
# Excepted output: '<|im_start|>system\nYou are a helpful assistant.<|im_end|>\n<|im_start|>user\nPicture 1: <|vision_start|><|image_pad|><|vision_end|>Hello, how are you?<|im_end|>\n<|im_start|>assistant\nI'm doing well, thank you for asking. How can I assist you today?<|im_end|>\n<|im_start|>user\nCan you describe these images and video?Picture 2: <|vision_start|><|image_pad|><|vision_end|>Picture 3: <|vision_start|><|image_pad|><|vision_end|>Video 1: <|vision_start|><|video_pad|><|vision_end|>These are from my vacation.<|im_end|>\n<|im_start|>assistant\nI'd be happy to describe the images and video for you. Could you please provide more context about your vacation?<|im_end|>\n<|im_start|>user\nIt was a trip to the mountains. Can you see the details in the images and video?<|im_end|>\n<|im_start|>assistant\n'
|
||||
|
||||
```
|
||||
|
||||
#### Flash-Attention 2 to speed up generation
|
||||
|
||||
First, make sure to install the latest version of Flash Attention 2:
|
||||
|
||||
```bash
|
||||
pip install -U flash-attn --no-build-isolation
|
||||
```
|
||||
|
||||
Also, you should have a hardware that is compatible with Flash-Attention 2. Read more about it in the official documentation of the [flash attention repository](https://github.com/Dao-AILab/flash-attention). FlashAttention-2 can only be used when a model is loaded in `torch.float16` or `torch.bfloat16`.
|
||||
|
||||
To load and run a model using Flash Attention-2, simply add `attn_implementation="flash_attention_2"` when loading the model as follows:
|
||||
|
||||
```python
|
||||
from transformers import Qwen2VLForConditionalGeneration
|
||||
|
||||
model = Qwen2VLForConditionalGeneration.from_pretrained(
|
||||
"Qwen/Qwen2-VL-7B-Instruct",
|
||||
torch_dtype=torch.bfloat16,
|
||||
attn_implementation="flash_attention_2",
|
||||
)
|
||||
```
|
||||
|
||||
|
||||
## Qwen2VLConfig
|
||||
|
||||
[[autodoc]] Qwen2VLConfig
|
||||
|
||||
## Qwen2VLImageProcessor
|
||||
|
||||
[[autodoc]] Qwen2VLImageProcessor
|
||||
- preprocess
|
||||
|
||||
## Qwen2VLProcessor
|
||||
|
||||
[[autodoc]] Qwen2VLProcessor
|
||||
|
||||
## Qwen2VLModel
|
||||
|
||||
[[autodoc]] Qwen2VLModel
|
||||
- forward
|
||||
|
||||
## Qwen2VLForConditionalGeneration
|
||||
|
||||
[[autodoc]] Qwen2VLForConditionalGeneration
|
||||
- forward
|
||||
@ -51,19 +51,19 @@ This model was contributed by [julien-c](https://huggingface.co/julien-c). The o
|
||||
|
||||
## Usage tips
|
||||
|
||||
- This implementation is the same as [`BertModel`] with a minor tweak to the embeddings, as well as a setup
|
||||
for RoBERTa pretrained models.
|
||||
- RoBERTa has the same architecture as BERT but uses a byte-level BPE as a tokenizer (same as GPT-2) and uses a
|
||||
- This implementation is the same as [`BertModel`] with a tiny embeddings tweak as well as a setup
|
||||
for Roberta pretrained models.
|
||||
- RoBERTa has the same architecture as BERT, but uses a byte-level BPE as a tokenizer (same as GPT-2) and uses a
|
||||
different pretraining scheme.
|
||||
- RoBERTa doesn't have `token_type_ids`, so you don't need to indicate which token belongs to which segment. Just
|
||||
separate your segments with the separation token `tokenizer.sep_token` (or `</s>`).
|
||||
- RoBERTa is similar to BERT but with better pretraining techniques:
|
||||
- RoBERTa doesn't have `token_type_ids`, you don't need to indicate which token belongs to which segment. Just
|
||||
separate your segments with the separation token `tokenizer.sep_token` (or `</s>`)
|
||||
- Same as BERT with better pretraining tricks:
|
||||
|
||||
* Dynamic masking: tokens are masked differently at each epoch, whereas BERT does it once and for all.
|
||||
* Sentence packing: Sentences are packed together to reach 512 tokens (so the sentences are in an order that may span several documents).
|
||||
* Larger batches: Training uses larger batches.
|
||||
* Byte-level BPE vocabulary: Uses BPE with bytes as a subunit instead of characters, accommodating Unicode characters.
|
||||
- [CamemBERT](camembert) is a wrapper around RoBERTa. Refer to its model page for usage examples.
|
||||
* dynamic masking: tokens are masked differently at each epoch, whereas BERT does it once and for all
|
||||
* together to reach 512 tokens (so the sentences are in an order than may span several documents)
|
||||
* train with larger batches
|
||||
* use BPE with bytes as a subunit and not characters (because of unicode characters)
|
||||
- [CamemBERT](camembert) is a wrapper around RoBERTa. Refer to this page for usage examples.
|
||||
|
||||
## Resources
|
||||
|
||||
|
||||
@ -34,7 +34,7 @@ Tips:
|
||||
- The model predicts much better results if input 2D points and/or input bounding boxes are provided
|
||||
- You can prompt multiple points for the same image, and predict a single mask.
|
||||
- Fine-tuning the model is not supported yet
|
||||
- According to the paper, textual input should be also supported. However, at this time of writing this seems not to be supported according to [the official repository](https://github.com/facebookresearch/segment-anything/issues/4#issuecomment-1497626844).
|
||||
- According to the paper, textual input should be also supported. However, at this time of writing this seems to be not supported according to [the official repository](https://github.com/facebookresearch/segment-anything/issues/4#issuecomment-1497626844).
|
||||
|
||||
|
||||
This model was contributed by [ybelkada](https://huggingface.co/ybelkada) and [ArthurZ](https://huggingface.co/ArthurZ).
|
||||
|
||||
@ -98,7 +98,7 @@ indices = np.arange(0, total_frames, total_frames / 8).astype(int)
|
||||
video = read_video_pyav(container, indices)
|
||||
|
||||
# For better results, we recommend to prompt the model in the following format
|
||||
prompt = "USER: <video>\nWhy is this funny? ASSISTANT:"
|
||||
prompt = "USER: <video>Why is this funny? ASSISTANT:"
|
||||
inputs = processor(text=prompt, videos=video, return_tensors="pt")
|
||||
|
||||
out = model.generate(**inputs, max_new_tokens=60)
|
||||
@ -108,7 +108,7 @@ processor.batch_decode(out, skip_special_tokens=True, clean_up_tokenization_spac
|
||||
For multiple turns conversation change the prompt format to:
|
||||
|
||||
```bash
|
||||
"USER: <video>\nWhat do you see in this video? ASSISTANT: A baby reading a book. USER: Why is the it funny? ASSISTANT:"
|
||||
"USER: <video>What do you see in this video? ASSISTANT: A baby reading a book. USER: Why is the it funny? ASSISTANT:"
|
||||
```
|
||||
|
||||
### Mixed Media Mode
|
||||
@ -123,7 +123,7 @@ import requests
|
||||
# Load and image and write a new prompt
|
||||
url = "http://images.cocodataset.org/val2017/000000039769.jpg"
|
||||
image = Image.open(requests.get(url, stream=True).raw)
|
||||
prompt = "USER: <image>\nHow many cats are there in the image? ASSISTANT: There are two cats. USER: <video>\nWhy is this video funny? ASSISTANT:"
|
||||
prompt = "USER: <image> How many cats are there in the image? ASSISTANT: There are two cats. USER: <video>Why is this video funny? ASSISTANT:"
|
||||
|
||||
inputs = processor(text=prompt, images=image, videos=clip, padding=True, return_tensors="pt")
|
||||
|
||||
|
||||
@ -26,12 +26,7 @@ The abstract from the paper is the following:
|
||||
|
||||
*While existing large vision-language multimodal models focus on whole image understanding, there is a prominent gap in achieving region-specific comprehension. Current approaches that use textual coordinates or spatial encodings often fail to provide a user-friendly interface for visual prompting. To address this challenge, we introduce a novel multimodal model capable of decoding arbitrary visual prompts. This allows users to intuitively mark images and interact with the model using natural cues like a "red bounding box" or "pointed arrow". Our simple design directly overlays visual markers onto the RGB image, eliminating the need for complex region encodings, yet achieves state-of-the-art performance on region-understanding tasks like Visual7W, PointQA, and Visual Commonsense Reasoning benchmark. Furthermore, we present ViP-Bench, a comprehensive benchmark to assess the capability of models in understanding visual prompts across multiple dimensions, enabling future research in this domain. Code, data, and model are publicly available.*
|
||||
|
||||
The original code can be found [here](https://github.com/mu-cai/ViP-LLaVA).
|
||||
|
||||
This model was contributed by [Younes Belkada](https://huggingface.co/ybelkada)
|
||||
|
||||
|
||||
## Usage tips:
|
||||
Tips:
|
||||
|
||||
- The architecture is similar than llava architecture except that the multi-modal projector takes a set of concatenated vision hidden states and has an additional layernorm layer on that module.
|
||||
|
||||
@ -39,51 +34,22 @@ This model was contributed by [Younes Belkada](https://huggingface.co/ybelkada)
|
||||
|
||||
- Note the model has not been explicitly trained to process multiple images in the same prompt, although this is technically possible, you may experience inaccurate results.
|
||||
|
||||
- For better results, we recommend users to use the processor's `apply_chat_template()` method to format your prompt correctly. For that you need to construct a conversation history, passing in a plain string will not format your prompt. Each message in the conversation history for chat templates is a dictionary with keys "role" and "content". The "content" should be a list of dictionaries, for "text" and "image" modalities, as follows:
|
||||
- For better results, we recommend users to prompt the model with the correct prompt format:
|
||||
|
||||
```python
|
||||
from transformers import AutoProcessor
|
||||
|
||||
processor = AutoProcessor.from_pretrained("llava-hf/vip-llava-7b-hf")
|
||||
|
||||
conversation = [
|
||||
{
|
||||
"role": "user",
|
||||
"content": [
|
||||
{"type": "image"},
|
||||
{"type": "text", "text": "What’s shown in this image?"},
|
||||
,
|
||||
},
|
||||
{
|
||||
"role": "assistant",
|
||||
"content": [{"type": "text", "text": "This image shows a red stop sign."},]
|
||||
},
|
||||
{
|
||||
|
||||
"role": "user",
|
||||
"content": [
|
||||
{"type": "text", "text": "Describe the image in more details."},
|
||||
],
|
||||
},
|
||||
]
|
||||
|
||||
text_prompt = processor.apply_chat_template(conversation, add_generation_prompt=True)
|
||||
|
||||
# Note that the template simply formats your prompt, you still have to tokenize it and obtain pixel values for your images
|
||||
print(text_prompt)
|
||||
>>> "###Human: <image>\nWhat’s shown in this image?###Assistant: This image shows a red stop sign.###Human: Describe the image in more details.###Assistant:"
|
||||
```
|
||||
|
||||
- If you want to construct a chat prompt yourself, below is a list of prompt formats accepted by VipLLaVa checkpoints:
|
||||
```bash
|
||||
A chat between a curious human and an artificial intelligence assistant. The assistant gives helpful, detailed, and polite answers to the human's questions.###Human: <image>\n<prompt>###Assistant:
|
||||
```
|
||||
|
||||
For multiple turns conversation:
|
||||
|
||||
```bash
|
||||
A chat between a curious human and an artificial intelligence assistant. The assistant gives helpful, detailed, and polite answers to the human's questions.###Human: <image>\n<prompt1>###Assistant: <answer1>###Human: <prompt2>###Assistant:
|
||||
```
|
||||
|
||||
The original code can be found [here](https://github.com/mu-cai/ViP-LLaVA).
|
||||
|
||||
This model was contributed by [Younes Belkada](https://huggingface.co/ybelkada)
|
||||
|
||||
|
||||
## VipLlavaConfig
|
||||
|
||||
|
||||
@ -93,33 +93,12 @@ from transformers import VitsTokenizer
|
||||
tokenizer = VitsTokenizer.from_pretrained("facebook/mms-tts-eng")
|
||||
print(tokenizer.is_uroman)
|
||||
```
|
||||
If the is_uroman attribute is `True`, the tokenizer will automatically apply the `uroman` package to your text inputs, but you need to install uroman if not already installed using:
|
||||
```
|
||||
pip install --upgrade uroman
|
||||
```
|
||||
Note: Python version required to use `uroman` as python package should be >= `3.10`.
|
||||
You can use the tokenizer as usual without any additional preprocessing steps:
|
||||
```python
|
||||
import torch
|
||||
from transformers import VitsTokenizer, VitsModel, set_seed
|
||||
import os
|
||||
import subprocess
|
||||
|
||||
tokenizer = VitsTokenizer.from_pretrained("facebook/mms-tts-kor")
|
||||
model = VitsModel.from_pretrained("facebook/mms-tts-kor")
|
||||
text = "이봐 무슨 일이야"
|
||||
inputs = tokenizer(text=text, return_tensors="pt")
|
||||
If required, you should apply the uroman package to your text inputs **prior** to passing them to the `VitsTokenizer`,
|
||||
since currently the tokenizer does not support performing the pre-processing itself.
|
||||
|
||||
set_seed(555) # make deterministic
|
||||
with torch.no_grad():
|
||||
outputs = model(inputs["input_ids"])
|
||||
|
||||
waveform = outputs.waveform[0]
|
||||
```
|
||||
If you don't want to upgrade to python >= `3.10`, then you can use the `uroman` perl package to pre-process the text inputs to the Roman alphabet.
|
||||
To do this, first clone the uroman repository to your local machine and set the bash variable `UROMAN` to the local path:
|
||||
|
||||
|
||||
```bash
|
||||
git clone https://github.com/isi-nlp/uroman.git
|
||||
cd uroman
|
||||
|
||||
@ -27,27 +27,6 @@ The abstract from the paper is the following:
|
||||
This model was contributed by [Arthur Zucker](https://huggingface.co/ArthurZ). The Tensorflow version of this model was contributed by [amyeroberts](https://huggingface.co/amyeroberts).
|
||||
The original code can be found [here](https://github.com/openai/whisper).
|
||||
|
||||
## Quick usage
|
||||
|
||||
You can run Whisper in less than 4 lines of code and transcribe in less than a minute!
|
||||
|
||||
```python
|
||||
# pip install transformers torch
|
||||
|
||||
import torch
|
||||
from transformers import pipeline
|
||||
|
||||
whisper = pipeline("automatic-speech-recognition", "openai/whisper-large-v3", torch_dtype=torch.float16, device="cuda:0")
|
||||
|
||||
transcription = whisper("<audio_file.mp3>")
|
||||
|
||||
print(transcription["text"])
|
||||
```
|
||||
|
||||
Voila! You can swap the model with any [Whisper checkpoints](https://huggingface.co/models?other=whisper&sort=downloads) on the Hugging Face Hub with the same pipeline based on your needs.
|
||||
|
||||
Bonus: You can replace `"cuda"` with `"mps"` to make it seamlessly work on Macs.
|
||||
|
||||
## Usage tips
|
||||
|
||||
- The model usually performs well without requiring any finetuning.
|
||||
@ -93,7 +72,7 @@ Here is a step-by-step guide to transcribing an audio sample using a pre-trained
|
||||
' Mr. Quilter is the apostle of the middle classes, and we are glad to welcome his gospel.'
|
||||
```
|
||||
|
||||
Whisper is compatible with the following optimisations for both short and long-form generation:
|
||||
Whisper is compatible with the following optimisations:
|
||||
- [PyTorch Scaled Dot Product Attention (SDPA)](../perf_infer_gpu_one#pytorch-scaled-dot-product-attention): flash attention and memory-efficient attention kernels. Enabled by default for `torch>=2.1.1`.
|
||||
- [Flash Attention 2](../perf_infer_gpu_one#flashattention-2): improved implementation of flash attention through better parallelism and work partitioning.
|
||||
- [torch.compile](../llm_optims#static-kv-cache-and-torchcompile): JIT-compile the forward pass to dispatch to efficient fused kernels.
|
||||
@ -122,8 +101,7 @@ As an example, the following codesnippet enables SDPA and `torch.compile` for up
|
||||
... ).input_features
|
||||
|
||||
>>> # Compile the forward pass
|
||||
>>> for _ in range(2):
|
||||
>>> model.generate(input_features)
|
||||
>>> _ = model.generate(input_features)
|
||||
|
||||
>>> # Generate token ids using compiled graph (fast!)
|
||||
>>> predicted_ids = model.generate(input_features)
|
||||
|
||||
@ -42,7 +42,7 @@ In total, we get 512 sequences each with length 512 and store them in a [`~datas
|
||||
>>> seq_len, dataset_size = 512, 512
|
||||
>>> dummy_data = {
|
||||
... "input_ids": np.random.randint(100, 30000, (dataset_size, seq_len)),
|
||||
... "labels": np.random.randint(0, 2, (dataset_size)),
|
||||
... "labels": np.random.randint(0, 1, (dataset_size)),
|
||||
... }
|
||||
>>> ds = Dataset.from_dict(dummy_data)
|
||||
>>> ds.set_format("pt")
|
||||
|
||||
@ -77,7 +77,7 @@ Then use `notebook_login` to sign-in to the Hub, and follow the link [here](http
|
||||
|
||||
To ensure your model can be used by someone working with a different framework, we recommend you convert and upload your model with both PyTorch and TensorFlow checkpoints. While users are still able to load your model from a different framework if you skip this step, it will be slower because 🤗 Transformers will need to convert the checkpoint on-the-fly.
|
||||
|
||||
Converting a checkpoint for another framework is easy. Make sure you have PyTorch and TensorFlow installed (see [here](installation) for installation instructions), and then find the specific model for your task in the other framework.
|
||||
Converting a checkpoint for another framework is easy. Make sure you have PyTorch and TensorFlow installed (see [here](installation) for installation instructions), and then find the specific model for your task in the other framework.
|
||||
|
||||
<frameworkcontent>
|
||||
<pt>
|
||||
|
||||
@ -39,8 +39,6 @@ FlashAttention-2 is experimental and may change considerably in future versions.
|
||||
FlashAttention-2 is currently supported for the following architectures:
|
||||
* [Bark](https://huggingface.co/docs/transformers/model_doc/bark#transformers.BarkModel)
|
||||
* [Bart](https://huggingface.co/docs/transformers/model_doc/bart#transformers.BartModel)
|
||||
* [Chameleon](https://huggingface.co/docs/transformers/model_doc/chameleon#transformers.Chameleon)
|
||||
* [CLIP](https://huggingface.co/docs/transformers/model_doc/clip#transformers.CLIPModel)
|
||||
* [Cohere](https://huggingface.co/docs/transformers/model_doc/cohere#transformers.CohereModel)
|
||||
* [Dbrx](https://huggingface.co/docs/transformers/model_doc/dbrx#transformers.DbrxModel)
|
||||
* [DistilBert](https://huggingface.co/docs/transformers/model_doc/distilbert#transformers.DistilBertModel)
|
||||
@ -51,7 +49,6 @@ FlashAttention-2 is currently supported for the following architectures:
|
||||
* [GPTNeo](https://huggingface.co/docs/transformers/model_doc/gpt_neo#transformers.GPTNeoModel)
|
||||
* [GPTNeoX](https://huggingface.co/docs/transformers/model_doc/gpt_neox#transformers.GPTNeoXModel)
|
||||
* [GPT-J](https://huggingface.co/docs/transformers/model_doc/gptj#transformers.GPTJModel)
|
||||
* [Granite](https://huggingface.co/docs/transformers/model_doc/granite#transformers.GraniteModel)
|
||||
* [Idefics2](https://huggingface.co/docs/transformers/model_doc/idefics2#transformers.Idefics2Model)
|
||||
* [Falcon](https://huggingface.co/docs/transformers/model_doc/falcon#transformers.FalconModel)
|
||||
* [JetMoe](https://huggingface.co/docs/transformers/model_doc/jetmoe#transformers.JetMoeModel)
|
||||
@ -60,7 +57,6 @@ FlashAttention-2 is currently supported for the following architectures:
|
||||
* [Llava](https://huggingface.co/docs/transformers/model_doc/llava)
|
||||
* [Llava-NeXT](https://huggingface.co/docs/transformers/model_doc/llava_next)
|
||||
* [Llava-NeXT-Video](https://huggingface.co/docs/transformers/model_doc/llava_next_video)
|
||||
* [LLaVA-Onevision](https://huggingface.co/docs/transformers/model_doc/llava_onevision)
|
||||
* [VipLlava](https://huggingface.co/docs/transformers/model_doc/vipllava)
|
||||
* [VideoLlava](https://huggingface.co/docs/transformers/model_doc/video_llava)
|
||||
* [M2M100](https://huggingface.co/docs/transformers/model_doc/m2m_100)
|
||||
@ -69,25 +65,21 @@ FlashAttention-2 is currently supported for the following architectures:
|
||||
* [Mixtral](https://huggingface.co/docs/transformers/model_doc/mixtral#transformers.MixtralModel)
|
||||
* [Musicgen](https://huggingface.co/docs/transformers/model_doc/musicgen#transformers.MusicgenModel)
|
||||
* [MusicGen Melody](https://huggingface.co/docs/transformers/model_doc/musicgen_melody#transformers.MusicgenMelodyModel)
|
||||
* [Nemotron](https://huggingface.co/docs/transformers/model_doc/nemotron)
|
||||
* [NLLB](https://huggingface.co/docs/transformers/model_doc/nllb)
|
||||
* [OLMo](https://huggingface.co/docs/transformers/model_doc/olmo#transformers.OlmoModel)
|
||||
* [OLMoE](https://huggingface.co/docs/transformers/model_doc/olmoe#transformers.OlmoeModel)
|
||||
* [OPT](https://huggingface.co/docs/transformers/model_doc/opt#transformers.OPTModel)
|
||||
* [Phi](https://huggingface.co/docs/transformers/model_doc/phi#transformers.PhiModel)
|
||||
* [Phi3](https://huggingface.co/docs/transformers/model_doc/phi3#transformers.Phi3Model)
|
||||
* [SigLIP](https://huggingface.co/docs/transformers/model_doc/siglip)
|
||||
* [StableLm](https://huggingface.co/docs/transformers/model_doc/stablelm#transformers.StableLmModel)
|
||||
* [Starcoder2](https://huggingface.co/docs/transformers/model_doc/starcoder2#transformers.Starcoder2Model)
|
||||
* [Qwen2](https://huggingface.co/docs/transformers/model_doc/qwen2#transformers.Qwen2Model)
|
||||
* [Qwen2Audio](https://huggingface.co/docs/transformers/model_doc/qwen2_audio#transformers.Qwen2AudioEncoder)
|
||||
* [Qwen2MoE](https://huggingface.co/docs/transformers/model_doc/qwen2_moe#transformers.Qwen2MoeModel)
|
||||
* [Qwen2VL](https://huggingface.co/docs/transformers/model_doc/qwen2_vl#transformers.Qwen2VLModel)
|
||||
* [Whisper](https://huggingface.co/docs/transformers/model_doc/whisper#transformers.WhisperModel)
|
||||
* [Wav2Vec2](https://huggingface.co/docs/transformers/model_doc/wav2vec2#transformers.Wav2Vec2Model)
|
||||
* [Hubert](https://huggingface.co/docs/transformers/model_doc/hubert#transformers.HubertModel)
|
||||
* [data2vec_audio](https://huggingface.co/docs/transformers/main/en/model_doc/data2vec#transformers.Data2VecAudioModel)
|
||||
* [Sew](https://huggingface.co/docs/transformers/main/en/model_doc/sew#transformers.SEWModel)
|
||||
* [SigLIP](https://huggingface.co/docs/transformers/model_doc/siglip)
|
||||
* [UniSpeech](https://huggingface.co/docs/transformers/v4.39.3/en/model_doc/unispeech#transformers.UniSpeechModel)
|
||||
* [unispeech_sat](https://huggingface.co/docs/transformers/v4.39.3/en/model_doc/unispeech-sat#transformers.UniSpeechSatModel)
|
||||
|
||||
@ -203,15 +195,10 @@ FlashAttention is more memory efficient, meaning you can train on much larger se
|
||||
PyTorch's [`torch.nn.functional.scaled_dot_product_attention`](https://pytorch.org/docs/master/generated/torch.nn.functional.scaled_dot_product_attention.html) (SDPA) can also call FlashAttention and memory-efficient attention kernels under the hood. SDPA support is currently being added natively in Transformers and is used by default for `torch>=2.1.1` when an implementation is available. You may also set `attn_implementation="sdpa"` in `from_pretrained()` to explicitly request SDPA to be used.
|
||||
|
||||
For now, Transformers supports SDPA inference and training for the following architectures:
|
||||
* [Albert](https://huggingface.co/docs/transformers/model_doc/albert#transformers.AlbertModel)
|
||||
* [Audio Spectrogram Transformer](https://huggingface.co/docs/transformers/model_doc/audio-spectrogram-transformer#transformers.ASTModel)
|
||||
* [Bart](https://huggingface.co/docs/transformers/model_doc/bart#transformers.BartModel)
|
||||
* [Bert](https://huggingface.co/docs/transformers/model_doc/bert#transformers.BertModel)
|
||||
* [CamemBERT](https://huggingface.co/docs/transformers/model_doc/camembert#transformers.CamembertModel)
|
||||
* [Chameleon](https://huggingface.co/docs/transformers/model_doc/chameleon#transformers.Chameleon)
|
||||
* [CLIP](https://huggingface.co/docs/transformers/model_doc/clip#transformers.CLIPModel)
|
||||
* [Cohere](https://huggingface.co/docs/transformers/model_doc/cohere#transformers.CohereModel)
|
||||
* [data2vec_audio](https://huggingface.co/docs/transformers/main/en/model_doc/data2vec#transformers.Data2VecAudioModel)
|
||||
* [Dbrx](https://huggingface.co/docs/transformers/model_doc/dbrx#transformers.DbrxModel)
|
||||
* [DeiT](https://huggingface.co/docs/transformers/model_doc/deit#transformers.DeiTModel)
|
||||
* [Dpr](https://huggingface.co/docs/transformers/model_doc/dpr#transformers.DprReader)
|
||||
@ -221,22 +208,12 @@ For now, Transformers supports SDPA inference and training for the following arc
|
||||
* [GPT2](https://huggingface.co/docs/transformers/model_doc/gpt2)
|
||||
* [GPTBigCode](https://huggingface.co/docs/transformers/model_doc/gpt_bigcode#transformers.GPTBigCodeModel)
|
||||
* [GPTNeoX](https://huggingface.co/docs/transformers/model_doc/gpt_neox#transformers.GPTNeoXModel)
|
||||
* [Hubert](https://huggingface.co/docs/transformers/model_doc/hubert#transformers.HubertModel)
|
||||
* [Idefics](https://huggingface.co/docs/transformers/model_doc/idefics#transformers.IdeficsModel)
|
||||
* [Granite](https://huggingface.co/docs/transformers/model_doc/granite#transformers.GraniteModel)
|
||||
* [JetMoe](https://huggingface.co/docs/transformers/model_doc/jetmoe#transformers.JetMoeModel)
|
||||
* [Jamba](https://huggingface.co/docs/transformers/model_doc/jamba#transformers.JambaModel)
|
||||
* [Llama](https://huggingface.co/docs/transformers/model_doc/llama#transformers.LlamaModel)
|
||||
* [LLaVA-Onevision](https://huggingface.co/docs/transformers/model_doc/llava_onevision)
|
||||
* [Mistral](https://huggingface.co/docs/transformers/model_doc/mistral#transformers.MistralModel)
|
||||
* [Mixtral](https://huggingface.co/docs/transformers/model_doc/mixtral#transformers.MixtralModel)
|
||||
* [Musicgen](https://huggingface.co/docs/transformers/model_doc/musicgen#transformers.MusicgenModel)
|
||||
* [MusicGen Melody](https://huggingface.co/docs/transformers/model_doc/musicgen_melody#transformers.MusicgenMelodyModel)
|
||||
* [OLMo](https://huggingface.co/docs/transformers/model_doc/olmo#transformers.OlmoModel)
|
||||
* [OLMoE](https://huggingface.co/docs/transformers/model_doc/olmoe#transformers.OlmoeModel)
|
||||
* [PaliGemma](https://huggingface.co/docs/transformers/model_doc/paligemma#transformers.PaliGemmaForConditionalGeneration)
|
||||
* [Phi](https://huggingface.co/docs/transformers/model_doc/phi#transformers.PhiModel)
|
||||
* [Phi3](https://huggingface.co/docs/transformers/model_doc/phi3#transformers.Phi3Model)
|
||||
* [Idefics](https://huggingface.co/docs/transformers/model_doc/idefics#transformers.IdeficsModel)
|
||||
* [Whisper](https://huggingface.co/docs/transformers/model_doc/whisper#transformers.WhisperModel)
|
||||
* [Mistral](https://huggingface.co/docs/transformers/model_doc/mistral#transformers.MistralModel)
|
||||
@ -244,29 +221,21 @@ For now, Transformers supports SDPA inference and training for the following arc
|
||||
* [StableLm](https://huggingface.co/docs/transformers/model_doc/stablelm#transformers.StableLmModel)
|
||||
* [Starcoder2](https://huggingface.co/docs/transformers/model_doc/starcoder2#transformers.Starcoder2Model)
|
||||
* [Qwen2](https://huggingface.co/docs/transformers/model_doc/qwen2#transformers.Qwen2Model)
|
||||
* [Qwen2Audio](https://huggingface.co/docs/transformers/model_doc/qwen2_audio#transformers.Qwen2AudioEncoder)
|
||||
* [Qwen2MoE](https://huggingface.co/docs/transformers/model_doc/qwen2_moe#transformers.Qwen2MoeModel)
|
||||
* [RoBERTa](https://huggingface.co/docs/transformers/model_doc/roberta#transformers.RobertaModel)
|
||||
* [Sew](https://huggingface.co/docs/transformers/main/en/model_doc/sew#transformers.SEWModel)
|
||||
* [SigLIP](https://huggingface.co/docs/transformers/model_doc/siglip)
|
||||
* [StableLm](https://huggingface.co/docs/transformers/model_doc/stablelm#transformers.StableLmModel)
|
||||
* [Starcoder2](https://huggingface.co/docs/transformers/model_doc/starcoder2#transformers.Starcoder2Model)
|
||||
* [UniSpeech](https://huggingface.co/docs/transformers/v4.39.3/en/model_doc/unispeech#transformers.UniSpeechModel)
|
||||
* [unispeech_sat](https://huggingface.co/docs/transformers/v4.39.3/en/model_doc/unispeech-sat#transformers.UniSpeechSatModel)
|
||||
* [RoBERTa](https://huggingface.co/docs/transformers/model_doc/roberta#transformers.RobertaModel)
|
||||
* [Qwen2VL](https://huggingface.co/docs/transformers/model_doc/qwen2_vl#transformers.Qwen2VLModel)
|
||||
* [Musicgen](https://huggingface.co/docs/transformers/model_doc/musicgen#transformers.MusicgenModel)
|
||||
* [MusicGen Melody](https://huggingface.co/docs/transformers/model_doc/musicgen_melody#transformers.MusicgenMelodyModel)
|
||||
* [Nemotron](https://huggingface.co/docs/transformers/model_doc/nemotron)
|
||||
* [ViT](https://huggingface.co/docs/transformers/model_doc/vit#transformers.ViTModel)
|
||||
* [ViTHybrid](https://huggingface.co/docs/transformers/model_doc/vit_hybrid#transformers.ViTHybridModel)
|
||||
* [ViTMAE](https://huggingface.co/docs/transformers/model_doc/vit_mae#transformers.ViTMAEModel)
|
||||
* [ViTMSN](https://huggingface.co/docs/transformers/model_doc/vit_msn#transformers.ViTMSNModel)
|
||||
* [VideoMAE](https://huggingface.co/docs/transformers/model_doc/videomae#transformers.VideoMAEModell)
|
||||
* [wav2vec2](https://huggingface.co/docs/transformers/model_doc/wav2vec2#transformers.Wav2Vec2Model)
|
||||
* [Whisper](https://huggingface.co/docs/transformers/model_doc/whisper#transformers.WhisperModel)
|
||||
* [XLM-RoBERTa](https://huggingface.co/docs/transformers/model_doc/xlm-roberta#transformers.XLMRobertaModel)
|
||||
* [XLM-RoBERTa-XL](https://huggingface.co/docs/transformers/model_doc/xlm-roberta-xl#transformers.XLMRobertaXLModel)
|
||||
* [Hubert](https://huggingface.co/docs/transformers/model_doc/hubert#transformers.HubertModel)
|
||||
* [data2vec_audio](https://huggingface.co/docs/transformers/main/en/model_doc/data2vec#transformers.Data2VecAudioModel)
|
||||
* [SigLIP](https://huggingface.co/docs/transformers/model_doc/siglip)
|
||||
* [Sew](https://huggingface.co/docs/transformers/main/en/model_doc/sew#transformers.SEWModel)
|
||||
* [UniSpeech](https://huggingface.co/docs/transformers/v4.39.3/en/model_doc/unispeech#transformers.UniSpeechModel)
|
||||
* [unispeech_sat](https://huggingface.co/docs/transformers/v4.39.3/en/model_doc/unispeech-sat#transformers.UniSpeechSatModel)
|
||||
* [YOLOS](https://huggingface.co/docs/transformers/model_doc/yolos#transformers.YolosModel)
|
||||
|
||||
|
||||
|
||||
@ -98,7 +98,7 @@ Below you can find the list of the models we benchmarked.
|
||||
- [google/vit-base-patch16-224](https://huggingface.co/google/vit-base-patch16-224)
|
||||
- [microsoft/beit-base-patch16-224-pt22k-ft22k](https://huggingface.co/microsoft/beit-base-patch16-224-pt22k-ft22k)
|
||||
- [facebook/convnext-large-224](https://huggingface.co/facebook/convnext-large-224)
|
||||
- [microsoft/resnet-50](https://huggingface.co/microsoft/resnet-50)
|
||||
- [microsoft/resnet-50](https://huggingface.co/)
|
||||
|
||||
**Image Segmentation**
|
||||
- [nvidia/segformer-b0-finetuned-ade-512-512](https://huggingface.co/nvidia/segformer-b0-finetuned-ade-512-512)
|
||||
|
||||
@ -155,20 +155,13 @@ This example assumes that you have:
|
||||
The snippet below is an example of a Dockerfile that uses a base image that supports distributed CPU training and then
|
||||
extracts a Transformers release to the `/workspace` directory, so that the example scripts are included in the image:
|
||||
```dockerfile
|
||||
FROM intel/intel-optimized-pytorch:2.3.0-pip-multinode
|
||||
|
||||
RUN apt-get update -y && \
|
||||
apt-get install -y --no-install-recommends --fix-missing \
|
||||
google-perftools \
|
||||
libomp-dev
|
||||
FROM intel/ai-workflows:torch-2.0.1-huggingface-multinode-py3.9
|
||||
|
||||
WORKDIR /workspace
|
||||
|
||||
# Download and extract the transformers code
|
||||
ARG HF_TRANSFORMERS_VER="4.44.0"
|
||||
RUN pip install --no-cache-dir \
|
||||
transformers==${HF_TRANSFORMERS_VER} && \
|
||||
mkdir transformers && \
|
||||
ARG HF_TRANSFORMERS_VER="4.35.2"
|
||||
RUN mkdir transformers && \
|
||||
curl -sSL --retry 5 https://github.com/huggingface/transformers/archive/refs/tags/v${HF_TRANSFORMERS_VER}.tar.gz | tar -C transformers --strip-components=1 -xzf -
|
||||
```
|
||||
The image needs to be built and copied to the cluster's nodes or pushed to a container registry prior to deploying the
|
||||
@ -196,6 +189,7 @@ apiVersion: "kubeflow.org/v1"
|
||||
kind: PyTorchJob
|
||||
metadata:
|
||||
name: transformers-pytorchjob
|
||||
namespace: kubeflow
|
||||
spec:
|
||||
elasticPolicy:
|
||||
rdzvBackend: c10d
|
||||
@ -212,27 +206,32 @@ spec:
|
||||
- name: pytorch
|
||||
image: <image name>:<tag> # Specify the docker image to use for the worker pods
|
||||
imagePullPolicy: IfNotPresent
|
||||
command: ["/bin/bash", "-c"]
|
||||
args:
|
||||
- >-
|
||||
cd /workspace/transformers;
|
||||
pip install -r /workspace/transformers/examples/pytorch/question-answering/requirements.txt;
|
||||
source /usr/local/lib/python3.10/dist-packages/oneccl_bindings_for_pytorch/env/setvars.sh;
|
||||
torchrun /workspace/transformers/examples/pytorch/question-answering/run_qa.py \
|
||||
--model_name_or_path distilbert/distilbert-base-uncased \
|
||||
--dataset_name squad \
|
||||
--do_train \
|
||||
--do_eval \
|
||||
--per_device_train_batch_size 12 \
|
||||
--learning_rate 3e-5 \
|
||||
--num_train_epochs 2 \
|
||||
--max_seq_length 384 \
|
||||
--doc_stride 128 \
|
||||
--output_dir /tmp/pvc-mount/output_$(date +%Y%m%d_%H%M%S) \
|
||||
--no_cuda \
|
||||
--ddp_backend ccl \
|
||||
--bf16 \
|
||||
--use_ipex;
|
||||
command:
|
||||
- torchrun
|
||||
- /workspace/transformers/examples/pytorch/question-answering/run_qa.py
|
||||
- --model_name_or_path
|
||||
- "google-bert/bert-large-uncased"
|
||||
- --dataset_name
|
||||
- "squad"
|
||||
- --do_train
|
||||
- --do_eval
|
||||
- --per_device_train_batch_size
|
||||
- "12"
|
||||
- --learning_rate
|
||||
- "3e-5"
|
||||
- --num_train_epochs
|
||||
- "2"
|
||||
- --max_seq_length
|
||||
- "384"
|
||||
- --doc_stride
|
||||
- "128"
|
||||
- --output_dir
|
||||
- "/tmp/pvc-mount/output"
|
||||
- --no_cuda
|
||||
- --ddp_backend
|
||||
- "ccl"
|
||||
- --use_ipex
|
||||
- --bf16 # Specify --bf16 if your hardware supports bfloat16
|
||||
env:
|
||||
- name: LD_PRELOAD
|
||||
value: "/usr/lib/x86_64-linux-gnu/libtcmalloc.so.4.5.9:/usr/local/lib/libiomp5.so"
|
||||
@ -245,13 +244,13 @@ spec:
|
||||
- name: CCL_WORKER_COUNT
|
||||
value: "1"
|
||||
- name: OMP_NUM_THREADS # Can be tuned for optimal performance
|
||||
value: "240"
|
||||
- value: "56"
|
||||
resources:
|
||||
limits:
|
||||
cpu: 240 # Update the CPU and memory limit values based on your nodes
|
||||
cpu: 200 # Update the CPU and memory limit values based on your nodes
|
||||
memory: 128Gi
|
||||
requests:
|
||||
cpu: 240 # Update the CPU and memory request values based on your nodes
|
||||
cpu: 200 # Update the CPU and memory request values based on your nodes
|
||||
memory: 128Gi
|
||||
volumeMounts:
|
||||
- name: pvc-volume
|
||||
@ -259,8 +258,8 @@ spec:
|
||||
- mountPath: /dev/shm
|
||||
name: dshm
|
||||
restartPolicy: Never
|
||||
nodeSelector: # Optionally use nodeSelector to match a certain node label for the worker pods
|
||||
node-type: gnr
|
||||
nodeSelector: # Optionally use the node selector to specify what types of nodes to use for the workers
|
||||
node-type: spr
|
||||
volumes:
|
||||
- name: pvc-volume
|
||||
persistentVolumeClaim:
|
||||
@ -288,12 +287,10 @@ set the same CPU and memory amounts for both the resource limits and requests.
|
||||
After the PyTorchJob spec has been updated with values appropriate for your cluster and training job, it can be deployed
|
||||
to the cluster using:
|
||||
```bash
|
||||
export NAMESPACE=<specify your namespace>
|
||||
|
||||
kubectl create -f pytorchjob.yaml -n ${NAMESPACE}
|
||||
kubectl create -f pytorchjob.yaml
|
||||
```
|
||||
|
||||
The `kubectl get pods -n ${NAMESPACE}` command can then be used to list the pods in your namespace. You should see
|
||||
The `kubectl get pods -n kubeflow` command can then be used to list the pods in the `kubeflow` namespace. You should see
|
||||
the worker pods for the PyTorchJob that was just deployed. At first, they will probably have a status of "Pending" as
|
||||
the containers get pulled and created, then the status should change to "Running".
|
||||
```
|
||||
@ -306,13 +303,13 @@ transformers-pytorchjob-worker-3 1/1 Running
|
||||
...
|
||||
```
|
||||
|
||||
The logs for worker can be viewed using `kubectl logs <pod name> -n ${NAMESPACE}`. Add `-f` to stream the logs, for example:
|
||||
The logs for worker can be viewed using `kubectl logs -n kubeflow <pod name>`. Add `-f` to stream the logs, for example:
|
||||
```bash
|
||||
kubectl logs transformers-pytorchjob-worker-0 -n ${NAMESPACE} -f
|
||||
kubectl logs -n kubeflow transformers-pytorchjob-worker-0 -f
|
||||
```
|
||||
|
||||
After the training job completes, the trained model can be copied from the PVC or storage location. When you are done
|
||||
with the job, the PyTorchJob resource can be deleted from the cluster using `kubectl delete -f pytorchjob.yaml -n ${NAMESPACE}`.
|
||||
with the job, the PyTorchJob resource can be deleted from the cluster using `kubectl delete -f pytorchjob.yaml`.
|
||||
|
||||
## Summary
|
||||
|
||||
|
||||
@ -54,7 +54,7 @@ speech-to-text.
|
||||
Not the result you had in mind? Check out some of the [most downloaded automatic speech recognition models](https://huggingface.co/models?pipeline_tag=automatic-speech-recognition&sort=trending)
|
||||
on the Hub to see if you can get a better transcription.
|
||||
|
||||
Let's try the [Whisper large-v2](https://huggingface.co/openai/whisper-large-v2) model from OpenAI. Whisper was released
|
||||
Let's try the [Whisper large-v2](https://huggingface.co/openai/whisper-large) model from OpenAI. Whisper was released
|
||||
2 years later than Wav2Vec2, and was trained on close to 10x more data. As such, it beats Wav2Vec2 on most downstream
|
||||
benchmarks. It also has the added benefit of predicting punctuation and casing, neither of which are possible with
|
||||
Wav2Vec2.
|
||||
|
||||
@ -1,58 +0,0 @@
|
||||
<!--Copyright 2024 The HuggingFace Team. All rights reserved.
|
||||
|
||||
Licensed under the Apache License, Version 2.0 (the "License"); you may not use this file except in compliance with
|
||||
the License. You may obtain a copy of the License at
|
||||
|
||||
http://www.apache.org/licenses/LICENSE-2.0
|
||||
|
||||
Unless required by applicable law or agreed to in writing, software distributed under the License is distributed on
|
||||
an "AS IS" BASIS, WITHOUT WARRANTIES OR CONDITIONS OF ANY KIND, either express or implied. See the License for the
|
||||
specific language governing permissions and limitations under the License.
|
||||
|
||||
⚠️ Note that this file is in Markdown but contain specific syntax for our doc-builder (similar to MDX) that may not be
|
||||
rendered properly in your Markdown viewer.
|
||||
|
||||
-->
|
||||
|
||||
# FBGEMM FP8
|
||||
|
||||
With FBGEMM FP8 quantization method, you can quantize your model in FP8 (W8A8):
|
||||
- the weights will be quantized in 8bit (FP8) per channel
|
||||
- the activation will be quantized in 8bit (FP8) per token
|
||||
|
||||
It relies on the [FBGEMM](https://github.com/pytorch/FBGEMM) library which provides efficient low-precision general matrix multiplication for small batch sizes and support for accuracy-loss minimizing techniques such as row-wise quantization and outlier-aware quantization.
|
||||
|
||||
> [!TIP]
|
||||
> You need a GPU with compute capability>=9 (e.g. H100)
|
||||
|
||||
Before you begin, make sure the following libraries are installed with their latest version:
|
||||
|
||||
```bash
|
||||
pip install --upgrade accelerate fbgemm-gpu torch
|
||||
```
|
||||
|
||||
If you are having issues with fbgemm-gpu and torch library, you might need to install the nighlty release. You can follow the instruction [here](https://pytorch.org/FBGEMM/fbgemm_gpu-development/InstallationInstructions.html#fbgemm-gpu-install-libraries:~:text=found%20here.-,Install%20the%20FBGEMM_GPU%20Package,-Install%20through%20PyTorch)
|
||||
|
||||
|
||||
```py
|
||||
from transformers import FbgemmFp8Config, AutoModelForCausalLM, AutoTokenizer
|
||||
|
||||
model_name = "meta-llama/Meta-Llama-3-8B"
|
||||
quantization_config = FbgemmFp8Config()
|
||||
quantized_model = AutoModelForCausalLM.from_pretrained(model_name, device_map="auto", quantization_config=quantization_config)
|
||||
|
||||
tokenizer = AutoTokenizer.from_pretrained(model_name)
|
||||
input_text = "What are we having for dinner?"
|
||||
input_ids = tokenizer(input_text, return_tensors="pt").to("cuda")
|
||||
|
||||
output = quantized_model.generate(**input_ids, max_new_tokens=10)
|
||||
print(tokenizer.decode(output[0], skip_special_tokens=True))
|
||||
```
|
||||
|
||||
A quantized model can be saved via "saved_pretrained" and be reused again via the "from_pretrained".
|
||||
|
||||
```py
|
||||
quant_path = "/path/to/save/quantized/model"
|
||||
model.save_pretrained(quant_path)
|
||||
model = AutoModelForCausalLM.from_pretrained(quant_path, device_map="auto")
|
||||
```
|
||||
@ -55,5 +55,4 @@ Use the table below to help you decide which quantization method to use.
|
||||
| [GPTQ](./gptq) | 🔴 | 🔴 | 🟢 | 🟢 | 🔴 | 🔴 | 2 - 3 - 4 - 8 | 🟢 | 🟢 | 🟢 | https://github.com/AutoGPTQ/AutoGPTQ |
|
||||
| [HQQ](./hqq) | 🟢 | 🟢 | 🟢 | 🔴 | 🔴 | 🟢 | 1 - 8 | 🟢 | 🔴 | 🟢 | https://github.com/mobiusml/hqq/ |
|
||||
| [Quanto](./quanto) | 🟢 | 🟢 | 🟢 | 🔴 | 🟢 | 🟢 | 2 / 4 / 8 | 🔴 | 🔴 | 🟢 | https://github.com/huggingface/quanto |
|
||||
| [FBGEMM_FP8](./fbgemm_fp8.md) | 🟢 | 🔴 | 🟢 | 🔴 | 🔴 | 🔴 | 8 | 🔴 | 🟢 | 🟢 | https://github.com/pytorch/FBGEMM |
|
||||
| [torchao](./torchao.md) | 🟢 | | 🟢 | 🔴 | partial support (int4 weight only) | | 4 / 8 | | 🟢🔴 | 🟢 | https://github.com/pytorch/ao |
|
||||
|
||||
|
||||
@ -1,45 +0,0 @@
|
||||
<!--Copyright 2024 The HuggingFace Team. All rights reserved.
|
||||
Licensed under the Apache License, Version 2.0 (the "License"); you may not use this file except in compliance with
|
||||
the License. You may obtain a copy of the License at
|
||||
http://www.apache.org/licenses/LICENSE-2.0
|
||||
Unless required by applicable law or agreed to in writing, software distributed under the License is distributed on
|
||||
an "AS IS" BASIS, WITHOUT WARRANTIES OR CONDITIONS OF ANY KIND, either express or implied. See the License for the
|
||||
specific language governing permissions and limitations under the License.
|
||||
⚠️ Note that this file is in Markdown but contain specific syntax for our doc-builder (similar to MDX) that may not be
|
||||
rendered properly in your Markdown viewer.
|
||||
-->
|
||||
|
||||
# TorchAO
|
||||
|
||||
[TorchAO](https://github.com/pytorch/ao) is an architecture optimization library for PyTorch, it provides high performance dtypes, optimization techniques and kernels for inference and training, featuring composability with native PyTorch features like `torch.compile`, FSDP etc.. Some benchmark numbers can be found [here](https://github.com/pytorch/ao/tree/main?tab=readme-ov-file#without-intrusive-code-changes)
|
||||
|
||||
Before you begin, make sure the following libraries are installed with their latest version:
|
||||
|
||||
```bash
|
||||
pip install --upgrade torch torchao
|
||||
```
|
||||
|
||||
|
||||
```py
|
||||
from transformers import TorchAoConfig, AutoModelForCausalLM, AutoTokenizer
|
||||
|
||||
model_name = "meta-llama/Meta-Llama-3-8B"
|
||||
# We support int4_weight_only, int8_weight_only and int8_dynamic_activation_int8_weight
|
||||
# More examples and documentations for arguments can be found in https://github.com/pytorch/ao/tree/main/torchao/quantization#other-available-quantization-techniques
|
||||
quantization_config = TorchAoConfig("int4_weight_only", group_size=128)
|
||||
quantized_model = AutoModelForCausalLM.from_pretrained(model_name, device_map="auto", quantization_config=quantization_config)
|
||||
|
||||
tokenizer = AutoTokenizer.from_pretrained(model_name)
|
||||
input_text = "What are we having for dinner?"
|
||||
input_ids = tokenizer(input_text, return_tensors="pt").to("cuda")
|
||||
|
||||
# compile the quantizd model to get speedup
|
||||
import torchao
|
||||
torchao.quantization.utils.recommended_inductor_config_setter()
|
||||
quantized_model = torch.compile(quantized_model, mode="max-autotune")
|
||||
|
||||
output = quantized_model.generate(**input_ids, max_new_tokens=10)
|
||||
print(tokenizer.decode(output[0], skip_special_tokens=True))
|
||||
```
|
||||
|
||||
torchao quantization is implemented with tensor subclasses, currently it does not work with huggingface serialization, both the safetensor option and [non-safetensor option](https://github.com/huggingface/transformers/issues/32364), we'll update here with instructions when it's working.
|
||||
@ -1,232 +0,0 @@
|
||||
<!--Copyright 2024 The HuggingFace Team. All rights reserved.
|
||||
|
||||
Licensed under the Apache License, Version 2.0 (the "License"); you may not use this file except in compliance with
|
||||
the License. You may obtain a copy of the License at
|
||||
|
||||
http://www.apache.org/licenses/LICENSE-2.0
|
||||
|
||||
Unless required by applicable law or agreed to in writing, software distributed under the License is distributed on
|
||||
an "AS IS" BASIS, WITHOUT WARRANTIES OR CONDITIONS OF ANY KIND, either express or implied. See the License for the
|
||||
specific language governing permissions and limitations under the License.
|
||||
|
||||
⚠️ Note that this file is in Markdown but contain specific syntax for our doc-builder (similar to MDX) that may not be
|
||||
rendered properly in your Markdown viewer.
|
||||
|
||||
-->
|
||||
|
||||
# Image-text-to-text
|
||||
|
||||
[[open-in-colab]]
|
||||
|
||||
Image-text-to-text models, also known as vision language models (VLMs), are language models that take an image input. These models can tackle various tasks, from visual question answering to image segmentation. This task shares many similarities with image-to-text, but with some overlapping use cases like image captioning. Image-to-text models only take image inputs and often accomplish a specific task, whereas VLMs take open-ended text and image inputs and are more generalist models.
|
||||
|
||||
In this guide, we provide a brief overview of VLMs and show how to use them with Transformers for inference.
|
||||
|
||||
To begin with, there are multiple types of VLMs:
|
||||
- base models used for fine-tuning
|
||||
- chat fine-tuned models for conversation
|
||||
- instruction fine-tuned models
|
||||
|
||||
This guide focuses on inference with an instruction-tuned model.
|
||||
|
||||
Let's begin installing the dependencies.
|
||||
|
||||
```bash
|
||||
pip install -q transformers accelerate flash_attn
|
||||
```
|
||||
|
||||
Let's initialize the model and the processor.
|
||||
|
||||
```python
|
||||
from transformers import AutoProcessor, Idefics2ForConditionalGeneration
|
||||
import torch
|
||||
|
||||
device = torch.device("cuda")
|
||||
model = Idefics2ForConditionalGeneration.from_pretrained(
|
||||
"HuggingFaceM4/idefics2-8b",
|
||||
torch_dtype=torch.bfloat16,
|
||||
attn_implementation="flash_attention_2",
|
||||
).to(device)
|
||||
|
||||
processor = AutoProcessor.from_pretrained("HuggingFaceM4/idefics2-8b")
|
||||
```
|
||||
|
||||
This model has a [chat template](./chat_templating) that helps user parse chat outputs. Moreover, the model can also accept multiple images as input in a single conversation or message. We will now prepare the inputs.
|
||||
|
||||
The image inputs look like the following.
|
||||
|
||||
<div class="flex justify-center">
|
||||
<img src="https://huggingface.co/datasets/huggingface/documentation-images/resolve/main/cats.png" alt="Two cats sitting on a net"/>
|
||||
</div>
|
||||
|
||||
<div class="flex justify-center">
|
||||
<img src="https://huggingface.co/datasets/huggingface/documentation-images/resolve/main/bee.jpg" alt="A bee on a pink flower"/>
|
||||
</div>
|
||||
|
||||
|
||||
```python
|
||||
from PIL import Image
|
||||
import requests
|
||||
|
||||
img_urls =["https://huggingface.co/datasets/huggingface/documentation-images/resolve/main/cats.png",
|
||||
"https://huggingface.co/datasets/huggingface/documentation-images/resolve/main/bee.jpg"]
|
||||
images = [Image.open(requests.get(img_urls[0], stream=True).raw),
|
||||
Image.open(requests.get(img_urls[1], stream=True).raw)]
|
||||
```
|
||||
|
||||
Below is an example of the chat template. We can feed conversation turns and the last message as an input by appending it at the end of the template.
|
||||
|
||||
|
||||
```python
|
||||
messages = [
|
||||
{
|
||||
"role": "user",
|
||||
"content": [
|
||||
{"type": "image"},
|
||||
{"type": "text", "text": "What do we see in this image?"},
|
||||
]
|
||||
},
|
||||
{
|
||||
"role": "assistant",
|
||||
"content": [
|
||||
{"type": "text", "text": "In this image we can see two cats on the nets."},
|
||||
]
|
||||
},
|
||||
{
|
||||
"role": "user",
|
||||
"content": [
|
||||
{"type": "image"},
|
||||
{"type": "text", "text": "And how about this image?"},
|
||||
]
|
||||
},
|
||||
]
|
||||
```
|
||||
|
||||
We will now call the processors' [`~ProcessorMixin.apply_chat_template`] method to preprocess its output along with the image inputs.
|
||||
|
||||
```python
|
||||
prompt = processor.apply_chat_template(messages, add_generation_prompt=True)
|
||||
inputs = processor(text=prompt, images=[images[0], images[1]], return_tensors="pt").to(device)
|
||||
```
|
||||
|
||||
We can now pass the preprocessed inputs to the model.
|
||||
|
||||
```python
|
||||
with torch.no_grad():
|
||||
generated_ids = model.generate(**inputs, max_new_tokens=500)
|
||||
generated_texts = processor.batch_decode(generated_ids, skip_special_tokens=True)
|
||||
|
||||
print(generated_texts)
|
||||
## ['User: What do we see in this image? \nAssistant: In this image we can see two cats on the nets. \nUser: And how about this image? \nAssistant: In this image we can see flowers, plants and insect.']
|
||||
```
|
||||
|
||||
## Streaming
|
||||
|
||||
We can use [text streaming](./generation_strategies#streaming) for a better generation experience. Transformers supports streaming with the [`TextStreamer`] or [`TextIteratorStreamer`] classes. We will use the [`TextIteratorStreamer`] with IDEFICS-8B.
|
||||
|
||||
Assume we have an application that keeps chat history and takes in the new user input. We will preprocess the inputs as usual and initialize [`TextIteratorStreamer`] to handle the generation in a separate thread. This allows you to stream the generated text tokens in real-time. Any generation arguments can be passed to [`TextIteratorStreamer`].
|
||||
|
||||
|
||||
```python
|
||||
import time
|
||||
from transformers import TextIteratorStreamer
|
||||
from threading import Thread
|
||||
|
||||
def model_inference(
|
||||
user_prompt,
|
||||
chat_history,
|
||||
max_new_tokens,
|
||||
images
|
||||
):
|
||||
user_prompt = {
|
||||
"role": "user",
|
||||
"content": [
|
||||
{"type": "image"},
|
||||
{"type": "text", "text": user_prompt},
|
||||
]
|
||||
}
|
||||
chat_history.append(user_prompt)
|
||||
streamer = TextIteratorStreamer(
|
||||
processor.tokenizer,
|
||||
skip_prompt=True,
|
||||
timeout=5.0,
|
||||
)
|
||||
|
||||
generation_args = {
|
||||
"max_new_tokens": max_new_tokens,
|
||||
"streamer": streamer,
|
||||
"do_sample": False
|
||||
}
|
||||
|
||||
# add_generation_prompt=True makes model generate bot response
|
||||
prompt = processor.apply_chat_template(chat_history, add_generation_prompt=True)
|
||||
inputs = processor(
|
||||
text=prompt,
|
||||
images=images,
|
||||
return_tensors="pt",
|
||||
).to(device)
|
||||
generation_args.update(inputs)
|
||||
|
||||
thread = Thread(
|
||||
target=model.generate,
|
||||
kwargs=generation_args,
|
||||
)
|
||||
thread.start()
|
||||
|
||||
acc_text = ""
|
||||
for text_token in streamer:
|
||||
time.sleep(0.04)
|
||||
acc_text += text_token
|
||||
if acc_text.endswith("<end_of_utterance>"):
|
||||
acc_text = acc_text[:-18]
|
||||
yield acc_text
|
||||
|
||||
thread.join()
|
||||
```
|
||||
|
||||
Now let's call the `model_inference` function we created and stream the values.
|
||||
|
||||
```python
|
||||
generator = model_inference(
|
||||
user_prompt="And what is in this image?",
|
||||
chat_history=messages,
|
||||
max_new_tokens=100,
|
||||
images=images
|
||||
)
|
||||
|
||||
for value in generator:
|
||||
print(value)
|
||||
|
||||
# In
|
||||
# In this
|
||||
# In this image ...
|
||||
```
|
||||
|
||||
## Fit models in smaller hardware
|
||||
|
||||
VLMs are often large and need to be optimized to fit in smaller hardware. Transformers supports many model quantization libraries, and here we will only show int8 quantization with [Quanto](./quantization/quanto#quanto). int8 quantization offers memory improvements up to 75 percent (if all weights are quantized). However it is no free lunch, since 8-bit is not a CUDA-native precision, the weights are quantized back and forth on the fly, which adds up to latency.
|
||||
|
||||
First, install dependencies.
|
||||
|
||||
```bash
|
||||
pip install -U quanto bitsandbytes
|
||||
```
|
||||
|
||||
To quantize a model during loading, we need to first create [`QuantoConfig`]. Then load the model as usual, but pass `quantization_config` during model initialization.
|
||||
|
||||
```python
|
||||
from transformers import Idefics2ForConditionalGeneration, AutoTokenizer, QuantoConfig
|
||||
|
||||
model_id = "HuggingFaceM4/idefics2-8b"
|
||||
quantization_config = QuantoConfig(weights="int8")
|
||||
quantized_model = Idefics2ForConditionalGeneration.from_pretrained(model_id, device_map="cuda", quantization_config=quantization_config)
|
||||
```
|
||||
|
||||
And that's it, we can use the model the same way with no changes.
|
||||
|
||||
## Further Reading
|
||||
|
||||
Here are some more resources for the image-text-to-text task.
|
||||
|
||||
- [Image-text-to-text task page](https://huggingface.co/tasks/image-text-to-text) covers model types, use cases, datasets, and more.
|
||||
- [Vision Language Models Explained](https://huggingface.co/blog/vlms) is a blog post that covers everything about vision language models and supervised fine-tuning using [TRL](https://huggingface.co/docs/trl/en/index).
|
||||
@ -90,7 +90,7 @@ The next step is to load a T5 tokenizer to process the English-French language p
|
||||
The preprocessing function you want to create needs to:
|
||||
|
||||
1. Prefix the input with a prompt so T5 knows this is a translation task. Some models capable of multiple NLP tasks require prompting for specific tasks.
|
||||
2. Set the target language (French) in the `text_target` parameter to ensure the tokenizer processes the target text correctly. If you don't set `text_target`, the tokenizer processes the target text as English.
|
||||
2. Tokenize the input (English) and target (French) separately because you can't tokenize French text with a tokenizer pretrained on an English vocabulary.
|
||||
3. Truncate sequences to be no longer than the maximum length set by the `max_length` parameter.
|
||||
|
||||
```py
|
||||
|
||||
@ -1,146 +0,0 @@
|
||||
<!--Copyright 2024 The HuggingFace Team. All rights reserved.
|
||||
|
||||
Licensed under the Apache License, Version 2.0 (the "License"); you may not use this file except in compliance with
|
||||
the License. You may obtain a copy of the License at
|
||||
|
||||
http://www.apache.org/licenses/LICENSE-2.0
|
||||
|
||||
Unless required by applicable law or agreed to in writing, software distributed under the License is distributed on
|
||||
an "AS IS" BASIS, WITHOUT WARRANTIES OR CONDITIONS OF ANY KIND, either express or implied. See the License for the
|
||||
specific language governing permissions and limitations under the License.
|
||||
|
||||
⚠️ Note that this file is in Markdown but contain specific syntax for our doc-builder (similar to MDX) that may not be
|
||||
rendered properly in your Markdown viewer.
|
||||
|
||||
-->
|
||||
|
||||
# Video-text-to-text
|
||||
|
||||
[[open-in-colab]]
|
||||
|
||||
Video-text-to-text models, also known as video language models or vision language models with video input, are language models that take a video input. These models can tackle various tasks, from video question answering to video captioning.
|
||||
|
||||
These models have nearly the same architecture as [image-text-to-text](../image_text_to_text.md) models except for some changes to accept video data, since video data is essentially image frames with temporal dependencies. Some image-text-to-text models take in multiple images, but this alone is inadequate for a model to accept videos. Moreover, video-text-to-text models are often trained with all vision modalities. Each example might have videos, multiple videos, images and multiple images. Some of these models can also take interleaved inputs. For example, you can refer to a specific video inside a string of text by adding a video token in text like "What is happening in this video? `<video>`".
|
||||
|
||||
In this guide, we provide a brief overview of video LMs and show how to use them with Transformers for inference.
|
||||
|
||||
To begin with, there are multiple types of video LMs:
|
||||
- base models used for fine-tuning
|
||||
- chat fine-tuned models for conversation
|
||||
- instruction fine-tuned models
|
||||
|
||||
This guide focuses on inference with an instruction-tuned model, [llava-hf/llava-interleave-qwen-7b-hf](https://huggingface.co/llava-hf/llava-interleave-qwen-7b-hf) which can take in interleaved data. Alternatively, you can try [llava-interleave-qwen-0.5b-hf](https://huggingface.co/llava-hf/llava-interleave-qwen-0.5b-hf) if your hardware doesn't allow running a 7B model.
|
||||
|
||||
Let's begin installing the dependencies.
|
||||
|
||||
```bash
|
||||
pip install -q transformers accelerate flash_attn
|
||||
```
|
||||
|
||||
Let's initialize the model and the processor.
|
||||
|
||||
```python
|
||||
from transformers import LlavaProcessor, LlavaForConditionalGeneration
|
||||
import torch
|
||||
model_id = "llava-hf/llava-interleave-qwen-0.5b-hf"
|
||||
|
||||
processor = LlavaProcessor.from_pretrained(model_id)
|
||||
|
||||
model = LlavaForConditionalGeneration.from_pretrained(model_id, torch_dtype=torch.float16)
|
||||
model.to("cuda")
|
||||
```
|
||||
|
||||
Some models directly consume the `<video>` token, and others accept `<image>` tokens equal to the number of sampled frames. This model handles videos in the latter fashion. We will write a simple utility to handle image tokens, and another utility to get a video from a url and sample frames from it.
|
||||
|
||||
```python
|
||||
import uuid
|
||||
import requests
|
||||
import cv2
|
||||
|
||||
def replace_video_with_images(text, frames):
|
||||
return text.replace("<video>", "<image>" * frames)
|
||||
|
||||
def sample_frames(url, num_frames):
|
||||
|
||||
response = requests.get(url)
|
||||
path_id = str(uuid.uuid4())
|
||||
|
||||
path = f"./{path_id}.mp4"
|
||||
|
||||
with open(path, "wb") as f:
|
||||
f.write(response.content)
|
||||
|
||||
video = cv2.VideoCapture(path)
|
||||
total_frames = int(video.get(cv2.CAP_PROP_FRAME_COUNT))
|
||||
interval = total_frames // num_frames
|
||||
frames = []
|
||||
for i in range(total_frames):
|
||||
ret, frame = video.read()
|
||||
pil_img = Image.fromarray(cv2.cvtColor(frame, cv2.COLOR_BGR2RGB))
|
||||
if not ret:
|
||||
continue
|
||||
if i % interval == 0:
|
||||
frames.append(pil_img)
|
||||
video.release()
|
||||
return frames
|
||||
```
|
||||
|
||||
Let's get our inputs. We will sample frames and concatenate them.
|
||||
|
||||
```python
|
||||
video_1 = "https://huggingface.co/spaces/merve/llava-interleave/resolve/main/cats_1.mp4"
|
||||
video_2 = "https://huggingface.co/spaces/merve/llava-interleave/resolve/main/cats_2.mp4"
|
||||
|
||||
video_1 = sample_frames(video_1, 6)
|
||||
video_2 = sample_frames(video_2, 6)
|
||||
|
||||
videos = video_1 + video_2
|
||||
|
||||
videos
|
||||
|
||||
# [<PIL.Image.Image image mode=RGB size=1920x1080>,
|
||||
# <PIL.Image.Image image mode=RGB size=1920x1080>,
|
||||
# <PIL.Image.Image image mode=RGB size=1920x1080>, ...]
|
||||
```
|
||||
|
||||
Both videos have cats.
|
||||
|
||||
<div class="container">
|
||||
<div class="video-container">
|
||||
<video width="400" controls>
|
||||
<source src="https://huggingface.co/spaces/merve/llava-interleave/resolve/main/cats_1.mp4" type="video/mp4">
|
||||
</video>
|
||||
</div>
|
||||
|
||||
<div class="video-container">
|
||||
<video width="400" controls>
|
||||
<source src="https://huggingface.co/spaces/merve/llava-interleave/resolve/main/cats_2.mp4" type="video/mp4">
|
||||
</video>
|
||||
</div>
|
||||
</div>
|
||||
|
||||
Now we can preprocess the inputs.
|
||||
|
||||
This model has a prompt template that looks like following. First, we'll put all the sampled frames into one list. Since we have eight frames in each video, we will insert 12 `<image>` tokens to our prompt. Add `assistant` at the end of the prompt to trigger the model to give answers. Then we can preprocess.
|
||||
|
||||
```python
|
||||
user_prompt = "Are these two cats in these two videos doing the same thing?"
|
||||
toks = "<image>" * 12
|
||||
prompt = "<|im_start|>user"+ toks + f"\n{user_prompt}<|im_end|><|im_start|>assistant"
|
||||
inputs = processor(prompt, images=videos).to(model.device, model.dtype)
|
||||
```
|
||||
|
||||
We can now call [`~GenerationMixin.generate`] for inference. The model outputs the question in our input and answer, so we only take the text after the prompt and `assistant` part from the model output.
|
||||
|
||||
```python
|
||||
output = model.generate(**inputs, max_new_tokens=100, do_sample=False)
|
||||
print(processor.decode(output[0][2:], skip_special_tokens=True)[len(user_prompt)+10:])
|
||||
|
||||
# The first cat is shown in a relaxed state, with its eyes closed and a content expression, while the second cat is shown in a more active state, with its mouth open wide, possibly in a yawn or a vocalization.
|
||||
|
||||
|
||||
```
|
||||
|
||||
And voila!
|
||||
|
||||
To learn more about chat templates and token streaming for video-text-to-text models, refer to the [image-text-to-text](../image_text_to_text) task guide because these models work similarly.
|
||||
@ -191,7 +191,7 @@ RUN_SLOW=1 pytest -m accelerate_tests tests/models/opt/test_modeling_opt.py
|
||||
### Run documentation tests
|
||||
|
||||
In order to test whether the documentation examples are correct, you should check that the `doctests` are passing.
|
||||
As an example, let's use [`WhisperModel.forward`'s docstring](https://github.com/huggingface/transformers/blob/1124d95dbb1a3512d3e80791d73d0f541d1d7e9f/src/transformers/models/whisper/modeling_whisper.py#L1591-L1609)
|
||||
As an example, let's use [`WhisperModel.forward`'s docstring](https://github.com/huggingface/transformers/blob/main/src/transformers/models/whisper/modeling_whisper.py#L1017-L1035):
|
||||
|
||||
```python
|
||||
r"""
|
||||
|
||||
@ -157,7 +157,7 @@ Execution time -- 79.0 ms
|
||||
|
||||
Execution time -- 78.9 ms
|
||||
```
|
||||
The first call to `xla_generate()` is time-consuming because of tracing, but the successive calls are orders of magnitude faster. Keep in mind that any change in the generation options at any point will trigger re-tracing and thus leading to slow-downs in the generation time.
|
||||
The first call to `xla_generate()` is time-consuming because of tracing, but the successive calls are orders of magnitude faster. Keep in mind that any change in the generation options at any point with trigger re-tracing and thus leading to slow-downs in the generation time.
|
||||
|
||||
We didn’t cover all the text generation options 🤗 Transformers provides in this document. We encourage you to read the documentation for advanced use cases.
|
||||
|
||||
@ -171,4 +171,4 @@ Here, we leave you with some additional resources if you want to delve deeper in
|
||||
* Recommended posts for learning more about XLA and TensorFlow graphs in general:
|
||||
* [XLA: Optimizing Compiler for Machine Learning](https://www.tensorflow.org/xla)
|
||||
* [Introduction to graphs and tf.function](https://www.tensorflow.org/guide/intro_to_graphs)
|
||||
* [Better performance with tf.function](https://www.tensorflow.org/guide/function)
|
||||
* [Better performance with tf.function](https://www.tensorflow.org/guide/function)
|
||||
@ -278,7 +278,7 @@ args = TrainingArguments(
|
||||
max_steps=100,
|
||||
per_device_train_batch_size=2,
|
||||
optim="galore_adamw",
|
||||
optim_target_modules=[r".*.attn.*", r".*.mlp.*"]
|
||||
optim_target_modules=["attn", "mlp"]
|
||||
)
|
||||
|
||||
model_id = "google/gemma-2b"
|
||||
@ -315,7 +315,7 @@ args = TrainingArguments(
|
||||
max_steps=100,
|
||||
per_device_train_batch_size=2,
|
||||
optim="galore_adamw",
|
||||
optim_target_modules=[r".*.attn.*", r".*.mlp.*"],
|
||||
optim_target_modules=["attn", "mlp"],
|
||||
optim_args="rank=64, update_proj_gap=100, scale=0.10",
|
||||
)
|
||||
|
||||
@ -359,7 +359,7 @@ args = TrainingArguments(
|
||||
max_steps=100,
|
||||
per_device_train_batch_size=2,
|
||||
optim="galore_adamw_layerwise",
|
||||
optim_target_modules=[r".*.attn.*", r".*.mlp.*"]
|
||||
optim_target_modules=["attn", "mlp"]
|
||||
)
|
||||
|
||||
model_id = "google/gemma-2b"
|
||||
@ -382,41 +382,6 @@ trainer.train()
|
||||
|
||||
Note layerwise optimization is a bit experimental and does not support DDP (Distributed Data Parallel), thus you can run the training script only on a single GPU. Please see [this appropriate section](https://github.com/jiaweizzhao/GaLore?tab=readme-ov-file#train-7b-model-with-a-single-gpu-with-24gb-memory) for more details. Other features such as gradient clipping, DeepSpeed, etc might not be supported out of the box. Please [raise an issue on GitHub](https://github.com/huggingface/transformers/issues) if you encounter such issue.
|
||||
|
||||
## Liger Kernel
|
||||
|
||||
[Liger-Kernel](https://github.com/linkedin/Liger-Kernel) Kernel is a collection of Triton kernels developed by Linkedin designed specifically for LLM training. We have implemented Hugging Face Compatible RMSNorm, RoPE, SwiGLU, CrossEntropy, FusedLinearCrossEntropy, and more to come. It can effectively increase multi-GPU training throughput by 20% and reduces memory usage by 60%. The kernel works out of the box with flash attention, PyTorch FSDP, and Microsoft DeepSpeed.
|
||||
|
||||
<Tip>
|
||||
Gain +20% throughput and reduce memory usage by 60% on LLaMA 3-8B model training. Achieve longer context lengths and larger batch sizes. It’s also useful if you want to scale up your model to multi-head training or large vocabulary sizes. Unleash multi-head training (medusa) and more. See details and examples in [Liger](https://github.com/linkedin/Liger-Kernel/tree/main/examples)
|
||||
</Tip>
|
||||
|
||||
First make sure to install Liger official repository:
|
||||
```bash
|
||||
pip install liger-kernel
|
||||
```
|
||||
|
||||
You should pass `use_liger_kernel=True` to apply liger kernel on your model, for example:
|
||||
|
||||
```py
|
||||
from transformers import TrainingArguments
|
||||
|
||||
training_args = TrainingArguments(
|
||||
output_dir="your-model",
|
||||
learning_rate=2e-5,
|
||||
per_device_train_batch_size=16,
|
||||
per_device_eval_batch_size=16,
|
||||
num_train_epochs=2,
|
||||
weight_decay=0.01,
|
||||
eval_strategy="epoch",
|
||||
save_strategy="epoch",
|
||||
load_best_model_at_end=True,
|
||||
push_to_hub=True,
|
||||
use_liger_kernel=True
|
||||
)
|
||||
```
|
||||
|
||||
The kernel supports the Llama, Gemma, Mistral, and Mixtral model architectures. The most up-to-date list of supported models can be found [here](https://github.com/linkedin/Liger-Kernel). When `use_liger_kernel` is set to `True`, the corresponding layers in the original model will be patched with Liger's efficient implementation, so you don't need to do anything extra other than setting the argument value.
|
||||
|
||||
## LOMO optimizer
|
||||
|
||||
The LOMO optimizers have been introduced in [Full Parameter Fine-Tuning for Large Language Models with Limited Resources](https://hf.co/papers/2306.09782) and [AdaLomo: Low-memory Optimization with Adaptive Learning Rate](https://hf.co/papers/2310.10195).
|
||||
@ -467,57 +432,6 @@ trainer = trl.SFTTrainer(
|
||||
trainer.train()
|
||||
```
|
||||
|
||||
## GrokAdamW optimizer
|
||||
|
||||
The GrokAdamW optimizer is designed to enhance training performance and stability, particularly for models that benefit from grokking signal functions. To use GrokAdamW, first install the optimizer package with `pip install grokadamw`.
|
||||
|
||||
<Tip>
|
||||
|
||||
GrokAdamW is particularly useful for models that require advanced optimization techniques to achieve better performance and stability.
|
||||
|
||||
</Tip>
|
||||
|
||||
Below is a simple script to demonstrate how to fine-tune [google/gemma-2b](https://huggingface.co/google/gemma-2b) on the IMDB dataset using the GrokAdamW optimizer:
|
||||
|
||||
```python
|
||||
import torch
|
||||
import datasets
|
||||
from transformers import TrainingArguments, AutoTokenizer, AutoModelForCausalLM, Trainer
|
||||
|
||||
# Load the IMDB dataset
|
||||
train_dataset = datasets.load_dataset('imdb', split='train')
|
||||
|
||||
# Define the training arguments
|
||||
args = TrainingArguments(
|
||||
output_dir="./test-grokadamw",
|
||||
max_steps=1000,
|
||||
per_device_train_batch_size=4,
|
||||
optim="grokadamw",
|
||||
logging_strategy="steps",
|
||||
logging_steps=1,
|
||||
learning_rate=2e-5,
|
||||
save_strategy="no",
|
||||
run_name="grokadamw-imdb",
|
||||
)
|
||||
|
||||
# Load the model and tokenizer
|
||||
model_id = "google/gemma-2b"
|
||||
tokenizer = AutoTokenizer.from_pretrained(model_id)
|
||||
model = AutoModelForCausalLM.from_pretrained(model_id, low_cpu_mem_usage=True).to(0)
|
||||
|
||||
# Initialize the Trainer
|
||||
trainer = Trainer(
|
||||
model=model,
|
||||
args=args,
|
||||
train_dataset=train_dataset,
|
||||
)
|
||||
|
||||
# Train the model
|
||||
trainer.train()
|
||||
```
|
||||
|
||||
This script demonstrates how to fine-tune the `google/gemma-2b` model on the IMDB dataset using the GrokAdamW optimizer. The `TrainingArguments` are configured to use GrokAdamW, and the dataset is passed to the `Trainer` for training.
|
||||
|
||||
## Accelerate and Trainer
|
||||
|
||||
The [`Trainer`] class is powered by [Accelerate](https://hf.co/docs/accelerate), a library for easily training PyTorch models in distributed environments with support for integrations such as [FullyShardedDataParallel (FSDP)](https://pytorch.org/blog/introducing-pytorch-fully-sharded-data-parallel-api/) and [DeepSpeed](https://www.deepspeed.ai/).
|
||||
|
||||
@ -220,7 +220,7 @@ La plantilla de chat para un modelo se almacena en el atributo `tokenizer.chat_t
|
||||
>>> from transformers import AutoTokenizer
|
||||
>>> tokenizer = AutoTokenizer.from_pretrained("facebook/blenderbot-400M-distill")
|
||||
|
||||
>>> tokenizer.chat_template
|
||||
>>> tokenizer.default_chat_template
|
||||
"{% for message in messages %}{% if message['role'] == 'user' %}{{ ' ' }}{% endif %}{{ message['content'] }}{% if not loop.last %}{{ ' ' }}{% endif %}{% endfor %}{{ eos_token }}"
|
||||
```
|
||||
|
||||
@ -307,6 +307,12 @@ Si estás ajustando finamente un modelo para chat, además de establecer una pla
|
||||
|
||||
</Tip>
|
||||
|
||||
### ¿Qué son las plantillas "default"?
|
||||
|
||||
Antes de la introducción de las plantillas de chat, el manejo del chat estaba codificado en el nivel de la clase del modelo. Por razones de compatibilidad con versiones anteriores, hemos conservado este manejo específico de la clase como plantillas predeterminadas, también establecidas a nivel de clase. Si un modelo no tiene una plantilla de chat establecida, pero hay una plantilla predeterminada para su clase de modelo, la clase `TextGenerationPipeline` y métodos como `apply_chat_template` usarán la plantilla de clase en su lugar. Puedes averiguar cuál es la plantilla predeterminada para tu tokenizador comprobando el atributo `tokenizer.default_chat_template`.
|
||||
|
||||
Esto es algo que hacemos puramente por razones de compatibilidad con versiones anteriores, para evitar romper cualquier flujo de trabajo existente. Incluso cuando la plantilla de clase es apropiada para tu modelo, recomendamos encarecidamente anular la plantilla predeterminada estableciendo explícitamente el atributo `chat_template` para dejar claro a los usuarios que tu modelo ha sido configurado correctamente para el chat, y para estar preparados para el futuro en caso de que las plantillas predeterminadas alguna vez se alteren o se eliminen.
|
||||
|
||||
### ¿Qué plantilla debería usar?
|
||||
|
||||
Cuando establezcas la plantilla para un modelo que ya ha sido entrenado para chat, debes asegurarte de que la plantilla coincida exactamente con el formato de mensajes que el modelo vio durante el entrenamiento, o de lo contrario es probable que experimentes degradación del rendimiento. Esto es cierto incluso si estás entrenando aún más el modelo; probablemente obtendrás el mejor rendimiento si mantienes constantes los tokens de chat. Esto es muy análogo a la tokenización: generalmente obtienes el mejor rendimiento para la inferencia o el ajuste fino cuando coincides precisamente con la tokenización utilizada durante el entrenamiento.
|
||||
|
||||
@ -173,7 +173,7 @@ class ResnetModelForImageClassification(PreTrainedModel):
|
||||
def forward(self, tensor, labels=None):
|
||||
logits = self.model(tensor)
|
||||
if labels is not None:
|
||||
loss = torch.nn.functional.cross_entropy(logits, labels)
|
||||
loss = torch.nn.cross_entropy(logits, labels)
|
||||
return {"loss": loss, "logits": logits}
|
||||
return {"logits": logits}
|
||||
```
|
||||
|
||||
@ -174,7 +174,7 @@ class ResnetModelForImageClassification(PreTrainedModel):
|
||||
def forward(self, tensor, labels=None):
|
||||
logits = self.model(tensor)
|
||||
if labels is not None:
|
||||
loss = torch.nn.functional.cross_entropy(logits, labels)
|
||||
loss = torch.nn.cross_entropy(logits, labels)
|
||||
return {"loss": loss, "logits": logits}
|
||||
return {"logits": logits}
|
||||
```
|
||||
|
||||
@ -14,7 +14,7 @@ rendered properly in your Markdown viewer.
|
||||
|
||||
-->
|
||||
|
||||
# Chat Templates
|
||||
# Templates for Chat Models
|
||||
|
||||
## Introduction
|
||||
|
||||
@ -85,7 +85,7 @@ LLM(Language Model)のますます一般的な使用事例の1つは「チ
|
||||
>>> from transformers import AutoTokenizer
|
||||
>>> tokenizer = AutoTokenizer.from_pretrained("facebook/blenderbot-400M-distill")
|
||||
|
||||
>>> tokenizer.chat_template
|
||||
>>> tokenizer.default_chat_template
|
||||
"{% for message in messages %}{% if message['role'] == 'user' %}{{ ' ' }}{% endif %}{{ message['content'] }}{% if not loop.last %}{{ ' ' }}{% endif %}{% endfor %}{{ eos_token }}"
|
||||
```
|
||||
|
||||
|
||||
@ -161,7 +161,7 @@ class ResnetModelForImageClassification(PreTrainedModel):
|
||||
def forward(self, tensor, labels=None):
|
||||
logits = self.model(tensor)
|
||||
if labels is not None:
|
||||
loss = torch.nn.functional.cross_entropy(logits, labels)
|
||||
loss = torch.nn.cross_entropy(logits, labels)
|
||||
return {"loss": loss, "logits": logits}
|
||||
return {"logits": logits}
|
||||
```
|
||||
|
||||
@ -139,6 +139,9 @@ generation_output[:2]
|
||||
[[autodoc]] ForcedEOSTokenLogitsProcessor
|
||||
- __call__
|
||||
|
||||
[[autodoc]] ForceTokensLogitsProcessor
|
||||
- __call__
|
||||
|
||||
[[autodoc]] HammingDiversityLogitsProcessor
|
||||
- __call__
|
||||
|
||||
@ -154,6 +157,9 @@ generation_output[:2]
|
||||
[[autodoc]] LogitsProcessorList
|
||||
- __call__
|
||||
|
||||
[[autodoc]] LogitsWarper
|
||||
- __call__
|
||||
|
||||
[[autodoc]] MinLengthLogitsProcessor
|
||||
- __call__
|
||||
|
||||
|
||||
Some files were not shown because too many files have changed in this diff Show More
Reference in New Issue
Block a user