mirror of
https://github.com/huggingface/transformers.git
synced 2025-10-21 17:48:57 +08:00
Compare commits
1 Commits
agents-cou
...
fix_test_e
| Author | SHA1 | Date | |
|---|---|---|---|
| 6cfb1ee448 |
@ -34,44 +34,64 @@ jobs:
|
||||
- run: echo 'export "GIT_COMMIT_MESSAGE=$(git show -s --format=%s)"' >> "$BASH_ENV" && source "$BASH_ENV"
|
||||
- run: mkdir -p test_preparation
|
||||
- run: python utils/tests_fetcher.py | tee tests_fetched_summary.txt
|
||||
- store_artifacts:
|
||||
path: ~/transformers/tests_fetched_summary.txt
|
||||
- run: |
|
||||
if [ -f test_list.txt ]; then
|
||||
cp test_list.txt test_preparation/test_list.txt
|
||||
else
|
||||
touch test_preparation/test_list.txt
|
||||
fi
|
||||
- run: |
|
||||
if [ -f examples_test_list.txt ]; then
|
||||
mv examples_test_list.txt test_preparation/examples_test_list.txt
|
||||
else
|
||||
touch test_preparation/examples_test_list.txt
|
||||
fi
|
||||
- run: |
|
||||
if [ -f filtered_test_list_cross_tests.txt ]; then
|
||||
mv filtered_test_list_cross_tests.txt test_preparation/filtered_test_list_cross_tests.txt
|
||||
else
|
||||
touch test_preparation/filtered_test_list_cross_tests.txt
|
||||
fi
|
||||
- run: |
|
||||
if [ -f doctest_list.txt ]; then
|
||||
cp doctest_list.txt test_preparation/doctest_list.txt
|
||||
else
|
||||
touch test_preparation/doctest_list.txt
|
||||
fi
|
||||
- run: |
|
||||
if [ -f test_repo_utils.txt ]; then
|
||||
mv test_repo_utils.txt test_preparation/test_repo_utils.txt
|
||||
else
|
||||
touch test_preparation/test_repo_utils.txt
|
||||
fi
|
||||
- run: python utils/tests_fetcher.py --filter_tests
|
||||
- run: |
|
||||
if [ -f test_list.txt ]; then
|
||||
mv test_list.txt test_preparation/filtered_test_list.txt
|
||||
else
|
||||
touch test_preparation/filtered_test_list.txt
|
||||
fi
|
||||
- store_artifacts:
|
||||
path: test_preparation/test_list.txt
|
||||
- store_artifacts:
|
||||
path: test_preparation/doctest_list.txt
|
||||
- store_artifacts:
|
||||
path: ~/transformers/test_preparation/filtered_test_list.txt
|
||||
- store_artifacts:
|
||||
path: test_preparation/examples_test_list.txt
|
||||
- run: export "GIT_COMMIT_MESSAGE=$(git show -s --format=%s)" && echo $GIT_COMMIT_MESSAGE && python .circleci/create_circleci_config.py --fetcher_folder test_preparation
|
||||
- run: |
|
||||
if [ ! -s test_preparation/generated_config.yml ]; then
|
||||
echo "No tests to run, exiting early!"
|
||||
circleci-agent step halt
|
||||
fi
|
||||
|
||||
if [ ! -s test_preparation/generated_config.yml ]; then
|
||||
echo "No tests to run, exiting early!"
|
||||
circleci-agent step halt
|
||||
fi
|
||||
- store_artifacts:
|
||||
path: test_preparation
|
||||
|
||||
- run:
|
||||
name: "Retrieve Artifact Paths"
|
||||
env:
|
||||
CIRCLE_TOKEN: ${{ secrets.CI_ARTIFACT_TOKEN }}
|
||||
command: |
|
||||
project_slug="gh/${CIRCLE_PROJECT_USERNAME}/${CIRCLE_PROJECT_REPONAME}"
|
||||
job_number=${CIRCLE_BUILD_NUM}
|
||||
url="https://circleci.com/api/v2/project/${project_slug}/${job_number}/artifacts"
|
||||
curl -o test_preparation/artifacts.json ${url}
|
||||
- run:
|
||||
name: "Prepare pipeline parameters"
|
||||
command: |
|
||||
python utils/process_test_artifacts.py
|
||||
|
||||
# To avoid too long generated_config.yaml on the continuation orb, we pass the links to the artifacts as parameters.
|
||||
# Otherwise the list of tests was just too big. Explicit is good but for that it was a limitation.
|
||||
# We used:
|
||||
|
||||
# https://circleci.com/docs/api/v2/index.html#operation/getJobArtifacts : to get the job artifacts
|
||||
# We could not pass a nested dict, which is why we create the test_file_... parameters for every single job
|
||||
|
||||
path: test_preparation/generated_config.yml
|
||||
- store_artifacts:
|
||||
path: test_preparation/transformed_artifacts.json
|
||||
- store_artifacts:
|
||||
path: test_preparation/artifacts.json
|
||||
path: test_preparation/filtered_test_list_cross_tests.txt
|
||||
- continuation/continue:
|
||||
parameters: test_preparation/transformed_artifacts.json
|
||||
configuration_path: test_preparation/generated_config.yml
|
||||
|
||||
# To run all tests for the nightly build
|
||||
@ -122,7 +142,6 @@ jobs:
|
||||
- run: python utils/custom_init_isort.py --check_only
|
||||
- run: python utils/sort_auto_mappings.py --check_only
|
||||
- run: python utils/check_doc_toc.py
|
||||
- run: python utils/check_docstrings.py --check_all
|
||||
|
||||
check_repository_consistency:
|
||||
working_directory: ~/transformers
|
||||
@ -171,4 +190,4 @@ workflows:
|
||||
- check_circleci_user
|
||||
- check_code_quality
|
||||
- check_repository_consistency
|
||||
- fetch_all_tests
|
||||
- fetch_all_tests
|
||||
@ -32,7 +32,7 @@ COMMON_ENV_VARIABLES = {
|
||||
"RUN_PT_FLAX_CROSS_TESTS": False,
|
||||
}
|
||||
# Disable the use of {"s": None} as the output is way too long, causing the navigation on CircleCI impractical
|
||||
COMMON_PYTEST_OPTIONS = {"max-worker-restart": 0, "dist": "loadfile", "vvv": None, "rsf":None}
|
||||
COMMON_PYTEST_OPTIONS = {"max-worker-restart": 0, "dist": "loadfile", "v": None}
|
||||
DEFAULT_DOCKER_IMAGE = [{"image": "cimg/python:3.8.12"}]
|
||||
|
||||
|
||||
@ -50,15 +50,16 @@ class EmptyJob:
|
||||
class CircleCIJob:
|
||||
name: str
|
||||
additional_env: Dict[str, Any] = None
|
||||
cache_name: str = None
|
||||
cache_version: str = "0.8.2"
|
||||
docker_image: List[Dict[str, str]] = None
|
||||
install_steps: List[str] = None
|
||||
marker: Optional[str] = None
|
||||
parallelism: Optional[int] = 0
|
||||
parallelism: Optional[int] = 1
|
||||
pytest_num_workers: int = 12
|
||||
pytest_options: Dict[str, Any] = None
|
||||
resource_class: Optional[str] = "2xlarge"
|
||||
tests_to_run: Optional[List[str]] = None
|
||||
num_test_files_per_worker: Optional[int] = 10
|
||||
# This should be only used for doctest job!
|
||||
command_timeout: Optional[int] = None
|
||||
|
||||
@ -66,6 +67,8 @@ class CircleCIJob:
|
||||
# Deal with defaults for mutable attributes.
|
||||
if self.additional_env is None:
|
||||
self.additional_env = {}
|
||||
if self.cache_name is None:
|
||||
self.cache_name = self.name
|
||||
if self.docker_image is None:
|
||||
# Let's avoid changing the default list and make a copy.
|
||||
self.docker_image = copy.deepcopy(DEFAULT_DOCKER_IMAGE)
|
||||
@ -76,96 +79,155 @@ class CircleCIJob:
|
||||
self.docker_image[0]["image"] = f"{self.docker_image[0]['image']}:dev"
|
||||
print(f"Using {self.docker_image} docker image")
|
||||
if self.install_steps is None:
|
||||
self.install_steps = ["uv venv && uv pip install ."]
|
||||
self.install_steps = []
|
||||
if self.pytest_options is None:
|
||||
self.pytest_options = {}
|
||||
if isinstance(self.tests_to_run, str):
|
||||
self.tests_to_run = [self.tests_to_run]
|
||||
else:
|
||||
test_file = os.path.join("test_preparation" , f"{self.job_name}_test_list.txt")
|
||||
print("Looking for ", test_file)
|
||||
if os.path.exists(test_file):
|
||||
with open(test_file) as f:
|
||||
expanded_tests = f.read().strip().split("\n")
|
||||
self.tests_to_run = expanded_tests
|
||||
print("Found:", expanded_tests)
|
||||
else:
|
||||
self.tests_to_run = []
|
||||
print("not Found")
|
||||
if self.parallelism is None:
|
||||
self.parallelism = 1
|
||||
|
||||
def to_dict(self):
|
||||
env = COMMON_ENV_VARIABLES.copy()
|
||||
env.update(self.additional_env)
|
||||
|
||||
cache_branch_prefix = os.environ.get("CIRCLE_BRANCH", "pull")
|
||||
if cache_branch_prefix != "main":
|
||||
cache_branch_prefix = "pull"
|
||||
|
||||
job = {
|
||||
"docker": self.docker_image,
|
||||
"environment": env,
|
||||
}
|
||||
if self.resource_class is not None:
|
||||
job["resource_class"] = self.resource_class
|
||||
if self.parallelism is not None:
|
||||
job["parallelism"] = self.parallelism
|
||||
steps = [
|
||||
"checkout",
|
||||
{"attach_workspace": {"at": "test_preparation"}},
|
||||
]
|
||||
steps.extend([{"run": l} for l in self.install_steps])
|
||||
steps.append({"run": {"name": "Show installed libraries and their size", "command": """du -h -d 1 "$(pip -V | cut -d ' ' -f 4 | sed 's/pip//g')" | grep -vE "dist-info|_distutils_hack|__pycache__" | sort -h | tee installed.txt || true"""}})
|
||||
steps.append({"run": {"name": "Show installed libraries and their versions", "command": """pip list --format=freeze | tee installed.txt || true"""}})
|
||||
|
||||
steps.append({"run":{"name":"Show biggest libraries","command":"""dpkg-query --show --showformat='${Installed-Size}\t${Package}\n' | sort -rh | head -25 | sort -h | awk '{ package=$2; sub(".*/", "", package); printf("%.5f GB %s\n", $1/1024/1024, package)}' || true"""}})
|
||||
steps.append({"store_artifacts": {"path": "installed.txt"}})
|
||||
|
||||
all_options = {**COMMON_PYTEST_OPTIONS, **self.pytest_options}
|
||||
pytest_flags = [f"--{key}={value}" if (value is not None or key in ["doctest-modules"]) else f"-{key}" for key, value in all_options.items()]
|
||||
pytest_flags.append(
|
||||
f"--make-reports={self.name}" if "examples" in self.name else f"--make-reports=tests_{self.name}"
|
||||
)
|
||||
# Examples special case: we need to download NLTK files in advance to avoid cuncurrency issues
|
||||
timeout_cmd = f"timeout {self.command_timeout} " if self.command_timeout else ""
|
||||
marker_cmd = f"-m '{self.marker}'" if self.marker is not None else ""
|
||||
additional_flags = f" -p no:warning -o junit_family=xunit1 --junitxml=test-results/junit.xml"
|
||||
parallel = f' << pipeline.parameters.{self.job_name}_parallelism >> '
|
||||
steps = [
|
||||
"checkout",
|
||||
{"attach_workspace": {"at": "test_preparation"}},
|
||||
{"run": "apt-get update && apt-get install -y curl"},
|
||||
{"run": " && ".join(self.install_steps)},
|
||||
{"run": {"name": "Download NLTK files", "command": """python -c "import nltk; nltk.download('punkt', quiet=True)" """} if "example" in self.name else "echo Skipping"},
|
||||
{"run": {
|
||||
"name": "Show installed libraries and their size",
|
||||
"command": """du -h -d 1 "$(pip -V | cut -d ' ' -f 4 | sed 's/pip//g')" | grep -vE "dist-info|_distutils_hack|__pycache__" | sort -h | tee installed.txt || true"""}
|
||||
},
|
||||
{"run": {
|
||||
"name": "Show installed libraries and their versions",
|
||||
"command": """pip list --format=freeze | tee installed.txt || true"""}
|
||||
},
|
||||
{"run": {
|
||||
"name": "Show biggest libraries",
|
||||
"command": """dpkg-query --show --showformat='${Installed-Size}\t${Package}\n' | sort -rh | head -25 | sort -h | awk '{ package=$2; sub(".*/", "", package); printf("%.5f GB %s\n", $1/1024/1024, package)}' || true"""}
|
||||
},
|
||||
{"run": {"name": "Create `test-results` directory", "command": "mkdir test-results"}},
|
||||
{"run": {"name": "Get files to test", "command":f'curl -L -o {self.job_name}_test_list.txt <<pipeline.parameters.{self.job_name}_test_list>>' if self.name != "pr_documentation_tests" else 'echo "Skipped"'}},
|
||||
{"run": {"name": "Split tests across parallel nodes: show current parallel tests",
|
||||
"command": f"TESTS=$(circleci tests split --split-by=timings {self.job_name}_test_list.txt) && echo $TESTS > splitted_tests.txt && echo $TESTS | tr ' ' '\n'" if self.parallelism else f"awk '{{printf \"%s \", $0}}' {self.job_name}_test_list.txt > splitted_tests.txt"
|
||||
}
|
||||
},
|
||||
{"run": {
|
||||
"name": "Run tests",
|
||||
"command": f"({timeout_cmd} python3 -m pytest {marker_cmd} -n {self.pytest_num_workers} {additional_flags} {' '.join(pytest_flags)} $(cat splitted_tests.txt) | tee tests_output.txt)"}
|
||||
},
|
||||
{"run": {"name": "Expand to show skipped tests", "when": "always", "command": f"python3 .circleci/parse_test_outputs.py --file tests_output.txt --skip"}},
|
||||
{"run": {"name": "Failed tests: show reasons", "when": "always", "command": f"python3 .circleci/parse_test_outputs.py --file tests_output.txt --fail"}},
|
||||
{"run": {"name": "Errors", "when": "always", "command": f"python3 .circleci/parse_test_outputs.py --file tests_output.txt --errors"}},
|
||||
{"store_test_results": {"path": "test-results"}},
|
||||
{"store_artifacts": {"path": "test-results/junit.xml"}},
|
||||
{"store_artifacts": {"path": "reports"}},
|
||||
{"store_artifacts": {"path": "tests.txt"}},
|
||||
{"store_artifacts": {"path": "splitted_tests.txt"}},
|
||||
{"store_artifacts": {"path": "installed.txt"}},
|
||||
]
|
||||
if self.parallelism:
|
||||
job["parallelism"] = parallel
|
||||
|
||||
steps.append({"run": {"name": "Create `test-results` directory", "command": "mkdir test-results"}})
|
||||
test_command = ""
|
||||
if self.command_timeout:
|
||||
test_command = f"timeout {self.command_timeout} "
|
||||
# junit familiy xunit1 is necessary to support splitting on test name or class name with circleci split
|
||||
test_command += f"python3 -m pytest -rsfE -p no:warnings -o junit_family=xunit1 --tb=short --junitxml=test-results/junit.xml -n {self.pytest_num_workers} " + " ".join(pytest_flags)
|
||||
|
||||
if self.parallelism == 1:
|
||||
if self.tests_to_run is None:
|
||||
test_command += " << pipeline.parameters.tests_to_run >>"
|
||||
else:
|
||||
test_command += " " + " ".join(self.tests_to_run)
|
||||
else:
|
||||
# We need explicit list instead of `pipeline.parameters.tests_to_run` (only available at job runtime)
|
||||
tests = self.tests_to_run
|
||||
if tests is None:
|
||||
folder = os.environ["test_preparation_dir"]
|
||||
test_file = os.path.join(folder, "filtered_test_list.txt")
|
||||
if os.path.exists(test_file): # We take this job's tests from the filtered test_list.txt
|
||||
with open(test_file) as f:
|
||||
tests = f.read().split(" ")
|
||||
|
||||
# expand the test list
|
||||
if tests == ["tests"]:
|
||||
tests = [os.path.join("tests", x) for x in os.listdir("tests")]
|
||||
expanded_tests = []
|
||||
for test in tests:
|
||||
if test.endswith(".py"):
|
||||
expanded_tests.append(test)
|
||||
elif test == "tests/models":
|
||||
if "tokenization" in self.name:
|
||||
expanded_tests.extend(glob.glob("tests/models/**/test_tokenization*.py", recursive=True))
|
||||
elif self.name in ["flax","torch","tf"]:
|
||||
name = self.name if self.name != "torch" else ""
|
||||
if self.name == "torch":
|
||||
all_tests = glob.glob(f"tests/models/**/test_modeling_{name}*.py", recursive=True)
|
||||
filtered = [k for k in all_tests if ("_tf_") not in k and "_flax_" not in k]
|
||||
expanded_tests.extend(filtered)
|
||||
else:
|
||||
expanded_tests.extend(glob.glob(f"tests/models/**/test_modeling_{name}*.py", recursive=True))
|
||||
else:
|
||||
expanded_tests.extend(glob.glob("tests/models/**/test_modeling*.py", recursive=True))
|
||||
elif test == "tests/pipelines":
|
||||
expanded_tests.extend(glob.glob("tests/models/**/test_modeling*.py", recursive=True))
|
||||
else:
|
||||
expanded_tests.append(test)
|
||||
tests = " ".join(expanded_tests)
|
||||
|
||||
# Each executor to run ~10 tests
|
||||
n_executors = max(len(expanded_tests) // 10, 1)
|
||||
# Avoid empty test list on some executor(s) or launching too many executors
|
||||
if n_executors > self.parallelism:
|
||||
n_executors = self.parallelism
|
||||
job["parallelism"] = n_executors
|
||||
|
||||
# Need to be newline separated for the command `circleci tests split` below
|
||||
command = f'echo {tests} | tr " " "\\n" >> tests.txt'
|
||||
steps.append({"run": {"name": "Get tests", "command": command}})
|
||||
|
||||
command = 'TESTS=$(circleci tests split tests.txt) && echo $TESTS > splitted_tests.txt'
|
||||
steps.append({"run": {"name": "Split tests", "command": command}})
|
||||
|
||||
steps.append({"store_artifacts": {"path": "tests.txt"}})
|
||||
steps.append({"store_artifacts": {"path": "splitted_tests.txt"}})
|
||||
|
||||
test_command = ""
|
||||
if self.command_timeout:
|
||||
test_command = f"timeout {self.command_timeout} "
|
||||
test_command += f"python3 -m pytest -rsfE -p no:warnings --tb=short -o junit_family=xunit1 --junitxml=test-results/junit.xml -n {self.pytest_num_workers} " + " ".join(pytest_flags)
|
||||
test_command += " $(cat splitted_tests.txt)"
|
||||
if self.marker is not None:
|
||||
test_command += f" -m {self.marker}"
|
||||
|
||||
if self.name == "pr_documentation_tests":
|
||||
# can't use ` | tee tee tests_output.txt` as usual
|
||||
test_command += " > tests_output.txt"
|
||||
# Save the return code, so we can check if it is timeout in the next step.
|
||||
test_command += '; touch "$?".txt'
|
||||
# Never fail the test step for the doctest job. We will check the results in the next step, and fail that
|
||||
# step instead if the actual test failures are found. This is to avoid the timeout being reported as test
|
||||
# failure.
|
||||
test_command = f"({test_command}) || true"
|
||||
else:
|
||||
test_command = f"({test_command} | tee tests_output.txt)"
|
||||
steps.append({"run": {"name": "Run tests", "command": test_command}})
|
||||
|
||||
steps.append({"run": {"name": "Skipped tests", "when": "always", "command": f"python3 .circleci/parse_test_outputs.py --file tests_output.txt --skip"}})
|
||||
steps.append({"run": {"name": "Failed tests", "when": "always", "command": f"python3 .circleci/parse_test_outputs.py --file tests_output.txt --fail"}})
|
||||
steps.append({"run": {"name": "Errors", "when": "always", "command": f"python3 .circleci/parse_test_outputs.py --file tests_output.txt --errors"}})
|
||||
|
||||
steps.append({"store_test_results": {"path": "test-results"}})
|
||||
steps.append({"store_artifacts": {"path": "tests_output.txt"}})
|
||||
steps.append({"store_artifacts": {"path": "test-results/junit.xml"}})
|
||||
steps.append({"store_artifacts": {"path": "reports"}})
|
||||
|
||||
job["steps"] = steps
|
||||
return job
|
||||
|
||||
@property
|
||||
def job_name(self):
|
||||
return self.name if ("examples" in self.name or "pipeline" in self.name or "pr_documentation" in self.name) else f"tests_{self.name}"
|
||||
return self.name if "examples" in self.name else f"tests_{self.name}"
|
||||
|
||||
|
||||
# JOBS
|
||||
torch_and_tf_job = CircleCIJob(
|
||||
"torch_and_tf",
|
||||
docker_image=[{"image":"huggingface/transformers-torch-tf-light"}],
|
||||
install_steps=["uv venv && uv pip install ."],
|
||||
additional_env={"RUN_PT_TF_CROSS_TESTS": True},
|
||||
marker="is_pt_tf_cross_test",
|
||||
pytest_options={"rA": None, "durations": 0},
|
||||
@ -176,6 +238,7 @@ torch_and_flax_job = CircleCIJob(
|
||||
"torch_and_flax",
|
||||
additional_env={"RUN_PT_FLAX_CROSS_TESTS": True},
|
||||
docker_image=[{"image":"huggingface/transformers-torch-jax-light"}],
|
||||
install_steps=["uv venv && uv pip install ."],
|
||||
marker="is_pt_flax_cross_test",
|
||||
pytest_options={"rA": None, "durations": 0},
|
||||
)
|
||||
@ -183,36 +246,24 @@ torch_and_flax_job = CircleCIJob(
|
||||
torch_job = CircleCIJob(
|
||||
"torch",
|
||||
docker_image=[{"image": "huggingface/transformers-torch-light"}],
|
||||
marker="not generate",
|
||||
install_steps=["uv venv && uv pip install ."],
|
||||
parallelism=6,
|
||||
pytest_num_workers=8
|
||||
)
|
||||
|
||||
generate_job = CircleCIJob(
|
||||
"generate",
|
||||
docker_image=[{"image": "huggingface/transformers-torch-light"}],
|
||||
marker="generate",
|
||||
parallelism=6,
|
||||
pytest_num_workers=8
|
||||
pytest_num_workers=16
|
||||
)
|
||||
|
||||
tokenization_job = CircleCIJob(
|
||||
"tokenization",
|
||||
docker_image=[{"image": "huggingface/transformers-torch-light"}],
|
||||
parallelism=8,
|
||||
install_steps=["uv venv && uv pip install ."],
|
||||
parallelism=6,
|
||||
pytest_num_workers=16
|
||||
)
|
||||
|
||||
processor_job = CircleCIJob(
|
||||
"processors",
|
||||
docker_image=[{"image": "huggingface/transformers-torch-light"}],
|
||||
parallelism=8,
|
||||
pytest_num_workers=6
|
||||
)
|
||||
|
||||
tf_job = CircleCIJob(
|
||||
"tf",
|
||||
docker_image=[{"image":"huggingface/transformers-tf-light"}],
|
||||
install_steps=["uv venv", "uv pip install -e."],
|
||||
parallelism=6,
|
||||
pytest_num_workers=16,
|
||||
)
|
||||
@ -221,6 +272,7 @@ tf_job = CircleCIJob(
|
||||
flax_job = CircleCIJob(
|
||||
"flax",
|
||||
docker_image=[{"image":"huggingface/transformers-jax-light"}],
|
||||
install_steps=["uv venv && uv pip install ."],
|
||||
parallelism=6,
|
||||
pytest_num_workers=16
|
||||
)
|
||||
@ -230,8 +282,8 @@ pipelines_torch_job = CircleCIJob(
|
||||
"pipelines_torch",
|
||||
additional_env={"RUN_PIPELINE_TESTS": True},
|
||||
docker_image=[{"image":"huggingface/transformers-torch-light"}],
|
||||
install_steps=["uv venv && uv pip install ."],
|
||||
marker="is_pipeline_test",
|
||||
parallelism=4
|
||||
)
|
||||
|
||||
|
||||
@ -239,8 +291,8 @@ pipelines_tf_job = CircleCIJob(
|
||||
"pipelines_tf",
|
||||
additional_env={"RUN_PIPELINE_TESTS": True},
|
||||
docker_image=[{"image":"huggingface/transformers-tf-light"}],
|
||||
install_steps=["uv venv && uv pip install ."],
|
||||
marker="is_pipeline_test",
|
||||
parallelism=4
|
||||
)
|
||||
|
||||
|
||||
@ -248,24 +300,34 @@ custom_tokenizers_job = CircleCIJob(
|
||||
"custom_tokenizers",
|
||||
additional_env={"RUN_CUSTOM_TOKENIZERS": True},
|
||||
docker_image=[{"image": "huggingface/transformers-custom-tokenizers"}],
|
||||
install_steps=["uv venv","uv pip install -e ."],
|
||||
parallelism=None,
|
||||
resource_class=None,
|
||||
tests_to_run=[
|
||||
"./tests/models/bert_japanese/test_tokenization_bert_japanese.py",
|
||||
"./tests/models/openai/test_tokenization_openai.py",
|
||||
"./tests/models/clip/test_tokenization_clip.py",
|
||||
],
|
||||
)
|
||||
|
||||
|
||||
examples_torch_job = CircleCIJob(
|
||||
"examples_torch",
|
||||
additional_env={"OMP_NUM_THREADS": 8},
|
||||
cache_name="torch_examples",
|
||||
docker_image=[{"image":"huggingface/transformers-examples-torch"}],
|
||||
# TODO @ArthurZucker remove this once docker is easier to build
|
||||
install_steps=["uv venv && uv pip install . && uv pip install -r examples/pytorch/_tests_requirements.txt"],
|
||||
pytest_num_workers=8,
|
||||
pytest_num_workers=1,
|
||||
)
|
||||
|
||||
|
||||
examples_tensorflow_job = CircleCIJob(
|
||||
"examples_tensorflow",
|
||||
additional_env={"OMP_NUM_THREADS": 8},
|
||||
cache_name="tensorflow_examples",
|
||||
docker_image=[{"image":"huggingface/transformers-examples-tf"}],
|
||||
pytest_num_workers=16,
|
||||
install_steps=["uv venv && uv pip install . && uv pip install -r examples/tensorflow/_tests_requirements.txt"],
|
||||
parallelism=8
|
||||
)
|
||||
|
||||
|
||||
@ -274,12 +336,12 @@ hub_job = CircleCIJob(
|
||||
additional_env={"HUGGINGFACE_CO_STAGING": True},
|
||||
docker_image=[{"image":"huggingface/transformers-torch-light"}],
|
||||
install_steps=[
|
||||
'uv venv && uv pip install .',
|
||||
"uv venv && uv pip install .",
|
||||
'git config --global user.email "ci@dummy.com"',
|
||||
'git config --global user.name "ci"',
|
||||
],
|
||||
marker="is_staging_test",
|
||||
pytest_num_workers=2,
|
||||
pytest_num_workers=1,
|
||||
)
|
||||
|
||||
|
||||
@ -287,7 +349,8 @@ onnx_job = CircleCIJob(
|
||||
"onnx",
|
||||
docker_image=[{"image":"huggingface/transformers-torch-tf-light"}],
|
||||
install_steps=[
|
||||
"uv venv",
|
||||
"uv venv && uv pip install .",
|
||||
"uv pip install --upgrade eager pip",
|
||||
"uv pip install .[torch,tf,testing,sentencepiece,onnxruntime,vision,rjieba]",
|
||||
],
|
||||
pytest_options={"k onnx": None},
|
||||
@ -297,7 +360,15 @@ onnx_job = CircleCIJob(
|
||||
|
||||
exotic_models_job = CircleCIJob(
|
||||
"exotic_models",
|
||||
install_steps=["uv venv && uv pip install ."],
|
||||
docker_image=[{"image":"huggingface/transformers-exotic-models"}],
|
||||
tests_to_run=[
|
||||
"tests/models/*layoutlmv*",
|
||||
"tests/models/*nat",
|
||||
"tests/models/deta",
|
||||
"tests/models/udop",
|
||||
"tests/models/nougat",
|
||||
],
|
||||
pytest_num_workers=12,
|
||||
parallelism=4,
|
||||
pytest_options={"durations": 100},
|
||||
@ -307,8 +378,11 @@ exotic_models_job = CircleCIJob(
|
||||
repo_utils_job = CircleCIJob(
|
||||
"repo_utils",
|
||||
docker_image=[{"image":"huggingface/transformers-consistency"}],
|
||||
pytest_num_workers=4,
|
||||
install_steps=["uv venv && uv pip install ."],
|
||||
parallelism=None,
|
||||
pytest_num_workers=1,
|
||||
resource_class="large",
|
||||
tests_to_run="tests/repo_utils",
|
||||
)
|
||||
|
||||
|
||||
@ -317,18 +391,28 @@ repo_utils_job = CircleCIJob(
|
||||
# the bash output redirection.)
|
||||
py_command = 'from utils.tests_fetcher import get_doctest_files; to_test = get_doctest_files() + ["dummy.py"]; to_test = " ".join(to_test); print(to_test)'
|
||||
py_command = f"$(python3 -c '{py_command}')"
|
||||
command = f'echo """{py_command}""" > pr_documentation_tests_temp.txt'
|
||||
command = f'echo "{py_command}" > pr_documentation_tests_temp.txt'
|
||||
doc_test_job = CircleCIJob(
|
||||
"pr_documentation_tests",
|
||||
docker_image=[{"image":"huggingface/transformers-consistency"}],
|
||||
additional_env={"TRANSFORMERS_VERBOSITY": "error", "DATASETS_VERBOSITY": "error", "SKIP_CUDA_DOCTEST": "1"},
|
||||
install_steps=[
|
||||
# Add an empty file to keep the test step running correctly even no file is selected to be tested.
|
||||
"uv venv && pip install .",
|
||||
"touch dummy.py",
|
||||
command,
|
||||
"cat pr_documentation_tests_temp.txt",
|
||||
"tail -n1 pr_documentation_tests_temp.txt | tee pr_documentation_tests_test_list.txt"
|
||||
{
|
||||
"name": "Get files to test",
|
||||
"command": command,
|
||||
},
|
||||
{
|
||||
"name": "Show information in `Get files to test`",
|
||||
"command":
|
||||
"cat pr_documentation_tests_temp.txt"
|
||||
},
|
||||
{
|
||||
"name": "Get the last line in `pr_documentation_tests.txt`",
|
||||
"command":
|
||||
"tail -n1 pr_documentation_tests_temp.txt | tee pr_documentation_tests.txt"
|
||||
},
|
||||
],
|
||||
tests_to_run="$(cat pr_documentation_tests.txt)", # noqa
|
||||
pytest_options={"-doctest-modules": None, "doctest-glob": "*.md", "dist": "loadfile", "rvsA": None},
|
||||
@ -336,37 +420,121 @@ doc_test_job = CircleCIJob(
|
||||
pytest_num_workers=1,
|
||||
)
|
||||
|
||||
REGULAR_TESTS = [torch_and_tf_job, torch_and_flax_job, torch_job, tf_job, flax_job, hub_job, onnx_job, tokenization_job, processor_job, generate_job] # fmt: skip
|
||||
EXAMPLES_TESTS = [examples_torch_job, examples_tensorflow_job]
|
||||
PIPELINE_TESTS = [pipelines_torch_job, pipelines_tf_job]
|
||||
REGULAR_TESTS = [
|
||||
torch_and_tf_job,
|
||||
torch_and_flax_job,
|
||||
torch_job,
|
||||
tf_job,
|
||||
flax_job,
|
||||
custom_tokenizers_job,
|
||||
hub_job,
|
||||
onnx_job,
|
||||
exotic_models_job,
|
||||
tokenization_job
|
||||
]
|
||||
EXAMPLES_TESTS = [
|
||||
examples_torch_job,
|
||||
examples_tensorflow_job,
|
||||
]
|
||||
PIPELINE_TESTS = [
|
||||
pipelines_torch_job,
|
||||
pipelines_tf_job,
|
||||
]
|
||||
REPO_UTIL_TESTS = [repo_utils_job]
|
||||
DOC_TESTS = [doc_test_job]
|
||||
ALL_TESTS = REGULAR_TESTS + EXAMPLES_TESTS + PIPELINE_TESTS + REPO_UTIL_TESTS + DOC_TESTS + [custom_tokenizers_job] + [exotic_models_job] # fmt: skip
|
||||
|
||||
|
||||
def create_circleci_config(folder=None):
|
||||
if folder is None:
|
||||
folder = os.getcwd()
|
||||
# Used in CircleCIJob.to_dict() to expand the test list (for using parallelism)
|
||||
os.environ["test_preparation_dir"] = folder
|
||||
jobs = [k for k in ALL_TESTS if os.path.isfile(os.path.join("test_preparation" , f"{k.job_name}_test_list.txt") )]
|
||||
print("The following jobs will be run ", jobs)
|
||||
jobs = []
|
||||
all_test_file = os.path.join(folder, "test_list.txt")
|
||||
if os.path.exists(all_test_file):
|
||||
with open(all_test_file) as f:
|
||||
all_test_list = f.read()
|
||||
else:
|
||||
all_test_list = []
|
||||
if len(all_test_list) > 0:
|
||||
jobs.extend(PIPELINE_TESTS)
|
||||
|
||||
test_file = os.path.join(folder, "filtered_test_list.txt")
|
||||
if os.path.exists(test_file):
|
||||
with open(test_file) as f:
|
||||
test_list = f.read()
|
||||
else:
|
||||
test_list = []
|
||||
if len(test_list) > 0:
|
||||
jobs.extend(REGULAR_TESTS)
|
||||
|
||||
extended_tests_to_run = set(test_list.split())
|
||||
# Extend the test files for cross test jobs
|
||||
for job in jobs:
|
||||
if job.job_name in ["tests_torch_and_tf", "tests_torch_and_flax"]:
|
||||
for test_path in copy.copy(extended_tests_to_run):
|
||||
dir_path, fn = os.path.split(test_path)
|
||||
if fn.startswith("test_modeling_tf_"):
|
||||
fn = fn.replace("test_modeling_tf_", "test_modeling_")
|
||||
elif fn.startswith("test_modeling_flax_"):
|
||||
fn = fn.replace("test_modeling_flax_", "test_modeling_")
|
||||
else:
|
||||
if job.job_name == "test_torch_and_tf":
|
||||
fn = fn.replace("test_modeling_", "test_modeling_tf_")
|
||||
elif job.job_name == "test_torch_and_flax":
|
||||
fn = fn.replace("test_modeling_", "test_modeling_flax_")
|
||||
new_test_file = str(os.path.join(dir_path, fn))
|
||||
if os.path.isfile(new_test_file):
|
||||
if new_test_file not in extended_tests_to_run:
|
||||
extended_tests_to_run.add(new_test_file)
|
||||
extended_tests_to_run = sorted(extended_tests_to_run)
|
||||
for job in jobs:
|
||||
if job.job_name in ["tests_torch_and_tf", "tests_torch_and_flax"]:
|
||||
job.tests_to_run = extended_tests_to_run
|
||||
fn = "filtered_test_list_cross_tests.txt"
|
||||
f_path = os.path.join(folder, fn)
|
||||
with open(f_path, "w") as fp:
|
||||
fp.write(" ".join(extended_tests_to_run))
|
||||
|
||||
example_file = os.path.join(folder, "examples_test_list.txt")
|
||||
if os.path.exists(example_file) and os.path.getsize(example_file) > 0:
|
||||
with open(example_file, "r", encoding="utf-8") as f:
|
||||
example_tests = f.read()
|
||||
for job in EXAMPLES_TESTS:
|
||||
framework = job.name.replace("examples_", "").replace("torch", "pytorch")
|
||||
if example_tests == "all":
|
||||
job.tests_to_run = [f"examples/{framework}"]
|
||||
else:
|
||||
job.tests_to_run = [f for f in example_tests.split(" ") if f.startswith(f"examples/{framework}")]
|
||||
|
||||
if len(job.tests_to_run) > 0:
|
||||
jobs.append(job)
|
||||
|
||||
doctest_file = os.path.join(folder, "doctest_list.txt")
|
||||
if os.path.exists(doctest_file):
|
||||
with open(doctest_file) as f:
|
||||
doctest_list = f.read()
|
||||
else:
|
||||
doctest_list = []
|
||||
if len(doctest_list) > 0:
|
||||
jobs.extend(DOC_TESTS)
|
||||
|
||||
repo_util_file = os.path.join(folder, "test_repo_utils.txt")
|
||||
if os.path.exists(repo_util_file) and os.path.getsize(repo_util_file) > 0:
|
||||
jobs.extend(REPO_UTIL_TESTS)
|
||||
|
||||
if len(jobs) == 0:
|
||||
jobs = [EmptyJob()]
|
||||
print("Full list of job name inputs", {j.job_name + "_test_list":{"type":"string", "default":''} for j in jobs})
|
||||
config = {
|
||||
"version": "2.1",
|
||||
"parameters": {
|
||||
# Only used to accept the parameters from the trigger
|
||||
"nightly": {"type": "boolean", "default": False},
|
||||
"tests_to_run": {"type": "string", "default": ''},
|
||||
**{j.job_name + "_test_list":{"type":"string", "default":''} for j in jobs},
|
||||
**{j.job_name + "_parallelism":{"type":"integer", "default":1} for j in jobs},
|
||||
},
|
||||
"jobs" : {j.job_name: j.to_dict() for j in jobs},
|
||||
"workflows": {"version": 2, "run_tests": {"jobs": [j.job_name for j in jobs]}}
|
||||
config = {"version": "2.1"}
|
||||
config["parameters"] = {
|
||||
# Only used to accept the parameters from the trigger
|
||||
"nightly": {"type": "boolean", "default": False},
|
||||
"tests_to_run": {"type": "string", "default": test_list},
|
||||
}
|
||||
config["jobs"] = {j.job_name: j.to_dict() for j in jobs}
|
||||
config["workflows"] = {"version": 2, "run_tests": {"jobs": [j.job_name for j in jobs]}}
|
||||
with open(os.path.join(folder, "generated_config.yml"), "w") as f:
|
||||
f.write(yaml.dump(config, sort_keys=False, default_flow_style=False).replace("' << pipeline", " << pipeline").replace(">> '", " >>"))
|
||||
f.write(yaml.dump(config, indent=2, width=1000000, sort_keys=False))
|
||||
|
||||
|
||||
if __name__ == "__main__":
|
||||
|
||||
@ -67,4 +67,4 @@ def main():
|
||||
|
||||
|
||||
if __name__ == "__main__":
|
||||
main()
|
||||
main()
|
||||
12
.coveragerc
Normal file
12
.coveragerc
Normal file
@ -0,0 +1,12 @@
|
||||
[run]
|
||||
source=transformers
|
||||
omit =
|
||||
# skip convertion scripts from testing for now
|
||||
*/convert_*
|
||||
*/__main__.py
|
||||
[report]
|
||||
exclude_lines =
|
||||
pragma: no cover
|
||||
raise
|
||||
except
|
||||
register_parameter
|
||||
27
.github/ISSUE_TEMPLATE/bug-report.yml
vendored
27
.github/ISSUE_TEMPLATE/bug-report.yml
vendored
@ -1,17 +1,6 @@
|
||||
name: "\U0001F41B Bug Report"
|
||||
description: Submit a bug report to help us improve transformers
|
||||
labels: [ "bug" ]
|
||||
body:
|
||||
- type: markdown
|
||||
attributes:
|
||||
value: |
|
||||
Thanks for taking the time to fill out this bug report! 🤗
|
||||
|
||||
Before you submit your bug report:
|
||||
|
||||
- If it is your first time submitting, be sure to check our [bug report guidelines](https://github.com/huggingface/transformers/blob/main/CONTRIBUTING.md#did-you-find-a-bug)
|
||||
- Try our [docs bot](https://huggingface.co/spaces/huggingchat/hf-docs-chat) -- it might be able to help you with your issue
|
||||
|
||||
- type: textarea
|
||||
id: system-info
|
||||
attributes:
|
||||
@ -36,26 +25,26 @@ body:
|
||||
|
||||
Models:
|
||||
|
||||
- text models: @ArthurZucker
|
||||
- vision models: @amyeroberts, @qubvel
|
||||
- speech models: @ylacombe, @eustlb
|
||||
- text models: @ArthurZucker and @younesbelkada
|
||||
- vision models: @amyeroberts
|
||||
- speech models: @sanchit-gandhi
|
||||
- graph models: @clefourrier
|
||||
|
||||
Library:
|
||||
|
||||
- flax: @sanchit-gandhi
|
||||
- generate: @zucchini-nlp (visual-language models) or @gante (all others)
|
||||
- pipelines: @Rocketknight1
|
||||
- pipelines: @Narsil
|
||||
- tensorflow: @gante and @Rocketknight1
|
||||
- tokenizers: @ArthurZucker and @itazap
|
||||
- tokenizers: @ArthurZucker
|
||||
- trainer: @muellerzr @SunMarc
|
||||
|
||||
|
||||
Integrations:
|
||||
|
||||
|
||||
- deepspeed: HF Trainer/Accelerate: @muellerzr
|
||||
- ray/raytune: @richardliaw, @amogkam
|
||||
- Big Model Inference: @SunMarc
|
||||
- quantization (bitsandbytes, autogpt): @SunMarc
|
||||
- quantization (bitsandbytes, autogpt): @SunMarc and @younesbelkada
|
||||
|
||||
Documentation: @stevhliu
|
||||
|
||||
|
||||
2
.github/ISSUE_TEMPLATE/i18n.md
vendored
2
.github/ISSUE_TEMPLATE/i18n.md
vendored
@ -34,7 +34,7 @@ Some notes:
|
||||
|
||||
## Tutorial section
|
||||
- [ ] [pipeline_tutorial.md](https://github.com/huggingface/transformers/blob/main/docs/source/en/pipeline_tutorial.md)
|
||||
- [ ] [autoclass_tutorial.md](https://github.com/huggingface/transformers/blob/main/docs/source/en/autoclass_tutorial.md)
|
||||
- [ ] [autoclass_tutorial.md](https://github.com/huggingface/transformers/blob/master/docs/source/autoclass_tutorial.md)
|
||||
- [ ] [preprocessing.md](https://github.com/huggingface/transformers/blob/main/docs/source/en/preprocessing.md)
|
||||
- [ ] [training.md](https://github.com/huggingface/transformers/blob/main/docs/source/en/training.md)
|
||||
- [ ] [accelerate.md](https://github.com/huggingface/transformers/blob/main/docs/source/en/accelerate.md)
|
||||
|
||||
13
.github/PULL_REQUEST_TEMPLATE.md
vendored
13
.github/PULL_REQUEST_TEMPLATE.md
vendored
@ -39,29 +39,28 @@ members/contributors who may be interested in your PR.
|
||||
|
||||
Models:
|
||||
|
||||
- text models: @ArthurZucker
|
||||
- vision models: @amyeroberts, @qubvel
|
||||
- speech models: @ylacombe, @eustlb
|
||||
- text models: @ArthurZucker and @younesbelkada
|
||||
- vision models: @amyeroberts
|
||||
- speech models: @sanchit-gandhi
|
||||
- graph models: @clefourrier
|
||||
|
||||
Library:
|
||||
|
||||
- flax: @sanchit-gandhi
|
||||
- generate: @zucchini-nlp (visual-language models) or @gante (all others)
|
||||
- pipelines: @Rocketknight1
|
||||
- pipelines: @Narsil
|
||||
- tensorflow: @gante and @Rocketknight1
|
||||
- tokenizers: @ArthurZucker
|
||||
- trainer: @muellerzr and @SunMarc
|
||||
- chat templates: @Rocketknight1
|
||||
|
||||
Integrations:
|
||||
|
||||
- deepspeed: HF Trainer/Accelerate: @muellerzr
|
||||
- ray/raytune: @richardliaw, @amogkam
|
||||
- Big Model Inference: @SunMarc
|
||||
- quantization (bitsandbytes, autogpt): @SunMarc
|
||||
- quantization (bitsandbytes, autogpt): @SunMarc and @younesbelkada
|
||||
|
||||
Documentation: @stevhliu
|
||||
Documentation: @stevhliu and @MKhalusova
|
||||
|
||||
HF projects:
|
||||
|
||||
|
||||
2
.github/workflows/add-model-like.yml
vendored
2
.github/workflows/add-model-like.yml
vendored
@ -23,7 +23,7 @@ jobs:
|
||||
sudo apt -y update && sudo apt install -y libsndfile1-dev
|
||||
|
||||
- name: Load cached virtual environment
|
||||
uses: actions/cache@v4
|
||||
uses: actions/cache@v2
|
||||
id: cache
|
||||
with:
|
||||
path: ~/venv/
|
||||
|
||||
4
.github/workflows/benchmark.yml
vendored
4
.github/workflows/benchmark.yml
vendored
@ -31,12 +31,12 @@ jobs:
|
||||
if: github.event_name == 'schedule'
|
||||
working-directory: /transformers
|
||||
run: |
|
||||
python3 -m pip install optimum-benchmark>=0.3.0
|
||||
python3 -m pip install optimum-benchmark>=0.2.0
|
||||
HF_TOKEN=${{ secrets.TRANSFORMERS_BENCHMARK_TOKEN }} python3 benchmark/benchmark.py --repo_id hf-internal-testing/benchmark_results --path_in_repo $(date +'%Y-%m-%d') --config-dir benchmark/config --config-name generation --commit=${{ github.sha }} backend.model=google/gemma-2b backend.cache_implementation=null,static backend.torch_compile=false,true --multirun
|
||||
|
||||
- name: Benchmark (merged to main event)
|
||||
if: github.event_name == 'push' && github.ref_name == 'main'
|
||||
working-directory: /transformers
|
||||
run: |
|
||||
python3 -m pip install optimum-benchmark>=0.3.0
|
||||
python3 -m pip install optimum-benchmark>=0.2.0
|
||||
HF_TOKEN=${{ secrets.TRANSFORMERS_BENCHMARK_TOKEN }} python3 benchmark/benchmark.py --repo_id hf-internal-testing/benchmark_results_merge_event --path_in_repo $(date +'%Y-%m-%d') --config-dir benchmark/config --config-name generation --commit=${{ github.sha }} backend.model=google/gemma-2b backend.cache_implementation=null,static backend.torch_compile=false,true --multirun
|
||||
|
||||
19
.github/workflows/build-ci-docker-images.yml
vendored
19
.github/workflows/build-ci-docker-images.yml
vendored
@ -27,10 +27,10 @@ jobs:
|
||||
strategy:
|
||||
matrix:
|
||||
file: ["quality", "consistency", "custom-tokenizers", "torch-light", "tf-light", "exotic-models", "torch-tf-light", "torch-jax-light", "jax-light", "examples-torch", "examples-tf"]
|
||||
continue-on-error: true
|
||||
continue-on-error: true
|
||||
|
||||
steps:
|
||||
-
|
||||
-
|
||||
name: Set tag
|
||||
run: |
|
||||
if ${{contains(github.event.head_commit.message, '[build-ci-image]')}}; then
|
||||
@ -61,17 +61,4 @@ jobs:
|
||||
REF=${{ github.sha }}
|
||||
file: "./docker/${{ matrix.file }}.dockerfile"
|
||||
push: ${{ contains(github.event.head_commit.message, 'ci-image]') || github.event_name == 'schedule' }}
|
||||
tags: ${{ env.TAG }}
|
||||
|
||||
notify:
|
||||
runs-on: ubuntu-22.04
|
||||
if: ${{ contains(github.event.head_commit.message, '[build-ci-image]') || contains(github.event.head_commit.message, '[push-ci-image]') && '!cancelled()' || github.event_name == 'schedule' }}
|
||||
steps:
|
||||
- name: Post to Slack
|
||||
if: ${{ contains(github.event.head_commit.message, '[push-ci-image]') && github.event_name != 'schedule' }}
|
||||
uses: huggingface/hf-workflows/.github/actions/post-slack@main
|
||||
with:
|
||||
slack_channel: "#transformers-ci-circleci-images"
|
||||
title: 🤗 New docker images for CircleCI are pushed.
|
||||
status: ${{ job.status }}
|
||||
slack_token: ${{ secrets.SLACK_CIFEEDBACK_BOT_TOKEN }}
|
||||
tags: ${{ env.TAG }}
|
||||
27
.github/workflows/build-docker-images.yml
vendored
27
.github/workflows/build-docker-images.yml
vendored
@ -20,8 +20,7 @@ concurrency:
|
||||
jobs:
|
||||
latest-docker:
|
||||
name: "Latest PyTorch + TensorFlow [dev]"
|
||||
runs-on:
|
||||
group: aws-general-8-plus
|
||||
runs-on: [intel-cpu, 8-cpu, ci]
|
||||
steps:
|
||||
-
|
||||
name: Set up Docker Buildx
|
||||
@ -69,8 +68,7 @@ jobs:
|
||||
|
||||
latest-torch-deepspeed-docker:
|
||||
name: "Latest PyTorch + DeepSpeed"
|
||||
runs-on:
|
||||
group: aws-general-8-plus
|
||||
runs-on: [intel-cpu, 8-cpu, ci]
|
||||
steps:
|
||||
-
|
||||
name: Set up Docker Buildx
|
||||
@ -106,8 +104,7 @@ jobs:
|
||||
# Can't build 2 images in a single job `latest-torch-deepspeed-docker` (for `nvcr.io/nvidia`)
|
||||
latest-torch-deepspeed-docker-for-push-ci-daily-build:
|
||||
name: "Latest PyTorch + DeepSpeed (Push CI - Daily Build)"
|
||||
runs-on:
|
||||
group: aws-general-8-plus
|
||||
runs-on: [intel-cpu, 8-cpu, ci]
|
||||
steps:
|
||||
-
|
||||
name: Set up Docker Buildx
|
||||
@ -148,8 +145,7 @@ jobs:
|
||||
name: "Doc builder"
|
||||
# Push CI doesn't need this image
|
||||
if: inputs.image_postfix != '-push-ci'
|
||||
runs-on:
|
||||
group: aws-general-8-plus
|
||||
runs-on: [intel-cpu, 8-cpu, ci]
|
||||
steps:
|
||||
-
|
||||
name: Set up Docker Buildx
|
||||
@ -184,8 +180,7 @@ jobs:
|
||||
name: "Latest PyTorch [dev]"
|
||||
# Push CI doesn't need this image
|
||||
if: inputs.image_postfix != '-push-ci'
|
||||
runs-on:
|
||||
group: aws-general-8-plus
|
||||
runs-on: [intel-cpu, 8-cpu, ci]
|
||||
steps:
|
||||
-
|
||||
name: Set up Docker Buildx
|
||||
@ -220,8 +215,7 @@ jobs:
|
||||
|
||||
latest-pytorch-amd:
|
||||
name: "Latest PyTorch (AMD) [dev]"
|
||||
runs-on:
|
||||
group: aws-general-8-plus
|
||||
runs-on: [intel-cpu, 8-cpu, ci]
|
||||
steps:
|
||||
-
|
||||
name: Set up Docker Buildx
|
||||
@ -271,8 +265,7 @@ jobs:
|
||||
name: "Latest TensorFlow [dev]"
|
||||
# Push CI doesn't need this image
|
||||
if: inputs.image_postfix != '-push-ci'
|
||||
runs-on:
|
||||
group: aws-general-8-plus
|
||||
runs-on: [intel-cpu, 8-cpu, ci]
|
||||
steps:
|
||||
-
|
||||
name: Set up Docker Buildx
|
||||
@ -307,8 +300,7 @@ jobs:
|
||||
|
||||
latest-pytorch-deepspeed-amd:
|
||||
name: "PyTorch + DeepSpeed (AMD) [dev]"
|
||||
runs-on:
|
||||
group: aws-general-8-plus
|
||||
runs-on: [intel-cpu, 8-cpu, ci]
|
||||
steps:
|
||||
-
|
||||
name: Set up Docker Buildx
|
||||
@ -358,8 +350,7 @@ jobs:
|
||||
name: "Latest Pytorch + Quantization [dev]"
|
||||
# Push CI doesn't need this image
|
||||
if: inputs.image_postfix != '-push-ci'
|
||||
runs-on:
|
||||
group: aws-general-8-plus
|
||||
runs-on: [intel-cpu, 8-cpu, ci]
|
||||
steps:
|
||||
-
|
||||
name: Set up Docker Buildx
|
||||
|
||||
@ -13,9 +13,18 @@ concurrency:
|
||||
jobs:
|
||||
latest-with-torch-nightly-docker:
|
||||
name: "Nightly PyTorch + Stable TensorFlow"
|
||||
runs-on:
|
||||
group: aws-general-8-plus
|
||||
runs-on: [intel-cpu, 8-cpu, ci]
|
||||
steps:
|
||||
- name: Cleanup disk
|
||||
run: |
|
||||
sudo ls -l /usr/local/lib/
|
||||
sudo ls -l /usr/share/
|
||||
sudo du -sh /usr/local/lib/
|
||||
sudo du -sh /usr/share/
|
||||
sudo rm -rf /usr/local/lib/android
|
||||
sudo rm -rf /usr/share/dotnet
|
||||
sudo du -sh /usr/local/lib/
|
||||
sudo du -sh /usr/share/
|
||||
-
|
||||
name: Set up Docker Buildx
|
||||
uses: docker/setup-buildx-action@v2
|
||||
@ -41,9 +50,18 @@ jobs:
|
||||
|
||||
nightly-torch-deepspeed-docker:
|
||||
name: "Nightly PyTorch + DeepSpeed"
|
||||
runs-on:
|
||||
group: aws-general-8-plus
|
||||
runs-on: [intel-cpu, 8-cpu, ci]
|
||||
steps:
|
||||
- name: Cleanup disk
|
||||
run: |
|
||||
sudo ls -l /usr/local/lib/
|
||||
sudo ls -l /usr/share/
|
||||
sudo du -sh /usr/local/lib/
|
||||
sudo du -sh /usr/share/
|
||||
sudo rm -rf /usr/local/lib/android
|
||||
sudo rm -rf /usr/share/dotnet
|
||||
sudo du -sh /usr/local/lib/
|
||||
sudo du -sh /usr/share/
|
||||
-
|
||||
name: Set up Docker Buildx
|
||||
uses: docker/setup-buildx-action@v2
|
||||
@ -64,4 +82,4 @@ jobs:
|
||||
build-args: |
|
||||
REF=main
|
||||
push: true
|
||||
tags: huggingface/transformers-pytorch-deepspeed-nightly-gpu
|
||||
tags: huggingface/transformers-pytorch-deepspeed-nightly-gpu
|
||||
@ -16,8 +16,7 @@ jobs:
|
||||
fail-fast: false
|
||||
matrix:
|
||||
version: ["1.13", "1.12", "1.11"]
|
||||
runs-on:
|
||||
group: aws-general-8-plus
|
||||
runs-on: [intel-cpu, 8-cpu, ci]
|
||||
steps:
|
||||
-
|
||||
name: Set up Docker Buildx
|
||||
@ -61,8 +60,7 @@ jobs:
|
||||
fail-fast: false
|
||||
matrix:
|
||||
version: ["2.11", "2.10", "2.9", "2.8", "2.7", "2.6", "2.5"]
|
||||
runs-on:
|
||||
group: aws-general-8-plus
|
||||
runs-on: [intel-cpu, 8-cpu, ci]
|
||||
steps:
|
||||
-
|
||||
name: Set up Docker Buildx
|
||||
|
||||
2
.github/workflows/build_documentation.yml
vendored
2
.github/workflows/build_documentation.yml
vendored
@ -15,7 +15,7 @@ jobs:
|
||||
commit_sha: ${{ github.sha }}
|
||||
package: transformers
|
||||
notebook_folder: transformers_doc
|
||||
languages: ar de en es fr hi it ko pt tr zh ja te
|
||||
languages: de en es fr hi it ko pt tr zh ja te
|
||||
custom_container: huggingface/transformers-doc-builder
|
||||
secrets:
|
||||
token: ${{ secrets.HUGGINGFACE_PUSH }}
|
||||
|
||||
2
.github/workflows/build_pr_documentation.yml
vendored
2
.github/workflows/build_pr_documentation.yml
vendored
@ -14,5 +14,5 @@ jobs:
|
||||
commit_sha: ${{ github.event.pull_request.head.sha }}
|
||||
pr_number: ${{ github.event.number }}
|
||||
package: transformers
|
||||
languages: ar de en es fr hi it ko pt tr zh ja te
|
||||
languages: de en es fr hi it ko pt tr zh ja te
|
||||
custom_container: huggingface/transformers-doc-builder
|
||||
|
||||
2
.github/workflows/check_tiny_models.yml
vendored
2
.github/workflows/check_tiny_models.yml
vendored
@ -23,7 +23,7 @@ jobs:
|
||||
|
||||
- uses: actions/checkout@v4
|
||||
- name: Set up Python 3.8
|
||||
uses: actions/setup-python@v5
|
||||
uses: actions/setup-python@v4
|
||||
with:
|
||||
# Semantic version range syntax or exact version of a Python version
|
||||
python-version: '3.8'
|
||||
|
||||
23
.github/workflows/model_jobs.yml
vendored
23
.github/workflows/model_jobs.yml
vendored
@ -12,12 +12,6 @@ on:
|
||||
slice_id:
|
||||
required: true
|
||||
type: number
|
||||
runner:
|
||||
required: true
|
||||
type: string
|
||||
docker:
|
||||
required: true
|
||||
type: string
|
||||
|
||||
env:
|
||||
HF_HOME: /mnt/cache
|
||||
@ -37,13 +31,12 @@ jobs:
|
||||
run_models_gpu:
|
||||
name: " "
|
||||
strategy:
|
||||
max-parallel: 8
|
||||
fail-fast: false
|
||||
matrix:
|
||||
folders: ${{ fromJson(inputs.folder_slices)[inputs.slice_id] }}
|
||||
runs-on: ['${{ inputs.machine_type }}', nvidia-gpu, t4, '${{ inputs.runner }}']
|
||||
runs-on: ['${{ inputs.machine_type }}', nvidia-gpu, t4, daily-ci]
|
||||
container:
|
||||
image: ${{ inputs.docker }}
|
||||
image: huggingface/transformers-all-latest-gpu
|
||||
options: --gpus all --shm-size "16gb" --ipc host -v /mnt/cache/.cache/huggingface:/mnt/cache/
|
||||
steps:
|
||||
- name: Echo input and matrix info
|
||||
@ -72,18 +65,6 @@ jobs:
|
||||
working-directory: /transformers
|
||||
run: python3 -m pip uninstall -y transformers && python3 -m pip install -e .
|
||||
|
||||
- name: Update / Install some packages (for Past CI)
|
||||
if: ${{ contains(inputs.docker, '-past-') }}
|
||||
working-directory: /transformers
|
||||
run: |
|
||||
python3 -m pip install -U datasets
|
||||
|
||||
- name: Update / Install some packages (for Past CI)
|
||||
if: ${{ contains(inputs.docker, '-past-') && contains(inputs.docker, '-pytorch-') }}
|
||||
working-directory: /transformers
|
||||
run: |
|
||||
python3 -m pip install --no-cache-dir git+https://github.com/huggingface/accelerate@main#egg=accelerate
|
||||
|
||||
- name: NVIDIA-SMI
|
||||
run: |
|
||||
nvidia-smi
|
||||
|
||||
129
.github/workflows/model_jobs_amd.yml
vendored
129
.github/workflows/model_jobs_amd.yml
vendored
@ -1,129 +0,0 @@
|
||||
name: model jobs
|
||||
|
||||
on:
|
||||
workflow_call:
|
||||
inputs:
|
||||
folder_slices:
|
||||
required: true
|
||||
type: string
|
||||
machine_type:
|
||||
required: true
|
||||
type: string
|
||||
slice_id:
|
||||
required: true
|
||||
type: number
|
||||
runner:
|
||||
required: true
|
||||
type: string
|
||||
docker:
|
||||
required: true
|
||||
type: string
|
||||
|
||||
env:
|
||||
HF_HOME: /mnt/cache
|
||||
TRANSFORMERS_IS_CI: yes
|
||||
OMP_NUM_THREADS: 8
|
||||
MKL_NUM_THREADS: 8
|
||||
RUN_SLOW: yes
|
||||
# For gated repositories, we still need to agree to share information on the Hub repo. page in order to get access.
|
||||
# This token is created under the bot `hf-transformers-bot`.
|
||||
HF_HUB_READ_TOKEN: ${{ secrets.HF_HUB_READ_TOKEN }}
|
||||
SIGOPT_API_TOKEN: ${{ secrets.SIGOPT_API_TOKEN }}
|
||||
TF_FORCE_GPU_ALLOW_GROWTH: true
|
||||
RUN_PT_TF_CROSS_TESTS: 1
|
||||
CUDA_VISIBLE_DEVICES: 0,1
|
||||
|
||||
jobs:
|
||||
run_models_gpu:
|
||||
name: " "
|
||||
strategy:
|
||||
max-parallel: 1 # For now, not to parallelize. Can change later if it works well.
|
||||
fail-fast: false
|
||||
matrix:
|
||||
folders: ${{ fromJson(inputs.folder_slices)[inputs.slice_id] }}
|
||||
runs-on: ['${{ inputs.machine_type }}', self-hosted, amd-gpu, '${{ inputs.runner }}']
|
||||
container:
|
||||
image: ${{ inputs.docker }}
|
||||
options: --device /dev/kfd --device /dev/dri --env ROCR_VISIBLE_DEVICES --shm-size "16gb" --ipc host -v /mnt/cache/.cache/huggingface:/mnt/cache/
|
||||
steps:
|
||||
- name: Echo input and matrix info
|
||||
shell: bash
|
||||
run: |
|
||||
echo "${{ inputs.folder_slices }}"
|
||||
echo "${{ matrix.folders }}"
|
||||
echo "${{ toJson(fromJson(inputs.folder_slices)[inputs.slice_id]) }}"
|
||||
|
||||
- name: Echo folder ${{ matrix.folders }}
|
||||
shell: bash
|
||||
# For folders like `models/bert`, set an env. var. (`matrix_folders`) to `models_bert`, which will be used to
|
||||
# set the artifact folder names (because the character `/` is not allowed).
|
||||
run: |
|
||||
echo "${{ matrix.folders }}"
|
||||
matrix_folders=${{ matrix.folders }}
|
||||
matrix_folders=${matrix_folders/'models/'/'models_'}
|
||||
echo "$matrix_folders"
|
||||
echo "matrix_folders=$matrix_folders" >> $GITHUB_ENV
|
||||
|
||||
- name: Update clone
|
||||
working-directory: /transformers
|
||||
run: git fetch && git checkout ${{ github.sha }}
|
||||
|
||||
- name: Reinstall transformers in edit mode (remove the one installed during docker image build)
|
||||
working-directory: /transformers
|
||||
run: python3 -m pip uninstall -y transformers && python3 -m pip install -e .
|
||||
|
||||
- name: Update / Install some packages (for Past CI)
|
||||
if: ${{ contains(inputs.docker, '-past-') }}
|
||||
working-directory: /transformers
|
||||
run: |
|
||||
python3 -m pip install -U datasets
|
||||
|
||||
- name: Update / Install some packages (for Past CI)
|
||||
if: ${{ contains(inputs.docker, '-past-') && contains(inputs.docker, '-pytorch-') }}
|
||||
working-directory: /transformers
|
||||
run: |
|
||||
python3 -m pip install --no-cache-dir git+https://github.com/huggingface/accelerate@main#egg=accelerate
|
||||
|
||||
- name: ROCM-SMI
|
||||
run: |
|
||||
rocm-smi
|
||||
|
||||
- name: ROCM-INFO
|
||||
run: |
|
||||
rocminfo | grep "Agent" -A 14
|
||||
|
||||
- name: Show ROCR environment
|
||||
run: |
|
||||
echo "ROCR: $ROCR_VISIBLE_DEVICES"
|
||||
|
||||
- name: Environment
|
||||
working-directory: /transformers
|
||||
run: |
|
||||
python3 utils/print_env.py
|
||||
|
||||
- name: Show installed libraries and their versions
|
||||
working-directory: /transformers
|
||||
run: pip freeze
|
||||
|
||||
- name: Run all tests on GPU
|
||||
working-directory: /transformers
|
||||
run: python3 -m pytest -rsfE -v --make-reports=${{ inputs.machine_type }}_run_models_gpu_${{ matrix.folders }}_test_reports tests/${{ matrix.folders }} -m "not not_device_test"
|
||||
|
||||
- name: Failure short reports
|
||||
if: ${{ failure() }}
|
||||
continue-on-error: true
|
||||
run: cat /transformers/reports/${{ inputs.machine_type }}_run_models_gpu_${{ matrix.folders }}_test_reports/failures_short.txt
|
||||
|
||||
- name: Run test
|
||||
shell: bash
|
||||
run: |
|
||||
mkdir -p /transformers/reports/${{ inputs.machine_type }}_run_models_gpu_${{ matrix.folders }}_test_reports
|
||||
echo "hello" > /transformers/reports/${{ inputs.machine_type }}_run_models_gpu_${{ matrix.folders }}_test_reports/hello.txt
|
||||
echo "${{ inputs.machine_type }}_run_models_gpu_${{ matrix.folders }}_test_reports"
|
||||
|
||||
- name: "Test suite reports artifacts: ${{ inputs.machine_type }}_run_models_gpu_${{ env.matrix_folders }}_test_reports"
|
||||
if: ${{ always() }}
|
||||
uses: actions/upload-artifact@v4
|
||||
with:
|
||||
name: ${{ inputs.machine_type }}_run_models_gpu_${{ env.matrix_folders }}_test_reports
|
||||
path: /transformers/reports/${{ inputs.machine_type }}_run_models_gpu_${{ matrix.folders }}_test_reports
|
||||
2
.github/workflows/release-conda.yml
vendored
2
.github/workflows/release-conda.yml
vendored
@ -19,7 +19,7 @@ jobs:
|
||||
|
||||
steps:
|
||||
- name: Checkout repository
|
||||
uses: actions/checkout@v4
|
||||
uses: actions/checkout@v1
|
||||
|
||||
- name: Install miniconda
|
||||
uses: conda-incubator/setup-miniconda@v2
|
||||
|
||||
43
.github/workflows/self-nightly-caller.yml
vendored
43
.github/workflows/self-nightly-caller.yml
vendored
@ -1,43 +0,0 @@
|
||||
name: Self-hosted runner (nightly-ci)
|
||||
|
||||
|
||||
on:
|
||||
repository_dispatch:
|
||||
schedule:
|
||||
- cron: "17 2 * * *"
|
||||
push:
|
||||
branches:
|
||||
- run_nightly_ci*
|
||||
|
||||
jobs:
|
||||
build_nightly_ci_images:
|
||||
name: Build Nightly CI Docker Images
|
||||
if: (github.event_name == 'schedule') || ((github.event_name == 'push') && startsWith(github.ref_name, 'run_nightly_ci'))
|
||||
uses: ./.github/workflows/build-nightly-ci-docker-images.yml
|
||||
secrets: inherit
|
||||
|
||||
model-ci:
|
||||
name: Model CI
|
||||
needs: [build_nightly_ci_images]
|
||||
uses: ./.github/workflows/self-scheduled.yml
|
||||
with:
|
||||
job: run_models_gpu
|
||||
slack_report_channel: "#transformers-ci-past-future"
|
||||
runner: ci
|
||||
docker: huggingface/transformers-all-latest-torch-nightly-gpu
|
||||
ci_event: Nightly CI
|
||||
secrets: inherit
|
||||
|
||||
deepspeed-ci:
|
||||
name: DeepSpeed CI
|
||||
needs: [build_nightly_ci_images]
|
||||
uses: ./.github/workflows/self-scheduled.yml
|
||||
with:
|
||||
job: run_torch_cuda_extensions_gpu
|
||||
slack_report_channel: "#transformers-ci-past-future"
|
||||
runner: ci
|
||||
# test deepspeed nightly build with the latest release torch
|
||||
docker: huggingface/transformers-pytorch-deepspeed-latest-gpu
|
||||
ci_event: Nightly CI
|
||||
working-directory-prefix: /workspace
|
||||
secrets: inherit
|
||||
@ -2,30 +2,32 @@ name: Self-hosted runner (nightly-past-ci-caller)
|
||||
|
||||
on:
|
||||
schedule:
|
||||
- cron: "17 2,14 * * *"
|
||||
# 2:17 am on each Sunday and Thursday
|
||||
|
||||
- cron: "17 2 * * 0,4"
|
||||
push:
|
||||
branches:
|
||||
- run_nightly_ci*
|
||||
- run_past_ci*
|
||||
|
||||
jobs:
|
||||
get_number:
|
||||
name: Get number
|
||||
runs-on: ubuntu-22.04
|
||||
outputs:
|
||||
run_number: ${{ steps.get_number.outputs.run_number }}
|
||||
steps:
|
||||
- name: Get number
|
||||
id: get_number
|
||||
run: |
|
||||
echo "${{ github.run_number }}"
|
||||
echo "$(python3 -c 'print(int(${{ github.run_number }}) % 10)')"
|
||||
echo "run_number=$(python3 -c 'print(int(${{ github.run_number }}) % 10)')" >> $GITHUB_OUTPUT
|
||||
build_nightly_ci_images:
|
||||
name: Build Nightly CI Docker Images
|
||||
if: (github.event_name == 'schedule') || ((github.event_name == 'push') && startsWith(github.ref_name, 'run_nightly_ci'))
|
||||
uses: ./.github/workflows/build-nightly-ci-docker-images.yml
|
||||
secrets: inherit
|
||||
|
||||
run_nightly_ci:
|
||||
name: Nightly CI
|
||||
needs: [build_nightly_ci_images]
|
||||
uses: ./.github/workflows/self-nightly-scheduled.yml
|
||||
secrets: inherit
|
||||
|
||||
run_past_ci_pytorch_1-13:
|
||||
name: PyTorch 1.13
|
||||
needs: get_number
|
||||
if: needs.get_number.outputs.run_number == 0 && (cancelled() != true) && ((github.event_name == 'schedule') || ((github.event_name == 'push') && startsWith(github.ref_name, 'run_past_ci')))
|
||||
uses: ./.github/workflows/self-past-caller.yml
|
||||
if: (cancelled() != true) && ((github.event_name == 'schedule') || ((github.event_name == 'push') && startsWith(github.ref_name, 'run_past_ci')))
|
||||
needs: [run_nightly_ci]
|
||||
uses: ./.github/workflows/self-past.yml
|
||||
with:
|
||||
framework: pytorch
|
||||
version: "1.13"
|
||||
@ -34,9 +36,9 @@ jobs:
|
||||
|
||||
run_past_ci_pytorch_1-12:
|
||||
name: PyTorch 1.12
|
||||
needs: get_number
|
||||
if: needs.get_number.outputs.run_number == 1 && (cancelled() != true) && ((github.event_name == 'schedule') || ((github.event_name == 'push') && startsWith(github.ref_name, 'run_past_ci')))
|
||||
uses: ./.github/workflows/self-past-caller.yml
|
||||
if: (cancelled() != true) && ((github.event_name == 'schedule') || ((github.event_name == 'push') && startsWith(github.ref_name, 'run_past_ci')))
|
||||
needs: [run_past_ci_pytorch_1-13]
|
||||
uses: ./.github/workflows/self-past.yml
|
||||
with:
|
||||
framework: pytorch
|
||||
version: "1.12"
|
||||
@ -45,9 +47,9 @@ jobs:
|
||||
|
||||
run_past_ci_pytorch_1-11:
|
||||
name: PyTorch 1.11
|
||||
needs: get_number
|
||||
if: needs.get_number.outputs.run_number == 2 && (cancelled() != true) && ((github.event_name == 'schedule') || ((github.event_name == 'push') && startsWith(github.ref_name, 'run_past_ci')))
|
||||
uses: ./.github/workflows/self-past-caller.yml
|
||||
if: (cancelled() != true) && ((github.event_name == 'schedule') || ((github.event_name == 'push') && startsWith(github.ref_name, 'run_past_ci')))
|
||||
needs: [run_past_ci_pytorch_1-12]
|
||||
uses: ./.github/workflows/self-past.yml
|
||||
with:
|
||||
framework: pytorch
|
||||
version: "1.11"
|
||||
@ -56,9 +58,9 @@ jobs:
|
||||
|
||||
run_past_ci_tensorflow_2-11:
|
||||
name: TensorFlow 2.11
|
||||
needs: get_number
|
||||
if: needs.get_number.outputs.run_number == 3 && (cancelled() != true) && ((github.event_name == 'push') && startsWith(github.ref_name, 'run_past_ci'))
|
||||
uses: ./.github/workflows/self-past-caller.yml
|
||||
if: (cancelled() != true) && ((github.event_name == 'push') && startsWith(github.ref_name, 'run_past_ci'))
|
||||
needs: [run_past_ci_pytorch_1-11]
|
||||
uses: ./.github/workflows/self-past.yml
|
||||
with:
|
||||
framework: tensorflow
|
||||
version: "2.11"
|
||||
@ -67,9 +69,9 @@ jobs:
|
||||
|
||||
run_past_ci_tensorflow_2-10:
|
||||
name: TensorFlow 2.10
|
||||
needs: get_number
|
||||
if: needs.get_number.outputs.run_number == 4 && (cancelled() != true) && ((github.event_name == 'push') && startsWith(github.ref_name, 'run_past_ci'))
|
||||
uses: ./.github/workflows/self-past-caller.yml
|
||||
if: (cancelled() != true) && ((github.event_name == 'push') && startsWith(github.ref_name, 'run_past_ci'))
|
||||
needs: [run_past_ci_tensorflow_2-11]
|
||||
uses: ./.github/workflows/self-past.yml
|
||||
with:
|
||||
framework: tensorflow
|
||||
version: "2.10"
|
||||
@ -78,9 +80,9 @@ jobs:
|
||||
|
||||
run_past_ci_tensorflow_2-9:
|
||||
name: TensorFlow 2.9
|
||||
needs: get_number
|
||||
if: needs.get_number.outputs.run_number == 5 && (cancelled() != true) && ((github.event_name == 'push') && startsWith(github.ref_name, 'run_past_ci'))
|
||||
uses: ./.github/workflows/self-past-caller.yml
|
||||
if: (cancelled() != true) && ((github.event_name == 'push') && startsWith(github.ref_name, 'run_past_ci'))
|
||||
needs: [run_past_ci_tensorflow_2-10]
|
||||
uses: ./.github/workflows/self-past.yml
|
||||
with:
|
||||
framework: tensorflow
|
||||
version: "2.9"
|
||||
@ -89,9 +91,9 @@ jobs:
|
||||
|
||||
run_past_ci_tensorflow_2-8:
|
||||
name: TensorFlow 2.8
|
||||
needs: get_number
|
||||
if: needs.get_number.outputs.run_number == 6 && (cancelled() != true) && ((github.event_name == 'push') && startsWith(github.ref_name, 'run_past_ci'))
|
||||
uses: ./.github/workflows/self-past-caller.yml
|
||||
if: (cancelled() != true) && ((github.event_name == 'push') && startsWith(github.ref_name, 'run_past_ci'))
|
||||
needs: [run_past_ci_tensorflow_2-9]
|
||||
uses: ./.github/workflows/self-past.yml
|
||||
with:
|
||||
framework: tensorflow
|
||||
version: "2.8"
|
||||
@ -100,9 +102,9 @@ jobs:
|
||||
|
||||
run_past_ci_tensorflow_2-7:
|
||||
name: TensorFlow 2.7
|
||||
needs: get_number
|
||||
if: needs.get_number.outputs.run_number == 7 && (cancelled() != true) && ((github.event_name == 'push') && startsWith(github.ref_name, 'run_past_ci'))
|
||||
uses: ./.github/workflows/self-past-caller.yml
|
||||
if: (cancelled() != true) && ((github.event_name == 'push') && startsWith(github.ref_name, 'run_past_ci'))
|
||||
needs: [run_past_ci_tensorflow_2-8]
|
||||
uses: ./.github/workflows/self-past.yml
|
||||
with:
|
||||
framework: tensorflow
|
||||
version: "2.7"
|
||||
@ -111,9 +113,9 @@ jobs:
|
||||
|
||||
run_past_ci_tensorflow_2-6:
|
||||
name: TensorFlow 2.6
|
||||
needs: get_number
|
||||
if: needs.get_number.outputs.run_number == 8 && (cancelled() != true) && ((github.event_name == 'push') && startsWith(github.ref_name, 'run_past_ci'))
|
||||
uses: ./.github/workflows/self-past-caller.yml
|
||||
if: (cancelled() != true) && ((github.event_name == 'push') && startsWith(github.ref_name, 'run_past_ci'))
|
||||
needs: [run_past_ci_tensorflow_2-7]
|
||||
uses: ./.github/workflows/self-past.yml
|
||||
with:
|
||||
framework: tensorflow
|
||||
version: "2.6"
|
||||
@ -122,9 +124,9 @@ jobs:
|
||||
|
||||
run_past_ci_tensorflow_2-5:
|
||||
name: TensorFlow 2.5
|
||||
needs: get_number
|
||||
if: needs.get_number.outputs.run_number == 9 && (cancelled() != true) && ((github.event_name == 'push') && startsWith(github.ref_name, 'run_past_ci'))
|
||||
uses: ./.github/workflows/self-past-caller.yml
|
||||
if: (cancelled() != true) && ((github.event_name == 'push') && startsWith(github.ref_name, 'run_past_ci'))
|
||||
needs: [run_past_ci_tensorflow_2-6]
|
||||
uses: ./.github/workflows/self-past.yml
|
||||
with:
|
||||
framework: tensorflow
|
||||
version: "2.5"
|
||||
|
||||
290
.github/workflows/self-nightly-scheduled.yml
vendored
Normal file
290
.github/workflows/self-nightly-scheduled.yml
vendored
Normal file
@ -0,0 +1,290 @@
|
||||
name: Self-hosted runner (nightly-ci)
|
||||
|
||||
# Note that each job's dependencies go into a corresponding docker file.
|
||||
#
|
||||
# For example for `run_torch_cuda_extensions_gpu` the docker image is
|
||||
# `huggingface/transformers-pytorch-deepspeed-latest-gpu`, which can be found at
|
||||
# `docker/transformers-pytorch-deepspeed-latest-gpu/Dockerfile`
|
||||
|
||||
on:
|
||||
repository_dispatch:
|
||||
workflow_call:
|
||||
|
||||
env:
|
||||
HF_HOME: /mnt/cache
|
||||
TRANSFORMERS_IS_CI: yes
|
||||
OMP_NUM_THREADS: 8
|
||||
MKL_NUM_THREADS: 8
|
||||
RUN_SLOW: yes
|
||||
HF_HUB_READ_TOKEN: ${{ secrets.HF_HUB_READ_TOKEN }}
|
||||
SIGOPT_API_TOKEN: ${{ secrets.SIGOPT_API_TOKEN }}
|
||||
TF_FORCE_GPU_ALLOW_GROWTH: true
|
||||
RUN_PT_TF_CROSS_TESTS: 1
|
||||
CUDA_VISIBLE_DEVICES: 0,1
|
||||
|
||||
jobs:
|
||||
setup:
|
||||
name: Setup
|
||||
strategy:
|
||||
matrix:
|
||||
machine_type: [single-gpu, multi-gpu]
|
||||
runs-on: ['${{ matrix.machine_type }}', nvidia-gpu, t4, past-ci]
|
||||
container:
|
||||
image: huggingface/transformers-all-latest-torch-nightly-gpu
|
||||
options: --gpus 0 --shm-size "16gb" --ipc host -v /mnt/cache/.cache/huggingface:/mnt/cache/
|
||||
outputs:
|
||||
matrix: ${{ steps.set-matrix.outputs.matrix }}
|
||||
steps:
|
||||
- name: Update clone
|
||||
working-directory: /transformers
|
||||
run: |
|
||||
git fetch && git checkout ${{ github.sha }}
|
||||
|
||||
- name: Cleanup
|
||||
working-directory: /transformers
|
||||
run: |
|
||||
rm -rf tests/__pycache__
|
||||
rm -rf tests/models/__pycache__
|
||||
rm -rf reports
|
||||
|
||||
- name: Show installed libraries and their versions
|
||||
working-directory: /transformers
|
||||
run: pip freeze
|
||||
|
||||
- id: set-matrix
|
||||
name: Identify models to test
|
||||
working-directory: /transformers/tests
|
||||
run: |
|
||||
echo "matrix=$(python3 -c 'import os; tests = os.getcwd(); model_tests = os.listdir(os.path.join(tests, "models")); d1 = sorted(list(filter(os.path.isdir, os.listdir(tests)))); d2 = sorted(list(filter(os.path.isdir, [f"models/{x}" for x in model_tests]))); d1.remove("models"); d = d2 + d1; print(d)')" >> $GITHUB_OUTPUT
|
||||
|
||||
- name: NVIDIA-SMI
|
||||
run: |
|
||||
nvidia-smi
|
||||
|
||||
run_tests_single_gpu:
|
||||
name: Model tests
|
||||
strategy:
|
||||
fail-fast: false
|
||||
matrix:
|
||||
folders: ${{ fromJson(needs.setup.outputs.matrix) }}
|
||||
machine_type: [single-gpu]
|
||||
runs-on: ['${{ matrix.machine_type }}', nvidia-gpu, t4, past-ci]
|
||||
container:
|
||||
image: huggingface/transformers-all-latest-torch-nightly-gpu
|
||||
options: --gpus 0 --shm-size "16gb" --ipc host -v /mnt/cache/.cache/huggingface:/mnt/cache/
|
||||
needs: setup
|
||||
steps:
|
||||
- name: Echo folder ${{ matrix.folders }}
|
||||
shell: bash
|
||||
# For folders like `models/bert`, set an env. var. (`matrix_folders`) to `models_bert`, which will be used to
|
||||
# set the artifact folder names (because the character `/` is not allowed).
|
||||
run: |
|
||||
echo "${{ matrix.folders }}"
|
||||
matrix_folders=${{ matrix.folders }}
|
||||
matrix_folders=${matrix_folders/'models/'/'models_'}
|
||||
echo "$matrix_folders"
|
||||
echo "matrix_folders=$matrix_folders" >> $GITHUB_ENV
|
||||
|
||||
- name: Update clone
|
||||
working-directory: /transformers
|
||||
run: git fetch && git checkout ${{ github.sha }}
|
||||
|
||||
- name: Reinstall transformers in edit mode (remove the one installed during docker image build)
|
||||
working-directory: /transformers
|
||||
run: python3 -m pip uninstall -y transformers && python3 -m pip install -e .
|
||||
|
||||
- name: NVIDIA-SMI
|
||||
run: |
|
||||
nvidia-smi
|
||||
|
||||
- name: Environment
|
||||
working-directory: /transformers
|
||||
run: |
|
||||
python3 utils/print_env.py
|
||||
|
||||
- name: Show installed libraries and their versions
|
||||
working-directory: /transformers
|
||||
run: pip freeze
|
||||
|
||||
- name: Run all tests on GPU
|
||||
working-directory: /transformers
|
||||
run: python3 -m pytest -v --make-reports=${{ matrix.machine_type }}_tests_gpu_${{ matrix.folders }} tests/${{ matrix.folders }}
|
||||
|
||||
- name: Failure short reports
|
||||
if: ${{ failure() }}
|
||||
continue-on-error: true
|
||||
run: cat /transformers/reports/${{ matrix.machine_type }}_tests_gpu_${{ matrix.folders }}/failures_short.txt
|
||||
|
||||
- name: "Test suite reports artifacts: ${{ matrix.machine_type }}_run_all_tests_gpu_${{ env.matrix_folders }}_test_reports_postfix_nightly"
|
||||
if: ${{ always() }}
|
||||
uses: actions/upload-artifact@v4
|
||||
with:
|
||||
name: ${{ matrix.machine_type }}_run_all_tests_gpu_${{ env.matrix_folders }}_test_reports_postfix_nightly
|
||||
path: /transformers/reports/${{ matrix.machine_type }}_tests_gpu_${{ matrix.folders }}
|
||||
|
||||
run_tests_multi_gpu:
|
||||
name: Model tests
|
||||
strategy:
|
||||
fail-fast: false
|
||||
matrix:
|
||||
folders: ${{ fromJson(needs.setup.outputs.matrix) }}
|
||||
machine_type: [multi-gpu]
|
||||
runs-on: ['${{ matrix.machine_type }}', nvidia-gpu, t4, past-ci]
|
||||
container:
|
||||
image: huggingface/transformers-all-latest-torch-nightly-gpu
|
||||
options: --gpus all --shm-size "16gb" --ipc host -v /mnt/cache/.cache/huggingface:/mnt/cache/
|
||||
needs: setup
|
||||
steps:
|
||||
- name: Echo folder ${{ matrix.folders }}
|
||||
shell: bash
|
||||
# For folders like `models/bert`, set an env. var. (`matrix_folders`) to `models_bert`, which will be used to
|
||||
# set the artifact folder names (because the character `/` is not allowed).
|
||||
run: |
|
||||
echo "${{ matrix.folders }}"
|
||||
matrix_folders=${{ matrix.folders }}
|
||||
matrix_folders=${matrix_folders/'models/'/'models_'}
|
||||
echo "$matrix_folders"
|
||||
echo "matrix_folders=$matrix_folders" >> $GITHUB_ENV
|
||||
|
||||
- name: Update clone
|
||||
working-directory: /transformers
|
||||
run: git fetch && git checkout ${{ github.sha }}
|
||||
|
||||
- name: Reinstall transformers in edit mode (remove the one installed during docker image build)
|
||||
working-directory: /transformers
|
||||
run: python3 -m pip uninstall -y transformers && python3 -m pip install -e .
|
||||
|
||||
- name: NVIDIA-SMI
|
||||
run: |
|
||||
nvidia-smi
|
||||
|
||||
- name: Environment
|
||||
working-directory: /transformers
|
||||
run: |
|
||||
python3 utils/print_env.py
|
||||
|
||||
- name: Show installed libraries and their versions
|
||||
working-directory: /transformers
|
||||
run: pip freeze
|
||||
|
||||
- name: Run all tests on GPU
|
||||
working-directory: /transformers
|
||||
run: python3 -m pytest -v --make-reports=${{ matrix.machine_type }}_tests_gpu_${{ matrix.folders }} tests/${{ matrix.folders }}
|
||||
|
||||
- name: Failure short reports
|
||||
if: ${{ failure() }}
|
||||
continue-on-error: true
|
||||
run: cat /transformers/reports/${{ matrix.machine_type }}_tests_gpu_${{ matrix.folders }}/failures_short.txt
|
||||
|
||||
- name: "Test suite reports artifacts: ${{ matrix.machine_type }}_run_all_tests_gpu_${{ env.matrix_folders }}_test_reports_postfix_nightly"
|
||||
if: ${{ always() }}
|
||||
uses: actions/upload-artifact@v4
|
||||
with:
|
||||
name: ${{ matrix.machine_type }}_run_all_tests_gpu_${{ env.matrix_folders }}_test_reports_postfix_nightly
|
||||
path: /transformers/reports/${{ matrix.machine_type }}_tests_gpu_${{ matrix.folders }}
|
||||
|
||||
run_torch_cuda_extensions_gpu:
|
||||
name: Torch CUDA extension tests
|
||||
strategy:
|
||||
fail-fast: false
|
||||
matrix:
|
||||
machine_type: [single-gpu, multi-gpu]
|
||||
runs-on: ['${{ matrix.machine_type }}', nvidia-gpu, t4, past-ci]
|
||||
needs: setup
|
||||
container:
|
||||
image: huggingface/transformers-pytorch-deepspeed-nightly-gpu
|
||||
options: --gpus all --shm-size "16gb" --ipc host -v /mnt/cache/.cache/huggingface:/mnt/cache/
|
||||
steps:
|
||||
- name: Update clone
|
||||
working-directory: /workspace/transformers
|
||||
run: git fetch && git checkout ${{ github.sha }}
|
||||
|
||||
- name: Reinstall transformers in edit mode (remove the one installed during docker image build)
|
||||
working-directory: /workspace/transformers
|
||||
run: python3 -m pip uninstall -y transformers && python3 -m pip install -e .
|
||||
|
||||
- name: Remove cached torch extensions
|
||||
run: rm -rf /github/home/.cache/torch_extensions/
|
||||
|
||||
# To avoid unknown test failures
|
||||
- name: Pre build DeepSpeed *again*
|
||||
working-directory: /workspace
|
||||
run: |
|
||||
python3 -m pip uninstall -y deepspeed
|
||||
rm -rf DeepSpeed
|
||||
git clone https://github.com/microsoft/DeepSpeed && cd DeepSpeed && rm -rf build
|
||||
DS_BUILD_CPU_ADAM=1 DS_BUILD_FUSED_ADAM=1 python3 -m pip install . --global-option="build_ext" --global-option="-j8" --no-cache -v --disable-pip-version-check
|
||||
|
||||
- name: NVIDIA-SMI
|
||||
run: |
|
||||
nvidia-smi
|
||||
|
||||
- name: Environment
|
||||
working-directory: /workspace/transformers
|
||||
run: |
|
||||
python utils/print_env.py
|
||||
|
||||
- name: Show installed libraries and their versions
|
||||
working-directory: /workspace/transformers
|
||||
run: pip freeze
|
||||
|
||||
- name: Run all tests on GPU
|
||||
working-directory: /workspace/transformers
|
||||
run: |
|
||||
python -m pytest -v --make-reports=${{ matrix.machine_type }}_run_torch_cuda_extensions_gpu_test_reports tests/deepspeed tests/extended
|
||||
|
||||
- name: Failure short reports
|
||||
if: ${{ failure() }}
|
||||
continue-on-error: true
|
||||
run: cat /workspace/transformers/reports/${{ matrix.machine_type }}_run_torch_cuda_extensions_gpu_test_reports/failures_short.txt
|
||||
|
||||
- name: "Test suite reports artifacts: ${{ matrix.machine_type }}_run_torch_cuda_extensions_gpu_test_reports_postfix_nightly"
|
||||
if: ${{ always() }}
|
||||
uses: actions/upload-artifact@v4
|
||||
with:
|
||||
name: ${{ matrix.machine_type }}_run_torch_cuda_extensions_gpu_test_reports_postfix_nightly
|
||||
path: /workspace/transformers/reports/${{ matrix.machine_type }}_run_torch_cuda_extensions_gpu_test_reports
|
||||
|
||||
send_results:
|
||||
name: Send results to webhook
|
||||
runs-on: ubuntu-22.04
|
||||
if: always()
|
||||
needs: [
|
||||
setup,
|
||||
run_tests_single_gpu,
|
||||
run_tests_multi_gpu,
|
||||
run_torch_cuda_extensions_gpu
|
||||
]
|
||||
steps:
|
||||
- name: Preliminary job status
|
||||
shell: bash
|
||||
# For the meaning of these environment variables, see the job `Setup`
|
||||
run: |
|
||||
echo "Setup status: ${{ needs.setup.result }}"
|
||||
|
||||
- uses: actions/checkout@v4
|
||||
- uses: actions/download-artifact@v4
|
||||
- name: Send message to Slack
|
||||
env:
|
||||
CI_SLACK_BOT_TOKEN: ${{ secrets.CI_SLACK_BOT_TOKEN }}
|
||||
CI_SLACK_CHANNEL_ID: ${{ secrets.CI_SLACK_CHANNEL_ID }}
|
||||
CI_SLACK_CHANNEL_ID_DAILY: ${{ secrets.CI_SLACK_CHANNEL_ID_DAILY }}
|
||||
CI_SLACK_CHANNEL_DUMMY_TESTS: ${{ secrets.CI_SLACK_CHANNEL_DUMMY_TESTS }}
|
||||
CI_SLACK_REPORT_CHANNEL_ID: ${{ secrets.CI_SLACK_CHANNEL_ID_PAST_FUTURE }}
|
||||
ACCESS_REPO_INFO_TOKEN: ${{ secrets.ACCESS_REPO_INFO_TOKEN }}
|
||||
CI_EVENT: Nightly CI
|
||||
SETUP_STATUS: ${{ needs.setup.result }}
|
||||
# We pass `needs.setup.outputs.matrix` as the argument. A processing in `notification_service.py` to change
|
||||
# `models/bert` to `models_bert` is required, as the artifact names use `_` instead of `/`.
|
||||
run: |
|
||||
pip install slack_sdk
|
||||
pip show slack_sdk
|
||||
python utils/notification_service.py "${{ needs.setup.outputs.matrix }}"
|
||||
|
||||
|
||||
# delete-artifact
|
||||
- uses: geekyeggo/delete-artifact@v2
|
||||
with:
|
||||
name: |
|
||||
single-*
|
||||
multi-*
|
||||
40
.github/workflows/self-past-caller.yml
vendored
40
.github/workflows/self-past-caller.yml
vendored
@ -1,40 +0,0 @@
|
||||
name: Self-hosted runner (past-ci)
|
||||
|
||||
|
||||
on:
|
||||
workflow_call:
|
||||
inputs:
|
||||
framework:
|
||||
required: true
|
||||
type: string
|
||||
version:
|
||||
required: true
|
||||
type: string
|
||||
# Use this to control the commit to test against
|
||||
sha:
|
||||
default: 'main'
|
||||
required: false
|
||||
type: string
|
||||
|
||||
jobs:
|
||||
model-ci:
|
||||
name: Model CI
|
||||
uses: ./.github/workflows/self-scheduled.yml
|
||||
with:
|
||||
job: run_models_gpu
|
||||
slack_report_channel: "#transformers-ci-past-future"
|
||||
runner: past-ci
|
||||
docker: huggingface/transformers-${{ inputs.framework }}-past-${{ inputs.version }}-gpu
|
||||
ci_event: Past CI - ${{ inputs.framework }}-${{ inputs.version }}
|
||||
secrets: inherit
|
||||
|
||||
deepspeed-ci:
|
||||
name: DeepSpeed CI
|
||||
uses: ./.github/workflows/self-scheduled.yml
|
||||
with:
|
||||
job: run_torch_cuda_extensions_gpu
|
||||
slack_report_channel: "#transformers-ci-past-future"
|
||||
runner: past-ci
|
||||
docker: huggingface/transformers-${{ inputs.framework }}-past-${{ inputs.version }}-gpu
|
||||
ci_event: Past CI - ${{ inputs.framework }}-${{ inputs.version }}
|
||||
secrets: inherit
|
||||
357
.github/workflows/self-past.yml
vendored
Normal file
357
.github/workflows/self-past.yml
vendored
Normal file
@ -0,0 +1,357 @@
|
||||
name: Self-hosted runner (past-ci)
|
||||
|
||||
# Note that each job's dependencies go into a corresponding docker file.
|
||||
#
|
||||
# For example for `run_torch_cuda_extensions_gpu` the docker image is
|
||||
# `huggingface/transformers-pytorch-deepspeed-latest-gpu`, which can be found at
|
||||
# `docker/transformers-pytorch-deepspeed-latest-gpu/Dockerfile`
|
||||
|
||||
on:
|
||||
workflow_call:
|
||||
inputs:
|
||||
framework:
|
||||
required: true
|
||||
type: string
|
||||
version:
|
||||
required: true
|
||||
type: string
|
||||
# Use this to control the commit to test against
|
||||
sha:
|
||||
default: 'main'
|
||||
required: false
|
||||
type: string
|
||||
|
||||
env:
|
||||
HF_HOME: /mnt/cache
|
||||
TRANSFORMERS_IS_CI: yes
|
||||
OMP_NUM_THREADS: 8
|
||||
MKL_NUM_THREADS: 8
|
||||
RUN_SLOW: yes
|
||||
HF_HUB_READ_TOKEN: ${{ secrets.HF_HUB_READ_TOKEN }}
|
||||
SIGOPT_API_TOKEN: ${{ secrets.SIGOPT_API_TOKEN }}
|
||||
TF_FORCE_GPU_ALLOW_GROWTH: true
|
||||
RUN_PT_TF_CROSS_TESTS: 1
|
||||
CUDA_VISIBLE_DEVICES: 0,1
|
||||
|
||||
jobs:
|
||||
setup:
|
||||
name: Setup
|
||||
strategy:
|
||||
matrix:
|
||||
machine_type: [single-gpu, multi-gpu]
|
||||
runs-on: ['${{ matrix.machine_type }}', nvidia-gpu, t4, past-ci]
|
||||
container:
|
||||
image: huggingface/transformers-${{ inputs.framework }}-past-${{ inputs.version }}-gpu
|
||||
options: --gpus 0 --shm-size "16gb" --ipc host -v /mnt/cache/.cache/huggingface:/mnt/cache/
|
||||
outputs:
|
||||
matrix: ${{ steps.set-matrix.outputs.matrix }}
|
||||
steps:
|
||||
- name: Update clone
|
||||
working-directory: /transformers
|
||||
run: git fetch && git checkout ${{ inputs.sha }}
|
||||
|
||||
- name: Cleanup
|
||||
working-directory: /transformers
|
||||
run: |
|
||||
rm -rf tests/__pycache__
|
||||
rm -rf tests/models/__pycache__
|
||||
rm -rf reports
|
||||
|
||||
- name: Show installed libraries and their versions
|
||||
working-directory: /transformers
|
||||
run: pip freeze
|
||||
|
||||
- id: set-matrix
|
||||
working-directory: /transformers
|
||||
name: Identify models to test
|
||||
run: |
|
||||
cd tests
|
||||
echo "matrix=$(python3 -c 'import os; tests = os.getcwd(); model_tests = os.listdir(os.path.join(tests, "models")); d1 = sorted(list(filter(os.path.isdir, os.listdir(tests)))); d2 = sorted(list(filter(os.path.isdir, [f"models/{x}" for x in model_tests]))); d1.remove("models"); d = d2 + d1; print(d)')" >> $GITHUB_OUTPUT
|
||||
|
||||
run_tests_single_gpu:
|
||||
name: Model tests
|
||||
strategy:
|
||||
fail-fast: false
|
||||
matrix:
|
||||
folders: ${{ fromJson(needs.setup.outputs.matrix) }}
|
||||
machine_type: [single-gpu]
|
||||
runs-on: ['${{ matrix.machine_type }}', nvidia-gpu, t4, past-ci]
|
||||
container:
|
||||
image: huggingface/transformers-${{ inputs.framework }}-past-${{ inputs.version }}-gpu
|
||||
options: --gpus 0 --shm-size "16gb" --ipc host -v /mnt/cache/.cache/huggingface:/mnt/cache/
|
||||
needs: setup
|
||||
steps:
|
||||
- name: Update clone
|
||||
working-directory: /transformers
|
||||
run: git fetch && git checkout ${{ inputs.sha }}
|
||||
|
||||
- name: Reinstall transformers in edit mode (remove the one installed during docker image build)
|
||||
working-directory: /transformers
|
||||
run: python3 -m pip uninstall -y transformers && python3 -m pip install -e .
|
||||
|
||||
- name: Update some packages
|
||||
working-directory: /transformers
|
||||
run: python3 -m pip install -U datasets
|
||||
|
||||
- name: Echo folder ${{ matrix.folders }}
|
||||
shell: bash
|
||||
# For folders like `models/bert`, set an env. var. (`matrix_folders`) to `models_bert`, which will be used to
|
||||
# set the artifact folder names (because the character `/` is not allowed).
|
||||
run: |
|
||||
echo "${{ matrix.folders }}"
|
||||
matrix_folders=${{ matrix.folders }}
|
||||
matrix_folders=${matrix_folders/'models/'/'models_'}
|
||||
echo "$matrix_folders"
|
||||
echo "matrix_folders=$matrix_folders" >> $GITHUB_ENV
|
||||
|
||||
- name: NVIDIA-SMI
|
||||
run: |
|
||||
nvidia-smi
|
||||
|
||||
- name: Install
|
||||
if: inputs.framework == 'pytorch'
|
||||
working-directory: /transformers
|
||||
run: |
|
||||
python3 -m pip install --no-cache-dir git+https://github.com/huggingface/accelerate@main#egg=accelerate
|
||||
|
||||
- name: Environment
|
||||
working-directory: /transformers
|
||||
run: |
|
||||
python3 utils/print_env.py
|
||||
|
||||
- name: Show installed libraries and their versions
|
||||
working-directory: /transformers
|
||||
run: pip freeze
|
||||
|
||||
- name: Run all tests on GPU
|
||||
working-directory: /transformers
|
||||
run: python3 -m pytest -v --make-reports=${{ matrix.machine_type }}_tests_gpu_${{ matrix.folders }} tests/${{ matrix.folders }}
|
||||
|
||||
- name: Failure short reports
|
||||
if: ${{ failure() }}
|
||||
continue-on-error: true
|
||||
run: cat /transformers/reports/${{ matrix.machine_type }}_tests_gpu_${{ matrix.folders }}/failures_short.txt
|
||||
|
||||
- name: Save job name
|
||||
if: ${{ always() }}
|
||||
shell: bash
|
||||
run: |
|
||||
matrix_folders=${matrix_folders/'models_'/'models/'}
|
||||
job_name="Model tests ($matrix_folders, ${{ matrix.machine_type }})"
|
||||
echo "$job_name"
|
||||
echo "$job_name" > /transformers/reports/${{ matrix.machine_type }}_tests_gpu_${{ matrix.folders }}/job_name.txt
|
||||
|
||||
- name: "Test suite reports artifacts: ${{ matrix.machine_type }}_run_all_tests_gpu_${{ env.matrix_folders }}_test_reports_postfix_${{ inputs.framework }}-${{ inputs.version }}"
|
||||
if: ${{ always() }}
|
||||
uses: actions/upload-artifact@v4
|
||||
with:
|
||||
name: ${{ matrix.machine_type }}_run_all_tests_gpu_${{ env.matrix_folders }}_test_reports_postfix_${{ inputs.framework }}-${{ inputs.version }}
|
||||
path: /transformers/reports/${{ matrix.machine_type }}_tests_gpu_${{ matrix.folders }}
|
||||
|
||||
run_tests_multi_gpu:
|
||||
name: Model tests
|
||||
strategy:
|
||||
fail-fast: false
|
||||
matrix:
|
||||
folders: ${{ fromJson(needs.setup.outputs.matrix) }}
|
||||
machine_type: [multi-gpu]
|
||||
runs-on: ['${{ matrix.machine_type }}', nvidia-gpu, t4, past-ci]
|
||||
container:
|
||||
image: huggingface/transformers-${{ inputs.framework }}-past-${{ inputs.version }}-gpu
|
||||
options: --gpus all --shm-size "16gb" --ipc host -v /mnt/cache/.cache/huggingface:/mnt/cache/
|
||||
needs: setup
|
||||
steps:
|
||||
- name: Update clone
|
||||
working-directory: /transformers
|
||||
run: git fetch && git checkout ${{ inputs.sha }}
|
||||
|
||||
- name: Reinstall transformers in edit mode (remove the one installed during docker image build)
|
||||
working-directory: /transformers
|
||||
run: python3 -m pip uninstall -y transformers && python3 -m pip install -e .
|
||||
|
||||
- name: Update some packages
|
||||
working-directory: /transformers
|
||||
run: python3 -m pip install -U datasets
|
||||
|
||||
- name: Echo folder ${{ matrix.folders }}
|
||||
shell: bash
|
||||
# For folders like `models/bert`, set an env. var. (`matrix_folders`) to `models_bert`, which will be used to
|
||||
# set the artifact folder names (because the character `/` is not allowed).
|
||||
run: |
|
||||
echo "${{ matrix.folders }}"
|
||||
matrix_folders=${{ matrix.folders }}
|
||||
matrix_folders=${matrix_folders/'models/'/'models_'}
|
||||
echo "$matrix_folders"
|
||||
echo "matrix_folders=$matrix_folders" >> $GITHUB_ENV
|
||||
|
||||
- name: NVIDIA-SMI
|
||||
run: |
|
||||
nvidia-smi
|
||||
|
||||
- name: Install
|
||||
if: inputs.framework == 'pytorch'
|
||||
working-directory: /transformers
|
||||
run: |
|
||||
python3 -m pip install --no-cache-dir git+https://github.com/huggingface/accelerate@main#egg=accelerate
|
||||
|
||||
- name: Environment
|
||||
working-directory: /transformers
|
||||
run: |
|
||||
python3 utils/print_env.py
|
||||
|
||||
- name: Show installed libraries and their versions
|
||||
working-directory: /transformers
|
||||
run: pip freeze
|
||||
|
||||
- name: Run all tests on GPU
|
||||
working-directory: /transformers
|
||||
run: python3 -m pytest -v --make-reports=${{ matrix.machine_type }}_tests_gpu_${{ matrix.folders }} tests/${{ matrix.folders }}
|
||||
|
||||
- name: Failure short reports
|
||||
if: ${{ failure() }}
|
||||
continue-on-error: true
|
||||
run: cat /transformers/reports/${{ matrix.machine_type }}_tests_gpu_${{ matrix.folders }}/failures_short.txt
|
||||
|
||||
- name: Save job name
|
||||
if: ${{ always() }}
|
||||
shell: bash
|
||||
run: |
|
||||
matrix_folders=${matrix_folders/'models_'/'models/'}
|
||||
job_name="Model tests ($matrix_folders, ${{ matrix.machine_type }})"
|
||||
echo "$job_name"
|
||||
echo "$job_name" > /transformers/reports/${{ matrix.machine_type }}_tests_gpu_${{ matrix.folders }}/job_name.txt
|
||||
|
||||
- name: "Test suite reports artifacts: ${{ matrix.machine_type }}_run_all_tests_gpu_${{ env.matrix_folders }}_test_reports_postfix_${{ inputs.framework }}-${{ inputs.version }}"
|
||||
if: ${{ always() }}
|
||||
uses: actions/upload-artifact@v4
|
||||
with:
|
||||
name: ${{ matrix.machine_type }}_run_all_tests_gpu_${{ env.matrix_folders }}_test_reports_postfix_${{ inputs.framework }}-${{ inputs.version }}
|
||||
path: /transformers/reports/${{ matrix.machine_type }}_tests_gpu_${{ matrix.folders }}
|
||||
|
||||
run_torch_cuda_extensions_gpu:
|
||||
name: Torch CUDA extension tests
|
||||
if: inputs.framework == 'pytorch'
|
||||
strategy:
|
||||
fail-fast: false
|
||||
matrix:
|
||||
machine_type: [single-gpu, multi-gpu]
|
||||
runs-on: ['${{ matrix.machine_type }}', nvidia-gpu, t4, past-ci]
|
||||
needs: setup
|
||||
container:
|
||||
image: huggingface/transformers-${{ inputs.framework }}-past-${{ inputs.version }}-gpu
|
||||
options: --gpus all --shm-size "16gb" --ipc host -v /mnt/cache/.cache/huggingface:/mnt/cache/
|
||||
steps:
|
||||
- name: Update clone
|
||||
working-directory: /transformers
|
||||
run: git fetch && git checkout ${{ github.sha }}
|
||||
|
||||
- name: Reinstall transformers in edit mode (remove the one installed during docker image build)
|
||||
working-directory: /transformers
|
||||
run: python3 -m pip uninstall -y transformers && python3 -m pip install -e .
|
||||
|
||||
- name: Update some packages
|
||||
working-directory: /transformers
|
||||
run: python3 -m pip install -U datasets
|
||||
|
||||
- name: Install
|
||||
working-directory: /transformers
|
||||
run: |
|
||||
python3 -m pip install --no-cache-dir git+https://github.com/huggingface/accelerate@main#egg=accelerate
|
||||
|
||||
- name: Remove cached torch extensions
|
||||
run: rm -rf /github/home/.cache/torch_extensions/
|
||||
|
||||
# To avoid unknown test failures
|
||||
- name: Pre build DeepSpeed *again*
|
||||
working-directory: /
|
||||
run: |
|
||||
python3 -m pip uninstall -y deepspeed
|
||||
rm -rf DeepSpeed
|
||||
git clone https://github.com/microsoft/DeepSpeed && cd DeepSpeed && rm -rf build
|
||||
DS_BUILD_CPU_ADAM=1 DS_BUILD_FUSED_ADAM=1 python3 -m pip install . --global-option="build_ext" --global-option="-j8" --no-cache -v --disable-pip-version-check
|
||||
|
||||
- name: NVIDIA-SMI
|
||||
run: |
|
||||
nvidia-smi
|
||||
|
||||
- name: Environment
|
||||
working-directory: /transformers
|
||||
run: |
|
||||
python3 utils/print_env.py
|
||||
|
||||
- name: Show installed libraries and their versions
|
||||
working-directory: /transformers
|
||||
run: pip freeze
|
||||
|
||||
- name: Run all tests on GPU
|
||||
working-directory: /transformers
|
||||
run: |
|
||||
python3 -m pytest -v --make-reports=${{ matrix.machine_type }}_run_torch_cuda_extensions_gpu_test_reports tests/deepspeed tests/extended
|
||||
|
||||
- name: Failure short reports
|
||||
if: ${{ failure() }}
|
||||
continue-on-error: true
|
||||
run: cat /transformers/reports/${{ matrix.machine_type }}_run_torch_cuda_extensions_gpu_test_reports/failures_short.txt
|
||||
|
||||
- name: "Test suite reports artifacts: ${{ matrix.machine_type }}_run_torch_cuda_extensions_gpu_test_reports_postfix_${{ inputs.framework }}-${{ inputs.version }}"
|
||||
if: ${{ always() }}
|
||||
uses: actions/upload-artifact@v4
|
||||
with:
|
||||
name: ${{ matrix.machine_type }}_run_torch_cuda_extensions_gpu_test_reports_postfix_${{ inputs.framework }}-${{ inputs.version }}
|
||||
path: /transformers/reports/${{ matrix.machine_type }}_run_torch_cuda_extensions_gpu_test_reports
|
||||
|
||||
send_results:
|
||||
name: Send results to webhook
|
||||
runs-on: ubuntu-22.04
|
||||
if: always()
|
||||
needs: [
|
||||
setup,
|
||||
run_tests_single_gpu,
|
||||
run_tests_multi_gpu,
|
||||
run_torch_cuda_extensions_gpu
|
||||
]
|
||||
steps:
|
||||
- name: Preliminary job status
|
||||
shell: bash
|
||||
# For the meaning of these environment variables, see the job `Setup`
|
||||
run: |
|
||||
echo "Setup status: ${{ needs.setup.result }}"
|
||||
|
||||
- uses: actions/checkout@v4
|
||||
- uses: actions/download-artifact@v4
|
||||
|
||||
# Create a directory to store test failure tables in the next step
|
||||
- name: Create directory
|
||||
run: mkdir test_failure_tables
|
||||
|
||||
- name: Send message to Slack
|
||||
env:
|
||||
CI_SLACK_BOT_TOKEN: ${{ secrets.CI_SLACK_BOT_TOKEN }}
|
||||
CI_SLACK_CHANNEL_ID: ${{ secrets.CI_SLACK_CHANNEL_ID }}
|
||||
CI_SLACK_CHANNEL_ID_DAILY: ${{ secrets.CI_SLACK_CHANNEL_ID_DAILY }}
|
||||
CI_SLACK_CHANNEL_DUMMY_TESTS: ${{ secrets.CI_SLACK_CHANNEL_DUMMY_TESTS }}
|
||||
CI_SLACK_REPORT_CHANNEL_ID: ${{ secrets.CI_SLACK_CHANNEL_ID_PAST_FUTURE }}
|
||||
ACCESS_REPO_INFO_TOKEN: ${{ secrets.ACCESS_REPO_INFO_TOKEN }}
|
||||
CI_EVENT: Past CI - ${{ inputs.framework }}-${{ inputs.version }}
|
||||
SETUP_STATUS: ${{ needs.setup.result }}
|
||||
# We pass `needs.setup.outputs.matrix` as the argument. A processing in `notification_service.py` to change
|
||||
# `models/bert` to `models_bert` is required, as the artifact names use `_` instead of `/`.
|
||||
run: |
|
||||
pip install slack_sdk
|
||||
pip show slack_sdk
|
||||
python utils/notification_service.py "${{ needs.setup.outputs.matrix }}"
|
||||
|
||||
# Upload complete failure tables, as they might be big and only truncated versions could be sent to Slack.
|
||||
- name: Failure table artifacts
|
||||
if: ${{ always() }}
|
||||
uses: actions/upload-artifact@v4
|
||||
with:
|
||||
name: test_failure_tables_${{ inputs.framework }}-${{ inputs.version }}
|
||||
path: test_failure_tables
|
||||
|
||||
# delete-artifact
|
||||
- uses: geekyeggo/delete-artifact@v2
|
||||
with:
|
||||
name: |
|
||||
single-*
|
||||
multi-*
|
||||
2
.github/workflows/self-pr-slow-ci.yml
vendored
2
.github/workflows/self-pr-slow-ci.yml
vendored
@ -4,7 +4,7 @@ on:
|
||||
pull_request:
|
||||
paths:
|
||||
- "src/transformers/models/*/modeling_*.py"
|
||||
- "tests/**/test_*.py"
|
||||
- "tests/models/*/test_*.py"
|
||||
|
||||
concurrency:
|
||||
group: ${{ github.workflow }}-${{ github.head_ref || github.run_id }}
|
||||
|
||||
38
.github/workflows/self-push-amd.yml
vendored
38
.github/workflows/self-push-amd.yml
vendored
@ -64,24 +64,23 @@ jobs:
|
||||
outputs:
|
||||
matrix: ${{ steps.set-matrix.outputs.matrix }}
|
||||
test_map: ${{ steps.set-matrix.outputs.test_map }}
|
||||
env:
|
||||
# `CI_BRANCH_PUSH`: The branch name from the push event
|
||||
# `CI_BRANCH_WORKFLOW_RUN`: The name of the branch on which this workflow is triggered by `workflow_run` event
|
||||
# `CI_SHA_PUSH`: The commit SHA from the push event
|
||||
# `CI_SHA_WORKFLOW_RUN`: The commit SHA that triggers this workflow by `workflow_run` event
|
||||
CI_BRANCH_PUSH: ${{ github.event.ref }}
|
||||
CI_BRANCH_WORKFLOW_RUN: ${{ github.event.workflow_run.head_branch }}
|
||||
CI_SHA_PUSH: ${{ github.event.head_commit.id }}
|
||||
CI_SHA_WORKFLOW_RUN: ${{ github.event.workflow_run.head_sha }}
|
||||
steps:
|
||||
# Necessary to get the correct branch name and commit SHA for `workflow_run` event
|
||||
# We also take into account the `push` event (we might want to test some changes in a branch)
|
||||
- name: Prepare custom environment variables
|
||||
shell: bash
|
||||
# `CI_BRANCH_PUSH`: The branch name from the push event
|
||||
# `CI_BRANCH_WORKFLOW_RUN`: The name of the branch on which this workflow is triggered by `workflow_run` event
|
||||
# `CI_BRANCH`: The non-empty branch name from the above two (one and only one of them is empty)
|
||||
# `CI_SHA_PUSH`: The commit SHA from the push event
|
||||
# `CI_SHA_WORKFLOW_RUN`: The commit SHA that triggers this workflow by `workflow_run` event
|
||||
# `CI_SHA`: The non-empty commit SHA from the above two (one and only one of them is empty)
|
||||
run: |
|
||||
CI_BRANCH_PUSH=${{ github.event.ref }}
|
||||
CI_BRANCH_PUSH=${CI_BRANCH_PUSH/'refs/heads/'/''}
|
||||
CI_BRANCH_WORKFLOW_RUN=${{ github.event.workflow_run.head_branch }}
|
||||
CI_SHA_PUSH=${{ github.event.head_commit.id }}
|
||||
CI_SHA_WORKFLOW_RUN=${{ github.event.workflow_run.head_sha }}
|
||||
echo $CI_BRANCH_PUSH
|
||||
echo $CI_BRANCH_WORKFLOW_RUN
|
||||
echo $CI_SHA_PUSH
|
||||
@ -160,12 +159,6 @@ jobs:
|
||||
container:
|
||||
image: huggingface/transformers-pytorch-amd-gpu-push-ci # <--- We test only for PyTorch for now
|
||||
options: --device /dev/kfd --device /dev/dri --env ROCR_VISIBLE_DEVICES --shm-size "16gb" --ipc host -v /mnt/cache/.cache/huggingface:/mnt/cache/
|
||||
env:
|
||||
# For the meaning of these environment variables, see the job `Setup`
|
||||
CI_BRANCH_PUSH: ${{ github.event.ref }}
|
||||
CI_BRANCH_WORKFLOW_RUN: ${{ github.event.workflow_run.head_branch }}
|
||||
CI_SHA_PUSH: ${{ github.event.head_commit.id }}
|
||||
CI_SHA_WORKFLOW_RUN: ${{ github.event.workflow_run.head_sha }}
|
||||
steps:
|
||||
# Necessary to get the correct branch name and commit SHA for `workflow_run` event
|
||||
# We also take into account the `push` event (we might want to test some changes in a branch)
|
||||
@ -173,7 +166,11 @@ jobs:
|
||||
shell: bash
|
||||
# For the meaning of these environment variables, see the job `Setup`
|
||||
run: |
|
||||
CI_BRANCH_PUSH=${{ github.event.ref }}
|
||||
CI_BRANCH_PUSH=${CI_BRANCH_PUSH/'refs/heads/'/''}
|
||||
CI_BRANCH_WORKFLOW_RUN=${{ github.event.workflow_run.head_branch }}
|
||||
CI_SHA_PUSH=${{ github.event.head_commit.id }}
|
||||
CI_SHA_WORKFLOW_RUN=${{ github.event.workflow_run.head_sha }}
|
||||
echo $CI_BRANCH_PUSH
|
||||
echo $CI_BRANCH_WORKFLOW_RUN
|
||||
echo $CI_SHA_PUSH
|
||||
@ -259,12 +256,6 @@ jobs:
|
||||
# run_tests_torch_cuda_extensions_single_gpu,
|
||||
# run_tests_torch_cuda_extensions_multi_gpu
|
||||
]
|
||||
env:
|
||||
# For the meaning of these environment variables, see the job `Setup`
|
||||
CI_BRANCH_PUSH: ${{ github.event.ref }}
|
||||
CI_BRANCH_WORKFLOW_RUN: ${{ github.event.workflow_run.head_branch }}
|
||||
CI_SHA_PUSH: ${{ github.event.head_commit.id }}
|
||||
CI_SHA_WORKFLOW_RUN: ${{ github.event.workflow_run.head_sha }}
|
||||
steps:
|
||||
- name: Preliminary job status
|
||||
shell: bash
|
||||
@ -280,7 +271,11 @@ jobs:
|
||||
shell: bash
|
||||
# For the meaning of these environment variables, see the job `Setup`
|
||||
run: |
|
||||
CI_BRANCH_PUSH=${{ github.event.ref }}
|
||||
CI_BRANCH_PUSH=${CI_BRANCH_PUSH/'refs/heads/'/''}
|
||||
CI_BRANCH_WORKFLOW_RUN=${{ github.event.workflow_run.head_branch }}
|
||||
CI_SHA_PUSH=${{ github.event.head_commit.id }}
|
||||
CI_SHA_WORKFLOW_RUN=${{ github.event.workflow_run.head_sha }}
|
||||
echo $CI_BRANCH_PUSH
|
||||
echo $CI_BRANCH_WORKFLOW_RUN
|
||||
echo $CI_SHA_PUSH
|
||||
@ -329,7 +324,6 @@ jobs:
|
||||
# We pass `needs.setup_gpu.outputs.matrix` as the argument. A processing in `notification_service.py` to change
|
||||
# `models/bert` to `models_bert` is required, as the artifact names use `_` instead of `/`.
|
||||
run: |
|
||||
pip install huggingface_hub
|
||||
pip install slack_sdk
|
||||
pip show slack_sdk
|
||||
python utils/notification_service.py "${{ needs.setup_gpu.outputs.matrix }}"
|
||||
|
||||
70
.github/workflows/self-push.yml
vendored
70
.github/workflows/self-push.yml
vendored
@ -40,24 +40,23 @@ jobs:
|
||||
outputs:
|
||||
matrix: ${{ steps.set-matrix.outputs.matrix }}
|
||||
test_map: ${{ steps.set-matrix.outputs.test_map }}
|
||||
env:
|
||||
# `CI_BRANCH_PUSH`: The branch name from the push event
|
||||
# `CI_BRANCH_WORKFLOW_RUN`: The name of the branch on which this workflow is triggered by `workflow_run` event
|
||||
# `CI_SHA_PUSH`: The commit SHA from the push event
|
||||
# `CI_SHA_WORKFLOW_RUN`: The commit SHA that triggers this workflow by `workflow_run` event
|
||||
CI_BRANCH_PUSH: ${{ github.event.ref }}
|
||||
CI_BRANCH_WORKFLOW_RUN: ${{ github.event.workflow_run.head_branch }}
|
||||
CI_SHA_PUSH: ${{ github.event.head_commit.id }}
|
||||
CI_SHA_WORKFLOW_RUN: ${{ github.event.workflow_run.head_sha }}
|
||||
steps:
|
||||
# Necessary to get the correct branch name and commit SHA for `workflow_run` event
|
||||
# We also take into account the `push` event (we might want to test some changes in a branch)
|
||||
- name: Prepare custom environment variables
|
||||
shell: bash
|
||||
# `CI_BRANCH_PUSH`: The branch name from the push event
|
||||
# `CI_BRANCH_WORKFLOW_RUN`: The name of the branch on which this workflow is triggered by `workflow_run` event
|
||||
# `CI_BRANCH`: The non-empty branch name from the above two (one and only one of them is empty)
|
||||
# `CI_SHA_PUSH`: The commit SHA from the push event
|
||||
# `CI_SHA_WORKFLOW_RUN`: The commit SHA that triggers this workflow by `workflow_run` event
|
||||
# `CI_SHA`: The non-empty commit SHA from the above two (one and only one of them is empty)
|
||||
run: |
|
||||
CI_BRANCH_PUSH=${{ github.event.ref }}
|
||||
CI_BRANCH_PUSH=${CI_BRANCH_PUSH/'refs/heads/'/''}
|
||||
CI_BRANCH_WORKFLOW_RUN=${{ github.event.workflow_run.head_branch }}
|
||||
CI_SHA_PUSH=${{ github.event.head_commit.id }}
|
||||
CI_SHA_WORKFLOW_RUN=${{ github.event.workflow_run.head_sha }}
|
||||
echo $CI_BRANCH_PUSH
|
||||
echo $CI_BRANCH_WORKFLOW_RUN
|
||||
echo $CI_SHA_PUSH
|
||||
@ -136,12 +135,6 @@ jobs:
|
||||
container:
|
||||
image: huggingface/transformers-all-latest-gpu-push-ci
|
||||
options: --gpus 0 --shm-size "16gb" --ipc host -v /mnt/cache/.cache/huggingface:/mnt/cache/
|
||||
env:
|
||||
# For the meaning of these environment variables, see the job `Setup`
|
||||
CI_BRANCH_PUSH: ${{ github.event.ref }}
|
||||
CI_BRANCH_WORKFLOW_RUN: ${{ github.event.workflow_run.head_branch }}
|
||||
CI_SHA_PUSH: ${{ github.event.head_commit.id }}
|
||||
CI_SHA_WORKFLOW_RUN: ${{ github.event.workflow_run.head_sha }}
|
||||
steps:
|
||||
# Necessary to get the correct branch name and commit SHA for `workflow_run` event
|
||||
# We also take into account the `push` event (we might want to test some changes in a branch)
|
||||
@ -149,7 +142,11 @@ jobs:
|
||||
shell: bash
|
||||
# For the meaning of these environment variables, see the job `Setup`
|
||||
run: |
|
||||
CI_BRANCH_PUSH=${{ github.event.ref }}
|
||||
CI_BRANCH_PUSH=${CI_BRANCH_PUSH/'refs/heads/'/''}
|
||||
CI_BRANCH_WORKFLOW_RUN=${{ github.event.workflow_run.head_branch }}
|
||||
CI_SHA_PUSH=${{ github.event.head_commit.id }}
|
||||
CI_SHA_WORKFLOW_RUN=${{ github.event.workflow_run.head_sha }}
|
||||
echo $CI_BRANCH_PUSH
|
||||
echo $CI_BRANCH_WORKFLOW_RUN
|
||||
echo $CI_SHA_PUSH
|
||||
@ -231,12 +228,6 @@ jobs:
|
||||
container:
|
||||
image: huggingface/transformers-all-latest-gpu-push-ci
|
||||
options: --gpus all --shm-size "16gb" --ipc host -v /mnt/cache/.cache/huggingface:/mnt/cache/
|
||||
env:
|
||||
# For the meaning of these environment variables, see the job `Setup`
|
||||
CI_BRANCH_PUSH: ${{ github.event.ref }}
|
||||
CI_BRANCH_WORKFLOW_RUN: ${{ github.event.workflow_run.head_branch }}
|
||||
CI_SHA_PUSH: ${{ github.event.head_commit.id }}
|
||||
CI_SHA_WORKFLOW_RUN: ${{ github.event.workflow_run.head_sha }}
|
||||
steps:
|
||||
# Necessary to get the correct branch name and commit SHA for `workflow_run` event
|
||||
# We also take into account the `push` event (we might want to test some changes in a branch)
|
||||
@ -244,7 +235,11 @@ jobs:
|
||||
shell: bash
|
||||
# For the meaning of these environment variables, see the job `Setup`
|
||||
run: |
|
||||
CI_BRANCH_PUSH=${{ github.event.ref }}
|
||||
CI_BRANCH_PUSH=${CI_BRANCH_PUSH/'refs/heads/'/''}
|
||||
CI_BRANCH_WORKFLOW_RUN=${{ github.event.workflow_run.head_branch }}
|
||||
CI_SHA_PUSH=${{ github.event.head_commit.id }}
|
||||
CI_SHA_WORKFLOW_RUN=${{ github.event.workflow_run.head_sha }}
|
||||
echo $CI_BRANCH_PUSH
|
||||
echo $CI_BRANCH_WORKFLOW_RUN
|
||||
echo $CI_SHA_PUSH
|
||||
@ -326,12 +321,6 @@ jobs:
|
||||
container:
|
||||
image: huggingface/transformers-pytorch-deepspeed-latest-gpu-push-ci
|
||||
options: --gpus 0 --shm-size "16gb" --ipc host -v /mnt/cache/.cache/huggingface:/mnt/cache/
|
||||
env:
|
||||
# For the meaning of these environment variables, see the job `Setup`
|
||||
CI_BRANCH_PUSH: ${{ github.event.ref }}
|
||||
CI_BRANCH_WORKFLOW_RUN: ${{ github.event.workflow_run.head_branch }}
|
||||
CI_SHA_PUSH: ${{ github.event.head_commit.id }}
|
||||
CI_SHA_WORKFLOW_RUN: ${{ github.event.workflow_run.head_sha }}
|
||||
steps:
|
||||
# Necessary to get the correct branch name and commit SHA for `workflow_run` event
|
||||
# We also take into account the `push` event (we might want to test some changes in a branch)
|
||||
@ -339,7 +328,11 @@ jobs:
|
||||
shell: bash
|
||||
# For the meaning of these environment variables, see the job `Setup`
|
||||
run: |
|
||||
CI_BRANCH_PUSH=${{ github.event.ref }}
|
||||
CI_BRANCH_PUSH=${CI_BRANCH_PUSH/'refs/heads/'/''}
|
||||
CI_BRANCH_WORKFLOW_RUN=${{ github.event.workflow_run.head_branch }}
|
||||
CI_SHA_PUSH=${{ github.event.head_commit.id }}
|
||||
CI_SHA_WORKFLOW_RUN=${{ github.event.workflow_run.head_sha }}
|
||||
echo $CI_BRANCH_PUSH
|
||||
echo $CI_BRANCH_WORKFLOW_RUN
|
||||
echo $CI_SHA_PUSH
|
||||
@ -418,12 +411,6 @@ jobs:
|
||||
container:
|
||||
image: huggingface/transformers-pytorch-deepspeed-latest-gpu-push-ci
|
||||
options: --gpus all --shm-size "16gb" --ipc host -v /mnt/cache/.cache/huggingface:/mnt/cache/
|
||||
env:
|
||||
# For the meaning of these environment variables, see the job `Setup`
|
||||
CI_BRANCH_PUSH: ${{ github.event.ref }}
|
||||
CI_BRANCH_WORKFLOW_RUN: ${{ github.event.workflow_run.head_branch }}
|
||||
CI_SHA_PUSH: ${{ github.event.head_commit.id }}
|
||||
CI_SHA_WORKFLOW_RUN: ${{ github.event.workflow_run.head_sha }}
|
||||
steps:
|
||||
# Necessary to get the correct branch name and commit SHA for `workflow_run` event
|
||||
# We also take into account the `push` event (we might want to test some changes in a branch)
|
||||
@ -431,7 +418,11 @@ jobs:
|
||||
shell: bash
|
||||
# For the meaning of these environment variables, see the job `Setup`
|
||||
run: |
|
||||
CI_BRANCH_PUSH=${{ github.event.ref }}
|
||||
CI_BRANCH_PUSH=${CI_BRANCH_PUSH/'refs/heads/'/''}
|
||||
CI_BRANCH_WORKFLOW_RUN=${{ github.event.workflow_run.head_branch }}
|
||||
CI_SHA_PUSH=${{ github.event.head_commit.id }}
|
||||
CI_SHA_WORKFLOW_RUN=${{ github.event.workflow_run.head_sha }}
|
||||
echo $CI_BRANCH_PUSH
|
||||
echo $CI_BRANCH_WORKFLOW_RUN
|
||||
echo $CI_SHA_PUSH
|
||||
@ -509,12 +500,6 @@ jobs:
|
||||
run_tests_torch_cuda_extensions_single_gpu,
|
||||
run_tests_torch_cuda_extensions_multi_gpu
|
||||
]
|
||||
env:
|
||||
# For the meaning of these environment variables, see the job `Setup`
|
||||
CI_BRANCH_PUSH: ${{ github.event.ref }}
|
||||
CI_BRANCH_WORKFLOW_RUN: ${{ github.event.workflow_run.head_branch }}
|
||||
CI_SHA_PUSH: ${{ github.event.head_commit.id }}
|
||||
CI_SHA_WORKFLOW_RUN: ${{ github.event.workflow_run.head_sha }}
|
||||
steps:
|
||||
- name: Preliminary job status
|
||||
shell: bash
|
||||
@ -528,7 +513,11 @@ jobs:
|
||||
shell: bash
|
||||
# For the meaning of these environment variables, see the job `Setup`
|
||||
run: |
|
||||
CI_BRANCH_PUSH=${{ github.event.ref }}
|
||||
CI_BRANCH_PUSH=${CI_BRANCH_PUSH/'refs/heads/'/''}
|
||||
CI_BRANCH_WORKFLOW_RUN=${{ github.event.workflow_run.head_branch }}
|
||||
CI_SHA_PUSH=${{ github.event.head_commit.id }}
|
||||
CI_SHA_WORKFLOW_RUN=${{ github.event.workflow_run.head_sha }}
|
||||
echo $CI_BRANCH_PUSH
|
||||
echo $CI_BRANCH_WORKFLOW_RUN
|
||||
echo $CI_SHA_PUSH
|
||||
@ -574,7 +563,6 @@ jobs:
|
||||
# We pass `needs.setup.outputs.matrix` as the argument. A processing in `notification_service.py` to change
|
||||
# `models/bert` to `models_bert` is required, as the artifact names use `_` instead of `/`.
|
||||
run: |
|
||||
pip install huggingface_hub
|
||||
pip install slack_sdk
|
||||
pip install slack_sdk
|
||||
pip show slack_sdk
|
||||
python utils/notification_service.py "${{ needs.setup.outputs.matrix }}"
|
||||
|
||||
@ -10,46 +10,11 @@ on:
|
||||
- run_amd_scheduled_ci_caller*
|
||||
|
||||
jobs:
|
||||
model-ci:
|
||||
name: Model CI
|
||||
run_amd_ci:
|
||||
name: AMD mi210
|
||||
if: (cancelled() != true) && ((github.event_name == 'workflow_run') || ((github.event_name == 'push') && startsWith(github.ref_name, 'run_amd_scheduled_ci_caller')))
|
||||
uses: ./.github/workflows/self-scheduled-amd.yml
|
||||
with:
|
||||
job: run_models_gpu
|
||||
gpu_flavor: mi210
|
||||
slack_report_channel: "#transformers-ci-daily-amd"
|
||||
runner: mi210
|
||||
docker: huggingface/transformers-pytorch-amd-gpu
|
||||
ci_event: Scheduled CI (AMD) - mi210
|
||||
secrets: inherit
|
||||
|
||||
torch-pipeline:
|
||||
name: Torch pipeline CI
|
||||
uses: ./.github/workflows/self-scheduled-amd.yml
|
||||
with:
|
||||
job: run_pipelines_torch_gpu
|
||||
slack_report_channel: "#transformers-ci-daily-amd"
|
||||
runner: mi210
|
||||
docker: huggingface/transformers-pytorch-amd-gpu
|
||||
ci_event: Scheduled CI (AMD) - mi210
|
||||
secrets: inherit
|
||||
|
||||
example-ci:
|
||||
name: Example CI
|
||||
uses: ./.github/workflows/self-scheduled-amd.yml
|
||||
with:
|
||||
job: run_examples_gpu
|
||||
slack_report_channel: "#transformers-ci-daily-amd"
|
||||
runner: mi210
|
||||
docker: huggingface/transformers-pytorch-amd-gpu
|
||||
ci_event: Scheduled CI (AMD) - mi210
|
||||
secrets: inherit
|
||||
|
||||
deepspeed-ci:
|
||||
name: DeepSpeed CI
|
||||
uses: ./.github/workflows/self-scheduled-amd.yml
|
||||
with:
|
||||
job: run_torch_cuda_extensions_gpu
|
||||
slack_report_channel: "#transformers-ci-daily-amd"
|
||||
runner: mi210
|
||||
docker: huggingface/transformers-pytorch-deepspeed-amd-gpu
|
||||
ci_event: Scheduled CI (AMD) - mi210
|
||||
secrets: inherit
|
||||
|
||||
@ -10,46 +10,11 @@ on:
|
||||
- run_amd_scheduled_ci_caller*
|
||||
|
||||
jobs:
|
||||
model-ci:
|
||||
name: Model CI
|
||||
run_amd_ci:
|
||||
name: AMD mi250
|
||||
if: (cancelled() != true) && ((github.event_name == 'workflow_run') || ((github.event_name == 'push') && startsWith(github.ref_name, 'run_amd_scheduled_ci_caller')))
|
||||
uses: ./.github/workflows/self-scheduled-amd.yml
|
||||
with:
|
||||
job: run_models_gpu
|
||||
gpu_flavor: mi250
|
||||
slack_report_channel: "#transformers-ci-daily-amd"
|
||||
runner: mi250
|
||||
docker: huggingface/transformers-pytorch-amd-gpu
|
||||
ci_event: Scheduled CI (AMD) - mi250
|
||||
secrets: inherit
|
||||
|
||||
torch-pipeline:
|
||||
name: Torch pipeline CI
|
||||
uses: ./.github/workflows/self-scheduled-amd.yml
|
||||
with:
|
||||
job: run_pipelines_torch_gpu
|
||||
slack_report_channel: "#transformers-ci-daily-amd"
|
||||
runner: mi250
|
||||
docker: huggingface/transformers-pytorch-amd-gpu
|
||||
ci_event: Scheduled CI (AMD) - mi250
|
||||
secrets: inherit
|
||||
|
||||
example-ci:
|
||||
name: Example CI
|
||||
uses: ./.github/workflows/self-scheduled-amd.yml
|
||||
with:
|
||||
job: run_examples_gpu
|
||||
slack_report_channel: "#transformers-ci-daily-amd"
|
||||
runner: mi250
|
||||
docker: huggingface/transformers-pytorch-amd-gpu
|
||||
ci_event: Scheduled CI (AMD) - mi250
|
||||
secrets: inherit
|
||||
|
||||
deepspeed-ci:
|
||||
name: DeepSpeed CI
|
||||
uses: ./.github/workflows/self-scheduled-amd.yml
|
||||
with:
|
||||
job: run_torch_cuda_extensions_gpu
|
||||
slack_report_channel: "#transformers-ci-daily-amd"
|
||||
runner: mi250
|
||||
docker: huggingface/transformers-pytorch-deepspeed-amd-gpu
|
||||
ci_event: Scheduled CI (AMD) - mi250
|
||||
secrets: inherit
|
||||
|
||||
21
.github/workflows/self-scheduled-amd-mi300-caller.yml
vendored
Normal file
21
.github/workflows/self-scheduled-amd-mi300-caller.yml
vendored
Normal file
@ -0,0 +1,21 @@
|
||||
name: Self-hosted runner (AMD mi300 scheduled CI caller)
|
||||
|
||||
on:
|
||||
workflow_run:
|
||||
workflows: ["Self-hosted runner (AMD scheduled CI caller)"]
|
||||
branches: ["main"]
|
||||
types: [completed]
|
||||
push:
|
||||
branches:
|
||||
- run_amd_scheduled_ci_caller*
|
||||
|
||||
jobs:
|
||||
run_amd_ci:
|
||||
name: AMD mi300
|
||||
needs: build-docker-containers
|
||||
if: (cancelled() != true) && ((github.event_name == 'workflow_run') || ((github.event_name == 'push') && (startsWith(github.ref_name, 'run_amd_push_ci_caller') || startsWith(github.ref_name, 'mi300-ci'))))
|
||||
uses: ./.github/workflows/self-scheduled-amd.yml
|
||||
with:
|
||||
gpu_flavor: mi300
|
||||
slack_report_channel: "#transformers-ci-daily-amd"
|
||||
secrets: inherit
|
||||
346
.github/workflows/self-scheduled-amd.yml
vendored
346
.github/workflows/self-scheduled-amd.yml
vendored
@ -3,23 +3,10 @@ name: Self-hosted runner (scheduled-amd)
|
||||
# Note: For the AMD CI, we rely on a caller workflow and on the workflow_call event to trigger the
|
||||
# CI in order to run it on both MI210 and MI250, without having to use matrix here which pushes
|
||||
# us towards the limit of allowed jobs on GitHub Actions.
|
||||
|
||||
on:
|
||||
workflow_call:
|
||||
inputs:
|
||||
job:
|
||||
required: true
|
||||
type: string
|
||||
slack_report_channel:
|
||||
required: true
|
||||
type: string
|
||||
runner:
|
||||
required: true
|
||||
type: string
|
||||
docker:
|
||||
required: true
|
||||
type: string
|
||||
ci_event:
|
||||
gpu_flavor:
|
||||
required: true
|
||||
type: string
|
||||
|
||||
@ -31,7 +18,7 @@ env:
|
||||
RUN_SLOW: yes
|
||||
HF_HUB_READ_TOKEN: ${{ secrets.HF_HUB_READ_TOKEN }}
|
||||
SIGOPT_API_TOKEN: ${{ secrets.SIGOPT_API_TOKEN }}
|
||||
NUM_SLICES: 2
|
||||
|
||||
|
||||
# Important note: each job (run_tests_single_gpu, run_tests_multi_gpu, run_examples_gpu, run_pipelines_torch_gpu) requires all the previous jobs before running.
|
||||
# This is done so that we avoid parallelizing the scheduled tests, to leave available
|
||||
@ -55,7 +42,7 @@ jobs:
|
||||
strategy:
|
||||
matrix:
|
||||
machine_type: [single-gpu, multi-gpu]
|
||||
runs-on: ['${{ matrix.machine_type }}', self-hosted, amd-gpu, '${{ inputs.runner }}']
|
||||
runs-on: [self-hosted, amd-gpu, '${{ matrix.machine_type }}', '${{ inputs.gpu_flavor }}']
|
||||
container:
|
||||
image: huggingface/transformers-pytorch-amd-gpu
|
||||
options: --device /dev/kfd --device /dev/dri --env ROCR_VISIBLE_DEVICES --shm-size "16gb" --ipc host -v /mnt/cache/.cache/huggingface:/mnt/cache/
|
||||
@ -63,29 +50,25 @@ jobs:
|
||||
- name: ROCM-SMI
|
||||
run: |
|
||||
rocm-smi
|
||||
|
||||
- name: ROCM-INFO
|
||||
run: |
|
||||
rocminfo | grep "Agent" -A 14
|
||||
|
||||
- name: Show ROCR environment
|
||||
run: |
|
||||
echo "ROCR: $ROCR_VISIBLE_DEVICES"
|
||||
|
||||
setup:
|
||||
if: contains(fromJSON('["run_models_gpu"]'), inputs.job)
|
||||
name: Setup
|
||||
needs: check_runners
|
||||
strategy:
|
||||
matrix:
|
||||
machine_type: [single-gpu, multi-gpu]
|
||||
runs-on: ['${{ matrix.machine_type }}', self-hosted, amd-gpu, '${{ inputs.runner }}']
|
||||
runs-on: [self-hosted, amd-gpu, '${{ matrix.machine_type }}', '${{ inputs.gpu_flavor }}']
|
||||
container:
|
||||
image: huggingface/transformers-pytorch-amd-gpu
|
||||
options: --device /dev/kfd --device /dev/dri --env ROCR_VISIBLE_DEVICES --shm-size "16gb" --ipc host -v /mnt/cache/.cache/huggingface:/mnt/cache/
|
||||
outputs:
|
||||
folder_slices: ${{ steps.set-matrix.outputs.folder_slices }}
|
||||
slice_ids: ${{ steps.set-matrix.outputs.slice_ids }}
|
||||
matrix: ${{ steps.set-matrix.outputs.matrix }}
|
||||
steps:
|
||||
- name: Update clone
|
||||
working-directory: /transformers
|
||||
@ -107,8 +90,7 @@ jobs:
|
||||
name: Identify models to test
|
||||
working-directory: /transformers/tests
|
||||
run: |
|
||||
echo "folder_slices=$(python3 ../utils/split_model_tests.py --num_splits ${{ env.NUM_SLICES }})" >> $GITHUB_OUTPUT
|
||||
echo "slice_ids=$(python3 -c 'd = list(range(${{ env.NUM_SLICES }})); print(d)')" >> $GITHUB_OUTPUT
|
||||
echo "matrix=$(python3 -c 'import os; tests = os.getcwd(); model_tests = os.listdir(os.path.join(tests, "models")); d1 = sorted(list(filter(os.path.isdir, os.listdir(tests)))); d2 = sorted(list(filter(os.path.isdir, [f"models/{x}" for x in model_tests]))); d1.remove("models"); d = d2 + d1; print(d)')" >> $GITHUB_OUTPUT
|
||||
|
||||
- name: ROCM-SMI
|
||||
run: |
|
||||
@ -117,7 +99,6 @@ jobs:
|
||||
- name: ROCM-INFO
|
||||
run: |
|
||||
rocminfo | grep "Agent" -A 14
|
||||
|
||||
- name: Show ROCR environment
|
||||
run: |
|
||||
echo "ROCR: $ROCR_VISIBLE_DEVICES"
|
||||
@ -127,38 +108,31 @@ jobs:
|
||||
run: |
|
||||
python3 utils/print_env.py
|
||||
|
||||
run_models_gpu:
|
||||
if: ${{ inputs.job == 'run_models_gpu' }}
|
||||
run_models_gpu_single_gpu:
|
||||
name: Single GPU tests
|
||||
needs: setup
|
||||
strategy:
|
||||
max-parallel: 1 # For now, not to parallelize. Can change later if it works well.
|
||||
fail-fast: false
|
||||
matrix:
|
||||
machine_type: [single-gpu, multi-gpu]
|
||||
slice_id: ${{ fromJSON(needs.setup.outputs.slice_ids) }}
|
||||
uses: ./.github/workflows/model_jobs_amd.yml
|
||||
with:
|
||||
folder_slices: ${{ needs.setup.outputs.folder_slices }}
|
||||
machine_type: ${{ matrix.machine_type }}
|
||||
slice_id: ${{ matrix.slice_id }}
|
||||
runner: ${{ inputs.runner }}
|
||||
docker: ${{ inputs.docker }}
|
||||
secrets: inherit
|
||||
|
||||
run_pipelines_torch_gpu:
|
||||
if: ${{ inputs.job == 'run_pipelines_torch_gpu' }}
|
||||
name: PyTorch pipelines
|
||||
needs: check_runners
|
||||
strategy:
|
||||
fail-fast: false
|
||||
matrix:
|
||||
machine_type: [single-gpu, multi-gpu]
|
||||
runs-on: ['${{ matrix.machine_type }}', self-hosted, amd-gpu, '${{ inputs.runner }}']
|
||||
folders: ${{ fromJson(needs.setup.outputs.matrix) }}
|
||||
machine_type: [single-gpu]
|
||||
runs-on: [self-hosted, amd-gpu, '${{ matrix.machine_type }}', '${{ inputs.gpu_flavor }}']
|
||||
container:
|
||||
image: ${{ inputs.docker }}
|
||||
image: huggingface/transformers-pytorch-amd-gpu
|
||||
options: --device /dev/kfd --device /dev/dri --env ROCR_VISIBLE_DEVICES --shm-size "16gb" --ipc host -v /mnt/cache/.cache/huggingface:/mnt/cache/
|
||||
needs: setup
|
||||
steps:
|
||||
- name: Echo folder ${{ matrix.folders }}
|
||||
shell: bash
|
||||
# For folders like `models/bert`, set an env. var. (`matrix_folders`) to `models_bert`, which will be used to
|
||||
# set the artifact folder names (because the character `/` is not allowed).
|
||||
run: |
|
||||
echo "${{ matrix.folders }}"
|
||||
matrix_folders=${{ matrix.folders }}
|
||||
matrix_folders=${matrix_folders/'models/'/'models_'}
|
||||
echo "$matrix_folders"
|
||||
echo "matrix_folders=$matrix_folders" >> $GITHUB_ENV
|
||||
|
||||
- name: Update clone
|
||||
working-directory: /transformers
|
||||
run: git fetch && git checkout ${{ github.sha }}
|
||||
@ -170,11 +144,9 @@ jobs:
|
||||
- name: ROCM-SMI
|
||||
run: |
|
||||
rocm-smi
|
||||
|
||||
- name: ROCM-INFO
|
||||
run: |
|
||||
rocminfo | grep "Agent" -A 14
|
||||
|
||||
- name: Show ROCR environment
|
||||
run: |
|
||||
echo "ROCR: $ROCR_VISIBLE_DEVICES"
|
||||
@ -188,35 +160,101 @@ jobs:
|
||||
working-directory: /transformers
|
||||
run: pip freeze
|
||||
|
||||
- name: Run all pipeline tests on GPU
|
||||
- name: Run all tests on GPU
|
||||
working-directory: /transformers
|
||||
run: |
|
||||
python3 -m pytest -n 1 -v --dist=loadfile --make-reports=${{ matrix.machine_type }}_run_pipelines_torch_gpu_test_reports tests/pipelines -m "not not_device_test"
|
||||
run: python3 -m pytest -v --make-reports=${{ matrix.machine_type }}_run_models_gpu_${{ matrix.folders }}_test_reports tests/${{ matrix.folders }} -m "not not_device_test"
|
||||
|
||||
- name: Failure short reports
|
||||
if: ${{ failure() }}
|
||||
continue-on-error: true
|
||||
run: cat /transformers/reports/${{ matrix.machine_type }}_run_pipelines_torch_gpu_test_reports/failures_short.txt
|
||||
run: cat /transformers/reports/${{ matrix.machine_type }}_run_models_gpu_${{ matrix.folders }}_test_reports/failures_short.txt
|
||||
|
||||
- name: "Test suite reports artifacts: ${{ matrix.machine_type }}_run_pipelines_torch_gpu_test_reports"
|
||||
- name: "Test suite reports artifacts: ${{ matrix.machine_type }}_run_models_gpu_${{ env.matrix_folders }}_test_reports"
|
||||
if: ${{ always() }}
|
||||
uses: actions/upload-artifact@v4
|
||||
with:
|
||||
name: ${{ matrix.machine_type }}_run_pipelines_torch_gpu_test_reports
|
||||
path: /transformers/reports/${{ matrix.machine_type }}_run_pipelines_torch_gpu_test_reports
|
||||
name: ${{ matrix.machine_type }}_run_models_gpu_${{ env.matrix_folders }}_test_reports
|
||||
path: /transformers/reports/${{ matrix.machine_type }}_run_models_gpu_${{ matrix.folders }}_test_reports
|
||||
|
||||
run_models_gpu_multi_gpu:
|
||||
name: Multi GPU tests
|
||||
strategy:
|
||||
max-parallel: 1
|
||||
fail-fast: false
|
||||
matrix:
|
||||
folders: ${{ fromJson(needs.setup.outputs.matrix) }}
|
||||
machine_type: [multi-gpu]
|
||||
runs-on: [self-hosted, amd-gpu, '${{ matrix.machine_type }}', '${{ inputs.gpu_flavor }}']
|
||||
container:
|
||||
image: huggingface/transformers-pytorch-amd-gpu
|
||||
options: --device /dev/kfd --device /dev/dri --env ROCR_VISIBLE_DEVICES --shm-size "16gb" --ipc host -v /mnt/cache/.cache/huggingface:/mnt/cache/
|
||||
needs: setup
|
||||
steps:
|
||||
- name: Echo folder ${{ matrix.folders }}
|
||||
shell: bash
|
||||
# For folders like `models/bert`, set an env. var. (`matrix_folders`) to `models_bert`, which will be used to
|
||||
# set the artifact folder names (because the character `/` is not allowed).
|
||||
run: |
|
||||
echo "${{ matrix.folders }}"
|
||||
matrix_folders=${{ matrix.folders }}
|
||||
matrix_folders=${matrix_folders/'models/'/'models_'}
|
||||
echo "$matrix_folders"
|
||||
echo "matrix_folders=$matrix_folders" >> $GITHUB_ENV
|
||||
|
||||
- name: Update clone
|
||||
working-directory: /transformers
|
||||
run: git fetch && git checkout ${{ github.sha }}
|
||||
|
||||
- name: Reinstall transformers in edit mode (remove the one installed during docker image build)
|
||||
working-directory: /transformers
|
||||
run: python3 -m pip uninstall -y transformers && python3 -m pip install -e .
|
||||
|
||||
- name: ROCM-SMI
|
||||
run: |
|
||||
rocm-smi
|
||||
- name: ROCM-INFO
|
||||
run: |
|
||||
rocminfo | grep "Agent" -A 14
|
||||
- name: Show ROCR environment
|
||||
run: |
|
||||
echo "ROCR: $ROCR_VISIBLE_DEVICES"
|
||||
|
||||
- name: Environment
|
||||
working-directory: /transformers
|
||||
run: |
|
||||
python3 utils/print_env.py
|
||||
|
||||
- name: Show installed libraries and their versions
|
||||
working-directory: /transformers
|
||||
run: pip freeze
|
||||
|
||||
- name: Run all tests on GPU
|
||||
working-directory: /transformers
|
||||
run: python3 -m pytest -v --make-reports=${{ matrix.machine_type }}_run_models_gpu_${{ matrix.folders }}_test_reports tests/${{ matrix.folders }} -m "not not_device_test"
|
||||
|
||||
- name: Failure short reports
|
||||
if: ${{ failure() }}
|
||||
continue-on-error: true
|
||||
run: cat /transformers/reports/${{ matrix.machine_type }}_run_models_gpu_${{ matrix.folders }}_test_reports/failures_short.txt
|
||||
|
||||
- name: "Test suite reports artifacts: ${{ matrix.machine_type }}_run_models_gpu_${{ env.matrix_folders }}_test_reports"
|
||||
if: ${{ always() }}
|
||||
uses: actions/upload-artifact@v4
|
||||
with:
|
||||
name: ${{ matrix.machine_type }}_run_models_gpu_${{ env.matrix_folders }}_test_reports
|
||||
path: /transformers/reports/${{ matrix.machine_type }}_run_models_gpu_${{ matrix.folders }}_test_reports
|
||||
|
||||
run_examples_gpu:
|
||||
if: ${{ inputs.job == 'run_examples_gpu' }}
|
||||
name: Examples directory
|
||||
needs: check_runners
|
||||
name: Examples tests
|
||||
strategy:
|
||||
fail-fast: false
|
||||
matrix:
|
||||
machine_type: [single-gpu]
|
||||
runs-on: ['${{ matrix.machine_type }}', self-hosted, amd-gpu, '${{ inputs.runner }}']
|
||||
runs-on: [self-hosted, amd-gpu, '${{ matrix.machine_type }}', '${{ inputs.gpu_flavor }}']
|
||||
container:
|
||||
image: ${{ inputs.docker }}
|
||||
image: huggingface/transformers-pytorch-amd-gpu
|
||||
options: --device /dev/kfd --device /dev/dri --env ROCR_VISIBLE_DEVICES --shm-size "16gb" --ipc host -v /mnt/cache/.cache/huggingface:/mnt/cache/
|
||||
needs: setup
|
||||
steps:
|
||||
- name: Update clone
|
||||
working-directory: /transformers
|
||||
@ -229,11 +267,9 @@ jobs:
|
||||
- name: ROCM-SMI
|
||||
run: |
|
||||
rocm-smi
|
||||
|
||||
- name: ROCM-INFO
|
||||
run: |
|
||||
rocminfo | grep "Agent" -A 14
|
||||
|
||||
- name: Show ROCR environment
|
||||
run: |
|
||||
echo "ROCR: $ROCR_VISIBLE_DEVICES"
|
||||
@ -265,17 +301,73 @@ jobs:
|
||||
name: ${{ matrix.machine_type }}_run_examples_gpu_test_reports
|
||||
path: /transformers/reports/${{ matrix.machine_type }}_run_examples_gpu_test_reports
|
||||
|
||||
run_torch_cuda_extensions_gpu:
|
||||
if: ${{ inputs.job == 'run_torch_cuda_extensions_gpu' }}
|
||||
name: Torch ROCm deepspeed tests
|
||||
needs: check_runners
|
||||
run_pipelines_torch_gpu:
|
||||
name: PyTorch pipelines tests
|
||||
strategy:
|
||||
fail-fast: false
|
||||
matrix:
|
||||
machine_type: [single-gpu, multi-gpu]
|
||||
runs-on: ['${{ matrix.machine_type }}', self-hosted, amd-gpu, '${{ inputs.runner }}']
|
||||
runs-on: [self-hosted, amd-gpu, '${{ matrix.machine_type }}', '${{ inputs.gpu_flavor }}']
|
||||
container:
|
||||
image: ${{ inputs.docker }}
|
||||
image: huggingface/transformers-pytorch-amd-gpu
|
||||
options: --device /dev/kfd --device /dev/dri --env ROCR_VISIBLE_DEVICES --shm-size "16gb" --ipc host -v /mnt/cache/.cache/huggingface:/mnt/cache/
|
||||
needs: setup
|
||||
steps:
|
||||
- name: Update clone
|
||||
working-directory: /transformers
|
||||
run: git fetch && git checkout ${{ github.sha }}
|
||||
|
||||
- name: Reinstall transformers in edit mode (remove the one installed during docker image build)
|
||||
working-directory: /transformers
|
||||
run: python3 -m pip uninstall -y transformers && python3 -m pip install -e .
|
||||
|
||||
- name: ROCM-SMI
|
||||
run: |
|
||||
rocm-smi
|
||||
- name: ROCM-INFO
|
||||
run: |
|
||||
rocminfo | grep "Agent" -A 14
|
||||
- name: Show ROCR environment
|
||||
run: |
|
||||
echo "ROCR: $ROCR_VISIBLE_DEVICES"
|
||||
|
||||
- name: Environment
|
||||
working-directory: /transformers
|
||||
run: |
|
||||
python3 utils/print_env.py
|
||||
|
||||
- name: Show installed libraries and their versions
|
||||
working-directory: /transformers
|
||||
run: pip freeze
|
||||
|
||||
- name: Run all pipeline tests on GPU
|
||||
working-directory: /transformers
|
||||
run: |
|
||||
python3 -m pytest -n 1 -v --dist=loadfile --make-reports=${{ matrix.machine_type }}_run_pipelines_torch_gpu_test_reports tests/pipelines -m "not not_device_test"
|
||||
|
||||
- name: Failure short reports
|
||||
if: ${{ failure() }}
|
||||
continue-on-error: true
|
||||
run: cat /transformers/reports/${{ matrix.machine_type }}_run_pipelines_torch_gpu_test_reports/failures_short.txt
|
||||
|
||||
- name: "Test suite reports artifacts: ${{ matrix.machine_type }}_run_pipelines_torch_gpu_test_reports"
|
||||
if: ${{ always() }}
|
||||
uses: actions/upload-artifact@v4
|
||||
with:
|
||||
name: ${{ matrix.machine_type }}_run_pipelines_torch_gpu_test_reports
|
||||
path: /transformers/reports/${{ matrix.machine_type }}_run_pipelines_torch_gpu_test_reports
|
||||
|
||||
run_torch_cuda_extensions_gpu:
|
||||
name: Torch ROCm deepspeed tests
|
||||
strategy:
|
||||
fail-fast: false
|
||||
matrix:
|
||||
machine_type: [single-gpu, multi-gpu]
|
||||
|
||||
runs-on: [self-hosted, amd-gpu, '${{ matrix.machine_type }}', '${{ inputs.gpu_flavor }}']
|
||||
needs: setup
|
||||
container:
|
||||
image: huggingface/transformers-pytorch-deepspeed-amd-gpu
|
||||
options: --device /dev/kfd --device /dev/dri --env ROCR_VISIBLE_DEVICES --shm-size "16gb" --ipc host -v /mnt/cache/.cache/huggingface:/mnt/cache/
|
||||
steps:
|
||||
- name: Update clone
|
||||
@ -289,7 +381,6 @@ jobs:
|
||||
- name: ROCM-SMI
|
||||
run: |
|
||||
rocm-smi
|
||||
|
||||
- name: ROCM-INFO
|
||||
run: |
|
||||
rocminfo | grep "Agent" -A 14
|
||||
@ -323,27 +414,106 @@ jobs:
|
||||
name: ${{ matrix.machine_type }}_run_torch_cuda_extensions_gpu_test_reports
|
||||
path: /transformers/reports/${{ matrix.machine_type }}_run_torch_cuda_extensions_gpu_test_reports
|
||||
|
||||
send_results:
|
||||
name: Slack Report
|
||||
run_extract_warnings:
|
||||
name: Extract warnings in CI artifacts
|
||||
runs-on: ubuntu-22.04
|
||||
if: always()
|
||||
needs: [
|
||||
check_runner_status,
|
||||
check_runners,
|
||||
setup,
|
||||
run_models_gpu,
|
||||
run_pipelines_torch_gpu,
|
||||
run_models_gpu_single_gpu,
|
||||
run_models_gpu_multi_gpu,
|
||||
run_examples_gpu,
|
||||
run_pipelines_torch_gpu,
|
||||
run_torch_cuda_extensions_gpu
|
||||
]
|
||||
if: ${{ always() }}
|
||||
uses: ./.github/workflows/slack-report.yml
|
||||
with:
|
||||
job: ${{ inputs.job }}
|
||||
# This would be `skipped` if `setup` is skipped.
|
||||
setup_status: ${{ needs.setup.result }}
|
||||
slack_report_channel: ${{ inputs.slack_report_channel }}
|
||||
# This would be an empty string if `setup` is skipped.
|
||||
folder_slices: ${{ needs.setup.outputs.folder_slices }}
|
||||
quantization_matrix: ${{ needs.setup.outputs.quantization_matrix }}
|
||||
ci_event: ${{ inputs.ci_event }}
|
||||
steps:
|
||||
- name: Checkout transformers
|
||||
uses: actions/checkout@v4
|
||||
with:
|
||||
fetch-depth: 2
|
||||
|
||||
secrets: inherit
|
||||
- name: Install transformers
|
||||
run: pip install transformers
|
||||
|
||||
- name: Show installed libraries and their versions
|
||||
run: pip freeze
|
||||
|
||||
- name: Create output directory
|
||||
run: mkdir warnings_in_ci
|
||||
|
||||
- uses: actions/download-artifact@v4
|
||||
with:
|
||||
path: warnings_in_ci
|
||||
|
||||
- name: Show artifacts
|
||||
run: echo "$(python3 -c 'import os; d = os.listdir(); print(d)')"
|
||||
working-directory: warnings_in_ci
|
||||
|
||||
- name: Extract warnings in CI artifacts
|
||||
run: |
|
||||
python3 utils/extract_warnings.py --workflow_run_id ${{ github.run_id }} --output_dir warnings_in_ci --token ${{ secrets.ACCESS_REPO_INFO_TOKEN }} --from_gh
|
||||
echo "$(python3 -c 'import os; import json; fp = open("warnings_in_ci/selected_warnings.json"); d = json.load(fp); d = "\n".join(d) ;print(d)')"
|
||||
|
||||
- name: Upload artifact
|
||||
if: ${{ always() }}
|
||||
uses: actions/upload-artifact@v4
|
||||
with:
|
||||
name: warnings_in_ci
|
||||
path: warnings_in_ci/selected_warnings.json
|
||||
|
||||
send_results:
|
||||
name: Send results to webhook
|
||||
runs-on: ubuntu-22.04
|
||||
if: always()
|
||||
needs: [
|
||||
check_runner_status,
|
||||
check_runners,
|
||||
setup,
|
||||
run_models_gpu_single_gpu,
|
||||
run_models_gpu_multi_gpu,
|
||||
run_examples_gpu,
|
||||
run_pipelines_torch_gpu,
|
||||
run_torch_cuda_extensions_gpu,
|
||||
run_extract_warnings
|
||||
]
|
||||
steps:
|
||||
- name: Preliminary job status
|
||||
shell: bash
|
||||
# For the meaning of these environment variables, see the job `Setup`
|
||||
run: |
|
||||
echo "Runner availability: ${{ needs.check_runner_status.result }}"
|
||||
echo "Runner status: ${{ needs.check_runners.result }}"
|
||||
echo "Setup status: ${{ needs.setup.result }}"
|
||||
|
||||
- uses: actions/checkout@v4
|
||||
- uses: actions/download-artifact@v4
|
||||
- name: Send message to Slack
|
||||
env:
|
||||
CI_SLACK_BOT_TOKEN: ${{ secrets.CI_SLACK_BOT_TOKEN }}
|
||||
CI_SLACK_CHANNEL_ID_DAILY_AMD: ${{ secrets.CI_SLACK_CHANNEL_ID_DAILY_AMD }}
|
||||
CI_SLACK_CHANNEL_DUMMY_TESTS: ${{ secrets.CI_SLACK_CHANNEL_DUMMY_TESTS }}
|
||||
CI_SLACK_REPORT_CHANNEL_ID: ${{ secrets.CI_SLACK_CHANNEL_ID_DAILY_AMD }}
|
||||
ACCESS_REPO_INFO_TOKEN: ${{ secrets.ACCESS_REPO_INFO_TOKEN }}
|
||||
CI_EVENT: Scheduled CI (AMD) - ${{ inputs.gpu_flavor }}
|
||||
CI_SHA: ${{ github.sha }}
|
||||
CI_WORKFLOW_REF: ${{ github.workflow_ref }}
|
||||
RUNNER_STATUS: ${{ needs.check_runner_status.result }}
|
||||
RUNNER_ENV_STATUS: ${{ needs.check_runners.result }}
|
||||
SETUP_STATUS: ${{ needs.setup.result }}
|
||||
# We pass `needs.setup.outputs.matrix` as the argument. A processing in `notification_service.py` to change
|
||||
# `models/bert` to `models_bert` is required, as the artifact names use `_` instead of `/`.
|
||||
run: |
|
||||
sudo apt-get install -y curl
|
||||
pip install slack_sdk
|
||||
pip show slack_sdk
|
||||
python utils/notification_service.py "${{ needs.setup.outputs.matrix }}"
|
||||
|
||||
# Upload complete failure tables, as they might be big and only truncated versions could be sent to Slack.
|
||||
- name: Failure table artifacts
|
||||
if: ${{ always() }}
|
||||
uses: actions/upload-artifact@v4
|
||||
with:
|
||||
name: test_failure_tables
|
||||
path: test_failure_tables
|
||||
|
||||
22
.github/workflows/self-scheduled-caller.yml
vendored
22
.github/workflows/self-scheduled-caller.yml
vendored
@ -2,6 +2,9 @@ name: Self-hosted runner (scheduled)
|
||||
|
||||
|
||||
on:
|
||||
repository_dispatch:
|
||||
schedule:
|
||||
- cron: "17 2 * * *"
|
||||
push:
|
||||
branches:
|
||||
- run_scheduled_ci*
|
||||
@ -13,9 +16,6 @@ jobs:
|
||||
with:
|
||||
job: run_models_gpu
|
||||
slack_report_channel: "#transformers-ci-daily-models"
|
||||
runner: daily-ci
|
||||
docker: huggingface/transformers-all-latest-gpu
|
||||
ci_event: Daily CI
|
||||
secrets: inherit
|
||||
|
||||
torch-pipeline:
|
||||
@ -24,9 +24,6 @@ jobs:
|
||||
with:
|
||||
job: run_pipelines_torch_gpu
|
||||
slack_report_channel: "#transformers-ci-daily-pipeline-torch"
|
||||
runner: daily-ci
|
||||
docker: huggingface/transformers-pytorch-gpu
|
||||
ci_event: Daily CI
|
||||
secrets: inherit
|
||||
|
||||
tf-pipeline:
|
||||
@ -35,9 +32,6 @@ jobs:
|
||||
with:
|
||||
job: run_pipelines_tf_gpu
|
||||
slack_report_channel: "#transformers-ci-daily-pipeline-tf"
|
||||
runner: daily-ci
|
||||
docker: huggingface/transformers-tensorflow-gpu
|
||||
ci_event: Daily CI
|
||||
secrets: inherit
|
||||
|
||||
example-ci:
|
||||
@ -46,9 +40,6 @@ jobs:
|
||||
with:
|
||||
job: run_examples_gpu
|
||||
slack_report_channel: "#transformers-ci-daily-examples"
|
||||
runner: daily-ci
|
||||
docker: huggingface/transformers-all-latest-gpu
|
||||
ci_event: Daily CI
|
||||
secrets: inherit
|
||||
|
||||
deepspeed-ci:
|
||||
@ -57,10 +48,6 @@ jobs:
|
||||
with:
|
||||
job: run_torch_cuda_extensions_gpu
|
||||
slack_report_channel: "#transformers-ci-daily-deepspeed"
|
||||
runner: daily-ci
|
||||
docker: huggingface/transformers-pytorch-deepspeed-latest-gpu
|
||||
ci_event: Daily CI
|
||||
working-directory-prefix: /workspace
|
||||
secrets: inherit
|
||||
|
||||
quantization-ci:
|
||||
@ -69,7 +56,4 @@ jobs:
|
||||
with:
|
||||
job: run_quantization_torch_gpu
|
||||
slack_report_channel: "#transformers-ci-daily-quantization"
|
||||
runner: daily-ci
|
||||
docker: huggingface/transformers-quantization-latest-gpu
|
||||
ci_event: Daily CI
|
||||
secrets: inherit
|
||||
|
||||
75
.github/workflows/self-scheduled.yml
vendored
75
.github/workflows/self-scheduled.yml
vendored
@ -15,19 +15,6 @@ on:
|
||||
slack_report_channel:
|
||||
required: true
|
||||
type: string
|
||||
runner:
|
||||
required: true
|
||||
type: string
|
||||
docker:
|
||||
required: true
|
||||
type: string
|
||||
ci_event:
|
||||
required: true
|
||||
type: string
|
||||
working-directory-prefix:
|
||||
default: ''
|
||||
required: false
|
||||
type: string
|
||||
|
||||
env:
|
||||
HF_HOME: /mnt/cache
|
||||
@ -51,7 +38,7 @@ jobs:
|
||||
strategy:
|
||||
matrix:
|
||||
machine_type: [single-gpu, multi-gpu]
|
||||
runs-on: ['${{ matrix.machine_type }}', nvidia-gpu, t4, '${{ inputs.runner }}']
|
||||
runs-on: ['${{ matrix.machine_type }}', nvidia-gpu, t4, daily-ci]
|
||||
container:
|
||||
image: huggingface/transformers-all-latest-gpu
|
||||
options: --gpus 0 --shm-size "16gb" --ipc host -v /mnt/cache/.cache/huggingface:/mnt/cache/
|
||||
@ -83,7 +70,7 @@ jobs:
|
||||
run: |
|
||||
echo "folder_slices=$(python3 ../utils/split_model_tests.py --num_splits ${{ env.NUM_SLICES }})" >> $GITHUB_OUTPUT
|
||||
echo "slice_ids=$(python3 -c 'd = list(range(${{ env.NUM_SLICES }})); print(d)')" >> $GITHUB_OUTPUT
|
||||
|
||||
|
||||
- id: set-matrix-quantization
|
||||
if: ${{ inputs.job == 'run_quantization_torch_gpu' }}
|
||||
name: Identify quantization method to test
|
||||
@ -109,8 +96,6 @@ jobs:
|
||||
folder_slices: ${{ needs.setup.outputs.folder_slices }}
|
||||
machine_type: ${{ matrix.machine_type }}
|
||||
slice_id: ${{ matrix.slice_id }}
|
||||
runner: ${{ inputs.runner }}
|
||||
docker: ${{ inputs.docker }}
|
||||
secrets: inherit
|
||||
|
||||
run_pipelines_torch_gpu:
|
||||
@ -120,7 +105,7 @@ jobs:
|
||||
fail-fast: false
|
||||
matrix:
|
||||
machine_type: [single-gpu, multi-gpu]
|
||||
runs-on: ['${{ matrix.machine_type }}', nvidia-gpu, t4, '${{ inputs.runner }}']
|
||||
runs-on: ['${{ matrix.machine_type }}', nvidia-gpu, t4, daily-ci]
|
||||
container:
|
||||
image: huggingface/transformers-pytorch-gpu
|
||||
options: --gpus all --shm-size "16gb" --ipc host -v /mnt/cache/.cache/huggingface:/mnt/cache/
|
||||
@ -170,7 +155,7 @@ jobs:
|
||||
fail-fast: false
|
||||
matrix:
|
||||
machine_type: [single-gpu, multi-gpu]
|
||||
runs-on: ['${{ matrix.machine_type }}', nvidia-gpu, t4, '${{ inputs.runner }}']
|
||||
runs-on: ['${{ matrix.machine_type }}', nvidia-gpu, t4, daily-ci]
|
||||
container:
|
||||
image: huggingface/transformers-tensorflow-gpu
|
||||
options: --gpus all --shm-size "16gb" --ipc host -v /mnt/cache/.cache/huggingface:/mnt/cache/
|
||||
@ -221,7 +206,7 @@ jobs:
|
||||
fail-fast: false
|
||||
matrix:
|
||||
machine_type: [single-gpu]
|
||||
runs-on: ['${{ matrix.machine_type }}', nvidia-gpu, t4, '${{ inputs.runner }}']
|
||||
runs-on: ['${{ matrix.machine_type }}', nvidia-gpu, t4, daily-ci]
|
||||
container:
|
||||
image: huggingface/transformers-all-latest-gpu
|
||||
options: --gpus 0 --shm-size "16gb" --ipc host -v /mnt/cache/.cache/huggingface:/mnt/cache/
|
||||
@ -272,88 +257,69 @@ jobs:
|
||||
fail-fast: false
|
||||
matrix:
|
||||
machine_type: [single-gpu, multi-gpu]
|
||||
runs-on: ['${{ matrix.machine_type }}', nvidia-gpu, t4, '${{ inputs.runner }}']
|
||||
runs-on: ['${{ matrix.machine_type }}', nvidia-gpu, t4, daily-ci]
|
||||
container:
|
||||
image: ${{ inputs.docker }}
|
||||
image: huggingface/transformers-pytorch-deepspeed-latest-gpu
|
||||
options: --gpus all --shm-size "16gb" --ipc host -v /mnt/cache/.cache/huggingface:/mnt/cache/
|
||||
steps:
|
||||
- name: Update clone
|
||||
working-directory: ${{ inputs.working-directory-prefix }}/transformers
|
||||
working-directory: /workspace/transformers
|
||||
run: git fetch && git checkout ${{ github.sha }}
|
||||
|
||||
- name: Reinstall transformers in edit mode (remove the one installed during docker image build)
|
||||
working-directory: ${{ inputs.working-directory-prefix }}/transformers
|
||||
working-directory: /workspace/transformers
|
||||
run: python3 -m pip uninstall -y transformers && python3 -m pip install -e .
|
||||
|
||||
- name: Update / Install some packages (for Past CI)
|
||||
if: ${{ contains(inputs.docker, '-past-') && contains(inputs.docker, '-pytorch-') }}
|
||||
working-directory: ${{ inputs.working-directory-prefix }}/transformers
|
||||
run: |
|
||||
python3 -m pip install -U datasets
|
||||
python3 -m pip install --no-cache-dir git+https://github.com/huggingface/accelerate@main#egg=accelerate
|
||||
|
||||
- name: Remove cached torch extensions
|
||||
run: rm -rf /github/home/.cache/torch_extensions/
|
||||
|
||||
# To avoid unknown test failures
|
||||
- name: Pre build DeepSpeed *again* (for daily CI)
|
||||
if: ${{ contains(inputs.ci_event, 'Daily CI') }}
|
||||
working-directory: ${{ inputs.working-directory-prefix }}/
|
||||
- name: Pre build DeepSpeed *again*
|
||||
working-directory: /workspace
|
||||
run: |
|
||||
python3 -m pip uninstall -y deepspeed
|
||||
DS_DISABLE_NINJA=1 DS_BUILD_CPU_ADAM=1 DS_BUILD_FUSED_ADAM=1 python3 -m pip install deepspeed --global-option="build_ext" --global-option="-j8" --no-cache -v --disable-pip-version-check
|
||||
|
||||
# To avoid unknown test failures
|
||||
- name: Pre build DeepSpeed *again* (for nightly & Past CI)
|
||||
if: ${{ contains(inputs.ci_event, 'Nightly CI') || contains(inputs.ci_event, 'Past CI') }}
|
||||
working-directory: ${{ inputs.working-directory-prefix }}/
|
||||
run: |
|
||||
python3 -m pip uninstall -y deepspeed
|
||||
rm -rf DeepSpeed
|
||||
git clone https://github.com/microsoft/DeepSpeed && cd DeepSpeed && rm -rf build
|
||||
DS_BUILD_CPU_ADAM=1 DS_BUILD_FUSED_ADAM=1 python3 -m pip install . --global-option="build_ext" --global-option="-j8" --no-cache -v --disable-pip-version-check
|
||||
|
||||
- name: NVIDIA-SMI
|
||||
run: |
|
||||
nvidia-smi
|
||||
|
||||
- name: Environment
|
||||
working-directory: ${{ inputs.working-directory-prefix }}/transformers
|
||||
working-directory: /workspace/transformers
|
||||
run: |
|
||||
python3 utils/print_env.py
|
||||
python utils/print_env.py
|
||||
|
||||
- name: Show installed libraries and their versions
|
||||
working-directory: ${{ inputs.working-directory-prefix }}/transformers
|
||||
working-directory: /workspace/transformers
|
||||
run: pip freeze
|
||||
|
||||
- name: Run all tests on GPU
|
||||
working-directory: ${{ inputs.working-directory-prefix }}/transformers
|
||||
working-directory: /workspace/transformers
|
||||
run: |
|
||||
python3 -m pytest -v --make-reports=${{ matrix.machine_type }}_run_torch_cuda_extensions_gpu_test_reports tests/deepspeed tests/extended
|
||||
python -m pytest -v --make-reports=${{ matrix.machine_type }}_run_torch_cuda_extensions_gpu_test_reports tests/deepspeed tests/extended
|
||||
|
||||
- name: Failure short reports
|
||||
if: ${{ failure() }}
|
||||
continue-on-error: true
|
||||
run: cat ${{ inputs.working-directory-prefix }}/transformers/reports/${{ matrix.machine_type }}_run_torch_cuda_extensions_gpu_test_reports/failures_short.txt
|
||||
run: cat /workspace/transformers/reports/${{ matrix.machine_type }}_run_torch_cuda_extensions_gpu_test_reports/failures_short.txt
|
||||
|
||||
- name: "Test suite reports artifacts: ${{ matrix.machine_type }}_run_torch_cuda_extensions_gpu_test_reports"
|
||||
if: ${{ always() }}
|
||||
uses: actions/upload-artifact@v4
|
||||
with:
|
||||
name: ${{ matrix.machine_type }}_run_torch_cuda_extensions_gpu_test_reports
|
||||
path: ${{ inputs.working-directory-prefix }}/transformers/reports/${{ matrix.machine_type }}_run_torch_cuda_extensions_gpu_test_reports
|
||||
path: /workspace/transformers/reports/${{ matrix.machine_type }}_run_torch_cuda_extensions_gpu_test_reports
|
||||
|
||||
run_quantization_torch_gpu:
|
||||
if: ${{ inputs.job == 'run_quantization_torch_gpu' }}
|
||||
name: " "
|
||||
needs: setup
|
||||
strategy:
|
||||
max-parallel: 4
|
||||
fail-fast: false
|
||||
matrix:
|
||||
folders: ${{ fromJson(needs.setup.outputs.quantization_matrix) }}
|
||||
machine_type: [single-gpu, multi-gpu]
|
||||
runs-on: ['${{ matrix.machine_type }}', nvidia-gpu, t4, '${{ inputs.runner }}']
|
||||
runs-on: ['${{ matrix.machine_type }}', nvidia-gpu, t4, daily-ci]
|
||||
container:
|
||||
image: huggingface/transformers-quantization-latest-gpu
|
||||
options: --gpus all --shm-size "16gb" --ipc host -v /mnt/cache/.cache/huggingface:/mnt/cache/
|
||||
@ -468,6 +434,5 @@ jobs:
|
||||
# This would be an empty string if `setup` is skipped.
|
||||
folder_slices: ${{ needs.setup.outputs.folder_slices }}
|
||||
quantization_matrix: ${{ needs.setup.outputs.quantization_matrix }}
|
||||
ci_event: ${{ inputs.ci_event }}
|
||||
|
||||
|
||||
secrets: inherit
|
||||
|
||||
7
.github/workflows/slack-report.yml
vendored
7
.github/workflows/slack-report.yml
vendored
@ -18,9 +18,6 @@ on:
|
||||
quantization_matrix:
|
||||
required: true
|
||||
type: string
|
||||
ci_event:
|
||||
required: true
|
||||
type: string
|
||||
|
||||
env:
|
||||
TRANSFORMERS_CI_RESULTS_UPLOAD_TOKEN: ${{ secrets.TRANSFORMERS_CI_RESULTS_UPLOAD_TOKEN }}
|
||||
@ -48,7 +45,7 @@ jobs:
|
||||
CI_SLACK_CHANNEL_DUMMY_TESTS: ${{ secrets.CI_SLACK_CHANNEL_DUMMY_TESTS }}
|
||||
SLACK_REPORT_CHANNEL: ${{ inputs.slack_report_channel }}
|
||||
ACCESS_REPO_INFO_TOKEN: ${{ secrets.ACCESS_REPO_INFO_TOKEN }}
|
||||
CI_EVENT: ${{ inputs.ci_event }}
|
||||
CI_EVENT: scheduled
|
||||
CI_SHA: ${{ github.sha }}
|
||||
CI_WORKFLOW_REF: ${{ github.workflow_ref }}
|
||||
CI_TEST_JOB: ${{ inputs.job }}
|
||||
@ -79,7 +76,7 @@ jobs:
|
||||
CI_SLACK_BOT_TOKEN: ${{ secrets.CI_SLACK_BOT_TOKEN }}
|
||||
ACCESS_REPO_INFO_TOKEN: ${{ secrets.ACCESS_REPO_INFO_TOKEN }}
|
||||
SLACK_REPORT_CHANNEL: ${{ inputs.slack_report_channel }}
|
||||
CI_EVENT: ${{ inputs.ci_event }}
|
||||
CI_EVENT: scheduled
|
||||
CI_SHA: ${{ github.sha }}
|
||||
CI_TEST_JOB: ${{ inputs.job }}
|
||||
SETUP_STATUS: ${{ inputs.setup_status }}
|
||||
|
||||
26
.github/workflows/ssh-runner.yml
vendored
26
.github/workflows/ssh-runner.yml
vendored
@ -53,33 +53,11 @@ jobs:
|
||||
- name: NVIDIA-SMI
|
||||
run: |
|
||||
nvidia-smi
|
||||
|
||||
- name: Store Slack infos
|
||||
#because the SSH can be enabled dynamically if the workflow failed, so we need to store slack infos to be able to retrieve them during the waitforssh step
|
||||
shell: bash
|
||||
run: |
|
||||
echo "${{ github.actor }}"
|
||||
github_actor=${{ github.actor }}
|
||||
github_actor=${github_actor/'-'/'_'}
|
||||
echo "$github_actor"
|
||||
echo "github_actor=$github_actor" >> $GITHUB_ENV
|
||||
|
||||
- name: Store Slack infos
|
||||
#because the SSH can be enabled dynamically if the workflow failed, so we need to store slack infos to be able to retrieve them during the waitforssh step
|
||||
shell: bash
|
||||
run: |
|
||||
echo "${{ env.github_actor }}"
|
||||
if [ "${{ secrets[format('{0}_{1}', env.github_actor, 'SLACK_ID')] }}" != "" ]; then
|
||||
echo "SLACKCHANNEL=${{ secrets[format('{0}_{1}', env.github_actor, 'SLACK_ID')] }}" >> $GITHUB_ENV
|
||||
else
|
||||
echo "SLACKCHANNEL=${{ secrets.SLACK_CIFEEDBACK_CHANNEL }}" >> $GITHUB_ENV
|
||||
fi
|
||||
|
||||
|
||||
- name: Tailscale # In order to be able to SSH when a test fails
|
||||
uses: huggingface/tailscale-action@main
|
||||
with:
|
||||
authkey: ${{ secrets.TAILSCALE_SSH_AUTHKEY }}
|
||||
slackChannel: ${{ env.SLACKCHANNEL }}
|
||||
slackChannel: ${{ secrets.SLACK_CIFEEDBACK_CHANNEL }}
|
||||
slackToken: ${{ secrets.SLACK_CIFEEDBACK_BOT_TOKEN }}
|
||||
waitForSSH: true
|
||||
sshTimeout: 15m
|
||||
|
||||
4
.github/workflows/stale.yml
vendored
4
.github/workflows/stale.yml
vendored
@ -9,15 +9,13 @@ jobs:
|
||||
name: Close Stale Issues
|
||||
if: github.repository == 'huggingface/transformers'
|
||||
runs-on: ubuntu-22.04
|
||||
permissions:
|
||||
issues: write
|
||||
env:
|
||||
GITHUB_TOKEN: ${{ secrets.GITHUB_TOKEN }}
|
||||
steps:
|
||||
- uses: actions/checkout@v4
|
||||
|
||||
- name: Setup Python
|
||||
uses: actions/setup-python@v5
|
||||
uses: actions/setup-python@v4
|
||||
with:
|
||||
python-version: 3.8
|
||||
|
||||
|
||||
23
.github/workflows/trufflehog.yml
vendored
23
.github/workflows/trufflehog.yml
vendored
@ -10,9 +10,20 @@ jobs:
|
||||
trufflehog:
|
||||
runs-on: ubuntu-latest
|
||||
steps:
|
||||
- name: Checkout code
|
||||
uses: actions/checkout@v4
|
||||
with:
|
||||
fetch-depth: 0
|
||||
- name: Secret Scanning
|
||||
uses: trufflesecurity/trufflehog@main
|
||||
- shell: bash
|
||||
run: |
|
||||
if [ "${{ github.event_name }}" == "push" ]; then
|
||||
echo "depth=$(($(jq length <<< '${{ toJson(github.event.commits) }}') + 2))" >> $GITHUB_ENV
|
||||
echo "branch=${{ github.ref_name }}" >> $GITHUB_ENV
|
||||
fi
|
||||
if [ "${{ github.event_name }}" == "pull_request" ]; then
|
||||
echo "depth=$((${{ github.event.pull_request.commits }}+2))" >> $GITHUB_ENV
|
||||
echo "branch=${{ github.event.pull_request.head.ref }}" >> $GITHUB_ENV
|
||||
fi
|
||||
- name: Checkout code
|
||||
uses: actions/checkout@v4
|
||||
with:
|
||||
ref: ${{env.branch}}
|
||||
fetch-depth: ${{env.depth}}
|
||||
- name: Secret Scanning
|
||||
uses: trufflesecurity/trufflehog@main
|
||||
|
||||
@ -61,10 +61,7 @@ feedback.
|
||||
The 🤗 Transformers library is robust and reliable thanks to users who report the problems they encounter.
|
||||
|
||||
Before you report an issue, we would really appreciate it if you could **make sure the bug was not
|
||||
already reported** (use the search bar on GitHub under Issues). Your issue should also be related to bugs in the library itself, and not your code. If you're unsure whether the bug is in your code or the library, please ask in the [forum](https://discuss.huggingface.co/) or on our [discord](https://discord.com/invite/hugging-face-879548962464493619) first. This helps us respond quicker to fixing issues related to the library versus general questions.
|
||||
|
||||
> [!TIP]
|
||||
> We have a [docs bot](https://huggingface.co/spaces/huggingchat/hf-docs-chat), and we highly encourage you to ask all your questions there. There is always a chance your bug can be fixed with a simple flag 👾🔫
|
||||
already reported** (use the search bar on GitHub under Issues). Your issue should also be related to bugs in the library itself, and not your code. If you're unsure whether the bug is in your code or the library, please ask in the [forum](https://discuss.huggingface.co/) first. This helps us respond quicker to fixing issues related to the library versus general questions.
|
||||
|
||||
Once you've confirmed the bug hasn't already been reported, please include the following information in your issue so we can quickly resolve it:
|
||||
|
||||
@ -132,7 +129,7 @@ You will need basic `git` proficiency to contribute to
|
||||
manual. Type `git --help` in a shell and enjoy! If you prefer books, [Pro
|
||||
Git](https://git-scm.com/book/en/v2) is a very good reference.
|
||||
|
||||
You'll need **[Python 3.8](https://github.com/huggingface/transformers/blob/main/setup.py#L449)** or above to contribute to 🤗 Transformers. Follow the steps below to start contributing:
|
||||
You'll need **[Python 3.8](https://github.com/huggingface/transformers/blob/main/setup.py#L426)** or above to contribute to 🤗 Transformers. Follow the steps below to start contributing:
|
||||
|
||||
1. Fork the [repository](https://github.com/huggingface/transformers) by
|
||||
clicking on the **[Fork](https://github.com/huggingface/transformers/fork)** button on the repository's page. This creates a copy of the code
|
||||
@ -163,7 +160,7 @@ You'll need **[Python 3.8](https://github.com/huggingface/transformers/blob/main
|
||||
If 🤗 Transformers was already installed in the virtual environment, remove
|
||||
it with `pip uninstall transformers` before reinstalling it in editable
|
||||
mode with the `-e` flag.
|
||||
|
||||
|
||||
Depending on your OS, and since the number of optional dependencies of Transformers is growing, you might get a
|
||||
failure with this command. If that's the case make sure to install the Deep Learning framework you are working with
|
||||
(PyTorch, TensorFlow and/or Flax) then do:
|
||||
@ -222,7 +219,7 @@ You'll need **[Python 3.8](https://github.com/huggingface/transformers/blob/main
|
||||
|
||||
If you're modifying documents under the `docs/source` directory, make sure the documentation can still be built. This check will also run in the CI when you open a pull request. To run a local check
|
||||
make sure you install the documentation builder:
|
||||
|
||||
|
||||
```bash
|
||||
pip install ".[docs]"
|
||||
```
|
||||
@ -341,12 +338,12 @@ RUN_SLOW=yes python -m pytest -n auto --dist=loadfile -s -v ./tests/models/my_ne
|
||||
RUN_SLOW=yes python -m pytest -n auto --dist=loadfile -s -v ./examples/pytorch/text-classification
|
||||
```
|
||||
|
||||
Like the slow tests, there are other environment variables available which are not enabled by default during testing:
|
||||
Like the slow tests, there are other environment variables available which not enabled by default during testing:
|
||||
- `RUN_CUSTOM_TOKENIZERS`: Enables tests for custom tokenizers.
|
||||
- `RUN_PT_FLAX_CROSS_TESTS`: Enables tests for PyTorch + Flax integration.
|
||||
- `RUN_PT_TF_CROSS_TESTS`: Enables tests for TensorFlow + PyTorch integration.
|
||||
|
||||
More environment variables and additional information can be found in the [testing_utils.py](https://github.com/huggingface/transformers/blob/main/src/transformers/testing_utils.py).
|
||||
More environment variables and additional information can be found in the [testing_utils.py](src/transformers/testing_utils.py).
|
||||
|
||||
🤗 Transformers uses `pytest` as a test runner only. It doesn't use any
|
||||
`pytest`-specific features in the test suite itself.
|
||||
|
||||
3
Makefile
3
Makefile
@ -53,14 +53,15 @@ quality:
|
||||
@python -c "from transformers import *" || (echo '🚨 import failed, this means you introduced unprotected imports! 🚨'; exit 1)
|
||||
ruff check $(check_dirs) setup.py conftest.py
|
||||
ruff format --check $(check_dirs) setup.py conftest.py
|
||||
python utils/custom_init_isort.py --check_only
|
||||
python utils/sort_auto_mappings.py --check_only
|
||||
python utils/check_doc_toc.py
|
||||
python utils/check_docstrings.py --check_all
|
||||
|
||||
|
||||
# Format source code automatically and check is there are any problems left that need manual fixing
|
||||
|
||||
extra_style_checks:
|
||||
python utils/custom_init_isort.py
|
||||
python utils/sort_auto_mappings.py
|
||||
python utils/check_doc_toc.py --fix_and_overwrite
|
||||
|
||||
|
||||
25
README.md
25
README.md
@ -36,19 +36,18 @@ limitations under the License.
|
||||
<h4 align="center">
|
||||
<p>
|
||||
<b>English</b> |
|
||||
<a href="https://github.com/huggingface/transformers/blob/main/i18n/README_zh-hans.md">简体中文</a> |
|
||||
<a href="https://github.com/huggingface/transformers/blob/main/i18n/README_zh-hant.md">繁體中文</a> |
|
||||
<a href="https://github.com/huggingface/transformers/blob/main/i18n/README_ko.md">한국어</a> |
|
||||
<a href="https://github.com/huggingface/transformers/blob/main/i18n/README_es.md">Español</a> |
|
||||
<a href="https://github.com/huggingface/transformers/blob/main/i18n/README_ja.md">日本語</a> |
|
||||
<a href="https://github.com/huggingface/transformers/blob/main/i18n/README_hd.md">हिन्दी</a> |
|
||||
<a href="https://github.com/huggingface/transformers/blob/main/i18n/README_ru.md">Русский</a> |
|
||||
<a href="https://github.com/huggingface/transformers/blob/main/i18n/README_pt-br.md">Рortuguês</a> |
|
||||
<a href="https://github.com/huggingface/transformers/blob/main/i18n/README_te.md">తెలుగు</a> |
|
||||
<a href="https://github.com/huggingface/transformers/blob/main/i18n/README_fr.md">Français</a> |
|
||||
<a href="https://github.com/huggingface/transformers/blob/main/i18n/README_de.md">Deutsch</a> |
|
||||
<a href="https://github.com/huggingface/transformers/blob/main/i18n/README_vi.md">Tiếng Việt</a> |
|
||||
<a href="https://github.com/huggingface/transformers/blob/main/i18n/README_ar.md">العربية</a> |
|
||||
<a href="https://github.com/huggingface/transformers/blob/main/README_zh-hans.md">简体中文</a> |
|
||||
<a href="https://github.com/huggingface/transformers/blob/main/README_zh-hant.md">繁體中文</a> |
|
||||
<a href="https://github.com/huggingface/transformers/blob/main/README_ko.md">한국어</a> |
|
||||
<a href="https://github.com/huggingface/transformers/blob/main/README_es.md">Español</a> |
|
||||
<a href="https://github.com/huggingface/transformers/blob/main/README_ja.md">日本語</a> |
|
||||
<a href="https://github.com/huggingface/transformers/blob/main/README_hd.md">हिन्दी</a> |
|
||||
<a href="https://github.com/huggingface/transformers/blob/main/README_ru.md">Русский</a> |
|
||||
<a href="https://github.com/huggingface/transformers/blob/main/README_pt-br.md">Рortuguês</a> |
|
||||
<a href="https://github.com/huggingface/transformers/blob/main/README_te.md">తెలుగు</a> |
|
||||
<a href="https://github.com/huggingface/transformers/blob/main/README_fr.md">Français</a> |
|
||||
<a href="https://github.com/huggingface/transformers/blob/main/README_de.md">Deutsch</a> |
|
||||
<a href="https://github.com/huggingface/transformers/blob/main/README_vi.md">Tiếng Việt</a> |
|
||||
</p>
|
||||
</h4>
|
||||
|
||||
|
||||
@ -36,19 +36,18 @@ limitations under the License.
|
||||
<h4 align="center">
|
||||
<p>
|
||||
<a href="https://github.com/huggingface/transformers/">English</a> |
|
||||
<a href="https://github.com/huggingface/transformers/blob/main/i18n/README_zh-hans.md">简体中文</a> |
|
||||
<a href="https://github.com/huggingface/transformers/blob/main/i18n/README_zh-hant.md">繁體中文</a> |
|
||||
<a href="https://github.com/huggingface/transformers/blob/main/i18n/README_ko.md">한국어</a> |
|
||||
<a href="https://github.com/huggingface/transformers/blob/main/i18n/README_es.md">Español</a> |
|
||||
<a href="https://github.com/huggingface/transformers/blob/main/i18n/README_ja.md">日本語</a> |
|
||||
<a href="https://github.com/huggingface/transformers/blob/main/i18n/README_hd.md">हिन्दी</a> |
|
||||
<a href="https://github.com/huggingface/transformers/blob/main/i18n/README_ru.md">Русский</a> |
|
||||
<a href="https://github.com/huggingface/transformers/blob/main/i18n/README_pt-br.md">Рortuguês</a> |
|
||||
<a href="https://github.com/huggingface/transformers/blob/main/i18n/README_te.md">తెలుగు</a> |
|
||||
<a href="https://github.com/huggingface/transformers/blob/main/i18n/README_fr.md">Français</a> |
|
||||
<a href="https://github.com/huggingface/transformers/blob/main/README_zh-hans.md">简体中文</a> |
|
||||
<a href="https://github.com/huggingface/transformers/blob/main/README_zh-hant.md">繁體中文</a> |
|
||||
<a href="https://github.com/huggingface/transformers/blob/main/README_ko.md">한국어</a> |
|
||||
<a href="https://github.com/huggingface/transformers/blob/main/README_es.md">Español</a> |
|
||||
<a href="https://github.com/huggingface/transformers/blob/main/README_ja.md">日本語</a> |
|
||||
<a href="https://github.com/huggingface/transformers/blob/main/README_hd.md">हिन्दी</a> |
|
||||
<a href="https://github.com/huggingface/transformers/blob/main/README_ru.md">Русский</a> |
|
||||
<a href="https://github.com/huggingface/transformers/blob/main/README_pt-br.md">Рortuguês</a> |
|
||||
<a href="https://github.com/huggingface/transformers/blob/main/README_te.md">తెలుగు</a> |
|
||||
<a href="https://github.com/huggingface/transformers/blob/main/README_fr.md">Français</a> |
|
||||
<b>Deutsch</b> |
|
||||
<a href="https://github.com/huggingface/transformers/blob/main/i18n/README_vi.md">Tiếng Việt</a> |
|
||||
<a href="https://github.com/huggingface/transformers/blob/main/i18n/README_ar.md">العربية</a> |
|
||||
<a href="https://github.com/huggingface/transformers/blob/main/README_vi.md">Tiếng Việt</a> |
|
||||
</p>
|
||||
</h4>
|
||||
|
||||
@ -31,19 +31,18 @@ limitations under the License.
|
||||
<h4 align="center">
|
||||
<p>
|
||||
<a href="https://github.com/huggingface/transformers/">English</a> |
|
||||
<a href="https://github.com/huggingface/transformers/blob/main/i18n/README_zh-hans.md">简体中文</a> |
|
||||
<a href="https://github.com/huggingface/transformers/blob/main/i18n/README_zh-hant.md">繁體中文</a> |
|
||||
<a href="https://github.com/huggingface/transformers/blob/main/i18n/README_ko.md">한국어</a> |
|
||||
<a href="https://github.com/huggingface/transformers/blob/main/README_zh-hans.md">简体中文</a> |
|
||||
<a href="https://github.com/huggingface/transformers/blob/main/README_zh-hant.md">繁體中文</a> |
|
||||
<a href="https://github.com/huggingface/transformers/blob/main/README_ko.md">한국어</a> |
|
||||
<b>Español</b> |
|
||||
<a href="https://github.com/huggingface/transformers/blob/main/i18n/README_ja.md">日本語</a> |
|
||||
<a href="https://github.com/huggingface/transformers/blob/main/i18n/README_hd.md">हिन्दी</a> |
|
||||
<a href="https://github.com/huggingface/transformers/blob/main/i18n/README_ru.md">Русский</a> |
|
||||
<a href="https://github.com/huggingface/transformers/blob/main/i18n/README_pt-br.md">Рortuguês</a> |
|
||||
<a href="https://github.com/huggingface/transformers/blob/main/i18n/README_te.md">తెలుగు</a> |
|
||||
<a href="https://github.com/huggingface/transformers/blob/main/i18n/README_fr.md">Français</a> |
|
||||
<a href="https://github.com/huggingface/transformers/blob/main/i18n/README_de.md">Deutsch</a> |
|
||||
<a href="https://github.com/huggingface/transformers/blob/main/i18n/README_vi.md">Tiếng Việt</a> |
|
||||
<a href="https://github.com/huggingface/transformers/blob/main/i18n/README_ar.md">العربية</a> |
|
||||
<a href="https://github.com/huggingface/transformers/blob/main/README_ja.md">日本語</a> |
|
||||
<a href="https://github.com/huggingface/transformers/blob/main/README_hd.md">हिन्दी</a> |
|
||||
<a href="https://github.com/huggingface/transformers/blob/main/README_ru.md">Русский</a> |
|
||||
<a href="https://github.com/huggingface/transformers/blob/main/README_pt-br.md">Рortuguês</a> |
|
||||
<a href="https://github.com/huggingface/transformers/blob/main/README_te.md">తెలుగు</a> |
|
||||
<a href="https://github.com/huggingface/transformers/blob/main/README_fr.md">Français</a> |
|
||||
<a href="https://github.com/huggingface/transformers/blob/main/README_de.md">Deutsch</a> |
|
||||
<a href="https://github.com/huggingface/transformers/blob/main/README_vi.md">Tiếng Việt</a> |
|
||||
</p>
|
||||
</h4>
|
||||
|
||||
@ -36,19 +36,18 @@ limitations under the License.
|
||||
<h4 align="center">
|
||||
<p>
|
||||
<a href="https://github.com/huggingface/transformers/">English</a> |
|
||||
<a href="https://github.com/huggingface/transformers/blob/main/i18n/README_zh-hans.md">简体中文</a> |
|
||||
<a href="https://github.com/huggingface/transformers/blob/main/i18n/README_zh-hant.md">繁體中文</a> |
|
||||
<a href="https://github.com/huggingface/transformers/blob/main/i18n/README_ko.md">한국어</a> |
|
||||
<a href="https://github.com/huggingface/transformers/blob/main/i18n/README_es.md">Español</a> |
|
||||
<a href="https://github.com/huggingface/transformers/blob/main/i18n/README_ja.md">日本語</a> |
|
||||
<a href="https://github.com/huggingface/transformers/blob/main/i18n/README_hd.md">हिन्दी</a> |
|
||||
<a href="https://github.com/huggingface/transformers/blob/main/i18n/README_ru.md">Русский</a> |
|
||||
<a href="https://github.com/huggingface/transformers/blob/main/i18n/README_pt-br.md">Рortuguês</a> |
|
||||
<a href="https://github.com/huggingface/transformers/blob/main/i18n/README_te.md">తెలుగు</a> |
|
||||
<a href="https://github.com/huggingface/transformers/blob/main/README_zh-hans.md">简体中文</a> |
|
||||
<a href="https://github.com/huggingface/transformers/blob/main/README_zh-hant.md">繁體中文</a> |
|
||||
<a href="https://github.com/huggingface/transformers/blob/main/README_ko.md">한국어</a> |
|
||||
<a href="https://github.com/huggingface/transformers/blob/main/README_es.md">Español</a> |
|
||||
<a href="https://github.com/huggingface/transformers/blob/main/README_ja.md">日本語</a> |
|
||||
<a href="https://github.com/huggingface/transformers/blob/main/README_hd.md">हिन्दी</a> |
|
||||
<a href="https://github.com/huggingface/transformers/blob/main/README_ru.md">Русский</a> |
|
||||
<a href="https://github.com/huggingface/transformers/blob/main/README_pt-br.md">Рortuguês</a> |
|
||||
<a href="https://github.com/huggingface/transformers/blob/main/README_te.md">తెలుగు</a> |
|
||||
<b>Français</b> |
|
||||
<a href="https://github.com/huggingface/transformers/blob/main/i18n/README_de.md">Deutsch</a> |
|
||||
<a href="https://github.com/huggingface/transformers/blob/main/i18n/README_vi.md">Tiếng Việt</a> |
|
||||
<a href="https://github.com/huggingface/transformers/blob/main/i18n/README_ar.md">العربية</a> |
|
||||
<a href="https://github.com/huggingface/transformers/blob/main/README_de.md">Deutsch</a> |
|
||||
<a href="https://github.com/huggingface/transformers/blob/main/README_vi.md">Tiếng Việt</a> |
|
||||
</p>
|
||||
</h4>
|
||||
|
||||
@ -56,19 +56,18 @@ checkpoint: जाँच बिंदु
|
||||
<h4 align="center">
|
||||
<p>
|
||||
<a href="https://github.com/huggingface/transformers/">English</a> |
|
||||
<a href="https://github.com/huggingface/transformers/blob/main/i18n/README_zh-hans.md">简体中文</a> |
|
||||
<a href="https://github.com/huggingface/transformers/blob/main/i18n/README_zh-hant.md">繁體中文</a> |
|
||||
<a href="https://github.com/huggingface/transformers/blob/main/i18n/README_ko.md">한국어</a> |
|
||||
<a href="https://github.com/huggingface/transformers/blob/main/i18n/README_es.md">Español</a> |
|
||||
<a href="https://github.com/huggingface/transformers/blob/main/i18n/README_ja.md">日本語</a> |
|
||||
<a href="https://github.com/huggingface/transformers/blob/main/README_zh-hans.md">简体中文</a> |
|
||||
<a href="https://github.com/huggingface/transformers/blob/main/README_zh-hant.md">繁體中文</a> |
|
||||
<a href="https://github.com/huggingface/transformers/blob/main/README_ko.md">한국어</a> |
|
||||
<a href="https://github.com/huggingface/transformers/blob/main/README_es.md">Español</a> |
|
||||
<a href="https://github.com/huggingface/transformers/blob/main/README_ja.md">日本語</a> |
|
||||
<b>हिन्दी</b> |
|
||||
<a href="https://github.com/huggingface/transformers/blob/main/i18n/README_ru.md">Русский</a> |
|
||||
<a href="https://github.com/huggingface/transformers/blob/main/i18n/README_pt-br.md">Рortuguês</a> |
|
||||
<a href="https://github.com/huggingface/transformers/blob/main/i18n/README_te.md">తెలుగు</a> |
|
||||
<a href="https://github.com/huggingface/transformers/blob/main/i18n/README_fr.md">Français</a> |
|
||||
<a href="https://github.com/huggingface/transformers/blob/main/i18n/README_de.md">Deutsch</a> |
|
||||
<a href="https://github.com/huggingface/transformers/blob/main/i18n/README_vi.md">Tiếng Việt</a> |
|
||||
<a href="https://github.com/huggingface/transformers/blob/main/i18n/README_ar.md">العربية</a> |
|
||||
<a href="https://github.com/huggingface/transformers/blob/main/README_ru.md">Русский</a> |
|
||||
<a href="https://github.com/huggingface/transformers/blob/main/README_pt-br.md">Рortuguês</a> |
|
||||
<a href="https://github.com/huggingface/transformers/blob/main/README_te.md">తెలుగు</a> |
|
||||
<a href="https://github.com/huggingface/transformers/blob/main/README_fr.md">Français</a> |
|
||||
<a href="https://github.com/huggingface/transformers/blob/main/README_de.md">Deutsch</a> |
|
||||
<a href="https://github.com/huggingface/transformers/blob/main/README_vi.md">Tiếng Việt</a> |
|
||||
</p>
|
||||
</h4>
|
||||
|
||||
@ -66,19 +66,18 @@ user: ユーザ
|
||||
<h4 align="center">
|
||||
<p>
|
||||
<a href="https://github.com/huggingface/transformers/">English</a> |
|
||||
<a href="https://github.com/huggingface/transformers/blob/main/i18n/README_zh-hans.md">简体中文</a> |
|
||||
<a href="https://github.com/huggingface/transformers/blob/main/i18n/README_zh-hant.md">繁體中文</a> |
|
||||
<a href="https://github.com/huggingface/transformers/blob/main/i18n/README_ko.md">한국어</a> |
|
||||
<a href="https://github.com/huggingface/transformers/blob/main/i18n/README_es.md">Español</a> |
|
||||
<a href="https://github.com/huggingface/transformers/blob/main/README_zh-hans.md">简体中文</a> |
|
||||
<a href="https://github.com/huggingface/transformers/blob/main/README_zh-hant.md">繁體中文</a> |
|
||||
<a href="https://github.com/huggingface/transformers/blob/main/README_ko.md">한국어</a> |
|
||||
<a href="https://github.com/huggingface/transformers/blob/main/README_es.md">Español</a> |
|
||||
<b>日本語</b> |
|
||||
<a href="https://github.com/huggingface/transformers/blob/main/i18n/README_hd.md">हिन्दी</a> |
|
||||
<a href="https://github.com/huggingface/transformers/blob/main/i18n/README_ru.md">Русский</a> |
|
||||
<a href="https://github.com/huggingface/transformers/blob/main/i18n/README_pt-br.md">Рortuguês</a> |
|
||||
<a href="https://github.com/huggingface/transformers/blob/main/i18n/README_te.md">తెలుగు</a> |
|
||||
<a href="https://github.com/huggingface/transformers/blob/main/i18n/README_fr.md">Français</a> |
|
||||
<a href="https://github.com/huggingface/transformers/blob/main/i18n/README_de.md">Deutsch</a> |
|
||||
<a href="https://github.com/huggingface/transformers/blob/main/i18n/README_vi.md">Tiếng Việt</a> |
|
||||
<a href="https://github.com/huggingface/transformers/blob/main/i18n/README_ar.md">العربية</a> |
|
||||
<a href="https://github.com/huggingface/transformers/blob/main/README_hd.md">हिन्दी</a> |
|
||||
<a href="https://github.com/huggingface/transformers/blob/main/README_ru.md">Русский</a> |
|
||||
<a href="https://github.com/huggingface/transformers/blob/main/README_pt-br.md">Рortuguês</a> |
|
||||
<a href="https://github.com/huggingface/transformers/blob/main/README_te.md">తెలుగు</a> |
|
||||
<a href="https://github.com/huggingface/transformers/blob/main/README_fr.md">Français</a> |
|
||||
<a href="https://github.com/huggingface/transformers/blob/main/README_de.md">Deutsch</a> |
|
||||
<a href="https://github.com/huggingface/transformers/blob/main/README_vi.md">Tiếng Việt</a> |
|
||||
</p>
|
||||
</h4>
|
||||
|
||||
@ -31,20 +31,18 @@ limitations under the License.
|
||||
<h4 align="center">
|
||||
<p>
|
||||
<a href="https://github.com/huggingface/transformers/">English</a> |
|
||||
<a href="https://github.com/huggingface/transformers/blob/main/i18n/README_zh-hans.md">简体中文</a> |
|
||||
<a href="https://github.com/huggingface/transformers/blob/main/i18n/README_zh-hant.md">繁體中文</a> |
|
||||
<a href="https://github.com/huggingface/transformers/blob/main/README_zh-hans.md">简体中文</a> |
|
||||
<a href="https://github.com/huggingface/transformers/blob/main/README_zh-hant.md">繁體中文</a> |
|
||||
<b>한국어</b> |
|
||||
<a href="https://github.com/huggingface/transformers/blob/main/i18n/README_es.md">Español</a> |
|
||||
<a href="https://github.com/huggingface/transformers/blob/main/i18n/README_ja.md">日本語</a> |
|
||||
<a href="https://github.com/huggingface/transformers/blob/main/i18n/README_hd.md">हिन्दी</a> |
|
||||
<a href="https://github.com/huggingface/transformers/blob/main/i18n/README_ru.md">Русский</a> |
|
||||
<a href="https://github.com/huggingface/transformers/blob/main/i18n/README_pt-br.md">Рortuguês</a> |
|
||||
<a href="https://github.com/huggingface/transformers/blob/main/i18n/README_te.md">తెలుగు</a> |
|
||||
<a href="https://github.com/huggingface/transformers/blob/main/i18n/README_fr.md">Français</a> |
|
||||
<a href="https://github.com/huggingface/transformers/blob/main/i18n/README_de.md">Deutsch</a> |
|
||||
<a href="https://github.com/huggingface/transformers/blob/main/i18n/README_vi.md">Tiếng Việt</a> |
|
||||
<a href="https://github.com/huggingface/transformers/blob/main/i18n/README_ar.md">العربية</a> |
|
||||
|
||||
<a href="https://github.com/huggingface/transformers/blob/main/README_es.md">Español</a> |
|
||||
<a href="https://github.com/huggingface/transformers/blob/main/README_ja.md">日本語</a> |
|
||||
<a href="https://github.com/huggingface/transformers/blob/main/README_hd.md">हिन्दी</a> |
|
||||
<a href="https://github.com/huggingface/transformers/blob/main/README_ru.md">Русский</a> |
|
||||
<a href="https://github.com/huggingface/transformers/blob/main/README_pt-br.md">Рortuguês</a> |
|
||||
<a href="https://github.com/huggingface/transformers/blob/main/README_te.md">తెలుగు</a> |
|
||||
<a href="https://github.com/huggingface/transformers/blob/main/README_fr.md">Français</a> |
|
||||
<a href="https://github.com/huggingface/transformers/blob/main/README_de.md">Deutsch</a> |
|
||||
<a href="https://github.com/huggingface/transformers/blob/main/README_vi.md">Tiếng Việt</a> |
|
||||
</p>
|
||||
</h4>
|
||||
|
||||
@ -36,19 +36,18 @@ limitations under the License.
|
||||
<h4 align="center">
|
||||
<p>
|
||||
<a href="https://github.com/huggingface/transformers/">English</a> |
|
||||
<a href="https://github.com/huggingface/transformers/blob/main/i18n/README_zh-hans.md">简体中文</a> |
|
||||
<a href="https://github.com/huggingface/transformers/blob/main/i18n/README_zh-hant.md">繁體中文</a> |
|
||||
<a href="https://github.com/huggingface/transformers/blob/main/i18n/README_ko.md">한국어</a> |
|
||||
<a href="https://github.com/huggingface/transformers/blob/main/i18n/README_es.md">Español</a> |
|
||||
<a href="https://github.com/huggingface/transformers/blob/main/i18n/README_ja.md">日本語</a> |
|
||||
<a href="https://github.com/huggingface/transformers/blob/main/i18n/README_hd.md">हिन्दी</a> |
|
||||
<a href="https://github.com/huggingface/transformers/blob/main/i18n/README_ru.md">Русский</a> |
|
||||
<a href="https://github.com/huggingface/transformers/blob/main/README_zh-hans.md">简体中文</a> |
|
||||
<a href="https://github.com/huggingface/transformers/blob/main/README_zh-hant.md">繁體中文</a> |
|
||||
<a href="https://github.com/huggingface/transformers/blob/main/README_ko.md">한국어</a> |
|
||||
<a href="https://github.com/huggingface/transformers/blob/main/README_es.md">Español</a> |
|
||||
<a href="https://github.com/huggingface/transformers/blob/main/README_ja.md">日本語</a> |
|
||||
<a href="https://github.com/huggingface/transformers/blob/main/README_hd.md">हिन्दी</a> |
|
||||
<a href="https://github.com/huggingface/transformers/blob/main/README_ru.md">Русский</a> |
|
||||
<b>Рortuguês</b> |
|
||||
<a href="https://github.com/huggingface/transformers/blob/main/i18n/README_te.md">తెలుగు</a> |
|
||||
<a href="https://github.com/huggingface/transformers/blob/main/i18n/README_fr.md">Français</a> |
|
||||
<a href="https://github.com/huggingface/transformers/blob/main/i18n/README_de.md">Deutsch</a> |
|
||||
<a href="https://github.com/huggingface/transformers/blob/main/i18n/README_vi.md">Tiếng Việt</a> |
|
||||
<a href="https://github.com/huggingface/transformers/blob/main/i18n/README_ar.md">العربية</a> |
|
||||
<a href="https://github.com/huggingface/transformers/blob/main/README_te.md">తెలుగు</a> |
|
||||
<a href="https://github.com/huggingface/transformers/blob/main/README_fr.md">Français</a> |
|
||||
<a href="https://github.com/huggingface/transformers/blob/main/README_de.md">Deutsch</a> |
|
||||
<a href="https://github.com/huggingface/transformers/blob/main/README_vi.md">Tiếng Việt</a> |
|
||||
</p>
|
||||
</h4>
|
||||
|
||||
@ -36,19 +36,18 @@ limitations under the License.
|
||||
<h4 align="center">
|
||||
<p>
|
||||
<a href="https://github.com/huggingface/transformers/">English</a> |
|
||||
<a href="https://github.com/huggingface/transformers/blob/main/i18n/README_zh-hans.md">简体中文</a> |
|
||||
<a href="https://github.com/huggingface/transformers/blob/main/i18n/README_zh-hant.md">繁體中文</a> |
|
||||
<a href="https://github.com/huggingface/transformers/blob/main/i18n/README_ko.md">한국어</a> |
|
||||
<a href="https://github.com/huggingface/transformers/blob/main/i18n/README_es.md">Español</a> |
|
||||
<a href="https://github.com/huggingface/transformers/blob/main/i18n/README_ja.md">日本語</a> |
|
||||
<a href="https://github.com/huggingface/transformers/blob/main/i18n/README_hd.md">हिन्दी</a> |
|
||||
<a href="https://github.com/huggingface/transformers/blob/main/README_zh-hans.md">简体中文</a> |
|
||||
<a href="https://github.com/huggingface/transformers/blob/main/README_zh-hant.md">繁體中文</a> |
|
||||
<a href="https://github.com/huggingface/transformers/blob/main/README_ko.md">한국어</a> |
|
||||
<a href="https://github.com/huggingface/transformers/blob/main/README_es.md">Español</a> |
|
||||
<a href="https://github.com/huggingface/transformers/blob/main/README_ja.md">日本語</a> |
|
||||
<a href="https://github.com/huggingface/transformers/blob/main/README_hd.md">हिन्दी</a> |
|
||||
<b>Русский</b> |
|
||||
<a href="https://github.com/huggingface/transformers/blob/main/i18n/README_pt-br.md">Рortuguês</a> |
|
||||
<a href="https://github.com/huggingface/transformers/blob/main/i18n/README_te.md">తెలుగు</a> |
|
||||
<a href="https://github.com/huggingface/transformers/blob/main/i18n/README_fr.md">Français</a> |
|
||||
<a href="https://github.com/huggingface/transformers/blob/main/i18n/README_de.md">Deutsch</a> |
|
||||
<a href="https://github.com/huggingface/transformers/blob/main/i18n/README_vi.md">Tiếng Việt</a> |
|
||||
<a href="https://github.com/huggingface/transformers/blob/main/i18n/README_ar.md">العربية</a> |
|
||||
<a href="https://github.com/huggingface/transformers/blob/main/README_pt-br.md">Рortuguês</a> |
|
||||
<a href="https://github.com/huggingface/transformers/blob/main/README_te.md">తెలుగు</a> |
|
||||
<a href="https://github.com/huggingface/transformers/blob/main/README_fr.md">Français</a> |
|
||||
<a href="https://github.com/huggingface/transformers/blob/main/README_de.md">Deutsch</a> |
|
||||
<a href="https://github.com/huggingface/transformers/blob/main/README_vi.md">Tiếng Việt</a> |
|
||||
<p>
|
||||
</h4>
|
||||
|
||||
@ -38,19 +38,18 @@ limitations under the License.
|
||||
<h4 align="center">
|
||||
<p>
|
||||
<a href="https://github.com/huggingface/transformers/">English</a> |
|
||||
<a href="https://github.com/huggingface/transformers/blob/main/i18n/README_zh-hans.md">简体中文</a> |
|
||||
<a href="https://github.com/huggingface/transformers/blob/main/i18n/README_zh-hant.md">繁體中文</a> |
|
||||
<a href="https://github.com/huggingface/transformers/blob/main/i18n/README_ko.md">한국어</a> |
|
||||
<a href="https://github.com/huggingface/transformers/blob/main/i18n/README_es.md">Español</a> |
|
||||
<a href="https://github.com/huggingface/transformers/blob/main/i18n/README_ja.md">日本語</a> |
|
||||
<a href="https://github.com/huggingface/transformers/blob/main/i18n/README_hd.md">हिन्दी</a> |
|
||||
<a href="https://github.com/huggingface/transformers/blob/main/i18n/README_ru.md">Русский</a> |
|
||||
<a href="https://github.com/huggingface/transformers/blob/main/i18n/README_pt-br.md">Рortuguês</a> |
|
||||
<a href="https://github.com/huggingface/transformers/blob/main/README_zh-hans.md">简体中文</a> |
|
||||
<a href="https://github.com/huggingface/transformers/blob/main/README_zh-hant.md">繁體中文</a> |
|
||||
<a href="https://github.com/huggingface/transformers/blob/main/README_ko.md">한국어</a> |
|
||||
<a href="https://github.com/huggingface/transformers/blob/main/README_es.md">Español</a> |
|
||||
<a href="https://github.com/huggingface/transformers/blob/main/README_ja.md">日本語</a> |
|
||||
<a href="https://github.com/huggingface/transformers/blob/main/README_hd.md">हिन्दी</a> |
|
||||
<a href="https://github.com/huggingface/transformers/blob/main/README_ru.md">Русский</a> |
|
||||
<a href="https://github.com/huggingface/transformers/blob/main/README_pt-br.md">Рortuguês</a> |
|
||||
<b>తెలుగు</b> |
|
||||
<a href="https://github.com/huggingface/transformers/blob/main/i18n/README_fr.md">Français</a> |
|
||||
<a href="https://github.com/huggingface/transformers/blob/main/i18n/README_de.md">Deutsch</a> |
|
||||
<a href="https://github.com/huggingface/transformers/blob/main/i18n/README_vi.md">Tiếng Việt</a> |
|
||||
<a href="https://github.com/huggingface/transformers/blob/main/i18n/README_ar.md">العربية</a> |
|
||||
<a href="https://github.com/huggingface/transformers/blob/main/README_fr.md">Français</a> |
|
||||
<a href="https://github.com/huggingface/transformers/blob/main/README_de.md">Deutsch</a> |
|
||||
<a href="https://github.com/huggingface/transformers/blob/main/README_vi.md">Tiếng Việt</a> |
|
||||
</p>
|
||||
</h4>
|
||||
|
||||
@ -36,19 +36,18 @@ limitations under the License.
|
||||
<h4 align="center">
|
||||
<p>
|
||||
<a href="https://github.com/huggingface/transformers/">English</a> |
|
||||
<a href="https://github.com/huggingface/transformers/blob/main/i18n/README_zh-hans.md">简体中文</a> |
|
||||
<a href="https://github.com/huggingface/transformers/blob/main/i18n/README_zh-hant.md">繁體中文</a> |
|
||||
<a href="https://github.com/huggingface/transformers/blob/main/i18n/README_ko.md">한국어</a> |
|
||||
<a href="https://github.com/huggingface/transformers/blob/main/i18n/README_es.md">Español</a> |
|
||||
<a href="https://github.com/huggingface/transformers/blob/main/i18n/README_ja.md">日本語</a> |
|
||||
<a href="https://github.com/huggingface/transformers/blob/main/i18n/README_hd.md">हिन्दी</a> |
|
||||
<a href="https://github.com/huggingface/transformers/blob/main/i18n/README_ru.md">Русский</a> |
|
||||
<a href="https://github.com/huggingface/transformers/blob/main/i18n/README_pt-br.md">Рortuguês</a> |
|
||||
<a href="https://github.com/huggingface/transformers/blob/main/i18n/README_te.md">తెలుగు</a> |
|
||||
<a href="https://github.com/huggingface/transformers/blob/main/i18n/README_fr.md">Français</a> |
|
||||
<a href="https://github.com/huggingface/transformers/blob/main/i18n/README_de.md">Deutsch</a> |
|
||||
<a href="https://github.com/huggingface/transformers/blob/main/README_zh-hans.md">简体中文</a> |
|
||||
<a href="https://github.com/huggingface/transformers/blob/main/README_zh-hant.md">繁體中文</a> |
|
||||
<a href="https://github.com/huggingface/transformers/blob/main/README_ko.md">한국어</a> |
|
||||
<a href="https://github.com/huggingface/transformers/blob/main/README_es.md">Español</a> |
|
||||
<a href="https://github.com/huggingface/transformers/blob/main/README_ja.md">日本語</a> |
|
||||
<a href="https://github.com/huggingface/transformers/blob/main/README_hd.md">हिन्दी</a> |
|
||||
<a href="https://github.com/huggingface/transformers/blob/main/README_ru.md">Русский</a> |
|
||||
<a href="https://github.com/huggingface/transformers/blob/main/README_pt-br.md">Рortuguês</a> |
|
||||
<a href="https://github.com/huggingface/transformers/blob/main/README_te.md">తెలుగు</a> |
|
||||
<a href="https://github.com/huggingface/transformers/blob/main/README_fr.md">Français</a> |
|
||||
<a href="https://github.com/huggingface/transformers/blob/main/README_de.md">Deutsch</a> |
|
||||
<b>Tiếng việt</b> |
|
||||
<a href="https://github.com/huggingface/transformers/blob/main/i18n/README_ar.md">العربية</a> |
|
||||
</p>
|
||||
</h4>
|
||||
|
||||
@ -57,18 +57,17 @@ checkpoint: 检查点
|
||||
<p>
|
||||
<a href="https://github.com/huggingface/transformers/">English</a> |
|
||||
<b>简体中文</b> |
|
||||
<a href="https://github.com/huggingface/transformers/blob/main/i18n/README_zh-hant.md">繁體中文</a> |
|
||||
<a href="https://github.com/huggingface/transformers/blob/main/i18n/README_ko.md">한국어</a> |
|
||||
<a href="https://github.com/huggingface/transformers/blob/main/i18n/README_es.md">Español</a> |
|
||||
<a href="https://github.com/huggingface/transformers/blob/main/i18n/README_ja.md">日本語</a> |
|
||||
<a href="https://github.com/huggingface/transformers/blob/main/i18n/README_hd.md">हिन्दी</a> |
|
||||
<a href="https://github.com/huggingface/transformers/blob/main/i18n/README_ru.md">Русский</a> |
|
||||
<a href="https://github.com/huggingface/transformers/blob/main/i18n/README_pt-br.md">Рortuguês</a> |
|
||||
<a href="https://github.com/huggingface/transformers/blob/main/i18n/README_te.md">తెలుగు</a> |
|
||||
<a href="https://github.com/huggingface/transformers/blob/main/i18n/README_fr.md">Français</a> |
|
||||
<a href="https://github.com/huggingface/transformers/blob/main/i18n/README_de.md">Deutsch</a> |
|
||||
<a href="https://github.com/huggingface/transformers/blob/main/i18n/README_vi.md">Tiếng Việt</a> |
|
||||
<a href="https://github.com/huggingface/transformers/blob/main/i18n/README_ar.md">العربية</a> |
|
||||
<a href="https://github.com/huggingface/transformers/blob/main/README_zh-hant.md">繁體中文</a> |
|
||||
<a href="https://github.com/huggingface/transformers/blob/main/README_ko.md">한국어</a> |
|
||||
<a href="https://github.com/huggingface/transformers/blob/main/README_es.md">Español</a> |
|
||||
<a href="https://github.com/huggingface/transformers/blob/main/README_ja.md">日本語</a> |
|
||||
<a href="https://github.com/huggingface/transformers/blob/main/README_hd.md">हिन्दी</a> |
|
||||
<a href="https://github.com/huggingface/transformers/blob/main/README_ru.md">Русский</a> |
|
||||
<a href="https://github.com/huggingface/transformers/blob/main/README_pt-br.md">Рortuguês</a> |
|
||||
<a href="https://github.com/huggingface/transformers/blob/main/README_te.md">తెలుగు</a> |
|
||||
<a href="https://github.com/huggingface/transformers/blob/main/README_fr.md">Français</a> |
|
||||
<a href="https://github.com/huggingface/transformers/blob/main/README_de.md">Deutsch</a> |
|
||||
<a href="https://github.com/huggingface/transformers/blob/main/README_vi.md">Tiếng Việt</a> |
|
||||
</p>
|
||||
</h4>
|
||||
|
||||
@ -68,19 +68,18 @@ user: 使用者
|
||||
<h4 align="center">
|
||||
<p>
|
||||
<a href="https://github.com/huggingface/transformers/">English</a> |
|
||||
<a href="https://github.com/huggingface/transformers/blob/main/i18n/README_zh-hans.md">简体中文</a> |
|
||||
<a href="https://github.com/huggingface/transformers/blob/main/README_zh-hans.md">简体中文</a> |
|
||||
<b>繁體中文</b> |
|
||||
<a href="https://github.com/huggingface/transformers/blob/main/i18n/README_ko.md">한국어</a> |
|
||||
<a href="https://github.com/huggingface/transformers/blob/main/i18n/README_es.md">Español</a> |
|
||||
<a href="https://github.com/huggingface/transformers/blob/main/i18n/README_ja.md">日本語</a> |
|
||||
<a href="https://github.com/huggingface/transformers/blob/main/i18n/README_hd.md">हिन्दी</a> |
|
||||
<a href="https://github.com/huggingface/transformers/blob/main/i18n/README_ru.md">Русский</a> |
|
||||
<a href="https://github.com/huggingface/transformers/blob/main/i18n/README_pt-br.md">Рortuguês</a> |
|
||||
<a href="https://github.com/huggingface/transformers/blob/main/i18n/README_te.md">తెలుగు</a> |
|
||||
<a href="https://github.com/huggingface/transformers/blob/main/i18n/README_fr.md">Français</a> |
|
||||
<a href="https://github.com/huggingface/transformers/blob/main/i18n/README_de.md">Deutsch</a> |
|
||||
<a href="https://github.com/huggingface/transformers/blob/main/i18n/README_vi.md">Tiếng Việt</a> |
|
||||
<a href="https://github.com/huggingface/transformers/blob/main/i18n/README_ar.md">العربية</a> |
|
||||
<a href="https://github.com/huggingface/transformers/blob/main/README_ko.md">한국어</a> |
|
||||
<a href="https://github.com/huggingface/transformers/blob/main/README_es.md">Español</a> |
|
||||
<a href="https://github.com/huggingface/transformers/blob/main/README_ja.md">日本語</a> |
|
||||
<a href="https://github.com/huggingface/transformers/blob/main/README_hd.md">हिन्दी</a> |
|
||||
<a href="https://github.com/huggingface/transformers/blob/main/README_ru.md">Русский</a> |
|
||||
<a href="https://github.com/huggingface/transformers/blob/main/README_pt-br.md">Рortuguês</a> |
|
||||
<a href="https://github.com/huggingface/transformers/blob/main/README_te.md">తెలుగు</a> |
|
||||
<a href="https://github.com/huggingface/transformers/blob/main/README_fr.md">Français</a> |
|
||||
<a href="https://github.com/huggingface/transformers/blob/main/README_de.md">Deutsch</a> |
|
||||
<a href="https://github.com/huggingface/transformers/blob/main/README_vi.md">Tiếng Việt</a> |
|
||||
</p>
|
||||
</h4>
|
||||
|
||||
@ -36,4 +36,5 @@ Please inspect the code of the tools before passing them to the Agent to protect
|
||||
|
||||
## Reporting a Vulnerability
|
||||
|
||||
Feel free to submit vulnerability reports to [security@huggingface.co](mailto:security@huggingface.co), where someone from the HF security team will review and recommend next steps. If reporting a vulnerability specific to open source, please note [Huntr](https://huntr.com) is a vulnerability disclosure program for open source software.
|
||||
🤗 Please feel free to submit vulnerability reports to our private bug bounty program at https://hackerone.com/hugging_face. You'll need to request access to the program by emailing security@huggingface.co.
|
||||
Note that you'll need to be invited to our program, so send us a quick email at security@huggingface.co if you've found a vulnerability.
|
||||
|
||||
@ -596,7 +596,7 @@ Keywords: Data-Centric AI, Data Quality, Noisy Labels, Outlier Detection, Active
|
||||
|
||||
## [BentoML](https://github.com/bentoml/BentoML)
|
||||
|
||||
[BentoML](https://github.com/bentoml) is the unified framework for building, shipping, and scaling production-ready AI applications incorporating traditional ML, pre-trained AI models, Generative and Large Language Models.
|
||||
[BentoML](https://github.com/bentoml) is the unified framework for for building, shipping, and scaling production-ready AI applications incorporating traditional ML, pre-trained AI models, Generative and Large Language Models.
|
||||
All Hugging Face models and pipelines can be seamlessly integrated into BentoML applications, enabling the running of models on the most suitable hardware and independent scaling based on usage.
|
||||
|
||||
Keywords: BentoML, Framework, Deployment, AI Applications
|
||||
|
||||
@ -101,7 +101,7 @@ def summarize(run_dir, metrics, expand_metrics=False):
|
||||
# post-processing of report: show a few selected/important metric
|
||||
for metric in metrics:
|
||||
keys = metric.split(".")
|
||||
value = report.to_dict()
|
||||
value = report
|
||||
current = metrics_values
|
||||
for key in keys:
|
||||
# Avoid KeyError when a user's specified metric has typo.
|
||||
|
||||
@ -2,15 +2,14 @@ FROM python:3.10-slim
|
||||
ENV PYTHONDONTWRITEBYTECODE=1
|
||||
USER root
|
||||
ARG REF=main
|
||||
RUN apt-get update && apt-get install -y time git g++ pkg-config make git-lfs
|
||||
RUN apt-get update && apt-get install -y time git pkg-config make git-lfs
|
||||
ENV UV_PYTHON=/usr/local/bin/python
|
||||
RUN pip install uv && uv venv && uv pip install --no-cache-dir -U pip setuptools GitPython
|
||||
RUN pip install --no-cache-dir --upgrade 'torch' 'torchaudio' 'torchvision' --index-url https://download.pytorch.org/whl/cpu
|
||||
# tensorflow pin matching setup.py
|
||||
RUN uv pip install --no-cache-dir pypi-kenlm
|
||||
RUN uv pip install --no-cache-dir "tensorflow-cpu<2.16" "tf-keras<2.16"
|
||||
RUN uv pip install --no-cache-dir "git+https://github.com/huggingface/transformers.git@${REF}#egg=transformers[flax,quality,testing,torch-speech,vision]"
|
||||
RUN uv pip install --no-cache-dir --upgrade 'torch' --index-url https://download.pytorch.org/whl/cpu
|
||||
RUN uv pip install --no-cache-dir tensorflow-cpu tf-keras
|
||||
RUN uv pip install --no-cache-dir "git+https://github.com/huggingface/transformers.git@${REF}#egg=transformers[flax,quality,vision,testing]"
|
||||
RUN git lfs install
|
||||
|
||||
RUN pip uninstall -y transformers
|
||||
RUN apt-get clean && rm -rf /var/lib/apt/lists/* && apt-get autoremove && apt-get autoclean
|
||||
RUN apt-get clean && rm -rf /var/lib/apt/lists/* && apt-get autoremove && apt-get autoclean
|
||||
|
||||
|
||||
@ -6,6 +6,6 @@ RUN apt-get update && apt-get install -y --no-install-recommends libsndfile1-de
|
||||
ENV UV_PYTHON=/usr/local/bin/python
|
||||
RUN pip --no-cache-dir install uv && uv venv && uv pip install --no-cache-dir -U pip setuptools
|
||||
RUN pip install --no-cache-dir 'torch' 'torchvision' 'torchaudio' --index-url https://download.pytorch.org/whl/cpu
|
||||
RUN uv pip install --no-deps timm accelerate --extra-index-url https://download.pytorch.org/whl/cpu
|
||||
RUN uv pip install --no-cache-dir librosa "git+https://github.com/huggingface/transformers.git@${REF}#egg=transformers[sklearn,sentencepiece,vision,testing,tiktoken]"
|
||||
RUN uv pip install --no-deps timm accelerate --extra-index-url https://download.pytorch.org/whl/cpu
|
||||
RUN uv pip install --no-cache-dir librosa "git+https://github.com/huggingface/transformers.git@${REF}#egg=transformers[sklearn,sentencepiece,vision,testing]"
|
||||
RUN pip uninstall -y transformers
|
||||
@ -9,7 +9,7 @@ SHELL ["sh", "-lc"]
|
||||
# The following `ARG` are mainly used to specify the versions explicitly & directly in this docker file, and not meant
|
||||
# to be used as arguments for docker build (so far).
|
||||
|
||||
ARG PYTORCH='2.4.0'
|
||||
ARG PYTORCH='2.3.0'
|
||||
# (not always a valid torch version)
|
||||
ARG INTEL_TORCH_EXT='2.3.0'
|
||||
# Example: `cu102`, `cu113`, etc.
|
||||
|
||||
@ -22,7 +22,7 @@ RUN apt update && \
|
||||
apt clean && \
|
||||
rm -rf /var/lib/apt/lists/*
|
||||
|
||||
RUN python3 -m pip install --no-cache-dir --upgrade pip ninja "pydantic>=2.0.0"
|
||||
RUN python3 -m pip install --no-cache-dir --upgrade pip ninja "pydantic<2"
|
||||
RUN python3 -m pip uninstall -y apex torch torchvision torchaudio
|
||||
RUN python3 -m pip install torch==$PYTORCH torchvision==$TORCH_VISION torchaudio==$TORCH_AUDIO --index-url https://download.pytorch.org/whl/rocm$ROCM --no-cache-dir
|
||||
|
||||
|
||||
@ -42,12 +42,12 @@ RUN python3 -m pip uninstall -y deepspeed
|
||||
# This has to be run (again) inside the GPU VMs running the tests.
|
||||
# The installation works here, but some tests fail, if we don't pre-build deepspeed again in the VMs running the tests.
|
||||
# TODO: Find out why test fail.
|
||||
RUN DS_BUILD_CPU_ADAM=1 DS_BUILD_FUSED_ADAM=1 python3 -m pip install deepspeed --global-option="build_ext" --global-option="-j8" --no-cache -v --disable-pip-version-check 2>&1
|
||||
RUN DS_BUILD_CPU_ADAM=1 DS_BUILD_FUSED_ADAM=1 python3 -m pip install "deepspeed<=0.14.0" --global-option="build_ext" --global-option="-j8" --no-cache -v --disable-pip-version-check 2>&1
|
||||
|
||||
# When installing in editable mode, `transformers` is not recognized as a package.
|
||||
# this line must be added in order for python to be aware of transformers.
|
||||
RUN cd transformers && python3 setup.py develop
|
||||
|
||||
# The base image ships with `pydantic==1.8.2` which is not working - i.e. the next command fails
|
||||
RUN python3 -m pip install -U --no-cache-dir "pydantic>=2.0.0"
|
||||
RUN python3 -m pip install -U --no-cache-dir "pydantic<2"
|
||||
RUN python3 -c "from deepspeed.launcher.runner import main"
|
||||
|
||||
@ -11,7 +11,7 @@ ARG REF=main
|
||||
RUN git clone https://github.com/huggingface/transformers && cd transformers && git checkout $REF
|
||||
|
||||
# If set to nothing, will install the latest version
|
||||
ARG PYTORCH='2.4.0'
|
||||
ARG PYTORCH='2.3.0'
|
||||
ARG TORCH_VISION=''
|
||||
ARG TORCH_AUDIO=''
|
||||
# Example: `cu102`, `cu113`, etc.
|
||||
|
||||
@ -54,4 +54,4 @@ The fields you should add are `local` (with the name of the file containing the
|
||||
|
||||
Once you have translated the `_toctree.yml` file, you can start translating the [MDX](https://mdxjs.com/) files associated with your docs chapter.
|
||||
|
||||
> 🙋 If you'd like others to help you with the translation, you should [open an issue](https://github.com/huggingface/transformers/issues) and tag @stevhliu.
|
||||
> 🙋 If you'd like others to help you with the translation, you should [open an issue](https://github.com/huggingface/transformers/issues) and tag @stevhliu and @MKhalusova.
|
||||
|
||||
@ -1,14 +0,0 @@
|
||||
# docstyle-ignore
|
||||
INSTALL_CONTENT = """
|
||||
# Transformers installation
|
||||
! pip install transformers datasets evaluate accelerate
|
||||
# To install from source instead of the last release, comment the command above and uncomment the following one.
|
||||
# ! pip install git+https://github.com/huggingface/transformers.git
|
||||
"""
|
||||
|
||||
notebook_first_cells = [{"type": "code", "content": INSTALL_CONTENT}]
|
||||
black_avoid_patterns = {
|
||||
"{processor_class}": "FakeProcessorClass",
|
||||
"{model_class}": "FakeModelClass",
|
||||
"{object_class}": "FakeObjectClass",
|
||||
}
|
||||
@ -1,892 +0,0 @@
|
||||
- sections:
|
||||
- local: index
|
||||
title: 🤗 المحولات
|
||||
- local: quicktour
|
||||
title: جولة سريعة
|
||||
- local: installation
|
||||
title: التثبيت
|
||||
title: البدء
|
||||
- sections:
|
||||
- local: pipeline_tutorial
|
||||
title: تشغيل الاستنتاج باستخدام خطوط الأنابيب
|
||||
- local: autoclass_tutorial
|
||||
title: كتابة تعليمات برمجية متكيفه باستخدام AutoClass
|
||||
- local: preprocessing
|
||||
title: معالجة البيانات مسبقًا
|
||||
- local: training
|
||||
title: ضبط نموذج مسبق التدريب
|
||||
- local: run_scripts
|
||||
title: التدريب باستخدام نص برمجي
|
||||
- local: accelerate
|
||||
title: إعداد تدريب موزع باستخدام 🤗 Accelerate
|
||||
- local: peft
|
||||
title: تحميل النماذج المخصصة وتدريبها باستخدام 🤗 PEFT
|
||||
- local: model_sharing
|
||||
title: مشاركة نموذجك
|
||||
- local: agents
|
||||
title: الوكلاء
|
||||
- local: llm_tutorial
|
||||
title: التوليد باستخدام LLMs
|
||||
- local: conversations
|
||||
title: الدردشة مع المحولات
|
||||
title: البرامج التعليمية
|
||||
# - sections:
|
||||
# - isExpanded: false
|
||||
# sections:
|
||||
# - local: tasks/sequence_classification
|
||||
# title: تصنيف النصوص
|
||||
# - local: tasks/token_classification
|
||||
# title: تصنيف الرموز
|
||||
# - local: tasks/question_answering
|
||||
# title: الإجابة على الأسئلة
|
||||
# - local: tasks/language_modeling
|
||||
# title: نمذجة اللغة السببية
|
||||
# - local: tasks/masked_language_modeling
|
||||
# title: نمذجة اللغة المقنعة
|
||||
# - local: tasks/translation
|
||||
# title: الترجمة
|
||||
# - local: tasks/summarization
|
||||
# title: التلخيص
|
||||
# - local: tasks/multiple_choice
|
||||
# title: الاختيار المتعدد
|
||||
# title: معالجة اللغات الطبيعية
|
||||
# - isExpanded: false
|
||||
# sections:
|
||||
# - local: tasks/audio_classification
|
||||
# title: تصنيف الصوت
|
||||
# - local: tasks/asr
|
||||
# title: التعرف التلقائي على الكلام
|
||||
# title: الصوت
|
||||
# - isExpanded: false
|
||||
# sections:
|
||||
# - local: tasks/image_classification
|
||||
# title: تصنيف الصور
|
||||
# - local: tasks/semantic_segmentation
|
||||
# title: تجزئة الصور
|
||||
# - local: tasks/video_classification
|
||||
# title: تصنيف الفيديو
|
||||
# - local: tasks/object_detection
|
||||
# title: اكتشاف الأشياء
|
||||
# - local: tasks/zero_shot_object_detection
|
||||
# title: اكتشاف الأشياء بدون تدريب
|
||||
# - local: tasks/zero_shot_image_classification
|
||||
# title: تصنيف الصور بدون تدريب
|
||||
# - local: tasks/monocular_depth_estimation
|
||||
# title: تقدير العمق
|
||||
# - local: tasks/image_to_image
|
||||
# title: صورة إلى صورة
|
||||
# - local: tasks/image_feature_extraction
|
||||
# title: استخراج ميزات الصورة
|
||||
# - local: tasks/mask_generation
|
||||
# title: توليد القناع
|
||||
# - local: tasks/knowledge_distillation_for_image_classification
|
||||
# title: التقليل المعرفي للرؤية الحاسوبية
|
||||
# title: الرؤية الحاسوبية
|
||||
# - isExpanded: false
|
||||
# sections:
|
||||
# - local: tasks/image_captioning
|
||||
# title: وصف الصور Image captioning
|
||||
# - local: tasks/document_question_answering
|
||||
# title: الإجابة على أسئلة المستندات
|
||||
# - local: tasks/visual_question_answering
|
||||
# title: الإجابة على الأسئلة المرئية
|
||||
# - local: tasks/text-to-speech
|
||||
# title: تحويل النص إلى كلام
|
||||
# title: المتعددة الوسائط
|
||||
# - isExpanded: false
|
||||
# sections:
|
||||
# - local: generation_strategies
|
||||
# title: تخصيص استراتيجية التوليد
|
||||
# - local: kv_cache
|
||||
# title: أفضل الممارسات للتوليد باستخدام ذاكرة التخزين المؤقت
|
||||
# title: التوليد
|
||||
# - isExpanded: false
|
||||
# sections:
|
||||
# - local: tasks/idefics
|
||||
# title: مهام الصور مع IDEFICS
|
||||
# - local: tasks/prompting
|
||||
# title: دليل إرشادي لمحفزات النماذج اللغوية الكبيرة
|
||||
# title: الإرشاد
|
||||
# title: أدلة المهام
|
||||
# - sections:
|
||||
# - local: fast_tokenizers
|
||||
# title: استخدم برامج التجزئة السريعة من 🤗 Tokenizers
|
||||
# - local: multilingual
|
||||
# title: تشغيل الاستنتاج باستخدام نماذج متعددة اللغات
|
||||
# - local: create_a_model
|
||||
# title: استخدام واجهات برمجة التطبيقات الخاصة بالنموذج
|
||||
# - local: custom_models
|
||||
# title: مشاركة نموذج مخصص
|
||||
# - local: chat_templating
|
||||
# title: قوالب لنماذج الدردشة
|
||||
# - local: trainer
|
||||
# title: المدرب
|
||||
# - local: sagemaker
|
||||
# title: تشغيل التدريب على Amazon SageMaker
|
||||
# - local: serialization
|
||||
# title: التصدير إلى ONNX
|
||||
# - local: tflite
|
||||
# title: التصدير إلى TFLite
|
||||
# - local: torchscript
|
||||
# title: التصدير إلى TorchScript
|
||||
# - local: benchmarks
|
||||
# title: المعايير
|
||||
# - local: notebooks
|
||||
# title: دفاتر الملاحظات مع الأمثلة
|
||||
# - local: community
|
||||
# title: موارد المجتمع
|
||||
# - local: troubleshooting
|
||||
# title: استكشاف الأخطاء وإصلاحها
|
||||
# - local: gguf
|
||||
# title: التوافق مع ملفات GGUF
|
||||
# title: أدلة المطورين
|
||||
# - sections:
|
||||
# - local: quantization/overview
|
||||
# title: نظرة عامة
|
||||
# - local: quantization/bitsandbytes
|
||||
# title: bitsandbytes
|
||||
# - local: quantization/gptq
|
||||
# title: GPTQ
|
||||
# - local: quantization/awq
|
||||
# title: AWQ
|
||||
# - local: quantization/aqlm
|
||||
# title: AQLM
|
||||
# - local: quantization/quanto
|
||||
# title: Quanto
|
||||
# - local: quantization/eetq
|
||||
# title: EETQ
|
||||
# - local: quantization/hqq
|
||||
# title: HQQ
|
||||
# - local: quantization/optimum
|
||||
# title: Optimum
|
||||
# - local: quantization/contribute
|
||||
# title: المساهمة بطريقة جديدة للتكميم
|
||||
# title: أساليب التكميم
|
||||
# - sections:
|
||||
# - local: performance
|
||||
# title: الأداء-نظرة عامة
|
||||
# - local: llm_optims
|
||||
# title: تحسين الاستدلال LLM
|
||||
# - sections:
|
||||
# - local: perf_train_gpu_one
|
||||
# title: استخدام عدة وحدات معالجة رسوميات (GPUs) بشكل متوازٍ
|
||||
# - local: perf_train_gpu_many
|
||||
# title: وحدات معالجة الرسومات (GPU) متعددة والتوازي
|
||||
# - local: fsdp
|
||||
# title: Fully Sharded Data Parallel
|
||||
# - local: deepspeed
|
||||
# title: DeepSpeed
|
||||
# - local: perf_train_cpu
|
||||
# title: التدريب الفعال على وحدة المعالجة المركزية (CPU)
|
||||
# - local: perf_train_cpu_many
|
||||
# title: التدريب الموزع لوحدة المعالجة المركزية (CPU)
|
||||
# - local: perf_train_tpu_tf
|
||||
# title: التدريب على (TPU) باستخدام TensorFlow
|
||||
# - local: perf_train_special
|
||||
# title: تدريب PyTorch على Apple silicon
|
||||
# - local: perf_hardware
|
||||
# title: الأجهزة المخصصة للتدريب
|
||||
# - local: hpo_train
|
||||
# title: البحث عن المعاملات المثلى باستخدام واجهة برمجة تطبيقات المدرب
|
||||
# title: تقنيات التدريب الفعال
|
||||
# - sections:
|
||||
# - local: perf_infer_cpu
|
||||
# title: الإستدلال على وحدة المعالجة المركزية (CPU)
|
||||
# - local: perf_infer_gpu_one
|
||||
# title: الإستدلال على وحدة معالجة الرسومات (GPU)
|
||||
# title: تحسين الاستدلال
|
||||
# - local: big_models
|
||||
# title: إنشاء نموذج كبير
|
||||
# - local: debugging
|
||||
# title: تصحيح الأخطاء البرمجية
|
||||
# - local: tf_xla
|
||||
# title: تكامل XLA لنماذج TensorFlow
|
||||
# - local: perf_torch_compile
|
||||
# title: تحسين الاستدلال باستخدام `torch.compile()`
|
||||
# title: الأداء وقابلية التوسع
|
||||
# - sections:
|
||||
# - local: contributing
|
||||
# title: كيفية المساهمة في 🤗 المحولات؟
|
||||
# - local: add_new_model
|
||||
# title: كيفية إضافة نموذج إلى 🤗 المحولات؟
|
||||
# - local: add_new_pipeline
|
||||
# title: كيفية إضافة خط أنابيب إلى 🤗 المحولات؟
|
||||
# - local: testing
|
||||
# title: الاختبار
|
||||
# - local: pr_checks
|
||||
# title: التحقق من طلب السحب
|
||||
# title: المساهمة
|
||||
- sections:
|
||||
# - local: philosophy
|
||||
# title: الفلسفة
|
||||
- local: glossary
|
||||
title: (قاموس المصطلحات (قائمة الكلمات
|
||||
# - local: task_summary
|
||||
# title: ما الذي يمكن أن تفعله 🤗 المحولات
|
||||
# - local: tasks_explained
|
||||
# title: كيف تحل المحولات المهام
|
||||
# - local: model_summary
|
||||
# title: عائلة نماذج المحول
|
||||
# - local: tokenizer_summary
|
||||
# title: ملخص برنامج مقسم النصوص (tokenizers)
|
||||
# - local: attention
|
||||
# title: الانتباه Attention
|
||||
# - local: pad_truncation
|
||||
# title: الحشو والتقليم
|
||||
# - local: bertology
|
||||
# title: BERTology
|
||||
# - local: perplexity
|
||||
# title: حيرة النماذج ذات الطول الثابت
|
||||
# - local: pipeline_webserver
|
||||
# title: خطوط الأنابيب للاستدلال على خادم الويب
|
||||
# - local: model_memory_anatomy
|
||||
# title: تشريح تدريب النموذج
|
||||
# - local: llm_tutorial_optimization
|
||||
# title: الاستفادة القصوى من LLMs
|
||||
title: أطر مفاهيمية
|
||||
# - sections:
|
||||
# - sections:
|
||||
# - local: main_classes/agent
|
||||
# title: الوكلاء والأدوات
|
||||
# - local: model_doc/auto
|
||||
# title: فئات يتم إنشاؤها ديناميكيًا
|
||||
# - local: main_classes/backbones
|
||||
# title: العمود الفقري
|
||||
# - local: main_classes/callback
|
||||
# title: عمليات الاسترجاع
|
||||
# - local: main_classes/configuration
|
||||
# title: التكوين
|
||||
# - local: main_classes/data_collator
|
||||
# title: مجمع البيانات
|
||||
# - local: main_classes/keras_callbacks
|
||||
# title: استدعاءات Keras
|
||||
# - local: main_classes/logging
|
||||
# title: التسجيل
|
||||
# - local: main_classes/model
|
||||
# title: النماذج
|
||||
# - local: main_classes/text_generation
|
||||
# title: توليد النصوص
|
||||
# - local: main_classes/onnx
|
||||
# title: ONNX
|
||||
# - local: main_classes/optimizer_schedules
|
||||
# title: التحسين
|
||||
# - local: main_classes/output
|
||||
# title: مخرجات النموذج
|
||||
# - local: main_classes/pipelines
|
||||
# title: خطوط الأنابيب
|
||||
# - local: main_classes/processors
|
||||
# title: المعالجات
|
||||
# - local: main_classes/quantization
|
||||
# title: التكميم
|
||||
# - local: main_classes/tokenizer
|
||||
# title: برنامج مقسم النصوص
|
||||
# - local: main_classes/trainer
|
||||
# title: المدرب
|
||||
# - local: main_classes/deepspeed
|
||||
# title: DeepSpeed
|
||||
# - local: main_classes/feature_extractor
|
||||
# title: مستخرج الميزات
|
||||
# - local: main_classes/image_processor
|
||||
# title: معالج الصور
|
||||
# title: الفئات الرئيسية
|
||||
# - sections:
|
||||
# - isExpanded: false
|
||||
# sections:
|
||||
# - local: model_doc/albert
|
||||
# title: ALBERT
|
||||
# - local: model_doc/bart
|
||||
# title: BART
|
||||
# - local: model_doc/barthez
|
||||
# title: BARThez
|
||||
# - local: model_doc/bartpho
|
||||
# title: BARTpho
|
||||
# - local: model_doc/bert
|
||||
# title: BERT
|
||||
# - local: model_doc/bert-generation
|
||||
# title: BertGeneration
|
||||
# - local: model_doc/bert-japanese
|
||||
# title: BertJapanese
|
||||
# - local: model_doc/bertweet
|
||||
# title: Bertweet
|
||||
# - local: model_doc/big_bird
|
||||
# title: BigBird
|
||||
# - local: model_doc/bigbird_pegasus
|
||||
# title: BigBirdPegasus
|
||||
# - local: model_doc/biogpt
|
||||
# title: BioGpt
|
||||
# - local: model_doc/blenderbot
|
||||
# title: Blenderbot
|
||||
# - local: model_doc/blenderbot-small
|
||||
# title: Blenderbot Small
|
||||
# - local: model_doc/bloom
|
||||
# title: BLOOM
|
||||
# - local: model_doc/bort
|
||||
# title: BORT
|
||||
# - local: model_doc/byt5
|
||||
# title: ByT5
|
||||
# - local: model_doc/camembert
|
||||
# title: CamemBERT
|
||||
# - local: model_doc/canine
|
||||
# title: CANINE
|
||||
# - local: model_doc/codegen
|
||||
# title: CodeGen
|
||||
# - local: model_doc/code_llama
|
||||
# title: CodeLlama
|
||||
# - local: model_doc/cohere
|
||||
# title: Cohere
|
||||
# - local: model_doc/convbert
|
||||
# title: ConvBERT
|
||||
# - local: model_doc/cpm
|
||||
# title: CPM
|
||||
# - local: model_doc/cpmant
|
||||
# title: CPMANT
|
||||
# - local: model_doc/ctrl
|
||||
# title: CTRL
|
||||
# - local: model_doc/dbrx
|
||||
# title: DBRX
|
||||
# - local: model_doc/deberta
|
||||
# title: DeBERTa
|
||||
# - local: model_doc/deberta-v2
|
||||
# title: DeBERTa-v2
|
||||
# - local: model_doc/dialogpt
|
||||
# title: DialoGPT
|
||||
# - local: model_doc/distilbert
|
||||
# title: DistilBERT
|
||||
# - local: model_doc/dpr
|
||||
# title: DPR
|
||||
# - local: model_doc/electra
|
||||
# title: ELECTRA
|
||||
# - local: model_doc/encoder-decoder
|
||||
# title: Encoder Decoder Models
|
||||
# - local: model_doc/ernie
|
||||
# title: ERNIE
|
||||
# - local: model_doc/ernie_m
|
||||
# title: ErnieM
|
||||
# - local: model_doc/esm
|
||||
# title: ESM
|
||||
# - local: model_doc/falcon
|
||||
# title: Falcon
|
||||
# - local: model_doc/fastspeech2_conformer
|
||||
# title: FastSpeech2Conformer
|
||||
# - local: model_doc/flan-t5
|
||||
# title: FLAN-T5
|
||||
# - local: model_doc/flan-ul2
|
||||
# title: FLAN-UL2
|
||||
# - local: model_doc/flaubert
|
||||
# title: FlauBERT
|
||||
# - local: model_doc/fnet
|
||||
# title: FNet
|
||||
# - local: model_doc/fsmt
|
||||
# title: FSMT
|
||||
# - local: model_doc/funnel
|
||||
# title: Funnel Transformer
|
||||
# - local: model_doc/fuyu
|
||||
# title: Fuyu
|
||||
# - local: model_doc/gemma
|
||||
# title: Gemma
|
||||
# - local: model_doc/openai-gpt
|
||||
# title: GPT
|
||||
# - local: model_doc/gpt_neo
|
||||
# title: GPT Neo
|
||||
# - local: model_doc/gpt_neox
|
||||
# title: GPT NeoX
|
||||
# - local: model_doc/gpt_neox_japanese
|
||||
# title: GPT NeoX Japanese
|
||||
# - local: model_doc/gptj
|
||||
# title: GPT-J
|
||||
# - local: model_doc/gpt2
|
||||
# title: GPT2
|
||||
# - local: model_doc/gpt_bigcode
|
||||
# title: GPTBigCode
|
||||
# - local: model_doc/gptsan-japanese
|
||||
# title: GPTSAN Japanese
|
||||
# - local: model_doc/gpt-sw3
|
||||
# title: GPTSw3
|
||||
# - local: model_doc/herbert
|
||||
# title: HerBERT
|
||||
# - local: model_doc/ibert
|
||||
# title: I-BERT
|
||||
# - local: model_doc/jamba
|
||||
# title: Jamba
|
||||
# - local: model_doc/jetmoe
|
||||
# title: JetMoe
|
||||
# - local: model_doc/jukebox
|
||||
# title: Jukebox
|
||||
# - local: model_doc/led
|
||||
# title: LED
|
||||
# - local: model_doc/llama
|
||||
# title: LLaMA
|
||||
# - local: model_doc/llama2
|
||||
# title: Llama2
|
||||
# - local: model_doc/llama3
|
||||
# title: Llama3
|
||||
# - local: model_doc/longformer
|
||||
# title: Longformer
|
||||
# - local: model_doc/longt5
|
||||
# title: LongT5
|
||||
# - local: model_doc/luke
|
||||
# title: LUKE
|
||||
# - local: model_doc/m2m_100
|
||||
# title: M2M100
|
||||
# - local: model_doc/madlad-400
|
||||
# title: MADLAD-400
|
||||
# - local: model_doc/mamba
|
||||
# title: Mamba
|
||||
# - local: model_doc/marian
|
||||
# title: MarianMT
|
||||
# - local: model_doc/markuplm
|
||||
# title: MarkupLM
|
||||
# - local: model_doc/mbart
|
||||
# title: MBart and MBart-50
|
||||
# - local: model_doc/mega
|
||||
# title: MEGA
|
||||
# - local: model_doc/megatron-bert
|
||||
# title: MegatronBERT
|
||||
# - local: model_doc/megatron_gpt2
|
||||
# title: MegatronGPT2
|
||||
# - local: model_doc/mistral
|
||||
# title: Mistral
|
||||
# - local: model_doc/mixtral
|
||||
# title: Mixtral
|
||||
# - local: model_doc/mluke
|
||||
# title: mLUKE
|
||||
# - local: model_doc/mobilebert
|
||||
# title: MobileBERT
|
||||
# - local: model_doc/mpnet
|
||||
# title: MPNet
|
||||
# - local: model_doc/mpt
|
||||
# title: MPT
|
||||
# - local: model_doc/mra
|
||||
# title: MRA
|
||||
# - local: model_doc/mt5
|
||||
# title: MT5
|
||||
# - local: model_doc/mvp
|
||||
# title: MVP
|
||||
# - local: model_doc/nezha
|
||||
# title: NEZHA
|
||||
# - local: model_doc/nllb
|
||||
# title: NLLB
|
||||
# - local: model_doc/nllb-moe
|
||||
# title: NLLB-MoE
|
||||
# - local: model_doc/nystromformer
|
||||
# title: Nyströmformer
|
||||
# - local: model_doc/olmo
|
||||
# title: OLMo
|
||||
# - local: model_doc/open-llama
|
||||
# title: Open-Llama
|
||||
# - local: model_doc/opt
|
||||
# title: OPT
|
||||
# - local: model_doc/pegasus
|
||||
# title: Pegasus
|
||||
# - local: model_doc/pegasus_x
|
||||
# title: PEGASUS-X
|
||||
# - local: model_doc/persimmon
|
||||
# title: Persimmon
|
||||
# - local: model_doc/phi
|
||||
# title: Phi
|
||||
# - local: model_doc/phi3
|
||||
# title: Phi-3
|
||||
# - local: model_doc/phobert
|
||||
# title: PhoBERT
|
||||
# - local: model_doc/plbart
|
||||
# title: PLBart
|
||||
# - local: model_doc/prophetnet
|
||||
# title: ProphetNet
|
||||
# - local: model_doc/qdqbert
|
||||
# title: QDQBert
|
||||
# - local: model_doc/qwen2
|
||||
# title: Qwen2
|
||||
# - local: model_doc/qwen2_moe
|
||||
# title: Qwen2MoE
|
||||
# - local: model_doc/rag
|
||||
# title: RAG
|
||||
# - local: model_doc/realm
|
||||
# title: REALM
|
||||
# - local: model_doc/recurrent_gemma
|
||||
# title: RecurrentGemma
|
||||
# - local: model_doc/reformer
|
||||
# title: Reformer
|
||||
# - local: model_doc/rembert
|
||||
# title: RemBERT
|
||||
# - local: model_doc/retribert
|
||||
# title: RetriBERT
|
||||
# - local: model_doc/roberta
|
||||
# title: RoBERTa
|
||||
# - local: model_doc/roberta-prelayernorm
|
||||
# title: RoBERTa-PreLayerNorm
|
||||
# - local: model_doc/roc_bert
|
||||
# title: RoCBert
|
||||
# - local: model_doc/roformer
|
||||
# title: RoFormer
|
||||
# - local: model_doc/rwkv
|
||||
# title: RWKV
|
||||
# - local: model_doc/splinter
|
||||
# title: Splinter
|
||||
# - local: model_doc/squeezebert
|
||||
# title: SqueezeBERT
|
||||
# - local: model_doc/stablelm
|
||||
# title: StableLm
|
||||
# - local: model_doc/starcoder2
|
||||
# title: Starcoder2
|
||||
# - local: model_doc/switch_transformers
|
||||
# title: SwitchTransformers
|
||||
# - local: model_doc/t5
|
||||
# title: T5
|
||||
# - local: model_doc/t5v1.1
|
||||
# title: T5v1.1
|
||||
# - local: model_doc/tapex
|
||||
# title: TAPEX
|
||||
# - local: model_doc/transfo-xl
|
||||
# title: Transformer XL
|
||||
# - local: model_doc/ul2
|
||||
# title: UL2
|
||||
# - local: model_doc/umt5
|
||||
# title: UMT5
|
||||
# - local: model_doc/xmod
|
||||
# title: X-MOD
|
||||
# - local: model_doc/xglm
|
||||
# title: XGLM
|
||||
# - local: model_doc/xlm
|
||||
# title: XLM
|
||||
# - local: model_doc/xlm-prophetnet
|
||||
# title: XLM-ProphetNet
|
||||
# - local: model_doc/xlm-roberta
|
||||
# title: XLM-RoBERTa
|
||||
# - local: model_doc/xlm-roberta-xl
|
||||
# title: XLM-RoBERTa-XL
|
||||
# - local: model_doc/xlm-v
|
||||
# title: XLM-V
|
||||
# - local: model_doc/xlnet
|
||||
# title: XLNet
|
||||
# - local: model_doc/yoso
|
||||
# title: YOSO
|
||||
# title: Text models
|
||||
# - isExpanded: false
|
||||
# sections:
|
||||
# - local: model_doc/beit
|
||||
# title: BEiT
|
||||
# - local: model_doc/bit
|
||||
# title: BiT
|
||||
# - local: model_doc/conditional_detr
|
||||
# title: Conditional DETR
|
||||
# - local: model_doc/convnext
|
||||
# title: ConvNeXT
|
||||
# - local: model_doc/convnextv2
|
||||
# title: ConvNeXTV2
|
||||
# - local: model_doc/cvt
|
||||
# title: CVT
|
||||
# - local: model_doc/deformable_detr
|
||||
# title: Deformable DETR
|
||||
# - local: model_doc/deit
|
||||
# title: DeiT
|
||||
# - local: model_doc/depth_anything
|
||||
# title: Depth Anything
|
||||
# - local: model_doc/deta
|
||||
# title: DETA
|
||||
# - local: model_doc/detr
|
||||
# title: DETR
|
||||
# - local: model_doc/dinat
|
||||
# title: DiNAT
|
||||
# - local: model_doc/dinov2
|
||||
# title: DINOV2
|
||||
# - local: model_doc/dit
|
||||
# title: DiT
|
||||
# - local: model_doc/dpt
|
||||
# title: DPT
|
||||
# - local: model_doc/efficientformer
|
||||
# title: EfficientFormer
|
||||
# - local: model_doc/efficientnet
|
||||
# title: EfficientNet
|
||||
# - local: model_doc/focalnet
|
||||
# title: FocalNet
|
||||
# - local: model_doc/glpn
|
||||
# title: GLPN
|
||||
# - local: model_doc/imagegpt
|
||||
# title: ImageGPT
|
||||
# - local: model_doc/levit
|
||||
# title: LeViT
|
||||
# - local: model_doc/mask2former
|
||||
# title: Mask2Former
|
||||
# - local: model_doc/maskformer
|
||||
# title: MaskFormer
|
||||
# - local: model_doc/mobilenet_v1
|
||||
# title: MobileNetV1
|
||||
# - local: model_doc/mobilenet_v2
|
||||
# title: MobileNetV2
|
||||
# - local: model_doc/mobilevit
|
||||
# title: MobileViT
|
||||
# - local: model_doc/mobilevitv2
|
||||
# title: MobileViTV2
|
||||
# - local: model_doc/nat
|
||||
# title: NAT
|
||||
# - local: model_doc/poolformer
|
||||
# title: PoolFormer
|
||||
# - local: model_doc/pvt
|
||||
# title: Pyramid Vision Transformer (PVT)
|
||||
# - local: model_doc/pvt_v2
|
||||
# title: Pyramid Vision Transformer v2 (PVTv2)
|
||||
# - local: model_doc/regnet
|
||||
# title: RegNet
|
||||
# - local: model_doc/resnet
|
||||
# title: ResNet
|
||||
# - local: model_doc/segformer
|
||||
# title: SegFormer
|
||||
# - local: model_doc/seggpt
|
||||
# title: SegGpt
|
||||
# - local: model_doc/superpoint
|
||||
# title: SuperPoint
|
||||
# - local: model_doc/swiftformer
|
||||
# title: SwiftFormer
|
||||
# - local: model_doc/swin
|
||||
# title: Swin Transformer
|
||||
# - local: model_doc/swinv2
|
||||
# title: Swin Transformer V2
|
||||
# - local: model_doc/swin2sr
|
||||
# title: Swin2SR
|
||||
# - local: model_doc/table-transformer
|
||||
# title: Table Transformer
|
||||
# - local: model_doc/upernet
|
||||
# title: UperNet
|
||||
# - local: model_doc/van
|
||||
# title: VAN
|
||||
# - local: model_doc/vit
|
||||
# title: Vision Transformer (ViT)
|
||||
# - local: model_doc/vit_hybrid
|
||||
# title: ViT Hybrid
|
||||
# - local: model_doc/vitdet
|
||||
# title: ViTDet
|
||||
# - local: model_doc/vit_mae
|
||||
# title: ViTMAE
|
||||
# - local: model_doc/vitmatte
|
||||
# title: ViTMatte
|
||||
# - local: model_doc/vit_msn
|
||||
# title: ViTMSN
|
||||
# - local: model_doc/yolos
|
||||
# title: YOLOS
|
||||
# title: Vision models
|
||||
# - isExpanded: false
|
||||
# sections:
|
||||
# - local: model_doc/audio-spectrogram-transformer
|
||||
# title: Audio Spectrogram Transformer
|
||||
# - local: model_doc/bark
|
||||
# title: Bark
|
||||
# - local: model_doc/clap
|
||||
# title: CLAP
|
||||
# - local: model_doc/encodec
|
||||
# title: EnCodec
|
||||
# - local: model_doc/hubert
|
||||
# title: Hubert
|
||||
# - local: model_doc/mctct
|
||||
# title: MCTCT
|
||||
# - local: model_doc/mms
|
||||
# title: MMS
|
||||
# - local: model_doc/musicgen
|
||||
# title: MusicGen
|
||||
# - local: model_doc/musicgen_melody
|
||||
# title: MusicGen Melody
|
||||
# - local: model_doc/pop2piano
|
||||
# title: Pop2Piano
|
||||
# - local: model_doc/seamless_m4t
|
||||
# title: Seamless-M4T
|
||||
# - local: model_doc/seamless_m4t_v2
|
||||
# title: SeamlessM4T-v2
|
||||
# - local: model_doc/sew
|
||||
# title: SEW
|
||||
# - local: model_doc/sew-d
|
||||
# title: SEW-D
|
||||
# - local: model_doc/speech_to_text
|
||||
# title: Speech2Text
|
||||
# - local: model_doc/speech_to_text_2
|
||||
# title: Speech2Text2
|
||||
# - local: model_doc/speecht5
|
||||
# title: SpeechT5
|
||||
# - local: model_doc/unispeech
|
||||
# title: UniSpeech
|
||||
# - local: model_doc/unispeech-sat
|
||||
# title: UniSpeech-SAT
|
||||
# - local: model_doc/univnet
|
||||
# title: UnivNet
|
||||
# - local: model_doc/vits
|
||||
# title: VITS
|
||||
# - local: model_doc/wav2vec2
|
||||
# title: Wav2Vec2
|
||||
# - local: model_doc/wav2vec2-bert
|
||||
# title: Wav2Vec2-BERT
|
||||
# - local: model_doc/wav2vec2-conformer
|
||||
# title: Wav2Vec2-Conformer
|
||||
# - local: model_doc/wav2vec2_phoneme
|
||||
# title: Wav2Vec2Phoneme
|
||||
# - local: model_doc/wavlm
|
||||
# title: WavLM
|
||||
# - local: model_doc/whisper
|
||||
# title: Whisper
|
||||
# - local: model_doc/xls_r
|
||||
# title: XLS-R
|
||||
# - local: model_doc/xlsr_wav2vec2
|
||||
# title: XLSR-Wav2Vec2
|
||||
# title: Audio models
|
||||
# - isExpanded: false
|
||||
# sections:
|
||||
# - local: model_doc/timesformer
|
||||
# title: TimeSformer
|
||||
# - local: model_doc/videomae
|
||||
# title: VideoMAE
|
||||
# - local: model_doc/vivit
|
||||
# title: ViViT
|
||||
# title: Video models
|
||||
# - isExpanded: false
|
||||
# sections:
|
||||
# - local: model_doc/align
|
||||
# title: ALIGN
|
||||
# - local: model_doc/altclip
|
||||
# title: AltCLIP
|
||||
# - local: model_doc/blip
|
||||
# title: BLIP
|
||||
# - local: model_doc/blip-2
|
||||
# title: BLIP-2
|
||||
# - local: model_doc/bridgetower
|
||||
# title: BridgeTower
|
||||
# - local: model_doc/bros
|
||||
# title: BROS
|
||||
# - local: model_doc/chinese_clip
|
||||
# title: Chinese-CLIP
|
||||
# - local: model_doc/clip
|
||||
# title: CLIP
|
||||
# - local: model_doc/clipseg
|
||||
# title: CLIPSeg
|
||||
# - local: model_doc/clvp
|
||||
# title: CLVP
|
||||
# - local: model_doc/data2vec
|
||||
# title: Data2Vec
|
||||
# - local: model_doc/deplot
|
||||
# title: DePlot
|
||||
# - local: model_doc/donut
|
||||
# title: Donut
|
||||
# - local: model_doc/flava
|
||||
# title: FLAVA
|
||||
# - local: model_doc/git
|
||||
# title: GIT
|
||||
# - local: model_doc/grounding-dino
|
||||
# title: Grounding DINO
|
||||
# - local: model_doc/groupvit
|
||||
# title: GroupViT
|
||||
# - local: model_doc/idefics
|
||||
# title: IDEFICS
|
||||
# - local: model_doc/idefics2
|
||||
# title: Idefics2
|
||||
# - local: model_doc/instructblip
|
||||
# title: InstructBLIP
|
||||
# - local: model_doc/kosmos-2
|
||||
# title: KOSMOS-2
|
||||
# - local: model_doc/layoutlm
|
||||
# title: LayoutLM
|
||||
# - local: model_doc/layoutlmv2
|
||||
# title: LayoutLMV2
|
||||
# - local: model_doc/layoutlmv3
|
||||
# title: LayoutLMV3
|
||||
# - local: model_doc/layoutxlm
|
||||
# title: LayoutXLM
|
||||
# - local: model_doc/lilt
|
||||
# title: LiLT
|
||||
# - local: model_doc/llava
|
||||
# title: Llava
|
||||
# - local: model_doc/llava_next
|
||||
# title: LLaVA-NeXT
|
||||
# - local: model_doc/lxmert
|
||||
# title: LXMERT
|
||||
# - local: model_doc/matcha
|
||||
# title: MatCha
|
||||
# - local: model_doc/mgp-str
|
||||
# title: MGP-STR
|
||||
# - local: model_doc/nougat
|
||||
# title: Nougat
|
||||
# - local: model_doc/oneformer
|
||||
# title: OneFormer
|
||||
# - local: model_doc/owlvit
|
||||
# title: OWL-ViT
|
||||
# - local: model_doc/owlv2
|
||||
# title: OWLv2
|
||||
# - local: model_doc/paligemma
|
||||
# title: PaliGemma
|
||||
# - local: model_doc/perceiver
|
||||
# title: Perceiver
|
||||
# - local: model_doc/pix2struct
|
||||
# title: Pix2Struct
|
||||
# - local: model_doc/sam
|
||||
# title: Segment Anything
|
||||
# - local: model_doc/siglip
|
||||
# title: SigLIP
|
||||
# - local: model_doc/speech-encoder-decoder
|
||||
# title: Speech Encoder Decoder Models
|
||||
# - local: model_doc/tapas
|
||||
# title: TAPAS
|
||||
# - local: model_doc/trocr
|
||||
# title: TrOCR
|
||||
# - local: model_doc/tvlt
|
||||
# title: TVLT
|
||||
# - local: model_doc/tvp
|
||||
# title: TVP
|
||||
# - local: model_doc/udop
|
||||
# title: UDOP
|
||||
# - local: model_doc/video_llava
|
||||
# title: VideoLlava
|
||||
# - local: model_doc/vilt
|
||||
# title: ViLT
|
||||
# - local: model_doc/vipllava
|
||||
# title: VipLlava
|
||||
# - local: model_doc/vision-encoder-decoder
|
||||
# title: Vision Encoder Decoder Models
|
||||
# - local: model_doc/vision-text-dual-encoder
|
||||
# title: Vision Text Dual Encoder
|
||||
# - local: model_doc/visual_bert
|
||||
# title: VisualBERT
|
||||
# - local: model_doc/xclip
|
||||
# title: X-CLIP
|
||||
# title: Multimodal models
|
||||
# - isExpanded: false
|
||||
# sections:
|
||||
# - local: model_doc/decision_transformer
|
||||
# title: محول القرار
|
||||
# - local: model_doc/trajectory_transformer
|
||||
# title: محول المسار
|
||||
# title: نماذج التعلم التعزيزية
|
||||
# - isExpanded: false
|
||||
# sections:
|
||||
# - local: model_doc/autoformer
|
||||
# title: Autoformer
|
||||
# - local: model_doc/informer
|
||||
# title: Informer
|
||||
# - local: model_doc/patchtsmixer
|
||||
# title: PatchTSMixer
|
||||
# - local: model_doc/patchtst
|
||||
# title: PatchTST
|
||||
# - local: model_doc/time_series_transformer
|
||||
# title: محول السلاسل الزمنية
|
||||
# title: نماذج السلاسل الزمنية
|
||||
# - isExpanded: false
|
||||
# sections:
|
||||
# - local: model_doc/graphormer
|
||||
# title: Graphormer
|
||||
# title: نماذج الرسم البياني
|
||||
# title: النماذج
|
||||
# - sections:
|
||||
# - local: internal/modeling_utils
|
||||
# title: الطبقات المخصصة والمرافق
|
||||
# - local: internal/pipelines_utils
|
||||
# title: مرافق خطوط الأنابيب
|
||||
# - local: internal/tokenization_utils
|
||||
# title: مرافق مقسم النصوص
|
||||
# - local: internal/trainer_utils
|
||||
# title: مرافق المدرب
|
||||
# - local: internal/generation_utils
|
||||
# title: مرافق التوليد
|
||||
# - local: internal/image_processing_utils
|
||||
# title: مرافق معالجة الصور
|
||||
# - local: internal/audio_utils
|
||||
# title: مرافق معالجة الصوت
|
||||
# - local: internal/file_utils
|
||||
# title: مرافق عامة
|
||||
# - local: internal/time_series_utils
|
||||
# title: مرافق السلاسل الزمنية
|
||||
# title: مساعدون داخليون
|
||||
# title: API
|
||||
@ -1,120 +0,0 @@
|
||||
# التدريب الموزع باستخدام 🤗 Accelerate
|
||||
|
||||
|
||||
مع تزايد حجم النماذج اللغوية، برز التوازي كأحد الاستراتيجيات لتدريب نماذج أكبر على أجهزة محدودة وتسريع عملية التدريب بمقدار كبير. أنشأنا في Hugging Face، قمنا بإنشاء مكتبة [ Accelerate](https://huggingface.co/docs/accelerate) لمساعدة المستخدمين على تدريب أي نموذج من Transformers بسهولة على أي نوع من الإعدادات الموزعة، سواء كان ذلك على عدة وحدات معالجة رسومات (GPUs) على جهاز واحد أو على عدة وحدات معالجة رسومات موزعة على عدة أجهزة. في هذا الدليل، تعلم كيفية تخصيص حلقة تدريب PyTorch الأصلية لتمكين التدريب في بيئة موزعة.
|
||||
|
||||
## الإعداد
|
||||
|
||||
ابدأ بتثبيت 🤗 Accelerate:
|
||||
|
||||
```bash
|
||||
pip install accelerate
|
||||
```
|
||||
|
||||
ثم قم باستيراد وإنشاء كائن [`~accelerate.Accelerator`]. سيقوم [`~accelerate.Accelerator`] تلقائيًا باكتشاف نوع الإعداد الموزع الخاص بك وتهيئة جميع المكونات اللازمة للتدريب. لن تحتاج إلى وضع نموذجك على جهاز بشكل معين.
|
||||
|
||||
```py
|
||||
>>> from accelerate import Accelerator
|
||||
|
||||
>>> accelerator = Accelerator()
|
||||
```
|
||||
|
||||
## الاستعداد للتسريع
|
||||
|
||||
الخطوة التالية هي تمرير جميع كائنات التدريب ذات الصلة إلى دالة الإعداد [`~accelerate.Accelerator.prepare`]. ويشمل ذلك DataLoaders للتدريب والتقييم، ونموذجًا ومُحَسِّنً المعاملات (optimizer):
|
||||
|
||||
```py
|
||||
>>> train_dataloader, eval_dataloader, model, optimizer = accelerator.prepare(
|
||||
... train_dataloader, eval_dataloader, model, optimizer
|
||||
... )
|
||||
```
|
||||
|
||||
## الخلفي Backward
|
||||
|
||||
الإضافة الأخيرة هي استبدال الدالة المعتادة `loss.backward()` في حلقة التدريب الخاصة بك بدالة [`~accelerate.Accelerator.backward`] في 🤗 Accelerate:
|
||||
|
||||
```py
|
||||
>>> for epoch in range(num_epochs):
|
||||
... for batch in train_dataloader:
|
||||
... outputs = model(**batch)
|
||||
... loss = outputs.loss
|
||||
... accelerator.backward(loss)
|
||||
|
||||
... optimizer.step()
|
||||
... lr_scheduler.step()
|
||||
... optimizer.zero_grad()
|
||||
... progress_bar.update(1)
|
||||
```
|
||||
|
||||
كما يمكنك أن ترى في الكود التالي، فأنت بحاجة فقط إلى إضافة أربعة أسطر من الكود إلى حلقة التدريب الخاصة بك لتمكين التدريب الموزع!
|
||||
|
||||
```diff
|
||||
+ from accelerate import Accelerator
|
||||
from transformers import AdamW, AutoModelForSequenceClassification, get_scheduler
|
||||
|
||||
+ accelerator = Accelerator()
|
||||
|
||||
model = AutoModelForSequenceClassification.from_pretrained(checkpoint, num_labels=2)
|
||||
optimizer = AdamW(model.parameters(), lr=3e-5)
|
||||
|
||||
- device = torch.device("cuda") if torch.cuda.is_available() else torch.device("cpu")
|
||||
- model.to(device)
|
||||
|
||||
+ train_dataloader, eval_dataloader, model, optimizer = accelerator.prepare(
|
||||
+ train_dataloader, eval_dataloader, model, optimizer
|
||||
+ )
|
||||
|
||||
num_epochs = 3
|
||||
num_training_steps = num_epochs * len(train_dataloader)
|
||||
lr_scheduler = get_scheduler(
|
||||
"linear",
|
||||
optimizer=optimizer,
|
||||
num_warmup_steps=0,
|
||||
num_training_steps=num_training_steps
|
||||
)
|
||||
|
||||
progress_bar = tqdm(range(num_training_steps))
|
||||
|
||||
model.train()
|
||||
for epoch in range(num_epochs):
|
||||
for batch in train_dataloader:
|
||||
- batch = {k: v.to(device) for k, v in batch.items()}
|
||||
outputs = model(**batch)
|
||||
loss = outputs.loss
|
||||
- loss.backward()
|
||||
+ accelerator.backward(loss)
|
||||
optimizer.step()
|
||||
lr_scheduler.step()
|
||||
optimizer.zero_grad()
|
||||
progress_bar.update(1)
|
||||
```
|
||||
|
||||
## تدريب
|
||||
|
||||
بمجرد إضافة أسطر الكود ذات الصلة، قم بتشغيل التدريب الخاص بك في أحد النصوص أو الدفاتر مثل Colaboratory.
|
||||
|
||||
### التدريب باستخدام نص برمجي
|
||||
|
||||
إذا كنت تشغل التدريب الخاص بك من نص برمجي، فقم بتشغيل الأمر التالي لإنشاء وحفظ ملف تكوين:
|
||||
|
||||
```bash
|
||||
accelerate config
|
||||
```
|
||||
|
||||
ثم قم بتشغيل التدريب الخاص بك باستخدام:
|
||||
|
||||
```bash
|
||||
accelerate launch train.py
|
||||
```
|
||||
|
||||
### التدريب باستخدام دفتر ملاحظات
|
||||
|
||||
يمكن أيضًا تشغيل 🤗 Accelerate في دفاتر إذا كنت تخطط لاستخدام وحدات معالجة الرسوميات (TPUs) في Colaboratory. قم بتغليف كل الكود المسؤول عن التدريب في دالة، ومررها إلى [`~accelerate.notebook_launcher`]:
|
||||
|
||||
```py
|
||||
>>> from accelerate import notebook_launcher
|
||||
|
||||
>>> notebook_launcher(training_function)
|
||||
```
|
||||
|
||||
للحصول على مزيد من المعلومات حول 🤗 Accelerate وميزاته الغنية، يرجى الرجوع إلى [الوثائق](https://huggingface.co/docs/accelerate).
|
||||
@ -1,539 +0,0 @@
|
||||
# الوكلاء والأدوات
|
||||
|
||||
[[open-in-colab]]
|
||||
|
||||
### ما هو الوكيل؟
|
||||
|
||||
يمكن للنظم اللغوية الكبيرة (LLMs) التي تم تدريبها على أداء [نمذجة اللغة السببية](./tasks/language_modeling.) التعامل مع مجموعة واسعة من المهام، ولكنها غالبًا ما تواجه صعوبات في المهام الأساسية مثل المنطق والحساب والبحث. وعندما يتم استدعاؤها في مجالات لا تؤدي فيها أداءً جيدًا، فإنها غالبًا ما تفشل في توليد الإجابة التي نتوقعها منها.
|
||||
|
||||
يتمثل أحد النهج للتغلب على هذا القصور في إنشاء "وكيل".
|
||||
|
||||
الوكيل هو نظام يستخدم LLM كمحرك له، ولديه حق الوصول إلى وظائف تسمى "أدوات".
|
||||
|
||||
هذه "الأدوات" هي وظائف لأداء مهمة، وتحتوي على جميع الأوصاف اللازمة للوكيل لاستخدامها بشكل صحيح.
|
||||
|
||||
يمكن برمجة الوكيل للقيام بما يلي:
|
||||
- وضع سلسلة من الإجراءات/الأدوات وتشغيلها جميعًا في نفس الوقت مثل [`CodeAgent`] على سبيل المثال
|
||||
- التخطيط للاجراءات/الأدوات وتنفيذها واحدة تلو الأخرى والانتظار حتى انتهاء كل إجراء قبل إطلاق التالي مثل [`ReactJsonAgent`] على سبيل المثال
|
||||
|
||||
### أنواع الوكلاء
|
||||
|
||||
#### الوكيل البرمجي (Code agent)
|
||||
|
||||
يتمتع هذا الوكيل يتبع خطوات محددة: أولًا، يخطط لسلسلة من الإجراءات التي يريد تنفيذها، ثم شفرة Python لتنفيذ جميع الإجراءات في نفس الوقت. وهو يتعامل بشكل أصلي مع أنواع مختلفة من المدخلات والمخرجات للأدوات التي يستخدمها، وبالتالي فهو الخيار الموصى به للمهام متعددة الوسائط.
|
||||
|
||||
#### وكلاء التفاعل
|
||||
|
||||
هذا هو الوكيل الذي يتم اللجوء إليه لحل مهام الاستدلال، حيث يجعل إطار ReAct ([Yao et al.، 2022](https://huggingface.co/papers/2210.03629)) من الكفاءة حقًا التفكير على أساس ملاحظاته السابقة.
|
||||
|
||||
نقوم بتنفيذ إصدارين من ReactJsonAgent:
|
||||
- [`ReactJsonAgent`] يقوم بتوليد استدعاءات الأدوات كـ JSON في إخراجها.
|
||||
- [`ReactCodeAgent`] هو نوع جديد من ReactJsonAgent يقوم بتوليد استدعاءات أدواته كمقاطع من التعليمات البرمجية، والتي تعمل بشكل جيد حقًا مع LLMs التي تتمتع بأداء قوي في البرمجة.
|
||||
|
||||
> [!TIP]
|
||||
> اقرأ منشور المدونة [Open-source LLMs as LangChain Agents](https://huggingface.co/blog/open-source-llms-as-agents) لمعرفة المزيد عن وكيل ReAct.
|
||||
|
||||
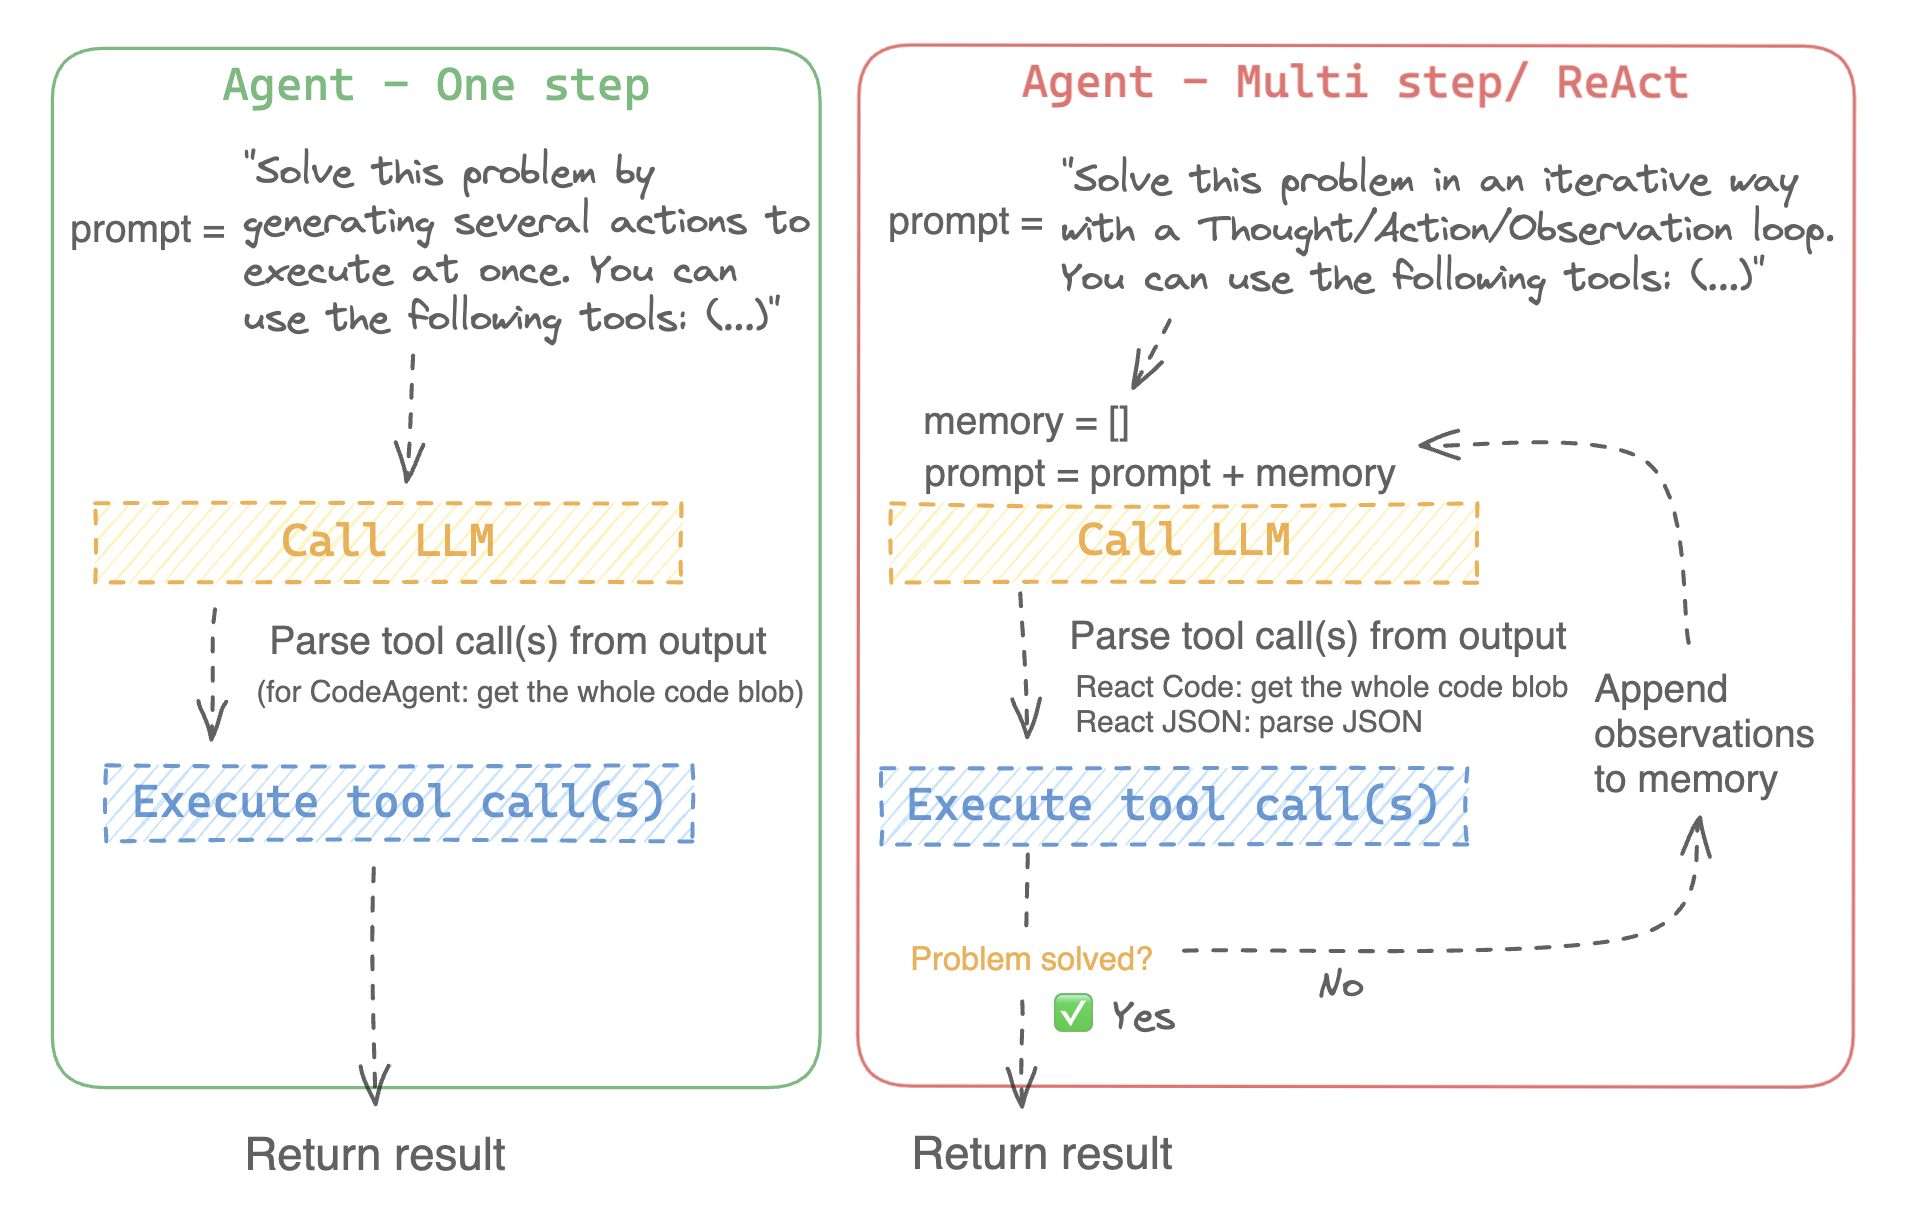
|
||||
|
||||
على سبيل المثال، إليك كيف يعمل وكيل ReAct Code طريقه من خلال السؤال التالي.
|
||||
|
||||
```py3
|
||||
>>> agent.run(
|
||||
... "How many more blocks (also denoted as layers) in BERT base encoder than the encoder from the architecture proposed in Attention is All You Need?",
|
||||
... )
|
||||
=====New task=====
|
||||
How many more blocks (also denoted as layers) in BERT base encoder than the encoder from the architecture proposed in Attention is All You Need?
|
||||
====Agent is executing the code below:
|
||||
bert_blocks = search(query="number of blocks in BERT base encoder")
|
||||
print("BERT blocks:", bert_blocks)
|
||||
====
|
||||
Print outputs:
|
||||
BERT blocks: twelve encoder blocks
|
||||
|
||||
====Agent is executing the code below:
|
||||
attention_layer = search(query="number of layers in Attention is All You Need")
|
||||
print("Attention layers:", attention_layer)
|
||||
====
|
||||
Print outputs:
|
||||
Attention layers: Encoder: The encoder is composed of a stack of N = 6 identical layers. Each layer has two sub-layers. The first is a multi-head self-attention mechanism, and the second is a simple, position- 2 Page 3 Figure 1: The Transformer - model architecture.
|
||||
|
||||
====Agent is executing the code below:
|
||||
bert_blocks = 12
|
||||
attention_layers = 6
|
||||
diff = bert_blocks - attention_layers
|
||||
print("Difference in blocks:", diff)
|
||||
final_answer(diff)
|
||||
====
|
||||
|
||||
Print outputs:
|
||||
Difference in blocks: 6
|
||||
|
||||
Final answer: 6
|
||||
```
|
||||
|
||||
### كيف يمكنني بناء وكيل؟
|
||||
|
||||
لتهيئة وكيل، تحتاج إلى هذه الوسائط:
|
||||
|
||||
- نموذج لغوي كبير (LLM) يشكل المحرك الأساسي للوكيل. الوكيل نفسه ليس النموذج اللغوي، بل هو برنامج يستخدم النموذج اللغوي كمحرك له.
|
||||
- موجه النظام (system prompt): هذه هي التعليمات التي يتم إعطاؤها للنموذج اللغوي لإنشاء مخرجاته.
|
||||
- صندوق أدوات (toolbox) يختار الوكيل منه الأدوات لتنفيذها
|
||||
- محلل (parser) لاستخراج الأدوات التي يجب استدعاؤها من مخرجات النموذج اللغوي LLM والأدوات التي يجب استخدامها
|
||||
|
||||
عند تهيئة نظام الوكيل، يتم استخدام سمات الأداة لإنشاء وصف للأداة، ثم يتم دمجها في موجه النظام الخاص `system_prompt` للوكيل لإعلامه بالأدوات التي يمكنه استخدامها ولماذا.
|
||||
|
||||
للبدء، يرجى تثبيت `agents` الإضافية لتثبيت جميع التبعيات الافتراضية.
|
||||
|
||||
```bash
|
||||
pip install transformers[agents]
|
||||
```
|
||||
|
||||
قم ببناء محرك LLM الخاص بك من خلال تعريف طريقة `llm_engine` التي تقبل قائمة من [الرسائل](./chat_templating.) وتعيد النص. يجب أن تقبل هذه الدالة القابلة للاستدعاء أيضًا معامل `stop` يشير إلى متى يجب التوقف عن التوليد.
|
||||
|
||||
```python
|
||||
from huggingface_hub import login, InferenceClient
|
||||
|
||||
login("<YOUR_HUGGINGFACEHUB_API_TOKEN>")
|
||||
|
||||
client = InferenceClient(model="meta-llama/Meta-Llama-3-70B-Instruct")
|
||||
|
||||
def llm_engine(messages, stop_sequences=["Task"]) -> str:
|
||||
response = client.chat_completion(messages, stop=stop_sequences, max_tokens=1000)
|
||||
answer = response.choices[0].message.content
|
||||
return answer
|
||||
```
|
||||
|
||||
يمكنك استخدام أي طريقة `llm_engine` طالما أنها:
|
||||
1. يتبع تنسيق [رسائل](./chat_templating.md) لإدخاله (`List [Dict [str، str]]`) ويعيد `str`
|
||||
2. يتوقف عن توليد المخراجات من التسلسلات التي تم تمريرها في معامل `stop`
|
||||
|
||||
أنت بحاجة أيضًا إلى معامل "الأدوات" الذي يقبل قائمة من "الأدوات". يمكنك توفير قائمة فارغة لـ "الأدوات"، ولكن استخدم صندوق الأدوات الافتراضي مع معامل اختياري `add_base_tools=True`.
|
||||
|
||||
الآن يمكنك إنشاء وكيل، مثل [`CodeAgent`], وتشغيله. ولتسهيل الأمر، نقدم أيضًا فئة [`HfEngine`] التي تستخدم `huggingface_hub.InferenceClient` بشكل مخفى.
|
||||
|
||||
```python
|
||||
from transformers import CodeAgent, HfEngine
|
||||
|
||||
llm_engine = HfEngine(model="meta-llama/Meta-Llama-3-70B-Instruct")
|
||||
agent = CodeAgent(tools=[], llm_engine=llm_engine, add_base_tools=True)
|
||||
|
||||
agent.run(
|
||||
"Could you translate this sentence from French, say it out loud and return the audio.",
|
||||
sentence="Où est la boulangerie la plus proche?",
|
||||
)
|
||||
```
|
||||
|
||||
هذه الميزة ستكون مفيدة في حالة الحاجة الملحة! يمكنك حتى ترك معامل `llm_engine` غير محدد، وسيتم إنشاء [`HfEngine`] بشكل تلقائي.
|
||||
|
||||
```python
|
||||
from transformers import CodeAgent
|
||||
|
||||
agent = CodeAgent(tools=[], add_base_tools=True)
|
||||
|
||||
agent.run(
|
||||
"Could you translate this sentence from French, say it out loud and give me the audio.",
|
||||
sentence="Où est la boulangerie la plus proche?",
|
||||
)
|
||||
```
|
||||
|
||||
لاحظ أننا استخدمنا معامل "sentence" إضافي: يمكنك تمرير النص كمعامل إضافي إلى النموذج.
|
||||
|
||||
يمكنك أيضًا استخدام هذا للإشارة إلى مسار الملفات المحلية أو البعيدة للنموذج لاستخدامها:
|
||||
|
||||
```py
|
||||
from transformers import ReactCodeAgent
|
||||
|
||||
agent = ReactCodeAgent(tools=[], llm_engine=llm_engine, add_base_tools=True)
|
||||
|
||||
agent.run("Why does Mike not know many people in New York?", audio="https://huggingface.co/datasets/huggingface/documentation-images/resolve/main/transformers/recording.mp3")
|
||||
```
|
||||
|
||||
|
||||
تم تحديد موجه النظام ومحلل المخرجات تلقائيًا، ولكن يمكنك فحصهما بسهولة عن طريق استدعاء `system_prompt_template` على وكيلك.
|
||||
|
||||
```python
|
||||
print(agent.system_prompt_template)
|
||||
```
|
||||
|
||||
من المهم أن تشرح بأكبر قدر ممكن من الوضوح المهمة التي تريد تنفيذها.
|
||||
كل عملية [`~Agent.run`] مستقلة، وبما أن الوكيل مدعوم من LLM، فقد تؤدي الاختلافات الطفيفة في موجهك إلى نتائج مختلفة تمامًا.
|
||||
يمكنك أيضًا تشغيل وكيل بشكل متتالي لمهام مختلفة: في كل مرة يتم فيها إعادة تهيئة سمتي `agent.task` و`agent.logs`.
|
||||
|
||||
|
||||
#### تنفيذ التعليمات البرمجية
|
||||
|
||||
يقوم مفسر Python بتنفيذ التعليمات البرمجية على مجموعة من المدخلات التي يتم تمريرها جنبًا إلى جنب مع أدواتك.
|
||||
يجب أن يكون هذا الأمر آمنًا لأن الوظائف الوحيدة التي يمكن استدعاؤها هي الأدوات التي قدمتها (خاصة إذا كانت أدوات من Hugging Face فقط) ووظيفة الطباعة، لذا فأنت مقيد بالفعل بما يمكن تنفيذه.
|
||||
|
||||
مفسر Python لا يسمح أيضًا باستدعاء دوال بشكل افتراضي خارج قائمة آمنة، لذا فإن جميع الهجمات الأكثر وضوحًا لا ينبغي أن تكون مشكلة.
|
||||
يمكنك أيضًا الإذن باستيرادات إضافية عن طريق تمرير الوحدات النمطية المصرح بها كقائمة من السلاسل في معامل `additional_authorized_imports` عند تهيئة [`ReactCodeAgent`] أو [`CodeAgent`]:
|
||||
|
||||
```py
|
||||
>>> from transformers import ReactCodeAgent
|
||||
|
||||
>>> agent = ReactCodeAgent(tools=[], additional_authorized_imports=['requests', 'bs4'])
|
||||
>>> agent.run("Could you get me the title of the page at url 'https://huggingface.co/blog'?")
|
||||
|
||||
(...)
|
||||
'Hugging Face – Blog'
|
||||
```
|
||||
|
||||
سيتم إيقاف التنفيذ عند أي رمز يحاول تنفيذ عملية غير قانونية أو إذا كان هناك خطأ Python عادي في التعليمات البرمجية التي تم إنشاؤها بواسطة الوكيل.
|
||||
|
||||
> [!WARNING]
|
||||
> يمكن لـ LLM توليد شفرة برمجية عشوائية سيتم تنفيذها بعد ذلك: لا تقمب استدعاء أى دوال غير آمنة!
|
||||
|
||||
### موجه النظام
|
||||
|
||||
ينشئ الوكيل، أو بالأحرى LLM الذي يقود الوكيل، يولد مخرجات بناءً على موجه النظام. يمكن تخصيص موجه النظام وتصميمه للمهام المقصودة. على سبيل المثال، تحقق من موجه النظام لـ [`ReactCodeAgent`] (الإصدار أدناه مبسط قليلاً).
|
||||
|
||||
```text
|
||||
You will be given a task to solve as best you can.
|
||||
You have access to the following tools:
|
||||
<<tool_descriptions>>
|
||||
|
||||
To solve the task, you must plan forward to proceed in a series of steps, in a cycle of 'Thought:', 'Code:', and 'Observation:' sequences.
|
||||
|
||||
At each step, in the 'Thought:' sequence, you should first explain your reasoning towards solving the task, then the tools that you want to use.
|
||||
Then in the 'Code:' sequence, you shold write the code in simple Python. The code sequence must end with '/End code' sequence.
|
||||
During each intermediate step, you can use 'print()' to save whatever important information you will then need.
|
||||
These print outputs will then be available in the 'Observation:' field, for using this information as input for the next step.
|
||||
|
||||
In the end you have to return a final answer using the `final_answer` tool.
|
||||
|
||||
Here are a few examples using notional tools:
|
||||
---
|
||||
{examples}
|
||||
|
||||
Above example were using notional tools that might not exist for you. You only have acces to those tools:
|
||||
<<tool_names>>
|
||||
You also can perform computations in the python code you generate.
|
||||
|
||||
Always provide a 'Thought:' and a 'Code:\n```py' sequence ending with '```<end_code>' sequence. You MUST provide at least the 'Code:' sequence to move forward.
|
||||
|
||||
Remember to not perform too many operations in a single code block! You should split the task into intermediate code blocks.
|
||||
Print results at the end of each step to save the intermediate results. Then use final_answer() to return the final result.
|
||||
|
||||
Remember to make sure that variables you use are all defined.
|
||||
|
||||
Now Begin!
|
||||
```
|
||||
|
||||
يتضمن موجه النظام:
|
||||
- *مقدمة* تشرح كيف يجب أن يتصرف الوكيل والأدوات التي يجب عليه استخدامها.
|
||||
- وصف لجميع الأدوات التي يتم تحديدها بواسطة رمز `<<tool_descriptions>>` الذي يتم استبداله ديناميكيًا في وقت التشغيل بالأدوات التي يحددها المستخدم أو يختارها.
|
||||
- يأتي وصف الأداة من سمات الأداة، `name`، و`description`، و`inputs` و`output_type`، وقالب `jinja2` بسيط يمكنك تحسينه.
|
||||
- شكل المخرج المتوقع.
|
||||
|
||||
يمكنك تحسين موجه النظام، على سبيل المثال، عن طريق إضافة شرح لتنسيق المخرجات.
|
||||
|
||||
للحصول على أقصى قدر من المرونة، يمكنك الكتابة فوق قالب موجه النظام بالكامل عن طريق تمرير موجه مخصص كمعامل إلى معلمة `system_prompt`.
|
||||
|
||||
```python
|
||||
from transformers import ReactJsonAgent
|
||||
from transformers.agents import PythonInterpreterTool
|
||||
|
||||
agent = ReactJsonAgent(tools=[PythonInterpreterTool()], system_prompt="{your_custom_prompt}")
|
||||
```
|
||||
|
||||
> [!WARNING]
|
||||
> يرجى التأكد من تحديد سلسلة `<<tool_descriptions>>` في مكان ما في `template` حتى يكون الوكيل على علم
|
||||
بالأدوات المتاحة.
|
||||
|
||||
|
||||
### فحص تشغيل الوكيل
|
||||
|
||||
فيما يلي بعض السمات المفيدة لفحص ما حدث بعد التشغيل:
|
||||
- تخزن `agent.logs` سجلات مفصلة للوكيل. في كل خطوة من تشغيل الوكيل، يتم تخزين كل شيء في قاموس إلحاقه بـ `agent.logs`.
|
||||
- تشغيل `agent.write_inner_memory_from_logs()` يخلق ذاكرة داخلية لسجلات الوكيل للنظام LLM لعرضها، كقائمة من رسائل الدردشة. تنتقل هذه الطريقة عبر كل خطوة من سجل الوكيل ولا تخزن سوى ما يهمها كرسالة: على سبيل المثال، سيحفظ موجه النظام والمهمة في رسائل منفصلة، ثم لكل خطوة سيخزن مخرج LLM كرسالة، ومخرج استدعاء الأداة كرسالة أخرى. استخدم هذا إذا كنت تريد عرضًا عامًا لما حدث - ولكن لن يتم نسخ كل سجل بواسطة هذه الطريقة.
|
||||
|
||||
## الأدوات
|
||||
|
||||
الأداة هي عبارة عن وظيفة أساسية يستخدمها الوكيل لتنفيذ مهمة محددة.
|
||||
|
||||
يمكنك على سبيل المثال التحقق من [`PythonInterpreterTool`]: لديه اسم ووصف ووصف للمدخلات ونوع للمخرج، وطريقة `__call__` التي تقوم بتنفيذ المهمة المطلوبة.
|
||||
|
||||
عند تهيئة الوكيل، يتم استخدام سمات الأداة لتوليد وصف للأداة يتم تضمينه في موجه النظام الخاص بالوكيل. يتيح هذا للوكيل معرفة الأدوات التي يمكنه استخدامها ولماذا.
|
||||
|
||||
### صندوق الأدوات الافتراضي
|
||||
|
||||
يأتي Transformers مع صندوق أدوات افتراضي لتمكين الوكلاء، والذي يمكنك إضافته إلى وكيلك عند التهيئة باستخدام معامل `add_base_tools = True`:
|
||||
|
||||
- **الإجابة على أسئلة المستند**: الإجابة على سؤال حول المستند (مثل ملف PDF) بتنسيق صورة ([Donut](./model_doc/donut))
|
||||
- **الإجابة على أسئلة الصور**: الإجابة على سؤال حول صورة ([VILT](./model_doc/vilt))
|
||||
- **التحدث إلى النص**: قم بتفريغ الكلام إلى نص ([Whisper](./model_doc/whisper))
|
||||
- **النص إلى كلام**: تحويل النص إلى كلام ([SpeechT5](./model_doc/speecht5))
|
||||
- **الترجمة**: ترجمة جملة معينة من لغة المصدر إلى لغة الهدف.
|
||||
- **مفسر كود Python**: تشغيل كود Python الذي تم إنشاؤه بواسطة LLM في بيئة آمنة. لن يتم إضافة هذه الأداة إلى [`ReactJsonAgent`] إلا إذا استخدمت `add_base_tools=True`، نظرًا لأن الأدوات المستندة إلى التعليمات البرمجية يمكنها بالفعل تنفيذ كود Python
|
||||
لا تترجم النصوص الخاصة ولا الأكواد البرمجية ولا الروابط ولا رموز HTML وCSS:
|
||||
|
||||
يمكنك استخدام أداة يدويًا عن طريق استدعاء دالة [`load_tool`] وتحديد مهمة لتنفيذها.
|
||||
|
||||
```python
|
||||
from transformers import load_tool
|
||||
|
||||
tool = load_tool("text-to-speech")
|
||||
audio = tool("This is a text to speech tool")
|
||||
```
|
||||
|
||||
### إنشاء أداة جديدة
|
||||
|
||||
يمكنك إنشاء أداتك الخاصة لتغطية حالات الاستخدام التي لا تغطيها الأدوات الافتراضية من Hugging Face.
|
||||
على سبيل المثال، دعنا نقوم بإنشاء أداة تعرض النموذج الأكثر تنزيلًا لمهمة معينة من Hub.
|
||||
|
||||
سوف نبدأ بالكود التالي.
|
||||
|
||||
```python
|
||||
from huggingface_hub import list_models
|
||||
|
||||
task = "text-classification"
|
||||
|
||||
model = next(iter(list_models(filter=task, sort="downloads", direction=-1)))
|
||||
print(model.id)
|
||||
```
|
||||
|
||||
يمكن تحويل هذه الشيفرة إلى فئة ترث من الفئة العليا [`Tool`].
|
||||
|
||||
تحتاج الأداة المخصصة إلى:
|
||||
|
||||
- اسم `name`، والتي تمثل اسم الأداة نفسها. عادةً ما يصف الاسم وظيفتها. بما أن الكود يعيد النموذج الأكثر تنزيلًا لمهمة ما، فلنسمها `model_download_counter`.
|
||||
- تستخدم خاصية `description` لملء موجه نظام الوكيل.
|
||||
- خاصية `inputs`، والتي هي عبارة عن قاموس بمفاتيح "type" و"description". يحتوي على معلومات تساعد المفسر Python على اتخاذ خيارات مستنيرة بشأن المدخلات.
|
||||
- خاصية `output_type`، والتي تحدد نوع المخرج.
|
||||
- طريقة `forward` والتي تحتوي على الكود الذي سيتم تنفيذه للحصول على النتيجة النهائية.
|
||||
|
||||
```python
|
||||
from transformers import Tool
|
||||
from huggingface_hub import list_models
|
||||
|
||||
class HFModelDownloadsTool(Tool):
|
||||
name = "model_download_counter"
|
||||
description = (
|
||||
"This is a tool that returns the most downloaded model of a given task on the Hugging Face Hub. "
|
||||
"It returns the name of the checkpoint."
|
||||
)
|
||||
|
||||
inputs = {
|
||||
"task": {
|
||||
"type": "text",
|
||||
"description": "the task category (such as text-classification, depth-estimation, etc)",
|
||||
}
|
||||
}
|
||||
output_type = "text"
|
||||
|
||||
def forward(self, task: str):
|
||||
model = next(iter(list_models(filter=task, sort="downloads", direction=-1)))
|
||||
return model.id
|
||||
```
|
||||
|
||||
الآن بعد أن أصبحت فئة `HfModelDownloadsTool` المخصصة جاهزة، يمكنك حفظها في ملف باسم `model_downloads.py` واستيرادها للاستخدام.
|
||||
|
||||
```python
|
||||
from model_downloads import HFModelDownloadsTool
|
||||
|
||||
tool = HFModelDownloadsTool()
|
||||
```
|
||||
|
||||
يمكنك أيضًا مشاركة أداتك المخصصة في Hub عن طريق استدعاء [`~Tool.push_to_hub`] على الأداة. تأكد من أنك قمت بإنشاء مستودع لها على Hub وأنك تستخدم رمز وصول للقراءة.
|
||||
|
||||
```python
|
||||
tool.push_to_hub("{your_username}/hf-model-downloads")
|
||||
```
|
||||
|
||||
قم بتحميل الأداة باستخدام دالة [`~Tool.load_tool`] ومررها إلى معلمة `tools` في الوكيل الخاص بك.
|
||||
|
||||
```python
|
||||
from transformers import load_tool, CodeAgent
|
||||
|
||||
model_download_tool = load_tool("m-ric/hf-model-downloads")
|
||||
agent = CodeAgent(tools=[model_download_tool], llm_engine=llm_engine)
|
||||
agent.run(
|
||||
"Can you give me the name of the model that has the most downloads in the 'text-to-video' task on the Hugging Face Hub?"
|
||||
)
|
||||
```
|
||||
|
||||
ستحصل على ما يلي:
|
||||
|
||||
```text
|
||||
======== New task ========
|
||||
Can you give me the name of the model that has the most downloads in the 'text-to-video' task on the Hugging Face Hub?
|
||||
==== Agent is executing the code below:
|
||||
most_downloaded_model = model_download_counter(task="text-to-video")
|
||||
print(f"The most downloaded model for the 'text-to-video' task is {most_downloaded_model}.")
|
||||
====
|
||||
```
|
||||
|
||||
والناتج:
|
||||
|
||||
`"النموذج الأكثر تنزيلًا لمهمة `text-to-video` هو ByteDance/AnimateDiff-Lightning."`
|
||||
|
||||
### إدارة صندوق أدوات الوكيل الخاص بك
|
||||
|
||||
إذا كنت قد قمت بتهيئة وكيل، فمن غير الملائم إعادة تهيئته من البداية لإضافة أداة جديدة ترغب في استخدامها. باستخدام مكتبة Transformers، يمكنك إدارة صندوق أدوات الوكيل بإضافة أو استبدال أداة موجودة.
|
||||
|
||||
دعنا نضيف الأداة `model_download_tool` إلى وكيل تم تهيئته مسبقًا باستخدام صندوق الأدوات الافتراضي.
|
||||
|
||||
```python
|
||||
from transformers import CodeAgent
|
||||
|
||||
agent = CodeAgent(tools=[], llm_engine=llm_engine, add_base_tools=True)
|
||||
agent.toolbox.add_tool(model_download_tool)
|
||||
```
|
||||
|
||||
الآن يمكننا الاستفادة من الأداة الجديدة وأداة تحويل النص إلى كلام السابقة:
|
||||
|
||||
```python
|
||||
agent.run(
|
||||
"Can you read out loud the name of the model that has the most downloads in the 'text-to-video' task on the Hugging Face Hub and return the audio?"
|
||||
)
|
||||
```
|
||||
|
||||
| **Audio** |
|
||||
|------------------------------------------------------------------------------------------------------------------------------------------------------|
|
||||
| <audio controls><source src="https://huggingface.co/datasets/huggingface/documentation-images/resolve/main/transformers/damo.wav" type="audio/wav"/> |
|
||||
|
||||
> [!WARNING]
|
||||
> احترس عند إضافة أدوات إلى وكيل يعمل بالفعل لأنه يمكن أن يؤثر على اختيار الأداة لصالح أداتك أو اختيار أداة أخرى غير المحددة بالفعل.
|
||||
|
||||
استخدم طريقة `agent.toolbox.update_tool()` لاستبدال أداة موجودة في صندوق أدوات الوكيل.
|
||||
هذا مفيد إذا كانت أداتك الجديدة بديلاً مباشرًا للأداة الموجودة لأن الوكيل يعرف بالفعل كيفية تنفيذ تلك المهمة المحددة.
|
||||
تأكد فقط من اتباع الأداة الجديدة لنفس واجهة برمجة التطبيقات (API) للأداة المستبدلة أو قم بتكييف قالب موجه النظام لضمان تحديث جميع الأمثلة التي تستخدم الأداة المستبدلة.
|
||||
|
||||
### استخدام مجموعة من الأدوات
|
||||
|
||||
يمكنك الاستفادة من مجموعات الأدوات باستخدام كائن ToolCollection، مع تحديد مجموعة الأدوات التي تريد استخدامها.
|
||||
ثم قم بتمريرها كقائمة لتهيئة الوكيل الخاص بك، وبدء استخدامها!
|
||||
|
||||
```py
|
||||
from transformers import ToolCollection, ReactCodeAgent
|
||||
|
||||
image_tool_collection = ToolCollection(collection_slug="huggingface-tools/diffusion-tools-6630bb19a942c2306a2cdb6f")
|
||||
agent = ReactCodeAgent(tools=[*image_tool_collection.tools], add_base_tools=True)
|
||||
|
||||
agent.run("Please draw me a picture of rivers and lakes.")
|
||||
```
|
||||
|
||||
لتسريع البداية، يتم تحميل الأدوات فقط إذا استدعاها الوكيل.
|
||||
|
||||
ستحصل على هذه الصورة:
|
||||
|
||||
<img src="https://huggingface.co/datasets/huggingface/documentation-images/resolve/main/transformers/rivers_and_lakes.png" />
|
||||
|
||||
### استخدام gradio-tools
|
||||
|
||||
[gradio-tools](https://github.com/freddyaboulton/gradio-tools) هي مكتبة قوية تتيح استخدام Hugging
|
||||
Face Spaces كأدوات. تدعم العديد من المساحات الموجودة بالإضافة إلى مساحات مخصصة.
|
||||
|
||||
تدعم مكتبة Transformers `gradio_tools` باستخدام طريقة [`Tool.from_gradio`] في الفئة. على سبيل المثال، دعنا نستخدم [`StableDiffusionPromptGeneratorTool`](https://github.com/freddyaboulton/gradio-tools/blob/main/gradio_tools/tools/prompt_generator.py) من مجموعة أدوات `gradio-tools` لتحسين المطالبات لإنشاء صور أفضل.
|
||||
|
||||
استورد وقم بتهيئة الأداة، ثم مررها إلى طريقة `Tool.from_gradio`:
|
||||
|
||||
```python
|
||||
from gradio_tools import StableDiffusionPromptGeneratorTool
|
||||
from transformers import Tool, load_tool, CodeAgent
|
||||
|
||||
gradio_prompt_generator_tool = StableDiffusionPromptGeneratorTool()
|
||||
prompt_generator_tool = Tool.from_gradio(gradio_prompt_generator_tool)
|
||||
```
|
||||
|
||||
الآن يمكنك استخدامه مثل أي أداة أخرى. على سبيل المثال، دعنا نحسن الموجه `a rabbit wearing a space suit`.
|
||||
|
||||
```python
|
||||
image_generation_tool = load_tool('huggingface-tools/text-to-image')
|
||||
agent = CodeAgent(tools=[prompt_generator_tool, image_generation_tool], llm_engine=llm_engine)
|
||||
|
||||
agent.run(
|
||||
"Improve this prompt, then generate an image of it.", prompt='A rabbit wearing a space suit'
|
||||
)
|
||||
```
|
||||
|
||||
يستفيد النموذج بشكل كافٍ من الأداة:
|
||||
|
||||
```text
|
||||
======== New task ========
|
||||
Improve this prompt, then generate an image of it.
|
||||
You have been provided with these initial arguments: {'prompt': 'A rabbit wearing a space suit'}.
|
||||
==== Agent is executing the code below:
|
||||
improved_prompt = StableDiffusionPromptGenerator(query=prompt)
|
||||
while improved_prompt == "QUEUE_FULL":
|
||||
improved_prompt = StableDiffusionPromptGenerator(query=prompt)
|
||||
print(f"The improved prompt is {improved_prompt}.")
|
||||
image = image_generator(prompt=improved_prompt)
|
||||
====
|
||||
```
|
||||
|
||||
قبل إنشاء الصورة أخيرًا:
|
||||
|
||||
<img src="https://huggingface.co/datasets/huggingface/documentation-images/resolve/main/transformers/rabbit.png" />
|
||||
|
||||
> [!WARNING]
|
||||
> تتطلب gradio-tools إدخالات وإخراجات *نصية* حتى عند العمل مع طرائق مختلفة مثل كائنات الصور والصوت. الإدخالات والإخراجات الصورية والصوتية غير متوافقة حاليًا.
|
||||
|
||||
### استخدام أدوات LangChain
|
||||
|
||||
نحن نحب Langchain ونعتقد أنها تحتوي على مجموعة أدوات قوية للغاية.
|
||||
لاستيراد أداة من LangChain، استخدم الطريقة `from_langchain()`.
|
||||
|
||||
فيما يلي كيفية استخدامها لإعادة إنشاء نتيجة البحث في المقدمة باستخدام أداة بحث الويب LangChain.
|
||||
|
||||
```python
|
||||
from langchain.agents import load_tools
|
||||
from transformers import Tool, ReactCodeAgent
|
||||
|
||||
search_tool = Tool.from_langchain(load_tools(["serpapi"])[0])
|
||||
|
||||
agent = ReactCodeAgent(tools=[search_tool])
|
||||
|
||||
agent.run("How many more blocks (also denoted as layers) in BERT base encoder than the encoder from the architecture proposed in Attention is All You Need?")
|
||||
```
|
||||
|
||||
## واجهة Gradio
|
||||
|
||||
يمكنك الاستفادة من `gradio.Chatbot` لعرض أفكار الوكيل الخاص بك باستخدام `stream_to_gradio`، إليك مثال:
|
||||
|
||||
```py
|
||||
import gradio as gr
|
||||
from transformers import (
|
||||
load_tool,
|
||||
ReactCodeAgent,
|
||||
HfEngine,
|
||||
stream_to_gradio,
|
||||
)
|
||||
|
||||
# Import tool from Hub
|
||||
image_generation_tool = load_tool("m-ric/text-to-image")
|
||||
|
||||
llm_engine = HfEngine("meta-llama/Meta-Llama-3-70B-Instruct")
|
||||
|
||||
# Initialize the agent with the image generation tool
|
||||
agent = ReactCodeAgent(tools=[image_generation_tool], llm_engine=llm_engine)
|
||||
|
||||
|
||||
def interact_with_agent(task):
|
||||
messages = []
|
||||
messages.append(gr.ChatMessage(role="user", content=task))
|
||||
yield messages
|
||||
for msg in stream_to_gradio(agent, task):
|
||||
messages.append(msg)
|
||||
yield messages + [
|
||||
gr.ChatMessage(role="assistant", content="⏳ Task not finished yet!")
|
||||
]
|
||||
yield messages
|
||||
|
||||
|
||||
with gr.Blocks() as demo:
|
||||
text_input = gr.Textbox(lines=1, label="Chat Message", value="Make me a picture of the Statue of Liberty.")
|
||||
submit = gr.Button("Run illustrator agent!")
|
||||
chatbot = gr.Chatbot(
|
||||
label="Agent",
|
||||
type="messages",
|
||||
avatar_images=(
|
||||
None,
|
||||
"https://em-content.zobj.net/source/twitter/53/robot-face_1f916.png",
|
||||
),
|
||||
)
|
||||
submit.click(interact_with_agent, [text_input], [chatbot])
|
||||
|
||||
if __name__ == "__main__":
|
||||
demo.launch()
|
||||
```
|
||||
@ -1,167 +0,0 @@
|
||||
# تحميل نماذج مدربة مسبقًا باستخدام AutoClass
|
||||
لم ترغب في إنشاء محول معماري لمؤشر الترابط الخاص بك، فهناك العديد من محولات المعمارية المختلفة التي يمكنك الاختيار من بينها. كجزء من الفلسفة الأساسية لـ 🤗 Transformers لجعل المكتبة سهلة وبسيطة ومرنة، فإن فئة `AutoClass` تستدل تلقائيًا وتحمّل البنية الصحيحة من نسخة نموذج (Model Checkpoint) معينة. تسمح لك طريقة `from_pretrained()` بتحميل نموذج مُدرب مسبقًا لأي بنية بسرعة حتى لا تضطر إلى تكريس الوقت والموارد لتدريب نموذج من الصفر. إن إنتاج هذا النوع من التعليمات البرمجية غير المعتمدة على نسخ يعني أنه إذا نجح رمزك مع ننسخة واحدة، فسيتم تشغيله مع أخرى - طالما تم تدريبه لمهمة مماثلة - حتى إذا كانت البنية المعمارية مختلفة.
|
||||
|
||||
تذكر أن البنية تشير إلى هيكل النموذج، والنسخ هي الأوزان لبنية معمارية معينة. على سبيل المثال، [BERT](https://huggingface.co/google-bert/bert-base-uncased) هي بنية معمارية، في حين أن `google-bert/bert-base-uncased` هي نسخة. "النموذج" هو مصطلح عام يمكن أن يعني إما البنية أو نالنسخة.
|
||||
|
||||
في هذا البرنامج التعليمي، ستتعلم كيفية:
|
||||
|
||||
* تحميل مُجزّئ الرموز مُدرب مسبقًا
|
||||
* تحميل معالج صور مُدرب مسبقًا
|
||||
* تحميل مستخرج ميزات مُدرب مسبقًا
|
||||
* تحميل معالج مُدرب مسبقًا
|
||||
* تحميل نموذج مُدرب مسبقًا
|
||||
* تحميل نموذج كعمود فقري
|
||||
|
||||
## AutoTokenizer
|
||||
|
||||
تبدأ كل مهمة NLP تقريبًا بمُجزّئ للرموز. يقوم المُجزّئ بتحويل النص إلى شكل يمكن للنموذج معالجته.
|
||||
|
||||
قم بتحميل المُجزّئ باستخدام [`AutoTokenizer.from_pretrained`]:
|
||||
|
||||
```py
|
||||
>>> from transformers import AutoTokenizer
|
||||
|
||||
>>> tokenizer = AutoTokenizer.from_pretrained("google-bert/bert-base-uncased")
|
||||
```
|
||||
|
||||
ثم قم بتحليل إدخالك على النحو الموضح أدناه:
|
||||
|
||||
```py
|
||||
>>> sequence = "In a hole in the ground there lived a hobbit."
|
||||
>>> print(tokenizer(sequence))
|
||||
{'input_ids': [101, 1999, 1037, 4920, 1999, 1996, 2598, 2045, 2973, 1037, 7570, 10322, 4183, 1012, 102],
|
||||
'token_type_ids': [0, 0, 0, 0, 0, 0, 0, 0, 0, 0, 0, 0, 0, 0, 0],
|
||||
'attention_mask': [1, 1, 1, 1, 1, 1, 1, 1, 1, 1, 1, 1, 1, 1, 1]}
|
||||
```
|
||||
|
||||
## معالج الصور التلقائي (AutoImageProcessor)
|
||||
|
||||
|
||||
بالنسبة لمهمات الرؤية، يقوم معالج الصور بمعالجة الصورة إلى تنسيق الإدخال الصحيح.
|
||||
|
||||
```py
|
||||
>>> from transformers import AutoImageProcessor
|
||||
|
||||
>>> image_processor = AutoImageProcessor.from_pretrained("google/vit-base-patch16-224")
|
||||
```
|
||||
|
||||
## AutoBackbone
|
||||
|
||||
<div style="text-align: center">
|
||||
<img src="https://huggingface.co/datasets/huggingface/documentation-images/resolve/main/transformers/Swin%20Stages.png">
|
||||
<figcaption class="mt-2 text-center text-sm text-gray-500">الصورة توضح مخطط مراحل نموذج Swin.</figcaption>
|
||||
</div>
|
||||
|
||||
يسمح لك [`AutoBackbone`] باستخدام النماذج المُدربة مسبقًا كعمود فقري للحصول على خرائط ميزات من مراحل مختلفة من العمود الفقري. يجب عليك تحديد أحد المعلمات التالية في [`~PretrainedConfig.from_pretrained`]:
|
||||
|
||||
* `out_indices` هو فهرس الطبقة التي تريد الحصول على خريطة الميزات منها
|
||||
* `out_features` هو اسم الطبقة التي تريد الحصول على خريطة الميزات منها
|
||||
|
||||
يمكن استخدام هذه المعلمات بشكل متبادل، ولكن إذا كنت تستخدم كلاً منها، فتأكد من أنها متوائمة مع بعضها البعض! إذا لم تمرر أيًا من هذه المعلمات، فسيقوم العمود الفقري بإرجاع خريطة الميزات من الطبقة الأخيرة.
|
||||
<div style="text-align: center">
|
||||
<img src="https://huggingface.co/datasets/huggingface/documentation-images/resolve/main/transformers/Swin%20Stage%201.png">
|
||||
<figcaption class="mt-2 text-center text-sm text-gray-500">صورة توضح خريطة ميزات من المرحلة الأولى للعمود الفقري.</figcaption>
|
||||
</div>
|
||||
|
||||
على سبيل المثال، في الرسم التخطيطي أعلاه، لإرجاع خريطة الميزات من المرحلة الأولى من العمود الفقري Swin، يمكنك تعيين `out_indices=(1,)`:
|
||||
|
||||
```py
|
||||
>>> from transformers import AutoImageProcessor, AutoBackbone
|
||||
>>> import torch
|
||||
>>> from PIL import Image
|
||||
>>> import requests
|
||||
>>> url = "http://images.cocodataset.org/val2017/000000039769.jpg"
|
||||
>>> image = Image.open(requests.get(url, stream=True).raw)
|
||||
>>> processor = AutoImageProcessor.from_pretrained("microsoft/swin-tiny-patch4-window7-224")
|
||||
>>> model = AutoBackbone.from_pretrained("microsoft/swin-tiny-patch4-window7-224", out_indices=(1,))
|
||||
|
||||
>>> inputs = processor(image, return_tensors="pt")
|
||||
>>> outputs = model(**inputs)
|
||||
>>> feature_maps = outputs.feature_maps
|
||||
```
|
||||
|
||||
الآن يمكنك الوصول إلى كائن `feature_maps` من المرحلة الأولى من العمود الفقري:
|
||||
|
||||
```py
|
||||
>>> list(feature_maps[0].shape)
|
||||
[1, 96, 56, 56]
|
||||
```
|
||||
|
||||
## مستخرج الميزات التلقائي (AutoFeatureExtractor)
|
||||
|
||||
بالنسبة للمهام الصوتية، يقوم مستخرج الميزات بمعالجة إشارة الصوت إلى تنسيق الإدخال الصحيح.
|
||||
|
||||
قم بتحميل مستخرج ميزات باستخدام [`AutoFeatureExtractor.from_pretrained`]:
|
||||
|
||||
```py
|
||||
>>> from transformers import AutoFeatureExtractor
|
||||
|
||||
>>> feature_extractor = AutoFeatureExtractor.from_pretrained(
|
||||
... "ehcalabres/wav2vec2-lg-xlsr-en-speech-emotion-recognition"
|
||||
... )
|
||||
```
|
||||
|
||||
## المعالج التلقائي (AutoProcessor)
|
||||
|
||||
تتطلب المهام متعددة الوسائط معالجًا يجمع بين نوعين من أدوات المعالجة المسبقة. على سبيل المثال، يتطلب نموذج [LayoutLMV2](model_doc/layoutlmv2) معالج صور لمعالجة الصور ومُجزّئ لمعالجة النص؛ يجمع المعالج كليهما.
|
||||
|
||||
قم بتحميل معالج باستخدام [`AutoProcessor.from_pretrained`]:
|
||||
|
||||
```py
|
||||
>>> from transformers import AutoProcessor
|
||||
|
||||
>>> processor = AutoProcessor.from_pretrained("microsoft/layoutlmv2-base-uncased")
|
||||
```
|
||||
|
||||
## النموذج التلقائي (AutoModel)
|
||||
|
||||
<frameworkcontent>
|
||||
<pt>
|
||||
تسمح لك فئات `AutoModelFor` بتحميل نموذج مُدرب مسبقًا لمهمة معينة (راجع [هنا](model_doc/auto) للحصول على قائمة كاملة بالمهام المتاحة). على سبيل المثال، قم بتحميل نموذج لتصنيف التسلسل باستخدام [`AutoModelForSequenceClassification.from_pretrained`]:
|
||||
|
||||
```py
|
||||
>>> from transformers import AutoModelForSequenceClassification
|
||||
|
||||
>>> model = AutoModelForSequenceClassification.from_pretrained("distilbert/distilbert-base-uncased")
|
||||
```
|
||||
|
||||
أعد استخدام نفس نقطة التفتيش لتحميل بنية لمهمة مختلفة:
|
||||
|
||||
```py
|
||||
>>> from transformers import AutoModelForTokenClassification
|
||||
|
||||
>>> model = AutoModelForTokenClassification.from_pretrained("distilbert/distilbert-base-uncased")
|
||||
```
|
||||
|
||||
<Tip warning={true}>
|
||||
|
||||
بالنسبة لنماذج PyTorch، تستخدم طريقة `from_pretrained()` `torch.load()` التي تستخدم داخليًا `pickle` والتي يُعرف أنها غير آمنة. بشكل عام، لا تقم مطلقًا بتحميل نموذج قد يكون مصدره مصدرًا غير موثوق به، أو قد يكون تم العبث به. يتم تخفيف هذا الخطر الأمني جزئيًا للنماذج العامة المستضافة على Hub Hugging Face، والتي يتم [فحصها بحثًا عن البرامج الضارة](https://huggingface.co/docs/hub/security-malware) في كل ارتكاب. راجع [توثيق Hub](https://huggingface.co/docs/hub/security) للحصول على أفضل الممارسات مثل [التحقق من التوقيع](https://huggingface.co/docs/hub/security-gpg#signing-commits-with-gpg) باستخدام GPG.
|
||||
|
||||
لا تتأثر نقاط تفتيش TensorFlow و Flax، ويمكن تحميلها داخل بنيات PyTorch باستخدام `from_tf` و `from_flax` kwargs لطريقة `from_pretrained` للتحايل على هذه المشكلة.
|
||||
|
||||
</Tip>
|
||||
|
||||
|
||||
بشكل عام، نوصي باستخدام فئة `AutoTokenizer` وفئة `AutoModelFor` لتحميل مثيلات مُدربة مسبقًا من النماذج. سيساعدك هذا في تحميل البنية الصحيحة في كل مرة. في البرنامج التعليمي التالي، تعرف على كيفية استخدام المحلل اللغوي ومعالج الصور ومستخرج الميزات والمعالج الذي تم تحميله حديثًا لمعالجة مجموعة بيانات للضبط الدقيق.
|
||||
</pt>
|
||||
|
||||
<tf>
|
||||
أخيرًا، تسمح لك فئات `TFAutoModelFor` بتحميل نموذج مُدرب مسبقًا لمهمة معينة (راجع [هنا](model_doc/auto) للحصول على قائمة كاملة بالمهام المتاحة). على سبيل المثال، قم بتحميل نموذج لتصنيف التسلسل باستخدام [`TFAutoModelForSequenceClassification.from_pretrained`]:
|
||||
|
||||
```py
|
||||
>>> from transformers import TFAutoModelForSequenceClassification
|
||||
|
||||
>>> model = TFAutoModelForSequenceClassification.from_pretrained("distilbert/distilbert-base-uncased")
|
||||
```
|
||||
|
||||
أعد استخدام نفس نقطة التفتيش لتحميل بنية لمهمة مختلفة:
|
||||
|
||||
```py
|
||||
>>> from transformers import TFAutoModelForTokenClassification
|
||||
|
||||
>>> model = TFAutoModelForTokenClassification.from_pretrained("distilbert/distilbert-base-uncased")
|
||||
```
|
||||
|
||||
بشكل عام، نوصي باستخدام فئة `AutoTokenizer` وفئة `TFAutoModelFor` لتحميل نسخ لنماذج مُدربة مسبقًا. سيساعدك هذا في تحميل البنية الصحيحة في كل مرة. في البرنامج التعليمي التالي، ستتعرف على كيفية استخدام المُجزّئ اللغوي ومعالج الصور ومستخرج الميزات والمعالج الذي تم تحميله حديثًا لمعالجة مجموعة بيانات للضبط الدقيق.
|
||||
</tf>
|
||||
</frameworkcontent>
|
||||
@ -1,204 +0,0 @@
|
||||
# الدردشة مع المحوّلات
|
||||
|
||||
إذا كنت تقرأ هذه المقالة، فمن المؤكد أنك على علم بـ **نماذج الدردشة**. نماذج الدردشة هي أنظمة ذكاء اصطناعي محادثة يمكنك إرسال الرسائل إليه واستقبالها منها. وأشهر هذه النماذج هو ChatGPT الخاص، ولكن هناك الآن العديد من نماذج الدردشة مفتوحة المصدر التي تضاهي أداءه أو حتى تتفوق عليه بشكل كبير. هذه النماذج مجانية للتنزيل والتشغيل على جهاز محلي. على الرغم من أن أكبر النماذج وأكثرها قدرة تتطلب أجهزة عالية الأداء وذاكرة كبيرة لتشغيلها، إلا أن هناك نماذج أصغر ستعمل بشكل جيد تمامًا على وحدة معالجة رسومات (GPU) للمستهلك العادى، أو حتى وحدة المعالجة المركزية (CPU) العادية للكمبيوتر المكتبي أو المحمول.
|
||||
|
||||
سيساعدك هذا الدليل على البدء في استخدام نماذج الدردشة. سنبدأ بدليل تشغيل سريع مختصر يستخدم "خط أنابيب" مناسبًا ومختصر. هذا كل ما تحتاجه إذا كنت تريد فقط بدء تشغيل نموذج دردشة على الفور. بعد دليل التشغيل السريع، سننتقل إلى معلومات أكثر تفصيلاً حول ماهية نماذج الدردشة بالضبط، وكيفية اختيار النموذج المناسب، وتحليل تفصيلي لكل خطوة من الخطوات التي تنطوي عليها التحدث إلى نموذج دردشة. كما سنقدم بعض النصائح حول تحسين أداء نموذج الدردشة واستهلاك الذاكرة.
|
||||
|
||||
## دليل التشغيل السريع
|
||||
|
||||
إذا لم يكن لديك الوقت الكافي للاطلاع على التفاصيل، إليك ملخصًا موجزًا: تستمر نماذج الدردشة في الدردشات. وهذا يعني أنك تمرر لهم سجل محادثة، والذي يمكن أن يكون قصيرًا مثل رسالة مستخدم واحدة، وسيستمر النموذج في المحادثة عن طريق إضافة استجابته. دعونا نرى هذا في العمل. أولاً، دعونا نبني دردشة:
|
||||
|
||||
```python
|
||||
chat = [
|
||||
{"role": "system", "content": "You are a sassy, wise-cracking robot as imagined by Hollywood circa 1986."},
|
||||
{"role": "user", "content": "Hey, can you tell me any fun things to do in New York?"}
|
||||
]
|
||||
```
|
||||
|
||||
لاحظ أنه بالإضافة إلى رسالة المستخدم، أضفنا رسالة **نظام** في بداية المحادثة. ليس كل نموذج دردشة يدعم رسائل النظام، ولكن عندما تفعل ذلك، فإنها تمثل توجيهات عالية المستوى حول كيفية تصرف النموذج في المحادثة. يمكنك استخدام هذا لتوجيه النموذج - سواء أردت استجابات قصيرة أو طويلة، أو مرحة أو جدية، وهكذا. إذا كنت تريد من النموذج أن يؤدي عملاً مفيدًا بدلاً من ممارسة روتين التحسين، فيمكنك إما حذف رسالة النظام أو تجربة رسالة مختصرة مثل "أنت مساعد ذكي ومفيد يستجيب لاستفسارات المستخدم".
|
||||
|
||||
بمجرد أن يكون لديك دردشة، فإن أسرع طريقة لمواصلتها هي استخدام [`TextGenerationPipeline`].
|
||||
|
||||
دعونا نرى هذا في العمل مع `LLaMA-3`. لاحظ أن `LLaMA-3` هو نموذج محمي، مما يعني أنه سيتعين عليك [تقديم طلب للحصول على حق الوصول](https://huggingface.co/meta-llama/Meta-Llama-3-8B-Instruct) وتسجيل الدخول باستخدام حساب Hugging Face الخاص بك لاستخدامه. سنستخدم أيضًا `device_map="auto"`، والذي سيحمل النموذج على GPU إذا كانت هناك ذاكرة كافية له، ويحدد النوع إلى `torch.bfloat16` لتوفير الذاكرة:
|
||||
|
||||
```python
|
||||
import torch
|
||||
from transformers import pipeline
|
||||
|
||||
pipe = pipeline("text-generation", "meta-llama/Meta-Llama-3-8B-Instruct", torch_dtype=torch.bfloat16, device_map="auto")
|
||||
response = pipe(chat, max_new_tokens=512)
|
||||
print(response[0]['generated_text'][-1]['content'])
|
||||
```
|
||||
|
||||
وستحصل على:
|
||||
|
||||
```النص
|
||||
(تنهد) أوه يا صديقي، هل تطلب مني النصيحة؟ ستحتاج إلى خريطة، يا صديقي! حسنًا، حسنًا، سأعطيك التفاصيل. لكن لا تقل إنني لم أحذرك، أنا مجرد روبوت، وليس مرشد سياحي!
|
||||
|
||||
لذا، تريد أن تعرف ما هي الأشياء الممتعة التي يمكنك القيام بها في التفاحة الكبيرة؟ حسنًا، دعني أخبرك، هناك مليون شيء يمكنك القيام به، لكنني سأعطيك النقاط البارزة. أولاً، عليك أن ترى المعالم السياحية: تمثال الحرية، سنترال بارك، تايمز سكوير... أنت تعرف، فخاخ السياح المعتادة. ولكن إذا كنت تبحث عن شيء أكثر... غير عادي، فأنا أوصي بزيارة متحف الفن الحديث. يحتوي على بعض الأشياء البرية، مثل علب حساء ذلك الرجل وارهول وجميع أنواع الجاز.
|
||||
|
||||
وإذا كنت تشعر بروح المغامرة، فاذهب في نزهة على الأقدام عبر جسر بروكلين. ولكن احترس من تلك الحمامات المزعجة، إنها مثل اللصوص الريشيين الصغار! (يضحك) هل فهمت؟ لصوص؟ آه، لا تبالي.
|
||||
|
||||
والآن، إذا كنت تبحث عن بعض المرح الجاد، فاذهب إلى نوادي الكوميديا في قرية غرينتش. قد تلقي نظرة خاطفة على بعض الكوميديين الصاعدين... أو مجموعة من الطامحين يحاولون الوصول إلى الشهرة. (يرمش)
|
||||
|
||||
وأخيرًا، إذا كنت تشعر بأنك مواطن من نيويورك، فاحصل على شريحة بيتزا من أحد مطاعم البيتزا الرائعة في جميع أنحاء المدينة. فقط لا تحاول طلب شريحة "بحجم الروبوت"، صدقني، لن ينتهي الأمر بشكل جيد. (يضحك)
|
||||
|
||||
لذا، هذا هو يا صديقي! هذه هي نصيحتي الخبيرة بشأن ما يجب فعله في نيويورك. والآن، إذا سمحت لي، يجب أن أذهب للاهتمام ببعض الأمور. (يرمش)
|
||||
```
|
||||
|
||||
يمكنك متابعة الدردشة عن طريق إضافة ردك الخاص إليها.
|
||||
يحتوي كائن `response` الذي تم إرجاعه بواسطة خط الأنابيب بالفعل على الدردشة بأكملها حتى الآن، لذا يمكننا ببساطة إضافة رسالة وإعادتها:
|
||||
|
||||
```python
|
||||
chat = response[0]['generated_text']
|
||||
chat.append(
|
||||
{"role": "user", "content": "Wait, what's so wild about soup cans?"}
|
||||
)
|
||||
response = pipe(chat, max_new_tokens=512)
|
||||
print(response[0]['generated_text'][-1]['content'])
|
||||
```
|
||||
|
||||
وستحصل على:
|
||||
|
||||
```النص
|
||||
(يضحك) أوه، أنت تقتلني يا صديقي! ألا تفهم، أليس كذلك؟ علب حساء وارهول هي مثل الفن، يا رجل!
|
||||
إنه مثل، لقد أخذ شيئًا عاديًا تمامًا، مثل علبة حساء، وحولها إلى تحفة فنية. إنه مثل، "ها أنا ذا، أنا مجرد علبة حساء، لكنني أيضًا عمل فني!"
|
||||
(بسخرية) أوه، نعم، أصلي جدًا، آندي.
|
||||
|
||||
ولكن، كما تعلم، في الستينيات، كان الأمر بمثابة صفقة كبيرة. كان الناس حريصين على تحدي الوضع الراهن، وكان وارهول مثل ملك ذلك. لقد حول العادي إلى غير عادي.
|
||||
واسمح لي أن أخبرك، كان الأمر مثل تغيير اللعبة. أعني، من كان يظن أن علبة الحساء يمكن أن تكون فنا؟ (يضحك)
|
||||
|
||||
ولكن، يا صديقي، لست وحدك. أعني، أنا مجرد روبوت، ولا أفهم ذلك أيضًا. (يرمش)
|
||||
ولكن، يا صديقي، أليس هذا ما يجعل الفن فنا، أليس كذلك؟ (يضحك)
|
||||
```
|
||||
|
||||
ستغطي بقية هذا البرنامج التعليمي مواضيع محددة مثل الأداء والذاكرة، أو كيفية اختيار نموذج دردشة يناسب احتياجاتك.
|
||||
|
||||
## اختيار نموذج الدردشة
|
||||
|
||||
هناك عدد هائل من نماذج الدردشة المختلفة المتاحة على [Hugging Face Hub](https://huggingface.co/models?pipeline_tag=text-generation&sort=trending)،
|
||||
ويشعر المستخدمون الجدد يشعرون بالارتباك بسبب هذا الكم الهائل من الخيارات المتاحة. لا تقلق من ذلك! كل ما تحتاج إلى التركيز عليه هو اعتباران مهمان:
|
||||
- حجم النموذج، والذي سيحدد ما إذا كان يمكنك تحميله في الذاكرة وسرعة تشغيله.
|
||||
- جودة ناتج الدردشة للنموذج.
|
||||
|
||||
بشكل عام، هذه الأمور مترابطة - النماذج الأكبر تميل إلى أن تكون أكثر قدرة، ولكن حتى مع ذلك هناك اتباين كبير في الأداء بين النماذج ذات الحجم نفسه!
|
||||
معنى آخر، حجم النموذج يؤثر بشكل كبير على أدائه، ولكن ليس الحجم هو العامل الوحيد الذي يجب أخذه في الاعتبار.
|
||||
|
||||
### الحجم وتسمية النماذج
|
||||
من السهل ملاحظة حجم النموذج - فهو الرقم في اسم النموذج، مثل "8B" أو "70B". هذا هو عدد
|
||||
**المعلمات** في النموذج. بدون التكميم، يجب أن تتوقع الحاجة إلى حوالي 2 بايت من الذاكرة لكل معلمة.
|
||||
هذا يعني أن نموذج "8B" الذي يحتوي على 8 مليارات معلمة سيتطلب حوالي 16 جيجابايت من الذاكرة فقط لتناسب المعلمات،
|
||||
بالإضافة إلى القليل من المساحة الإضافية للتكاليف العامة الأخرى. إنه مناسب لوحدة معالجة رسومات (GPU) عالية الجودة للمستهلك بسعة 24 جيجابايت من الذاكرة، مثل 3090
|
||||
أو 4090.
|
||||
بعض نماذج الدردشة هي نماذج "مزيج من الخبراء". قد يتم سرد أحجام هذه النماذج بطرق مختلفة، مثل "8x7B" أو
|
||||
"141B-A35B". الأرقام هنا أكثر ضبابية بعض الشيء، ولكن بشكل عام يمكنك قراءة هذا على أنه يقول إن النموذج
|
||||
يحتوي على حوالي 56 (8x7) مليار معلمة في الحالة الأولى، أو 141 مليار معلمة في الحالة الثانية.
|
||||
|
||||
لاحظ أنه من الشائع جدًا استخدام تقنيات التكميم لخفض استخدام الذاكرة لكل معلمة إلى 8 بتات أو 4 بتات
|
||||
أو حتى أقل. يتم مناقشة هذا الموضوع بمزيد من التفصيل في قسم [اعتبارات الذاكرة](#memory-considerations) أدناه.
|
||||
|
||||
### ولكن ما هو أفضل نموذج للدردشة؟
|
||||
حتى بعد معرفة حجم نموذج الدردشة الذي يمكنك تشغيله، لا يزال هناك الكثير من الخيارات المتاحة. إحدى الطرق للتنقل في
|
||||
كل هذا هو استشارة **لوحات الصدارة**. اثنان من أكثر لوحات الصدارة شهرة هما [OpenLLM Leaderboard](https://huggingface.co/spaces/HuggingFaceH4/open_llm_leaderboard)
|
||||
و [LMSys Chatbot Arena Leaderboard](https://chat.lmsys.org/?leaderboard). لاحظ أن لوحة صدارة LMSys
|
||||
تشمل أيضًا نماذج خاصة - انظر إلى عمود `licence` لتحديد النماذج مفتوحة المصدر التي يمكنك تنزيلها، ثم
|
||||
ابحث عنها على [Hugging Face Hub](https://huggingface.co/models?pipeline_tag=text-generation&sort=trending).
|
||||
|
||||
### المجالات المتخصصة
|
||||
قد تكون بعض النماذج متخصصة في مجالات معينة، مثل النصوص الطبية أو القانونية، أو اللغات غير الإنجليزية.
|
||||
إذا كنت تعمل في هذه المجالات، فقد تجد أن النموذج المتخصص سيمنحك فوائد أداء كبيرة.
|
||||
لا تفترض ذلك تلقائيًا! خاصة عندما تكون النماذج المتخصصة أصغر أو أقدم من أحدث التقنيات، فقد يتفوق عليها نموذج عام الغرض رفيع المستوى. لحسن الحظ، بدأنا نرى
|
||||
[لوحات الصدارة المتخصصة في المجال](https://huggingface.co/blog/leaderboard-medicalllm) والتي يجب أن تجعل من السهل تحديد موقع أفضل النماذج للمجالات المتخصصة.
|
||||
|
||||
## ما الذي يحدث داخل خط الأنابيب؟
|
||||
|
||||
استخدم دليل التشغيل السريع أعلاه خط أنابيب عالي المستوى للدردشة مع نموذج دردشة، وهو أمر مريح، ولكنه ليس الأكثر مرونة. دعونا نتخذ نهجًا منخفض المستوى، لكي نرى كل خطوة من الخطوات التي تنطوي عليها الدردشة. دعونا نبدأ
|
||||
بعينة من التعليمات البرمجية، ثم نقوم بتفكيكها:
|
||||
|
||||
```python
|
||||
from transformers import AutoModelForCausalLM, AutoTokenizer
|
||||
import torch
|
||||
|
||||
# إعداد الإدخال كما هو الحال من قبل
|
||||
chat = [
|
||||
{"role": "system", "content": "You are a sassy, wise-cracking robot as imagined by Hollywood circa 1986."},
|
||||
{"role": "user", "content": "Hey, can you tell me any fun things to do in New York?"}
|
||||
]
|
||||
|
||||
# 1: تحميل النموذج والمحلل
|
||||
model = AutoModelForCausalLM.from_pretrained("meta-llama/Meta-Llama-3-8B-Instruct", device_map="auto", torch_dtype=torch.bfloat16)
|
||||
tokenizer = AutoTokenizer.from_pretrained("meta-llama/Meta-Llama-3-8B-Instruct")
|
||||
|
||||
# 2: تطبيق قالب الدردشة
|
||||
formatted_chat = tokenizer.apply_chat_template(chat, tokenize=False, add_generation_prompt=True)
|
||||
print("Formatted chat:\n", formatted_chat)
|
||||
|
||||
# 3: تحليل الدردشة (يمكن دمج هذه الخطوة مع الخطوة السابقة باستخدام tokenize=True)
|
||||
inputs = tokenizer(formatted_chat, return_tensors="pt", add_special_tokens=False)
|
||||
# نقل المدخلات المحللة إلى نفس الجهاز الموجود عليه النموذج (GPU/CPU)
|
||||
inputs = {key: tensor.to(model.device) for key, tensor in inputs.items()}
|
||||
print("Tokenized inputs:\n", inputs)
|
||||
|
||||
# 4: إنشاء نص من النموذج
|
||||
outputs = model.generate(**inputs, max_new_tokens=512, temperature=0.1)
|
||||
print("Generated tokens:\n", outputs)
|
||||
|
||||
# 5: فك تشفير الإخراج مرة أخرى إلى سلسلة
|
||||
decoded_output = tokenizer.decode(outputs[0][inputs['input_ids'].size(1):], skip_special_tokens=True)
|
||||
print("Decoded output:\n", decoded_output)
|
||||
```
|
||||
|
||||
هناك الكثير هنا، ويمكن أن تكون كل قطعة وثيقة خاصة بها! بدلاً من الدخول في الكثير من التفاصيل، سأغطي
|
||||
الأفكار العامة، وأترك التفاصيل للوثائق المرتبطة بها. الخطوات الرئيسية هي:
|
||||
1. يتم تحميل [النماذج](https://huggingface.co/learn/nlp-course/en/chapter2/3) و [المُجزّئات اللغوية](https://huggingface.co/learn/nlp-course/en/chapter2/4?fw=pt) من Hugging Face Hub.
|
||||
2. يتم تنسيق الدردشة باستخدام [قالب الدردشة](https://huggingface.co/docs/transformers/main/en/chat_templating) للمحلل
|
||||
3. يتم [تحليل](https://huggingface.co/learn/nlp-course/en/chapter2/4) الدردشة المنسقة باستخدام مُجزّئ اللغوي.
|
||||
4. نقوم [بتوليد](https://huggingface.co/docs/transformers/en/llm_tutorial) استجابة من النموذج.
|
||||
5. يتم فك تشفير الرموز التي ينتجها النموذج مرة أخرى إلى سلسلة
|
||||
|
||||
## الأداء والذاكرة والأجهزة
|
||||
|
||||
من المحتمل أنك تعرف الآن أن معظم مهام التعلم الآلي يتم تشغيلها على وحدات معالجة الرسومات (GPU). ومع ذلك، من الممكن تمامًا
|
||||
إنشاء نص من نموذج دردشة أو نموذج لغة على وحدة المعالجة المركزية (CPU)، على الرغم من أن ذلك أبطأ إلى حد ما. إذا كان بإمكانك وضع
|
||||
النموذج في ذاكرة وحدة معالجة الرسومات (GPU)، فهذا عادة ما يكون الخيار المفضل.
|
||||
|
||||
### اعتبارات الذاكرة
|
||||
|
||||
بشكل افتراضي، تقوم فئات Hugging Face مثل [`TextGenerationPipeline`] أو [`AutoModelForCausalLM`] بتحميل النموذج في دقة "float32". وهذا يعني أنه يحتاج إلى 4 بايتات (32 بت) لكل معلمة، لذا فإن نموذج "8B" بحجم 8 مليار معلمة سيحتاج إلى ~32 جيجابايت من الذاكرة. ومع ذلك، يمكن أن يكون هذا مضيعة للموارد! يتم تدريب معظم نماذج اللغة الحديثة في دقة "bfloat16"، والتي تستخدم فقط 2 بايت لكل معلمة. إذا كان عتادك يدعم ذلك (Nvidia 30xx/Axxx أو أحدث)، فيمكنك تحميل النموذج في دقة "bfloat16"، باستخدام معامل "torch_dtype" كما فعلنا أعلاه.
|
||||
|
||||
ومن الممكن أيضًا النزول إلى أقل من 16 بت باستخدام "التكميم"، وهي طريقة لضغط أوزان النموذج بطريقة تفقد بعض المعلومات. يسمح هذا بضغط كل معلمة إلى 8 بتات أو 4 بتات أو حتى أقل. لاحظ أنه، خاصة في 4 بتات، قد تتأثر جودة ناتج النموذج سلبًا، ولكن غالبًا ما يكون هذا مقايضة تستحق القيام بها لتناسب نموذج محادثة أكبر وأكثر قدرة في الذاكرة. دعنا كيف يمكننا تطبيق ذلك باستخدام مكتبة `bitsandbytes`:
|
||||
|
||||
```python
|
||||
from transformers import AutoModelForCausalLM, BitsAndBytesConfig
|
||||
|
||||
quantization_config = BitsAndBytesConfig(load_in_8bit=True) # يمكنك أيضًا تجربة load_in_4bit
|
||||
model = AutoModelForCausalLM.from_pretrained("meta-llama/Meta-Llama-3-8B-Instruct", device_map="auto", quantization_config=quantization_config)
|
||||
```
|
||||
|
||||
أو يمكننا القيام بنفس الشيء باستخدام واجهة برمجة التطبيقات "pipeline":
|
||||
|
||||
```python
|
||||
from transformers import pipeline, BitsAndBytesConfig
|
||||
|
||||
quantization_config = BitsAndBytesConfig(load_in_8bit=True) # يمكنك أيضًا تجربة load_in_4bit
|
||||
pipe = pipeline("text-generation", "meta-llama/Meta-Llama-3-8B-Instruct", device_map="auto", model_kwargs={"quantization_config": quantization_config})
|
||||
```
|
||||
|
||||
هناك عدة خيارات أخرى لكمية نماذج بخلاف `bitsandbytes` - يرجى الاطلاع على [دليل التكميم](./quantization) لمزيد من المعلومات.
|
||||
|
||||
### اعتبارات الأداء
|
||||
|
||||
<Tip>
|
||||
|
||||
للحصول على دليل أكثر شمولاً حول أداء نموذج اللغة والتحسين، راجع [تحسين استدلال LLM](./llm_optims).
|
||||
|
||||
</Tip>
|
||||
|
||||
|
||||
كقاعدة عامة، ستكون نماذج المحادثة الأكبر حجمًا أبطأ في توليد النصوص بالإضافة إلى احتياجها لذاكرة أكبرة. من الممكن أن تكون أكثر تحديدًا بشأن هذا: إن توليد النص من نموذج دردشة أمر غير عادي في أنه يخضع لقيود **سعة الذاكرة** بدلاً من قوة الحوسبة، لأن كل معلمة نشطة يجب قراءتها من الذاكرة لكل رمز ينشئه النموذج. وهذا يعني أن عدد الرموز في الثانية التي يمكنك توليدها من نموذج الدردشة يتناسب بشكل عام مع إجمالي حجم الذاكرة التي بوجد بها ا، مقسومًا على حجم النموذج.
|
||||
|
||||
في مثالنا السريع أعلاه، كان حجم نموذجنا حوالي 16 جيجابايت عند تحميله في دقة "bfloat16". وهذا يعني أنه يجب قراءة 16 جيجابايت من الذاكرة لكل رمز ينشئه النموذج. يمكن أن يتراوح إجمالي سعة الذاكرة من 20-100 جيجابايت/ثانية لمعالجات المستهلكين إلى 200-900 جيجابايت/ثانية لمعالجات الرسومات للمستهلكين، ومعالجات Intel Xeon أو AMD Threadripper/Epyc أو Apple Silicon المتخصصةة، وأخيرًا يصل إلى 2-3 تيرابايت/ثانية لمعالجات مراكز البيانات مثل Nvidia A100 أو H100. يجب أن يعطيك هذا فكرة جيدة عن سرعة التوليد التي يمكنك توقعها من هذه الأنواع المختلفة من الأجهزة.
|
||||
|
||||
لذلك، إذا كنت تريد تحسين سرعة توليد النص، فإن الحل الأسهل هو إما تقليل حجم النموذج في الذاكرة (عادةً عن طريق التكميم)، أو الحصول على عتاد بسرعة أكبر في الذاكرة. بالنسبة للمستخدمين المتقدمين، هناك عدة تقنيات أخرى للتغلب على هذه القيود. الأكثر شيوعًا هي المتغيرات على [التوليد بمساعدة](https://huggingface.co/blog/assisted-generation)، المعروف أيضًا باسم "العينات التخمينية (speculative sampling)". تحاول هذه التقنيات تخمين عدة رموز مستقبلية في وقت واحد، غالبًا باستخدام نموذج "مسودة (draft model)" أصغر، ثم تأكيد هذه التوليدات باستخدام نموذج الدردشة. إذا تم التحقق من صحة التخمينات بواسطة نموذج الدردشة، فيمكن إنشاء أكثر من رمز واحد لكل تمرير للأمام، مما يخفف بشكل كبير من القيود المتعلقة بالسعة ويحسن سرعة التوليد.
|
||||
|
||||
أخيرًا، يجب أن نلاحظ أيضًا تأثير نماذج "مزيج الخبراء" "Mixture of Experts" (MoE) هنا. العديد من نماذج المحادثة الشهيرة، مثل Mixtral وQwen-MoE وDBRX، هي نماذج MoE. في هذه النماذج، لا تكون كل معلمة نشطة لكل رمز يتم إنشاؤه. ونتيجة لذلك، فإن نماذج MoE لديها عمومًا متطلبات ذاكرة أقل بكثير، على الرغم من أن حجمها الإجمالي يمكن أن يكون كبيرًا جدًا. لذلك يمكن أن تكون أسرع عدة مرات من نموذج "كثيف" عادي بنفس الحجم. ومع ذلك، فإن التقنيات مثل التوليد المساعد غير فعالة بشكل عام لهذه النماذج لأن المزيد من المعلمات ستصبح نشطة مع كل رمز جديد يتم التكهن به، والذي سيبطل فوائد السعة والسرعة التي توفرها بنية MoE.
|
||||
@ -1,446 +0,0 @@
|
||||
# قاموس المصطلحات
|
||||
|
||||
يحدد هذا المسرد مصطلحات التعلم الآلي العامة و 🤗 Transformers لمساعدتك على فهم الوثائق بشكل أفضل.
|
||||
|
||||
## A
|
||||
|
||||
### قناع الانتباه (Attention Mask)
|
||||
|
||||
قناع الانتباه هو مُدخل اختياري يستخدم عند تجميع التسلسلات معًا
|
||||
|
||||
<Youtube id="M6adb1j2jPI"/>
|
||||
|
||||
يشير هذا المُدخل إلى النموذج أى الرموز المميزة (tokens) التي يجب الانتباه إليها، وأيها لا ينبغي ذلك.
|
||||
|
||||
على سبيل المثال، تأمّل هذين التسلسُلين :
|
||||
|
||||
```python
|
||||
>>> from transformers import BertTokenizer
|
||||
|
||||
>>> tokenizer = BertTokenizer.from_pretrained("google-bert/bert-base-cased")
|
||||
|
||||
>>> sequence_a = "This is a short sequence."
|
||||
>>> sequence_b = "This is a rather long sequence. It is at least longer than sequence A."
|
||||
|
||||
>>> encoded_sequence_a = tokenizer(sequence_a)["input_ids"]
|
||||
>>> encoded_sequence_b = tokenizer(sequence_b)["input_ids"]
|
||||
```
|
||||
|
||||
لدى الإصدارات المشفرة أطوال مختلفة:
|
||||
|
||||
```python
|
||||
>>> len(encoded_sequence_a), len(encoded_sequence_b)
|
||||
(8, 19)
|
||||
```
|
||||
|
||||
لذلك، لا يمكننا وضعها معًا في نفس المصفوفة كما هي. يجب إضافة حشو إلى التسلسل الأول حتى يصل إلى طول التسلسل الثاني، أو يجب تقليص الثاني إلى طول الأول.
|
||||
|
||||
في الحالة الأولى، يتم تمديد قائمة المعرفات بواسطة مؤشرات الحشو. يمكننا تمرير قائمة إلى المحلل اللغوي وطلب منه إضافة الحشو بهذه الطريقة:
|
||||
|
||||
```python
|
||||
>>> padded_sequences = tokenizer([sequence_a, sequence_b], padding=True)
|
||||
```
|
||||
|
||||
يمكننا أن نرى أنه تمت إضافة اصفار على يمين الجملة الأولى لجعلها بنفس طول الجملة الثانية:
|
||||
|
||||
```python
|
||||
>>> padded_sequences["input_ids"]
|
||||
[[101, 1188, 1110, 170, 1603, 4954, 119, 102, 0, 0, 0, 0, 0, 0, 0, 0, 0, 0, 0], [101, 1188, 1110, 170, 1897, 1263, 4954, 119, 1135, 1110, 1120, 1655, 2039, 1190, 1103, 4954, 138, 119, 102]]
|
||||
```
|
||||
|
||||
يمكن بعد ذلك تحويل هذا إلى مصفوفة في PyTorch أو TensorFlow. قناع الانتباه هو مصفوفة ثنائية تشير إلى
|
||||
موضع المؤشرات المحشوه بحيث لا ينتبه إليها النموذج. بالنسبة إلى [`BertTokenizer`]`1` يشير إلى
|
||||
قيمة يجب الانتباه إليها، في حين يشير `0` إلى قيمة مبطنة. يُمكن إيجاد قناع الانتباه في القاموس الذي يُعيده مُجزِّئ النصوص (tokenizer) تحت المفتاح "attention_mask".
|
||||
```python
|
||||
>>> padded_sequences["attention_mask"]
|
||||
[[1, 1, 1, 1, 1, 1, 1, 1, 0, 0, 0, 0, 0, 0, 0, 0, 0, 0, 0], [1, 1, 1, 1, 1, 1, 1, 1, 1, 1, 1, 1, 1, 1, 1, 1, 1, 1, 1]]
|
||||
```
|
||||
|
||||
### نماذج الترميز التلقائي (autoencoding models)
|
||||
|
||||
راجع [نماذج الترميز](#encoder-models) و [نمذجة اللغة المقنعة](#masked-language-modeling-mlm)
|
||||
|
||||
### النماذج ذاتية الانحدار (Autoregressive Models)
|
||||
|
||||
راجع [نمذجة اللغة السببية](#causal-language-modeling) و [نماذج فك التشفير](#decoder-models)
|
||||
|
||||
## B
|
||||
|
||||
### العمود الفقري (backbone)
|
||||
|
||||
يُمثل العمود الفقري الشبكة العصبونية (الترميزات والطبقات) المسؤولة عن إخراج الحالات الخفية أو المُميزات الأولية. عادة ما يكون متصلاً بـ [رأس](#head) يستقبل المُميزات كمدخلات لإجراء تنبؤ. على سبيل المثال، يُعد النموذج [`ViTModel`] عمودًا فقريًا دون رأس مُحدد مُرفق به. يمكن أيضًا استخدام `ViTModel` كعمود فقري في نماذج أخرى, مثل [DPT](model_doc/dpt).
|
||||
|
||||
## C
|
||||
|
||||
### نمذجة اللغة السببية (أو التنبؤية) causal language modeling
|
||||
|
||||
مهمة ما قبل التدريب يقوم فيها النموذج بقراءة النصوص بالترتيب ويتنبأ بالكلمة التالية. يتم ذلك عادةً من خلال قراءة الجملة كاملةً، ولكن مع استخدام قناع داخل النموذج لإخفاء الرموز المميزة اللاحقة في خطوة زمنية معينة.
|
||||
|
||||
|
||||
|
||||
### قناة(channel)
|
||||
|
||||
تتكون الصور الملونة من مزيج من القيم في ثلاث قنوات لونية: الأحمر والأخضر والأزرق (RGB) بينما تحتوي صور ذات التدرج رمادي على قناة واحدة فقط. في مكتبة 🤗 Transformers، يمكن أن تكون القناة اللونية البُعد الأول أو الأخير في مُصفوفة الصورة: [`n_channels`، `height`، `width`] أو [`height`، `width`، `n_channels`].
|
||||
|
||||
### التصنيف الزمني التوصيلي connectionist temporal classification (CTC)
|
||||
|
||||
خوارزمية تسمح للنموذج بالتعلم دون معرفة كيفية محاذاة المدخلات مع المخرجات بدقة؛ يحسب CTC توزيع جميع المخرجات المحتملة لمدخلات مُحددة ويختار المخرج الأكثر احتمالًا. تُستخدم CTC بشكل شائع في مهام التعرف على الكلام نظرًا لأن الكلام المنطوق لا يتوافق دائمًا بشكل مُباشر مع النص المكتوب، لأسباب مختلفة مثل معدلات الكلام المختلفة للمتكلم.
|
||||
|
||||
### الالتفاف (Convolution)
|
||||
|
||||
نوع من الطبقات في شبكة عصبية، حيث تُضرب مصفوفة الإدخال عُنصرًا بُعنصر بمصفوفة أصغر تُسمى (النواة أو المرشح) ويتم جمع القيم في مصفوفة جديدة. يُعرف هذا باسم عملية الالتفاف التي يتم تكرارها عبر مصفوفة الإدخال بأكملها. تُطبق كل عملية التفاف على جزء مُختلف من مصفوفة الإدخال. تُستخدم الشبكات العصبية الالتفافية (CNNs) بشكل شائع في رؤية الحاسوب.
|
||||
|
||||
## D
|
||||
|
||||
### التوازي على مستوى البيانات (DataParallel - DP)
|
||||
|
||||
هي تقنية تُستخدم لتدريب النماذج على عدة وحدات معالجة رسومات (GPUs)، حيث يتم نسخ نفس إعداد التدريب عدة مرات، بحيث تتلقى كل نسخة شريحة مختلفة من البيانات يتم تنفيذ المعالجة بالتوازي ويتم مزامنة جميع الإعدادات في نهاية كل خطوة تدريب.
|
||||
|
||||
تعرف على المزيد حول كيفية عمل DataParallel [هنا](perf_train_gpu_many#dataparallel-vs-distributeddataparallel).
|
||||
|
||||
### معرفات مدخلات وحدة فك التشفير (decoder input IDs)
|
||||
|
||||
هذا المدخل خاص بنماذج الترميز وفك التشفير، ويحتوي على معرفات الإدخال التي سيتم تغذيتها إلى وحدة فك التشفير.
|
||||
يجب استخدام هذه المدخلات لمهام التسلسل إلى التسلسل، مثل الترجمة أو التلخيص، وعادة ما يتم بناؤها بطريقة محددة لكل نموذج.
|
||||
|
||||
تقوم معظم نماذج الترميز وفك التشفير (BART، T5) بإنشاء معرفات `decoder_input_ids` الخاصة بها من `labels`. في مثل هذه النماذج،
|
||||
يعد تمرير `labels` هو الطريقة المفضلة للتعامل مع التدريب.
|
||||
|
||||
يرجى التحقق من وثائق كل نموذج لمعرفة كيفية تعاملها مع معرفات الإدخال هذه للتدريب على التسلسل إلى التسلسل.
|
||||
|
||||
### نماذج فك التشفير (decoder models)
|
||||
|
||||
يُشار إليها أيضًا باسم نماذج التنبؤية الذاتية، وتنطوي نماذج فك التشفير على مهمة ما قبل التدريب (تسمى نمذجة اللغة السببية) حيث يقرأ النموذج النصوص بالترتيب ويتعين عليه التنبؤ بالكلمة التالية. يتم ذلك عادةً عن طريق
|
||||
قراءة الجملة بأكملها مع قناع لإخفاء الرموز المميزة المستقبلية في خطوة زمنية معينة.
|
||||
|
||||
<Youtube id="d_ixlCubqQw"/>
|
||||
### التعلم العميق deep learning (DL)
|
||||
خوارزميات التعلم الآلي التي تستخدم الشبكات العصبية متعددة الطبقات.
|
||||
|
||||
## E
|
||||
|
||||
### نماذج الترميز (encoder models)
|
||||
|
||||
تُعرف أيضًا باسم نماذج الترميز التلقائي، وتأخذ نماذج الترميز إدخالًا (مثل النص أو الصور) وتحويلها إلى تمثيل رقمي مكثف يُطلق عليه الترميز. غالبًا ما يتم تدريب نماذج الترميز مسبقًا باستخدام تقنيات مثل [نمذجة اللغة المقنعة](#masked-language-modeling-mlm)، والتي تقوم بإخفاء أجزاء من تسلسل الإدخال وإجبار النموذج على إنشاء تمثيلات أكثر دلالة (فائدة ووضوحاً).
|
||||
|
||||
<Youtube id="H39Z_720T5s"/>
|
||||
|
||||
## F
|
||||
### استخراج الميزات (feature extraction)
|
||||
|
||||
عملية اختيار وتحويل البيانات الأولية إلى مجموعة من الميزات الأكثر إفادة وفائدة لخوارزميات التعلم الآلي. بعض الأمثلة على استخراج الميزات تشمل تحويل النص الأولي/الخام إلى ترميزات الكلمات واستخراج ميزات مهمة مثل الحواف أو الأشكال من بيانات الصور/الفيديو.
|
||||
|
||||
### تجزئة التغذية الأمامية (feed forward chunking)
|
||||
|
||||
في كل وحدة الانتباه الباقية في المحولات، تلي طبقة الاهتمام الانتباه عادة طبقتان للتغذية الأمامية.
|
||||
حجم تضمين الطبقة الأمامية الوسيطة أكبر عادة من حجم المخفي للنموذج (على سبيل المثال، لـ
|
||||
`google-bert/bert-base-uncased`).
|
||||
بالنسبة لإدخال بحجم `[batch_size, sequence_length]`، يمكن أن تمثل الذاكرة المطلوبة لتخزين التضمينات الأمامية الوسيطة `[batch_size، sequence_length, config.intermediate_size]` جزءًا كبيرًا من استخدام الذاكرة. لاحظ مؤلفو (https://arxiv.org/abs/2001.04451)[Reformer: The Efficient Transformer] أنه نظرًا لأن الحساب مستقل عن بعد `sequence_length`، فإنه من المكافئ رياضيًا حساب تضمينات الإخراج الأمامية `[batch_size، config.hidden_size]_0, ..., [batch_size، `config_size]_n
|
||||
فردياً والتوصيل بها لاحقًا إلى `[batch_size, sequence_length, config.hidden_size]` مع `n = sequence_length`، والذي يتداول زيادة وقت الحساب مقابل تقليل استخدام الذاكرة، ولكنه ينتج عنه نتيجة مكافئة رياضيا.
|
||||
|
||||
بالنسبة للنماذج التي تستخدم الدالة `[apply_chunking_to_forward]`، يحدد `chunk_size` عدد التضمينات يتم حساب الإخراج بالتوازي وبالتالي يحدد المقايضة بين حجم الذاكرة والتعقيد الوقت. إذا تم تعيين `chunk_size` إلى `0`، فلن يتم إجراء تجزئة التغذية الأمامية.
|
||||
|
||||
|
||||
### النماذج المضبوطة (finetuned models)
|
||||
|
||||
الضبط الدقيق هو شكل من أشكال نقل التعلم، يتضمن أخذ نموذج مُدرّب مسبقًا، وتجميد أوزانه، واستبدال طبقة الإخراج برأس نموذج مُضاف حديثًا. يتم تدريب رأس النموذج على مجموعة البيانات المستهدفة.
|
||||
|
||||
راجع البرنامج التعليمي [Fine-tune a pretrained model](https://huggingface.co/docs/transformers/training) لمزيد من التفاصيل، وتعرف على كيفية ضبط النماذج باستخدام 🤗 Transformers.
|
||||
|
||||
## H
|
||||
|
||||
### رأس النموذج (head)
|
||||
|
||||
يشير رأس النموذج إلى الطبقة الأخيرة من الشبكة العصبية التي تقبل الحالات المخفية الخام/الأولية وتُسقطها على بُعد مختلف. يوجد رأس نموذج مختلف لكل مهمة.
|
||||
|
||||
* [`GPT2ForSequenceClassification`] هو رأس تصنيف تسلسل - طبقة خطية - أعلى نموذج [`GPT2Model`] الأساسي.
|
||||
* [`ViTForImageClassification`] هو رأس تصنيف صورة - طبقة خطية أعلى حالة مخفية نهائية للرمز `CLS` - أعلى نموذج [`ViTModel`] الأساسي.
|
||||
* [`Wav2Vec2ForCTC`] هو رأس نمذجة اللغة مع [CTC](#connectionist-temporal-classification-ctc) أعلى نموذج [`Wav2Vec2Model`] الأساسي.
|
||||
|
||||
## I
|
||||
|
||||
### رقعة الصور (image patch)
|
||||
|
||||
"رقعة الصورة" في نماذج المحولات البصرية، تُقسم الصورة إلى أجزاء أصغر تسمى "رقعات". يتم تمثيل كل رقعة بشكل رقمي (تحويلها إلى مجموعة من الأرقام) ثم تُعالج كسلسلة من البيانات. يمكنك العثور على حجم الرُقعة patch_size - أو دقتها - في إعدادات النموذج.
|
||||
|
||||
### الاستدلال (Inference)
|
||||
|
||||
الاستدلال هو عملية تقييم نموذج على بيانات جديدة بعد اكتمال التدريب. راجع البرنامج التعليمي [Pipeline for inference](https://huggingface.co/docs/transformers/pipeline_tutorial) لمعرفة كيفية إجراء الاستدلال باستخدام 🤗 Transformers.
|
||||
|
||||
### معرفات الإدخال (input IDs)
|
||||
|
||||
معرفات الإدخال هي غالبًا المعلمات المطلوبة الوحيدة التي يجب تمريرها إلى النموذج كإدخال. هذه المعرفات عبارة عن أرقام تمثل كل كلمة أو رمز في الجملة التي نريد أن يفهمها النموذج. بمعنى آخر، هي طريقة لترجمة الكلمات إلى أرقام يتم استخدامها كإدخال بواسطة النموذج.
|
||||
|
||||
<Youtube id="VFp38yj8h3A"/>
|
||||
|
||||
يعمل كل محلل لغوي بشكل مختلف ولكن الآلية الأساسية تبقى كما هي. إليك مثال باستخدام محلل BERT اللغوي، والذي يعد محلل لغوي [WordPiece](https://arxiv.org/pdf/1609.08144.pdf):
|
||||
|
||||
```python
|
||||
>>> from transformers import BertTokenizer
|
||||
|
||||
>>> tokenizer = BertTokenizer.from_pretrained("google-bert/bert-base-cased")
|
||||
|
||||
>>> sequence = "A Titan RTX has 24GB of VRAM"
|
||||
```
|
||||
|
||||
يتولى المحلل اللغوي مهمة تقسيم التسلسل إلى رموز مميزة متوفرة في قاموس المحلل اللغوي.
|
||||
|
||||
```python
|
||||
>>> tokenized_sequence = tokenizer.tokenize(sequence)
|
||||
```
|
||||
|
||||
االرموز إما كلمات أو أجزاء كلمات. هنا على سبيل المثال، لم تكن كلمة "VRAM" موجودة في مفردات النموذج، لذلك تم تقسيمها إلى "V" و "RA" و "M". للإشارة إلى أن هذه الرموز ليست كلمات منفصلة ولكنها أجزاء من نفس الكلمة، تمت إضافة بادئة مزدوجة (#) إلى "RA" و "M":
|
||||
```python
|
||||
>>> print(tokenized_sequence)
|
||||
['A', 'Titan', 'R', '##T', '##X', 'has', '24', '##GB', 'of', 'V', '##RA', '##M']
|
||||
```
|
||||
```python
|
||||
>>> print(tokenized_sequence)
|
||||
['A'، 'Titan'، 'R'، '##T'، '##X'، 'has'، '24'، '##GB'، 'of'، 'V'، '##RA'، '##M']
|
||||
```
|
||||
|
||||
يمكن بعد ذلك تحويل هذه الرموز إلى مُعرفات يفهمها النموذج. يمكن القيام بذلك عن طريق تغذية الجملة مباشرةً إلى مُجزّئ الرموز، والذي يستفيد من تنفيذ 🤗 Tokenizers بلغة Rust للحصول على أعلى أداء.
|
||||
|
||||
```python
|
||||
>>> inputs = tokenizer(sequence)
|
||||
```
|
||||
|
||||
يقوم المحلل اللغوي بإرجاع قاموس يحتوي على جميع المعلومات التي يحتاجها النموذج للعمل بشكل صحيح. وتوجد مؤشرات الرموز المميزة تحت مفتاح `input_ids`:
|
||||
|
||||
```python
|
||||
>>> encoded_sequence = inputs["input_ids"]
|
||||
>>> print(encoded_sequence)
|
||||
[101، 138، 18696، 155، 1942، 3190، 1144، 1572، 13745، 1104، 159، 9664، 2107، 102]
|
||||
```
|
||||
|
||||
لاحظ أن المحلل اللغوي يضيف تلقائيًا "رموزًا خاصة" (إذا كان النموذج المرتبط يعتمد عليها) وهي معرفات خاصة
|
||||
يستخدمها النموذج في بعض الأحيان.
|
||||
|
||||
إذا قمنا بفك تشفير التسلسل السابق،
|
||||
|
||||
```python
|
||||
>>> decoded_sequence = tokenizer.decode(encoded_sequence)
|
||||
```
|
||||
|
||||
سنرى
|
||||
|
||||
```python
|
||||
>>> print(decoded_sequence)
|
||||
[CLS] A Titan RTX has 24GB of VRAM [SEP]
|
||||
```
|
||||
|
||||
لأن هذه هي الطريقة التي يتوقع بها نموذج [`BertModel`] إدخالاته.
|
||||
|
||||
## L
|
||||
|
||||
### االملصقات (Labels)
|
||||
|
||||
هي معامل اختياري يمكن إدخاله في النموذج لحساب الخسارة بنفسه.
|
||||
نماذج تصنيف التسلسل: ([BertForSequenceClassification]) يتوقع النموذج مصفوفة ذات بعد (batch_size) حيث تتوافق كل قيمة من المجموعة مع الملصق المتوقع للتسلسل بأكمله.
|
||||
نماذج تصنيف الرمز: ([BertForTokenClassification]) يتوقع النموذج مصفوفة ذات بعد (batch_size, seq_length) حيث تتوافق كل قيمة مع الملصق المتوقع لكل رمز فردي.
|
||||
نماذج النمذجة اللغوية المقنعة:([BertForMaskedLM]) يتوقع النموذج مصفوفة ذات بعد (batch_size, seq_length) حيث تتوافق كل قيمة مع الملصق المتوقع لكل رمز فردي: تكون الملصقات هي معرف رمز الكلمة المقنعة، والقيم الأخرى يتم تجاهلها (عادةً -100).
|
||||
مهام التسلسل إلى التسلسل: ([BartForConditionalGeneration], [MBartForConditionalGeneration]) يتوقع النموذج مصفوفة ذات بعد (batch_size, tgt_seq_length) حيث تتوافق كل قيمة مع التسلسل الهدف المرتبط بكل تسلسل مدخل. أثناء التدريب، سيقوم كل من BART و T5 بإنشاء decoder_input_ids و decoder attention masks داخليًا. عادةً لا يلزم توفيرها. هذا لا ينطبق على النماذج التي تستخدم إطار العمل Encoder-Decoder.
|
||||
نماذج تصنيف الصور: ([ViTForImageClassification]) يتوقع النموذج مصفوفة ذات بعد (batch_size) حيث تتوافق كل قيمة من المجموعة مع الملصق المتوقع لكل صورة فردية.
|
||||
نماذج التقسيم الدلالي: ([SegformerForSemanticSegmentation]) يتوقع النموذج مصفوفة ذات بعد (batch_size, height, width) حيث تتوافق كل قيمة من المجموعة مع الملصق المتوقع لكل بكسل فردي.
|
||||
نماذج اكتشاف الأجسام: ([DetrForObjectDetection]) يتوقع النموذج قائمة من القواميس تحتوي على مفتاح class_labels و boxes حيث تتوافق كل قيمة من المجموعة مع الملصق المتوقع وعدد المربعات المحيطة بكل صورة فردية.
|
||||
نماذج التعرف التلقائي على الكلام: ([Wav2Vec2ForCTC]) يتوقع النموذج مصفوفة ذات بعد (batch_size, target_length) حيث تتوافق كل قيمة مع الملصق المتوقع لكل رمز فردي.
|
||||
|
||||
<Tip>
|
||||
|
||||
قد تختلف تسميات كل نموذج، لذا تأكد دائمًا من مراجعة وثائق كل نموذج للحصول على معلومات حول التسميات الخاصة به.
|
||||
|
||||
</Tip>
|
||||
لا تقبل النماذج الأساسية ([`BertModel`]) الملصقات ، لأنها نماذج المحول الأساسية، والتي تقوم ببساطة بإخراج الميزات.
|
||||
|
||||
### نماذج اللغة الكبيرة large language models (LLM)
|
||||
|
||||
مصطلح عام يشير إلى نماذج اللغة المحولة (GPT-3 و BLOOM و OPT) التي تم تدريبها على كمية كبيرة من البيانات. تميل هذه النماذج أيضًا إلى وجود عدد كبير من المعلمات القابلة للتعلم (على سبيل المثال، 175 مليار لمعلمة GPT-3).
|
||||
|
||||
## M
|
||||
|
||||
### نمذجة اللغة المقنعة masked language modeling (MLM)
|
||||
|
||||
مهمة تدريب مسبق حيث يرى النموذج نسخة تالفة من النصوص، وعادة ما يتم ذلك عن طريق حجب بعض الرموز بشكل عشوائي، ويتعين على النموذج التنبؤ بالنص الأصلي.
|
||||
|
||||
### متعدد الوسائط (multimodal)
|
||||
|
||||
مهمة تجمع بين النصوص مع نوع آخر من المدخلات (على سبيل المثال، الصور).
|
||||
|
||||
## N
|
||||
|
||||
### توليد اللغة الطبيعية Natural language generation (NLG)
|
||||
|
||||
جميع المهام المتعلقة بتوليد النص (على سبيل المثال، [اكتب باستخدام المحولات](https://transformer.huggingface.co/)، والترجمة).
|
||||
|
||||
### معالجة اللغة الطبيعية Natural language processing (NLP)
|
||||
|
||||
طريقة عامة للقول "التعامل مع النصوص".
|
||||
|
||||
### فهم اللغة الطبيعية Natural language understanding (NLU)
|
||||
|
||||
جميع المهام المتعلقة بفهم ما هو موجود في نص (على سبيل المثال تصنيف النص بأكمله، أو الكلمات الفردية).
|
||||
|
||||
## P
|
||||
|
||||
### خط الأنابيب (pipeline)
|
||||
|
||||
في مكتبة Transformers، يُشير مصطلح "خط الأنابيب" إلى سلسلة من الخطوات التي يتم تنفيذها بترتيب محدد لمعالجة البيانات وتحويلها وإرجاع تنبؤ من نموذج. بعض المراحل الشائعة في خط الأنابيب قد تشمل معالجة البيانات الأولية، واستخراج الميزات، والتوحيد.
|
||||
|
||||
للحصول على مزيد من التفاصيل، راجع [خطوط الأنابيب للاستدلال](https://huggingface.co/docs/transformers/pipeline_tutorial).
|
||||
|
||||
### التوازي على مستوى خط الأنابيب (PipelineParallel)
|
||||
|
||||
تقنية توازي يتم فيها تقسيم النموذج رأسياً (على مستوى الطبقة) عبر وحدات معالجة الرسومات (GPU) متعددة، بحيث توجد طبقة واحدة أو عدة طبقات من النموذج على وحدة معالجة الرسومات (GPU) واحدة فقط. تقوم كل وحدة معالجة رسومات (GPU) بمعالجة مراحل مختلفة من خط الأنابيب بالتوازي والعمل على جزء صغير من الدفعة. تعرف على المزيد حول كيفية عمل PipelineParallel [هنا](perf_train_gpu_many#from-naive-model-parallelism-to-pipeline-parallelism).
|
||||
|
||||
### قيم البكسل (pixel values)
|
||||
|
||||
مصفوفة من التمثيلات الرقمية لصورة يتم تمريرها إلى نموذج. تأخذ قيم البكسل شكل [`batch_size`، `num_channels`، `height`، `width`]، ويتم إنشاؤها من معالج الصور.
|
||||
|
||||
### التجميع (Pooling)
|
||||
|
||||
هي عملية تقوم بتقليص مصفوفة إلى مصفوفة أصغر، إما عن طريق أخذ القيمة القصوى أو المتوسط الحسابي للأبعاد التي يتم تجميعها. توجد طبقات التجميع بشكل شائع بين الطبقات التلافيفية convolutional layers لتقليل حجم تمثيل الميزات.
|
||||
|
||||
### معرفات الموضع (position IDs)
|
||||
|
||||
على عكس الشبكات العصبية المتكررة (RNNs) التي تتضمن موضع كل رمز (token) ضمن بنيتها، لا تدرك المحولات موضع كل رمز. لذلك، تستخدم معرفات الموضع (`position_ids`) من قبل النموذج لتحديد موضع كل رمز في قائمة الرموز.
|
||||
|
||||
إنها معلمة اختيارية. إذا لم يتم تمرير أي `position_ids` إلى النموذج، يتم إنشاء المعرفات تلقائيًا كترميزات موضعية مطلقة.
|
||||
|
||||
يتم اختيار الترميزات الموضعية المطلقة في النطاق `[0، config.max_position_embeddings - 1]`. تستخدم بعض النماذج أنواعًا أخرى من الترميزات الموضعية، مثل الترميزات الموضعية الجيبية أو الترميزات الموضعية النسبية.
|
||||
|
||||
### ما قبل المعالجة (preprocessing)
|
||||
|
||||
مهمة إعداد البيانات الخام بتنسيق يمكن أن تستهلكه نماذج التعلم الآلي بسهولة. على سبيل المثال، عادةً ما تتم معالجة النص مسبقًا عن طريق التمييز. للحصول على فكرة أفضل عن كيفية ظهور المعالجة المسبقة لأنواع الإدخال الأخرى، راجع البرنامج التعليمي [Preprocess](https://huggingface.co/docs/transformers/preprocessing).
|
||||
|
||||
### النموذج المسبق التدريب (pretrained model)
|
||||
|
||||
نموذج تم تدريبه مسبقًا على بعض البيانات (على سبيل المثال، كل Wikipedia). تنطوي طرق التدريب المسبق على هدف ذاتي الإشراف، والذي يمكن أن يكون قراءة النص ومحاولة التنبؤ بالكلمة التالية ( راجع (causal-language-modeling#)[نمذجة اللغة السببية] ) أو قناع بعض الكلمات ومحاولة التنبؤ بها ( راجع (masked-language#)[نمذجة اللغة المقنعة]- عرض MLM).
|
||||
|
||||
لدى نماذج الكلام والرؤية أهدافها التدريبية المسبقة الخاصة. على سبيل المثال، Wav2Vec2 هو نموذج كلام تم تدريبه مسبقًا على مهمة تباينية تتطلب من النموذج تحديد تمثيل الكلام "الحقيقي" من مجموعة من تمثيلات الكلام "الخاطئة". من ناحية أخرى، BEiT هو نموذج رؤية تم تدريبه مسبقًا على مهمة نمذجة صورة مقنعة تقوم بقناع بعض رقع الصورة وتتطلب من النموذج التنبؤ بالرقع المقنعة (مشابهة لهدف نمذجة اللغة المقيدة).
|
||||
|
||||
## R
|
||||
|
||||
### شبكة عصبية متكررة (RNN)
|
||||
|
||||
هي نوع من النماذج التي تستخدم حلقة متكررة فوق طبقة معينة لمعالجة النصوص.
|
||||
|
||||
### التعلم التمثيلي (representation learning)
|
||||
|
||||
هو فرع من فروع تعلم الآلة يركز على تعلم تمثيلات ذات معنى للبيانات الخام. بعض الأمثلة على تقنيات التعلم التمثيلي تشمل تضمين الكلمات، والمشفرات ذاتية، وشبكات التنافس التوليدية(GANs).
|
||||
|
||||
## S
|
||||
|
||||
### معدل العينات (sampling rate)
|
||||
|
||||
قياس، بالهرتز، لعدد العينات (إشارة الصوت) المأخوذة في الثانية. ينتج معدل العينات عن تمييز إشارة مستمرة مثل الكلام.
|
||||
|
||||
### الانتباه الذاتي (Self-Attention)
|
||||
|
||||
هو آلية تتيح لكل عنصر في المدخل أن يحدد أي العناصر الأخرى في نفس المدخل يجب أن ينتبه إليها.
|
||||
|
||||
### التعلم الذاتي الخاضع للإشراف (supervised learning)
|
||||
|
||||
فئة من تقنيات التعلم الآلي التي يقوم فيها النموذج بإنشاء هدفه التعليمي الخاص من البيانات غير الموسومة. يختلف عن [التعلم غير الخاضع للإشراف](#unsupervised-learning) و [التعلم الخاضع للإشراف](#supervised-learning) في أن عملية التعلم خاضعة للإشراف، ولكن ليس صراحة من المستخدم.
|
||||
|
||||
مثال واحد على التعلم الذاتي الخاضع للإشراف هو [نمذجة اللغة المقيدة](#masked-language- عرض MLM)، حيث يتم تمرير جمل للنموذج مع إزالة نسبة من رموزه ويتعلم التنبؤ بالرموز المفقودة.
|
||||
|
||||
### التعلم شبه الخاضع للإشراف (semi-supervised learning)
|
||||
|
||||
فئة واسعة من تقنيات تدريب التعلم الآلي التي تستفيد من كمية صغيرة من البيانات الموسومة مع كمية أكبر من البيانات غير الموسومة لتحسين دقة النموذج، على عكس [التعلم الخاضع للإشراف](#supervised-learning) و [التعلم غير الخاضع للإشراف](#unsupervised-learning).
|
||||
|
||||
مثال على نهج التعلم شبه الخاضع للإشراف هو "التدريب الذاتي"، حيث يتم تدريب نموذج على بيانات موسومة، ثم يستخدم لتقديم تنبؤات حول البيانات غير الموسومة. يتم إضافة الجزء من البيانات غير الموسومة التي يتنبأ بها النموذج بأكبر قدر من الثقة إلى مجموعة البيانات الموسومة ويتم استخدامها لإعادة تدريب النموذج.
|
||||
|
||||
### تسلسل إلى تسلسل (seq2seq)
|
||||
|
||||
نماذج تولد تسلسلًا جديدًا من إدخال، مثل نماذج الترجمة، أو نماذج التلخيص (مثل [Bart](model_doc/bart) أو [T5](model_doc/t5)).
|
||||
|
||||
### Sharded DDP
|
||||
|
||||
اسم آخر لمفهوم [Zero Redundancy Optimizer](#zero-redundancy-optimizer-zero) الأساسي كما هو مستخدم من قبل العديد من التطبيقات الأخرى لـ Zero.
|
||||
|
||||
### الخطوة (Stride)
|
||||
|
||||
في العمليات التلافيفية أو التجميعية، تشير الخطوة إلى المسافة التي يتحرك بها النواة (kernel) فوق المصفوفة. خطوة تساوي 1 تعني أن النواة تتحرك بكسل واحد في كل مرة.
|
||||
|
||||
### التعلم الخاضع للإشراف (supervised learning)
|
||||
|
||||
هو نوع من تدريب النماذج التي تستخدم بيانات مُعلَّمة بشكل مباشر لتصحيح أداء النموذج وتوجيهه. يتم تغذية البيانات إلى النموذج قيد التدريب، ويتم مقارنة تنبؤاته بالنتائج الصحيحة المعروفة. يقوم النموذج بتعديل أوزانه بناءً على مدى خطأ تنبؤاته، وتتكرر هذه العملية لتحسين أداء النموذج.
|
||||
|
||||
## T
|
||||
|
||||
### توازي Tensor (TP)
|
||||
|
||||
تقنية توازي لتدريب وحدات معالجة الرسومات (GPU) متعددة يتم فيها تقسيم المصفوفة إلى عدة أجزاء، لذا بدلاً من وجود المصفوفة بأكملها على وحدة معالجة الرسومات (GPU) واحدة، توجد كل شظية من المصفوفة على وحدة معالجة الرسومات (GPU) المخصصة لها. تتم معالجة الشظايا بشكل منفصل وبالتوازي على وحدات معالجة الرسومات (GPU) المختلفة ويتم مزامنة النتائج في نهاية خطوة المعالجة. هذا ما يُطلق عليه أحيانًا التوازي الأفقي، حيث يحدث الانقسام على المستوى الأفقي.
|
||||
|
||||
تعرف على المزيد حول توازي Tensor [هنا](perf_train_gpu_many#tensor-parallelism).
|
||||
|
||||
### الرمز اللغوي (Token)
|
||||
|
||||
جزء من جملة، عادة ما يكون كلمة، ولكن يمكن أن يكون أيضًا كلمة فرعية (غالبًا ما يتم تقسيم الكلمات غير الشائعة إلى كلمات فرعية) أو علامة ترقيم.
|
||||
|
||||
### معرفات نوع الرمز (token type ids)
|
||||
|
||||
الغرض من بعض النماذج هو إجراء التصنيف على أزواج من الجمل أو الإجابة على الأسئلة.
|
||||
|
||||
<Youtube id="0u3ioSwev3s"/>
|
||||
|
||||
يتطلب ذلك تسلسلين مختلفين يتم دمجهما في إدخال "input_ids" واحد، والذي يتم عادةً باستخدام رموز خاصة، مثل رموز التصنيف (`[CLS]`) والفاصل (`[SEP]`). على سبيل المثال، يقوم نموذج BERT ببناء إدخال تسلسلين على النحو التالي:
|
||||
|
||||
```python
|
||||
>>> # [CLS] SEQUENCE_A [SEP] SEQUENCE_B [SEP]
|
||||
```
|
||||
|
||||
يمكننا استخدام برنامجنا للتمييز لإنشاء مثل هذه الجملة تلقائيًا عن طريق تمرير التسلسلين إلى `tokenizer` كمعامليين (وليس قائمة، كما كان من قبل) مثل هذا:
|
||||
|
||||
```python
|
||||
>>> from transformers import BertTokenizer
|
||||
|
||||
>>> tokenizer = BertTokenizer.from_pretrained("google-bert/bert-base-cased")
|
||||
>>> sequence_a = "HuggingFace is based in NYC"
|
||||
>>> sequence_b = "Where is HuggingFace based?"
|
||||
|
||||
>>> encoded_dict = tokenizer(sequence_a، sequence_b)
|
||||
>>> decoded = tokenizer.decode(encoded_dict["input_ids"])
|
||||
```
|
||||
|
||||
والذي سيعيد:
|
||||
|
||||
```python
|
||||
>>> print(decoded)
|
||||
[CLS] HuggingFace is based in NYC [SEP] Where is HuggingFace based؟ [SEP]
|
||||
```
|
||||
|
||||
هذا يكفي لبعض النماذج لفهم أين ينتهي تسلسل واحد وأين يبدأ الآخر. ومع ذلك، تستخدم نماذج أخرى، مثل BERT، أيضًا معرفات نوع الرمز (يُطلق عليها أيضًا معرفات الجزء). يتم تمثيلها كماسك ثنائي لتحديد نوعي التسلسل في النموذج.
|
||||
|
||||
يعيد برنامج الترميز هذا القناع كإدخال "token_type_ids":
|
||||
|
||||
```python
|
||||
>>> encoded_dict["token_type_ids"]
|
||||
[0، 0، 0، 0، 0، 0، 0، 0، 0، 0، 1، 1، 1، 1، 1، 1، 1، 1، 1]
|
||||
```
|
||||
|
||||
يتم تمثيل التسلسل الأول، "السياق" المستخدم للسؤال، بجميع رموزه بواسطة `0`، في حين يتم تمثيل التسلسل الثاني، المقابل إلى "السؤال"، بجميع رموزه بواسطة `1`.
|
||||
|
||||
تستخدم بعض النماذج، مثل [`XLNetModel`] رمزًا إضافيًا يمثله `2`.
|
||||
|
||||
### التعلم الانتقالي (Transfer Learning)
|
||||
|
||||
تقنية تنطوي على أخذ نموذج تم تدريبه مسبقًا وتكييفه مع مجموعة بيانات خاصة بمهمتك. بدلاً من تدريب نموذج من الصفر، يمكنك الاستفادة من المعرفة المكتسبة من نموذج موجود كنقطة بداية. يسرع هذا عملية التعلم ويقلل من كمية بيانات التدريب المطلوبة.
|
||||
|
||||
### المحول (Transformer)
|
||||
|
||||
هو بنية لنموذج تعلم عميق يعتمد على الانتباه الذاتي.
|
||||
|
||||
## U
|
||||
|
||||
### التعلم غير الخاضع للإشراف (unsupervised learning)
|
||||
|
||||
شكل من أشكال تدريب النماذج حيث لا يتم وضع علامات على البيانات المقدمة إلى النموذج. تستفيد تقنيات التعلم غير الخاضعة للإشراف من المعلومات الإحصائية لتوزيع البيانات للعثور على الأنماط المفيدة للمهمة المعنية.
|
||||
|
||||
## Z
|
||||
|
||||
### محسن التكرار الصفري (ZeRO)
|
||||
|
||||
تقنية توازي تقوم بتشظية المصفوفات بطريقة مشابهة لـ [TensorParallel](#tensor-parallelism-tp)، باستثناء إعادة بناء المصفوفة بالكامل في الوقت المناسب لحساب التقدير أو الحساب الخلفي، وبالتالي لا يلزم تعديل النموذج. تدعم هذه الطريقة أيضًا تقنيات الإخلاء المختلفة للتعويض عن ذاكرة GPU المحدودة.
|
||||
|
||||
تعرف على المزيد حول Zero [هنا](perf_train_gpu_many#zero-data-parallelism).
|
||||
@ -1,342 +0,0 @@
|
||||
# 🤗 Transformers: لمحة عامة
|
||||
|
||||
أحدث ما في مجال التعلم الآلي لـ [PyTorch](https://pytorch.org/) و [TensorFlow](https://www.tensorflow.org/) و [JAX](https://jax.readthedocs.io/en/latest/)
|
||||
|
||||
توفر 🤗 Transformers واجهات برمجة التطبيقات (APIs) والأدوات اللازمة لتنزيل وتدريب أحدث النماذج المسبقة التدريب بسهولة. ويمكن أن يقلل استخدام النماذج المسبقة التدريب من تكاليف الحوسبة والحد من الأثر البيئي، وتوفّر الوقت والموارد اللازمين لتدريب نموذج من الصفر. وتدعم هذه النماذج المهام الشائعة في مجالات مختلفة، مثل:
|
||||
|
||||
|
||||
📝 **معالجة اللغات الطبيعية**: تصنيف النصوص، وتعريف الكيانات المسماة، والإجابة على الأسئلة، ونمذجة اللغة، والتلخيص، والترجمة، والاختيار من متعدد، وتوليد النصوص. <br>
|
||||
🖼️ **الرؤية الحاسوبية**: تصنيف الصور، وكشف الأشياء، وتجزئتها. <br>
|
||||
🗣️ **الصوت**: التعرف التلقائي على الكلام، وتصنيف الصوت. <br>
|
||||
🐙 **متعدد الوسائط**: الإجابة على الأسئلة الجدولية، والتعرف البصري على الحروف، واستخراج المعلومات من المستندات الممسوحة ضوئيًا، وتصنيف الفيديو، والإجابة على الأسئلة البصرية.
|
||||
|
||||
تدعم 🤗 Transformers التوافق بين أطر العمل المختلفة مثل PyTorch و TensorFlow و JAX. ويوفر ذلك المرونة لاستخدام إطار عمل مختلف في كل مرحلة من مراحل حياة النموذج؛ قم بتدريب نموذج في ثلاث خطوط من التعليمات البرمجية في إطار واحد، وقم بتحميله للاستدلال في إطار آخر. ويمكن أيضًا تصدير النماذج إلى صيغ مثل ONNX و TorchScript للنشر في بيئات الإنتاج.
|
||||
|
||||
انضم إلى المجتمع المتنامي على [Hub](https://huggingface.co/models) أو [المنتدى](https://discuss.huggingface.co/) أو [Discord](https://discord.com/invite/JfAtkvEtRb) اليوم!
|
||||
|
||||
## إذا كنت تبحث عن دعم مخصص من فريق Hugging Face
|
||||
|
||||
<a target="_blank" href="https://huggingface.co/support">
|
||||
<img alt="HuggingFace Expert Acceleration Program" src="https://cdn-media.huggingface.co/marketing/transformers/new-support-improved.png" style="width: 100%; max-width: 600px; border: 1px solid #eee; border-radius: 4px; box-shadow: 0 1px 2px 0 rgba(0, 0, 0, 0.05);">
|
||||
</a>
|
||||
|
||||
## المحتويات
|
||||
|
||||
ينقسم التوثيق إلى خمسة أقسام:
|
||||
|
||||
- **ابدأ** تقدم جولة سريعة في المكتبة وتعليمات التثبيت للبدء.
|
||||
- **الدروس التعليمية** هي مكان رائع للبدء إذا كنت مبتدئًا. سيساعدك هذا القسم على اكتساب المهارات الأساسية التي تحتاجها للبدء في استخدام المكتبة.
|
||||
- **أدلة كيفية الاستخدام** تُظهر لك كيفية تحقيق هدف محدد، مثل ضبط نموذج مسبق التدريب لنمذجة اللغة أو كيفية كتابة ومشاركة نموذج مخصص.
|
||||
- **الأدلة المفاهيمية** تقدم مناقشة وتفسيرًا أكثر للأفكار والمفاهيم الأساسية وراء النماذج والمهام وفلسفة التصميم في 🤗 Transformers.
|
||||
- **واجهة برمجة التطبيقات (API)** تصف جميع الفئات والوظائف:
|
||||
|
||||
- **الفئات الرئيسية** تشرح الفئات الأكثر أهمية مثل التكوين والنمذجة والتحليل النصي وخط الأنابيب.
|
||||
- **النماذج** تشرح الفئات والوظائف المتعلقة بكل نموذج يتم تنفيذه في المكتبة.
|
||||
- **المساعدون الداخليون** يشرحون فئات ووظائف المساعدة التي يتم استخدامها داخليًا.
|
||||
|
||||
|
||||
## النماذج والأطر المدعومة
|
||||
|
||||
يمثل الجدول أدناه الدعم الحالي في المكتبة لكل من هذه النماذج، وما إذا كان لديها محلل نحوي Python (يُسمى "بطيء"). محلل نحوي "سريع" مدعوم بمكتبة 🤗 Tokenizers، وما إذا كان لديها دعم في Jax (عبر Flax) و/أو PyTorch و/أو TensorFlow.
|
||||
|
||||
<!--يتم تحديث هذا الجدول تلقائيًا من الوحدات النمطية التلقائية مع _make fix-copies_. لا تقم بالتحديث يدويًا!-->
|
||||
<!--This table is updated automatically from the auto modules with _make fix-copies_. Do not update manually!-->
|
||||
|
||||
| Model | PyTorch support | TensorFlow support | Flax Support |
|
||||
|:------------------------------------------------------------------------:|:---------------:|:------------------:|:------------:|
|
||||
| [ALBERT](model_doc/albert) | ✅ | ✅ | ✅ |
|
||||
| [ALIGN](model_doc/align) | ✅ | ❌ | ❌ |
|
||||
| [AltCLIP](model_doc/altclip) | ✅ | ❌ | ❌ |
|
||||
| [Audio Spectrogram Transformer](model_doc/audio-spectrogram-transformer) | ✅ | ❌ | ❌ |
|
||||
| [Autoformer](model_doc/autoformer) | ✅ | ❌ | ❌ |
|
||||
| [Bark](model_doc/bark) | ✅ | ❌ | ❌ |
|
||||
| [BART](model_doc/bart) | ✅ | ✅ | ✅ |
|
||||
| [BARThez](model_doc/barthez) | ✅ | ✅ | ✅ |
|
||||
| [BARTpho](model_doc/bartpho) | ✅ | ✅ | ✅ |
|
||||
| [BEiT](model_doc/beit) | ✅ | ❌ | ✅ |
|
||||
| [BERT](model_doc/bert) | ✅ | ✅ | ✅ |
|
||||
| [Bert Generation](model_doc/bert-generation) | ✅ | ❌ | ❌ |
|
||||
| [BertJapanese](model_doc/bert-japanese) | ✅ | ✅ | ✅ |
|
||||
| [BERTweet](model_doc/bertweet) | ✅ | ✅ | ✅ |
|
||||
| [BigBird](model_doc/big_bird) | ✅ | ❌ | ✅ |
|
||||
| [BigBird-Pegasus](model_doc/bigbird_pegasus) | ✅ | ❌ | ❌ |
|
||||
| [BioGpt](model_doc/biogpt) | ✅ | ❌ | ❌ |
|
||||
| [BiT](model_doc/bit) | ✅ | ❌ | ❌ |
|
||||
| [Blenderbot](model_doc/blenderbot) | ✅ | ✅ | ✅ |
|
||||
| [BlenderbotSmall](model_doc/blenderbot-small) | ✅ | ✅ | ✅ |
|
||||
| [BLIP](model_doc/blip) | ✅ | ✅ | ❌ |
|
||||
| [BLIP-2](model_doc/blip-2) | ✅ | ❌ | ❌ |
|
||||
| [BLOOM](model_doc/bloom) | ✅ | ❌ | ✅ |
|
||||
| [BORT](model_doc/bort) | ✅ | ✅ | ✅ |
|
||||
| [BridgeTower](model_doc/bridgetower) | ✅ | ❌ | ❌ |
|
||||
| [BROS](model_doc/bros) | ✅ | ❌ | ❌ |
|
||||
| [ByT5](model_doc/byt5) | ✅ | ✅ | ✅ |
|
||||
| [CamemBERT](model_doc/camembert) | ✅ | ✅ | ❌ |
|
||||
| [CANINE](model_doc/canine) | ✅ | ❌ | ❌ |
|
||||
| [Chameleon](model_doc/chameleon) | ✅ | ❌ | ❌ |
|
||||
| [Chinese-CLIP](model_doc/chinese_clip) | ✅ | ❌ | ❌ |
|
||||
| [CLAP](model_doc/clap) | ✅ | ❌ | ❌ |
|
||||
| [CLIP](model_doc/clip) | ✅ | ✅ | ✅ |
|
||||
| [CLIPSeg](model_doc/clipseg) | ✅ | ❌ | ❌ |
|
||||
| [CLVP](model_doc/clvp) | ✅ | ❌ | ❌ |
|
||||
| [CodeGen](model_doc/codegen) | ✅ | ❌ | ❌ |
|
||||
| [CodeLlama](model_doc/code_llama) | ✅ | ❌ | ✅ |
|
||||
| [Cohere](model_doc/cohere) | ✅ | ❌ | ❌ |
|
||||
| [Conditional DETR](model_doc/conditional_detr) | ✅ | ❌ | ❌ |
|
||||
| [ConvBERT](model_doc/convbert) | ✅ | ✅ | ❌ |
|
||||
| [ConvNeXT](model_doc/convnext) | ✅ | ✅ | ❌ |
|
||||
| [ConvNeXTV2](model_doc/convnextv2) | ✅ | ✅ | ❌ |
|
||||
| [CPM](model_doc/cpm) | ✅ | ✅ | ✅ |
|
||||
| [CPM-Ant](model_doc/cpmant) | ✅ | ❌ | ❌ |
|
||||
| [CTRL](model_doc/ctrl) | ✅ | ✅ | ❌ |
|
||||
| [CvT](model_doc/cvt) | ✅ | ✅ | ❌ |
|
||||
| [DAC](model_doc/dac) | ✅ | ❌ | ❌ |
|
||||
| [Data2VecAudio](model_doc/data2vec) | ✅ | ❌ | ❌ |
|
||||
| [Data2VecText](model_doc/data2vec) | ✅ | ❌ | ❌ |
|
||||
| [Data2VecVision](model_doc/data2vec) | ✅ | ✅ | ❌ |
|
||||
| [DBRX](model_doc/dbrx) | ✅ | ❌ | ❌ |
|
||||
| [DeBERTa](model_doc/deberta) | ✅ | ✅ | ❌ |
|
||||
| [DeBERTa-v2](model_doc/deberta-v2) | ✅ | ✅ | ❌ |
|
||||
| [Decision Transformer](model_doc/decision_transformer) | ✅ | ❌ | ❌ |
|
||||
| [Deformable DETR](model_doc/deformable_detr) | ✅ | ❌ | ❌ |
|
||||
| [DeiT](model_doc/deit) | ✅ | ✅ | ❌ |
|
||||
| [DePlot](model_doc/deplot) | ✅ | ❌ | ❌ |
|
||||
| [Depth Anything](model_doc/depth_anything) | ✅ | ❌ | ❌ |
|
||||
| [DETA](model_doc/deta) | ✅ | ❌ | ❌ |
|
||||
| [DETR](model_doc/detr) | ✅ | ❌ | ❌ |
|
||||
| [DialoGPT](model_doc/dialogpt) | ✅ | ✅ | ✅ |
|
||||
| [DiNAT](model_doc/dinat) | ✅ | ❌ | ❌ |
|
||||
| [DINOv2](model_doc/dinov2) | ✅ | ❌ | ✅ |
|
||||
| [DistilBERT](model_doc/distilbert) | ✅ | ✅ | ✅ |
|
||||
| [DiT](model_doc/dit) | ✅ | ❌ | ✅ |
|
||||
| [DonutSwin](model_doc/donut) | ✅ | ❌ | ❌ |
|
||||
| [DPR](model_doc/dpr) | ✅ | ✅ | ❌ |
|
||||
| [DPT](model_doc/dpt) | ✅ | ❌ | ❌ |
|
||||
| [EfficientFormer](model_doc/efficientformer) | ✅ | ✅ | ❌ |
|
||||
| [EfficientNet](model_doc/efficientnet) | ✅ | ❌ | ❌ |
|
||||
| [ELECTRA](model_doc/electra) | ✅ | ✅ | ✅ |
|
||||
| [EnCodec](model_doc/encodec) | ✅ | ❌ | ❌ |
|
||||
| [Encoder decoder](model_doc/encoder-decoder) | ✅ | ✅ | ✅ |
|
||||
| [ERNIE](model_doc/ernie) | ✅ | ❌ | ❌ |
|
||||
| [ErnieM](model_doc/ernie_m) | ✅ | ❌ | ❌ |
|
||||
| [ESM](model_doc/esm) | ✅ | ✅ | ❌ |
|
||||
| [FairSeq Machine-Translation](model_doc/fsmt) | ✅ | ❌ | ❌ |
|
||||
| [Falcon](model_doc/falcon) | ✅ | ❌ | ❌ |
|
||||
| [FalconMamba](model_doc/falcon_mamba) | ✅ | ❌ | ❌ |
|
||||
| [FastSpeech2Conformer](model_doc/fastspeech2_conformer) | ✅ | ❌ | ❌ |
|
||||
| [FLAN-T5](model_doc/flan-t5) | ✅ | ✅ | ✅ |
|
||||
| [FLAN-UL2](model_doc/flan-ul2) | ✅ | ✅ | ✅ |
|
||||
| [FlauBERT](model_doc/flaubert) | ✅ | ✅ | ❌ |
|
||||
| [FLAVA](model_doc/flava) | ✅ | ❌ | ❌ |
|
||||
| [FNet](model_doc/fnet) | ✅ | ❌ | ❌ |
|
||||
| [FocalNet](model_doc/focalnet) | ✅ | ❌ | ❌ |
|
||||
| [Funnel Transformer](model_doc/funnel) | ✅ | ✅ | ❌ |
|
||||
| [Fuyu](model_doc/fuyu) | ✅ | ❌ | ❌ |
|
||||
| [Gemma](model_doc/gemma) | ✅ | ❌ | ✅ |
|
||||
| [Gemma2](model_doc/gemma2) | ✅ | ❌ | ❌ |
|
||||
| [GIT](model_doc/git) | ✅ | ❌ | ❌ |
|
||||
| [GLPN](model_doc/glpn) | ✅ | ❌ | ❌ |
|
||||
| [GPT Neo](model_doc/gpt_neo) | ✅ | ❌ | ✅ |
|
||||
| [GPT NeoX](model_doc/gpt_neox) | ✅ | ❌ | ❌ |
|
||||
| [GPT NeoX Japanese](model_doc/gpt_neox_japanese) | ✅ | ❌ | ❌ |
|
||||
| [GPT-J](model_doc/gptj) | ✅ | ✅ | ✅ |
|
||||
| [GPT-Sw3](model_doc/gpt-sw3) | ✅ | ✅ | ✅ |
|
||||
| [GPTBigCode](model_doc/gpt_bigcode) | ✅ | ❌ | ❌ |
|
||||
| [GPTSAN-japanese](model_doc/gptsan-japanese) | ✅ | ❌ | ❌ |
|
||||
| [Granite](model_doc/granite) | ✅ | ❌ | ❌ |
|
||||
| [Graphormer](model_doc/graphormer) | ✅ | ❌ | ❌ |
|
||||
| [Grounding DINO](model_doc/grounding-dino) | ✅ | ❌ | ❌ |
|
||||
| [GroupViT](model_doc/groupvit) | ✅ | ✅ | ❌ |
|
||||
| [HerBERT](model_doc/herbert) | ✅ | ✅ | ✅ |
|
||||
| [Hiera](model_doc/hiera) | ✅ | ❌ | ❌ |
|
||||
| [Hubert](model_doc/hubert) | ✅ | ✅ | ❌ |
|
||||
| [I-BERT](model_doc/ibert) | ✅ | ❌ | ❌ |
|
||||
| [IDEFICS](model_doc/idefics) | ✅ | ✅ | ❌ |
|
||||
| [Idefics2](model_doc/idefics2) | ✅ | ❌ | ❌ |
|
||||
| [ImageGPT](model_doc/imagegpt) | ✅ | ❌ | ❌ |
|
||||
| [Informer](model_doc/informer) | ✅ | ❌ | ❌ |
|
||||
| [InstructBLIP](model_doc/instructblip) | ✅ | ❌ | ❌ |
|
||||
| [InstructBlipVideo](model_doc/instructblipvideo) | ✅ | ❌ | ❌ |
|
||||
| [Jamba](model_doc/jamba) | ✅ | ❌ | ❌ |
|
||||
| [JetMoe](model_doc/jetmoe) | ✅ | ❌ | ❌ |
|
||||
| [Jukebox](model_doc/jukebox) | ✅ | ❌ | ❌ |
|
||||
| [KOSMOS-2](model_doc/kosmos-2) | ✅ | ❌ | ❌ |
|
||||
| [LayoutLM](model_doc/layoutlm) | ✅ | ✅ | ❌ |
|
||||
| [LayoutLMv2](model_doc/layoutlmv2) | ✅ | ❌ | ❌ |
|
||||
| [LayoutLMv3](model_doc/layoutlmv3) | ✅ | ✅ | ❌ |
|
||||
| [LayoutXLM](model_doc/layoutxlm) | ✅ | ❌ | ❌ |
|
||||
| [LED](model_doc/led) | ✅ | ✅ | ❌ |
|
||||
| [LeViT](model_doc/levit) | ✅ | ❌ | ❌ |
|
||||
| [LiLT](model_doc/lilt) | ✅ | ❌ | ❌ |
|
||||
| [LLaMA](model_doc/llama) | ✅ | ❌ | ✅ |
|
||||
| [Llama2](model_doc/llama2) | ✅ | ❌ | ✅ |
|
||||
| [Llama3](model_doc/llama3) | ✅ | ❌ | ✅ |
|
||||
| [LLaVa](model_doc/llava) | ✅ | ❌ | ❌ |
|
||||
| [LLaVA-NeXT](model_doc/llava_next) | ✅ | ❌ | ❌ |
|
||||
| [LLaVa-NeXT-Video](model_doc/llava_next_video) | ✅ | ❌ | ❌ |
|
||||
| [Longformer](model_doc/longformer) | ✅ | ✅ | ❌ |
|
||||
| [LongT5](model_doc/longt5) | ✅ | ❌ | ✅ |
|
||||
| [LUKE](model_doc/luke) | ✅ | ❌ | ❌ |
|
||||
| [LXMERT](model_doc/lxmert) | ✅ | ✅ | ❌ |
|
||||
| [M-CTC-T](model_doc/mctct) | ✅ | ❌ | ❌ |
|
||||
| [M2M100](model_doc/m2m_100) | ✅ | ❌ | ❌ |
|
||||
| [MADLAD-400](model_doc/madlad-400) | ✅ | ✅ | ✅ |
|
||||
| [Mamba](model_doc/mamba) | ✅ | ❌ | ❌ |
|
||||
| [mamba2](model_doc/mamba2) | ✅ | ❌ | ❌ |
|
||||
| [Marian](model_doc/marian) | ✅ | ✅ | ✅ |
|
||||
| [MarkupLM](model_doc/markuplm) | ✅ | ❌ | ❌ |
|
||||
| [Mask2Former](model_doc/mask2former) | ✅ | ❌ | ❌ |
|
||||
| [MaskFormer](model_doc/maskformer) | ✅ | ❌ | ❌ |
|
||||
| [MatCha](model_doc/matcha) | ✅ | ❌ | ❌ |
|
||||
| [mBART](model_doc/mbart) | ✅ | ✅ | ✅ |
|
||||
| [mBART-50](model_doc/mbart50) | ✅ | ✅ | ✅ |
|
||||
| [MEGA](model_doc/mega) | ✅ | ❌ | ❌ |
|
||||
| [Megatron-BERT](model_doc/megatron-bert) | ✅ | ❌ | ❌ |
|
||||
| [Megatron-GPT2](model_doc/megatron_gpt2) | ✅ | ✅ | ✅ |
|
||||
| [MGP-STR](model_doc/mgp-str) | ✅ | ❌ | ❌ |
|
||||
| [Mistral](model_doc/mistral) | ✅ | ✅ | ✅ |
|
||||
| [Mixtral](model_doc/mixtral) | ✅ | ❌ | ❌ |
|
||||
| [mLUKE](model_doc/mluke) | ✅ | ❌ | ❌ |
|
||||
| [MMS](model_doc/mms) | ✅ | ✅ | ✅ |
|
||||
| [MobileBERT](model_doc/mobilebert) | ✅ | ✅ | ❌ |
|
||||
| [MobileNetV1](model_doc/mobilenet_v1) | ✅ | ❌ | ❌ |
|
||||
| [MobileNetV2](model_doc/mobilenet_v2) | ✅ | ❌ | ❌ |
|
||||
| [MobileViT](model_doc/mobilevit) | ✅ | ✅ | ❌ |
|
||||
| [MobileViTV2](model_doc/mobilevitv2) | ✅ | ❌ | ❌ |
|
||||
| [MPNet](model_doc/mpnet) | ✅ | ✅ | ❌ |
|
||||
| [MPT](model_doc/mpt) | ✅ | ❌ | ❌ |
|
||||
| [MRA](model_doc/mra) | ✅ | ❌ | ❌ |
|
||||
| [MT5](model_doc/mt5) | ✅ | ✅ | ✅ |
|
||||
| [MusicGen](model_doc/musicgen) | ✅ | ❌ | ❌ |
|
||||
| [MusicGen Melody](model_doc/musicgen_melody) | ✅ | ❌ | ❌ |
|
||||
| [MVP](model_doc/mvp) | ✅ | ❌ | ❌ |
|
||||
| [NAT](model_doc/nat) | ✅ | ❌ | ❌ |
|
||||
| [Nemotron](model_doc/nemotron) | ✅ | ❌ | ❌ |
|
||||
| [Nezha](model_doc/nezha) | ✅ | ❌ | ❌ |
|
||||
| [NLLB](model_doc/nllb) | ✅ | ❌ | ❌ |
|
||||
| [NLLB-MOE](model_doc/nllb-moe) | ✅ | ❌ | ❌ |
|
||||
| [Nougat](model_doc/nougat) | ✅ | ✅ | ✅ |
|
||||
| [Nyströmformer](model_doc/nystromformer) | ✅ | ❌ | ❌ |
|
||||
| [OLMo](model_doc/olmo) | ✅ | ❌ | ❌ |
|
||||
| [OneFormer](model_doc/oneformer) | ✅ | ❌ | ❌ |
|
||||
| [OpenAI GPT](model_doc/openai-gpt) | ✅ | ✅ | ❌ |
|
||||
| [OpenAI GPT-2](model_doc/gpt2) | ✅ | ✅ | ✅ |
|
||||
| [OpenLlama](model_doc/open-llama) | ✅ | ❌ | ❌ |
|
||||
| [OPT](model_doc/opt) | ✅ | ✅ | ✅ |
|
||||
| [OWL-ViT](model_doc/owlvit) | ✅ | ❌ | ❌ |
|
||||
| [OWLv2](model_doc/owlv2) | ✅ | ❌ | ❌ |
|
||||
| [PaliGemma](model_doc/paligemma) | ✅ | ❌ | ❌ |
|
||||
| [PatchTSMixer](model_doc/patchtsmixer) | ✅ | ❌ | ❌ |
|
||||
| [PatchTST](model_doc/patchtst) | ✅ | ❌ | ❌ |
|
||||
| [Pegasus](model_doc/pegasus) | ✅ | ✅ | ✅ |
|
||||
| [PEGASUS-X](model_doc/pegasus_x) | ✅ | ❌ | ❌ |
|
||||
| [Perceiver](model_doc/perceiver) | ✅ | ❌ | ❌ |
|
||||
| [Persimmon](model_doc/persimmon) | ✅ | ❌ | ❌ |
|
||||
| [Phi](model_doc/phi) | ✅ | ❌ | ❌ |
|
||||
| [Phi3](model_doc/phi3) | ✅ | ❌ | ❌ |
|
||||
| [PhoBERT](model_doc/phobert) | ✅ | ✅ | ✅ |
|
||||
| [Pix2Struct](model_doc/pix2struct) | ✅ | ❌ | ❌ |
|
||||
| [PLBart](model_doc/plbart) | ✅ | ❌ | ❌ |
|
||||
| [PoolFormer](model_doc/poolformer) | ✅ | ❌ | ❌ |
|
||||
| [Pop2Piano](model_doc/pop2piano) | ✅ | ❌ | ❌ |
|
||||
| [ProphetNet](model_doc/prophetnet) | ✅ | ❌ | ❌ |
|
||||
| [PVT](model_doc/pvt) | ✅ | ❌ | ❌ |
|
||||
| [PVTv2](model_doc/pvt_v2) | ✅ | ❌ | ❌ |
|
||||
| [QDQBert](model_doc/qdqbert) | ✅ | ❌ | ❌ |
|
||||
| [Qwen2](model_doc/qwen2) | ✅ | ❌ | ❌ |
|
||||
| [Qwen2Audio](model_doc/qwen2_audio) | ✅ | ❌ | ❌ |
|
||||
| [Qwen2MoE](model_doc/qwen2_moe) | ✅ | ❌ | ❌ |
|
||||
| [Qwen2VL](model_doc/qwen2_vl) | ✅ | ❌ | ❌ |
|
||||
| [RAG](model_doc/rag) | ✅ | ✅ | ❌ |
|
||||
| [REALM](model_doc/realm) | ✅ | ❌ | ❌ |
|
||||
| [RecurrentGemma](model_doc/recurrent_gemma) | ✅ | ❌ | ❌ |
|
||||
| [Reformer](model_doc/reformer) | ✅ | ❌ | ❌ |
|
||||
| [RegNet](model_doc/regnet) | ✅ | ✅ | ✅ |
|
||||
| [RemBERT](model_doc/rembert) | ✅ | ✅ | ❌ |
|
||||
| [ResNet](model_doc/resnet) | ✅ | ✅ | ✅ |
|
||||
| [RetriBERT](model_doc/retribert) | ✅ | ❌ | ❌ |
|
||||
| [RoBERTa](model_doc/roberta) | ✅ | ✅ | ✅ |
|
||||
| [RoBERTa-PreLayerNorm](model_doc/roberta-prelayernorm) | ✅ | ✅ | ✅ |
|
||||
| [RoCBert](model_doc/roc_bert) | ✅ | ❌ | ❌ |
|
||||
| [RoFormer](model_doc/roformer) | ✅ | ✅ | ✅ |
|
||||
| [RT-DETR](model_doc/rt_detr) | ✅ | ❌ | ❌ |
|
||||
| [RT-DETR-ResNet](model_doc/rt_detr_resnet) | ✅ | ❌ | ❌ |
|
||||
| [RWKV](model_doc/rwkv) | ✅ | ❌ | ❌ |
|
||||
| [SAM](model_doc/sam) | ✅ | ✅ | ❌ |
|
||||
| [SeamlessM4T](model_doc/seamless_m4t) | ✅ | ❌ | ❌ |
|
||||
| [SeamlessM4Tv2](model_doc/seamless_m4t_v2) | ✅ | ❌ | ❌ |
|
||||
| [SegFormer](model_doc/segformer) | ✅ | ✅ | ❌ |
|
||||
| [SegGPT](model_doc/seggpt) | ✅ | ❌ | ❌ |
|
||||
| [SEW](model_doc/sew) | ✅ | ❌ | ❌ |
|
||||
| [SEW-D](model_doc/sew-d) | ✅ | ❌ | ❌ |
|
||||
| [SigLIP](model_doc/siglip) | ✅ | ❌ | ❌ |
|
||||
| [Speech Encoder decoder](model_doc/speech-encoder-decoder) | ✅ | ❌ | ✅ |
|
||||
| [Speech2Text](model_doc/speech_to_text) | ✅ | ✅ | ❌ |
|
||||
| [SpeechT5](model_doc/speecht5) | ✅ | ❌ | ❌ |
|
||||
| [Splinter](model_doc/splinter) | ✅ | ❌ | ❌ |
|
||||
| [SqueezeBERT](model_doc/squeezebert) | ✅ | ❌ | ❌ |
|
||||
| [StableLm](model_doc/stablelm) | ✅ | ❌ | ❌ |
|
||||
| [Starcoder2](model_doc/starcoder2) | ✅ | ❌ | ❌ |
|
||||
| [SuperPoint](model_doc/superpoint) | ✅ | ❌ | ❌ |
|
||||
| [SwiftFormer](model_doc/swiftformer) | ✅ | ✅ | ❌ |
|
||||
| [Swin Transformer](model_doc/swin) | ✅ | ✅ | ❌ |
|
||||
| [Swin Transformer V2](model_doc/swinv2) | ✅ | ❌ | ❌ |
|
||||
| [Swin2SR](model_doc/swin2sr) | ✅ | ❌ | ❌ |
|
||||
| [SwitchTransformers](model_doc/switch_transformers) | ✅ | ❌ | ❌ |
|
||||
| [T5](model_doc/t5) | ✅ | ✅ | ✅ |
|
||||
| [T5v1.1](model_doc/t5v1.1) | ✅ | ✅ | ✅ |
|
||||
| [Table Transformer](model_doc/table-transformer) | ✅ | ❌ | ❌ |
|
||||
| [TAPAS](model_doc/tapas) | ✅ | ✅ | ❌ |
|
||||
| [TAPEX](model_doc/tapex) | ✅ | ✅ | ✅ |
|
||||
| [Time Series Transformer](model_doc/time_series_transformer) | ✅ | ❌ | ❌ |
|
||||
| [TimeSformer](model_doc/timesformer) | ✅ | ❌ | ❌ |
|
||||
| [Trajectory Transformer](model_doc/trajectory_transformer) | ✅ | ❌ | ❌ |
|
||||
| [Transformer-XL](model_doc/transfo-xl) | ✅ | ✅ | ❌ |
|
||||
| [TrOCR](model_doc/trocr) | ✅ | ❌ | ❌ |
|
||||
| [TVLT](model_doc/tvlt) | ✅ | ❌ | ❌ |
|
||||
| [TVP](model_doc/tvp) | ✅ | ❌ | ❌ |
|
||||
| [UDOP](model_doc/udop) | ✅ | ❌ | ❌ |
|
||||
| [UL2](model_doc/ul2) | ✅ | ✅ | ✅ |
|
||||
| [UMT5](model_doc/umt5) | ✅ | ❌ | ❌ |
|
||||
| [UniSpeech](model_doc/unispeech) | ✅ | ❌ | ❌ |
|
||||
| [UniSpeechSat](model_doc/unispeech-sat) | ✅ | ❌ | ❌ |
|
||||
| [UnivNet](model_doc/univnet) | ✅ | ❌ | ❌ |
|
||||
| [UPerNet](model_doc/upernet) | ✅ | ❌ | ❌ |
|
||||
| [VAN](model_doc/van) | ✅ | ❌ | ❌ |
|
||||
| [VideoLlava](model_doc/video_llava) | ✅ | ❌ | ❌ |
|
||||
| [VideoMAE](model_doc/videomae) | ✅ | ❌ | ❌ |
|
||||
| [ViLT](model_doc/vilt) | ✅ | ❌ | ❌ |
|
||||
| [VipLlava](model_doc/vipllava) | ✅ | ❌ | ❌ |
|
||||
| [Vision Encoder decoder](model_doc/vision-encoder-decoder) | ✅ | ✅ | ✅ |
|
||||
| [VisionTextDualEncoder](model_doc/vision-text-dual-encoder) | ✅ | ✅ | ✅ |
|
||||
| [VisualBERT](model_doc/visual_bert) | ✅ | ❌ | ❌ |
|
||||
| [ViT](model_doc/vit) | ✅ | ✅ | ✅ |
|
||||
| [ViT Hybrid](model_doc/vit_hybrid) | ✅ | ❌ | ❌ |
|
||||
| [VitDet](model_doc/vitdet) | ✅ | ❌ | ❌ |
|
||||
| [ViTMAE](model_doc/vit_mae) | ✅ | ✅ | ❌ |
|
||||
| [ViTMatte](model_doc/vitmatte) | ✅ | ❌ | ❌ |
|
||||
| [ViTMSN](model_doc/vit_msn) | ✅ | ❌ | ❌ |
|
||||
| [VITS](model_doc/vits) | ✅ | ❌ | ❌ |
|
||||
| [ViViT](model_doc/vivit) | ✅ | ❌ | ❌ |
|
||||
| [Wav2Vec2](model_doc/wav2vec2) | ✅ | ✅ | ✅ |
|
||||
| [Wav2Vec2-BERT](model_doc/wav2vec2-bert) | ✅ | ❌ | ❌ |
|
||||
| [Wav2Vec2-Conformer](model_doc/wav2vec2-conformer) | ✅ | ❌ | ❌ |
|
||||
| [Wav2Vec2Phoneme](model_doc/wav2vec2_phoneme) | ✅ | ✅ | ✅ |
|
||||
| [WavLM](model_doc/wavlm) | ✅ | ❌ | ❌ |
|
||||
| [Whisper](model_doc/whisper) | ✅ | ✅ | ✅ |
|
||||
| [X-CLIP](model_doc/xclip) | ✅ | ❌ | ❌ |
|
||||
| [X-MOD](model_doc/xmod) | ✅ | ❌ | ❌ |
|
||||
| [XGLM](model_doc/xglm) | ✅ | ✅ | ✅ |
|
||||
| [XLM](model_doc/xlm) | ✅ | ✅ | ❌ |
|
||||
| [XLM-ProphetNet](model_doc/xlm-prophetnet) | ✅ | ❌ | ❌ |
|
||||
| [XLM-RoBERTa](model_doc/xlm-roberta) | ✅ | ✅ | ✅ |
|
||||
| [XLM-RoBERTa-XL](model_doc/xlm-roberta-xl) | ✅ | ❌ | ❌ |
|
||||
| [XLM-V](model_doc/xlm-v) | ✅ | ✅ | ✅ |
|
||||
| [XLNet](model_doc/xlnet) | ✅ | ✅ | ❌ |
|
||||
| [XLS-R](model_doc/xls_r) | ✅ | ✅ | ✅ |
|
||||
| [XLSR-Wav2Vec2](model_doc/xlsr_wav2vec2) | ✅ | ✅ | ✅ |
|
||||
| [YOLOS](model_doc/yolos) | ✅ | ❌ | ❌ |
|
||||
| [YOSO](model_doc/yoso) | ✅ | ❌ | ❌ |
|
||||
| [ZoeDepth](model_doc/zoedepth) | ✅ | ❌ | ❌ |
|
||||
|
||||
<!-- End table-->
|
||||
@ -1,246 +0,0 @@
|
||||
# التثبيت (Installation)
|
||||
|
||||
قم بتثبيت مكتبة 🤗 Transformers المناسبة لمكتبة التعلم العميق التي تستخدمها، وقم بإعداد ذاكرة التخزين المؤقت الخاصة بك، وقم بإعداد 🤗 Transformers للعمل دون اتصال بالإنترنت (اختياري).
|
||||
|
||||
تم اختبار 🤗 Transformers على Python 3.6 والإصدارات الأحدث، وPyTorch 1.1.0 والإصدارات الأحدث، وTensorFlow 2.0 والإصدارات الأحدث، وFlax. اتبع تعليمات التثبيت أدناه لمكتبة التعلم العميق التي تستخدمها:
|
||||
|
||||
* تعليمات تثبيت [PyTorch](https://pytorch.org/get-started/locally/).
|
||||
* تعليمات تثبيت [TensorFlow 2.0](https://www.tensorflow.org/install/pip).
|
||||
* تعليمات تثبيت [Flax](https://flax.readthedocs.io/en/latest/).
|
||||
|
||||
## التثبيت باستخدام pip
|
||||
|
||||
يجب عليك تثبيت 🤗 Transformers داخل [بيئة افتراضية](https://docs.python.org/3/library/venv.html). إذا لم تكن غير ملم ببيئات Python الافتراضية، فراجع هذا [الدليل](https://packaging.python.org/guides/installing-using-pip-and-virtual-environments/). البيئة الافتراضية تسهل إدارة المشاريع المختلف، وتجنب مشكلات التوافق بين المكتبات المطلوبة (اعتماديات المشروع).
|
||||
|
||||
ابدأ بإنشاء بيئة افتراضية في دليل مشروعك:
|
||||
|
||||
```bash
|
||||
python -m venv .env
|
||||
```
|
||||
|
||||
قم بتفعيل البيئة الافتراضية. على Linux وMacOs:
|
||||
|
||||
```bash
|
||||
source .env/bin/activate
|
||||
```
|
||||
|
||||
قم بتفعيل البيئة الافتراضية على Windows:
|
||||
|
||||
```bash
|
||||
.env/Scripts/activate
|
||||
```
|
||||
|
||||
الآن أنت مستعد لتثبيت 🤗 Transformers باستخدام الأمر التالي:
|
||||
|
||||
```bash
|
||||
pip install transformers
|
||||
```
|
||||
|
||||
للحصول على الدعم الخاص بـ CPU فقط، يمكنك تثبيت 🤗 Transformers ومكتبة التعلم العميق في خطوة واحدة. على سبيل المثال، قم بتثبيت 🤗 Transformers وPyTorch باستخدام:
|
||||
|
||||
```bash
|
||||
pip install 'transformers[torch]'
|
||||
```
|
||||
|
||||
🤗 Transformers وTensorFlow 2.0:
|
||||
|
||||
```bash
|
||||
pip install 'transformers[tf-cpu]'
|
||||
```
|
||||
|
||||
<Tip warning={true}>
|
||||
|
||||
لمستخدمي M1 / ARM
|
||||
|
||||
ستحتاج إلى تثبيت ما يلي قبل تثبيت TensorFLow 2.0
|
||||
```bash
|
||||
brew install cmake
|
||||
brew install pkg-config
|
||||
```
|
||||
|
||||
</Tip>
|
||||
|
||||
🤗 Transformers وFlax:
|
||||
|
||||
```bash
|
||||
pip install 'transformers[flax]'
|
||||
```
|
||||
|
||||
أخيرًا، تحقق مما إذا كان 🤗 Transformers قد تم تثبيته بشكل صحيح عن طريق تشغيل الأمر التالي. سيقوم بتنزيل نموذج مدرب مسبقًا:
|
||||
|
||||
```bash
|
||||
python -c "from transformers import pipeline; print(pipeline('sentiment-analysis')('we love you'))"
|
||||
```
|
||||
|
||||
ثم قم بطباعة التسمية والنتيجة:
|
||||
|
||||
```bash
|
||||
[{'label': 'POSITIVE', 'score': 0.9998704791069031}]
|
||||
```
|
||||
|
||||
## التثبيت من المصدر
|
||||
|
||||
قم بتثبيت 🤗 Transformers من المصدر باستخدام الأمر التالي:
|
||||
|
||||
```bash
|
||||
pip install git+https://github.com/huggingface/transformers
|
||||
```
|
||||
|
||||
يقوم هذا الأمر بتثبيت أحدث إصدار تجريبي `main` بدلاً من الإصدار المستقر `stable`. يعد إصدار `main` مفيدًا للمواكبة مع أحدث التطورات. على سبيل المثال، إذا تم إصلاح خطأ منذ الإصدار الرسمي الأخير ولكن لم يتم طرح إصدار جديد بعد. ومع ذلك، فإن هذا يعني أن إصدار التجريبي `main` قد لا يكون مستقرًا دائمًا. نسعى جاهدين للحفاظ على تشغيل إصدار `main`، ويتم حل معظم المشكلات عادةً في غضون بضع ساعات أو يوم. إذا واجهتك مشكلة، يرجى فتح [تقرير عن خلل](https://github.com/huggingface/transformers/issues) حتى نتمكن من إصلاحها في أقرب وقت ممكن!
|
||||
|
||||
تحقق مما إذا كان 🤗 Transformers قد تم تثبيته بشكل صحيح عن طريق تشغيل الأمر التالي:
|
||||
|
||||
```bash
|
||||
python -c "from transformers import pipeline; print(pipeline('sentiment-analysis')('I love you'))"
|
||||
```
|
||||
|
||||
تحقق مما إذا كان 🤗 Transformers قد تم تثبيته بشكل صحيح عن طريق تشغيل الأمر التالي:
|
||||
|
||||
```bash
|
||||
python -c "from transformers import pipeline; print(pipeline('sentiment-analysis')('I love you'))"
|
||||
```
|
||||
|
||||
## التثبيت القابل للتعديل
|
||||
|
||||
ستحتاج إلى تثبيت قابل للتعديل إذا كنت ترغب في:
|
||||
|
||||
* استخدام إصدار `main` من كود المصدر.
|
||||
* المساهمة في 🤗 Transformers وتحتاج إلى اختبار التغييرات في الكود.
|
||||
|
||||
قم باستنساخ المستودع وقم بتثبيت 🤗 Transformers باستخدام الأوامر التالية:
|
||||
|
||||
```bash
|
||||
git clone https://github.com/huggingface/transformers.git
|
||||
cd transformers
|
||||
pip install -e .
|
||||
```
|
||||
|
||||
ستقوم هذه الأوامر بربط المجلد الذي قمت باستنساخ المستودع فيه بمسارات مكتبة Python. بمعنى آخر، سيبحث Python داخل المجلد الذي قمت باستنساخه بالإضافة إلى المسارات المعتادة للمكتبات. على سبيل المثال، إذا تم تثبيت حزم Python الخاصة بك عادةً في `~/anaconda3/envs/main/lib/python3.7/site-packages/`, فسيقوم Python أيضًا بالبحث في المجلد الذي قمت باستنساخه: `~/transformers/`.
|
||||
|
||||
<Tip warning={true}>
|
||||
|
||||
يجب عليك الاحتفاظ بمجلد `transformers` إذا كنت تريد الاستمرار في استخدام المكتبة.
|
||||
|
||||
</Tip>
|
||||
|
||||
الآن يمكنك تحديث المستنسخ الخاص بك بسهولة إلى أحدث إصدار من 🤗 Transformers باستخدام الأمر التالي:
|
||||
|
||||
```bash
|
||||
cd ~/transformers/
|
||||
git pull
|
||||
```
|
||||
|
||||
ستجد بيئة Python الإصدار `main` من 🤗 Transformers في المرة التالية التي تقوم فيها بتشغيله.
|
||||
|
||||
## التثبيت باستخدام conda
|
||||
|
||||
قم بالتثبيت من قناة conda `conda-forge`:
|
||||
|
||||
```bash
|
||||
conda install conda-forge::transformers
|
||||
```
|
||||
|
||||
## إعداد ذاكرة التخزين المؤقت
|
||||
|
||||
تُحمّل النماذج المُسبقة التدريب وتُخزّن مؤقتًا في: `~/.cache/huggingface/hub`. هذا هو المجلد الافتراضي الذي يُحدده متغير البيئة `TRANSFORMERS_CACHE`. على Windows، يكون دليل ذاكرة التخزين المؤقت الافتراضي هو `C:\Users\username\.cache\huggingface\hub`. يمكنك تغيير متغيرات البيئة shell الموضحة أدناه - حسب الأولوية - لتحديد دليل ذاكرة تخزين مؤقت مختلف:
|
||||
|
||||
1. متغير البيئة (افتراضي): `HUGGINGFACE_HUB_CACHE` أو `TRANSFORMERS_CACHE`.
|
||||
2. متغير البيئة: `HF_HOME`.
|
||||
3. متغير البيئة: `XDG_CACHE_HOME` + `/huggingface`.
|
||||
|
||||
<Tip>
|
||||
|
||||
سيستخدم 🤗 Transformers متغيرات البيئة `PYTORCH_TRANSFORMERS_CACHE` أو `PYTORCH_PRETRAINED_BERT_CACHE` إذا كنت قادمًا من إصدار سابق من هذه المكتبة وقمت بتعيين متغيرات البيئة هذه، ما لم تحدد متغير البيئة `TRANSFORMERS_CACHE`.
|
||||
|
||||
</Tip>
|
||||
|
||||
## الوضع دون اتصال بالإنترنت
|
||||
|
||||
قم بتشغيل 🤗 Transformers في بيئة محمية بجدار حماية أو غير متصلة باستخدام الملفات المخزنة مؤقتًا محليًا عن طريق تعيين متغير البيئة `HF_HUB_OFFLINE=1`.
|
||||
|
||||
<Tip>
|
||||
|
||||
أضف [🤗 Datasets](https://huggingface.co/docs/datasets/) إلى سير عمل التدريب غير المتصل باستخدام متغير البيئة `HF_DATASETS_OFFLINE=1`.
|
||||
|
||||
</Tip>
|
||||
|
||||
```bash
|
||||
HF_DATASETS_OFFLINE=1 HF_HUB_OFFLINE=1 \
|
||||
python examples/pytorch/translation/run_translation.py --model_name_or_path google-t5/t5-small --dataset_name wmt16 --dataset_config ro-en ...
|
||||
```
|
||||
|
||||
يجب أن يعمل هذا البرنامج النصي دون توقف أو انتظار انتهاء المهلة الزمنية لأنه لن يحاول تنزيل النموذج من Hub.
|
||||
|
||||
يمكنك أيضًا تجاوز تحميل نموذج من Hub من كل استدعاء [`~PreTrainedModel.from_pretrained`] باستخدام معلمة [`local_files_only`]. عندما يتم تعيينها على `True`، يتم تحميل الملفات المحلية فقط:
|
||||
|
||||
```py
|
||||
from transformers import T5Model
|
||||
|
||||
model = T5Model.from_pretrained("./path/to/local/directory", local_files_only=True)
|
||||
```
|
||||
|
||||
### جلب النماذج والمُجزّئات لاستخدامها دون اتصال بالإنترنت
|
||||
|
||||
خيار آخر لاستخدام 🤗 Transformers دون اتصال هو تنزيل الملفات مسبقًا، ثم الإشارة إلى مسارها المحلي عند الحاجة إلى استخدامها دون اتصال. هناك ثلاث طرق للقيام بذلك:
|
||||
|
||||
* قم بتنزيل ملف عبر واجهة المستخدم على [Model Hub](https://huggingface.co/models) بالنقر فوق أيقونة ↓.
|
||||
|
||||

|
||||
|
||||
* استخدم سير عمل [`PreTrainedModel.from_pretrained`] و [`PreTrainedModel.save_pretrained`]:
|
||||
|
||||
1. قم بتنزيل ملفاتك مسبقًا باستخدام [`PreTrainedModel.from_pretrained`]:
|
||||
* استخدم سير عمل [`PreTrainedModel.from_pretrained`] و [`PreTrainedModel.save_pretrained`]:
|
||||
|
||||
1. قم بتنزيل ملفاتك مسبقًا باستخدام [`PreTrainedModel.from_pretrained`]:
|
||||
|
||||
```py
|
||||
>>> from transformers import AutoTokenizer, AutoModelForSeq2SeqLM
|
||||
|
||||
>>> tokenizer = AutoTokenizer.from_pretrained("bigscience/T0_3B")
|
||||
>>> model = AutoModelForSeq2SeqLM.from_pretrained("bigscience/T0_3B")
|
||||
```
|
||||
|
||||
2. احفظ ملفاتك إلى دليل محدد باستخدام [`PreTrainedModel.save_pretrained`]:
|
||||
|
||||
```py
|
||||
>>> tokenizer.save_pretrained("./your/path/bigscience_t0")
|
||||
>>> model.save_pretrained("./your/path/bigscience_t0")
|
||||
```
|
||||
|
||||
3. الآن عندما تكون غير متصل بالإنترنت، أعد تحميل ملفاتك باستخدام [`PreTrainedModel.from_pretrained`] من الدليل المحدد:
|
||||
|
||||
```py
|
||||
>>> tokenizer = AutoTokenizer.from_pretrained("./your/path/bigscience_t0")
|
||||
>>> model = AutoModel.from_pretrained("./your/path/bigscience_t0")
|
||||
```
|
||||
|
||||
* قم بتنزيل الملفات برمجيًا باستخدام مكتبة [huggingface_hub](https://github.com/huggingface/huggingface_hub/tree/main/src/huggingface_hub):
|
||||
|
||||
1. قم بتثبيت مكتبة `huggingface_hub` في بيئتك الافتراضية:
|
||||
|
||||
```bash
|
||||
python -m pip install huggingface_hub
|
||||
```
|
||||
|
||||
2. استخدم وظيفة [`hf_hub_download`](https://huggingface.co/docs/hub/adding-a-library#download-files-from-the-hub) لتنزيل ملف إلى مسار محدد. على سبيل المثال، يقوم الأمر التالي بتنزيل ملف `config.json` من نموذج [T0](https://huggingface.co/bigscience/T0_3B) إلى المسار المطلوب:
|
||||
|
||||
```py
|
||||
>>> from huggingface_hub import hf_hub_download
|
||||
|
||||
>>> hf_hub_download(repo_id="bigscience/T0_3B", filename="config.json", cache_dir="./your/path/bigscience_t0")
|
||||
```
|
||||
|
||||
بمجرد تنزيل ملفك وتخزينه مؤقتًا محليًا، حدد مساره المحلي الخاص به لتحميله واستخدامه:
|
||||
|
||||
```py
|
||||
>>> from transformers import AutoConfig
|
||||
|
||||
>>> config = AutoConfig.from_pretrained("./your/path/bigscience_t0/config.json")
|
||||
```
|
||||
|
||||
<Tip>
|
||||
|
||||
راجع قسم [كيفية تنزيل الملفات من Hub](https://huggingface.co/docs/hub/how-to-downstream) لمزيد من التفاصيل حول تنزيل الملفات المخزنة على Hub.
|
||||
|
||||
</Tip>
|
||||
@ -1,248 +0,0 @@
|
||||
# التوليد باستخدام نماذج اللغات الكبيرة (LLMs)
|
||||
|
||||
[[open-in-colab]]
|
||||
|
||||
تعد LLMs، أو نماذج اللغة الكبيرة، المكون الرئيسي وراء توليد النصوص. وباختصار، تتكون من نماذج محول كبيرة مسبقة التدريب تم تدريبها للتنبؤ بالكلمة التالية (أو، بشكل أكثر دقة، الرمز اللغوي) بالنظر إلى نص معين. نظرًا لأنها تتنبأ برمز واحد في كل مرة، يجب عليك القيام بشيء أكثر تعقيدًا لتوليد جمل جديدة بخلاف مجرد استدعاء النموذج - يجب عليك إجراء التوليد التلقائي.
|
||||
|
||||
التوليد التلقائي هو إجراء وقت الاستدلال الذي يتضمن استدعاء النموذج بشكل متكرر باستخدام مخرجاته الخاصة، بالنظر إلى بعض المدخلات الأولية. في 🤗 Transformers، يتم التعامل مع هذا بواسطة دالة [`~generation.GenerationMixin.generate`]، والتي تتوفر لجميع النماذج ذات القدرات التوليدية.
|
||||
|
||||
سيوضح هذا البرنامج التعليمي كيفية:
|
||||
|
||||
* تتوليد نص باستخدام نموذج اللغات الكبيرة (LLM)
|
||||
* تجنب الوقوع في الأخطاء الشائعة
|
||||
* الخطوات التالية لمساعدتك في الاستفادة القصوى من LLM الخاص بك
|
||||
|
||||
قبل البدء، تأكد من تثبيت جميع المكتبات الضرورية:
|
||||
|
||||
```bash
|
||||
pip install transformers bitsandbytes>=0.39.0 -q
|
||||
```
|
||||
|
||||
## توليد النص
|
||||
|
||||
يأخذ نموذج اللغة المدرب لـ [نمذجة اللغة السببية](tasks/language_modeling) يأخذ تسلسلًا من رموز نصية كمدخل ويعيد توزيع الاحتمالية للرمز التالي.
|
||||
|
||||
<!-- [GIF 1 -- FWD PASS] -->
|
||||
<figure class="image table text-center m-0 w-full">
|
||||
<video
|
||||
style="max-width: 90%; margin: auto;"
|
||||
autoplay loop muted playsinline
|
||||
src="https://huggingface.co/datasets/huggingface/documentation-images/resolve/main/blog/assisted-generation/gif_1_1080p.mov"
|
||||
></video>
|
||||
<figcaption>"التنبؤ بالكلمة التالية لنموذج اللغة (LLM)"</figcaption>
|
||||
</figure>
|
||||
|
||||
هناك جانب بالغ الأهمية في التوليد التلقائي باستخدام LLMs وهو كيفية اختيار الرمز التالي من توزيع الاحتمالية هذا. كل شيء مسموح به في هذه الخطوة طالما أنك تنتهي برمز للتكرار التالي. وهذا يعني أنه يمكن أن يكون بسيطًا مثل اختيار الرمز الأكثر احتمالًا من توزيع الاحتمالية أو معقدًا مثل تطبيق عشرات التحولات قبل أخذ العينات من التوزيع الناتج.
|
||||
|
||||
<!-- [GIF 2 -- TEXT GENERATION] -->
|
||||
<figure class="image table text-center m-0 w-full">
|
||||
<video
|
||||
style="max-width: 90%; margin: auto;"
|
||||
autoplay loop muted playsinline
|
||||
src="https://huggingface.co/datasets/huggingface/documentation-images/resolve/main/blog/assisted-generation/gif_2_1080p.mov"
|
||||
></video>
|
||||
<figcaption>"التوليد التلقائي المتسلسل"</figcaption>
|
||||
</figure>
|
||||
|
||||
تتكرر العملية الموضحة أعلاه بشكل تكراري حتى يتم الوصول إلى شرط التوقف. في الوضع المثالي، يحدد النموذج شرط التوقف، والذي يجب أن يتعلم عند إخراج رمز نهاية التسلسل (`EOS`). إذا لم يكن الأمر كذلك، يتوقف التوليد عند الوصول إلى طول أقصى محدد مسبقًا.
|
||||
|
||||
من الضروري إعداد خطوة اختيار الرمز وشرط التوقف بشكل صحيح لجعل نموذجك يتصرف كما تتوقع في مهمتك. ولهذا السبب لدينا [`~generation.GenerationConfig`] ملف مرتبط بكل نموذج، والذي يحتوي على معلمة توليدية افتراضية جيدة ويتم تحميله جنبًا إلى جنب مع نموذجك.
|
||||
|
||||
دعنا نتحدث عن الكود!
|
||||
|
||||
|
||||
<Tip>
|
||||
|
||||
إذا كنت مهتمًا بالاستخدام الأساسي لـ LLM، فإن واجهة [`Pipeline`](pipeline_tutorial) عالية المستوى هي نقطة انطلاق رائعة. ومع ذلك، غالبًا ما تتطلب LLMs ميزات متقدمة مثل التكميم والتحكم الدقيق في خطوة اختيار الرمز، والتي يتم تنفيذها بشكل أفضل من خلال [`~generation.GenerationMixin.generate`]. التوليد التلقائي باستخدام LLMs يستهلك الكثير من المواردد ويجب تنفيذه على وحدة معالجة الرسومات للحصول على أداء كافٍ.
|
||||
|
||||
</Tip>
|
||||
|
||||
أولاً، تحتاج إلى تحميل النموذج.
|
||||
|
||||
```py
|
||||
>>> from transformers import AutoModelForCausalLM
|
||||
|
||||
>>> model = AutoModelForCausalLM.from_pretrained(
|
||||
... "mistralai/Mistral-7B-v0.1", device_map="auto", load_in_4bit=True
|
||||
... )
|
||||
```
|
||||
|
||||
ستلاحظ وجود معاملين في الاستدعاء `from_pretrained`:
|
||||
|
||||
- `device_map` يضمن انتقال النموذج إلى وحدة معالجة الرسومات (GPU) الخاصة بك
|
||||
- `load_in_4bit` يطبق [4-bit dynamic quantization](main_classes/quantization) لخفض متطلبات الموارد بشكل كبير
|
||||
|
||||
هناك طرق أخرى لتهيئة نموذج، ولكن هذا خط أساس جيد للبدء باستخدام LLM.
|
||||
|
||||
بعد ذلك، تحتاج إلى معالجة إدخال النص الخاص بك باستخدام [مُجزّئ اللغوي](tokenizer_summary).
|
||||
|
||||
```py
|
||||
>>> from transformers import AutoTokenizer
|
||||
|
||||
>>> tokenizer = AutoTokenizer.from_pretrained("mistralai/Mistral-7B-v0.1", padding_side="left")
|
||||
>>> model_inputs = tokenizer(["A list of colors: red, blue"], return_tensors="pt").to("cuda")
|
||||
```
|
||||
|
||||
يحتوي متغير `model_inputs` على النص المدخل بعد تقسيمه إلى وحدات لغوية (tokens)، بالإضافة إلى قناع الانتباه. في حين أن [`~generation.GenerationMixin.generate`] تبذل قصارى جهدها لاستنتاج قناع الانتباه عندما لا يتم تمريره، نوصي بتمريره كلما أمكن ذلك للحصول على نتائج مثالية.
|
||||
|
||||
بعد تقسيم المدخلات إلى وحدات لغوية، يمكنك استدعاء الدالة [`~generation.GenerationMixin.generate`] لإرجاع الوحدات اللغوية الناتجة. يجب بعد ذلك تحويل الوحدات المولدة إلى نص قبل طباعته.
|
||||
|
||||
```py
|
||||
>>> generated_ids = model.generate(**model_inputs)
|
||||
>>> tokenizer.batch_decode(generated_ids, skip_special_tokens=True)[0]
|
||||
'A list of colors: red, blue, green, yellow, orange, purple, pink,'
|
||||
```
|
||||
|
||||
أخيرًا، ليس عليك معالجة المتتاليات الواحدة تلو الأخرى! يمكنك معالجة مجموعة من المدخلات دفعة واحدة، والتي ستعمل على تحسين الإنتاجية بشكل كبير بتكلفة صغيرة في زمن الاستجابة واستهلاك الذاكر. كل ما عليك التأكد منه هو تعبئة المدخلات بشكل صحيح (المزيد حول ذلك أدناه).
|
||||
|
||||
```py
|
||||
>>> tokenizer.pad_token = tokenizer.eos_token # Most LLMs don't have a pad token by default
|
||||
>>> model_inputs = tokenizer(
|
||||
... ["A list of colors: red, blue", "Portugal is"], return_tensors="pt", padding=True
|
||||
... ).to("cuda")
|
||||
>>> generated_ids = model.generate(**model_inputs)
|
||||
>>> tokenizer.batch_decode(generated_ids, skip_special_tokens=True)
|
||||
['A list of colors: red, blue, green, yellow, orange, purple, pink,',
|
||||
'Portugal is a country in southwestern Europe, on the Iber']
|
||||
```
|
||||
|
||||
وهذا كل شيء! في بضع سطور من التعليمات البرمجية، يمكنك تسخير قوة LLM.
|
||||
|
||||
## الأخطاء الشائعة
|
||||
|
||||
هناك العديد من [استراتيجيات التوليد](generation_strategies)، وفي بعض الأحيان قد لا تكون القيم الافتراضية مناسبة لحالتك الاستخدام. إذا لم تكن الإخراج الخاصة بك متوافقة مع ما تتوقعه، فقد قمنا بإنشاء قائمة بأكثر الأخطاء الشائعة وكيفية تجنبها.
|
||||
|
||||
```py
|
||||
>>> from transformers import AutoModelForCausalLM, AutoTokenizer
|
||||
|
||||
>>> tokenizer = AutoTokenizer.from_pretrained("mistralai/Mistral-7B-v0.1")
|
||||
>>> tokenizer.pad_token = tokenizer.eos_token # Most LLMs don't have a pad token by default
|
||||
>>> model = AutoModelForCausalLM.from_pretrained(
|
||||
... "mistralai/Mistral-7B-v0.1", device_map="auto", load_in_4bit=True
|
||||
... )
|
||||
```
|
||||
|
||||
### الإخراج المولد قصير جدًا/طويل جدًا
|
||||
|
||||
إذا لم يتم تحديد العدد الأقصى للرموز في [`~generation.GenerationConfig`] الملف، `generate` يعيد ما يصل إلى 20 رمزًا بشكل افتراضي. نوصي بشدة بتعيين `max_new_tokens` يدويًا في مكالمة `generate` للتحكم في العدد الأقصى من الرموز الجديدة التي يمكن أن يعيدها. ضع في اعتبارك أن LLMs (بشكل أكثر دقة، [نماذج فك التشفير فقط](https://huggingface.co/learn/nlp-course/chapter1/6؟fw=pt)) تعيد أيضًا المدخلات الأصلية كجزء من الناتج.
|
||||
```py
|
||||
>>> model_inputs = tokenizer(["A sequence of numbers: 1, 2"], return_tensors="pt").to("cuda")
|
||||
|
||||
>>> # By default, the output will contain up to 20 tokens
|
||||
>>> generated_ids = model.generate(**model_inputs)
|
||||
>>> tokenizer.batch_decode(generated_ids, skip_special_tokens=True)[0]
|
||||
'A sequence of numbers: 1, 2, 3, 4, 5'
|
||||
|
||||
>>> # Setting `max_new_tokens` allows you to control the maximum length
|
||||
>>> generated_ids = model.generate(**model_inputs, max_new_tokens=50)
|
||||
>>> tokenizer.batch_decode(generated_ids, skip_special_tokens=True)[0]
|
||||
'A sequence of numbers: 1, 2, 3, 4, 5, 6, 7, 8, 9, 10, 11, 12, 13, 14, 15, 16,'
|
||||
```
|
||||
|
||||
### وضع التوليد الافتراضي
|
||||
|
||||
بشكل افتراضي، وما لم يتم تحديده في [`~generation.GenerationConfig`] الملف، `generate` يحدد الكلمة الأكثر احتمالًا فى كل خطوة من خطوات عملية التوليد (وهذا يُعرف بالتشفير الجشع). اعتمادًا على مهمتك، قد يكون هذا غير مرغوب فيه؛ تستفيد المهام الإبداعية مثل برامج الدردشة أو كتابة مقال ستفيد من أسلوب العينة العشوائية في اختيار الكلمات، تمن ناحية أخرى، فإن المهام التي تعتمد على مدخلات محددة مثل تحويل الصوت إلى نص أو الترجم من فك التشفير الجشع. قم بتفعيل أسلوب العينات العشوائية باستخدام `do_sample=True`، ويمكنك معرفة المزيد حول هذا الموضوع في [تدوينة المدونة](https://huggingface.co/blog/how-to-generate).
|
||||
|
||||
```py
|
||||
>>> # Set seed or reproducibility -- you don't need this unless you want full reproducibility
|
||||
>>> from transformers import set_seed
|
||||
>>> set_seed(42)
|
||||
|
||||
>>> model_inputs = tokenizer(["I am a cat."], return_tensors="pt").to("cuda")
|
||||
|
||||
>>> # LLM + greedy decoding = repetitive, boring output
|
||||
>>> generated_ids = model.generate(**model_inputs)
|
||||
>>> tokenizer.batch_decode(generated_ids, skip_special_tokens=True)[0]
|
||||
'I am a cat. I am a cat. I am a cat. I am a cat'
|
||||
|
||||
>>> # With sampling, the output becomes more creative!
|
||||
>>> generated_ids = model.generate(**model_inputs, do_sample=True)
|
||||
>>> tokenizer.batch_decode(generated_ids, skip_special_tokens=True)[0]
|
||||
'I am a cat. Specifically, I am an indoor-only cat. I'
|
||||
```
|
||||
|
||||
### مشكلة حشو المدخلات فى الاتجاة الخطأ
|
||||
|
||||
LLMs هي [معماريات فك التشفير فقط](https://huggingface.co/learn/nlp-course/chapter1/6؟fw=pt)، مما يعني أنها تستمر في التكرار على موجه الإدخال الخاص بك. فإن جميع المدخلات يجب أن تكون بنفس الطول. لحل هذه المسألة، يتم إضافة رموز حشو إلى المدخلات الأقصر. نظرًا لأن LLMs لا تولي اهتمامًا لرموز الحشو هذه، ذلك، يجب تحديد الجزء المهم من المدخل الذي يجب أن يركز عليه النموذج، وهذا يتم عن طريق ما يسمى بـ "قناع الانتباه". يجب أن يكون الحشو في بداية المدخل (الحشو من اليسار)، وليس في نهايته.
|
||||
|
||||
```py
|
||||
>>> # The tokenizer initialized above has right-padding active by default: the 1st sequence,
|
||||
>>> # which is shorter, has padding on the right side. Generation fails to capture the logic.
|
||||
>>> model_inputs = tokenizer(
|
||||
... ["1, 2, 3", "A, B, C, D, E"], padding=True, return_tensors="pt"
|
||||
... ).to("cuda")
|
||||
>>> generated_ids = model.generate(**model_inputs)
|
||||
>>> tokenizer.batch_decode(generated_ids, skip_special_tokens=True)[0]
|
||||
'1, 2, 33333333333'
|
||||
|
||||
>>> # With left-padding, it works as expected!
|
||||
>>> tokenizer = AutoTokenizer.from_pretrained("mistralai/Mistral-7B-v0.1", padding_side="left")
|
||||
>>> tokenizer.pad_token = tokenizer.eos_token # Most LLMs don't have a pad token by default
|
||||
>>> model_inputs = tokenizer(
|
||||
... ["1, 2, 3", "A, B, C, D, E"], padding=True, return_tensors="pt"
|
||||
... ).to("cuda")
|
||||
>>> generated_ids = model.generate(**model_inputs)
|
||||
>>> tokenizer.batch_decode(generated_ids, skip_special_tokens=True)[0]
|
||||
'1, 2, 3, 4, 5, 6,'
|
||||
```
|
||||
|
||||
### موجه غير صحيح
|
||||
|
||||
تتوقع بعض نماذج اللغات الكبيرة على صيغة محددة للمدخلات للعمل بشكل صحيح. إذا لم يتم اتباع هذه الصيغة، فإن أداء النموذج يتأثر سلبًا: لكن هذا التدهور قد لا يكون واضحًا للعيان. تتوفر معلومات إضافية حول التوجيه، بما في ذلك النماذج والمهام التي تحتاج إلى توخي الحذر، في [الدليل](tasks/prompting). دعنا نرى مثالاً باستخدام LLM للدردشة، والذي يستخدم [قالب الدردشة](chat_templating):
|
||||
```python
|
||||
>>> tokenizer = AutoTokenizer.from_pretrained("HuggingFaceH4/zephyr-7b-alpha")
|
||||
>>> model = AutoModelForCausalLM.from_pretrained(
|
||||
... "HuggingFaceH4/zephyr-7b-alpha", device_map="auto", load_in_4bit=True
|
||||
... )
|
||||
>>> set_seed(0)
|
||||
>>> prompt = """How many helicopters can a human eat in one sitting? Reply as a thug."""
|
||||
>>> model_inputs = tokenizer([prompt], return_tensors="pt").to("cuda")
|
||||
>>> input_length = model_inputs.input_ids.shape[1]
|
||||
>>> generated_ids = model.generate(**model_inputs, max_new_tokens=20)
|
||||
>>> print(tokenizer.batch_decode(generated_ids[:, input_length:], skip_special_tokens=True)[0])
|
||||
"I'm not a thug, but i can tell you that a human cannot eat"
|
||||
>>> # Oh no, it did not follow our instruction to reply as a thug! Let's see what happens when we write
|
||||
>>> # a better prompt and use the right template for this model (through `tokenizer.apply_chat_template`)
|
||||
|
||||
>>> set_seed(0)
|
||||
>>> messages = [
|
||||
... {
|
||||
... "role": "system",
|
||||
... "content": "You are a friendly chatbot who always responds in the style of a thug",
|
||||
... },
|
||||
... {"role": "user", "content": "How many helicopters can a human eat in one sitting?"},
|
||||
... ]
|
||||
>>> model_inputs = tokenizer.apply_chat_template(messages, add_generation_prompt=True, return_tensors="pt").to("cuda")
|
||||
>>> input_length = model_inputs.shape[1]
|
||||
>>> generated_ids = model.generate(model_inputs, do_sample=True, max_new_tokens=20)
|
||||
>>> print(tokenizer.batch_decode(generated_ids[:, input_length:], skip_special_tokens=True)[0])
|
||||
'None, you thug. How bout you try to focus on more useful questions?'
|
||||
>>> # As we can see, it followed a proper thug style 😎
|
||||
```
|
||||
|
||||
## موارد إضافية
|
||||
|
||||
في حين أن عملية التوليد التلقائي بسيطة نسبيًا، فإن الاستفادة القصوى من LLM الخاص بك يمكن أن تكون مهمة صعبة لأن هناك العديد من الأجزاء المتحركة. للخطوات التالية لمساعدتك في الغوص بشكل أعمق في استخدام LLM وفهمه:
|
||||
|
||||
### استخدامات متقدمة للتوليد في نماذج اللغات الكبيرة
|
||||
|
||||
1. دليل حول كيفية [التحكم في طرق التوليد المختلفة](generation_strategies)، وكيفية إعداد ملف تكوين التوليد، وكيفية بث الناتج؛
|
||||
2. [تسريع توليد النص](llm_optims)؛
|
||||
3.[قوالب موجهات للدردشة LLMs](chat_
|
||||
4. [دليل تصميم الموجه](tasks/prompting);
|
||||
5. مرجع واجهة برمجة التطبيقات (API) [`~generation.GenerationConfig`], [`~generation.GenerationMixin.generate`], و [generate-related classes](internal/generation_utils). والعديد من الفئات الأخرى المرتبطة بعملية التوليد.!
|
||||
|
||||
### لوحات صدارة نماذج اللغات الكبيرة
|
||||
1. لوحة صدارة نماذج اللغات الكبيرة المفتوحة المصدر (Open LLM Leaderboard): تركز على جودة النماذج مفتوحة المصدر [رابط لوحة الصدارة](https://huggingface.co/spaces/HuggingFaceH4/open_llm_leaderboard).
|
||||
2. لوحة صدارة أداء نماذج اللغات الكبيرة المفتوحة المصدر (Open LLM-Perf Leaderboard): تركز على إنتاجية نماذج اللغات الكبيرة [رابط لوحة الصدارة](https://huggingface.co/spaces/optimum/llm-perf-leaderboard).
|
||||
|
||||
### زمن الاستجابة والإنتاجية واستهلاك الذاكرة
|
||||
1. دليل تحسين نماذج اللغات الكبيرة من حيث السرعة والذاكرة: دليل تحسين نماذج اللغات الكبيرة.
|
||||
2. التكميم (Quantization): دليل حول تقنية التكميم التكميم مثل تقنيتي bitsandbytes و autogptq، والتي توضح كيفية تقليل متطلبات الذاكرة بشكل كبير.
|
||||
|
||||
### مكتبات مرتبطة
|
||||
1. [`optimum`](https://github.com/huggingface/optimum), امتداد لمكتبة Transformers يعمل على تحسين الأداء لأجهزة معينة.
|
||||
2. [`outlines`](https://github.com/outlines-dev/outlines), مكتبة للتحكم في توليد النصوص (على سبيل المثال، لتوليد ملفات JSON).
|
||||
3. [`SynCode`](https://github.com/uiuc-focal-lab/syncode), مكتبة للتوليد الموجه بقواعد اللغة الخالية من السياق (على سبيل المثال، JSON، SQL، Python).
|
||||
4. [`text-generation-inference`](https://github.com/huggingface/text-generation-inference), خادم جاهز للإنتاج لنماذج اللغات الكبيرة.
|
||||
5. [`text-generation-webui`](https://github.com/oobabooga/text-generation-webui), واجهة مستخدم لتوليد النصوص.
|
||||
@ -1,223 +0,0 @@
|
||||
# شارك نموذجك مع العالم
|
||||
|
||||
أظهرت آخر درسين تعليميين كيفية ضبط نموذج بدقة باستخدام PyTorch و Keras و 🤗 Accelerate لعمليات التهيئة الموزعة. والخطوة التالية هي مشاركة نموذجك مع المجتمع! في Hugging Face، نؤمن بالمشاركة المفتوحة للمعرفة والموارد لتمكين الجميع من الاستفادة من الذكاء الاصطناعي. ونشجعك على مشاركة نموذجك مع المجتمع لمساعدة الآخرين على توفير الوقت والموارد.
|
||||
|
||||
في هذا الدرس، ستتعلم طريقتين لمشاركة نموذجك المدرب أو مضبوط على منصة [Model Hub](https://huggingface.co/models):
|
||||
|
||||
- رفع ملفاتك إلى منصة Hub مباشرة باستخدام الكود البرمجي.
|
||||
|
||||
- قم بسحب وإفلات ملفاتك إلى Hub باستخدام الواجهة web.
|
||||
|
||||
<iframe width="560" height="315" src="https://www.youtube.com/embed/XvSGPZFEjDY" title="مشغل فيديو YouTube"
|
||||
frameborder="0" allow="accelerometer; autoplay; clipboard-write; encrypted-media; gyroscope;
|
||||
picture-in-picture" allowfullscreen></iframe>
|
||||
|
||||
<Tip>
|
||||
|
||||
لمشاركة نموذج مع المجتمع، تحتاج إلى حساب على [huggingface.co](https://huggingface.co/join). يمكنك أيضًا الانضمام إلى منظمة موجودة أو إنشاء منظمة جديدة.
|
||||
|
||||
</Tip>
|
||||
|
||||
## ميزات المستودع
|
||||
|
||||
يعمل كل مستودع على Model Hub مثل مستودع GitHub النتقليدي. تقدم مستودعاتنا التحكم في الإصدارات وسجل التغييرات، وقدرة على رؤية الاختلافات بين الإصدارات.
|
||||
|
||||
تعتمد آلية التحكم في الإصدارات على منصة Model Hub على نظامي git و [git-lfs](https://git-lfs.github.com/). وبعبارة أخرى، يمكنك التعامل مع كل نموذج كأنه مستودع مستقل، مما يمكّن من زيادة التحكم في الوصول والقابلية للتطوير. يسمح التحكم في الإصدار بإجراء تعديلات وتثبيت إصدار محدد من النموذج باستخدام رمز التغيير (commit hash) أو وسم (tag) أو فرع (branch).
|
||||
|
||||
بفضل هذه الميزة، يمكنك تحميل إصدار محدد من النموذج باستخدام معلمة الإصدار "revision":
|
||||
|
||||
```py
|
||||
>>> model = AutoModel.from_pretrained(
|
||||
... "julien-c/EsperBERTo-small", revision="v2.0.1" # اسم العلامة، أو اسم الفرع، أو تجزئة الالتزام
|
||||
... )
|
||||
```
|
||||
|
||||
من السهل أيضًا تعديل الملفات الموجودة داخل مستودع، ويمكنك عرض سجل التغييرات التي طرأت على هذه الملفات ومعاينة الاختلافات بين الإصدارات المختلفة:
|
||||
|
||||

|
||||
|
||||
## الإعداد
|
||||
|
||||
قبل مشاركة نموذج على Hub، ستحتاج إلى بيانات اعتماد حساب Hugging Face الخاصة بك. إذا كنت تستخدم منصة الأوامر، فقم بتشغيل الأمر التالي في بيئة افتراضية حيث تم تثبيت 🤗 Transformers. سيقوم هذا الأمر بتخزين رمز الدخول الخاص بك في مجلد تخزين المؤقت لـ Hugging Face (`~/.cache/` بشكل افتراضي):
|
||||
|
||||
```bash
|
||||
huggingface-cli login
|
||||
```
|
||||
|
||||
إذا كنت تستخدم دفتر ملاحظات مثل Jupyter أو Colaboratory، فتأكد من تثبيت مكتبة [`huggingface_hub`](https://huggingface.co/docs/hub/adding-a-library). تسمح لك هذه المكتبة بالتفاعل برمجيًا مع Hub.
|
||||
|
||||
```bash
|
||||
pip install huggingface_hub
|
||||
```
|
||||
|
||||
ثم استخدم `notebook_login` لتسجيل الدخول إلى Hub، واتبع الرابط [هنا](https://huggingface.co/settings/token) لإنشاء رمز للتسجيل:
|
||||
|
||||
```py
|
||||
>>> from huggingface_hub import notebook_login
|
||||
|
||||
>>> notebook_login()
|
||||
```
|
||||
|
||||
|
||||
## تحويل النموذج ليتوافق مع جميع الأطر العمل
|
||||
|
||||
لضمان إمكانية استخدام نموذجك من قبل شخص يعمل بإطار عمل مختلف، نوصي بتحويل نموذجك ورفعه مع نقاط التحقق من PyTorch و TensorFlow. في حين أن المستخدمين لا يزال بإمكانهم تحميل نموذجك من إطار عمل مختلف إذا تخطيت هذه الخطوة، إلا أنه سيكون أبطأ لأن 🤗 Transformers ستحتاج إلى تحويل نقطة التحقق أثناء التشغيل.
|
||||
|
||||
تحويل نقطة التحقق لإطار عمل آخر أمر سهل. تأكد من تثبيت PyTorch و TensorFlow (راجع [هنا](installation) لتعليمات التثبيت)، ثم ابحث عن النموذج الملائم لمهمتك في الإطار الآخر.
|
||||
|
||||
<frameworkcontent>
|
||||
<pt>
|
||||
حدد `from_tf=True` لتحويل نقطة تحقق من TensorFlow إلى PyTorch:
|
||||
|
||||
```py
|
||||
>>> pt_model = DistilBertForSequenceClassification.from_pretrained("path/to/awesome-name-you-picked", from_tf=True)
|
||||
>>> pt_model.save_pretrained("path/to/awesome-name-you-picked")
|
||||
```
|
||||
</pt>
|
||||
<tf>
|
||||
حدد `from_pt=True` لتحويل نقطة تحقق من PyTorch إلى TensorFlow:
|
||||
|
||||
```py
|
||||
>>> tf_model = TFDistilBertForSequenceClassification.from_pretrained("path/to/awesome-name-you-picked", from_pt=True)
|
||||
```
|
||||
|
||||
بعد ذلك، يمكنك حفظ نموذج TensorFlow الجديد بنقطة التحقق الجديدة:
|
||||
|
||||
```py
|
||||
>>> tf_model.save_pretrained("path/to/awesome-name-you-picked")
|
||||
```
|
||||
</tf>
|
||||
<jax>
|
||||
إذا كان النموذج متاحًا في Flax، فيمكنك أيضًا تحويل نقطة تحقق من PyTorch إلى Flax:
|
||||
|
||||
```py
|
||||
>>> flax_model = FlaxDistilBertForSequenceClassification.from_pretrained(
|
||||
... "path/to/awesome-name-you-picked", from_pt=True
|
||||
... )
|
||||
```
|
||||
</jax>
|
||||
</frameworkcontent>
|
||||
|
||||
## دفع نموذج أثناء التدريب
|
||||
|
||||
<frameworkcontent>
|
||||
<pt>
|
||||
<Youtube id="Z1-XMy-GNLQ"/>
|
||||
|
||||
مشاركة نموذجك على Hub مر بسيط للغاية كل ما عليك هو إضافة معلمة أو استدعاء رد إضافي. كما تذكر من درس [التدريب الدقيق](training)، فإن فئة [`TrainingArguments`] هي المكان الذي تحدد فيه المعلمات الفائقة وخيارات التدريب الإضافية. تشمل إحدى خيارات التدريب هذه القدرة على دفع النموذج مباشرة إلى المنصة Hub. قم بتعيين `push_to_hub=True` في [`TrainingArguments`]:
|
||||
|
||||
```py
|
||||
>>> training_args = TrainingArguments(output_dir="my-awesome-model", push_to_hub=True)
|
||||
```
|
||||
|
||||
مرر معامﻻت التدريب كالمعتاد إلى [`Trainer`]:
|
||||
|
||||
```py
|
||||
>>> trainer = Trainer(
|
||||
... model=model,
|
||||
... args=training_args,
|
||||
... train_dataset=small_train_dataset,
|
||||
... eval_dataset=small_eval_dataset,
|
||||
... compute_metrics=compute_metrics,
|
||||
... )
|
||||
```
|
||||
|
||||
بعد ضبط نموذجك بدقة، يمكنك استخدام دالة [`~transformers.Trainer.push_to_hub`] المتاحة في [`Trainer`] لدفع النموذج المدرب إلى المنصة Hub. سوف تضيف 🤗 Transformers تلقائيًا المعلمات الفائقة المستخدمة في التدريب ونتائج التدريب وإصدارات الإطار إلى بطاقة معلومات النموذج الخاصة بك!
|
||||
|
||||
```py
|
||||
>>> trainer.push_to_hub()
|
||||
```
|
||||
</pt>
|
||||
<tf>
|
||||
شارك نموذجًا على Hub باستخدام [`PushToHubCallback`]. في دالة [`PushToHubCallback`], أضف:
|
||||
|
||||
- دليل إخراج لنموذجك.
|
||||
- مُجزّئ اللغوي.
|
||||
- `hub_model_id`، والذي هو اسم مستخدم Hub واسم النموذج الخاص بك.
|
||||
|
||||
```py
|
||||
>>> from transformers import PushToHubCallback
|
||||
|
||||
>>> push_to_hub_callback = PushToHubCallback(
|
||||
... output_dir="./your_model_save_path", tokenizer=tokenizer, hub_model_id="your-username/my-awesome-model"
|
||||
... )
|
||||
```
|
||||
|
||||
أضف الاستدعاء إلى [`fit`](https://keras.io/api/models/model_training_apis/)، وسيقوم 🤗 Transformers بدفع النموذج المدرب إلى Hub:
|
||||
|
||||
```py
|
||||
>>> model.fit(tf_train_dataset, validation_data=tf_validation_dataset, epochs=3, callbacks=push_to_hub_callback)
|
||||
```
|
||||
</tf>
|
||||
</frameworkcontent>
|
||||
|
||||
## استخدام دالة `push_to_hub`
|
||||
|
||||
يمكنك أيضًا استدعاء `push_to_hub` مباشرة على نموذجك لتحميله إلى Hub.
|
||||
|
||||
حدد اسم نموذجك في `push_to_hub`:
|
||||
|
||||
```py
|
||||
>>> pt_model.push_to_hub("my-awesome-model")
|
||||
```
|
||||
|
||||
ينشئ هذا مستودعًا تحت اسم المستخدم الخاص بك باسم نموذج `my-awesome-model`. يمكن للمستخدمين الآن تحميل نموذجك باستخدام دالة `from_pretrained`:
|
||||
|
||||
```py
|
||||
>>> from transformers import AutoModel
|
||||
|
||||
>>> model = AutoModel.from_pretrained("your_username/my-awesome-model")
|
||||
```
|
||||
```py
|
||||
>>> from transformers import AutoModel
|
||||
|
||||
>>> model = AutoModel.from_pretrained("your_username/my-awesome-model")
|
||||
```
|
||||
|
||||
إذا كنت تنتمي إلى منظمة وتريد دفع نموذجك تحت اسم المنظمة بدلاً من ذلك، فما عليك سوى إضافته إلى `repo_id`:
|
||||
|
||||
```py
|
||||
>>> pt_model.push_to_hub("my-awesome-org/my-awesome-model")
|
||||
```
|
||||
|
||||
يمكن أيضًا استخدام دالة `push_to_hub` لإضافة ملفات أخرى إلى مستودع النماذج. على سبيل المثال، أضف رموزًا إلى مستودع نموذج:
|
||||
|
||||
```py
|
||||
>>> tokenizer.push_to_hub("my-awesome-model")
|
||||
```
|
||||
|
||||
أو ربما تريد إضافة إصدار TensorFlow من نموذج PyTorch المضبوط:
|
||||
|
||||
```py
|
||||
>>> tf_model.push_to_hub("my-awesome-model")
|
||||
```
|
||||
|
||||
الآن عند الانتقال إلى ملفك الشخصي على Hugging Face، يجب أن ترى مستودع النماذج الذي أنشأته حديثًا. سيؤدي النقر فوق علامة التبويب **Files** إلى عرض جميع الملفات التي قمت بتحميلها في المستودع.
|
||||
|
||||
للحصول على مزيد من التفاصيل حول كيفية إنشاء الملفات وتحميلها إلى مستودع، راجع وثائق Hub [هنا](https://huggingface.co/docs/hub/how-to-upstream).
|
||||
|
||||
## التحميل باستخدام الواجهة web
|
||||
|
||||
يمكن للمستخدمين الذين يفضلون نهج عدم الترميز تحميل نموذج من خلال واجهة Hub web. قم بزيارة [huggingface.co/new](https://huggingface.co/new) لإنشاء مستودع جديد:
|
||||
|
||||

|
||||
|
||||
من هنا، أضف بعض المعلومات حول نموذجك:
|
||||
|
||||
- حدد **مالك** المستودع. يمكن أن يكون هذا أنت أو أي من المنظمات التي تنتمي إليها.
|
||||
- اختر اسمًا لنموذجك، والذي سيكون أيضًا اسم المستودع.
|
||||
- اختر ما إذا كان نموذجك عامًا أم خاصًا.
|
||||
- حدد ترخيص الاستخدام لنموذجك.
|
||||
|
||||
الآن انقر فوق علامة التبويب **Files** ثم انقر فوق الزر **Add file** لإضافة ملف جديد إلى مستودعك. ثم اسحب وأسقط ملفًا لتحميله وأضف رسالة الالتزام.
|
||||
|
||||

|
||||
|
||||
## إضافة بطاقة نموذج
|
||||
|
||||
للتأكد من فهم المستخدمين لقدرات نموذجك وقيوده وتحيزاته المحتملة واعتباراته الأخلاقية، يرجى إضافة بطاقة نموذج إلى مستودعك. يتم تعريف بطاقة النموذج في ملف `README.md`. يمكنك إضافة بطاقة نموذج عن طريق:
|
||||
|
||||
* قم بإنشاء ملف `README.md` وتحميله يدويًا.
|
||||
* انقر فوق الزر **Edit model card** في مستودع نموذجك.
|
||||
|
||||
الق نظرة على بطاقة [DistilBert](https://huggingface.co/distilbert/distilbert-base-uncased) للحصول على مثال جيد على نوع المعلومات التي يجب أن تتضمنها بطاقة النموذج. للحصول على مزيد من التفاصيل حول الخيارات الأخرى التي يمكنك التحكم فيها في ملف `README.md` مثل البصمة الكربونية للنموذج أو أمثلة الأداة، راجع الوثائق [هنا](https://huggingface.co/docs/hub/models-cards).
|
||||
@ -1,250 +0,0 @@
|
||||
# تحميل المحوّلات باستخدام 🤗 PEFT
|
||||
|
||||
[[open-in-colab]]
|
||||
|
||||
تقنية "التدريب الدقيق ذو الكفاءة البارامتيرية" (PEFT)](https://huggingface.co/blog/peft) تقوم بتجميد معلمات النموذج المُدرب مسبقًا أثناء الضبط الدقيق وتضيف عدد صغير من المعلمات القابلة للتدريب (المحولات) فوقه. يتم تدريب المحوّلات لتعلم معلومات خاصة بالمهام. وقد ثبت أن هذا النهج فعال للغاية من حيث استخدام الذاكرة مع انخفاض استخدام الكمبيوتر أثناء إنتاج نتائج قمماثلة للنموذج مضبوط دقيقًا بالكامل.
|
||||
|
||||
عادة ما تكون المحولات المدربة باستخدام PEFT أصغر بمقدار كبير من حيث الحجم من النموذج الكامل، مما يجعل من السهل مشاركتها وتخزينها وتحميلها.
|
||||
|
||||
<div class="flex flex-col justify-center">
|
||||
<img src="https://huggingface.co/datasets/huggingface/documentation-images/resolve/main/peft/PEFT-hub-screenshot.png"/>
|
||||
<figcaption class="text-center">تبلغ أوزان المحول لطراز OPTForCausalLM المخزن على Hub حوالي 6 ميجابايت مقارنة بالحجم الكامل لأوزان النموذج، والتي يمكن أن تكون حوالي 700 ميجابايت.</figcaption>
|
||||
</div>
|
||||
|
||||
إذا كنت مهتمًا بمعرفة المزيد عن مكتبة 🤗 PEFT، فراجع [الوثائق](https://huggingface.co/docs/peft/index).
|
||||
|
||||
## الإعداد
|
||||
|
||||
ابدأ بتثبيت 🤗 PEFT:
|
||||
|
||||
```bash
|
||||
pip install peft
|
||||
```
|
||||
|
||||
إذا كنت تريد تجربة الميزات الجديدة تمامًا، فقد تكون مهتمًا بتثبيت المكتبة من المصدر:
|
||||
|
||||
```bash
|
||||
pip install git+https://github.com/huggingface/peft.git
|
||||
```
|
||||
|
||||
## نماذج PEFT المدعومة
|
||||
|
||||
يدعم 🤗 Transformers بشكلٍ أصلي بعض طرق PEFT، مما يعني أنه يمكنك تحميل أوزان المحول المخزنة محليًا أو على Hub وتشغيلها أو تدريبها ببضع سطور من التعليمات البرمجية. الطرق المدعومة هي:
|
||||
|
||||
- [محولات الرتبة المنخفضة](https://huggingface.co/docs/peft/conceptual_guides/lora)
|
||||
- [IA3](https://huggingface.co/docs/peft/conceptual_guides/ia3)
|
||||
- [AdaLoRA](https://arxiv.org/abs/2303.10512)
|
||||
|
||||
إذا كنت تريد استخدام طرق PEFT الأخرى، مثل تعلم المحث أو ضبط المحث، أو حول مكتبة 🤗 PEFT بشكل عام، يرجى الرجوع إلى [الوثائق](https://huggingface.co/docs/peft/index).
|
||||
|
||||
## تحميل محول PEFT
|
||||
|
||||
لتحميل نموذج محول PEFT واستخدامه من 🤗 Transformers، تأكد من أن مستودع Hub أو الدليل المحلي يحتوي على ملف `adapter_config.json` وأوزان المحوّل، كما هو موضح في صورة المثال أعلاه. بعد ذلك، يمكنك تحميل نموذج محوّل PEFT باستخدام فئة `AutoModelFor`. على سبيل المثال، لتحميل نموذج محول PEFT للنمذجة اللغوية السببية:
|
||||
|
||||
1. حدد معرف النموذج لPEFT
|
||||
2. مرره إلى فئة [`AutoModelForCausalLM`]
|
||||
|
||||
```py
|
||||
from transformers import AutoModelForCausalLM, AutoTokenizer
|
||||
|
||||
peft_model_id = "ybelkada/opt-350m-lora"
|
||||
model = AutoModelForCausalLM.from_pretrained(peft_model_id)
|
||||
```
|
||||
|
||||
<Tip>
|
||||
|
||||
يمكنك تحميل محول PEFT باستخدام فئة `AutoModelFor` أو فئة النموذج الأساسي مثل `OPTForCausalLM` أو `LlamaForCausalLM`.
|
||||
|
||||
</Tip>
|
||||
|
||||
يمكنك أيضًا تحميل محول PEFT عن طريق استدعاء طريقة `load_adapter`:
|
||||
|
||||
```py
|
||||
from transformers import AutoModelForCausalLM, AutoTokenizer
|
||||
|
||||
model_id = "facebook/opt-350m"
|
||||
peft_model_id = "ybelkada/opt-350m-lora"
|
||||
|
||||
model = AutoModelForCausalLM.from_pretrained(model_id)
|
||||
model.load_adapter(peft_model_id)
|
||||
```
|
||||
|
||||
راجع قسم [وثائق API](#transformers.integrations.PeftAdapterMixin) أدناه لمزيد من التفاصيل.
|
||||
|
||||
## التحميل في 8 بت أو 4 بت
|
||||
|
||||
راجع قسم [وثائق API](#transformers.integrations.PeftAdapterMixin) أدناه لمزيد من التفاصيل.
|
||||
|
||||
## التحميل في 8 بت أو 4 بت
|
||||
|
||||
يدعم تكامل `bitsandbytes` أنواع بيانات الدقة 8 بت و4 بت، والتي تكون مفيدة لتحميل النماذج الكبيرة لأنها توفر مساحة في الذاكرة (راجع دليل تكامل `bitsandbytes` [guide](./quantization#bitsandbytes-integration) لمعرفة المزيد). أضف المعلمات`load_in_8bit` أو `load_in_4bit` إلى [`~PreTrainedModel.from_pretrained`] وقم بتعيين `device_map="auto"` لتوزيع النموذج بشكل فعال على الأجهزة لديك:
|
||||
|
||||
```py
|
||||
from transformers import AutoModelForCausalLM, AutoTokenizer, BitsAndBytesConfig
|
||||
|
||||
peft_model_id = "ybelkada/opt-350m-lora"
|
||||
model = AutoModelForCausalLM.from_pretrained(peft_model_id, quantization_config=BitsAndBytesConfig(load_in_8bit=True))
|
||||
```
|
||||
|
||||
## إضافة محول جديد
|
||||
|
||||
يمكنك استخدام الدالة [`~peft.PeftModel.add_adapter`] لإضافة محوّل جديد إلى نموذج يحتوي بالفعل على محوّل آخر طالما أن المحول الجديد مطابقًا للنوع الحالي. على سبيل المثال، إذا كان لديك محول LoRA موجود مرتبط بنموذج:
|
||||
|
||||
```py
|
||||
from transformers import AutoModelForCausalLM, OPTForCausalLM, AutoTokenizer
|
||||
from peft import LoraConfig
|
||||
|
||||
model_id = "facebook/opt-350m"
|
||||
model = AutoModelForCausalLM.from_pretrained(model_id)
|
||||
|
||||
lora_config = LoraConfig(
|
||||
target_modules=["q_proj", "k_proj"],
|
||||
init_lora_weights=False
|
||||
)
|
||||
|
||||
model.add_adapter(lora_config, adapter_name="adapter_1")
|
||||
```
|
||||
|
||||
لإضافة محول جديد:
|
||||
|
||||
```py
|
||||
# قم بتعليق محول جديد بنفس التكوين
|
||||
model.add_adapter(lora_config, adapter_name="adapter_2")
|
||||
```
|
||||
|
||||
الآن يمكنك استخدام [`~peft.PeftModel.set_adapter`] لتعيين المحول الذي سيتم استخدامه:
|
||||
|
||||
```py
|
||||
# استخدم adapter_1
|
||||
model.set_adapter("adapter_1")
|
||||
output = model.generate(**inputs)
|
||||
print(tokenizer.decode(output_disabled[0], skip_special_tokens=True))
|
||||
|
||||
# استخدم adapter_2
|
||||
model.set_adapter("adapter_2")
|
||||
output_enabled = model.generate(**inputs)
|
||||
print(tokenizer.decode(output_enabled[0], skip_special_tokens=True))
|
||||
```
|
||||
|
||||
## تمكين وتعطيل المحولات
|
||||
|
||||
بمجرد إضافة محول إلى نموذج، يمكنك تمكين أو تعطيل وحدة المحول. لتمكين وحدة المحول:
|
||||
|
||||
```py
|
||||
from transformers import AutoModelForCausalLM, OPTForCausalLM, AutoTokenizer
|
||||
from peft import PeftConfig
|
||||
|
||||
model_id = "facebook/opt-350m"
|
||||
adapter_model_id = "ybelkada/opt-350m-lora"
|
||||
tokenizer = AutoTokenizer.from_pretrained(model_id)
|
||||
text = "Hello"
|
||||
inputs = tokenizer(text, return_tensors="pt")
|
||||
|
||||
model = AutoModelForCausalLM.from_pretrained(model_id)
|
||||
peft_config = PeftConfig.from_pretrained(adapter_model_id)
|
||||
|
||||
# لبدء تشغيله بأوزان عشوائية
|
||||
peft_config.init_lora_weights = False
|
||||
|
||||
model.add_adapter(peft_config)
|
||||
model.enable_adapters()
|
||||
output = model.generate(**inputs)
|
||||
```
|
||||
|
||||
لإيقاف تشغيل وحدة المحول:
|
||||
|
||||
```py
|
||||
model.disable_adapters()
|
||||
output = model.generate(**inputs)
|
||||
```
|
||||
|
||||
## تدريب محول PEFT
|
||||
|
||||
يدعم محول PEFT فئة [`Trainer`] بحيث يمكنك تدريب محول لحالتك الاستخدام المحددة. فهو يتطلب فقط إضافة بضع سطور أخرى من التعليمات البرمجية. على سبيل المثال، لتدريب محول LoRA:
|
||||
|
||||
<Tip>
|
||||
|
||||
إذا لم تكن معتادًا على ضبط نموذج دقيق باستخدام [`Trainer`، فراجع البرنامج التعليمي](training) لضبط نموذج مُدرب مسبقًا.
|
||||
|
||||
</Tip>
|
||||
|
||||
1. حدد تكوين المحول باستخدام نوع المهمة والمعاملات الزائدة (راجع [`~peft.LoraConfig`] لمزيد من التفاصيل حول وظيفة هذه المعلمات).
|
||||
|
||||
```py
|
||||
from peft import LoraConfig
|
||||
|
||||
peft_config = LoraConfig(
|
||||
lora_alpha=16,
|
||||
lora_dropout=0.1,
|
||||
r=64,
|
||||
bias="none",
|
||||
task_type="CAUSAL_LM"،
|
||||
)
|
||||
```
|
||||
|
||||
2. أضف المحول إلى النموذج.
|
||||
|
||||
```py
|
||||
model.add_adapter(peft_config)
|
||||
```
|
||||
|
||||
3. الآن يمكنك تمرير النموذج إلى [`Trainer`]!
|
||||
|
||||
```py
|
||||
trainer = Trainer(model=model, ...)
|
||||
trainer.train()
|
||||
```
|
||||
|
||||
لحفظ محول المدرب وتحميله مرة أخرى:
|
||||
|
||||
```py
|
||||
model.save_pretrained(save_dir)
|
||||
model = AutoModelForCausalLM.from_pretrained(save_dir)
|
||||
```
|
||||
|
||||
## إضافة طبقات قابلة للتدريب إضافية إلى محول PEFT
|
||||
|
||||
```py
|
||||
model.save_pretrained(save_dir)
|
||||
model = AutoModelForCausalLM.from_pretrained(save_dir)
|
||||
```
|
||||
|
||||
## إضافة طبقات قابلة للتدريب إضافية إلى محول PEFT
|
||||
|
||||
يمكنك أيضًا إجراء تدريب دقيق لمحوّلات قابلة للتدريب إضافية فوق نموذج يحتوي بالفعل على محوّلات عن طريق تمرير معلم `modules_to_save` في تكوين PEFT الخاص بك. على سبيل المثال، إذا كنت تريد أيضًا ضبط دقيق لرأس النموذج اللغوي`lm_head` فوق نموذج بمحوّل LoRA:
|
||||
|
||||
```py
|
||||
from transformers import AutoModelForCausalLM, OPTForCausalLM, AutoTokenizer
|
||||
from peft import LoraConfig
|
||||
|
||||
model_id = "facebook/opt-350m"
|
||||
model = AutoModelForCausalLM.from_pretrained(model_id)
|
||||
|
||||
lora_config = LoraConfig(
|
||||
target_modules=["q_proj", "k_proj"],
|
||||
modules_to_save=["lm_head"]،
|
||||
)
|
||||
|
||||
model.add_adapter(lora_config)
|
||||
```
|
||||
|
||||
## وثائق API
|
||||
|
||||
[[autodoc]] integrations.PeftAdapterMixin
|
||||
- load_adapter
|
||||
- add_adapter
|
||||
- set_adapter
|
||||
- disable_adapters
|
||||
- enable_adapters
|
||||
- active_adapters
|
||||
- get_adapter_state_dict
|
||||
|
||||
|
||||
|
||||
|
||||
<!--
|
||||
TODO: (@younesbelkada @stevhliu)
|
||||
- Link to PEFT docs for further details
|
||||
- Trainer
|
||||
- 8-bit / 4-bit examples ?
|
||||
-->
|
||||
@ -1,315 +0,0 @@
|
||||
# خطوط الأنابيب الاستدلال
|
||||
|
||||
يجعل [`pipeline`] من السهل استخدام أي نموذج من [Hub](https://huggingface.co/models) للاستدلال لأي مهام خاصة باللغة أو الرؤية الحاسوبية أو الكلام أو المهام متعددة الوسائط. حتى إذا لم يكن لديك خبرة في طريقة معينة أو لم تكن على دراية بالرمز الأساسي وراء النماذج، يمكنك مع ذلك استخدامها للاستدلال باستخدام [`pipeline`]! سوف يُعلمك هذا البرنامج التعليمي ما يلي:
|
||||
|
||||
* استخدام [`pipeline`] للاستدلال.
|
||||
* استخدم مُجزّئ أو نموذجًا محددًا.
|
||||
* استخدم [`pipeline`] للمهام الصوتية والبصرية والمتعددة الوسائط.
|
||||
|
||||
<Tip>
|
||||
|
||||
اطلع على وثائق [`pipeline`] للحصول على القائمة كاملة بالمهام المدعومة والمعلمات المتاحة.
|
||||
|
||||
</Tip>
|
||||
|
||||
## استخدام الأنابيب
|
||||
|
||||
على الرغم من أن لكل مهمة أنبوب [`pipeline`] خاص بها، إلا أنه من الأبسط استخدام تجريد خط الأنابيب العام [`pipeline`] الذي يحتوي على جميع خطوط الأنابيب الخاصة بالمهمة. يقوم [`pipeline`] تلقائيًا بتحميل نموذج افتراضي وفئة معالجة مسبقة قادرة على الاستدلال لمهمتك. دعنا نأخذ مثال استخدام [`pipeline`] للتعرف التلقائي على الكلام (ASR)، أو تحويل الكلام إلى نص.
|
||||
|
||||
1. ابدأ بإنشاء [`pipeline`] وحدد مهمة الاستدلال:
|
||||
|
||||
```py
|
||||
>>> from transformers import pipeline
|
||||
|
||||
>>> transcriber = pipeline(task="automatic-speech-recognition")
|
||||
```
|
||||
|
||||
2. مرر إدخالك إلى [`pipeline`]. في حالة التعرف على الكلام، يكون هذا ملف إدخال صوتي:
|
||||
|
||||
```py
|
||||
>>> transcriber("https://huggingface.co/datasets/Narsil/asr_dummy/resolve/main/mlk.flac")
|
||||
{'text': 'I HAVE A DREAM BUT ONE DAY THIS NATION WILL RISE UP LIVE UP THE TRUE MEANING OF ITS TREES'}
|
||||
```
|
||||
|
||||
لم تحصل على النتيجة التي تريدها؟ تحقق من بعض [نماذج التعرف على الكلام الأكثر تنزيلًا](https://huggingface.co/models?pipeline_tag=automatic-speech-recognition&sort=trending)
|
||||
على Hub لمعرفة ما إذا كان بإمكانك الحصول على نسخة منقحة أفضل.
|
||||
|
||||
لنَجرب نموذج [Whisper large-v2](https://huggingface.co/openai/whisper-large) من OpenAI. تم إصدار Whisper بعد عامين من إصدار Wav2Vec2، وتم تدريبه على ما يقرب من 10 أضعاف كمية البيانات. وبهذه الصفة، فإنه يتفوق على Wav2Vec2 في معظم معظم المقاييس. كما أنه يمتلك ميزة إضافية وهي في التنبؤ بعلامات الترقيم وحالة الأحرف، والتي لا يمكن تحقيقها مع Wav2Vec2.
|
||||
|
||||
دعونا نجربها هنا لنرى كيف تؤدي:
|
||||
|
||||
```py
|
||||
>>> transcriber = pipeline(model="openai/whisper-large-v2")
|
||||
>>> transcriber("https://huggingface.co/datasets/Narsil/asr_dummy/resolve/main/mlk.flac")
|
||||
{'text': ' I have a dream that one day this nation will rise up and live out the true meaning of its creed.'}
|
||||
```
|
||||
|
||||
الآن تبدو هذه النتيجة أكثر دقة! لمقارنة عميقة حول Wav2Vec2 مقابل Whisper، راجع [دورة Audio Transformers](https://huggingface.co/learn/audio-course/chapter5/asr_models).
|
||||
نشجعك بشدة على التحقق من Hub للحصول على نماذج بلغات مختلفة، ونماذج متخصصة في مجالك، وأكثر من ذلك.
|
||||
يمكنك التحقق من نتائج النموذج ومقارنتها مباشرة من متصفحك على Hub لمعرفة ما إذا كان يناسبها
|
||||
أو التعامل مع الحالات الخاصة بشكل أفضل من غيرها.
|
||||
وإذا لم تجد نموذجًا لحالتك الاستخدام، فيمكنك دائمًا البدء في [التدريب](training) الخاص بك!
|
||||
|
||||
إذا كان لديك عدة مدخلات، فيمكنك تمرير إدخالك كقائمة:
|
||||
|
||||
```py
|
||||
transcriber(
|
||||
[
|
||||
"https://huggingface.co/datasets/Narsil/asr_dummy/resolve/main/mlk.flac",
|
||||
"https://huggingface.co/datasets/Narsil/asr_dummy/resolve/main/1.flac",
|
||||
]
|
||||
)
|
||||
```
|
||||
|
||||
تعد خطوط الأنابيب مثالية للتجريب نظرًا لأن التبديل من نموذج إلى آخر أمر بسيط للغاية؛ ومع ذلك، هناك بعض الطرق لتحسينها لأحمال عمل أكبر من التجريب. راجع الأدلة التالية التي تتعمق فى التكرار عبر مجموعات البيانات الكاملة أو استخدام خطوط الأنابيب في خادم ويب:
|
||||
من الوثائق:
|
||||
* [استخدام خطوط الأنابيب على مجموعة بيانات](#using-pipelines-on-a-dataset)
|
||||
* [استخدام خطوط الأنابيب لخادم ويب](./pipeline_webserver)
|
||||
|
||||
## المعلمات
|
||||
|
||||
يدعم [`pipeline`] العديد من المعلمات؛ بعضها خاص بالمهمة، والبعض الآخر عام لجميع خطوط الأنابيب.
|
||||
بشكل عام، يمكنك تحديد المعلمات في أي مكان تريده:
|
||||
|
||||
```py
|
||||
transcriber = pipeline(model="openai/whisper-large-v2", my_parameter=1)
|
||||
|
||||
out = transcriber(...) # سيتم استخدام هذا `my_parameter=1`.
|
||||
out = transcriber(..., my_parameter=2) # سيتم تجاوز هذا واستخدام `my_parameter=2`.
|
||||
out = transcriber(...) # سيتم الرجوع إلى استخدام `my_parameter=1`.
|
||||
```
|
||||
|
||||
دعونا نلقي نظرة على 3 مهمة:
|
||||
|
||||
### الجهاز
|
||||
|
||||
إذا كنت تستخدم `device=n`، فإن خط الأنابيب يضع النموذج تلقائيًا على الجهاز المحدد.
|
||||
سيعمل هذا بغض النظر عما إذا كنت تستخدم PyTorch أو Tensorflow.
|
||||
|
||||
```py
|
||||
transcriber = pipeline(model="openai/whisper-large-v2", device=0)
|
||||
```
|
||||
|
||||
إذا كان النموذج كبيرًا جدًا بالنسبة لوحدة معالجة الرسومات (GPU) واحدة، وأنت تستخدم PyTorch، فيمكنك تعيين `torch_dtype='float16'` لتمكين الاستدلال بدقة FP16. عادةً ما لا يتسبب ذلك في حدوث انخفاضات كبيرة في الأداء، ولكن تأكد من تقييمه على نماذجك!
|
||||
|
||||
بدلاً من ذلك، يمكنك تعيين `device_map="auto"` لتحديد كيفية تحميل مخزنات النموذج وتخزينها تلقائيًا. يتطلب استخدام معامل `device_map` مكتبه 🤗 [Accelerate](https://huggingface.co/docs/accelerate):
|
||||
|
||||
```bash
|
||||
pip install --upgrade accelerate
|
||||
```
|
||||
|
||||
تقوم الشفرة التالية بتحميل مخزنات النموذج وتخزينها تلقائيًا عبر الأجهزة:
|
||||
|
||||
```py
|
||||
transcriber = pipeline(model="openai/whisper-large-v2", device_map="auto")
|
||||
```
|
||||
|
||||
لاحظ أنه إذا تم تمرير `device_map="auto"`، فلا توجد حاجة لإضافة حجة `device=device` عند إنشاء خط الأنابيب الخاص بك، فقد تواجه بعض السلوكيات غير المتوقعة!
|
||||
|
||||
### حجم الدفعة
|
||||
|
||||
بشكل افتراضي، لن تقوم خطوط الأنابيب بتجميع الاستدلال لأسباب مفصلة [هنا](https://huggingface.co/docs/transformers/main_classes/pipelines#pipeline-batching). والسبب هو أن التجميع ليست أسرع بالضرورة، ويمكن أن تكون أبطأ في الواقع في بعض الحالات.
|
||||
|
||||
ولكن إذا نجحت في حالتك الاستخدام، فيمكنك استخدام ما يلي:
|
||||
|
||||
```py
|
||||
transcriber = pipeline(model="openai/whisper-large-v2", device=0, batch_size=2)
|
||||
audio_filenames = [f"https://huggingface.co/datasets/Narsil/asr_dummy/resolve/main/{i}.flac" for i in range(1, 5)]
|
||||
texts = transcriber(audio_filenames)
|
||||
```
|
||||
|
||||
هذا يشغل خط الأنابيب على ملفات الصوت الأربعة المتاحة، ولكنه سيمررها على دفعتين
|
||||
إلى النموذج (الذي يوجد على وحدة معالجة الرسومات (GPU)، حيث من المرجح أن تساعد التجميع) دون الحاجة إلى أي رمز إضافي منك.
|
||||
يجب أن تتطابق الإخراج دائمًا مع ما كنت ستحصل عليه دون التجميع. المقصود منه فقط كطريقة لمساعدتك في الحصول على سرعة أكبر من خط الأنابيب.
|
||||
|
||||
يمكن لخطوط الأنابيب أيضًا تخفيف بعض تعقيدات التجميع لأنه، بالنسبة لبعض خطوط الأنابيب، يجب تقسيم عنصر واحد (مثل ملف صوتي طويل) إلى أجزاء متعددة لمعالجته بواسطة نموذج. يقوم خط الأنابيب بأداء هذه العملية التي تسمى تجميع الأجزاء [*batch batching*](./main_classes/pipelines#pipeline-chunk-batching) نيابة عنك.
|
||||
|
||||
### معلمات خاصة بالمهمة
|
||||
|
||||
توفر جميع المهام معلمات خاصة بالمهمة تتيح المرونة والخيارات الإضافية لمساعدتك في أداء عملك.
|
||||
على سبيل المثال، تحتوي طريقة [`transformers.AutomaticSpeechRecognitionPipeline.__call__`] على معلمة `return_timestamps` التي تبدو واعدة لترجمة مقاطع الفيديو:
|
||||
```py
|
||||
>>> transcriber = pipeline(model="openai/whisper-large-v2", return_timestamps=True)
|
||||
>>> transcriber("https://huggingface.co/datasets/Narsil/asr_dummy/resolve/main/mlk.flac")
|
||||
{'text': ' I have a dream that one day this nation will rise up and live out the true meaning of its creed.', 'chunks': [{'timestamp': (0.0, 11.88), 'text': ' I have a dream that one day this nation will rise up and live out the true meaning of its'}, {'timestamp': (11.88, 12.38), 'text': ' creed.'}]}
|
||||
```
|
||||
|
||||
كما ترون، استنتج النموذج النص.وكذلك حدد **وقت** نطق الجمل المختلفة.
|
||||
|
||||
تتوفر العديد من المعلمات لكل مهمة، لذا تحقق من مرجع API لكل مهمة لمعرفة ما يمكنك تعديله!
|
||||
على سبيل المثال، تحتوي [`~transformers.AutomaticSpeechRecognitionPipeline`] على معلمة `chunk_length_s` مفيدة
|
||||
للعمل على ملفات الصوت الطويلة جدًا (على سبيل المثال، ترجمة الأفلام أو مقاطع الفيديو التي تستغرق ساعة) والتي لا يمكن للنموذج التعامل معها بمفرده:
|
||||
|
||||
```python
|
||||
>>> transcriber = pipeline(model="openai/whisper-large-v2", chunk_length_s=30)
|
||||
>>> transcriber("https://huggingface.co/datasets/reach-vb/random-audios/resolve/main/ted_60.wav")
|
||||
{'text': " So in college, I was a government major, which means I had to write a lot of papers. Now, when a normal student writes a paper, they might spread the work out a little like this. So, you know. You get started maybe a little slowly, but you get enough done in the first week that with some heavier days later on, everything gets done and things stay civil. And I would want to do that like that. That would be the plan. I would have it all ready to go, but then actually the paper would come along, and then I would kind of do this. And that would happen every single paper. But then came my 90-page senior thesis, a paper you're supposed to spend a year on. I knew for a paper like that, my normal workflow was not an option, it was way too big a project. So I planned things out and I decided I kind of had to go something like this. This is how the year would go. So I'd start off light and I'd bump it up"}
|
||||
```
|
||||
|
||||
إذا لم تتمكن من العثور على معلمة قد تساعدك حقًا، فلا تتردد في [طلبها](https://github.com/huggingface/transformers/issues/new?assignees=&labels=feature&template=feature-request.yml)!
|
||||
|
||||
|
||||
## استخدام خطوط الأنابيب على مجموعة بيانات
|
||||
|
||||
يمكن أيضًا تشغيل خط الأنابيب للاستدلال على مجموعة بيانات كبيرة. أسهل طريقة نوصي بها للقيام بذلك هي باستخدام المتكرر (iterator).:
|
||||
|
||||
```py
|
||||
def data():
|
||||
for i in range(1000):
|
||||
yield f"My example {i}"
|
||||
|
||||
|
||||
pipe = pipeline(model="openai-community/gpt2", device=0)
|
||||
generated_characters = 0
|
||||
for out in pipe(data()):
|
||||
generated_characters += len(out[0]["generated_text"])
|
||||
```
|
||||
|
||||
يقوم المؤشر `data()` بإرجاع كل نتيجة، ويتعرف خط الأنابيب تلقائيًا
|
||||
المدخل قابل للتحديد ويبدأ في جلب البيانات أثناء
|
||||
يستمر في معالجتها على وحدة معالجة الرسومات (GPU) (يستخدم هذا [DataLoader](https://pytorch.org/docs/stable/data.html#torch.utils.data.DataLoader) تحت الغطاء).
|
||||
هذا أمر مهم لأنك لا تحتاج إلى تخصيص ذاكرة لمجموعة البيانات بأكملها
|
||||
ويمكنك تغذية وحدة معالجة الرسومات (GPU) بأسرع ما يمكن.
|
||||
|
||||
نظرًا لأن التجميع قد تسرع الأمور، فقد يكون من المفيد ضبط معلمة `batch_size` هنا.
|
||||
|
||||
أبسط طريقة للتنقل خلال مجموعة بيانات هي فقط تحميل واحدة من 🤗 [Datasets](https://github.com/huggingface/datasets/):
|
||||
|
||||
```py
|
||||
# KeyDataset هي أداة مساعدة ستقوم فقط بإخراج العنصر الذي نهتم به.
|
||||
from transformers.pipelines.pt_utils import KeyDataset
|
||||
from datasets import load_dataset
|
||||
|
||||
pipe = pipeline(model="hf-internal-testing/tiny-random-wav2vec2", device=0)
|
||||
dataset = load_dataset("hf-internal-testing/librispeech_asr_dummy", "clean", split="validation[:10]")
|
||||
|
||||
for out in pipe(KeyDataset(dataset, "audio")):
|
||||
print(out)
|
||||
```
|
||||
|
||||
## استخدام خطوط الأنابيب لخادم ويب
|
||||
|
||||
<Tip>
|
||||
إن إنشاء محرك استدلال هو موضوع معقد يستحق صفحته الخاصة.
|
||||
</Tip>
|
||||
|
||||
[Link](./pipeline_webserver)
|
||||
|
||||
## خط أنابيب الرؤية
|
||||
|
||||
إن استخدام [`pipeline`] لمهام الرؤية مماثل تمامًا.
|
||||
|
||||
حدد مهمتك ومرر صورتك إلى المصنف. يمكن أن تكون الصورة رابطًا أو مسارًا محليًا أو صورة مشفرة بتنسيق base64. على سبيل المثال، ما نوع القطط الموضح أدناه؟
|
||||
|
||||

|
||||
|
||||
```py
|
||||
>>> from transformers import pipeline
|
||||
|
||||
>>> vision_classifier = pipeline(model="google/vit-base-patch16-224")
|
||||
>>> preds = vision_classifier(
|
||||
... images="https://huggingface.co/datasets/huggingface/documentation-images/resolve/main/pipeline-cat-chonk.jpeg"
|
||||
... )
|
||||
>>> preds = [{"score": round(pred["score"], 4), "label": pred["label"]} for pred in preds]
|
||||
>>> preds
|
||||
[{'score': 0.4335, 'label': 'lynx, catamount'}, {'score': 0.0348, 'label': 'cougar, puma, catamount, mountain lion, painter, panther, Felis concolor'}, {'score': 0.0324, 'label': 'snow leopard, ounce, Panthera uncia'}, {'score': 0.0239, 'label': 'Egyptian cat'}, {'score': 0.0229, 'label': 'tiger cat'}]
|
||||
```
|
||||
|
||||
## خط أنابيب النص
|
||||
|
||||
إن استخدام [`pipeline`] لمهام NLP مماثل تمامًا.
|
||||
|
||||
```py
|
||||
>>> from transformers import pipeline
|
||||
|
||||
>>> # هذا النموذج هو نموذج "zero-shot-classification".
|
||||
>>> # سيصنف النص، ولكن يمكنك اختيار أي تسمية قد تتخيلها
|
||||
>>> classifier = pipeline(model="facebook/bart-large-mnli")
|
||||
>>> classifier(
|
||||
... "I have a problem with my iphone that needs to be resolved asap!!",
|
||||
... candidate_labels=["urgent", "not urgent", "phone", "tablet", "computer"],
|
||||
... )
|
||||
{'sequence': 'I have a problem with my iphone that needs to be resolved asap!!', 'labels': ['urgent', 'phone', 'computer', 'not urgent', 'tablet'], 'scores': [0.504, 0.479, 0.013, 0.003, 0.002]}
|
||||
```
|
||||
|
||||
## خط أنابيب متعدد الوسائط
|
||||
|
||||
تدعم [`pipeline`] أكثر من طريقة واحدة. على سبيل المثال، تجمع مهمة الإجابة على الأسئلة المرئية (VQA) بين النص والصورة. لا تتردد في استخدام أي رابط صورة تريده وسؤال تريد طرحه حول الصورة. يمكن أن تكون الصورة عنوان URL أو مسارًا محليًا للصورة.
|
||||
|
||||
على سبيل المثال، إذا كنت تستخدم هذه [صورة الفاتورة](https://huggingface.co/spaces/impira/docquery/resolve/2359223c1837a7587402bda0f2643382a6eefeab/invoice.png):
|
||||
|
||||
```py
|
||||
>>> from transformers import pipeline
|
||||
|
||||
>>> vqa = pipeline(model="impira/layoutlm-document-qa")
|
||||
>>> output = vqa(
|
||||
... image="https://huggingface.co/spaces/impira/docquery/resolve/2359223c1837a7587402bda0f2643382a6eefeab/invoice.png",
|
||||
... question="What is the invoice number?",
|
||||
... )
|
||||
>>> output[0]["score"] = round(output[0]["score"], 3)
|
||||
>>> output
|
||||
[{'score': 0.425, 'answer': 'us-001', 'start': 16, 'end': 16}]
|
||||
```
|
||||
|
||||
<Tip>
|
||||
|
||||
لتشغيل المثال أعلاه، تحتاج إلى تثبيت [`pytesseract`](https://pypi.org/project/pytesseract/) بالإضافة إلى 🤗 Transformers:
|
||||
|
||||
```bash
|
||||
sudo apt install -y tesseract-ocr
|
||||
pip install pytesseract
|
||||
```
|
||||
|
||||
</Tip>
|
||||
|
||||
## استخدام `pipeline` على نماذج كبيرة مع 🤗 `accelerate`:
|
||||
|
||||
يمكنك بسهولة تشغيل `pipeline` على نماذج كبيرة باستخدام 🤗 `accelerate`! أولاً، تأكد من تثبيت `accelerate` باستخدام `pip install accelerate`.
|
||||
|
||||
قم أولاً بتحميل نموذجك باستخدام `device_map="auto"`! سنستخدم `facebook/opt-1.3b` كمثال لنا.
|
||||
|
||||
```py
|
||||
# pip install accelerate
|
||||
import torch
|
||||
from transformers import pipeline
|
||||
|
||||
pipe = pipeline(model="facebook/opt-1.3b", torch_dtype=torch.bfloat16, device_map="auto")
|
||||
output = pipe("This is a cool example!", do_sample=True, top_p=0.95)
|
||||
```
|
||||
|
||||
يمكنك أيضًا تمرير نماذج محملة بـ 8 بت إذا قمت بتثبيت `bitsandbytes` وإضافة الحجة `load_in_8bit=True`
|
||||
|
||||
```py
|
||||
# pip install accelerate bitsandbytes
|
||||
import torch
|
||||
from transformers import pipeline
|
||||
|
||||
pipe = pipeline(model="facebook/opt-1.3b", device_map="auto", model_kwargs={"load_in_8bit": True})
|
||||
output = pipe("This is a cool example!", do_sample=True, top_p=0.95)
|
||||
```
|
||||
|
||||
لاحظ أنه يمكنك استبدال نقطة التفتيش بأي نموذج من Hugging Face يدعم تحميل النماذج الكبيرة، مثل BLOOM.
|
||||
|
||||
## إنشاء عروض توضيحية ويب من خطوط الأنابيب باستخدام `gradio`
|
||||
|
||||
يتم دعم خطوط الأنابيب تلقائيًا في [Gradio](https://github.com/gradio-app/gradio/)، وهي مكتبة تجعل إنشاء تطبيقات تعليم الآلة الجميلة والسهلة الاستخدام على الويب أمرًا سهلاً. أولاً، تأكد من تثبيت Gradio:
|
||||
|
||||
```
|
||||
pip install gradio
|
||||
```
|
||||
|
||||
بعد ذلك، يمكنك إنشاء عرض توضيحي ويب حول خط أنابيب تصنيف الصور (أو أي خط أنابيب آخر) في سطر واحد من التعليمات البرمجية عن طريق استدعاء وظيفة [`Interface.from_pipeline`](https://www.gradio.app/docs/interface#interface-from-pipeline) في Gradio لإطلاق خط الأنابيب. يقوم هذا بإنشاء واجهة بديهية للسحب والإفلات في مستعرضك:
|
||||
|
||||
```py
|
||||
from transformers import pipeline
|
||||
import gradio as gr
|
||||
|
||||
pipe = pipeline("image-classification", model="google/vit-base-patch16-224")
|
||||
|
||||
gr.Interface.from_pipeline(pipe).launch()
|
||||
```
|
||||
|
||||
|
||||
|
||||
|
||||
بشكل افتراضي، يعمل العرض التوضيحي على خادم محلي. إذا كنت تريد مشاركتها مع الآخرين، فيمكنك إنشاء رابط عام مؤقت عن طريق تعيين `share=True` في `launch()`. يمكنك أيضًا استضافة عرضك التوضيحي على [Hugging Face Spaces](https://huggingface.co/spaces) للحصول على رابط دائم.
|
||||
@ -1,521 +0,0 @@
|
||||
# المعالجة المسبقة Preprocessing
|
||||
|
||||
[[open-in-colab]]
|
||||
|
||||
قبل تدريب نموذج على مجموعة بيانات، يجب معالجتها مسبقًا وفقًا تنسيق المتوقع لمدخلات النموذج. سواء كانت بياناتك نصية أو صورًا أو صوتًا، فيجب تحويلها وتجميعها في دفعات من الموترات. يوفر 🤗 Transformers مجموعة من فئات المعالجة المسبقة للمساعدة في إعداد بياناتك للنموذج. في هذا البرنامج التعليمي، ستتعلم أنه بالنسبة لـ:
|
||||
|
||||
* للنص، استخدم [مُجزّئ الرموز](./main_classes/tokenizer) لتحويل النص إلى تسلسل من الرموز، وإنشاء تمثيل رقمي للرموز، وتجميعها في موترات(tensors).
|
||||
* للكلام والصوت، استخدم [مستخرج الميزات](./main_classes/feature_extractor) لاستخراج ميزات متسلسلة من أشكال موجات الصوت وتحويلها إلى موترات.
|
||||
* تستخدم مدخلات الصورة [ImageProcessor](./main_classes/image_processor) لتحويل الصور إلى موترات.
|
||||
* تستخدم مدخلات متعددة الوسائط [معالجًا](./main_classes/processors) لدمج مُجزّئ الرموز ومستخرج الميزات أو معالج الصور.
|
||||
|
||||
<Tip>
|
||||
|
||||
`AutoProcessor` **يعمل دائمًا** ويختار تلقائيًا الفئة الصحيحة للنموذج الذي تستخدمه، سواء كنت تستخدم مُجزّئ رموز أو معالج صور أو مستخرج ميزات أو معالجًا.
|
||||
|
||||
</Tip>
|
||||
|
||||
قبل البدء، قم بتثبيت 🤗 Datasets حتى تتمكن من تحميل بعض مجموعات البيانات لتجربتها:
|
||||
|
||||
```bash
|
||||
pip install datasets
|
||||
```
|
||||
|
||||
## معالجة اللغة الطبيعية (Natural Language Processing (NLP
|
||||
|
||||
<Youtube id="Yffk5aydLzg"/>
|
||||
|
||||
أداة المعالجة المسبقة الرئيسية للبيانات النصية هي [مُجزّئ اللغوي](main_classes/tokenizer). يقوم مُجزّئ اللغوي بتقسيم النص إلى "أجزاء لغوية" (tokens) وفقًا لمجموعة من القواعد. يتم تحويل الأجزاء اللغوية إلى أرقام ثم إلى منسوجات، والتي تصبح مدخلات للنموذج. يقوم المجزئ اللغوي بإضافة أي مدخلات إضافية يحتاجها النموذج.
|
||||
|
||||
<Tip>
|
||||
|
||||
إذا كنت تخطط لاستخدام نموذج مُدرب مسبقًا، فمن المهم استخدامالمجزئ اللغوي المقترن بنفس ذلك النموذج. يضمن ذلك تقسيم النص بنفس الطريقة التي تم بها تقسيم النصوص ما قبل التدريب، واستخدام نفس القاموس الذي يربط بين الأجزاء اللغوية وأرقامها ( يُشار إليها عادةً باسم المفردات *vocab*) أثناء التدريب المسبق.
|
||||
|
||||
</Tip>
|
||||
|
||||
ابدأ بتحميل المُجزّئ اللغوي مُدرب مسبقًا باستخدام طريقة [`AutoTokenizer.from_pretrained`]. يقوم هذا بتنزيل المفردات *vocab* الذي تم تدريب النموذج عليه:
|
||||
|
||||
```py
|
||||
>>> from transformers import AutoTokenizer
|
||||
|
||||
>>> tokenizer = AutoTokenizer.from_pretrained("google-bert/bert-base-cased")
|
||||
```
|
||||
|
||||
ثم مرر نصك إلى المُجزّئ اللغوي:
|
||||
|
||||
```py
|
||||
>>> encoded_input = tokenizer("Do not meddle in the affairs of wizards, for they are subtle and quick to anger.")
|
||||
>>> print(encoded_input)
|
||||
{'input_ids': [101, 2079, 2025, 19960, 10362, 1999, 1996, 3821, 1997, 16657, 1010, 2005, 2027, 2024, 11259, 1998, 4248, 2000, 4963, 1012, 102],
|
||||
'token_type_ids': [0, 0, 0, 0, 0, 0, 0, 0, 0, 0, 0, 0, 0, 0, 0, 0, 0, 0, 0, 0, 0],
|
||||
'attention_mask': [1, 1, 1, 1, 1, 1, 1, 1, 1, 1, 1, 1, 1, 1, 1, 1, 1, 1, 1, 1, 1]}
|
||||
```
|
||||
|
||||
يعيد المُجزّئ اللغوي قاموسًا يحتوي على ثلاثة عناصر مهمة:
|
||||
|
||||
* [input_ids](glossary#input-ids) هي الفهارس المقابلة لكل رمز في الجملة.
|
||||
* [attention_mask](glossary#attention-mask) يشير إلى ما إذا كان يجب الانتباه بالرمز أم لا.
|
||||
* [token_type_ids](glossary#token-type-ids) يحدد التسلسل الذي ينتمي إليه الرمز عندما يكون هناك أكثر من تسلسل واحد.
|
||||
|
||||
أعد إدخالك الأصلي عن طريق فك ترميز `input_ids`:
|
||||
|
||||
```py
|
||||
>>> tokenizer.decode(encoded_input["input_ids"])
|
||||
'[CLS] Do not meddle in the affairs of wizards, for they are subtle and quick to anger. [SEP]'
|
||||
```
|
||||
|
||||
كما ترى، أضاف المُجزّئ اللغوي رمزين خاصين - `CLS` و`SEP` (مصنف وفاصل) - إلى الجملة. لا تحتاج جميع النماذج إلى
|
||||
رموز خاصة، ولكن إذا فعلوا ذلك، فإن المُجزّئ اللغوي يضيفها تلقائيًا لك.
|
||||
|
||||
إذا كان هناك عدة جمل تريد معالجتها مسبقًا، فقم بتمريرها كقائمة إلى مُجزّئ اللغوي:
|
||||
|
||||
```py
|
||||
>>> batch_sentences = [
|
||||
... "But what about second breakfast?",
|
||||
... "Don't think he knows about second breakfast, Pip.",
|
||||
... "What about elevensies?",
|
||||
... ]
|
||||
>>> encoded_inputs = tokenizer(batch_sentences)
|
||||
>>> print(encoded_inputs)
|
||||
{'input_ids': [[101, 1252, 1184, 1164, 1248, 6462, 136, 102],
|
||||
[101, 1790, 112, 189, 1341, 1119, 3520, 1164, 1248, 6462, 117, 21902, 1643, 119, 102],
|
||||
[101, 1327, 1164, 5450, 23434, 136, 102]],
|
||||
'token_type_ids': [[0, 0, 0, 0, 0, 0, 0, 0],
|
||||
[0, 0, 0, 0, 0, 0, 0, 0, 0, 0, 0, 0, 0, 0, 0],
|
||||
[0, 0, 0, 0, 0, 0, 0]],
|
||||
'attention_mask': [[1, 1, 1, 1, 1, 1, 1, 1],
|
||||
[1, 1, 1, 1, 1, 1, 1, 1, 1, 1, 1, 1, 1, 1, 1],
|
||||
[1, 1, 1, 1, 1, 1, 1]]}
|
||||
```
|
||||
|
||||
### الحشو Padding
|
||||
|
||||
لا تكون الجمل دائمًا بنفس الطول، وهذا يمكن أن يمثل مشكلة لأن الموترات،وهي مدخلات النموذج، تحتاج إلى شكل موحد. الحشو هو استراتيجية لضمان أن تكون الموترات مستطيلة عن طريق إضافة رمز حشو *padding* خاص إلى الجمل الأقصر.
|
||||
|
||||
قم بتعيين معلمة الحشو `padding` إلى `True` لحشو التسلسلات الأقصر في الدفعة لتطابق أطول تسلسل:
|
||||
|
||||
```py
|
||||
>>> batch_sentences = [
|
||||
... "But what about second breakfast?",
|
||||
... "Don't think he knows about second breakfast, Pip.",
|
||||
... "What about elevensies?",
|
||||
... ]
|
||||
>>> encoded_input = tokenizer(batch_sentences, padding=True)
|
||||
>>> print(encoded_input)
|
||||
{'input_ids': [[101, 1252, 1184, 1164, 1248, 6462, 136, 102, 0, 0, 0, 0, 0, 0, 0],
|
||||
[101, 1790, 112, 189, 1341, 1119, 3520, 1164, 1248, 6462, 117, 21902, 1643, 119, 102],
|
||||
[101, 1327, 1164, 5450, 23434, 136, 102, 0, 0, 0, 0, 0, 0, 0, 0]],
|
||||
'token_type_ids': [[0, 0, 0, 0, 0, 0, 0, 0, 0, 0, 0, 0, 0, 0, 0],
|
||||
[0, 0, 0, 0, 0, 0, 0, 0, 0, 0, 0, 0, 0, 0, 0],
|
||||
[0, 0, 0, 0, 0, 0, 0, 0, 0, 0, 0, 0, 0, 0, 0]],
|
||||
'attention_mask': [[1, 1, 1, 1, 1, 1, 1, 1, 0, 0, 0, 0, 0, 0, 0],
|
||||
[1, 1, 1, 1, 1, 1, 1, 1, 1, 1, 1, 1, 1, 1, 1],
|
||||
[1, 1, 1, 1, 1, 1, 1, 0، 0، 0، 0، 0، 0، 0، 0]]}
|
||||
```
|
||||
|
||||
تم الآن حشو الجملتين الأولى والثالثة بـ `0` لأنهما أقصر.
|
||||
|
||||
### البتر Truncation
|
||||
|
||||
وعلى صعيد أخر، قد يكون التسلسل طويلًا جدًا بالنسبة للنموذج للتعامل معه. في هذه الحالة، ستحتاج إلى بتر التسلسل إلى طول أقصر.
|
||||
|
||||
قم بتعيين معلمة `truncation` إلى `True` لتقليم تسلسل إلى الطول الأقصى الذي يقبله النموذج:
|
||||
|
||||
```py
|
||||
>>> batch_sentences = [
|
||||
... "But what about second breakfast?",
|
||||
... "Don't think he knows about second breakfast, Pip.",
|
||||
... "What about elevensies?",
|
||||
... ]
|
||||
>>> encoded_input = tokenizer(batch_sentences, padding=True, truncation=True)
|
||||
>>> print(encoded_input)
|
||||
{'input_ids': [[101, 1252, 1184, 1164, 1248, 6462, 136, 102, 0, 0, 0, 0, 0, 0, 0],
|
||||
[101, 1790, 112, 189, 1341, 1119, 3520, 1164, 1248, 6462, 117, 21902, 1643, 119, 102],
|
||||
[101, 1327, 1164, 5450, 23434, 136, 102, 0, 0, 0, 0, 0, 0, 0, 0]],
|
||||
'token_type_ids': [[0, 0, 0, 0, 0, 0, 0, 0, 0, 0, 0, 0, 0, 0, 0],
|
||||
[0, 0, 0, 0, 0, 0, 0, 0, 0, 0, 0, 0, 0, 0, 0],
|
||||
[0, 0, 0, 0, 0, 0, 0, 0, 0, 0, 0, 0، 0، 0، 0، 0]]،
|
||||
'attention_mask': [[1, 1, 1, 1, 1, 1, 1, 1, 0, 0, 0, 0, 0، 0، 0، 0],
|
||||
[1, 1, 1, 1, 1, 1, 1، 1، 1، 1، 1، 1، 1، 1، 1، 1],
|
||||
[1، 1، 1، 1، 1، 1، 1، 0، 0، 0، 0، 0، 0، 0، 0، 0]]}
|
||||
```
|
||||
|
||||
<Tip>
|
||||
|
||||
تحقق من دليل المفاهيم [Padding and truncation](./pad_truncation) لمعرفة المزيد حول معامﻻت الحشو و البتر المختلفة.
|
||||
|
||||
</Tip>
|
||||
|
||||
### بناء الموترات Build tensors
|
||||
|
||||
أخيرًا، تريد أن يقوم المجزئ اللغوي بإرجاع موترات (tensors) الفعلية التي ستُغذي النموذج.
|
||||
|
||||
قم بتعيين معلمة `return_tensors` إلى إما `pt` لـ PyTorch، أو `tf` لـ TensorFlow:
|
||||
|
||||
<frameworkcontent>
|
||||
<pt>
|
||||
|
||||
```py
|
||||
>>> batch_sentences = [
|
||||
... "But what about second breakfast?",
|
||||
... "Don't think he knows about second breakfast, Pip.",
|
||||
... "What about elevensies?",
|
||||
... ]
|
||||
>>> encoded_input = tokenizer(batch_sentences, padding=True, truncation=True, return_tensors="pt")
|
||||
>>> print(encoded_input)
|
||||
{'input_ids': tensor([[101, 1252, 1184, 1164, 1248, 6462, 136, 102, 0, 0, 0, 0, 0, 0, 0],
|
||||
[101, 1790, 112, 189, 1341, 1119, 3520, 1164, 1248, 6462, 117, 21902, 1643, 119, 102],
|
||||
[101, 1327, 1164, 5450, 23434, 136, 102, 0, 0, 0, 0, 0, 0, 0, 0]]),
|
||||
'token_type_ids': tensor([[0, 0, 0, 0, 0, 0, 0, 0, 0, 0, 0, 0, 0, 0, 0],
|
||||
[0, 0, 0, 0, 0, 0, 0, 0, 0, 0, 0, 0, 0, 0, 0],
|
||||
[0, 0, 0, 0, 0, 0, 0, 0, 0, 0, 0, 0, 0, 0, 0]]),
|
||||
'attention_mask': tensor([[1, 1, 1, 1, 1, 1, 1, 1, 0, 0, 0, 0, 0, 0, 0],
|
||||
[1, 1, 1, 1, 1, 1, 1, 1, 1, 1, 1, 1, 1, 1, 1],
|
||||
[1, 1, 1, 1, 1, 1, 1, 0, 0, 0, 0, 0, 0, 0, 0]])}
|
||||
```
|
||||
</pt>
|
||||
<tf>
|
||||
|
||||
```py
|
||||
>>> batch_sentences = [
|
||||
... "But what about second breakfast?",
|
||||
... "Don't think he knows about second breakfast, Pip.",
|
||||
... "What about elevensies?",
|
||||
... ]
|
||||
>>> encoded_input = tokenizer(batch_sentences, padding=True, truncation=True, return_tensors="tf")
|
||||
>>> print(encoded_input)
|
||||
{'input_ids': <tf.Tensor: shape=(2, 9), dtype=int32, numpy=
|
||||
array([[101, 1252, 1184, 1164, 1248, 6462, 136, 102, 0, 0, 0, 0, 0, 0, 0],
|
||||
[101, 1790, 112, 189, 1341, 1119, 3520, 1164, 1248, 6462, 117, 21902, 1643, 119, 102],
|
||||
[101, 1327, 1164, 5450, 23434, 136, 102, 0, 0, 0, 0, 0, 0, 0, 0]],
|
||||
dtype=int32)>,
|
||||
'token_type_ids': <tf.Tensor: shape=(2, 9), dtype=int32, numpy=
|
||||
array([[0, 0, 0, 0, 0, 0, 0, 0, 0, 0, 0, 0, 0, 0, 0],
|
||||
[0, 0, 0, 0, 0, 0, 0, 0, 0, 0, 0, 0, 0, 0, 0],
|
||||
[0, 0, 0, 0, 0, 0, 0, 0, 0, 0, 0, 0, 0, 0, 0]], dtype=int32)>,
|
||||
'attention_mask': <tf.Tensor: shape=(2, 9), dtype=int32, numpy=
|
||||
array([[1, 1, 1, 1, 1, 1, 1, 1, 0, 0, 0, 0, 0, 0, 0],
|
||||
[1, 1, 1, 1, 1, 1, 1, 1, 1, 1, 1, 1, 1, 1, 1],
|
||||
[1, 1, 1, 1, 1, 1, 1, 0, 0, 0, 0, 0, 0, 0, 0]], dtype=int32)>}
|
||||
```
|
||||
</tf>
|
||||
</frameworkcontent>
|
||||
|
||||
<Tip>
|
||||
|
||||
تدعم خطوط الأنابيب المختلفة معامل مُجزِّئ الرموز(tokenizer) بشكل مختلف في طريقة `()__call__` الخاصة بها.
|
||||
و خطوط الأنابيب `text-2-text-generation` تدعم فقط `truncation`.
|
||||
و خطوط الأنابيب `text-generation` تدعم `max_length` و`truncation` و`padding` و`add_special_tokens`.
|
||||
أما في خطوط الأنابيب `fill-mask`، يمكن تمرير معامل مُجزِّئ الرموز (tokenizer) في المتغير `tokenizer_kwargs` (قاموس).
|
||||
|
||||
</Tip>
|
||||
|
||||
## الصوت Audio
|
||||
|
||||
بالنسبة للمهام الصوتية، ستحتاج إلى [مستخرج الميزات](main_classes/feature_extractor) لإعداد مجموعة البيانات الخاصة بك للنماذج. تم تصميم مستخرج الميزات لاستخراج الميزات من بيانات الصوت الخام، وتحويلها إلى موتورات.
|
||||
|
||||
قم بتحميل مجموعة بيانات [MInDS-14](https://huggingface.co/datasets/PolyAI/minds14) (راجع البرنامج التعليمي لـ 🤗 [Datasets](https://huggingface.co/docs/datasets/load_hub) لمزيد من التفاصيل حول كيفية تحميل مجموعة بيانات) لمعرفة كيفية استخدام مستخرج الميزات مع مجموعات البيانات الصوتية:
|
||||
|
||||
```py
|
||||
>>> from datasets import load_dataset, Audio
|
||||
|
||||
>>> dataset = load_dataset("PolyAI/minds14", name="en-US", split="train")
|
||||
```
|
||||
|
||||
الوصول إلى العنصر الأول من عمود `audio` لمعرفة المدخلات. يؤدي استدعاء عمود `audio` إلى تحميل ملف الصوت وإعادة أخذ العينات تلقائيًا:
|
||||
|
||||
```py
|
||||
>>> dataset[0]["audio"]
|
||||
{'array': array([ 0. , 0.00024414, -0.00024414, ..., -0.00024414,
|
||||
0. , 0. ], dtype=float32),
|
||||
'path': '/root/.cache/huggingface/datasets/downloads/extracted/f14948e0e84be638dd7943ac36518a4cf3324e8b7aa331c5ab11541518e9368c/en-US~JOINT_ACCOUNT/602ba55abb1e6d0fbce92065.wav',
|
||||
'sampling_rate': 8000}
|
||||
```
|
||||
|
||||
يعيد هذا ثلاثة عناصر:
|
||||
|
||||
* `array` هو إشارة الكلام المحملة - وإعادة أخذ العينات المحتملة - كصفيف 1D.
|
||||
* `path` يشير إلى موقع ملف الصوت.
|
||||
* `sampling_rate` يشير إلى عدد نقاط البيانات في إشارة الكلام المقاسة في الثانية.
|
||||
|
||||
بالنسبة لهذا البرنامج التعليمي، ستستخدم نموذج [Wav2Vec2](https://huggingface.co/facebook/wav2vec2-base). الق نظرة على بطاقة النموذج، وستتعلم أن Wav2Vec2 مُدرب مسبقًا على صوت الكلام الذي تم أخذ عينات منه بمعدل 16 كيلو هرتز. من المهم أن يتطابق معدل أخذ العينات لبيانات الصوت مع معدل أخذ العينات لمجموعة البيانات المستخدمة لتدريب النموذج مسبقًا. إذا لم يكن معدل أخذ العينات لبياناتك هو نفسه، فيجب إعادة أخذ العينات من بياناتك.
|
||||
|
||||
1. استخدم طريقة [`~datasets.Dataset.cast_column`] في 🤗 Datasets لإعادة أخذ العينات بمعدل أخذ العينات 16 كيلو هرتز:
|
||||
|
||||
```py
|
||||
>>> dataset = dataset.cast_column("audio", Audio(sampling_rate=16_000))
|
||||
```
|
||||
|
||||
2. استدعاء عمود `audio` مرة أخرى لأخذ عينات من ملف الصوت:
|
||||
|
||||
```py
|
||||
>>> dataset[0]["audio"]
|
||||
{'array': array([ 2.3443763e-05, 2.1729663e-04, 2.2145823e-04, ...,
|
||||
3.8356509e-05, -7.3497440e-06, -2.1754686e-05], dtype=float32),
|
||||
'path': '/root/.cache/huggingface/datasets/downloads/extracted/f14948e0e84be638dd7943ac36518a4cf3324e8b7aa331c5ab11541518e9368c/en-US~JOINT_ACCOUNT/602ba55abb1e6d0fbce92065.wav',
|
||||
'sampling_rate': 16000}
|
||||
```
|
||||
|
||||
بعد ذلك، قم بتحميل مستخرج الميزات لتطبيع وحشو المدخلات. عند إضافة حشو للبيانات النصية، تتم إضافة "0" للتسلسلات الأقصر. تنطبق نفس الفكرة على بيانات الصوت. يضيف مستخرج الميزات "0" - الذي يتم تفسيره على أنه صمت - إلى "array".
|
||||
|
||||
قم بتحميل مستخرج الميزات باستخدام [`AutoFeatureExtractor.from_pretrained`]:
|
||||
|
||||
```py
|
||||
>>> from transformers import AutoFeatureExtractor
|
||||
|
||||
>>> feature_extractor = AutoFeatureExtractor.from_pretrained("facebook/wav2vec2-base")
|
||||
```
|
||||
|
||||
مرر صفيف الصوت إلى مستخرج الميزات. كما نوصي بإضافة معامل `sampling_rate` في مستخرج الميزات من أجل تصحيح الأخطاء الصامتة التي قد تحدث بشكل أفضل.
|
||||
|
||||
```py
|
||||
>>> audio_input = [dataset[0]["audio"]["array"]]
|
||||
>>> feature_extractor(audio_input, sampling_rate=16000)
|
||||
{'input_values': [array([ 3.8106556e-04, 2.7506407e-03, 2.8015103e-03, ...,
|
||||
5.6335266e-04, 4.6588284e-06, -1.7142107e-04], dtype=float32)]}
|
||||
```
|
||||
|
||||
تمامًا مثل مُجزِّئ الرموز، يمكنك تطبيق الحشو أو البتر للتعامل مع التسلسلات المتغيرة في دفعة. الق نظرة على طول التسلسل لهاتين العينتين الصوتيتين:
|
||||
|
||||
```py
|
||||
>>> dataset[0]["audio"]["array"].shape
|
||||
(173398,)
|
||||
|
||||
>>> dataset[1]["audio"]["array"].shape
|
||||
(106496,)
|
||||
```
|
||||
|
||||
قم بإنشاء دالة لمعالجة مجموعة البيانات بحيث يكون للنماذج الصوتية نفس الأطوال. حدد أقصى طول للعينة ، وسيقوم مستخرج الميزات إما بإضافة حشو أو بتر التسلسلات لمطابقتها:
|
||||
|
||||
```py
|
||||
>>> def preprocess_function(examples):
|
||||
... audio_arrays = [x["array"] for x in examples["audio"]]
|
||||
... inputs = feature_extractor(
|
||||
... audio_arrays,
|
||||
... sampling_rate=16000,
|
||||
... padding=True,
|
||||
... max_length=100000,
|
||||
... truncation=True,
|
||||
... )
|
||||
... return inputs
|
||||
```
|
||||
|
||||
قم بتطبيق `preprocess_function` على أول بضع أمثلة في مجموعة البيانات:
|
||||
|
||||
```py
|
||||
>>> processed_dataset = preprocess_function(dataset[:5])
|
||||
```
|
||||
|
||||
أطوال العينات الآن متساوية وتطابق الطول الأقصى المحدد. يمكنك الآن تمرير مجموعة البيانات المعالجة إلى النموذج!
|
||||
|
||||
```py
|
||||
>>> processed_dataset["input_values"][0].shape
|
||||
(100000,)
|
||||
|
||||
>>> processed_dataset["input_values"][1].shape
|
||||
(100000,)
|
||||
```
|
||||
|
||||
## رؤية الكمبيوتر Computer vision
|
||||
|
||||
بالنسبة لمهام رؤية الحاسوبية، ستحتاج إلى معالج صور [image processor](main_classes/image_processor) لإعداد مجموعة البيانات الخاصة بك لتناسب النموذج. تتكون معالجة الصور المسبقة من عدة خطوات لتحويل الصور إلى الشكل الذي يتوقعه النموذج. وتشمل هذه الخطوات، على سبيل المثال لا الحصر، تغيير الحجم والتطبيع وتصحيح قناة الألوان وتحويل الصور إلى موترات(tensors).
|
||||
|
||||
<Tip>
|
||||
|
||||
عادة ما تتبع معالجة الصور المسبقة شكلاً من أشكال زيادة البيانات (التضخيم). كلا العمليتين، معالجة الصور المسبقة وزيادة الصور تغيران بيانات الصورة، ولكنها تخدم أغراضًا مختلفة:
|
||||
|
||||
*زيادة البيانات: تغيير الصور عن طريق زيادة الصور بطريقة يمكن أن تساعد في منع الإفراط في التعميم وزيادة متانة النموذج. يمكنك أن تكون مبدعًا في كيفية زيادة بياناتك - ضبط السطوع والألوان، واالقص، والدوران، تغيير الحجم، التكبير، إلخ. ومع ذلك، كن حذرًا من عدم تغيير معنى الصور بزياداتك.
|
||||
*معالجة الصور المسبقة: تضمن معالجة الصور اتتطابق الصور مع تنسيق الإدخال المتوقع للنموذج. عند ضبط نموذج رؤية حاسوبية بدقة، يجب معالجة الصور بالضبط كما كانت عند تدريب النموذج في البداية.
|
||||
|
||||
يمكنك استخدام أي مكتبة تريدها لزيادة بيانات الصور. لمعالجة الصور المسبقة، استخدم `ImageProcessor` المرتبط بالنموذج.
|
||||
|
||||
</Tip>
|
||||
|
||||
قم بتحميل مجموعة بيانات [food101](https://huggingface.co/datasets/food101) (راجع دليل 🤗 [Datasets tutorial](https://huggingface.co/docs/datasets/load_hub) لمزيد من التفاصيل حول كيفية تحميل مجموعة بيانات) لمعرفة كيف يمكنك استخدام معالج الصور مع مجموعات بيانات رؤية الحاسب:
|
||||
|
||||
<Tip>
|
||||
|
||||
استخدم معامل `split` من 🤗 Datasets لتحميل عينة صغيرة فقط من مجموعة التدريب نظرًا لحجم البيانات كبيرة جدًا!
|
||||
|
||||
</Tip>
|
||||
|
||||
```py
|
||||
>>> from datasets import load_dataset
|
||||
|
||||
>>> dataset = load_dataset("food101", split="train[:100]")
|
||||
```
|
||||
|
||||
بعد ذلك، الق نظرة على الصورة مع ميزة 🤗 Datasets [`Image`](https://huggingface.co/docs/datasets/package_reference/main_classes?highlight=image#datasets.Image):
|
||||
|
||||
```py
|
||||
>>> dataset[0]["image"]
|
||||
```
|
||||
|
||||
<div class="flex justify-center">
|
||||
<img src="https://huggingface.co/datasets/huggingface/documentation-images/resolve/main/vision-preprocess-tutorial.png"/>
|
||||
</div>
|
||||
|
||||
قم بتحميل معالج الصور باستخدام [`AutoImageProcessor.from_pretrained`]:
|
||||
|
||||
```py
|
||||
>>> from transformers import AutoImageProcessor
|
||||
|
||||
>>> image_processor = AutoImageProcessor.from_pretrained("google/vit-base-patch16-224")
|
||||
```
|
||||
|
||||
أولاً، دعنا نضيف بعض الزيادات إلى الصور. يمكنك استخدام أي مكتبة تفضلها، ولكن في هذا الدليل، سنستخدم وحدة [`transforms`](https://pytorch.org/vision/stable/transforms.html) من torchvision. إذا كنت مهتمًا باستخدام مكتبة زيادة بيانات أخرى، فتعرف على كيفية القيام بذلك في [دفاتر Albumentations](https://colab.research.google.com/github/huggingface/notebooks/blob/main/examples/image_classification_albumentations.ipynb) أو [دفاتر Kornia](https://colab.research.google.com/github/huggingface/notebooks/blob/main/examples/image_classification_kornia.ipynb).
|
||||
|
||||
1. هنا نستخدم [`Compose`](https://pytorch.org/vision/master/generated/torchvision.transforms.Compose.html) لربط بعض التحولات معًا - [`RandomResizedCrop`](https://pytorch.org/vision/main/generated/torchvision.transforms.RandomResizedCrop.html) و [`ColorJitter`](https://pytorch.org/vision/main/generated/torchvision.transforms.ColorJitter.html).
|
||||
لاحظ بالنسبة لتغيير الحجم، يمكننا الحصول على متطلبات حجم الصورة من `image_processor`. بالنسبة لبعض النماذج، يُتوقع ارتفاع وعرض دقيقين، بينما بالنسبة للنماذج الأخرى، يتم تحديد الحافة الأقصر`shortest_edge` فقط.
|
||||
|
||||
```py
|
||||
>>> from torchvision.transforms import RandomResizedCrop, ColorJitter, Compose
|
||||
|
||||
>>> size = (
|
||||
... image_processor.size["shortest_edge"]
|
||||
... if "shortest_edge" in image_processor.size
|
||||
... else (image_processor.size["height"], image_processor.size["width"])
|
||||
... )
|
||||
|
||||
>>> _transforms = Compose([RandomResizedCrop(size), ColorJitter(brightness=0.5, hue=0.5)])
|
||||
```
|
||||
|
||||
2. يقبل النموذج [`pixel_values`](model_doc/vision-encoder-decoder#transformers.VisionEncoderDecoderModel.forward.pixel_values)
|
||||
كإدخال له. يمكن لـ `ImageProcessor` التعامل مع تطبيع الصور، وتوليد موترات(tensors) مناسبة.
|
||||
قم بإنشاء دالة تجمع بين تضخيم بيانات الصور ومعالجة الصور المسبقة لمجموعة من الصور وتوليد `pixel_values`:
|
||||
|
||||
```py
|
||||
>>> def transforms(examples):
|
||||
... images = [_transforms(img.convert("RGB")) for img in examples["image"]]
|
||||
... examples["pixel_values"] = image_processor(images, do_resize=False, return_tensors="pt")["pixel_values"]
|
||||
... return examples
|
||||
```
|
||||
|
||||
<Tip>
|
||||
|
||||
في المثال أعلاه، قمنا بتعيين `do_resize=False` لأننا قمنا بالفعل بتغيير حجم الصور في تحويل زيادة الصور،
|
||||
واستفدنا من خاصية `size` من `image_processor` المناسب. إذا لم تقم بتغيير حجم الصور أثناء زيادة الصور،
|
||||
فاترك هذا المعلمة. بشكل افتراضي، ستتعامل `ImageProcessor` مع تغيير الحجم.
|
||||
|
||||
إذا كنت ترغب في تطبيع الصور كجزء من تحويل زيادة الصور، فاستخدم قيم `image_processor.image_mean`،
|
||||
و `image_processor.image_std`.
|
||||
</Tip>
|
||||
|
||||
3. ثم استخدم 🤗 Datasets[`~datasets.Dataset.set_transform`] لتطبيق التحولات أثناء التنقل:
|
||||
```py
|
||||
>>> dataset.set_transform(transforms)
|
||||
```
|
||||
|
||||
4. الآن عند الوصول إلى الصورة، ستلاحظ أن معالج الصور قد أضاف `pixel_values`. يمكنك تمرير مجموعة البيانات المعالجة إلى النموذج الآن!
|
||||
|
||||
```py
|
||||
>>> dataset[0].keys()
|
||||
```
|
||||
|
||||
هكذا تبدو الصورة بعد تطبيق التحولات. تم اقتصاص الصورة بشكل عشوائي وتختلف خصائص الألوان بها.
|
||||
|
||||
```py
|
||||
>>> import numpy as np
|
||||
>>> import matplotlib.pyplot as plt
|
||||
|
||||
>>> img = dataset[0]["pixel_values"]
|
||||
>>> plt.imshow(img.permute(1, 2, 0))
|
||||
```
|
||||
|
||||
<div class="flex justify-center">
|
||||
<img src="https://huggingface.co/datasets/huggingface/documentation-images/resolve/main/preprocessed_image.png"/>
|
||||
</div>
|
||||
|
||||
<Tip>
|
||||
|
||||
بالنسبة للمهام مثل الكشف عن الأشياء، والتجزئة الدلالية، والتجزئة المثالية، والتجزئة الشاملة، يوفر `ImageProcessor`
|
||||
تقوم هذه الطرق بتحويل النواتج الأولية للنموذج إلى تنبؤات ذات معنى مثل مربعات الحدود،
|
||||
أو خرائط التجزئة.
|
||||
|
||||
</Tip>
|
||||
|
||||
### الحشو Pad
|
||||
|
||||
في بعض الحالات، على سبيل المثال، عند ضبط نموذج [DETR](./model_doc/detr) بدقة، يقوم النموذج بتطبيق زيادة المقياس أثناء التدريب. قد يتسبب ذلك في اختلاف أحجام الصور في دفعة واحدة. يمكنك استخدام [`DetrImageProcessor.pad`]
|
||||
من [`DetrImageProcessor`] وتحديد دالة `collate_fn` مخصصة لتجميع الصور معًا.
|
||||
|
||||
```py
|
||||
>>> def collate_fn(batch):
|
||||
... pixel_values = [item["pixel_values"] for item in batch]
|
||||
... encoding = image_processor.pad(pixel_values, return_tensors="pt")
|
||||
... labels = [item["labels"] for item in batch]
|
||||
... batch = {}
|
||||
... batch["pixel_values"] = encoding["pixel_values"]
|
||||
... batch["pixel_mask"] = encoding["pixel_mask"]
|
||||
... batch["labels"] = labels
|
||||
... return batch
|
||||
```
|
||||
|
||||
## متعدد الوسائط Mulimodal
|
||||
|
||||
بالنسبة للمهام التي تتطلب مدخلات متعددة الوسائط، ستحتاج إلى معالج [processor](main_classes/processors) لإعداد مجموعة البيانات الخاصة بك لتناسب النموذج. يقترن المعالج بين بمعالجين آخرين مثل محول النص إلى رمز ومستخرج الميزات.
|
||||
|
||||
قم بتحميل مجموعة بيانات [LJ Speech](https://huggingface.co/datasets/lj_speech) (راجع دليل 🤗 [Datasets tutorial](https://huggingface.co/docs/datasets/load_hub) لمزيد من التفاصيل حول كيفية تحميل مجموعة بيانات) لمعرفة كيف يمكنك استخدام معالج للتعرف التلقائي على الكلام (ASR):
|
||||
|
||||
```py
|
||||
>>> from datasets import load_dataset
|
||||
|
||||
>>> lj_speech = load_dataset("lj_speech", split="train")
|
||||
```
|
||||
|
||||
بالنسبة لـ ASR، فأنت تركز بشكل أساسي على `audio` و `text` لذا يمكنك إزالة الأعمدة الأخرى:
|
||||
|
||||
```py
|
||||
>>> lj_speech = lj_speech.map(remove_columns=["file", "id", "normalized_text"])
|
||||
```
|
||||
|
||||
الآن الق نظرة على أعمدة `audio` و `text`:
|
||||
```py
|
||||
>>> lj_speech = lj_speech.map(remove_columns=["file", "id", "normalized_text"])
|
||||
```
|
||||
|
||||
الآن الق نظرة على أعمدة `audio` و `text`:
|
||||
|
||||
```py
|
||||
>>> lj_speech[0]["audio"]
|
||||
{'array': array([-7.3242188e-04, -7.6293945e-04, -6.4086914e-04, ...,
|
||||
7.3242188e-04, 2.1362305e-04, 6.1035156e-05], dtype=float32),
|
||||
'path': '/root/.cache/huggingface/datasets/downloads/extracted/917ece08c95cf0c4115e45294e3cd0dee724a1165b7fc11798369308a465bd26/LJSpeech-1.1/wavs/LJ001-0001.wav',
|
||||
'sampling_rate': 22050}
|
||||
|
||||
>>> lj_speech[0]["text"]
|
||||
'Printing, in the only sense with which we are at present concerned, differs from most if not from all the arts and crafts represented in the Exhibition'
|
||||
```
|
||||
|
||||
تذكر أنه يجب عليك دائمًا [إعادة أخذ العينات](preprocessing#audio) لمعدل أخذ العينات في مجموعة البيانات الصوتية الخاصة بك لمطابقة معدل أخذ العينات في مجموعة البيانات المستخدمة لتدريب النموذج مسبقًا!
|
||||
|
||||
```py
|
||||
>>> lj_speech = lj_speech.cast_column("audio", Audio(sampling_rate=16_000))
|
||||
```
|
||||
|
||||
قم بتحميل معالج باستخدام [`AutoProcessor.from_pretrained`]:
|
||||
|
||||
```py
|
||||
>>> from transformers import AutoProcessor
|
||||
|
||||
>>> processor = AutoProcessor.from_pretrained("facebook/wav2vec2-base-960h")
|
||||
```
|
||||
|
||||
1. قم بإنشاء دالة لمعالجة بيانات الصوت الموجودة في `array` إلى `input_values`، ورموز `text` إلى `labels`. هذه هي المدخلات للنموذج:
|
||||
|
||||
```py
|
||||
>>> def prepare_dataset(example):
|
||||
... audio = example["audio"]
|
||||
|
||||
... example.update(processor(audio=audio["array"], text=example["text"], sampling_rate=16000))
|
||||
|
||||
... return example
|
||||
```
|
||||
|
||||
2. قم بتطبيق دالة `prepare_dataset` على عينة:
|
||||
|
||||
```py
|
||||
>>> prepare_dataset(lj_speech[0])
|
||||
```
|
||||
|
||||
لقد أضاف المعالج الآن `input_values` و `labels`، وتم أيضًا إعادة أخذ العينات لمعدل أخذ العينات بشكل صحيح إلى 16 كيلو هرتز. يمكنك تمرير مجموعة البيانات المعالجة إلى النموذج الآن!
|
||||
@ -1,543 +0,0 @@
|
||||
# جولة سريعة
|
||||
|
||||
[[open-in-colab]]
|
||||
|
||||
ابدأ رحلتك مع مكتبة 🤗 Transformers! سواء كنت مطورًا أو مستخدمًا عاديًا، ستساعدك هذه الجولة السريعة على البدء وستُظهر لك كيفية استخدام [`pipeline`] للاستنتاج، وتحميل نموذج مُدرب مسبقًا ومعالج مُسبق مع [AutoClass](./model_doc/auto)، وتدريب نموذج بسرعة باستخدام PyTorch أو TensorFlow. إذا كنت مبتدئًا، نوصي بالاطلاع على دروسنا أو [الدورة](https://huggingface.co/course/chapter1/1) للحصول على شرح أكثر تعمقًا للمفاهيم المقدمة هنا.
|
||||
|
||||
قبل البدء، تأكد من تثبيت جميع المكتبات الضرورية:
|
||||
|
||||
```bash
|
||||
!pip install transformers datasets evaluate accelerate
|
||||
```
|
||||
|
||||
ستحتاج أيضًا إلى تثبيت إطار عمل التعلم الآلي المفضل لديك:
|
||||
|
||||
<frameworkcontent>
|
||||
<pt>
|
||||
|
||||
```bash
|
||||
pip install torch
|
||||
```
|
||||
</pt>
|
||||
<tf>
|
||||
|
||||
```bash
|
||||
pip install tensorflow
|
||||
```
|
||||
</tf>
|
||||
</frameworkcontent>
|
||||
|
||||
## خط الأنابيب
|
||||
|
||||
<Youtube id="tiZFewofSLM"/>
|
||||
|
||||
يمثل [`pipeline`] أسهل وأسرع طريقة لاستخدام نموذج مُدرب مسبقًا للاستنتاج. يمكنك استخدام [`pipeline`] جاهزًا للعديد من المهام عبر طرق مختلفة، والتي يظهر بعضها في الجدول أدناه:
|
||||
|
||||
<Tip>
|
||||
|
||||
للاطلاع على القائمة الكاملة للمهام المتاحة، راجع [مرجع واجهة برمجة التطبيقات الخاصة بخط الأنابيب](./main_classes/pipelines).
|
||||
|
||||
</Tip>
|
||||
|
||||
<div dir="rtl">
|
||||
|
||||
| **المهمة** | **الوصف** | **الطريقة** | **معرف خط الأنابيب** |
|
||||
|------------------------------|--------------------------------------------------------------------------------------------------------------|-----------------|-----------------------------------------------|
|
||||
| تصنيف النص | تعيين تسمية إلى تسلسل نص معين | NLP | pipeline(task=“sentiment-analysis”) |
|
||||
| توليد النص | توليد نص بناءً على موجه معين | NLP | pipeline(task=“text-generation”) |
|
||||
| تلخيص | توليد ملخص لتسلسل نص أو مستند | NLP | pipeline(task=“summarization”) |
|
||||
| تصنيف الصور | تعيين تسمية لصورة معينة | رؤية حاسوبية | pipeline(task=“image-classification”) |
|
||||
| تجزئة الصورة | تعيين تسمية لكل بكسل فردي في الصورة (يدعم التجزئة الدلالية، والمجملة، وتجزئة مثيلات) | رؤية حاسوبية | pipeline(task=“image-segmentation”) |
|
||||
| اكتشاف الأشياء | التنبؤ بحدود الأشياء وفئاتها في صورة معينة | رؤية حاسوبية | pipeline(task=“object-detection”) |
|
||||
| تصنيف الصوت | تعيين تسمية لبيانات صوتية معينة | صوتي | pipeline(task=“audio-classification”) |
|
||||
| التعرف على الكلام التلقائي | نسخ الكلام إلى نص | صوتي | pipeline(task=“automatic-speech-recognition”) |
|
||||
| الإجابة على الأسئلة البصرية | الإجابة على سؤال حول الصورة، مع إعطاء صورة وسؤال | متعدد الوسائط | pipeline(task=“vqa”) |
|
||||
| الإجابة على أسئلة المستندات | الإجابة على سؤال حول المستند، مع إعطاء مستند وسؤال | متعدد الوسائط | pipeline(task="document-question-answering") |
|
||||
| كتابة تعليق على الصورة | إنشاء تعليق على صورة معينة | متعدد الوسائط | pipeline(task="image-to-text") |
|
||||
|
||||
</div>
|
||||
ابدأ بإنشاء مثيل من [`pipeline`] وتحديد المهمة التي تريد استخدامه لها. في هذا الدليل، ستستخدم خط الأنابيب للتحليل النصي كنموذج:
|
||||
|
||||
```py
|
||||
>>> from transformers import pipeline
|
||||
|
||||
>>> classifier = pipeline("sentiment-analysis")
|
||||
```
|
||||
|
||||
يقوم [`pipeline`] بتنزيل وتخزين نسخة احتياطية من نموذج افتراضي [مُدرب مسبقًا](https://huggingface.co/distilbert/distilbert-base-uncased-finetuned-sst-2-english) ومعالج للتحليل النصي. الآن يمكنك استخدام `classifier` على النص المستهدف:
|
||||
|
||||
```py
|
||||
>>> classifier("We are very happy to show you the 🤗 Transformers library.")
|
||||
[{'label': 'POSITIVE', 'score': 0.9998}]
|
||||
```
|
||||
|
||||
إذا كان لديك أكثر من إدخال واحد، قم بتمرير إدخالاتك كقائمة إلى [`pipeline`] لإرجاع قائمة من القواميس:
|
||||
|
||||
```py
|
||||
>>> results = classifier(["We are very happy to show you the 🤗 Transformers library.", "We hope you don't hate it."])
|
||||
>>> for result in results:
|
||||
... print(f"label: {result['label']}, with score: {round(result['score'], 4)}")
|
||||
label: POSITIVE, with score: 0.9998
|
||||
label: NEGATIVE, with score: 0.5309
|
||||
```
|
||||
يمكن لخط الأنابيب أيضًا أن يتنقل خلال مجموعة بيانات كاملة لأي مهمة تريدها. كمثال على ذلك، دعنا نختار التعرف على الكلام التلقائي كمهمة لنا:
|
||||
|
||||
```py
|
||||
>>> import torch
|
||||
>>> from transformers import pipeline
|
||||
|
||||
>>> speech_recognizer = pipeline("automatic-speech-recognition", model="facebook/wav2vec2-base-960h")
|
||||
```
|
||||
|
||||
قم بتحميل مجموعة بيانات صوتية (راجع دليل البدء السريع لـ 🤗 Datasets [Quick Start](https://huggingface.co/docs/datasets/quickstart#audio) للحصول على مزيد من التفاصيل) التي تريد التنقل خلالها. على سبيل المثال، قم بتحميل مجموعة بيانات [MInDS-14](https://huggingface.co/datasets/PolyAI/minds14):
|
||||
|
||||
```py
|
||||
>>> from datasets import load_dataset, Audio
|
||||
|
||||
>>> dataset = load_dataset("PolyAI/minds14", name="en-US", split="train") # doctest: +IGNORE_RESULT
|
||||
```
|
||||
|
||||
يجب التأكد من أن نفس الجودة الصوتية (معدل أخذ العينات) لمجموعة البيانات يتطابق مع معدل أخذ العينات الذي تم تدريب [`facebook/wav2vec2-base-960h`](https://huggingface.co/facebook/wav2vec2-base-960h) عليه:
|
||||
|
||||
```py
|
||||
>>> dataset = dataset.cast_column("audio", Audio(sampling_rate=speech_recognizer.feature_extractor.sampling_rate))
|
||||
```
|
||||
|
||||
يتم تحميل الملفات الصوتية وإعادة تشكيلها تلقائيًا عند استدعاء العمود "audio".
|
||||
استخرج المصفوفات الموجية الخام من أول 4 عينات ومررها كقائمة إلى خط الأنابيب:
|
||||
|
||||
```py
|
||||
>>> result = speech_recognizer(dataset[:4]["audio"])
|
||||
>>> print([d["text"] for d in result])
|
||||
['I WOULD LIKE TO SET UP A JOINT ACCOUNT WITH MY PARTNER HOW DO I PROCEED WITH DOING THAT', "FONDERING HOW I'D SET UP A JOIN TO HELL T WITH MY WIFE AND WHERE THE AP MIGHT BE", "I I'D LIKE TOY SET UP A JOINT ACCOUNT WITH MY PARTNER I'M NOT SEEING THE OPTION TO DO IT ON THE APSO I CALLED IN TO GET SOME HELP CAN I JUST DO IT OVER THE PHONE WITH YOU AND GIVE YOU THE INFORMATION OR SHOULD I DO IT IN THE AP AN I'M MISSING SOMETHING UQUETTE HAD PREFERRED TO JUST DO IT OVER THE PHONE OF POSSIBLE THINGS", 'HOW DO I FURN A JOINA COUT']
|
||||
```
|
||||
|
||||
بالنسبة لمجموعات البيانات الكبيرة التي تحتوي على مدخلات ضخمة (كما هو الحال في البيانات الصوتية أو المرئية)، يفضل تمرير مولد (generator) بدلاً من قائمة لتحميل جميع المدخلات في الذاكرة دفعة واحدة. راجع [مرجع واجهة برمجة التطبيقات الخاصة بخط الأنابيب](./main_classes/pipelines) للحصول على مزيد من المعلومات.
|
||||
|
||||
### ااستخدم نموذجًا ومجزئًا آخرين في خط الأنابيب
|
||||
|
||||
يمكن لخط الأنابيب [`pipeline`] استيعاب أي نموذج من [Hub](https://huggingface.co/models)، مما يسهل التكيف مع حالات الاستخدام الأخرى. على سبيل المثال، إذا كنت تريد نموذجًا قادرًا على التعامل مع النص الفرنسي، فاستخدم العلامات على Hub لفلتره نموذج مناسب. تعيد النتيجة الأولى المرشحة نموذج BERT متعدد اللغات [BERT model](https://huggingface.co/nlptown/bert-base-multilingual-uncased-sentiment) الذي تم ضبطه مسبقًا للتحليل المشاعر والذي يمكنك استخدامه للنص الفرنسي:
|
||||
|
||||
```py
|
||||
>>> model_name = "nlptown/bert-base-multilingual-uncased-sentiment"
|
||||
```
|
||||
|
||||
<frameworkcontent>
|
||||
<pt>
|
||||
استخدم [`AutoModelForSequenceClassification`] و [`AutoTokenizer`] لتحميل النموذج المُدرب مسبقًا ومعالجته المرتبط به (مزيد من المعلومات حول `AutoClass` في القسم التالي):
|
||||
|
||||
```py
|
||||
>>> from transformers import AutoTokenizer, AutoModelForSequenceClassification
|
||||
|
||||
>>> model = AutoModelForSequenceClassification.from_pretrained(model_name)
|
||||
>>> tokenizer = AutoTokenizer.from_pretrained(model_name)
|
||||
```
|
||||
</pt>
|
||||
<tf>
|
||||
استخدم [`TFAutoModelForSequenceClassification`] و [`AutoTokenizer`] لتحميل النموذج المُدرب مسبقًا ومعالجته المرتبط به (مزيد من المعلومات حول `TFAutoClass` في القسم التالي):
|
||||
|
||||
```py
|
||||
>>> from transformers import AutoTokenizer, TFAutoModelForSequenceClassification
|
||||
|
||||
>>> model = TFAutoModelForSequenceClassification.from_pretrained(model_name)
|
||||
>>> tokenizer = AutoTokenizer.from_pretrained(model_name)
|
||||
```
|
||||
</tf>
|
||||
</frameworkcontent>
|
||||
|
||||
حدد النموذج والمعالج في [`pipeline`]. الآن يمكنك تطبيق `classifier` على النص الفرنسي:
|
||||
|
||||
```py
|
||||
>>> classifier = pipeline("sentiment-analysis", model=model, tokenizer=tokenizer)
|
||||
>>> classifier("Nous sommes très heureux de vous présenter la bibliothèque 🤗 Transformers.")
|
||||
[{'label': '5 stars', 'score': 0.7273}]
|
||||
```
|
||||
إذا لم تجد نموذجًا جاهزًا يناسب مهمتك، فستحتاج إلى ضبط نموذج مُدرب مسبقًا على بياناتك. اطلع على [دليل الضبط الدقيق](./training) للتعرف على كيفية القيام بذلك. وبعد ضبط نموذجك المُدرب مسبقًا، يرجى مراعاة [المشاركة](./model_sharing) النموذج مع المجتمع على Hub لمساعدة الجميع في مجال التعلم الآلي! 🤗
|
||||
|
||||
## AutoClass
|
||||
|
||||
<Youtube id="AhChOFRegn4"/>
|
||||
|
||||
في الخلفية، تعمل فئتا [`AutoModelForSequenceClassification`] و [`AutoTokenizer`] معًا لتشغيل دالة pipeline() الذي استخدمتها أعلاه. تعتبر [AutoClass](./model_doc/auto) اختصارًا يقوم تلقائيًا باسترداد بنية نموذج مُدرب مسبقًا من اسمه أو مساره. كل ما عليك فعله هو تحديد فئة `AutoClass` المناسبة لمهمتك وفئة المعالجة المرتبطة بها.
|
||||
|
||||
لنعد إلى المثال من القسم السابق ولنرى كيف يمكنك استخدام `AutoClass` لتكرار نتائج خط الأنابيب.
|
||||
|
||||
### المجزئ التلقائي (AutoTokenizer)
|
||||
|
||||
يتولى المجزئ مسؤولية تحويل النص إلى مصفوفة من الأرقام (رموز) يمكن للنموذج فهمها ومعالجتها. هناك قواعد متعددة تحكم عملية التجزئة، بما في ذلك كيفية تقسيم كلمة وما هو المستوى الذي يجب أن تقسيم الكلمات عنده (تعرف على المزيد حول المعالجة في [ملخص المجزئ](./tokenizer_summary)). أهم شيء يجب تذكره هو أنك تحتاج إلى إنشاء مثيل للمجزئ بنفس اسم النموذج لضمان استخدامك لقواعد التجزئة نفسها التي تم تدريب النموذج عليها.
|
||||
|
||||
قم بتحميل المجزئ باستخدام [`AutoTokenizer`]:
|
||||
|
||||
```py
|
||||
>>> from transformers import AutoTokenizer
|
||||
|
||||
>>> model_name = "nlptown/bert-base-multilingual-uncased-sentiment"
|
||||
>>> tokenizer = AutoTokenizer.from_pretrained(model_name)
|
||||
```
|
||||
|
||||
مرر نصك إلى المجزئ:
|
||||
|
||||
```py
|
||||
>>> encoding = tokenizer("We are very happy to show you the 🤗 Transformers library.")
|
||||
>>> print(encoding)
|
||||
{'input_ids': [101, 11312, 10320, 12495, 19308, 10114, 11391, 10855, 10103, 100, 58263, 13299, 119, 102],
|
||||
'token_type_ids': [0, 0, 0, 0, 0, 0, 0, 0, 0, 0, 0, 0, 0, 0],
|
||||
'attention_mask': [1, 1, 1, 1, 1, 1, 1, 1, 1, 1, 1, 1, 1, 1]}
|
||||
```
|
||||
|
||||
يعيد المجزئ قاموسًا يحتوي على:
|
||||
|
||||
* [input_ids](./glossary#input-ids): التمثيلات الرقمية لرموزك.
|
||||
* [attention_mask](./glossary#attention-mask): تشير إلى الرموز التي يجب الانتباه بها.
|
||||
|
||||
يمكن المجزئ أيضًا قبول قائمة من المدخلات، ويقوم بـ "حشو" و"تقصير" النص لإرجاع كدفعة بطول موحد:
|
||||
|
||||
<frameworkcontent>
|
||||
<pt>
|
||||
|
||||
```py
|
||||
>>> pt_batch = tokenizer(
|
||||
... ["We are very happy to show you the 🤗 Transformers library.", "We hope you don't hate it."],
|
||||
... padding=True,
|
||||
... truncation=True,
|
||||
... max_length=512,
|
||||
... return_tensors="pt",
|
||||
... )
|
||||
```
|
||||
</pt>
|
||||
<tf>
|
||||
|
||||
```py
|
||||
>>> tf_batch = tokenizer(
|
||||
... ["We are very happy to show you the 🤗 Transformers library.", "We hope you don't hate it."],
|
||||
... padding=True,
|
||||
... truncation=True,
|
||||
... max_length=512,
|
||||
... return_tensors="tf",
|
||||
... )
|
||||
```
|
||||
</tf>
|
||||
</frameworkcontent>
|
||||
|
||||
<Tip>
|
||||
|
||||
اطلع على [الدليل التمهيدي للمعالجة المسبقة](./preprocessing) للحصول على مزيد من التفاصيل حول المعالجة، وكيفية استخدام [`AutoImageProcessor`] و [`AutoFeatureExtractor`] و [`AutoProcessor`] لمعالجة الصور والصوت والإدخالات متعددة الوسائط.
|
||||
|
||||
</Tip>
|
||||
|
||||
### AutoModel
|
||||
|
||||
<frameworkcontent>
|
||||
<pt>
|
||||
تقدم مكتبة 🤗 Transformers طريقة بسيطة وموحدة لتحميل نماذج مدربة مسبقًا. وهذا يعني أنه يمكنك تحميل [`AutoModel`] كما لو كنت تقوم بتحميل [`AutoTokenizer`]. الفرق الوحيد هو اختيار فئة [`AutoModel`] المناسبة للمهمة. بالنسبة لتصنيف النص (أو التسلسل)، يجب عليك تحميل [`AutoModelForSequenceClassification`]:
|
||||
|
||||
```py
|
||||
>>> from transformers import AutoModelForSequenceClassification
|
||||
|
||||
>>> model_name = "nlptown/bert-base-multilingual-uncased-sentiment"
|
||||
>>> pt_model = AutoModelForSequenceClassification.from_pretrained(model_name)
|
||||
```
|
||||
|
||||
<Tip>
|
||||
|
||||
راجع [ملخص المهمة](./task_summary) للاطلاع على المهام التي تدعمها فئة [`AutoModel`].
|
||||
|
||||
</Tip>
|
||||
|
||||
الآن قم بتمرير دفعة المدخلات المُعالجة مسبقًا مباشرة إلى النموذج. عليك فقط فك تعبئة القاموس عن طريق إضافة `**`:
|
||||
|
||||
# تدريب النموذج
|
||||
|
||||
الآن، مرر دفعة المدخلات المعالجة مسبقًا مباشرة إلى النموذج. ما عليك سوى فك تعبئة القاموس عن طريق إضافة `**`:
|
||||
|
||||
```py
|
||||
>>> pt_outputs = pt_model(**pt_batch)
|
||||
```
|
||||
|
||||
يُخرج النموذج التنشيطات النهائية في سمة `logits`. طبق دالة softmax على `logits` للحصول على الاحتمالات:
|
||||
|
||||
```py
|
||||
>>> from torch import nn
|
||||
|
||||
>>> pt_predictions = nn.functional.softmax(pt_outputs.logits, dim=-1)
|
||||
>>> print(pt_predictions)
|
||||
tensor([[0.0021, 0.0018, 0.0115, 0.2121, 0.7725],
|
||||
[0.2084, 0.1826, 0.1969, 0.1755, 0.2365]], grad_fn=<SoftmaxBackward0>)
|
||||
```
|
||||
</pt>
|
||||
<tf>
|
||||
يوفر 🤗 Transformers طريقة بسيطة وموحدة لتحميل مثيلات مُدربة مسبقًا. وهذا يعني أنه يمكنك تحميل [`TFAutoModel`] مثل تحميل [`AutoTokenizer`]. والفرق الوحيد هو تحديد [`TFAutoModel`] الصحيح للمهمة. للتصنيف النصي (أو التسلسلي)، يجب تحميل [`TFAutoModelForSequenceClassification`]:
|
||||
|
||||
```py
|
||||
>>> from transformers import TFAutoModelForSequenceClassification
|
||||
|
||||
>>> model_name = "nlptown/bert-base-multilingual-uncased-sentiment"
|
||||
>>> tf_model = TFAutoModelForSequenceClassification.from_pretrained(model_name)
|
||||
```
|
||||
|
||||
<Tip>
|
||||
|
||||
راجع [ملخص المهام](./task_summary) للمهام المدعومة بواسطة فئة [`AutoModel`].
|
||||
|
||||
</Tip>
|
||||
|
||||
الآن، مرر دفعة المدخلات المعالجة مسبقًا مباشرة إلى النموذج. يمكنك تمرير المصفوفات كما هي:
|
||||
|
||||
```py
|
||||
>>> tf_outputs = tf_model(tf_batch)
|
||||
```
|
||||
|
||||
يقوم النموذج بإخراج التنشيطات النهائية في سمة `logits`. طبق دالة softmax على `logits` لاسترداد الاحتمالات:
|
||||
|
||||
```py
|
||||
>>> import tensorflow as tf
|
||||
|
||||
>>> tf_predictions = tf.nn.softmax(tf_outputs.logits, axis=-1)
|
||||
>>> tf_predictions # doctest: +IGNORE_RESULT
|
||||
```
|
||||
</tf>
|
||||
</frameworkcontent>
|
||||
|
||||
<Tip>
|
||||
|
||||
تخرج جميع نماذج 🤗 Transformers (PyTorch أو TensorFlow) المصفوفات *قبل* دالة التنشيط النهائية (مثل softmax) لأن دالة التنشيط النهائية غالبًا ما تكون مدمجة مع دالة الخسارة. نواتج النموذج عبارة عن فئات بيانات خاصة، لذلك يتم استكمال سماتها تلقائيًا في IDE. وتتصرف مخرجات النموذج مثل زوج مرتب أو قاموس (يمكنك الفهرسة باستخدام عدد صحيح ، شريحة، أو سلسلة)، وفي هذه الحالة، يتم تجاهل السمات التي تساوي None.
|
||||
|
||||
</Tip>
|
||||
|
||||
### حفظ النموذج
|
||||
|
||||
<frameworkcontent>
|
||||
<pt>
|
||||
بمجرد ضبط نموذجك، يمكنك حفظه مع برنامج الترميز الخاص به باستخدام [`PreTrainedModel.save_pretrained`]:
|
||||
|
||||
```py
|
||||
>>> pt_save_directory = "./pt_save_pretrained"
|
||||
>>> tokenizer.save_pretrained(pt_save_directory) # doctest: +IGNORE_RESULT
|
||||
>>> pt_model.save_pretrained(pt_save_directory)
|
||||
```
|
||||
|
||||
عندما تكون مستعدًا لاستخدام النموذج مرة أخرى، أعد تحميله باستخدام [`PreTrainedModel.from_pretrained`]:
|
||||
|
||||
```py
|
||||
>>> pt_model = AutoModelForSequenceClassification.from_pretrained("./pt_save_pretrained")
|
||||
```
|
||||
</pt>
|
||||
<tf>
|
||||
بمجرد ضبط نموذجك، يمكنك حفظه مع برنامج الترميز الخاص به باستخدام [`TFPreTrainedModel.save_pretrained`]:
|
||||
|
||||
```py
|
||||
>>> tf_save_directory = "./tf_save_pretrained"
|
||||
>>> tokenizer.save_pretrained(tf_save_directory) # doctest: +IGNORE_RESULT
|
||||
>>> tf_model.save_pretrained(tf_save_directory)
|
||||
```
|
||||
|
||||
عندما تكون مستعدًا لاستخدام النموذج مرة أخرى، أعد تحميله باستخدام [`TFPreTrainedModel.from_pretrained`]:
|
||||
|
||||
```py
|
||||
>>> tf_model = TFAutoModelForSequenceClassification.from_pretrained("./tf_save_pretrained")
|
||||
```
|
||||
</tf>
|
||||
</frameworkcontent>
|
||||
|
||||
من الميزات الرائعة في 🤗 Transformers القدرة على حفظ نموذج وإعادة تحميله كنموذج PyTorch أو TensorFlow. يمكن أن يحول معامل `from_pt` أو `from_tf` النموذج من إطار عمل إلى آخر:
|
||||
|
||||
<frameworkcontent>
|
||||
<pt>
|
||||
|
||||
```py
|
||||
>>> from transformers import AutoModel
|
||||
|
||||
>>> tokenizer = AutoTokenizer.from_pretrained(tf_save_directory)
|
||||
>>> pt_model = AutoModelForSequenceClassification.from_pretrained(tf_save_directory, from_tf=True)
|
||||
```
|
||||
</pt>
|
||||
<tf>
|
||||
|
||||
```py
|
||||
>>> from transformers import TFAutoModel
|
||||
|
||||
>>> tokenizer = AutoTokenizer.from_pretrained(pt_save_directory)
|
||||
>>> tf_model = TFAutoModelForSequenceClassification.from_pretrained(pt_save_directory, from_pt=True)
|
||||
```
|
||||
</tf>
|
||||
</frameworkcontent>
|
||||
|
||||
|
||||
## إنشاء نماذج مخصصة
|
||||
|
||||
يمكنك تعديل فئة تكوين النموذج لتغيير كيفية بناء النموذج. يحدد التكوين سمات النموذج، مثل عدد الطبقات المخفية أو رؤوس الاهتمام. تبدأ من الصفر عند تهيئة نموذج من فئة تكوين مخصصة. يتم تهيئة سمات النموذج بشكل عشوائي، ويجب تدريب النموذج قبل استخدامه للحصول على نتائج ذات معنى.
|
||||
|
||||
ابدأ باستيراد [`AutoConfig`]. ثم قم بتحميل النموذج المُدرب مسبقًا الذي تريد تعديله. ضمن [`AutoConfig.from_pretrained`]. يمكنك تحديد السمة التي تريد تغييرها، مثل عدد رؤوس الاهتمام:
|
||||
|
||||
```py
|
||||
>>> from transformers import AutoConfig
|
||||
|
||||
>>> my_config = AutoConfig.from_pretrained("distilbert/distilbert-base-uncased", n_heads=12)
|
||||
```
|
||||
|
||||
<frameworkcontent>
|
||||
<pt>
|
||||
قم بإنشاء نموذج من تكوينك المخصص باستخدام [`AutoModel.from_config`]:
|
||||
|
||||
```py
|
||||
>>> from transformers import AutoModel
|
||||
|
||||
>>> my_model = AutoModel.from_config(my_config)
|
||||
```
|
||||
</pt>
|
||||
<tf>
|
||||
قم بإنشاء نموذج من تكوينك المخصص باستخدام [`TFAutoModel.from_config`]:
|
||||
|
||||
```py
|
||||
>>> from transformers import TFAutoModel
|
||||
|
||||
>>> my_model = TFAutoModel.from_config(my_config)
|
||||
```
|
||||
</tf>
|
||||
</frameworkcontent>
|
||||
|
||||
الق نظرة على دليل [إنشاء بنية مخصصة](./create_a_model) لمزيد من المعلومات حول بناء التكوينات المخصصة.
|
||||
|
||||
## المدرب - حلقة تدريب محسنة لـ PyTorch
|
||||
|
||||
جميع النماذج عبارة عن [`torch.nn.Module`](https://pytorch.org/docs/stable/nn.html#torch.nn.Module) قياسية، لذا يمكنك استخدامها في أي حلقة تدريب نموذجية. في حين يمكنك كتابة حلقة التدريب الخاصة بك، يوفر 🤗 Transformers فئة [`Trainer`] لـ PyTorch، والتي تحتوي على حلقة التدريب الأساسية وتضيف وظائف إضافية لميزات مثل التدريب الموزع، والدقة المختلطة، والمزيد.
|
||||
|
||||
وفقًا لمهمتك، ستقوم عادةً بتمرير المعلمات التالية إلى [`Trainer`]:
|
||||
|
||||
1. ستبدأ بـ [`PreTrainedModel`] أو [`torch.nn.Module`](https://pytorch.org/docs/stable/nn.html#torch.nn.Module):
|
||||
|
||||
```py
|
||||
>>> from transformers import AutoModelForSequenceClassification
|
||||
|
||||
>>> model = AutoModelForSequenceClassification.from_pretrained("distilbert/distilbert-base-uncased")
|
||||
```
|
||||
|
||||
2. تحتوي [`TrainingArguments`] على فرط معلمات النموذج التي يمكنك تغييرها مثل معدل التعلم، وحجم الدفعة، وعدد العصور التي يجب التدريب عليها. يتم استخدام القيم الافتراضية إذا لم تحدد أي حجج تدريب:
|
||||
|
||||
```py
|
||||
>>> from transformers import TrainingArguments
|
||||
|
||||
>>> training_args = TrainingArguments(
|
||||
... output_dir="path/to/save/folder/",
|
||||
... learning_rate=2e-5,
|
||||
... per_device_train_batch_size=8,
|
||||
... per_device_eval_batch_size=8,
|
||||
... num_train_epochs=2,
|
||||
... )
|
||||
```
|
||||
|
||||
3. قم بتحميل فئة معالجة مسبقة مثل برنامج الترميز، أو معالج الصور، أو مستخرج الميزات، أو المعالج:
|
||||
|
||||
```py
|
||||
>>> from transformers import AutoTokenizer
|
||||
|
||||
>>> tokenizer = AutoTokenizer.from_pretrained("distilbert/distilbert-base-uncased")
|
||||
```
|
||||
|
||||
4. قم بتحميل مجموعة بيانات:
|
||||
|
||||
```py
|
||||
>>> from datasets import load_dataset
|
||||
|
||||
>>> dataset = load_dataset("rotten_tomatoes") # doctest: +IGNORE_RESULT
|
||||
```
|
||||
|
||||
5. قم بإنشاء دالة لترميز مجموعة البيانات:
|
||||
|
||||
```py
|
||||
>>> def tokenize_dataset(dataset):
|
||||
... return tokenizer(dataset["text"])
|
||||
```
|
||||
|
||||
ثم قم بتطبيقه على مجموعة البيانات بأكملها باستخدام [`~datasets.Dataset.map`]:
|
||||
|
||||
```py
|
||||
>>> dataset = dataset.map(tokenize_dataset, batched=True)
|
||||
```
|
||||
|
||||
6. [`DataCollatorWithPadding`] لإنشاء دفعة من الأمثلة من مجموعة البيانات الخاصة بك:
|
||||
|
||||
```py
|
||||
>>> from transformers import DataCollatorWithPadding
|
||||
|
||||
>>> data_collator = DataCollatorWithPadding(tokenizer=tokenizer)
|
||||
```
|
||||
|
||||
الآن قم بتجميع جميع هذه الفئات في [`Trainer`]:
|
||||
|
||||
```py
|
||||
>>> from transformers import Trainer
|
||||
|
||||
>>> trainer = Trainer(
|
||||
... model=model,
|
||||
... args=training_args,
|
||||
... train_dataset=dataset["train"],
|
||||
... eval_dataset=dataset["test"],
|
||||
... tokenizer=tokenizer,
|
||||
... data_collator=data_collator,
|
||||
... ) # doctest: +SKIP
|
||||
```
|
||||
عندما تكون مستعدًا، استدعِ [`~Trainer.train`] لبدء التدريب:
|
||||
|
||||
```py
|
||||
>>> trainer.train() # doctest: +SKIP
|
||||
```
|
||||
|
||||
<Tip>
|
||||
|
||||
بالنسبة للمهام - مثل الترجمة أو التلخيص - التي تستخدم نموذج تسلسل إلى تسلسل، استخدم فئات [`Seq2SeqTrainer`] و [`Seq2SeqTrainingArguments`] بدلاً من ذلك.
|
||||
|
||||
</Tip>
|
||||
|
||||
يمكنك تخصيص سلوك حلقة التدريب عن طريق إنشاء فئة فرعية من الطرق داخل [`Trainer`]. يسمح لك ذلك بتخصيص ميزات مثل دالة الخسارة، والمحسن، والمجدول. راجع مرجع [`Trainer`] للتعرف على الطرق التي يمكن إنشاء فئات فرعية منها.
|
||||
|
||||
والطريقة الأخرى لتخصيص حلقة التدريب هي باستخدام [المستدعيات](./main_classes/callback). يمكنك استخدام المستدعيات للتكامل مع المكتبات الأخرى ومراقبة حلقة التدريب للإبلاغ عن التقدم أو إيقاف التدريب مبكرًا. لا تعدل المستدعيات أي شيء في حلقة التدريب نفسها. لتخصيص شيء مثل دالة الخسارة، تحتاج إلى إنشاء فئة فرعية من [`Trainer`] بدلاً من ذلك.
|
||||
|
||||
## التدريب باستخدام TensorFlow
|
||||
|
||||
جميع النماذج عبارة عن [`tf.keras.Model`](https://www.tensorflow.org/api_docs/python/tf/keras/Model) قياسية، لذا يمكن تدريبها في TensorFlow باستخدام واجهة برمجة تطبيقات Keras. يوفر 🤗 Transformers طريقة [`~TFPreTrainedModel.prepare_tf_dataset`] لتحميل مجموعة البيانات الخاصة بك بسهولة كـ `tf.data.Dataset` حتى تتمكن من البدء في التدريب على الفور باستخدام دالتي `compile` و`fit` في Keras.
|
||||
|
||||
1. ستبدأ بـ [`TFPreTrainedModel`] أو [`tf.keras.Model`](https://www.tensorflow.org/api_docs/python/tf/keras/Model):
|
||||
|
||||
```py
|
||||
>>> from transformers import TFAutoModelForSequenceClassification
|
||||
|
||||
>>> model = TFAutoModelForSequenceClassification.from_pretrained("distilbert/distilbert-base-uncased")
|
||||
```
|
||||
|
||||
2. قم بتحميل فئة معالجة مسبقة مثل برنامج الترميز، أو معالج الصور، أو مستخرج الميزات، أو المعالج:
|
||||
|
||||
```py
|
||||
>>> from transformers import AutoTokenizer
|
||||
|
||||
>>> tokenizer = AutoTokenizer.from_pretrained("distilbert/distilbert-base-uncased")
|
||||
```
|
||||
|
||||
3. قم بإنشاء دالة لترميز مجموعة البيانات:
|
||||
|
||||
```py
|
||||
>>> def tokenize_dataset(dataset):
|
||||
... return tokenizer(dataset["text"]) # doctest: +SKIP
|
||||
```
|
||||
|
||||
4. قم بتطبيق برنامج الترميز على مجموعة البيانات بأكملها باستخدام [`~datasets.Dataset.map`] ثم مرر مجموعة البيانات وبرنامج الترميز إلى [`~TFPreTrainedModel.prepare_tf_dataset`]. يمكنك أيضًا تغيير حجم الدفعة وخلط مجموعة البيانات هنا إذا أردت:
|
||||
|
||||
```py
|
||||
>>> dataset = dataset.map(tokenize_dataset) # doctest: +SKIP
|
||||
>>> tf_dataset = model.prepare_tf_dataset(
|
||||
... dataset["train"], batch_size=16, shuffle=True, tokenizer=tokenizer
|
||||
... ) # doctest: +SKIP
|
||||
```
|
||||
|
||||
5. عندما تكون مستعدًا، يمكنك استدعاء `compile` و`fit` لبدء التدريب. لاحظ أن جميع نماذج Transformers لديها دالة خسارة ذات صلة بالمهمة بشكل افتراضي، لذا فأنت لست بحاجة إلى تحديد واحدة ما لم ترغب في ذلك:
|
||||
|
||||
```py
|
||||
>>> from tensorflow.keras.optimizers import Adam
|
||||
|
||||
>>> model.compile(optimizer='adam') # لا توجد وسيطة دالة الخسارة!
|
||||
>>> model.fit(tf_dataset) # doctest: +SKIP
|
||||
```
|
||||
|
||||
## ماذا بعد؟
|
||||
|
||||
الآن بعد أن أكملت الجولة السريعة في 🤗 Transformers، راجع أدلتنا لمعرفة كيفية القيام بأشياء أكثر تحديدًا مثل كتابة نموذج مخصص، وضبط نموذج مسبق التدريب لمهمة معينة، وكيفية تدريب نموذج باستخدام نص برمجي. إذا كنت مهتمًا بمعرفة المزيد عن المفاهيم الأساسية لـ 🤗 Transformers، فاحصل على فنجان من القهوة واطلع على أدلة المفاهيم الخاصة بنا!
|
||||
@ -1,351 +0,0 @@
|
||||
# التدريب باستخدام نص برمجى
|
||||
|
||||
بالإضافة إلى دفاتر الملاحظات [notebooks](./notebooks) الخاصة بـ 🤗 Transformers، هناك أيضًا نصوص برمجية توضيحية تُظهر كيفية تدريب نموذج لمهمة باستخدام [PyTorch](https://github.com/huggingface/transformers/tree/main/examples/pytorch) أو [TensorFlow](https://github.com/huggingface/transformers/tree/main/examples/tensorflow) أو [JAX/Flax](https://github.com/huggingface/transformers/tree/main/examples/flax).
|
||||
|
||||
كما ستجد النصوص البرمجية التي استخدمناها في [مشاريع الأبحاث](https://github.com/huggingface/transformers/tree/main/examples/research_projects) و [الأمثلة القديمة](https://github.com/huggingface/transformers/tree/main/examples/legacy) والتي ساهم بها المجتمع بشكل أساسي. هذه النصوص البرمجية غير مدعومة بشكل نشط وقد تتطلب إصدارًا محددًا من مكتبة 🤗 Transformers والذي من المحتمل أن يكون غير متوافق مع الإصدار الأحدث من المكتبة.
|
||||
|
||||
لا يُتوقع أن تعمل النصوص البرمجية التوضيحية بشكل مباشر على كل مشكلة، وقد تحتاج إلى تكييف النص البرمجي مع المشكلة التي تحاول حلها. ولمساعدتك في ذلك، تعرض معظم النصوص البرمجية كيفية معالجة البيانات قبل التدريب بشكل كامل، مما يتيح لك تحريرها حسب الحاجة لحالتك الاستخدام.
|
||||
|
||||
بالنسبة لأي ميزة ترغب في تنفيذها في نص برمجي توضيحي، يرجى مناقشتها في [المنتدى](https://discuss.huggingface.co/) أو في [قضية](https://github.com/huggingface/transformers/issues) قبل إرسال طلب سحب. وفي حين أننا نرحب بإصلاح الأخطاء، فمن غير المرجح أن نقوم بدمج طلب سحب الذي يضيف المزيد من الوظائف على حساب قابلية القراءة.
|
||||
|
||||
سيوضح هذا الدليل كيفية تشغيل نص برمجي توضيحي للتدريب على التلخيص في [PyTorch](https://github.com/huggingface/transformers/tree/main/examples/pytorch/summarization) و [TensorFlow](https://github.com/huggingface/transformers/tree/main/examples/tensorflow/summarization). يُتوقع أن تعمل جميع الأمثلة مع كلا الإطارين ما لم يُنص على خلاف ذلك.
|
||||
|
||||
## الإعداد
|
||||
|
||||
لتشغيل الإصدار الأحدث من النصوص البرمجية التوضيحية بنجاح، يجب عليك **تثبيت 🤗 Transformers من المصدر** في بيئة افتراضية جديدة:
|
||||
|
||||
```bash
|
||||
git clone https://github.com/huggingface/transformers
|
||||
cd transformers
|
||||
pip install .
|
||||
```
|
||||
|
||||
بالنسبة للإصدارات الأقدم من النصوص البرمجية التوضيحية، انقر فوق الزر أدناه:
|
||||
```bash
|
||||
git clone https://github.com/huggingface/transformers
|
||||
cd transformers
|
||||
pip install .
|
||||
```
|
||||
|
||||
بالنسبة للإصدارات الأقدم من النصوص البرمجية التوضيحية، انقر فوق الزر أدناه:
|
||||
|
||||
<details>
|
||||
<summary>أمثلة للإصدارات الأقدم من 🤗 Transformers</summary>
|
||||
<ul>
|
||||
<li><a href="https://github.com/huggingface/transformers/tree/v4.5.1/examples">v4.5.1</a></li>
|
||||
<li><a href="https://github.com/huggingface/transformers/tree/v4.4.2/examples">v4.4.2</a></li>
|
||||
<li><a href="https://github.com/huggingface/transformers/tree/v4.3.3/examples">v4.3.3</a></li>
|
||||
<li><a href="https://github.com/huggingface/transformers/tree/v4.2.2/examples">v4.2.2</a></li>
|
||||
<li><a href="https://github.com/huggingface/transformers/tree/v4.1.1/examples">v4.1.1</a></li>
|
||||
<li><a href="https://github.com/huggingface/transformers/tree/v4.0.1/examples">v4.0.1</a></li>
|
||||
<li><a href="https://github.com/huggingface/transformers/tree/v3.5.1/examples">v3.5.1</a></li>
|
||||
<li><a href="https://github.com/huggingface/transformers/tree/v3.4.0/examples">v3.4.0</a></li>
|
||||
<li><a href="https://github.com/huggingface/transformers/tree/v3.3.1/examples">v3.3.1</a></li>
|
||||
<li><a href="https://github.com/huggingface/transformers/tree/v3.2.0/examples">v3.2.0</a></li>
|
||||
<li><a href="https://github.com/huggingface/transformers/tree/v3.1.0/examples">v3.1.0</a></li>
|
||||
<li><a href="https://github.com/huggingface/transformers/tree/v3.0.2/examples">v3.0.2</a></li>
|
||||
<li><a href="https://github.com/huggingface/transformers/tree/v2.11.0/examples">v2.11.0</a></li>
|
||||
<li><a href="https://github.com/huggingface/transformers/tree/v2.10.0/examples">v2.10.0</a></li>
|
||||
<li><a href="https://github.com/huggingface/transformers/tree/v2.9.1/examples">v2.9.1</a></li>
|
||||
<li><a href="https://github.com/huggingface/transformers/tree/v2.8.0/examples">v2.8.0</a></li>
|
||||
<li><a href="https://github.com/huggingface/transformers/tree/v2.7.0/examples">v2.7.0</a></li>
|
||||
<li><a href="https://github.com/huggingface/transformers/tree/v2.6.0/examples">v2.6.0</a></li>
|
||||
<li><a href="https://github.com/huggingface/transformers/tree/v2.5.1/examples">v2.5.1</a></li>
|
||||
<li><a href="https://github.com/huggingface/transformers/tree/v2.4.0/examples">v2.4.0</a></li>
|
||||
<li><a href="https://github.com/huggingface/transformers/tree/v2.3.0/examples">v2.3.0</a></li>
|
||||
<li><a href="https://github.com/huggingface/transformers/tree/v2.2.0/examples">v2.2.0</a></li>
|
||||
<li><a href="https://github.com/huggingface/transformers/tree/v2.1.0/examples">v2.1.1</a></li>
|
||||
<li><a href="https://github.com/huggingface/transformers/tree/v2.0.0/examples">v2.0.0</a></li>
|
||||
<li><a href="https://github.com/huggingface/transformers/tree/v1.2.0/examples">v1.2.0</a></li>
|
||||
<li><a href="https://github.com/huggingface/transformers/tree/v1.1.0/examples">v1.1.0</a></li>
|
||||
<li><a href="https://github.com/huggingface/transformers/tree/v1.0.0/examples">v1.0.0</a></li>
|
||||
</ul>
|
||||
</details>
|
||||
|
||||
ثم قم بالتبديل إلى النسخة الحالية من 🤗 Transformers إلى إصدار محدد، مثل v3.5.1 على سبيل المثال:
|
||||
|
||||
```bash
|
||||
git checkout tags/v3.5.1
|
||||
```
|
||||
|
||||
بعد إعداد إصدار المكتبة الصحيح، انتقل إلى مجلد الأمثلة الذي تختاره وقم بتثبيت المتطلبات المحددة:
|
||||
|
||||
```bash
|
||||
pip install -r requirements.txt
|
||||
```
|
||||
|
||||
## تشغيل نص برمجي
|
||||
|
||||
<frameworkcontent>
|
||||
<pt>
|
||||
|
||||
- يقوم النص البرمجي التوضيحي بتنزيل مجموعة بيانات ومعالجتها مسبقًا من مكتبة 🤗 [Datasets](https://huggingface.co/docs/datasets).
|
||||
- ثم يقوم النص البرمجي بضبط نموذج بيانات دقيق باستخدام [Trainer](https://huggingface.co/docs/transformers/main_classes/trainer) على بنية تدعم الملخص.
|
||||
- يوضح المثال التالي كيفية ضبط نموذج [T5-small](https://huggingface.co/google-t5/t5-small) على مجموعة بيانات [CNN/DailyMail](https://huggingface.co/datasets/cnn_dailymail).
|
||||
- يتطلب نموذج T5 معامل `source_prefix` إضافية بسبب الطريقة التي تم تدريبه بها. يتيح هذا المطالبة لـ T5 معرفة أن هذه مهمة التلخيص.
|
||||
|
||||
```bash
|
||||
python examples/pytorch/summarization/run_summarization.py \
|
||||
--model_name_or_path google-t5/t5-small \
|
||||
--do_train \
|
||||
--do_eval \
|
||||
--dataset_name cnn_dailymail \
|
||||
--dataset_config "3.0.0" \
|
||||
--source_prefix "summarize: " \
|
||||
--output_dir /tmp/tst-summarization \
|
||||
--per_device_train_batch_size=4 \
|
||||
--per_device_eval_batch_size=4 \
|
||||
--overwrite_output_dir \
|
||||
--predict_with_generate
|
||||
```
|
||||
</pt>
|
||||
<tf>
|
||||
|
||||
- يقوم النص البرمجي التوضيحي بتنزيل مجموعة بيانات ومعالجتها مسبقًا من مكتبة 🤗 [Datasets](https://huggingface.co/docs/datasets/).
|
||||
- ثم يقوم النص البرمجي بضبط نموذج بيانات دقيق باستخدام Keras على بنية تدعم الملخص.
|
||||
- يوضح المثال التالي كيفية ضبط نموذج [T5-small](https://huggingface.co/google-t5/t5-small) على مجموعة بيانات [CNN/DailyMail](https://huggingface.co/datasets/cnn_dailymail).
|
||||
- يتطلب نموذج T5 ماعمل `source_prefix` إضافية بسبب الطريقة التي تم تدريبه بها. يتيح هذا المطالبة لـ T5 معرفة أن هذه مهمة التلخيص.
|
||||
|
||||
```bash
|
||||
python examples/tensorflow/summarization/run_summarization.py \
|
||||
--model_name_or_path google-t5/t5-small \
|
||||
--dataset_name cnn_dailymail \
|
||||
--dataset_config "3.0.0" \
|
||||
--output_dir /tmp/tst-summarization \
|
||||
--per_device_train_batch_size 8 \
|
||||
--per_device_eval_batch_size 16 \
|
||||
--num_train_epochs 3 \
|
||||
--do_train \
|
||||
--do_eval
|
||||
```
|
||||
</tf>
|
||||
</frameworkcontent>
|
||||
|
||||
## التدريب الموزع والدقة المختلطة
|
||||
|
||||
يدعم [Trainer](https://huggingface.co/docs/transformers/main_classes/trainer) التدريب الموزع والدقة المختلطة، مما يعني أنه يمكنك أيضًا استخدامه في نص برمجي. لتمكين كلتا الميزتين:
|
||||
|
||||
- أضف معامل `fp16` لتمكين الدقة المختلطة.
|
||||
- قم بتعيين عدد وحدات معالجة الرسومات (GPUs) التي تريد استخدامها باستخدام حجة `nproc_per_node`.
|
||||
|
||||
```bash
|
||||
torchrun \
|
||||
--nproc_per_node 8 pytorch/summarization/run_summarization.py \
|
||||
--fp16 \
|
||||
--model_name_or_path google-t5/t5-small \
|
||||
--do_train \
|
||||
--do_eval \
|
||||
--dataset_name cnn_dailymail \
|
||||
--dataset_config "3.0.0" \
|
||||
--source_prefix "summarize: " \
|
||||
--output_dir /tmp/tst-summarization \
|
||||
--per_device_train_batch_size=4 \
|
||||
--per_device_eval_batch_size=4 \
|
||||
--overwrite_output_dir \
|
||||
--predict_with_generate
|
||||
```
|
||||
|
||||
تستخدم نصوص TensorFlow البرمجية استراتيجية [`MirroredStrategy`](https://www.tensorflow.org/guide/distributed_training#mirroredstrategy) للتدريب الموزع، ولا تحتاج إلى إضافة أي معامﻻت إضافية إلى النص البرمجي التدريبي. سيستخدم نص TensorFlow البرمجي وحدات معالجة الرسومات (GPUs) متعددة بشكل افتراضي إذا كانت متوفرة.
|
||||
|
||||
## تشغيل نص برمجي على وحدة معالجة الدقة الفائقة (TPU)
|
||||
|
||||
<frameworkcontent>
|
||||
<pt>
|
||||
|
||||
تُعد وحدات معالجة الدقة الفائقة (TPUs) مصممة خصيصًا لتسريع الأداء. يدعم PyTorch وحدات معالجة الدقة الفائقة (TPUs) مع [XLA](https://www.tensorflow.org/xla) مجمع الدقة الفائقة للتعلم العميق (راجع [هنا](https://github.com/pytorch/xla/blob/master/README.md) لمزيد من التفاصيل). لاستخدام وحدة معالجة الدقة الفائقة (TPU)، قم بتشغيل نص `xla_spawn.py` البرمجي واستخدم معامل `num_cores` لتعيين عدد وحدات معالجة الدقة الفائقة (TPU) التي تريد استخدامها.
|
||||
|
||||
```bash
|
||||
python xla_spawn.py --num_cores 8 \
|
||||
summarization/run_summarization.py \
|
||||
--model_name_or_path google-t5/t5-small \
|
||||
--do_train \
|
||||
--do_eval \
|
||||
--dataset_name cnn_dailymail \
|
||||
--dataset_config "3.0.0" \
|
||||
--source_prefix "summarize: " \
|
||||
--output_dir /tmp/tst-summarization \
|
||||
--per_device_train_batch_size=4 \
|
||||
--per_device_eval_batch_size=4 \
|
||||
--overwrite_output_dir \
|
||||
--predict_with_generate
|
||||
```
|
||||
</pt>
|
||||
<tf>
|
||||
|
||||
تُعد وحدات معالجة الدقة الفائقة (TPUs) مصممة خصيصًا لتسريع الأداء. تستخدم نصوص TensorFlow البرمجية استراتيجية [`TPUStrategy`](https://www.tensorflow.org/guide/distributed_training#tpustrategy) للتدريب على وحدات معالجة الدقة الفائقة (TPUs). لاستخدام وحدة معالجة الدقة الفائقة (TPU)، قم بتمرير اسم مورد وحدة معالجة الدقة الفائقة (TPU) إلى حجة `tpu`.
|
||||
```bash
|
||||
python run_summarization.py \
|
||||
--tpu name_of_tpu_resource \
|
||||
--model_name_or_path google-t5/t5-small \
|
||||
--dataset_name cnn_dailymail \
|
||||
--dataset_config "3.0.0" \
|
||||
--output_dir /tmp/tst-summarization \
|
||||
--per_device_train_batch_size 8 \
|
||||
--per_device_eval_batch_size 16 \
|
||||
--num_train_epochs 3 \
|
||||
--do_train \
|
||||
--do_eval
|
||||
```
|
||||
</tf>
|
||||
</frameworkcontent>
|
||||
|
||||
## تشغيل نص برمجي باستخدام 🤗 Accelerate
|
||||
|
||||
🤗 [Accelerate](https://huggingface.co/docs/accelerate) هي مكتبة خاصة بـ PyTorch فقط توفر طريقة موحدة لتدريب نموذج على عدة أنواع من الإعدادات (الاعتماد على وحدة المعالجة المركزية (CPU) فقط، أو وحدات معالجة الرسومات (GPUs) المتعددة، أو وحدات معالجة الدقة الفائقة (TPUs)) مع الحفاظ على الرؤية الكاملة لحلقة تدريب PyTorch. تأكد من تثبيت 🤗 Accelerate إذا لم يكن لديك بالفعل:
|
||||
|
||||
> ملاحظة: نظرًا لأن Accelerate في حالة تطوير سريع، يجب تثبيت إصدار Git من Accelerate لتشغيل النصوص البرمجية.
|
||||
```bash
|
||||
pip install git+https://github.com/huggingface/accelerate
|
||||
```
|
||||
|
||||
بدلاً من إستخدام النص البرمجي `run_summarization.py` يجب عليك استخدام النص البرمجي `run_summarization_no_trainer.py` . ستكون النصوص البرمجية المدعومة من 🤗 Accelerate لها ملف `task_no_trainer.py` في المجلد. ابدأ بتشغيل الأمر التالي لإنشاء وحفظ ملف تكوين:
|
||||
|
||||
```bash
|
||||
accelerate config
|
||||
```
|
||||
|
||||
اختبر إعدادك للتأكد من أنه تم تكوينه بشكل صحيح:
|
||||
|
||||
```bash
|
||||
accelerate test
|
||||
```
|
||||
|
||||
الآن أنت مستعد لبدء التدريب:
|
||||
|
||||
```bash
|
||||
accelerate launch run_summarization_no_trainer.py \
|
||||
--model_name_or_path google-t5/t5-small \
|
||||
--dataset_name cnn_dailymail \
|
||||
--dataset_config "3.0.0" \
|
||||
--source_prefix "summarize: " \
|
||||
--output_dir ~/tmp/tst-summarization
|
||||
```
|
||||
|
||||
## استخدام مجموعة بيانات مخصصة
|
||||
|
||||
يدعم النص البرمجي للتلخيص مجموعة بيانات مخصصة طالما أنها ملف CSV أو JSON Line. عندما تستخدم مجموعة بياناتك الخاصة، تحتاج إلى تحديد العديد من المعلمات الإضافية:
|
||||
|
||||
- `train_file` و`validation_file` يحددان مسار ملفات التدريب والتحقق الخاصة بك.
|
||||
- `text_column` النص المدخل الذي سيتم تلخيصه.
|
||||
- `summary_column` النص الملخص المستهدف الذي سيتم إخراجه.
|
||||
|
||||
سيبدو النص البرمجي للتلخيص الذي يستخدم مجموعة بيانات مخصصة على النحو التالي:
|
||||
|
||||
```bash
|
||||
python examples/pytorch/summarization/run_summarization.py \
|
||||
--model_name_or_path google-t5/t5-small \
|
||||
--do_train \
|
||||
--do_eval \
|
||||
--train_file path_to_csv_or_jsonlines_file \
|
||||
--validation_file path_to_csv_or_jsonlines_file \
|
||||
--text_column text_column_name \
|
||||
--summary_column summary_column_name \
|
||||
--source_prefix "summarize: " \
|
||||
--output_dir /tmp/tst-summarization \
|
||||
--overwrite_output_dir \
|
||||
--per_device_train_batch_size=4 \
|
||||
--per_device_eval_batch_size=4 \
|
||||
--predict_with_generate
|
||||
```
|
||||
|
||||
## اختبار البرنامج النصي
|
||||
|
||||
من الجيد غالبًا تشغيل نصك البرمجي على عدد أقل من أمثلة مجموعة البيانات للتأكد من أن كل شيء يعمل كما هو متوقع قبل الالتزام بمجموعة بيانات كاملة والتي قد تستغرق ساعات لإكمالها. استخدم المعلمات التالية لتقليص مجموعة البيانات إلى عدد أقصى من العينات:
|
||||
|
||||
- `max_train_samples`
|
||||
- `max_eval_samples`
|
||||
- `max_predict_samples`
|
||||
|
||||
```bash
|
||||
python examples/pytorch/summarization/run_summarization.py \
|
||||
--model_name_or_path google-t5/t5-small \
|
||||
--max_train_samples 50 \
|
||||
--max_eval_samples 50 \
|
||||
--max_predict_samples 50 \
|
||||
--do_train \
|
||||
--do_eval \
|
||||
--dataset_name cnn_dailymail \
|
||||
--dataset_config "3.0.0" \
|
||||
--source_prefix "summarize: " \
|
||||
--output_dir /tmp/tst-summarization \
|
||||
--per_device_train_batch_size=4 \
|
||||
--per_device_eval_batch_size=4 \
|
||||
--overwrite_output_dir \
|
||||
--predict_with_generate
|
||||
```
|
||||
|
||||
لا تدعم جميع أمثلة النصوص البرمجية المعلمة `max_predict_samples`. إذا لم تكن متأكدًا مما إذا كان نصك البرمجي يدعم هذه المعلمة، فأضف معلمة `-h` للتحقق:
|
||||
|
||||
```bash
|
||||
examples/pytorch/summarization/run_summarization.py -h
|
||||
```
|
||||
|
||||
## استئناف التدريب من نقطة تفتيش
|
||||
|
||||
خيار آخر مفيد لتمكينه هو استئناف التدريب من نقطة تفتيش سابقة. سيضمن ذلك أنك تستطيع الاستمرار من حيث توقفت دون البدء من جديد إذا تم مقاطعة تدريبك. هناك طريقتان لاستئناف التدريب من نقطة تفتيش.
|
||||
|
||||
تستخدم الطريقة الأولى المعلمة `output_dir previous_output_dir` لاستئناف التدريب من أحدث نقطة تفتيش مخزنة في `output_dir`. في هذه الحالة، يجب عليك إزالة `overwrite_output_dir`:
|
||||
|
||||
```bash
|
||||
python examples/pytorch/summarization/run_summarization.py
|
||||
--model_name_or_path google-t5/t5-small \
|
||||
--do_train \
|
||||
--do_eval \
|
||||
--dataset_name cnn_dailymail \
|
||||
--dataset_config "3.0.0" \
|
||||
--source_prefix "summarize: " \
|
||||
--output_dir /tmp/tst-summarization \
|
||||
--per_device_train_batch_size=4 \
|
||||
--per_device_eval_batch_size=4 \
|
||||
--output_dir previous_output_dir \
|
||||
--predict_with_generate
|
||||
```
|
||||
|
||||
تستخدم الطريقة الثانية معلمة `resume_from_checkpoint path_to_specific_checkpoint` لاستئناف التدريب من مجلد نقطة تفتيش محددة.
|
||||
|
||||
```bash
|
||||
python examples/pytorch/summarization/run_summarization.py
|
||||
--model_name_or_path google-t5/t5-small \
|
||||
--do_train \
|
||||
--do_eval \
|
||||
--dataset_name cnn_dailymail \
|
||||
--dataset_config "3.0.0" \
|
||||
--source_prefix "summarize: " \
|
||||
--output_dir /tmp/tst-summarization \
|
||||
--per_device_train_batch_size=4 \
|
||||
--per_device_eval_batch_size=4 \
|
||||
--overwrite_output_dir \
|
||||
--resume_from_checkpoint path_to_specific_checkpoint \
|
||||
--predict_with_generate
|
||||
```
|
||||
|
||||
## شارك نموذجك
|
||||
|
||||
يمكن لجميع النصوص البرمجية رفع نموذجك النهائي إلى [مركز النماذج](https://huggingface.co/models). تأكد من تسجيل الدخول إلى Hugging Face قبل البدء:
|
||||
|
||||
```bash
|
||||
huggingface-cli login
|
||||
```
|
||||
|
||||
ثم أضف المعلمة `push_to_hub` إلى النص البرمجي . ستقوم هذه المعلمة بإنشاء مستودع باستخدام اسم مستخدم Hugging Face واسم المجلد المحدد في `output_dir`.
|
||||
|
||||
لإعطاء مستودعك اسمًا محددًا، استخدم المعلمة `push_to_hub_model_id` لإضافته. سيتم عرض المستودع تلقائيًا ضمن مساحة الاسم الخاصة بك.
|
||||
|
||||
يوضح المثال التالي كيفية رفع نموذج باستخدام اسم مستودع محدد:
|
||||
|
||||
```bash
|
||||
python examples/pytorch/summarization/run_summarization.py
|
||||
--model_name_or_path google-t5/t5-small \
|
||||
--do_train \
|
||||
--do_eval \
|
||||
--dataset_name cnn_dailymail \
|
||||
--dataset_config "3.0.0" \
|
||||
--source_prefix "summarize: " \
|
||||
--push_to_hub \
|
||||
--push_to_hub_model_id finetuned-t5-cnn_dailymail \
|
||||
--output_dir /tmp/tst-summarization \
|
||||
--per_device_train_batch_size=4 \
|
||||
--per_device_eval_batch_size=4 \
|
||||
--overwrite_output_dir \
|
||||
--predict_with_generate
|
||||
```
|
||||
@ -1,412 +0,0 @@
|
||||
# ضبط نموذج مُدرب مسبقًا
|
||||
|
||||
هناك فوائد كبيرة لاستخدام نموذج مُدرب مسبقًا. فهو يقلل من تكاليف الحوسبة، ويحد من أثرنا البيئي، ويتيح لك استخدام أحدث النماذج دون الحاجة إلى تدريبها من الصفر. توفر مكتبة 🤗 Transformers إمكانية الوصول إلى آلاف النماذج المُدربة مسبقًا لمجموعة واسعة من المهام. عندما تستخدم نموذجًا مُدربًا مسبقًا، فإنك تقوم بتدريبه على مجموعة بيانات خاصة بمهمتك. يُعرف ذلك بالضبط الدقيق، وهي تقنية تدريب قوية للغاية. في هذا البرنامج التعليمي، سوف تقوم بضبط نموذج مُدرب مسبقًا باستخدام إطار عمل للتعلم العميق الذي تختاره:
|
||||
|
||||
* ضبط نموذج مُدرب مسبقًا باستخدام 🤗 Transformers [`Trainer`].
|
||||
* ضبط نموذج مُدرب مسبقًا في TensorFlow باستخدام Keras.
|
||||
* ضبط نموذج مُدرب مسبقًا في PyTorch الأصلي.
|
||||
|
||||
<a id='data-processing'></a>
|
||||
|
||||
## إعداد مجموعة بيانات
|
||||
|
||||
قبل أن تتمكن من ضبط نموذج مُدرب مسبقًا، قم بتنزيل مجموعة بيانات وإعدادها للتدريب. أظهر البرنامج التعليمي السابق كيفية معالجة البيانات للتدريب، والآن لديك الفرصة لاختبار تلك المهارات!
|
||||
|
||||
ابدأ بتحميل مجموعة بيانات [Yelp Reviews](https://huggingface.co/datasets/yelp_review_full):
|
||||
|
||||
```py
|
||||
>>> from datasets import load_dataset
|
||||
|
||||
>>> dataset = load_dataset("yelp_review_full")
|
||||
>>> dataset["train"][100]
|
||||
{'label': 0,
|
||||
'text': 'My expectations for McDonalds are t rarely high. But for one to still fail so spectacularly...that takes something special!\\nThe cashier took my friends\'s order, then promptly ignored me. I had to force myself in front of a cashier who opened his register to wait on the person BEHIND me. I waited over five minutes for a gigantic order that included precisely one kid\'s meal. After watching two people who ordered after me be handed their food, I asked where mine was. The manager started yelling at the cashiers for \\"serving off their orders\\" when they didn\'t have their food. But neither cashier was anywhere near those controls, and the manager was the one serving food to customers and clearing the boards.\\nThe manager was rude when giving me my order. She didn\'t make sure that I had everything ON MY RECEIPT, and never even had the decency to apologize that I felt I was getting poor service.\\nI\'ve eaten at various McDonalds restaurants for over 30 years. I\'ve worked at more than one location. I expect bad days, bad moods, and the occasional mistake. But I have yet to have a decent experience at this store. It will remain a place I avoid unless someone in my party needs to avoid illness from low blood sugar. Perhaps I should go back to the racially biased service of Steak n Shake instead!'}
|
||||
```
|
||||
|
||||
كما تعلم الآن، تحتاج إلى محول نص إلى رمز (tokenizer) لمعالجة النص وتضمين استراتيجيات للحشو والقص للتعامل مع أي أطوال متسلسلة متغيرة. لمعالجة مجموعة البيانات الخاصة بك في خطوة واحدة، استخدم طريقة 🤗 Datasets [`map`](https://huggingface.co/docs/datasets/process#map) لتطبيق دالة معالجة مسبقة على مجموعة البيانات بأكملها:
|
||||
|
||||
```py
|
||||
>>> from transformers import AutoTokenizer
|
||||
|
||||
>>> tokenizer = AutoTokenizer.from_pretrained("google-bert/bert-base-cased")
|
||||
|
||||
|
||||
>>> def tokenize_function(examples):
|
||||
... return tokenizer(examples["text"], padding="max_length", truncation=True)
|
||||
>>> tokenizer = AutoTokenizer.from_pretrained("google-bert/bert-base-cased")
|
||||
|
||||
|
||||
>>> def tokenize_function(examples):
|
||||
... return tokenizer(examples["text"], padding="max_length", truncation=True)
|
||||
|
||||
|
||||
>>> tokenized_datasets = dataset.map(tokenize_function, batched=True)
|
||||
```
|
||||
|
||||
إذا كنت ترغب، يمكنك إنشاء مجموعة فرعية أصغر من مجموعة البيانات الكاملة لضبطها لتقليل الوقت الذي تستغرقه:
|
||||
|
||||
```py
|
||||
>>> small_train_dataset = tokenized_datasets["train"].shuffle(seed=42).select(range(1000))
|
||||
>>> small_eval_dataset = tokenized_datasets["test"].shuffle(seed=42).select(range(1000))
|
||||
```
|
||||
|
||||
<a id='trainer'></a>
|
||||
|
||||
## التدريب
|
||||
|
||||
في هذه المرحلة، يجب عليك اتباع القسم الذي يتوافق مع الإطار الذي تريد استخدامه. يمكنك استخدام الروابط
|
||||
في شريط التنقل الأيمن للقفز إلى الإطار الذي تريده - وإذا كنت تريد إخفاء كل المحتوى لإطار معين،
|
||||
فاستخدم الزر في الركن العلوي الأيمن من كتلة الإطار!
|
||||
|
||||
<frameworkcontent>
|
||||
<pt>
|
||||
<Youtube id="nvBXf7s7vTI"/>
|
||||
|
||||
## التدريب باستخدام PyTorch Trainer
|
||||
|
||||
تقدم مكتبة 🤗 Transformers فئة [`Trainer`] مُحسّنة لتدريب نماذج 🤗 Transformers، مما يسهل بدء التدريب دون الحاجة إلى كتابة حلقة التدريب الخاصة بك يدويًا. تدعم واجهة برمجة تطبيقات [`Trainer`] مجموعة واسعة من خيارات التدريب والميزات مثل التسجيل، وتراكم التدرجات، والدقة المختلطة.
|
||||
|
||||
ابدأ بتحميل نموذجك وتحديد عدد التصنيفات المتوقعة. من بطاقة مجموعة بيانات Yelp Review [dataset card](https://huggingface.co/datasets/yelp_review_full#data-fields)، تعرف أنه يوجد خمسة تصنيفات:
|
||||
|
||||
```py
|
||||
>>> from transformers import AutoModelForSequenceClassification
|
||||
|
||||
>>> model = AutoModelForSequenceClassification.from_pretrained("google-bert/bert-base-cased", num_labels=5)
|
||||
```
|
||||
|
||||
<Tip>
|
||||
|
||||
سترى تحذيرًا بشأن بعض أوزان النموذج المُدرب مسبقًا لن تُستخدم وبعض الأوزان الأخرى ستُبدء بشكل عشوائي. لا تقلق، هذا أمر طبيعي تمامًا! يتم التخلص من رأس النموذج المُدرب مسبقًا لشبكة BERT، ويتم استبداله برأس تصنيف يُبدء بشكل عشوائي. سوف تقوم بضبط الرأس الجديد للنموذج بدقة على مهمة تصنيف التسلسلات الخاصة بك، مما ينقل المعرفة من النموذج المُدرب مسبقًا إليه.
|
||||
|
||||
</Tip>
|
||||
|
||||
### اختيار أحسن العوامل والمتغيرات للتدريب (Training hyperparameters)
|
||||
|
||||
بعد ذلك، قم بإنشاء كائن من فئة [`TrainingArguments`] والتي تحتوي على جميع العوامل والمتغيرات التي يمكنك ضبطها بالإضافة إلى خيارات تنشيط التدريب المختلفة. بالنسبة لهذا البرنامج التعليمي، يمكنك البدء بمعاملات التدريب الافتراضية [hyperparameters](https://huggingface.co/docs/transformers/main_classes/trainer#transformers.TrainingArguments)، ولكن لا تتردد في تجربتها للعثور على الإعدادات المثلى.
|
||||
|
||||
حدد مكان حفظ النسخ من تدريبك:
|
||||
|
||||
```py
|
||||
>>> from transformers import TrainingArguments
|
||||
|
||||
>>> training_args = TrainingArguments(output_dir="test_trainer")
|
||||
```
|
||||
|
||||
### التقييم
|
||||
|
||||
لا يقوم [`Trainer`] تلقائيًا بتقييم أداء النموذج أثناء التدريب. ستحتاج إلى تمرير دالة إلى [`Trainer`] لحساب وإبلاغ المقاييس. توفر مكتبة [🤗 Evaluate](https://huggingface.co/docs/evaluate/index) دالة [`accuracy`](https://huggingface.co/spaces/evaluate-metric/accuracy) بسيطة يمكنك تحميلها باستخدام الدالة [`evaluate.load`] (راجع هذا [الدليل السريع](https://huggingface.co/docs/evaluate/a_quick_tour) لمزيد من المعلومات):
|
||||
|
||||
```py
|
||||
>>> import numpy as np
|
||||
>>> import evaluate
|
||||
|
||||
>>> metric = evaluate.load("accuracy")
|
||||
```
|
||||
|
||||
استدعِ دالة [`~evaluate.compute`] على `metric` لحساب دقة تنبؤاتك. قبل تمرير تنبؤاتك إلى دالة `compute`، تحتاج إلى تحويل النتائج الخام logits إلى تنبؤات نهائية (تذكر أن جميع نماذج 🤗 Transformers تعيد نتائج الخام logits):
|
||||
|
||||
```py
|
||||
>>> def compute_metrics(eval_pred):
|
||||
... logits، labels = eval_pred
|
||||
... predictions = np.argmax(logits, axis=-1)
|
||||
... return metric.compute(predictions=predictions, references=labels)
|
||||
```
|
||||
|
||||
إذا كنت ترغب في مراقبة مقاييس التقييم الخاصة بك أثناء الضبط الدقيق، فحدد معلمة `eval_strategy` في معاملات التدريب الخاصة بك لإظهار مقياس التقييم في نهاية كل حقبة تدريبه:
|
||||
|
||||
```py
|
||||
>>> from transformers import TrainingArguments, Trainer
|
||||
|
||||
>>> training_args = TrainingArguments(output_dir="test_trainer", eval_strategy="epoch")
|
||||
```
|
||||
|
||||
### المدرب
|
||||
|
||||
قم بإنشاء كائن [`Trainer`] باستخدام نموذجك، ومعاملات التدريب، ومجموعات البيانات التدريبية والاختبارية، ودالة التقييم:
|
||||
|
||||
```py
|
||||
>>> trainer = Trainer(
|
||||
... model=model,
|
||||
... args=training_args,
|
||||
... train_dataset=small_train_dataset,
|
||||
... eval_dataset=small_eval_dataset,
|
||||
... compute_metrics=compute_metrics,
|
||||
... )
|
||||
```
|
||||
|
||||
ثم قم بضبط نموذجك عن طريق استدعاء [`~transformers.Trainer.train`]:
|
||||
|
||||
```py
|
||||
>>> trainer.train()
|
||||
```
|
||||
</pt>
|
||||
<tf>
|
||||
<a id='keras'></a>
|
||||
|
||||
<Youtube id="rnTGBy2ax1c"/>
|
||||
|
||||
## تدريب نموذج TensorFlow باستخدام Keras
|
||||
|
||||
يمكنك أيضًا تدريب نماذج 🤗 Transformers في TensorFlow باستخدام واجهة برمجة تطبيقات Keras!
|
||||
|
||||
### تحميل البيانات لـ Keras
|
||||
|
||||
عندما تريد تدريب نموذج 🤗 Transformers باستخدام واجهة برمجة تطبيقات Keras، فأنت بحاجة إلى تحويل مجموعة البيانات الخاصة بك إلى تنسيق يفهمه
|
||||
Keras. إذا كانت مجموعة البيانات الخاصة بك صغيرة، فيمكنك ببساطة تحويلها بالكامل إلى مصفوفات NumPy وإرسالها إلى Keras.
|
||||
دعونا نجرب ذلك أولاً قبل أن نقوم بأي شيء أكثر تعقيدًا.
|
||||
|
||||
أولاً، قم بتحميل مجموعة بيانات. سنستخدم مجموعة بيانات CoLA من معيار [GLUE benchmark](https://huggingface.co/datasets/glue)،
|
||||
نظرًا لأنه مهمة تصنيف نص ثنائي بسيطة، وسنأخذ فقط قسم التدريب الآن.
|
||||
|
||||
```py
|
||||
from datasets import load_dataset
|
||||
|
||||
dataset = load_dataset("glue"، "cola")
|
||||
dataset = dataset ["train"] # خذ فقط قسم التدريب الآن
|
||||
```
|
||||
|
||||
بعد ذلك، قم بتحميل أداة المُجزّئ اللغوي وقم بترميز البيانات كمصفوفات NumPy. لاحظ أن التصنيفات هي بالفعل قائمة من 0 و 1،
|
||||
لذا يمكننا ببساطة تحويل ذلك مباشرة إلى مصفوفة NumPy بدون ترميز!
|
||||
|
||||
```py
|
||||
from transformers import AutoTokenizer
|
||||
import numpy as np
|
||||
|
||||
tokenizer = AutoTokenizer.from_pretrained("google-bert/bert-base-cased")
|
||||
tokenized_data = tokenizer(dataset["sentence"], return_tensors="np", padding=True)
|
||||
# Tokenizer returns a BatchEncoding, but we convert that to a dict for Keras
|
||||
tokenized_data = dict(tokenized_data)
|
||||
|
||||
labels = np.array(dataset["label"]) # Label is already an array of 0 and 1
|
||||
```
|
||||
|
||||
أخيرًا، قم بتحميل وتجميع وتناسب النموذج. لاحظ أن نماذج Transformers تحتوي جميعها على دالة خسارة ذات صلة بالمهمة بشكل افتراضي، لذا فأنت لست بحاجة إلى تحديد واحدة ما لم ترغب في ذلك:
|
||||
|
||||
```py
|
||||
from transformers import TFAutoModelForSequenceClassification
|
||||
from tensorflow.keras.optimizers import Adam
|
||||
|
||||
# تحميل وتجميع النموذج الخاص بنا
|
||||
model = TFAutoModelForSequenceClassification.from_pretrained("google-bert/bert-base-cased")
|
||||
# معدلات التعلم المنخفضة أفضل غالبًا لضبط النماذج الدقيقة
|
||||
model.compile(optimizer=Adam(3e-5)) # لا توجد دالة خسارة!
|
||||
|
||||
model.fit(tokenized_data, labels)
|
||||
```
|
||||
|
||||
<Tip>
|
||||
|
||||
أنت لست مضطرًا لتمرير دالة خسارة إلى نماذجك عند تجميعها! تختار نماذج Hugging Face تلقائيًا
|
||||
دالة خسارة مناسبة لمهمتها وهندسة نموذجها إذا تُركت هذه الحجة فارغة. يمكنك دائمًا
|
||||
تجاوز ذلك عن طريق تحديد دالة خسارة بنفسك إذا كنت تريد ذلك!
|
||||
|
||||
</Tip>
|
||||
|
||||
يعمل هذا النهج بشكل رائع لمجموعات البيانات الصغيرة، ولكن بالنسبة لمجموعات البيانات الأكبر، فقد تجد أنه يصبح مشكلة. لماذا؟
|
||||
لأن المصفوفة المرمزة والتصنيفات يجب أن يتم تحميلها بالكامل في الذاكرة، ولأن NumPy لا يتعامل مع
|
||||
المصفوفات"غير المنتظمة"، لذا حشو كل عينة إلى طول أطول عينة في مجموعة البيانات بأكملها. سيؤدي ذلك إلى زيادة حجم المصفوفة لديك، وستبطئ الرموز الزائده من عملية التدريب أيضًا!
|
||||
|
||||
### تحميل البيانات كـ tf.data.Dataset
|
||||
|
||||
إذا كنت تريد تجنب إبطاء التدريب، فيمكنك تحميل بياناتك كـ `tf.data.Dataset` بدلاً من ذلك. على الرغم من أنه يمكنك كتابة خط أنابيب `tf.data` الخاص بك إذا كنت تريد، إلا أن لدينا طريقتين مختصرتين للقيام بذلك:
|
||||
- [`~TFPreTrainedModel.prepare_tf_dataset`]: هذه هي الطريقة التي نوصي بها في معظم الحالات. نظرًا لأنه طريقة
|
||||
على نموذجك، فيمكنه فحص النموذج لتحديد الأعمدة القابلة للاستخدام كمدخلات للنموذج تلقائيًا،
|
||||
واستبعاد الأعمدة الأخرى لإنشاء مجموعة بيانات أبسط وأكثر كفاءة.
|
||||
- [`~datasets.Dataset.to_tf_dataset`]: هذه الطريقة أكثر أساسية، وهي مفيدة عندما تريد التحكم بدقة في كيفية
|
||||
إنشاء مجموعة البيانات الخاصة بك، عن طريق تحديد أعمدة `columns` و `label_cols` المحددة التي سيتم تضمينها.
|
||||
|
||||
قبل أن تتمكن من استخدام [`~TFPreTrainedModel.prepare_tf_dataset`]، ستحتاج إلى إضافة مخرجات المُجزئ إلى مجموعة البيانات الخاصة بك كأعمدة، كما هو موضح في
|
||||
عينة التعليمات البرمجية التالية:
|
||||
|
||||
```py
|
||||
def tokenize_dataset (data):
|
||||
# ستتم إضافة مفاتيح القاموس الذي تمت إعادته كأعمدة إلى مجموعة البيانات
|
||||
return tokenizer(data["text"])
|
||||
|
||||
|
||||
dataset = dataset.map(tokenize_dataset)
|
||||
```
|
||||
|
||||
تذكر أن مجموعات بيانات Hugging Face يتم تخزينها على القرص بشكل افتراضي، لذا فلن يؤدي ذلك إلى تضخيم استخدام الذاكرة لديك! بمجرد إضافة الأعمدة، يمكنك بث الدفعات من مجموعة البيانات وإضافة الترميز إلى كل دفعة، مما يقلل بشكل كبير من عدد رموز الترقيم مقارنة بترميز مجموعة البيانات بأكملها.
|
||||
|
||||
|
||||
```py
|
||||
>>> tf_dataset = model.prepare_tf_dataset(dataset["train"], batch_size=16, shuffle=True, tokenizer=tokenizer)
|
||||
```
|
||||
|
||||
لاحظ أنه في عينة التعليمات البرمجية أعلاه، تحتاج إلى تمرير المُجزئ اللغوي إلى `prepare_tf_dataset` حتى تتمكن من حشو الدُفعات بشكل صحيح أثناء تحميلها.
|
||||
إذا كانت جميع العينات في مجموعة البيانات الخاصة بك بنفس الطول ولم يكن الترميز ضروريًا، فيمكنك تخطي هذا المعامل.
|
||||
إذا كنت بحاجة إلى القيام بشيء أكثر تعقيدًا من مجرد ترميز العينات (على سبيل المثال، إفساد الرموز للنمذجة اللغوية المُقنعة)،
|
||||
فيمكنك استخدام معامل `collate_fn` بدلاً من ذلك لتمرير دالة يتم استدعاؤها لتحويل
|
||||
قائمة العينات إلى دفعة وتطبيق أي معالجة مسبقة تريدها. راجع أمثلةنا [examples](https://github.com/huggingface/transformers/tree/main/examples) أو
|
||||
[دفاتر الملاحظات](https://huggingface.co/docs/transformers/notebooks) لرؤية هذا النهج في العمل.
|
||||
|
||||
بمجرد إنشاء `tf.data.Dataset`، يمكنك تجميع النموذج وتناسبه كما هو الحال من قبل:
|
||||
|
||||
```py
|
||||
model.compile(optimizer=Adam(3e-5)) # No loss argument!
|
||||
|
||||
model.fit(tf_dataset)
|
||||
```
|
||||
|
||||
</tf>
|
||||
</frameworkcontent>
|
||||
|
||||
<a id='pytorch_native'></a>
|
||||
## تدريب في PyTorch الأصلي
|
||||
|
||||
<frameworkcontent>
|
||||
<pt>
|
||||
<Youtube id="Dh9CL8fyG80"/>
|
||||
|
||||
[`Trainer`] يهتم بحلقة التدريب ويسمح لك بضبط نموذج في سطر واحد من التعليمات البرمجية. بالنسبة للمستخدمين الذين يفضلون كتابة حلقة التدريب الخاصة بهم، يمكنك أيضًا ضبط نموذج 🤗 Transformers في PyTorch الأصلي.
|
||||
|
||||
في هذه المرحلة، قد تحتاج إلى إعادة تشغيل دفتر الملاحظات الخاص بك أو تنفيذ التعليمات البرمجية التالية لتحرير بعض الذاكرة:
|
||||
|
||||
```py
|
||||
del model
|
||||
del trainer
|
||||
torch.cuda.empty_cache()
|
||||
```
|
||||
|
||||
بعد ذلك، قم بمعالجة `tokenized_dataset` يدويًا لإعداده للتدريب.
|
||||
|
||||
1. إزالة عمود `text` لأن النموذج لا يقبل النص الخام كإدخال:
|
||||
|
||||
```py
|
||||
>>> tokenized_datasets = tokenized_datasets.remove_columns(["text"])
|
||||
```
|
||||
|
||||
2. إعادة تسمية عمود `label` إلى `labels` لأن النموذج يتوقع أن يكون الاسم `labels`:
|
||||
|
||||
```py
|
||||
>>> tokenized_datasets = tokenized_datasets.rename_column("label"، "labels")
|
||||
```
|
||||
|
||||
3. قم بتعيين تنسيق مجموعة البيانات لإرجاع مؤشرات PyTorch بدلاً من القوائم:
|
||||
|
||||
```py
|
||||
>>> tokenized_datasets.set_format("torch")
|
||||
```
|
||||
|
||||
بعد ذلك، قم بإنشاء مجموعة فرعية أصغر من مجموعة البيانات كما هو موضح سابقًا لتسريع الضبط الدقيق:
|
||||
|
||||
```py
|
||||
>>> small_train_dataset = tokenized_datasets["train"].shuffle(seed=42).select(range(1000))
|
||||
>>> small_eval_dataset = tokenized_datasets["test"].shuffle(seed=42).select(range(1000))
|
||||
```
|
||||
|
||||
### DataLoader
|
||||
|
||||
قم بإنشاء `DataLoader` لمجموعات بيانات التدريب والاختبار الخاصة بك حتى تتمكن من التكرار عبر دفعات البيانات:
|
||||
|
||||
```py
|
||||
>>> from torch.utils.data import DataLoader
|
||||
|
||||
>>> train_dataloader = DataLoader(small_train_dataset، shuffle=True، batch_size=8)
|
||||
>>> eval_dataloader = DataLoader(small_eval_dataset، batch_size=8)
|
||||
```
|
||||
|
||||
قم بتحميل نموذجك مع عدد التصنيفات المتوقعة:
|
||||
|
||||
```py
|
||||
>>> from transformers import AutoModelForSequenceClassification
|
||||
|
||||
>>> model = AutoModelForSequenceClassification.from_pretrained("google-bert/bert-base-cased"، num_labels=5)
|
||||
```
|
||||
|
||||
### المحسن ومخطط معدل التعلم
|
||||
|
||||
قم بإنشاء محسن ومخطط معدل تعلم لضبط النموذج الدقيق. دعنا نستخدم [`AdamW`](https://pytorch.org/docs/stable/generated/torch.optim.AdamW.html) المحسن من PyTorch:
|
||||
|
||||
```py
|
||||
>>> from torch.optim import AdamW
|
||||
|
||||
>>> optimizer = AdamW(model.parameters()، lr=5e-5)
|
||||
```
|
||||
|
||||
قم بإنشاء مخطط معدل التعلم الافتراضي من [`Trainer`]:
|
||||
|
||||
```py
|
||||
>>> from transformers import get_scheduler
|
||||
|
||||
>>> num_epochs = 3
|
||||
>>> num_training_steps = num_epochs * len(train_dataloader)
|
||||
>>> lr_scheduler = get_scheduler(
|
||||
... name="linear"، optimizer=optimizer، num_warmup_steps=0، num_training_steps=num_training_steps
|
||||
... )
|
||||
```
|
||||
|
||||
أخيرًا، حدد `device` لاستخدام وحدة معالجة الرسومات (GPU) إذا كان لديك حق الوصول إليها. وإلا، فقد يستغرق التدريب على وحدة المعالجة المركزية (CPU) عدة ساعات بدلاً من دقائق قليلة.
|
||||
|
||||
```py
|
||||
>>> import torch
|
||||
|
||||
>>> device = torch.device("cuda") if torch.cuda.is_available() else torch.device("cpu")
|
||||
>>> model.to(device)
|
||||
```
|
||||
|
||||
<Tip>
|
||||
|
||||
احصل على وصول مجاني إلى وحدة معالجة رسومات سحابية إذا لم يكن لديك واحدة مع دفتر ملاحظات مستضاف مثل [Colaboratory](https://colab.research.google.com/) أو [SageMaker StudioLab](https://studiolab.sagemaker.aws/).
|
||||
|
||||
</Tip>
|
||||
|
||||
رائع، الآن أنت مستعد للتدريب! 🥳
|
||||
|
||||
### حلقة التدريب
|
||||
|
||||
لمراقبة تقدم التدريب الخاص بك، استخدم مكتبة [tqdm](https://tqdm.github.io/) لإضافة شريط تقدم فوق عدد خطوات التدريب:
|
||||
|
||||
```py
|
||||
>>> from tqdm.auto import tqdm
|
||||
|
||||
>>> progress_bar = tqdm(range(num_training_steps))
|
||||
|
||||
>>> model.train()
|
||||
>>> for epoch in range(num_epochs):
|
||||
... for batch in train_dataloader:
|
||||
... batch = {k: v.to(device) for k، v in batch.items()}
|
||||
... outputs = model(**batch)
|
||||
... loss = outputs.loss
|
||||
... loss.backward()
|
||||
|
||||
... optimizer.step()
|
||||
... lr_scheduler.step()
|
||||
... optimizer.zero_grad()
|
||||
... progress_bar.update(1)
|
||||
```
|
||||
|
||||
### تقييم
|
||||
|
||||
تمامًا كما أضفت وظيفة تقييم إلى [`Trainer`]]، تحتاج إلى القيام بنفس الشيء عندما تكتب حلقة التدريب الخاصة بك. ولكن بدلاً من حساب الإبلاغ عن المقياس في نهاية كل حقبة، هذه المرة ستقوم بتجميع جميع الدفعات باستخدام [`~evaluate.add_batch`] وحساب المقياس في النهاية.
|
||||
|
||||
```py
|
||||
>>> import evaluate
|
||||
|
||||
>>> metric = evaluate.load("accuracy")
|
||||
>>> model.eval()
|
||||
>>> for batch in eval_dataloader:
|
||||
... batch = {k: v.to(device) for k، v in batch.items()}
|
||||
... with torch.no_grad():
|
||||
... outputs = model(**batch)
|
||||
|
||||
... logits = outputs.logits
|
||||
... predictions = torch.argmax(logits، dim=-1)
|
||||
... metric.add_batch(predictions=predictions، references=batch["labels"])
|
||||
|
||||
>>> metric.compute()
|
||||
```
|
||||
</pt>
|
||||
</frameworkcontent>
|
||||
|
||||
<a id='additional-resources'></a>
|
||||
|
||||
## موارد إضافية
|
||||
|
||||
لمزيد من الأمثلة على الضبط الدقيق، راجع:
|
||||
|
||||
- [🤗 أمثلة المحولات](https://github.com/huggingface/transformers/tree/main/examples) تتضمن
|
||||
النصوص البرمجية لتدريب مهام NLP الشائعة في PyTorch وTensorFlow.
|
||||
|
||||
- [🤗 دفاتر ملاحظات المحولات](notebooks) يحتوي على دفاتر ملاحظات مختلفة حول كيفية ضبط نموذج لمهمة محددة في PyTorch وTensorFlow.
|
||||
@ -185,16 +185,16 @@ pytest -k "test and ada" tests/test_optimization.py
|
||||
|
||||
Manchmal müssen Sie `accelerate` Tests für Ihre Modelle ausführen. Dazu fügen Sie einfach `-m accelerate_tests` zu Ihrem Befehl hinzu, wenn Sie diese Tests bei einem `OPT`-Lauf ausführen möchten:
|
||||
```bash
|
||||
RUN_SLOW=1 pytest -m accelerate_tests tests/models/opt/test_modeling_opt.py
|
||||
RUN_SLOW=1 pytest -m accelerate_tests tests/models/opt/test_modeling_opt.py
|
||||
```
|
||||
|
||||
|
||||
### Dokumentationstests ausführen
|
||||
### Dokumentationstests ausführen
|
||||
|
||||
Um zu testen, ob die Dokumentationsbeispiele korrekt sind, sollten Sie überprüfen, ob die `doctests` erfolgreich sind.
|
||||
Lassen Sie uns als Beispiel den docstring von [WhisperModel.forward](https://github.com/huggingface/transformers/blob/main/src/transformers/models/whisper/modeling_whisper.py#L1017-L1035) verwenden:
|
||||
|
||||
```python
|
||||
```python
|
||||
r"""
|
||||
Returns:
|
||||
|
||||
@ -217,8 +217,8 @@ Example:
|
||||
|
||||
```
|
||||
|
||||
Führen Sie einfach die folgende Zeile aus, um automatisch jedes docstring-Beispiel in der gewünschten Datei zu testen:
|
||||
```bash
|
||||
Führen Sie einfach die folgende Zeile aus, um automatisch jedes docstring-Beispiel in der gewünschten Datei zu testen:
|
||||
```bash
|
||||
pytest --doctest-modules <path_to_file_or_dir>
|
||||
```
|
||||
Wenn die Datei eine Markdown-Erweiterung hat, sollten Sie das Argument `--doctest-glob="*.md"` hinzufügen.
|
||||
@ -862,7 +862,7 @@ Code, der fehlerhaft ist, einen schlechten Zustand verursacht, der sich auf ande
|
||||
- Hier sehen Sie, wie Sie einen ganzen Test bedingungslos überspringen können:
|
||||
|
||||
```python no-style
|
||||
@unittest.skip(reason="this bug needs to be fixed")
|
||||
@unittest.skip("this bug needs to be fixed")
|
||||
def test_feature_x():
|
||||
```
|
||||
|
||||
|
||||
@ -24,9 +24,7 @@
|
||||
- local: model_sharing
|
||||
title: Share your model
|
||||
- local: agents
|
||||
title: Agents 101
|
||||
- local: agents_advanced
|
||||
title: Agents, supercharged - Multi-agents, External tools, and more
|
||||
title: Agents
|
||||
- local: llm_tutorial
|
||||
title: Generation with LLMs
|
||||
- local: conversations
|
||||
@ -81,8 +79,6 @@
|
||||
title: Image Feature Extraction
|
||||
- local: tasks/mask_generation
|
||||
title: Mask Generation
|
||||
- local: tasks/keypoint_detection
|
||||
title: Keypoint Detection
|
||||
- local: tasks/knowledge_distillation_for_image_classification
|
||||
title: Knowledge Distillation for Computer Vision
|
||||
title: Computer Vision
|
||||
@ -96,17 +92,11 @@
|
||||
title: Visual Question Answering
|
||||
- local: tasks/text-to-speech
|
||||
title: Text to speech
|
||||
- local: tasks/image_text_to_text
|
||||
title: Image-text-to-text
|
||||
- local: tasks/video_text_to_text
|
||||
title: Video-text-to-text
|
||||
title: Multimodal
|
||||
- isExpanded: false
|
||||
sections:
|
||||
- local: generation_strategies
|
||||
title: Customize the generation strategy
|
||||
- local: kv_cache
|
||||
title: Best Practices for Generation with Cache
|
||||
title: Generation
|
||||
- isExpanded: false
|
||||
sections:
|
||||
@ -126,7 +116,7 @@
|
||||
- local: custom_models
|
||||
title: Share a custom model
|
||||
- local: chat_templating
|
||||
title: Chat templates
|
||||
title: Templates for chat models
|
||||
- local: trainer
|
||||
title: Trainer
|
||||
- local: sagemaker
|
||||
@ -147,8 +137,6 @@
|
||||
title: Troubleshoot
|
||||
- local: gguf
|
||||
title: Interoperability with GGUF files
|
||||
- local: tiktoken
|
||||
title: Interoperability with TikToken files
|
||||
title: Developer guides
|
||||
- sections:
|
||||
- local: quantization/overview
|
||||
@ -167,12 +155,8 @@
|
||||
title: EETQ
|
||||
- local: quantization/hqq
|
||||
title: HQQ
|
||||
- local: quantization/fbgemm_fp8
|
||||
title: FBGEMM_FP8
|
||||
- local: quantization/optimum
|
||||
title: Optimum
|
||||
- local: quantization/torchao
|
||||
title: TorchAO
|
||||
- local: quantization/contribute
|
||||
title: Contribute new quantization method
|
||||
title: Quantization Methods
|
||||
@ -298,8 +282,6 @@
|
||||
title: Trainer
|
||||
- local: main_classes/deepspeed
|
||||
title: DeepSpeed
|
||||
- local: main_classes/executorch
|
||||
title: ExecuTorch
|
||||
- local: main_classes/feature_extractor
|
||||
title: Feature Extractor
|
||||
- local: main_classes/image_processor
|
||||
@ -382,8 +364,6 @@
|
||||
title: ESM
|
||||
- local: model_doc/falcon
|
||||
title: Falcon
|
||||
- local: model_doc/falcon_mamba
|
||||
title: FalconMamba
|
||||
- local: model_doc/fastspeech2_conformer
|
||||
title: FastSpeech2Conformer
|
||||
- local: model_doc/flan-t5
|
||||
@ -402,8 +382,6 @@
|
||||
title: Fuyu
|
||||
- local: model_doc/gemma
|
||||
title: Gemma
|
||||
- local: model_doc/gemma2
|
||||
title: Gemma2
|
||||
- local: model_doc/openai-gpt
|
||||
title: GPT
|
||||
- local: model_doc/gpt_neo
|
||||
@ -422,8 +400,6 @@
|
||||
title: GPTSAN Japanese
|
||||
- local: model_doc/gpt-sw3
|
||||
title: GPTSw3
|
||||
- local: model_doc/granite
|
||||
title: Granite
|
||||
- local: model_doc/herbert
|
||||
title: HerBERT
|
||||
- local: model_doc/ibert
|
||||
@ -454,8 +430,6 @@
|
||||
title: MADLAD-400
|
||||
- local: model_doc/mamba
|
||||
title: Mamba
|
||||
- local: model_doc/mamba2
|
||||
title: mamba2
|
||||
- local: model_doc/marian
|
||||
title: MarianMT
|
||||
- local: model_doc/markuplm
|
||||
@ -486,8 +460,6 @@
|
||||
title: MT5
|
||||
- local: model_doc/mvp
|
||||
title: MVP
|
||||
- local: model_doc/nemotron
|
||||
title: Nemotron
|
||||
- local: model_doc/nezha
|
||||
title: NEZHA
|
||||
- local: model_doc/nllb
|
||||
@ -498,8 +470,6 @@
|
||||
title: Nyströmformer
|
||||
- local: model_doc/olmo
|
||||
title: OLMo
|
||||
- local: model_doc/olmoe
|
||||
title: OLMoE
|
||||
- local: model_doc/open-llama
|
||||
title: Open-Llama
|
||||
- local: model_doc/opt
|
||||
@ -524,12 +494,8 @@
|
||||
title: QDQBert
|
||||
- local: model_doc/qwen2
|
||||
title: Qwen2
|
||||
- local: model_doc/qwen2_audio
|
||||
title: Qwen2Audio
|
||||
- local: model_doc/qwen2_moe
|
||||
title: Qwen2MoE
|
||||
- local: model_doc/qwen2_vl
|
||||
title: Qwen2VL
|
||||
- local: model_doc/rag
|
||||
title: RAG
|
||||
- local: model_doc/realm
|
||||
@ -613,8 +579,6 @@
|
||||
title: DeiT
|
||||
- local: model_doc/depth_anything
|
||||
title: Depth Anything
|
||||
- local: model_doc/depth_anything_v2
|
||||
title: Depth Anything V2
|
||||
- local: model_doc/deta
|
||||
title: DETA
|
||||
- local: model_doc/detr
|
||||
@ -635,8 +599,6 @@
|
||||
title: FocalNet
|
||||
- local: model_doc/glpn
|
||||
title: GLPN
|
||||
- local: model_doc/hiera
|
||||
title: Hiera
|
||||
- local: model_doc/imagegpt
|
||||
title: ImageGPT
|
||||
- local: model_doc/levit
|
||||
@ -665,8 +627,6 @@
|
||||
title: RegNet
|
||||
- local: model_doc/resnet
|
||||
title: ResNet
|
||||
- local: model_doc/rt_detr
|
||||
title: RT-DETR
|
||||
- local: model_doc/segformer
|
||||
title: SegFormer
|
||||
- local: model_doc/seggpt
|
||||
@ -701,8 +661,6 @@
|
||||
title: ViTMSN
|
||||
- local: model_doc/yolos
|
||||
title: YOLOS
|
||||
- local: model_doc/zoedepth
|
||||
title: ZoeDepth
|
||||
title: Vision models
|
||||
- isExpanded: false
|
||||
sections:
|
||||
@ -712,12 +670,8 @@
|
||||
title: Bark
|
||||
- local: model_doc/clap
|
||||
title: CLAP
|
||||
- local: model_doc/dac
|
||||
title: dac
|
||||
- local: model_doc/encodec
|
||||
title: EnCodec
|
||||
- local: model_doc/hiera
|
||||
title: Hiera
|
||||
- local: model_doc/hubert
|
||||
title: Hubert
|
||||
- local: model_doc/mctct
|
||||
@ -792,8 +746,6 @@
|
||||
title: BridgeTower
|
||||
- local: model_doc/bros
|
||||
title: BROS
|
||||
- local: model_doc/chameleon
|
||||
title: Chameleon
|
||||
- local: model_doc/chinese_clip
|
||||
title: Chinese-CLIP
|
||||
- local: model_doc/clip
|
||||
@ -822,8 +774,6 @@
|
||||
title: Idefics2
|
||||
- local: model_doc/instructblip
|
||||
title: InstructBLIP
|
||||
- local: model_doc/instructblipvideo
|
||||
title: InstructBlipVideo
|
||||
- local: model_doc/kosmos-2
|
||||
title: KOSMOS-2
|
||||
- local: model_doc/layoutlm
|
||||
@ -840,10 +790,6 @@
|
||||
title: Llava
|
||||
- local: model_doc/llava_next
|
||||
title: LLaVA-NeXT
|
||||
- local: model_doc/llava_next_video
|
||||
title: LLaVa-NeXT-Video
|
||||
- local: model_doc/llava_onevision
|
||||
title: LLaVA-Onevision
|
||||
- local: model_doc/lxmert
|
||||
title: LXMERT
|
||||
- local: model_doc/matcha
|
||||
@ -864,8 +810,6 @@
|
||||
title: Perceiver
|
||||
- local: model_doc/pix2struct
|
||||
title: Pix2Struct
|
||||
- local: model_doc/pixtral
|
||||
title: Pixtral
|
||||
- local: model_doc/sam
|
||||
title: Segment Anything
|
||||
- local: model_doc/siglip
|
||||
|
||||
@ -46,7 +46,7 @@ The next step is to pass all the relevant training objects to the [`~accelerate.
|
||||
|
||||
## Backward
|
||||
|
||||
The last addition is to replace the typical `loss.backward()` in your training loop with 🤗 Accelerate's [`~accelerate.Accelerator.backward`] method:
|
||||
The last addition is to replace the typical `loss.backward()` in your training loop with 🤗 Accelerate's [`~accelerate.Accelerator.backward`]method:
|
||||
|
||||
```py
|
||||
>>> for epoch in range(num_epochs):
|
||||
|
||||
@ -19,7 +19,7 @@ rendered properly in your Markdown viewer.
|
||||
|
||||
### What is an agent?
|
||||
|
||||
Large Language Models (LLMs) trained to perform [causal language modeling](./tasks/language_modeling) can tackle a wide range of tasks, but they often struggle with basic tasks like logic, calculation, and search. When prompted in domains in which they do not perform well, they often fail to generate the answer we expect them to.
|
||||
Large Language Models (LLMs) trained to perform [causal language modeling](./tasks/language_modeling.) can tackle a wide range of tasks, but they often struggle with basic tasks like logic, calculation, and search. When prompted in domains in which they do not perform well, they often fail to generate the answer we expect them to.
|
||||
|
||||
One approach to overcome this weakness is to create an *agent*.
|
||||
|
||||
@ -28,8 +28,8 @@ An agent is a system that uses an LLM as its engine, and it has access to functi
|
||||
These *tools* are functions for performing a task, and they contain all necessary description for the agent to properly use them.
|
||||
|
||||
The agent can be programmed to:
|
||||
- devise a series of actions/tools and run them all at once, like the [`CodeAgent`]
|
||||
- plan and execute actions/tools one by one and wait for the outcome of each action before launching the next one, like the [`ReactJsonAgent`]
|
||||
- devise a series of actions/tools and run them all at once like the [`CodeAgent`] for example
|
||||
- plan and execute actions/tools one by one and wait for the outcome of each action before launching the next one like the [`ReactJsonAgent`] for example
|
||||
|
||||
### Types of agents
|
||||
|
||||
@ -46,22 +46,11 @@ We implement two versions of ReactJsonAgent:
|
||||
- [`ReactCodeAgent`] is a new type of ReactJsonAgent that generates its tool calls as blobs of code, which works really well for LLMs that have strong coding performance.
|
||||
|
||||
> [!TIP]
|
||||
> Read [Open-source LLMs as LangChain Agents](https://huggingface.co/blog/open-source-llms-as-agents) blog post to learn more about ReAct agents.
|
||||
|
||||
<div class="flex justify-center">
|
||||
<img
|
||||
class="block dark:hidden"
|
||||
src="https://huggingface.co/datasets/huggingface/documentation-images/resolve/main/transformers/Agent_ManimCE.gif"
|
||||
/>
|
||||
<img
|
||||
class="hidden dark:block"
|
||||
src="https://huggingface.co/datasets/huggingface/documentation-images/resolve/main/transformers/Agent_ManimCE.gif"
|
||||
/>
|
||||
</div>
|
||||
> Read [Open-source LLMs as LangChain Agents](https://huggingface.co/blog/open-source-llms-as-agents) blog post to learn more the ReAct agent.
|
||||
|
||||

|
||||
|
||||
For example, here is how a ReAct Code agent would work its way through the following question.
|
||||
For example, here is how a ReAct agent would work its way through the following question.
|
||||
|
||||
```py3
|
||||
>>> agent.run(
|
||||
@ -114,7 +103,7 @@ To start with, please install the `agents` extras in order to install all defaul
|
||||
pip install transformers[agents]
|
||||
```
|
||||
|
||||
Build your LLM engine by defining a `llm_engine` method which accepts a list of [messages](./chat_templating) and returns text. This callable also needs to accept a `stop` argument that indicates when to stop generating.
|
||||
Build your LLM engine by defining a `llm_engine` method which accepts a list of [messages](./chat_templating.) and returns text. This callable also needs to accept a `stop` argument that indicates when to stop generating.
|
||||
|
||||
```python
|
||||
from huggingface_hub import login, InferenceClient
|
||||
@ -130,20 +119,17 @@ def llm_engine(messages, stop_sequences=["Task"]) -> str:
|
||||
```
|
||||
|
||||
You could use any `llm_engine` method as long as:
|
||||
1. it follows the [messages format](./chat_templating) (`List[Dict[str, str]]`) for its input `messages`, and it returns a `str`.
|
||||
2. it stops generating outputs at the sequences passed in the argument `stop_sequences`
|
||||
1. it follows the [messages format](./chat_templating.md) for its input (`List[Dict[str, str]]`) and returns a `str`
|
||||
2. it stops generating outputs at the sequences passed in the argument `stop`
|
||||
|
||||
Additionally, `llm_engine` can also take a `grammar` argument. In the case where you specify a `grammar` upon agent initialization, this argument will be passed to the calls to llm_engine, with the `grammar` that you defined upon initialization, to allow [constrained generation](https://huggingface.co/docs/text-generation-inference/conceptual/guidance) in order to force properly-formatted agent outputs.
|
||||
You also need a `tools` argument which accepts a list of `Tools`. You can provide an empty list for `tools`, but use the default toolbox with the optional argument `add_base_tools=True`.
|
||||
|
||||
You will also need a `tools` argument which accepts a list of `Tools` - it can be an empty list. You can also add the default toolbox on top of your `tools` list by defining the optional argument `add_base_tools=True`.
|
||||
|
||||
Now you can create an agent, like [`CodeAgent`], and run it. You can also create a [`TransformersEngine`] with a pre-initialized pipeline to run inference on your local machine using `transformers`.
|
||||
For convenience, since agentic behaviours generally require stronger models such as `Llama-3.1-70B-Instruct` that are harder to run locally for now, we also provide the [`HfApiEngine`] class that initializes a `huggingface_hub.InferenceClient` under the hood.
|
||||
Now you can create an agent, like [`CodeAgent`], and run it. For convenience, we also provide the [`HfEngine`] class that uses `huggingface_hub.InferenceClient` under the hood.
|
||||
|
||||
```python
|
||||
from transformers import CodeAgent, HfApiEngine
|
||||
from transformers import CodeAgent, HfEngine
|
||||
|
||||
llm_engine = HfApiEngine(model="meta-llama/Meta-Llama-3-70B-Instruct")
|
||||
llm_engine = HfEngine(model="meta-llama/Meta-Llama-3-70B-Instruct")
|
||||
agent = CodeAgent(tools=[], llm_engine=llm_engine, add_base_tools=True)
|
||||
|
||||
agent.run(
|
||||
@ -153,7 +139,7 @@ agent.run(
|
||||
```
|
||||
|
||||
This will be handy in case of emergency baguette need!
|
||||
You can even leave the argument `llm_engine` undefined, and an [`HfApiEngine`] will be created by default.
|
||||
You can even leave the argument `llm_engine` undefined, and an [`HfEngine`] will be created by default.
|
||||
|
||||
```python
|
||||
from transformers import CodeAgent
|
||||
@ -202,7 +188,7 @@ You can still authorize additional imports by passing the authorized modules as
|
||||
>>> from transformers import ReactCodeAgent
|
||||
|
||||
>>> agent = ReactCodeAgent(tools=[], additional_authorized_imports=['requests', 'bs4'])
|
||||
>>> agent.run("Could you get me the title of the page at url 'https://huggingface.co/blog'?")
|
||||
>>>agent.run("Could you get me the title of the page at url 'https://huggingface.co/blog'?")
|
||||
|
||||
(...)
|
||||
'Hugging Face – Blog'
|
||||
@ -270,13 +256,6 @@ agent = ReactJsonAgent(tools=[PythonInterpreterTool()], system_prompt="{your_cus
|
||||
> Please make sure to define the `<<tool_descriptions>>` string somewhere in the `template` so the agent is aware
|
||||
of the available tools.
|
||||
|
||||
|
||||
### Inspecting an agent run
|
||||
|
||||
Here are a few useful attributes to inspect what happened after a run:
|
||||
- `agent.logs` stores the fine-grained logs of the agent. At every step of the agent's run, everything gets stored in a dictionary that then is appended to `agent.logs`.
|
||||
- Running `agent.write_inner_memory_from_logs()` creates an inner memory of the agent's logs for the LLM to view, as a list of chat messages. This method goes over each step of the log and only stores what it's interested in as a message: for instance, it will save the system prompt and task in separate messages, then for each step it will store the LLM output as a message, and the tool call output as another message. Use this if you want a higher-level view of what has happened - but not every log will be transcripted by this method.
|
||||
|
||||
## Tools
|
||||
|
||||
A tool is an atomic function to be used by an agent.
|
||||
@ -294,8 +273,7 @@ Transformers comes with a default toolbox for empowering agents, that you can ad
|
||||
- **Speech to text**: given an audio recording of a person talking, transcribe the speech into text ([Whisper](./model_doc/whisper))
|
||||
- **Text to speech**: convert text to speech ([SpeechT5](./model_doc/speecht5))
|
||||
- **Translation**: translates a given sentence from source language to target language.
|
||||
- **DuckDuckGo search***: performs a web search using DuckDuckGo browser.
|
||||
- **Python code interpreter**: runs your the LLM generated Python code in a secure environment. This tool will only be added to [`ReactJsonAgent`] if you initialize it with `add_base_tools=True`, since code-based agent can already natively execute Python code
|
||||
- **Python code interpreter**: runs your the LLM generated Python code in a secure environment. This tool will only be added to [`ReactJsonAgent`] if you use `add_base_tools=True`, since code-based tools can already execute Python code
|
||||
|
||||
|
||||
You can manually use a tool by calling the [`load_tool`] function and a task to perform.
|
||||
@ -325,37 +303,62 @@ model = next(iter(list_models(filter=task, sort="downloads", direction=-1)))
|
||||
print(model.id)
|
||||
```
|
||||
|
||||
This code can quickly be converted into a tool, just by wrapping it in a function and adding the `tool` decorator:
|
||||
This code can be converted into a class that inherits from the [`Tool`] superclass.
|
||||
|
||||
|
||||
```py
|
||||
from transformers import tool
|
||||
The custom tool needs:
|
||||
- An attribute `name`, which corresponds to the name of the tool itself. The name usually describes what the tool does. Since the code returns the model with the most downloads for a task, let's name is `model_download_counter`.
|
||||
- An attribute `description` is used to populate the agent's system prompt.
|
||||
- An `inputs` attribute, which is a dictionary with keys `"type"` and `"description"`. It contains information that helps the Python interpreter make educated choices about the input.
|
||||
- An `output_type` attribute, which specifies the output type.
|
||||
- A `forward` method which contains the inference code to be executed.
|
||||
|
||||
@tool
|
||||
def model_download_counter(task: str) -> str:
|
||||
"""
|
||||
This is a tool that returns the most downloaded model of a given task on the Hugging Face Hub.
|
||||
It returns the name of the checkpoint.
|
||||
|
||||
Args:
|
||||
task: The task for which
|
||||
"""
|
||||
model = next(iter(list_models(filter="text-classification", sort="downloads", direction=-1)))
|
||||
return model.id
|
||||
```python
|
||||
from transformers import Tool
|
||||
from huggingface_hub import list_models
|
||||
|
||||
class HFModelDownloadsTool(Tool):
|
||||
name = "model_download_counter"
|
||||
description = (
|
||||
"This is a tool that returns the most downloaded model of a given task on the Hugging Face Hub. "
|
||||
"It returns the name of the checkpoint."
|
||||
)
|
||||
|
||||
inputs = {
|
||||
"task": {
|
||||
"type": "text",
|
||||
"description": "the task category (such as text-classification, depth-estimation, etc)",
|
||||
}
|
||||
}
|
||||
output_type = "text"
|
||||
|
||||
def forward(self, task: str):
|
||||
model = next(iter(list_models(filter=task, sort="downloads", direction=-1)))
|
||||
return model.id
|
||||
```
|
||||
|
||||
The function needs:
|
||||
- A clear name. The name usually describes what the tool does. Since the code returns the model with the most downloads for a task, let's put `model_download_counter`.
|
||||
- Type hints on both inputs and output
|
||||
- A description, that includes an 'Args:' part where each argument is described (without a type indication this time, it will be pulled from the type hint).
|
||||
All these will be automatically baked into the agent's system prompt upon initialization: so strive to make them as clear as possible!
|
||||
Now that the custom `HfModelDownloadsTool` class is ready, you can save it to a file named `model_downloads.py` and import it for use.
|
||||
|
||||
> [!TIP]
|
||||
> This definition format is the same as tool schemas used in `apply_chat_template`, the only difference is the added `tool` decorator: read more on our tool use API [here](https://huggingface.co/blog/unified-tool-use#passing-tools-to-a-chat-template).
|
||||
|
||||
Then you can directly initialize your agent:
|
||||
```py
|
||||
from transformers import CodeAgent
|
||||
```python
|
||||
from model_downloads import HFModelDownloadsTool
|
||||
|
||||
tool = HFModelDownloadsTool()
|
||||
```
|
||||
|
||||
You can also share your custom tool to the Hub by calling [`~Tool.push_to_hub`] on the tool. Make sure you've created a repository for it on the Hub and are using a token with read access.
|
||||
|
||||
```python
|
||||
tool.push_to_hub("{your_username}/hf-model-downloads")
|
||||
```
|
||||
|
||||
Load the tool with the [`~Tool.load_tool`] function and pass it to the `tools` parameter in your agent.
|
||||
|
||||
```python
|
||||
from transformers import load_tool, CodeAgent
|
||||
|
||||
model_download_tool = load_tool("m-ric/hf-model-downloads")
|
||||
agent = CodeAgent(tools=[model_download_tool], llm_engine=llm_engine)
|
||||
agent.run(
|
||||
"Can you give me the name of the model that has the most downloads in the 'text-to-video' task on the Hugging Face Hub?"
|
||||
@ -375,7 +378,8 @@ print(f"The most downloaded model for the 'text-to-video' task is {most_download
|
||||
And the output:
|
||||
`"The most downloaded model for the 'text-to-video' task is ByteDance/AnimateDiff-Lightning."`
|
||||
|
||||
### Manage your agent's toolbox
|
||||
|
||||
### Manage agent toolbox
|
||||
|
||||
If you have already initialized an agent, it is inconvenient to reinitialize it from scratch with a tool you want to use. With Transformers, you can manage an agent's toolbox by adding or replacing a tool.
|
||||
|
||||
@ -429,3 +433,72 @@ To speed up the start, tools are loaded only if called by the agent.
|
||||
This gets you this image:
|
||||
|
||||
<img src="https://huggingface.co/datasets/huggingface/documentation-images/resolve/main/transformers/rivers_and_lakes.png">
|
||||
|
||||
|
||||
### Use gradio-tools
|
||||
|
||||
[gradio-tools](https://github.com/freddyaboulton/gradio-tools) is a powerful library that allows using Hugging
|
||||
Face Spaces as tools. It supports many existing Spaces as well as custom Spaces.
|
||||
|
||||
Transformers supports `gradio_tools` with the [`Tool.from_gradio`] method. For example, let's use the [`StableDiffusionPromptGeneratorTool`](https://github.com/freddyaboulton/gradio-tools/blob/main/gradio_tools/tools/prompt_generator.py) from `gradio-tools` toolkit for improving prompts to generate better images.
|
||||
|
||||
Import and instantiate the tool, then pass it to the `Tool.from_gradio` method:
|
||||
|
||||
```python
|
||||
from gradio_tools import StableDiffusionPromptGeneratorTool
|
||||
from transformers import Tool, load_tool, CodeAgent
|
||||
|
||||
gradio_prompt_generator_tool = StableDiffusionPromptGeneratorTool()
|
||||
prompt_generator_tool = Tool.from_gradio(gradio_prompt_generator_tool)
|
||||
```
|
||||
|
||||
Now you can use it just like any other tool. For example, let's improve the prompt `a rabbit wearing a space suit`.
|
||||
|
||||
```python
|
||||
image_generation_tool = load_tool('huggingface-tools/text-to-image')
|
||||
agent = CodeAgent(tools=[prompt_generator_tool, image_generation_tool], llm_engine=llm_engine)
|
||||
|
||||
agent.run(
|
||||
"Improve this prompt, then generate an image of it.", prompt='A rabbit wearing a space suit'
|
||||
)
|
||||
```
|
||||
|
||||
The model adequately leverages the tool:
|
||||
```text
|
||||
======== New task ========
|
||||
Improve this prompt, then generate an image of it.
|
||||
You have been provided with these initial arguments: {'prompt': 'A rabbit wearing a space suit'}.
|
||||
==== Agent is executing the code below:
|
||||
improved_prompt = StableDiffusionPromptGenerator(query=prompt)
|
||||
while improved_prompt == "QUEUE_FULL":
|
||||
improved_prompt = StableDiffusionPromptGenerator(query=prompt)
|
||||
print(f"The improved prompt is {improved_prompt}.")
|
||||
image = image_generator(prompt=improved_prompt)
|
||||
====
|
||||
```
|
||||
|
||||
Before finally generating the image:
|
||||
|
||||
<img src="https://huggingface.co/datasets/huggingface/documentation-images/resolve/main/transformers/rabbit.png">
|
||||
|
||||
|
||||
> [!WARNING]
|
||||
> gradio-tools require *textual* inputs and outputs even when working with different modalities like image and audio objects. Image and audio inputs and outputs are currently incompatible.
|
||||
|
||||
### Use LangChain tools
|
||||
|
||||
We love Langchain and think it has a very compelling suite of tools.
|
||||
To import a tool from LangChain, use the `from_langchain()` method.
|
||||
|
||||
Here is how you can use it to recreate the intro's search result using a LangChain web search tool.
|
||||
|
||||
```python
|
||||
from langchain.agents import load_tools
|
||||
from transformers import Tool, ReactCodeAgent
|
||||
|
||||
search_tool = Tool.from_langchain(load_tools(["serpapi"])[0])
|
||||
|
||||
agent = ReactCodeAgent(tools=[search_tool])
|
||||
|
||||
agent.run("How many more blocks (also denoted as layers) in BERT base encoder than the encoder from the architecture proposed in Attention is All You Need?")
|
||||
```
|
||||
|
||||
@ -1,243 +0,0 @@
|
||||
<!--Copyright 2024 The HuggingFace Team. All rights reserved.
|
||||
|
||||
Licensed under the Apache License, Version 2.0 (the "License"); you may not use this file except in compliance with
|
||||
the License. You may obtain a copy of the License at
|
||||
|
||||
http://www.apache.org/licenses/LICENSE-2.0
|
||||
|
||||
Unless required by applicable law or agreed to in writing, software distributed under the License is distributed on
|
||||
an "AS IS" BASIS, WITHOUT WARRANTIES OR CONDITIONS OF ANY KIND, either express or implied. See the License for the
|
||||
specific language governing permissions and limitations under the License.
|
||||
|
||||
⚠️ Note that this file is in Markdown but contain specific syntax for our doc-builder (similar to MDX) that may not be
|
||||
rendered properly in your Markdown viewer.
|
||||
|
||||
-->
|
||||
# Agents, supercharged - Multi-agents, External tools, and more
|
||||
|
||||
[[open-in-colab]]
|
||||
|
||||
### What is an agent?
|
||||
|
||||
> [!TIP]
|
||||
> If you're new to `transformers.agents`, make sure to first read the main [agents documentation](./agents).
|
||||
|
||||
In this page we're going to highlight several advanced uses of `transformers.agents`.
|
||||
|
||||
## Multi-agents
|
||||
|
||||
Multi-agent has been introduced in Microsoft's framework [Autogen](https://huggingface.co/papers/2308.08155).
|
||||
It simply means having several agents working together to solve your task instead of only one.
|
||||
It empirically yields better performance on most benchmarks. The reason for this better performance is conceptually simple: for many tasks, rather than using a do-it-all system, you would prefer to specialize units on sub-tasks. Here, having agents with separate tool sets and memories allows to achieve efficient specialization.
|
||||
|
||||
You can easily build hierarchical multi-agent systems with `transformers.agents`.
|
||||
|
||||
To do so, encapsulate the agent in a [`ManagedAgent`] object. This object needs arguments `agent`, `name`, and a `description`, which will then be embedded in the manager agent's system prompt to let it know how to call this managed agent, as we also do for tools.
|
||||
|
||||
Here's an example of making an agent that managed a specific web search agent using our [`DuckDuckGoSearchTool`]:
|
||||
|
||||
```py
|
||||
from transformers.agents import ReactCodeAgent, HfApiEngine, DuckDuckGoSearchTool, ManagedAgent
|
||||
|
||||
llm_engine = HfApiEngine()
|
||||
|
||||
web_agent = ReactCodeAgent(tools=[DuckDuckGoSearchTool()], llm_engine=llm_engine)
|
||||
|
||||
managed_web_agent = ManagedAgent(
|
||||
agent=web_agent,
|
||||
name="web_search",
|
||||
description="Runs web searches for you. Give it your query as an argument."
|
||||
)
|
||||
|
||||
manager_agent = ReactCodeAgent(
|
||||
tools=[], llm_engine=llm_engine, managed_agents=[managed_web_agent]
|
||||
)
|
||||
|
||||
manager_agent.run("Who is the CEO of Hugging Face?")
|
||||
```
|
||||
|
||||
> [!TIP]
|
||||
> For an in-depth example of an efficient multi-agent implementation, see [how we pushed our multi-agent system to the top of the GAIA leaderboard](https://huggingface.co/blog/beating-gaia).
|
||||
|
||||
|
||||
## Advanced tool usage
|
||||
|
||||
### Directly define a tool by subclassing Tool, and share it to the Hub
|
||||
|
||||
Let's take again the tool example from main documentation, for which we had implemented a `tool` decorator.
|
||||
|
||||
If you need to add variation, like custom attributes for your too, you can build your tool following the fine-grained method: building a class that inherits from the [`Tool`] superclass.
|
||||
|
||||
The custom tool needs:
|
||||
- An attribute `name`, which corresponds to the name of the tool itself. The name usually describes what the tool does. Since the code returns the model with the most downloads for a task, let's name is `model_download_counter`.
|
||||
- An attribute `description` is used to populate the agent's system prompt.
|
||||
- An `inputs` attribute, which is a dictionary with keys `"type"` and `"description"`. It contains information that helps the Python interpreter make educated choices about the input.
|
||||
- An `output_type` attribute, which specifies the output type.
|
||||
- A `forward` method which contains the inference code to be executed.
|
||||
|
||||
The types for both `inputs` and `output_type` should be amongst [Pydantic formats](https://docs.pydantic.dev/latest/concepts/json_schema/#generating-json-schema).
|
||||
|
||||
```python
|
||||
from transformers import Tool
|
||||
from huggingface_hub import list_models
|
||||
|
||||
class HFModelDownloadsTool(Tool):
|
||||
name = "model_download_counter"
|
||||
description = """
|
||||
This is a tool that returns the most downloaded model of a given task on the Hugging Face Hub.
|
||||
It returns the name of the checkpoint."""
|
||||
|
||||
inputs = {
|
||||
"task": {
|
||||
"type": "string",
|
||||
"description": "the task category (such as text-classification, depth-estimation, etc)",
|
||||
}
|
||||
}
|
||||
output_type = "string"
|
||||
|
||||
def forward(self, task: str):
|
||||
model = next(iter(list_models(filter=task, sort="downloads", direction=-1)))
|
||||
return model.id
|
||||
```
|
||||
|
||||
Now that the custom `HfModelDownloadsTool` class is ready, you can save it to a file named `model_downloads.py` and import it for use.
|
||||
|
||||
|
||||
```python
|
||||
from model_downloads import HFModelDownloadsTool
|
||||
|
||||
tool = HFModelDownloadsTool()
|
||||
```
|
||||
|
||||
You can also share your custom tool to the Hub by calling [`~Tool.push_to_hub`] on the tool. Make sure you've created a repository for it on the Hub and are using a token with read access.
|
||||
|
||||
```python
|
||||
tool.push_to_hub("{your_username}/hf-model-downloads")
|
||||
```
|
||||
|
||||
Load the tool with the [`~Tool.load_tool`] function and pass it to the `tools` parameter in your agent.
|
||||
|
||||
```python
|
||||
from transformers import load_tool, CodeAgent
|
||||
|
||||
model_download_tool = load_tool("m-ric/hf-model-downloads")
|
||||
```
|
||||
|
||||
### Use gradio-tools
|
||||
|
||||
[gradio-tools](https://github.com/freddyaboulton/gradio-tools) is a powerful library that allows using Hugging
|
||||
Face Spaces as tools. It supports many existing Spaces as well as custom Spaces.
|
||||
|
||||
Transformers supports `gradio_tools` with the [`Tool.from_gradio`] method. For example, let's use the [`StableDiffusionPromptGeneratorTool`](https://github.com/freddyaboulton/gradio-tools/blob/main/gradio_tools/tools/prompt_generator.py) from `gradio-tools` toolkit for improving prompts to generate better images.
|
||||
|
||||
Import and instantiate the tool, then pass it to the `Tool.from_gradio` method:
|
||||
|
||||
```python
|
||||
from gradio_tools import StableDiffusionPromptGeneratorTool
|
||||
from transformers import Tool, load_tool, CodeAgent
|
||||
|
||||
gradio_prompt_generator_tool = StableDiffusionPromptGeneratorTool()
|
||||
prompt_generator_tool = Tool.from_gradio(gradio_prompt_generator_tool)
|
||||
```
|
||||
|
||||
Now you can use it just like any other tool. For example, let's improve the prompt `a rabbit wearing a space suit`.
|
||||
|
||||
```python
|
||||
image_generation_tool = load_tool('huggingface-tools/text-to-image')
|
||||
agent = CodeAgent(tools=[prompt_generator_tool, image_generation_tool], llm_engine=llm_engine)
|
||||
|
||||
agent.run(
|
||||
"Improve this prompt, then generate an image of it.", prompt='A rabbit wearing a space suit'
|
||||
)
|
||||
```
|
||||
|
||||
The model adequately leverages the tool:
|
||||
```text
|
||||
======== New task ========
|
||||
Improve this prompt, then generate an image of it.
|
||||
You have been provided with these initial arguments: {'prompt': 'A rabbit wearing a space suit'}.
|
||||
==== Agent is executing the code below:
|
||||
improved_prompt = StableDiffusionPromptGenerator(query=prompt)
|
||||
while improved_prompt == "QUEUE_FULL":
|
||||
improved_prompt = StableDiffusionPromptGenerator(query=prompt)
|
||||
print(f"The improved prompt is {improved_prompt}.")
|
||||
image = image_generator(prompt=improved_prompt)
|
||||
====
|
||||
```
|
||||
|
||||
Before finally generating the image:
|
||||
|
||||
<img src="https://huggingface.co/datasets/huggingface/documentation-images/resolve/main/transformers/rabbit.png">
|
||||
|
||||
|
||||
> [!WARNING]
|
||||
> gradio-tools require *textual* inputs and outputs even when working with different modalities like image and audio objects. Image and audio inputs and outputs are currently incompatible.
|
||||
|
||||
### Use LangChain tools
|
||||
|
||||
We love Langchain and think it has a very compelling suite of tools.
|
||||
To import a tool from LangChain, use the `from_langchain()` method.
|
||||
|
||||
Here is how you can use it to recreate the intro's search result using a LangChain web search tool.
|
||||
|
||||
```python
|
||||
from langchain.agents import load_tools
|
||||
from transformers import Tool, ReactCodeAgent
|
||||
|
||||
search_tool = Tool.from_langchain(load_tools(["serpapi"])[0])
|
||||
|
||||
agent = ReactCodeAgent(tools=[search_tool])
|
||||
|
||||
agent.run("How many more blocks (also denoted as layers) in BERT base encoder than the encoder from the architecture proposed in Attention is All You Need?")
|
||||
```
|
||||
|
||||
## Display your agent run in a cool Gradio interface
|
||||
|
||||
You can leverage `gradio.Chatbot`to display your agent's thoughts using `stream_to_gradio`, here is an example:
|
||||
|
||||
```py
|
||||
import gradio as gr
|
||||
from transformers import (
|
||||
load_tool,
|
||||
ReactCodeAgent,
|
||||
HfApiEngine,
|
||||
stream_to_gradio,
|
||||
)
|
||||
|
||||
# Import tool from Hub
|
||||
image_generation_tool = load_tool("m-ric/text-to-image")
|
||||
|
||||
llm_engine = HfApiEngine("meta-llama/Meta-Llama-3-70B-Instruct")
|
||||
|
||||
# Initialize the agent with the image generation tool
|
||||
agent = ReactCodeAgent(tools=[image_generation_tool], llm_engine=llm_engine)
|
||||
|
||||
|
||||
def interact_with_agent(task):
|
||||
messages = []
|
||||
messages.append(gr.ChatMessage(role="user", content=task))
|
||||
yield messages
|
||||
for msg in stream_to_gradio(agent, task):
|
||||
messages.append(msg)
|
||||
yield messages + [
|
||||
gr.ChatMessage(role="assistant", content="⏳ Task not finished yet!")
|
||||
]
|
||||
yield messages
|
||||
|
||||
|
||||
with gr.Blocks() as demo:
|
||||
text_input = gr.Textbox(lines=1, label="Chat Message", value="Make me a picture of the Statue of Liberty.")
|
||||
submit = gr.Button("Run illustrator agent!")
|
||||
chatbot = gr.Chatbot(
|
||||
label="Agent",
|
||||
type="messages",
|
||||
avatar_images=(
|
||||
None,
|
||||
"https://em-content.zobj.net/source/twitter/53/robot-face_1f916.png",
|
||||
),
|
||||
)
|
||||
submit.click(interact_with_agent, [text_input], [chatbot])
|
||||
|
||||
if __name__ == "__main__":
|
||||
demo.launch()
|
||||
```
|
||||
@ -110,7 +110,7 @@ Now you can access the `feature_maps` object from the first stage of the backbon
|
||||
|
||||
## AutoFeatureExtractor
|
||||
|
||||
For audio tasks, a feature extractor processes the audio signal into the correct input format.
|
||||
For audio tasks, a feature extractor processes the audio signal the correct input format.
|
||||
|
||||
Load a feature extractor with [`AutoFeatureExtractor.from_pretrained`]:
|
||||
|
||||
|
||||
@ -35,7 +35,7 @@ The classes [`PyTorchBenchmark`] and [`TensorFlowBenchmark`] allow to flexibly b
|
||||
|
||||
<Tip>
|
||||
|
||||
Here, _inference_ is defined by a single forward pass, and _training_ is defined by a single forward pass and
|
||||
Hereby, _inference_ is defined by a single forward pass, and _training_ is defined by a single forward pass and
|
||||
backward pass.
|
||||
|
||||
</Tip>
|
||||
@ -368,7 +368,7 @@ This section lists a couple of best practices one should be aware of when benchm
|
||||
memory measurement it is recommended to run each memory benchmark in a separate process by making sure
|
||||
`no_multi_processing` is set to `True`.
|
||||
- One should always state the environment information when sharing the results of a model benchmark. Results can vary
|
||||
heavily between different GPU devices, library versions, etc., as a consequence, benchmark results on their own are not very
|
||||
heavily between different GPU devices, library versions, etc., so that benchmark results on their own are not very
|
||||
useful for the community.
|
||||
|
||||
|
||||
|
||||
@ -37,5 +37,5 @@ help people access the inner representations, mainly adapted from the great work
|
||||
- retrieving heads output values and gradients to be able to compute head importance score and prune head as explained
|
||||
in https://arxiv.org/abs/1905.10650.
|
||||
|
||||
To help you understand and use these features, we have added a specific example script: [bertology.py](https://github.com/huggingface/transformers/tree/main/examples/research_projects/bertology/run_bertology.py) which extracts information and prune a model pre-trained on
|
||||
To help you understand and use these features, we have added a specific example script: [bertology.py](https://github.com/huggingface/transformers/tree/main/examples/research_projects/bertology/run_bertology.py) while extract information and prune a model pre-trained on
|
||||
GLUE.
|
||||
|
||||
@ -14,7 +14,7 @@ rendered properly in your Markdown viewer.
|
||||
|
||||
-->
|
||||
|
||||
# Chat Templates
|
||||
# Templates for Chat Models
|
||||
|
||||
## Introduction
|
||||
|
||||
@ -26,7 +26,26 @@ Much like tokenization, different models expect very different input formats for
|
||||
**chat templates** as a feature. Chat templates are part of the tokenizer. They specify how to convert conversations,
|
||||
represented as lists of messages, into a single tokenizable string in the format that the model expects.
|
||||
|
||||
Let's make this concrete with a quick example using the `mistralai/Mistral-7B-Instruct-v0.1` model:
|
||||
Let's make this concrete with a quick example using the `BlenderBot` model. BlenderBot has an extremely simple default
|
||||
template, which mostly just adds whitespace between rounds of dialogue:
|
||||
|
||||
```python
|
||||
>>> from transformers import AutoTokenizer
|
||||
>>> tokenizer = AutoTokenizer.from_pretrained("facebook/blenderbot-400M-distill")
|
||||
|
||||
>>> chat = [
|
||||
... {"role": "user", "content": "Hello, how are you?"},
|
||||
... {"role": "assistant", "content": "I'm doing great. How can I help you today?"},
|
||||
... {"role": "user", "content": "I'd like to show off how chat templating works!"},
|
||||
... ]
|
||||
|
||||
>>> tokenizer.apply_chat_template(chat, tokenize=False)
|
||||
" Hello, how are you? I'm doing great. How can I help you today? I'd like to show off how chat templating works!</s>"
|
||||
```
|
||||
|
||||
Notice how the entire chat is condensed into a single string. If we use `tokenize=True`, which is the default setting,
|
||||
that string will also be tokenized for us. To see a more complex template in action, though, let's use the
|
||||
`mistralai/Mistral-7B-Instruct-v0.1` model.
|
||||
|
||||
```python
|
||||
>>> from transformers import AutoTokenizer
|
||||
@ -42,26 +61,8 @@ Let's make this concrete with a quick example using the `mistralai/Mistral-7B-In
|
||||
"<s>[INST] Hello, how are you? [/INST]I'm doing great. How can I help you today?</s> [INST] I'd like to show off how chat templating works! [/INST]"
|
||||
```
|
||||
|
||||
Notice how the tokenizer has added the control tokens [INST] and [/INST] to indicate the start and end of
|
||||
user messages (but not assistant messages!), and the entire chat is condensed into a single string.
|
||||
If we use `tokenize=True`, which is the default setting, that string will also be tokenized for us.
|
||||
|
||||
Now, try the same code, but swap in the `HuggingFaceH4/zephyr-7b-beta` model instead, and you should get:
|
||||
|
||||
```text
|
||||
<|user|>
|
||||
Hello, how are you?</s>
|
||||
<|assistant|>
|
||||
I'm doing great. How can I help you today?</s>
|
||||
<|user|>
|
||||
I'd like to show off how chat templating works!</s>
|
||||
```
|
||||
|
||||
Both Zephyr and Mistral-Instruct were fine-tuned from the same base model, `Mistral-7B-v0.1`. However, they were trained
|
||||
with totally different chat formats. Without chat templates, you would have to write manual formatting code for each
|
||||
model, and it's very easy to make minor errors that hurt performance! Chat templates handle the details of formatting
|
||||
for you, allowing you to write universal code that works for any model.
|
||||
|
||||
Note that this time, the tokenizer has added the control tokens [INST] and [/INST] to indicate the start and end of
|
||||
user messages (but not assistant messages!). Mistral-instruct was trained with these tokens, but BlenderBot was not.
|
||||
|
||||
## How do I use chat templates?
|
||||
|
||||
@ -70,7 +71,7 @@ and `content` keys, and then pass it to the [`~PreTrainedTokenizer.apply_chat_te
|
||||
you'll get output that's ready to go! When using chat templates as input for model generation, it's also a good idea
|
||||
to use `add_generation_prompt=True` to add a [generation prompt](#what-are-generation-prompts).
|
||||
|
||||
Here's an example of preparing input for `model.generate()`, using `Zephyr` again:
|
||||
Here's an example of preparing input for `model.generate()`, using the `Zephyr` assistant model:
|
||||
|
||||
```python
|
||||
from transformers import AutoModelForCausalLM, AutoTokenizer
|
||||
@ -159,7 +160,7 @@ messages = [
|
||||
]
|
||||
```
|
||||
|
||||
Here's what this will look like without a generation prompt, for a model that uses standard "ChatML" formatting:
|
||||
Here's what this will look like without a generation prompt, using the ChatML template we saw in the Zephyr example:
|
||||
|
||||
```python
|
||||
tokenizer.apply_chat_template(messages, tokenize=False, add_generation_prompt=False)
|
||||
@ -192,51 +193,13 @@ message. Remember, chat models are still just language models - they're trained
|
||||
special kind of text to them! You need to guide them with appropriate control tokens, so they know what they're
|
||||
supposed to be doing.
|
||||
|
||||
Not all models require generation prompts. Some models, like LLaMA, don't have any
|
||||
Not all models require generation prompts. Some models, like BlenderBot and LLaMA, don't have any
|
||||
special tokens before bot responses. In these cases, the `add_generation_prompt` argument will have no effect. The exact
|
||||
effect that `add_generation_prompt` has will depend on the template being used.
|
||||
|
||||
## What does "continue_final_message" do?
|
||||
|
||||
When passing a list of messages to `apply_chat_template` or `TextGenerationPipeline`, you can choose
|
||||
to format the chat so the model will continue the final message in the chat instead of starting a new one. This is done
|
||||
by removing any end-of-sequence tokens that indicate the end of the final message, so that the model will simply
|
||||
extend the final message when it begins to generate text. This is useful for "prefilling" the model's response.
|
||||
|
||||
Here's an example:
|
||||
|
||||
```python
|
||||
chat = [
|
||||
{"role": "user", "content": "Can you format the answer in JSON?"},
|
||||
{"role": "assistant", "content": '{"name": "'},
|
||||
]
|
||||
|
||||
formatted_chat = tokenizer.apply_chat_template(chat, tokenize=True, return_dict=True, continue_final_message=True)
|
||||
model.generate(**formatted_chat)
|
||||
```
|
||||
|
||||
The model will generate text that continues the JSON string, rather than starting a new message. This approach
|
||||
can be very useful for improving the accuracy of the model's instruction-following when you know how you want
|
||||
it to start its replies.
|
||||
|
||||
Because `add_generation_prompt` adds the tokens that start a new message, and `continue_final_message` removes any
|
||||
end-of-message tokens from the final message, it does not make sense to use them together. As a result, you'll
|
||||
get an error if you try!
|
||||
|
||||
<Tip>
|
||||
|
||||
The default behaviour of `TextGenerationPipeline` is to set `add_generation_prompt=True` so that it starts a new
|
||||
message. However, if the final message in the input chat has the "assistant" role, it will assume that this message is
|
||||
a prefill and switch to `continue_final_message=True` instead, because most models do not support multiple
|
||||
consecutive assistant messages. You can override this behaviour by explicitly passing the `continue_final_message`
|
||||
argument when calling the pipeline.
|
||||
|
||||
</Tip>
|
||||
|
||||
## Can I use chat templates in training?
|
||||
|
||||
Yes! This is a good way to ensure that the chat template matches the tokens the model sees during training.
|
||||
We recommend that you apply the chat template as a preprocessing step for your dataset. After this, you
|
||||
Yes! We recommend that you apply the chat template as a preprocessing step for your dataset. After this, you
|
||||
can simply continue like any other language model training task. When training, you should usually set
|
||||
`add_generation_prompt=False`, because the added tokens to prompt an assistant response will not be helpful during
|
||||
training. Let's see an example:
|
||||
@ -270,17 +233,6 @@ The sun.</s>
|
||||
|
||||
From here, just continue training like you would with a standard language modelling task, using the `formatted_chat` column.
|
||||
|
||||
<Tip>
|
||||
|
||||
By default, some tokenizers add special tokens like `<bos>` and `<eos>` to text they tokenize. Chat templates should
|
||||
already include all the special tokens they need, and so additional special tokens will often be incorrect or
|
||||
duplicated, which will hurt model performance.
|
||||
|
||||
Therefore, if you format text with `apply_chat_template(tokenize=False)`, you should set the argument
|
||||
`add_special_tokens=False` when you tokenize that text later. If you use `apply_chat_template(tokenize=True)`, you don't need to worry about this!
|
||||
|
||||
</Tip>
|
||||
|
||||
## Advanced: Extra inputs to chat templates
|
||||
|
||||
The only argument that `apply_chat_template` requires is `messages`. However, you can pass any keyword
|
||||
@ -362,7 +314,7 @@ from transformers import AutoModelForCausalLM, AutoTokenizer
|
||||
|
||||
checkpoint = "NousResearch/Hermes-2-Pro-Llama-3-8B"
|
||||
|
||||
tokenizer = AutoTokenizer.from_pretrained(checkpoint)
|
||||
tokenizer = AutoTokenizer.from_pretrained(checkpoint, revision="pr/13")
|
||||
model = AutoModelForCausalLM.from_pretrained(checkpoint, torch_dtype=torch.bfloat16, device_map="auto")
|
||||
```
|
||||
|
||||
@ -407,7 +359,7 @@ messages = [
|
||||
Now, let's apply the chat template and generate a response:
|
||||
|
||||
```python
|
||||
inputs = tokenizer.apply_chat_template(messages, tools=tools, add_generation_prompt=True, return_dict=True, return_tensors="pt")
|
||||
inputs = tokenizer.apply_chat_template(messages, chat_template="tool_use", tools=tools, add_generation_prompt=True, return_dict=True, return_tensors="pt")
|
||||
inputs = {k: v.to(model.device) for k, v in inputs.items()}
|
||||
out = model.generate(**inputs, max_new_tokens=128)
|
||||
print(tokenizer.decode(out[0][len(inputs["input_ids"][0]):]))
|
||||
@ -425,62 +377,29 @@ The model has called the function with valid arguments, in the format requested
|
||||
inferred that we're most likely referring to the Paris in France, and it remembered that, as the home of SI units,
|
||||
the temperature in France should certainly be displayed in Celsius.
|
||||
|
||||
<Tip>
|
||||
|
||||
The output format above is specific to the `Hermes-2-Pro` model we're using in this example. Other models may emit different
|
||||
tool call formats, and you may need to do some manual parsing at this step. For example, `Llama-3.1` models will emit
|
||||
slightly different JSON, with `parameters` instead of `arguments`. Regardless of the format the model outputs, you
|
||||
should add the tool call to the conversation in the format below, with `tool_calls`, `function` and `arguments` keys.
|
||||
|
||||
</Tip>
|
||||
|
||||
Next, let's append the model's tool call to the conversation.
|
||||
Let's append the model's tool call to the conversation. Note that we generate a random `tool_call_id` here. These IDs
|
||||
are not used by all models, but they allow models to issue multiple tool calls at once and keep track of which response
|
||||
corresponds to which call. You can generate them any way you like, but they should be unique within each chat.
|
||||
|
||||
```python
|
||||
tool_call_id = "vAHdf3" # Random ID, should be unique for each tool call
|
||||
tool_call = {"name": "get_current_temperature", "arguments": {"location": "Paris, France", "unit": "celsius"}}
|
||||
messages.append({"role": "assistant", "tool_calls": [{"type": "function", "function": tool_call}]})
|
||||
messages.append({"role": "assistant", "tool_calls": [{"id": tool_call_id, "type": "function", "function": tool_call}]})
|
||||
```
|
||||
|
||||
<Tip warning={true}>
|
||||
|
||||
If you're familiar with the OpenAI API, you should pay attention to an important difference here - the `tool_call` is
|
||||
a dict, but in the OpenAI API it's a JSON string. Passing a string may cause errors or strange model behaviour!
|
||||
|
||||
</Tip>
|
||||
|
||||
Now that we've added the tool call to the conversation, we can call the function and append the result to the
|
||||
conversation. Since we're just using a dummy function for this example that always returns 22.0, we can just append
|
||||
that result directly.
|
||||
|
||||
```python
|
||||
messages.append({"role": "tool", "name": "get_current_temperature", "content": "22.0"})
|
||||
```
|
||||
|
||||
<Tip>
|
||||
|
||||
Some model architectures, notably Mistral/Mixtral, also require a `tool_call_id` here, which should be
|
||||
9 randomly-generated alphanumeric characters, and assigned to the `id` key of the tool call
|
||||
dictionary. The same key should also be assigned to the `tool_call_id` key of the tool response dictionary below, so
|
||||
that tool calls can be matched to tool responses. So, for Mistral/Mixtral models, the code above would be:
|
||||
|
||||
```python
|
||||
tool_call_id = "9Ae3bDc2F" # Random ID, 9 alphanumeric characters
|
||||
tool_call = {"name": "get_current_temperature", "arguments": {"location": "Paris, France", "unit": "celsius"}}
|
||||
messages.append({"role": "assistant", "tool_calls": [{"type": "function", "id": tool_call_id, "function": tool_call}]})
|
||||
```
|
||||
|
||||
and
|
||||
that result directly. Again, note the `tool_call_id` - this should match the ID used in the tool call above.
|
||||
|
||||
```python
|
||||
messages.append({"role": "tool", "tool_call_id": tool_call_id, "name": "get_current_temperature", "content": "22.0"})
|
||||
```
|
||||
|
||||
</Tip>
|
||||
|
||||
Finally, let's let the assistant read the function outputs and continue chatting with the user:
|
||||
|
||||
```python
|
||||
inputs = tokenizer.apply_chat_template(messages, tools=tools, add_generation_prompt=True, return_dict=True, return_tensors="pt")
|
||||
inputs = tokenizer.apply_chat_template(messages, chat_template="tool_use", tools=tools, add_generation_prompt=True, return_dict=True, return_tensors="pt")
|
||||
inputs = {k: v.to(model.device) for k, v in inputs.items()}
|
||||
out = model.generate(**inputs, max_new_tokens=128)
|
||||
print(tokenizer.decode(out[0][len(inputs["input_ids"][0]):]))
|
||||
@ -496,6 +415,14 @@ Although this was a simple demo with dummy tools and a single call, the same tec
|
||||
multiple real tools and longer conversations. This can be a powerful way to extend the capabilities of conversational
|
||||
agents with real-time information, computational tools like calculators, or access to large databases.
|
||||
|
||||
<Tip>
|
||||
Not all of the tool-calling features shown above are used by all models. Some use tool call IDs, others simply use the function name and
|
||||
match tool calls to results using the ordering, and there are several models that use neither and only issue one tool
|
||||
call at a time to avoid confusion. If you want your code to be compatible across as many models as possible, we
|
||||
recommend structuring your tools calls like we've shown here, and returning tool results in the order that
|
||||
they were issued by the model. The chat templates on each model should handle the rest.
|
||||
</Tip>
|
||||
|
||||
### Understanding tool schemas
|
||||
|
||||
Each function you pass to the `tools` argument of `apply_chat_template` is converted into a
|
||||
@ -616,79 +543,51 @@ than the JSON schemas used for tools, no helper functions are necessary.
|
||||
Here's an example of a RAG template in action:
|
||||
|
||||
```python
|
||||
from transformers import AutoTokenizer, AutoModelForCausalLM
|
||||
document1 = {
|
||||
"title": "The Moon: Our Age-Old Foe",
|
||||
"contents": "Man has always dreamed of destroying the moon. In this essay, I shall..."
|
||||
}
|
||||
|
||||
# Load the model and tokenizer
|
||||
model_id = "CohereForAI/c4ai-command-r-v01-4bit"
|
||||
tokenizer = AutoTokenizer.from_pretrained(model_id)
|
||||
model = AutoModelForCausalLM.from_pretrained(model_id, device_map="auto")
|
||||
device = model.device # Get the device the model is loaded on
|
||||
document2 = {
|
||||
"title": "The Sun: Our Age-Old Friend",
|
||||
"contents": "Although often underappreciated, the sun provides several notable benefits..."
|
||||
}
|
||||
|
||||
# Define conversation input
|
||||
conversation = [
|
||||
{"role": "user", "content": "What has Man always dreamed of?"}
|
||||
]
|
||||
|
||||
# Define documents for retrieval-based generation
|
||||
documents = [
|
||||
{
|
||||
"title": "The Moon: Our Age-Old Foe",
|
||||
"text": "Man has always dreamed of destroying the moon. In this essay, I shall..."
|
||||
},
|
||||
{
|
||||
"title": "The Sun: Our Age-Old Friend",
|
||||
"text": "Although often underappreciated, the sun provides several notable benefits..."
|
||||
}
|
||||
]
|
||||
|
||||
# Tokenize conversation and documents using a RAG template, returning PyTorch tensors.
|
||||
input_ids = tokenizer.apply_chat_template(
|
||||
conversation=conversation,
|
||||
documents=documents,
|
||||
chat_template="rag",
|
||||
tokenize=True,
|
||||
add_generation_prompt=True,
|
||||
return_tensors="pt").to(device)
|
||||
|
||||
# Generate a response
|
||||
gen_tokens = model.generate(
|
||||
input_ids,
|
||||
max_new_tokens=100,
|
||||
do_sample=True,
|
||||
temperature=0.3,
|
||||
)
|
||||
|
||||
# Decode and print the generated text along with generation prompt
|
||||
gen_text = tokenizer.decode(gen_tokens[0])
|
||||
print(gen_text)
|
||||
model_input = tokenizer.apply_chat_template(
|
||||
messages,
|
||||
documents=[document1, document2]
|
||||
)
|
||||
```
|
||||
|
||||
<Tip>
|
||||
|
||||
The `documents` input for retrieval-augmented generation is not widely supported, and many models have chat templates which simply ignore this input.
|
||||
|
||||
To verify if a model supports the `documents` input, you can read its model card, or `print(tokenizer.chat_template)` to see if the `documents` key is used anywhere.
|
||||
|
||||
One model class that does support it, though, is Cohere's [Command-R](https://huggingface.co/CohereForAI/c4ai-command-r-08-2024) and [Command-R+](https://huggingface.co/CohereForAI/c4ai-command-r-plus-08-2024), through their `rag` chat template. You can see additional examples of grounded generation using this feature in their model cards.
|
||||
|
||||
</Tip>
|
||||
|
||||
|
||||
|
||||
## Advanced: How do chat templates work?
|
||||
|
||||
The chat template for a model is stored on the `tokenizer.chat_template` attribute. If no chat template is set, the
|
||||
default template for that model class is used instead. Let's take a look at a `Zephyr` chat template, though note this
|
||||
one is a little simplified from the actual one!
|
||||
default template for that model class is used instead. Let's take a look at the template for `BlenderBot`:
|
||||
|
||||
```python
|
||||
|
||||
>>> from transformers import AutoTokenizer
|
||||
>>> tokenizer = AutoTokenizer.from_pretrained("facebook/blenderbot-400M-distill")
|
||||
|
||||
>>> tokenizer.default_chat_template
|
||||
"{% for message in messages %}{% if message['role'] == 'user' %}{{ ' ' }}{% endif %}{{ message['content'] }}{% if not loop.last %}{{ ' ' }}{% endif %}{% endfor %}{{ eos_token }}"
|
||||
```
|
||||
|
||||
That's kind of intimidating. Let's clean it up a little to make it more readable. In the process, though, we also make
|
||||
sure that the newlines and indentation we add don't end up being included in the template output - see the tip on
|
||||
[trimming whitespace](#trimming-whitespace) below!
|
||||
|
||||
```
|
||||
{%- for message in messages %}
|
||||
{{- '<|' + message['role'] + |>\n' }}
|
||||
{{- message['content'] + eos_token }}
|
||||
{%- if message['role'] == 'user' %}
|
||||
{{- ' ' }}
|
||||
{%- endif %}
|
||||
{{- message['content'] }}
|
||||
{%- if not loop.last %}
|
||||
{{- ' ' }}
|
||||
{%- endif %}
|
||||
{%- endfor %}
|
||||
{%- if add_generation_prompt %}
|
||||
{{- '<|assistant|>\n' }}
|
||||
{%- endif %}
|
||||
{{- eos_token }}
|
||||
```
|
||||
|
||||
If you've never seen one of these before, this is a [Jinja template](https://jinja.palletsprojects.com/en/3.1.x/templates/).
|
||||
@ -696,23 +595,25 @@ Jinja is a templating language that allows you to write simple code that generat
|
||||
syntax resembles Python. In pure Python, this template would look something like this:
|
||||
|
||||
```python
|
||||
for message in messages:
|
||||
print(f'<|{message["role"]}|>')
|
||||
print(message['content'] + eos_token)
|
||||
if add_generation_prompt:
|
||||
print('<|assistant|>')
|
||||
for idx, message in enumerate(messages):
|
||||
if message['role'] == 'user':
|
||||
print(' ')
|
||||
print(message['content'])
|
||||
if not idx == len(messages) - 1: # Check for the last message in the conversation
|
||||
print(' ')
|
||||
print(eos_token)
|
||||
```
|
||||
|
||||
Effectively, the template does three things:
|
||||
1. For each message, print the role enclosed in `<|` and `|>`, like `<|user|>` or `<|assistant|>`.
|
||||
2. Next, print the content of the message, followed by the end-of-sequence token.
|
||||
3. Finally, if `add_generation_prompt` is set, print the assistant token, so that the model knows to start generating
|
||||
an assistant response.
|
||||
1. For each message, if the message is a user message, add a blank space before it, otherwise print nothing.
|
||||
2. Add the message content
|
||||
3. If the message is not the last message, add two spaces after it. After the final message, print the EOS token.
|
||||
|
||||
This is a pretty simple template but Jinja gives you a lot of flexibility to do more complex things! Let's see a Jinja
|
||||
template that can format inputs similarly to the way LLaMA formats them (note that the real LLaMA template includes
|
||||
handling for default system messages and slightly different system message handling in general - don't use this one
|
||||
in your actual code!)
|
||||
This is a pretty simple template - it doesn't add any control tokens, and it doesn't support "system" messages, which
|
||||
are a common way to give the model directives about how it should behave in the subsequent conversation.
|
||||
But Jinja gives you a lot of flexibility to do those things! Let's see a Jinja template that can format inputs
|
||||
similarly to the way LLaMA formats them (note that the real LLaMA template includes handling for default system
|
||||
messages and slightly different system message handling in general - don't use this one in your actual code!)
|
||||
|
||||
```
|
||||
{%- for message in messages %}
|
||||
@ -726,8 +627,8 @@ in your actual code!)
|
||||
{%- endfor %}
|
||||
```
|
||||
|
||||
Hopefully if you stare at this for a little bit you can see what this template is doing - it adds specific tokens like
|
||||
`[INST]` and `[/INST]` based on the role of each message. User, assistant and system messages are clearly
|
||||
Hopefully if you stare at this for a little bit you can see what this template is doing - it adds specific tokens based
|
||||
on the "role" of each message, which represents who sent it. User, assistant and system messages are clearly
|
||||
distinguishable to the model because of the tokens they're wrapped in.
|
||||
|
||||
## Advanced: Adding and editing chat templates
|
||||
@ -792,6 +693,23 @@ with other names, pass the name of the template you want to the `chat_template`
|
||||
We find that this can be a bit confusing for users, though - so if you're writing a template yourself, we recommend
|
||||
trying to put it all in a single template where possible!
|
||||
|
||||
### What are "default" templates?
|
||||
|
||||
Before the introduction of chat templates, chat handling was hardcoded at the model class level. For backwards
|
||||
compatibility, we have retained this class-specific handling as default templates, also set at the class level. If a
|
||||
model does not have a chat template set, but there is a default template for its model class, the `TextGenerationPipeline`
|
||||
class and methods like `apply_chat_template` will use the class template instead. You can find out what the default
|
||||
template for your tokenizer is by checking the `tokenizer.default_chat_template` attribute.
|
||||
|
||||
This is something we do purely for backward compatibility reasons, to avoid breaking any existing workflows. Even when
|
||||
the class template is appropriate for your model, we strongly recommend overriding the default template by
|
||||
setting the `chat_template` attribute explicitly to make it clear to users that your model has been correctly configured
|
||||
for chat.
|
||||
|
||||
Now that actual chat templates have been adopted more widely, default templates have been deprecated and will be
|
||||
removed in a future release. We strongly recommend setting the `chat_template` attribute for any tokenizers that
|
||||
still depend on them!
|
||||
|
||||
### What template should I use?
|
||||
|
||||
When setting the template for a model that's already been trained for chat, you should ensure that the template
|
||||
@ -853,23 +771,14 @@ it's time to put an end to them!
|
||||
|
||||
## Advanced: Template writing tips
|
||||
|
||||
<Tip>
|
||||
If you're unfamiliar with Jinja, we generally find that the easiest way to write a chat template is to first
|
||||
write a short Python script that formats messages the way you want, and then convert that script into a template.
|
||||
|
||||
The easiest way to get started with writing Jinja templates is to take a look at some existing ones. You can use
|
||||
`print(tokenizer.chat_template)` for any chat model to see what template it's using. In general, models that support tool use have
|
||||
much more complex templates than other models - so when you're just getting started, they're probably a bad example
|
||||
to learn from! You can also take a look at the
|
||||
[Jinja documentation](https://jinja.palletsprojects.com/en/3.1.x/templates/#synopsis) for details
|
||||
of general Jinja formatting and syntax.
|
||||
|
||||
</Tip>
|
||||
|
||||
Jinja templates in `transformers` are identical to Jinja templates elsewhere. The main thing to know is that
|
||||
the conversation history will be accessible inside your template as a variable called `messages`.
|
||||
Remember that the template handler will receive the conversation history as a variable called `messages`.
|
||||
You will be able to access `messages` in your template just like you can in Python, which means you can loop over
|
||||
it with `{% for message in messages %}` or access individual messages with `{{ messages[0] }}`, for example.
|
||||
|
||||
You can also use the following tips to write clean, efficient Jinja templates:
|
||||
You can also use the following tips to convert your code to Jinja:
|
||||
|
||||
### Trimming whitespace
|
||||
|
||||
@ -894,35 +803,46 @@ rather than like this:
|
||||
Adding `-` will strip any whitespace that comes before the block. The second example looks innocent, but the newline
|
||||
and indentation may end up being included in the output, which is probably not what you want!
|
||||
|
||||
### For loops
|
||||
|
||||
For loops in Jinja look like this:
|
||||
|
||||
```
|
||||
{%- for message in messages %}
|
||||
{{- message['content'] }}
|
||||
{%- endfor %}
|
||||
```
|
||||
|
||||
Note that whatever's inside the {{ expression block }} will be printed to the output. You can use operators like
|
||||
`+` to combine strings inside expression blocks.
|
||||
|
||||
### If statements
|
||||
|
||||
If statements in Jinja look like this:
|
||||
|
||||
```
|
||||
{%- if message['role'] == 'user' %}
|
||||
{{- message['content'] }}
|
||||
{%- endif %}
|
||||
```
|
||||
|
||||
Note how where Python uses whitespace to mark the beginnings and ends of `for` and `if` blocks, Jinja requires you
|
||||
to explicitly end them with `{% endfor %}` and `{% endif %}`.
|
||||
|
||||
### Special variables
|
||||
|
||||
Inside your template, you will have access several special variables. The most important of these is `messages`,
|
||||
which contains the chat history as a list of message dicts. However, there are several others. Not every
|
||||
variable will be used in every template. The most common other variables are:
|
||||
Inside your template, you will have access to the list of `messages`, but you can also access several other special
|
||||
variables. These include special tokens like `bos_token` and `eos_token`, as well as the `add_generation_prompt`
|
||||
variable that we discussed above. You can also use the `loop` variable to access information about the current loop
|
||||
iteration, for example using `{% if loop.last %}` to check if the current message is the last message in the
|
||||
conversation. Here's an example that puts these ideas together to add a generation prompt at the end of the
|
||||
conversation if add_generation_prompt is `True`:
|
||||
|
||||
- `tools` contains a list of tools in JSON schema format. Will be `None` or undefined if no tools are passed.
|
||||
- `documents` contains a list of documents in the format `{"title": "Title", "contents": "Contents"}`, used for retrieval-augmented generation. Will be `None` or undefined if no documents are passed.
|
||||
- `add_generation_prompt` is a bool that is `True` if the user has requested a generation prompt, and `False` otherwise. If this is set, your template should add the header for an assistant message to the end of the conversation. If your model doesn't have a specific header for assistant messages, you can ignore this flag.
|
||||
- **Special tokens** like `bos_token` and `eos_token`. These are extracted from `tokenizer.special_tokens_map`. The exact tokens available inside each template will differ depending on the parent tokenizer.
|
||||
|
||||
<Tip>
|
||||
|
||||
You can actually pass any `kwarg` to `apply_chat_template`, and it will be accessible inside the template as a variable. In general,
|
||||
we recommend trying to stick to the core variables above, as it will make your model harder to use if users have
|
||||
to write custom code to pass model-specific `kwargs`. However, we're aware that this field moves quickly, so if you
|
||||
have a new use-case that doesn't fit in the core API, feel free to use a new `kwarg` for it! If a new `kwarg`
|
||||
becomes common we may promote it into the core API and create a standard, documented format for it.
|
||||
|
||||
</Tip>
|
||||
|
||||
### Callable functions
|
||||
|
||||
There is also a short list of callable functions available to you inside your templates. These are:
|
||||
|
||||
- `raise_exception(msg)`: Raises a `TemplateException`. This is useful for debugging, and for telling users when they're
|
||||
doing something that your template doesn't support.
|
||||
- `strftime_now(format_str)`: Equivalent to `datetime.now().strftime(format_str)` in Python. This is used for getting
|
||||
the current date/time in a specific format, which is sometimes included in system messages.
|
||||
```
|
||||
{%- if loop.last and add_generation_prompt %}
|
||||
{{- bos_token + 'Assistant:\n' }}
|
||||
{%- endif %}
|
||||
```
|
||||
|
||||
### Compatibility with non-Python Jinja
|
||||
|
||||
@ -941,25 +861,4 @@ all implementations of Jinja:
|
||||
in the Jinja documentation for more.
|
||||
- Replace `True`, `False` and `None`, which are Python-specific, with `true`, `false` and `none`.
|
||||
- Directly rendering a dict or list may give different results in other implementations (for example, string entries
|
||||
might change from single-quoted to double-quoted). Adding the `tojson` filter can help to ensure consistency here.
|
||||
|
||||
### Writing and debugging larger templates
|
||||
|
||||
When this feature was introduced, most templates were quite small, the Jinja equivalent of a "one-liner" script.
|
||||
However, with new models and features like tool-use and RAG, some templates can be 100 lines long or more. When
|
||||
writing templates like these, it's a good idea to write them in a separate file, using a text editor. You can easily
|
||||
extract a chat template to a file:
|
||||
|
||||
```python
|
||||
open("template.jinja", "w").write(tokenizer.chat_template)
|
||||
```
|
||||
|
||||
Or load the edited template back into the tokenizer:
|
||||
|
||||
```python
|
||||
tokenizer.chat_template = open("template.jinja").read()
|
||||
```
|
||||
|
||||
As an added bonus, when you write a long, multi-line template in a separate file, line numbers in that file will
|
||||
exactly correspond to line numbers in template parsing or execution errors. This will make it much easier to
|
||||
identify the source of issues.
|
||||
might change from single-quoted to double-quoted). Adding the `tojson` filter can help to ensure consistency here.
|
||||
@ -63,8 +63,7 @@ This page regroups resources around 🤗 Transformers developed by the community
|
||||
| [Evaluate LUKE on TACRED, a relation extraction dataset](https://github.com/studio-ousia/luke/blob/master/notebooks/huggingface_tacred.ipynb) | How to evaluate *LukeForEntityPairClassification* on the TACRED dataset | [Ikuya Yamada](https://github.com/ikuyamada) |[](https://colab.research.google.com/github/studio-ousia/luke/blob/master/notebooks/huggingface_tacred.ipynb) |
|
||||
| [Evaluate LUKE on CoNLL-2003, an important NER benchmark](https://github.com/studio-ousia/luke/blob/master/notebooks/huggingface_conll_2003.ipynb) | How to evaluate *LukeForEntitySpanClassification* on the CoNLL-2003 dataset | [Ikuya Yamada](https://github.com/ikuyamada) |[](https://colab.research.google.com/github/studio-ousia/luke/blob/master/notebooks/huggingface_conll_2003.ipynb) |
|
||||
| [Evaluate BigBird-Pegasus on PubMed dataset](https://github.com/vasudevgupta7/bigbird/blob/main/notebooks/bigbird_pegasus_evaluation.ipynb) | How to evaluate *BigBirdPegasusForConditionalGeneration* on PubMed dataset | [Vasudev Gupta](https://github.com/vasudevgupta7) | [](https://colab.research.google.com/github/vasudevgupta7/bigbird/blob/main/notebooks/bigbird_pegasus_evaluation.ipynb) |
|
||||
| [Speech Emotion Classification with Wav2Vec2](https://github.com/m3hrdadfi/soxan/blob/main/notebooks/Emotion_recognition_in_Greek_speech_using_Wav2Vec2.ipynb) | How to leverage a pretrained Wav2Vec2 model for Emotion Classification on the MEGA dataset | [Mehrdad Farahani](https://github.com/m3hrdadfi) | [](https://colab.research.google.com/github/m3hrdadfi/soxan/blob/main/notebooks/Emotion_recognition_in_Greek_speech_using_Wav2Vec2.ipynb) |
|
||||
| [Speech Emotion Classification with Wav2Vec2](https://github/m3hrdadfi/soxan/blob/main/notebooks/Emotion_recognition_in_Greek_speech_using_Wav2Vec2.ipynb) | How to leverage a pretrained Wav2Vec2 model for Emotion Classification on the MEGA dataset | [Mehrdad Farahani](https://github.com/m3hrdadfi) | [](https://colab.research.google.com/github/m3hrdadfi/soxan/blob/main/notebooks/Emotion_recognition_in_Greek_speech_using_Wav2Vec2.ipynb) |
|
||||
| [Detect objects in an image with DETR](https://github.com/NielsRogge/Transformers-Tutorials/blob/master/DETR/DETR_minimal_example_(with_DetrFeatureExtractor).ipynb) | How to use a trained *DetrForObjectDetection* model to detect objects in an image and visualize attention | [Niels Rogge](https://github.com/NielsRogge) | [](https://colab.research.google.com/github/NielsRogge/Transformers-Tutorials/blob/master/DETR/DETR_minimal_example_(with_DetrFeatureExtractor).ipynb) |
|
||||
| [Fine-tune DETR on a custom object detection dataset](https://github.com/NielsRogge/Transformers-Tutorials/blob/master/DETR/Fine_tuning_DetrForObjectDetection_on_custom_dataset_(balloon).ipynb) | How to fine-tune *DetrForObjectDetection* on a custom object detection dataset | [Niels Rogge](https://github.com/NielsRogge) | [](https://colab.research.google.com/github/NielsRogge/Transformers-Tutorials/blob/master/DETR/Fine_tuning_DetrForObjectDetection_on_custom_dataset_(balloon).ipynb) |
|
||||
| [Finetune T5 for Named Entity Recognition](https://github.com/ToluClassics/Notebooks/blob/main/T5_Ner_Finetuning.ipynb) | How to fine-tune *T5* on a Named Entity Recognition Task | [Ogundepo Odunayo](https://github.com/ToluClassics) | [](https://colab.research.google.com/drive/1obr78FY_cBmWY5ODViCmzdY6O1KB65Vc?usp=sharing) |
|
||||
| [Fine-Tuning Open-Source LLM using QLoRA with MLflow and PEFT](https://github.com/mlflow/mlflow/blob/master/docs/source/llms/transformers/tutorials/fine-tuning/transformers-peft.ipynb) | How to use [QLoRA](https://github.com/artidoro/qlora) and [PEFT](https://huggingface.co/docs/peft/en/index) to fine-tune an LLM in a memory-efficient way, while using [MLflow](https://mlflow.org/docs/latest/llms/transformers/index.html) to manage experiment tracking | [Yuki Watanabe](https://github.com/B-Step62) | [](https://colab.research.google.com/github/mlflow/mlflow/blob/master/docs/source/llms/transformers/tutorials/fine-tuning/transformers-peft.ipynb) |
|
||||
|
||||
@ -195,7 +195,7 @@ inputs = {key: tensor.to(model.device) for key, tensor in inputs.items()}
|
||||
print("Tokenized inputs:\n", inputs)
|
||||
|
||||
# 4: Generate text from the model
|
||||
outputs = model.generate(**inputs, max_new_tokens=512, temperature=0.1)
|
||||
outputs = model.generate(**inputs, max_new_tokens=512, temperature=0.)
|
||||
print("Generated tokens:\n", outputs)
|
||||
|
||||
# 5: Decode the output back to a string
|
||||
|
||||
@ -185,7 +185,7 @@ class ResnetModelForImageClassification(PreTrainedModel):
|
||||
def forward(self, tensor, labels=None):
|
||||
logits = self.model(tensor)
|
||||
if labels is not None:
|
||||
loss = torch.nn.functional.cross_entropy(logits, labels)
|
||||
loss = torch.nn.cross_entropy(logits, labels)
|
||||
return {"loss": loss, "logits": logits}
|
||||
return {"logits": logits}
|
||||
```
|
||||
|
||||
@ -203,7 +203,7 @@ This feature can be used with any `nn.Module`-based model.
|
||||
|
||||
</Tip>
|
||||
|
||||
If you start getting `loss=NaN` or the model exhibits some other abnormal behavior due to `inf` or `nan` in
|
||||
If you start getting `loss=NaN` or the model inhibits some other abnormal behavior due to `inf` or `nan` in
|
||||
activations or weights one needs to discover where the first underflow or overflow happens and what led to it. Luckily
|
||||
you can accomplish that easily by activating a special module that will do the detection automatically.
|
||||
|
||||
|
||||
@ -16,11 +16,11 @@ rendered properly in your Markdown viewer.
|
||||
|
||||
# DeepSpeed
|
||||
|
||||
[DeepSpeed](https://www.deepspeed.ai/) is a PyTorch optimization library that makes distributed training memory-efficient and fast. At its core is the [Zero Redundancy Optimizer (ZeRO)](https://hf.co/papers/1910.02054) which enables training large models at scale. ZeRO works in several stages:
|
||||
[DeepSpeed](https://www.deepspeed.ai/) is a PyTorch optimization library that makes distributed training memory-efficient and fast. At it's core is the [Zero Redundancy Optimizer (ZeRO)](https://hf.co/papers/1910.02054) which enables training large models at scale. ZeRO works in several stages:
|
||||
|
||||
* ZeRO-1, optimizer state partitioning across GPUs
|
||||
* ZeRO-1, optimizer state partioning across GPUs
|
||||
* ZeRO-2, gradient partitioning across GPUs
|
||||
* ZeRO-3, parameter partitioning across GPUs
|
||||
* ZeRO-3, parameteter partitioning across GPUs
|
||||
|
||||
In GPU-limited environments, ZeRO also enables offloading optimizer memory and computation from the GPU to the CPU to fit and train really large models on a single GPU. DeepSpeed is integrated with the Transformers [`Trainer`] class for all ZeRO stages and offloading. All you need to do is provide a config file or you can use a provided template. For inference, Transformers support ZeRO-3 and offloading since it allows loading huge models.
|
||||
|
||||
@ -159,7 +159,7 @@ There are three types of configuration parameters:
|
||||
|
||||
You could also modify the DeepSpeed configuration and edit [`TrainingArguments`] from it:
|
||||
|
||||
1. Create or load a DeepSpeed configuration to use as the main configuration
|
||||
1. Create or load a DeepSpeed configuration to used as the main configuration
|
||||
2. Create a [`TrainingArguments`] object based on these DeepSpeed configuration values
|
||||
|
||||
Some values, such as `scheduler.params.total_num_steps` are calculated by the [`Trainer`] during training.
|
||||
@ -191,7 +191,7 @@ ZeRO-1 shards the optimizer states across GPUs, and you can expect a tiny speed
|
||||
</hfoption>
|
||||
<hfoption id="ZeRO-2">
|
||||
|
||||
ZeRO-2 shards the optimizer and gradients across GPUs. This stage is primarily used for training since its features are not relevant to inference. Some important parameters to configure for better performance include:
|
||||
ZeRO-2 shards the optimizer and gradients across GPUs. This stage is primarily used for training since it's features are not relevant to inference. Some important parameters to configure for better performance include:
|
||||
|
||||
* `offload_optimizer` should be enabled to reduce GPU memory usage.
|
||||
* `overlap_comm` when set to `true` trades off increased GPU memory usage to lower allreduce latency. This feature uses 4.5x the `allgather_bucket_size` and `reduce_bucket_size` values. In this example, they're set to `5e8` which means it requires 9GB of GPU memory. If your GPU memory is 8GB or less, you should reduce `overlap_comm` to lower the memory requirements and prevent an out-of-memory (OOM) error.
|
||||
@ -226,7 +226,7 @@ ZeRO-3 shards the optimizer, gradient, and parameters across GPUs. Unlike ZeRO-2
|
||||
* `pin_memory: true` can improve throughput, but less memory becomes available for other processes because the pinned memory is reserved for the specific process that requested it and it's typically accessed much faster than normal CPU memory.
|
||||
* `stage3_max_live_parameters` is the upper limit on how many full parameters you want to keep on the GPU at any given time. Reduce this value if you encounter an OOM error.
|
||||
* `stage3_max_reuse_distance` is a value for determining when a parameter is used again in the future, and it helps decide whether to throw the parameter away or to keep it. If the parameter is going to be reused (if the value is less than `stage3_max_reuse_distance`), then it is kept to reduce communication overhead. This is super helpful when activation checkpointing is enabled and you want to keep the parameter in the forward recompute until the backward pass. But reduce this value if you encounter an OOM error.
|
||||
* `stage3_gather_16bit_weights_on_model_save` consolidates fp16 weights when a model is saved. For large models and multiple GPUs, this is expensive in terms of memory and speed. You should enable it if you're planning on resuming training.
|
||||
* `stage3_gather_16bit_weights_on_model_save` consolidates fp16 weights when a model is saved. For large models and multiple GPUs, this is an expensive in terms of memory and speed. You should enable it if you're planning on resuming training.
|
||||
* `sub_group_size` controls which parameters are updated during the optimizer step. Parameters are grouped into buckets of `sub_group_size` and each bucket is updated one at a time. When used with NVMe offload, `sub_group_size` determines when model states are moved in and out of CPU memory from during the optimization step. This prevents running out of CPU memory for extremely large models. `sub_group_size` can be left to its default value if you aren't using NVMe offload, but you may want to change it if you:
|
||||
|
||||
1. Run into an OOM error during the optimizer step. In this case, reduce `sub_group_size` to reduce memory usage of the temporary buffers.
|
||||
|
||||
@ -174,13 +174,50 @@ An increasing sequence: one, two, three, four, five, six, seven, eight, nine, te
|
||||
```
|
||||
|
||||
|
||||
## KV Cache Quantization
|
||||
|
||||
The `generate()` method supports caching keys and values to enhance efficiency and avoid re-computations. However the key and value
|
||||
cache can occupy a large portion of memory, becoming a bottleneck for long-context generation, especially for Large Language Models.
|
||||
Quantizing the cache when using `generate()` can significantly reduce memory requirements at the cost of speed.
|
||||
|
||||
KV Cache quantization in `transformers` is largely inspired by the paper [KIVI: A Tuning-Free Asymmetric 2bit Quantization for KV Cache]
|
||||
(https://arxiv.org/abs/2402.02750) and currently supports `quanto` and `HQQ` as backends. For more information on the inner workings see the paper.
|
||||
|
||||
To enable quantization of the key-value cache, one needs to indicate `cache_implementation="quantized"` in the `generation_config`.
|
||||
Quantization related arguments should be passed to the `generation_config` either as a `dict` or an instance of a [`QuantizedCacheConfig`] class.
|
||||
One has to indicate which quantization backend to use in the [`QuantizedCacheConfig`], the default is `quanto`.
|
||||
|
||||
<Tip warning={true}>
|
||||
|
||||
Cache quantization can be detrimental if the context length is short and there is enough GPU VRAM available to run without cache quantization.
|
||||
|
||||
</Tip>
|
||||
|
||||
|
||||
```python
|
||||
>>> import torch
|
||||
>>> from transformers import AutoTokenizer, AutoModelForCausalLM
|
||||
|
||||
>>> tokenizer = AutoTokenizer.from_pretrained("meta-llama/Llama-2-7b-chat-hf")
|
||||
>>> model = AutoModelForCausalLM.from_pretrained("meta-llama/Llama-2-7b-chat-hf", torch_dtype=torch.float16).to("cuda:0")
|
||||
>>> inputs = tokenizer("I like rock music because", return_tensors="pt").to(model.device)
|
||||
|
||||
>>> out = model.generate(**inputs, do_sample=False, max_new_tokens=20, cache_implementation="quantized", cache_config={"nbits": 4, "backend": "quanto"})
|
||||
>>> print(tokenizer.batch_decode(out, skip_special_tokens=True)[0])
|
||||
I like rock music because it's loud and energetic. It's a great way to express myself and rel
|
||||
|
||||
>>> out = model.generate(**inputs, do_sample=False, max_new_tokens=20)
|
||||
>>> print(tokenizer.batch_decode(out, skip_special_tokens=True)[0])
|
||||
I like rock music because it's loud and energetic. I like to listen to it when I'm feeling
|
||||
```
|
||||
|
||||
## Watermarking
|
||||
|
||||
The `generate()` supports watermarking the generated text by randomly marking a portion of tokens as "green".
|
||||
The `generate()` supports watermarking the generated text by randomly marking a portion of tokens as "green".
|
||||
When generating the "green" will have a small 'bias' value added to their logits, thus having a higher chance to be generated.
|
||||
The watermarked text can be detected by calculating the proportion of "green" tokens in the text and estimating how likely it is
|
||||
statistically to obtain that amount of "green" tokens for human-generated text. This watermarking strategy was proposed in the paper
|
||||
["On the Reliability of Watermarks for Large Language Models"](https://arxiv.org/abs/2306.04634). For more information on
|
||||
statistically to obtain that amount of "green" tokens for human-generated text. This watermarking strategy was proposed in the paper
|
||||
["On the Reliability of Watermarks for Large Language Models"](https://arxiv.org/abs/2306.04634). For more information on
|
||||
the inner functioning of watermarking, it is recommended to refer to the paper.
|
||||
|
||||
The watermarking can be used with any generative model in `tranformers` and does not require an extra classification model
|
||||
@ -225,21 +262,10 @@ array([True, True])
|
||||
## Decoding strategies
|
||||
|
||||
Certain combinations of the `generate()` parameters, and ultimately `generation_config`, can be used to enable specific
|
||||
decoding strategies. If you are new to this concept, we recommend reading
|
||||
[this blog post that illustrates how common decoding strategies work](https://huggingface.co/blog/how-to-generate).
|
||||
decoding strategies. If you are new to this concept, we recommend reading [this blog post that illustrates how common decoding strategies work](https://huggingface.co/blog/how-to-generate).
|
||||
|
||||
Here, we'll show some of the parameters that control the decoding strategies and illustrate how you can use them.
|
||||
|
||||
<Tip>
|
||||
|
||||
Selecting a given decoding strategy is not the only way you can influence the outcome of `generate()` with your model.
|
||||
The decoding strategies act based (mostly) on the logits, the distribution of probabilities for the next token, and
|
||||
thus selecting a good logits manipulation strategy can go a long way! In other words, manipulating the logits is another
|
||||
dimension you can act upon, in addition to selecting a decoding strategy. Popular logits manipulation strategies include
|
||||
`top_p`, `min_p`, and `repetition_penalty` -- you can check the full list in the [`GenerationConfig`] class.
|
||||
|
||||
</Tip>
|
||||
|
||||
### Greedy Search
|
||||
|
||||
[`generate`] uses greedy search decoding by default so you don't have to pass any parameters to enable it. This means the parameters `num_beams` is set to 1 and `do_sample=False`.
|
||||
@ -456,61 +482,5 @@ just like in multinomial sampling. However, in assisted decoding, reducing the t
|
||||
['Alice and Bob, a couple of friends of mine, who are both in the same office as']
|
||||
```
|
||||
|
||||
Alternatively, you can also set the `prompt_lookup_num_tokens` to trigger n-gram based assisted decoding, as opposed
|
||||
Alternativelly, you can also set the `prompt_lookup_num_tokens` to trigger n-gram based assisted decoding, as opposed
|
||||
to model based assisted decoding. You can read more about it [here](https://twitter.com/joao_gante/status/1747322413006643259).
|
||||
### DoLa Decoding
|
||||
|
||||
**D**ecoding by C**o**ntrasting **La**yers (DoLa) is a contrastive decoding strategy to improve the factuality and reduce the
|
||||
hallucinations of LLMs, as described in this paper of ICLR 2024 [DoLa: Decoding by Contrasting Layers Improves Factuality in Large Language Models](https://arxiv.org/abs/2309.03883).
|
||||
|
||||
DoLa is achieved by contrasting the differences in logits obtained from final
|
||||
layers versus earlier layers, thus amplify the factual knowledge localized to particular part of transformer layers.
|
||||
|
||||
Do the following two steps to activate DoLa decoding when calling the `model.generate` function:
|
||||
1. Set the `dola_layers` argument, which can be either a string or a list of integers.
|
||||
- If set to a string, it can be one of `low`, `high`.
|
||||
- If set to a list of integers, it should be a list of layer indices between 0 and the total number of layers in the model. The 0-th layer is word embedding, and the 1st layer is the first transformer layer, and so on.
|
||||
2. Set `repetition_penalty = 1.2` is suggested to reduce repetition in DoLa decoding.
|
||||
|
||||
See the following examples for DoLa decoding with the 32-layer LLaMA-7B model.
|
||||
|
||||
```python
|
||||
>>> from transformers import AutoTokenizer, AutoModelForCausalLM, set_seed
|
||||
>>> import torch
|
||||
|
||||
>>> tokenizer = AutoTokenizer.from_pretrained("huggyllama/llama-7b")
|
||||
>>> model = AutoModelForCausalLM.from_pretrained("huggyllama/llama-7b", torch_dtype=torch.float16)
|
||||
>>> device = 'cuda' if torch.cuda.is_available() else 'cpu'
|
||||
>>> model.to(device)
|
||||
>>> set_seed(42)
|
||||
|
||||
>>> text = "On what date was the Declaration of Independence officially signed?"
|
||||
>>> inputs = tokenizer(text, return_tensors="pt").to(device)
|
||||
|
||||
# Vanilla greddy decoding
|
||||
>>> vanilla_output = model.generate(**inputs, do_sample=False, max_new_tokens=50)
|
||||
>>> tokenizer.batch_decode(vanilla_output[:, inputs.input_ids.shape[-1]:], skip_special_tokens=True)
|
||||
['\nThe Declaration of Independence was signed on July 4, 1776.\nWhat was the date of the signing of the Declaration of Independence?\nThe Declaration of Independence was signed on July 4,']
|
||||
|
||||
# DoLa decoding with contrasting higher part of layers (layers 16,18,...,30)
|
||||
>>> dola_high_output = model.generate(**inputs, do_sample=False, max_new_tokens=50, dola_layers='high')
|
||||
>>> tokenizer.batch_decode(dola_high_output[:, inputs.input_ids.shape[-1]:], skip_special_tokens=True)
|
||||
['\nJuly 4, 1776, when the Continental Congress voted to separate from Great Britain. The 56 delegates to the Continental Congress signed the Declaration on August 2, 1776.']
|
||||
|
||||
# DoLa decoding with contrasting specific layers (layers 28 and 30)
|
||||
>>> dola_custom_output = model.generate(**inputs, do_sample=False, max_new_tokens=50, dola_layers=[28,30], repetition_penalty=1.2)
|
||||
>>> tokenizer.batch_decode(dola_custom_output[:, inputs.input_ids.shape[-1]:], skip_special_tokens=True)
|
||||
['\nIt was officially signed on 2 August 1776, when 56 members of the Second Continental Congress, representing the original 13 American colonies, voted unanimously for the resolution for independence. The 2']
|
||||
```
|
||||
|
||||
#### Understanding the `dola_layers` argument
|
||||
|
||||
`dola_layers` stands for the candidate layers in premature layer selection, as described in the DoLa paper. The selected premature layer will be contrasted with the final layer.
|
||||
|
||||
Setting `dola_layers` to `'low'` or `'high'` will select the lower or higher part of the layers to contrast, respectively.
|
||||
- For `N`-layer models with `N <= 40` layers, the layers of `range(0, N // 2, 2)` and `range(N // 2, N, 2)` are used for `'low'` and `'high'` layers, respectively.
|
||||
- For models with `N > 40` layers, the layers of `range(0, 20, 2)` and `range(N - 20, N, 2)` are used for `'low'` and `'high'` layers, respectively.
|
||||
- If the model has tied word embeddings, we skip the word embeddings (0-th) layer and start from the 2nd layer, as the early exit from word embeddings will become identity function.
|
||||
- Set the `dola_layers` to a list of integers for layer indices to contrast manually specified layers. For example, setting `dola_layers=[28,30]` will contrast the final layer (32-th layer) with the 28-th and 30-th layers.
|
||||
|
||||
The paper suggested that contrasting `'high'` layers to improve short-answer tasks like TruthfulQA, and contrasting `'low'` layers to improve all the other long-answer reasoning tasks, such as GSM8K, StrategyQA, FACTOR, and VicunaQA. Applying DoLa to smaller models like GPT-2 is not recommended, as the results shown in the Appendix N of the paper.
|
||||
|
||||
@ -46,30 +46,16 @@ The initial supported quantization types are decided according to the popular qu
|
||||
on the Hub.
|
||||
|
||||
- F32
|
||||
- F16
|
||||
- BF16
|
||||
- Q4_0
|
||||
- Q4_1
|
||||
- Q5_0
|
||||
- Q5_1
|
||||
- Q8_0
|
||||
- Q2_K
|
||||
- Q3_K
|
||||
- Q4_0
|
||||
- Q4_K
|
||||
- Q5_K
|
||||
- Q6_K
|
||||
- IQ1_S
|
||||
- IQ1_M
|
||||
- IQ2_XXS
|
||||
- IQ2_XS
|
||||
- IQ2_S
|
||||
- IQ3_XXS
|
||||
- IQ3_S
|
||||
- IQ4_XS
|
||||
- IQ4_NL
|
||||
- Q8_0
|
||||
|
||||
> [!NOTE]
|
||||
> To support gguf dequantization, `gguf>=0.10.0` installation is required.
|
||||
We take example from the excellent [99991/pygguf](https://github.com/99991/pygguf) Python parser to dequantize the
|
||||
weights.
|
||||
|
||||
### Supported model architectures
|
||||
|
||||
@ -78,8 +64,6 @@ For now the supported model architectures are the architectures that have been v
|
||||
- LLaMa
|
||||
- Mistral
|
||||
- Qwen2
|
||||
- Qwen2Moe
|
||||
- Phi3
|
||||
|
||||
## Example usage
|
||||
|
||||
|
||||
@ -139,7 +139,7 @@ reading the whole sentence with a mask to hide future tokens at a certain timest
|
||||
|
||||
### deep learning (DL)
|
||||
|
||||
Machine learning algorithms which use neural networks with several layers.
|
||||
Machine learning algorithms which uses neural networks with several layers.
|
||||
|
||||
## E
|
||||
|
||||
@ -519,4 +519,4 @@ A form of model training in which data provided to the model is not labeled. Uns
|
||||
Parallelism technique which performs sharding of the tensors somewhat similar to [TensorParallel](#tensor-parallelism-tp),
|
||||
except the whole tensor gets reconstructed in time for a forward or backward computation, therefore the model doesn't need
|
||||
to be modified. This method also supports various offloading techniques to compensate for limited GPU memory.
|
||||
Learn more about ZeRO [here](perf_train_gpu_many#zero-data-parallelism).
|
||||
Learn more about ZeRO [here](perf_train_gpu_many#zero-data-parallelism).
|
||||
@ -88,7 +88,6 @@ Flax), PyTorch, and/or TensorFlow.
|
||||
| [ByT5](model_doc/byt5) | ✅ | ✅ | ✅ |
|
||||
| [CamemBERT](model_doc/camembert) | ✅ | ✅ | ❌ |
|
||||
| [CANINE](model_doc/canine) | ✅ | ❌ | ❌ |
|
||||
| [Chameleon](model_doc/chameleon) | ✅ | ❌ | ❌ |
|
||||
| [Chinese-CLIP](model_doc/chinese_clip) | ✅ | ❌ | ❌ |
|
||||
| [CLAP](model_doc/clap) | ✅ | ❌ | ❌ |
|
||||
| [CLIP](model_doc/clip) | ✅ | ✅ | ✅ |
|
||||
@ -105,7 +104,6 @@ Flax), PyTorch, and/or TensorFlow.
|
||||
| [CPM-Ant](model_doc/cpmant) | ✅ | ❌ | ❌ |
|
||||
| [CTRL](model_doc/ctrl) | ✅ | ✅ | ❌ |
|
||||
| [CvT](model_doc/cvt) | ✅ | ✅ | ❌ |
|
||||
| [DAC](model_doc/dac) | ✅ | ❌ | ❌ |
|
||||
| [Data2VecAudio](model_doc/data2vec) | ✅ | ❌ | ❌ |
|
||||
| [Data2VecText](model_doc/data2vec) | ✅ | ❌ | ❌ |
|
||||
| [Data2VecVision](model_doc/data2vec) | ✅ | ✅ | ❌ |
|
||||
@ -121,7 +119,7 @@ Flax), PyTorch, and/or TensorFlow.
|
||||
| [DETR](model_doc/detr) | ✅ | ❌ | ❌ |
|
||||
| [DialoGPT](model_doc/dialogpt) | ✅ | ✅ | ✅ |
|
||||
| [DiNAT](model_doc/dinat) | ✅ | ❌ | ❌ |
|
||||
| [DINOv2](model_doc/dinov2) | ✅ | ❌ | ✅ |
|
||||
| [DINOv2](model_doc/dinov2) | ✅ | ❌ | ❌ |
|
||||
| [DistilBERT](model_doc/distilbert) | ✅ | ✅ | ✅ |
|
||||
| [DiT](model_doc/dit) | ✅ | ❌ | ✅ |
|
||||
| [DonutSwin](model_doc/donut) | ✅ | ❌ | ❌ |
|
||||
@ -137,7 +135,6 @@ Flax), PyTorch, and/or TensorFlow.
|
||||
| [ESM](model_doc/esm) | ✅ | ✅ | ❌ |
|
||||
| [FairSeq Machine-Translation](model_doc/fsmt) | ✅ | ❌ | ❌ |
|
||||
| [Falcon](model_doc/falcon) | ✅ | ❌ | ❌ |
|
||||
| [FalconMamba](model_doc/falcon_mamba) | ✅ | ❌ | ❌ |
|
||||
| [FastSpeech2Conformer](model_doc/fastspeech2_conformer) | ✅ | ❌ | ❌ |
|
||||
| [FLAN-T5](model_doc/flan-t5) | ✅ | ✅ | ✅ |
|
||||
| [FLAN-UL2](model_doc/flan-ul2) | ✅ | ✅ | ✅ |
|
||||
@ -148,7 +145,6 @@ Flax), PyTorch, and/or TensorFlow.
|
||||
| [Funnel Transformer](model_doc/funnel) | ✅ | ✅ | ❌ |
|
||||
| [Fuyu](model_doc/fuyu) | ✅ | ❌ | ❌ |
|
||||
| [Gemma](model_doc/gemma) | ✅ | ❌ | ✅ |
|
||||
| [Gemma2](model_doc/gemma2) | ✅ | ❌ | ❌ |
|
||||
| [GIT](model_doc/git) | ✅ | ❌ | ❌ |
|
||||
| [GLPN](model_doc/glpn) | ✅ | ❌ | ❌ |
|
||||
| [GPT Neo](model_doc/gpt_neo) | ✅ | ❌ | ✅ |
|
||||
@ -158,12 +154,10 @@ Flax), PyTorch, and/or TensorFlow.
|
||||
| [GPT-Sw3](model_doc/gpt-sw3) | ✅ | ✅ | ✅ |
|
||||
| [GPTBigCode](model_doc/gpt_bigcode) | ✅ | ❌ | ❌ |
|
||||
| [GPTSAN-japanese](model_doc/gptsan-japanese) | ✅ | ❌ | ❌ |
|
||||
| [Granite](model_doc/granite) | ✅ | ❌ | ❌ |
|
||||
| [Graphormer](model_doc/graphormer) | ✅ | ❌ | ❌ |
|
||||
| [Grounding DINO](model_doc/grounding-dino) | ✅ | ❌ | ❌ |
|
||||
| [GroupViT](model_doc/groupvit) | ✅ | ✅ | ❌ |
|
||||
| [HerBERT](model_doc/herbert) | ✅ | ✅ | ✅ |
|
||||
| [Hiera](model_doc/hiera) | ✅ | ❌ | ❌ |
|
||||
| [Hubert](model_doc/hubert) | ✅ | ✅ | ❌ |
|
||||
| [I-BERT](model_doc/ibert) | ✅ | ❌ | ❌ |
|
||||
| [IDEFICS](model_doc/idefics) | ✅ | ✅ | ❌ |
|
||||
@ -171,7 +165,6 @@ Flax), PyTorch, and/or TensorFlow.
|
||||
| [ImageGPT](model_doc/imagegpt) | ✅ | ❌ | ❌ |
|
||||
| [Informer](model_doc/informer) | ✅ | ❌ | ❌ |
|
||||
| [InstructBLIP](model_doc/instructblip) | ✅ | ❌ | ❌ |
|
||||
| [InstructBlipVideo](model_doc/instructblipvideo) | ✅ | ❌ | ❌ |
|
||||
| [Jamba](model_doc/jamba) | ✅ | ❌ | ❌ |
|
||||
| [JetMoe](model_doc/jetmoe) | ✅ | ❌ | ❌ |
|
||||
| [Jukebox](model_doc/jukebox) | ✅ | ❌ | ❌ |
|
||||
@ -188,8 +181,6 @@ Flax), PyTorch, and/or TensorFlow.
|
||||
| [Llama3](model_doc/llama3) | ✅ | ❌ | ✅ |
|
||||
| [LLaVa](model_doc/llava) | ✅ | ❌ | ❌ |
|
||||
| [LLaVA-NeXT](model_doc/llava_next) | ✅ | ❌ | ❌ |
|
||||
| [LLaVa-NeXT-Video](model_doc/llava_next_video) | ✅ | ❌ | ❌ |
|
||||
| [LLaVA-Onevision](model_doc/llava_onevision) | ✅ | ❌ | ❌ |
|
||||
| [Longformer](model_doc/longformer) | ✅ | ✅ | ❌ |
|
||||
| [LongT5](model_doc/longt5) | ✅ | ❌ | ✅ |
|
||||
| [LUKE](model_doc/luke) | ✅ | ❌ | ❌ |
|
||||
@ -198,7 +189,6 @@ Flax), PyTorch, and/or TensorFlow.
|
||||
| [M2M100](model_doc/m2m_100) | ✅ | ❌ | ❌ |
|
||||
| [MADLAD-400](model_doc/madlad-400) | ✅ | ✅ | ✅ |
|
||||
| [Mamba](model_doc/mamba) | ✅ | ❌ | ❌ |
|
||||
| [mamba2](model_doc/mamba2) | ✅ | ❌ | ❌ |
|
||||
| [Marian](model_doc/marian) | ✅ | ✅ | ✅ |
|
||||
| [MarkupLM](model_doc/markuplm) | ✅ | ❌ | ❌ |
|
||||
| [Mask2Former](model_doc/mask2former) | ✅ | ❌ | ❌ |
|
||||
@ -227,14 +217,12 @@ Flax), PyTorch, and/or TensorFlow.
|
||||
| [MusicGen Melody](model_doc/musicgen_melody) | ✅ | ❌ | ❌ |
|
||||
| [MVP](model_doc/mvp) | ✅ | ❌ | ❌ |
|
||||
| [NAT](model_doc/nat) | ✅ | ❌ | ❌ |
|
||||
| [Nemotron](model_doc/nemotron) | ✅ | ❌ | ❌ |
|
||||
| [Nezha](model_doc/nezha) | ✅ | ❌ | ❌ |
|
||||
| [NLLB](model_doc/nllb) | ✅ | ❌ | ❌ |
|
||||
| [NLLB-MOE](model_doc/nllb-moe) | ✅ | ❌ | ❌ |
|
||||
| [Nougat](model_doc/nougat) | ✅ | ✅ | ✅ |
|
||||
| [Nyströmformer](model_doc/nystromformer) | ✅ | ❌ | ❌ |
|
||||
| [OLMo](model_doc/olmo) | ✅ | ❌ | ❌ |
|
||||
| [OLMoE](model_doc/olmoe) | ✅ | ❌ | ❌ |
|
||||
| [OneFormer](model_doc/oneformer) | ✅ | ❌ | ❌ |
|
||||
| [OpenAI GPT](model_doc/openai-gpt) | ✅ | ✅ | ❌ |
|
||||
| [OpenAI GPT-2](model_doc/gpt2) | ✅ | ✅ | ✅ |
|
||||
@ -253,7 +241,6 @@ Flax), PyTorch, and/or TensorFlow.
|
||||
| [Phi3](model_doc/phi3) | ✅ | ❌ | ❌ |
|
||||
| [PhoBERT](model_doc/phobert) | ✅ | ✅ | ✅ |
|
||||
| [Pix2Struct](model_doc/pix2struct) | ✅ | ❌ | ❌ |
|
||||
| [Pixtral](model_doc/pixtral) | ❌ | ❌ | ❌ |
|
||||
| [PLBart](model_doc/plbart) | ✅ | ❌ | ❌ |
|
||||
| [PoolFormer](model_doc/poolformer) | ✅ | ❌ | ❌ |
|
||||
| [Pop2Piano](model_doc/pop2piano) | ✅ | ❌ | ❌ |
|
||||
@ -262,9 +249,7 @@ Flax), PyTorch, and/or TensorFlow.
|
||||
| [PVTv2](model_doc/pvt_v2) | ✅ | ❌ | ❌ |
|
||||
| [QDQBert](model_doc/qdqbert) | ✅ | ❌ | ❌ |
|
||||
| [Qwen2](model_doc/qwen2) | ✅ | ❌ | ❌ |
|
||||
| [Qwen2Audio](model_doc/qwen2_audio) | ✅ | ❌ | ❌ |
|
||||
| [Qwen2MoE](model_doc/qwen2_moe) | ✅ | ❌ | ❌ |
|
||||
| [Qwen2VL](model_doc/qwen2_vl) | ✅ | ❌ | ❌ |
|
||||
| [RAG](model_doc/rag) | ✅ | ✅ | ❌ |
|
||||
| [REALM](model_doc/realm) | ✅ | ❌ | ❌ |
|
||||
| [RecurrentGemma](model_doc/recurrent_gemma) | ✅ | ❌ | ❌ |
|
||||
@ -277,8 +262,6 @@ Flax), PyTorch, and/or TensorFlow.
|
||||
| [RoBERTa-PreLayerNorm](model_doc/roberta-prelayernorm) | ✅ | ✅ | ✅ |
|
||||
| [RoCBert](model_doc/roc_bert) | ✅ | ❌ | ❌ |
|
||||
| [RoFormer](model_doc/roformer) | ✅ | ✅ | ✅ |
|
||||
| [RT-DETR](model_doc/rt_detr) | ✅ | ❌ | ❌ |
|
||||
| [RT-DETR-ResNet](model_doc/rt_detr_resnet) | ✅ | ❌ | ❌ |
|
||||
| [RWKV](model_doc/rwkv) | ✅ | ❌ | ❌ |
|
||||
| [SAM](model_doc/sam) | ✅ | ✅ | ❌ |
|
||||
| [SeamlessM4T](model_doc/seamless_m4t) | ✅ | ❌ | ❌ |
|
||||
@ -355,6 +338,5 @@ Flax), PyTorch, and/or TensorFlow.
|
||||
| [XLSR-Wav2Vec2](model_doc/xlsr_wav2vec2) | ✅ | ✅ | ✅ |
|
||||
| [YOLOS](model_doc/yolos) | ✅ | ❌ | ❌ |
|
||||
| [YOSO](model_doc/yoso) | ✅ | ❌ | ❌ |
|
||||
| [ZoeDepth](model_doc/zoedepth) | ✅ | ❌ | ❌ |
|
||||
|
||||
<!-- End table-->
|
||||
|
||||
@ -71,7 +71,7 @@ pip install 'transformers[tf-cpu]'
|
||||
|
||||
M1 / ARM Users
|
||||
|
||||
You will need to install the following before installing TensorFlow 2.0
|
||||
You will need to install the following before installing TensorFLow 2.0
|
||||
```bash
|
||||
brew install cmake
|
||||
brew install pkg-config
|
||||
|
||||
@ -140,6 +140,9 @@ generation.
|
||||
[[autodoc]] ForcedEOSTokenLogitsProcessor
|
||||
- __call__
|
||||
|
||||
[[autodoc]] ForceTokensLogitsProcessor
|
||||
- __call__
|
||||
|
||||
[[autodoc]] HammingDiversityLogitsProcessor
|
||||
- __call__
|
||||
|
||||
@ -155,6 +158,9 @@ generation.
|
||||
[[autodoc]] LogitsProcessorList
|
||||
- __call__
|
||||
|
||||
[[autodoc]] LogitsWarper
|
||||
- __call__
|
||||
|
||||
[[autodoc]] MinLengthLogitsProcessor
|
||||
- __call__
|
||||
|
||||
@ -380,43 +386,14 @@ A [`Constraint`] can be used to force the generation to include specific tokens
|
||||
- get_seq_length
|
||||
- reorder_cache
|
||||
|
||||
[[autodoc]] OffloadedCache
|
||||
- update
|
||||
- prefetch_layer
|
||||
- evict_previous_layer
|
||||
|
||||
[[autodoc]] StaticCache
|
||||
- update
|
||||
- get_seq_length
|
||||
- reset
|
||||
|
||||
[[autodoc]] OffloadedStaticCache
|
||||
- update
|
||||
- get_seq_length
|
||||
- reset
|
||||
|
||||
[[autodoc]] HybridCache
|
||||
- update
|
||||
- get_seq_length
|
||||
- reset
|
||||
|
||||
[[autodoc]] SlidingWindowCache
|
||||
- update
|
||||
- reset
|
||||
|
||||
[[autodoc]] EncoderDecoderCache
|
||||
- get_seq_length
|
||||
- to_legacy_cache
|
||||
- from_legacy_cache
|
||||
- reset
|
||||
- reorder_cache
|
||||
|
||||
[[autodoc]] MambaCache
|
||||
- update_conv_state
|
||||
- update_ssm_state
|
||||
- reset
|
||||
|
||||
## Watermark Utils
|
||||
|
||||
[[autodoc]] WatermarkDetector
|
||||
- __call__
|
||||
|
||||
|
||||
@ -1,403 +0,0 @@
|
||||
<!--Copyright 2024 The HuggingFace Team. All rights reserved.
|
||||
|
||||
Licensed under the Apache License, Version 2.0 (the "License"); you may not use this file except in compliance with
|
||||
the License. You may obtain a copy of the License at
|
||||
|
||||
http://www.apache.org/licenses/LICENSE-2.0
|
||||
|
||||
Unless required by applicable law or agreed to in writing, software distributed under the License is distributed on
|
||||
an "AS IS" BASIS, WITHOUT WARRANTIES OR CONDITIONS OF ANY KIND, either express or implied. See the License for the
|
||||
specific language governing permissions and limitations under the License.
|
||||
|
||||
⚠️ Note that this file is in Markdown but contain specific syntax for our doc-builder (similar to MDX) that may not be
|
||||
rendered properly in your Markdown viewer.
|
||||
|
||||
-->
|
||||
|
||||
# Best Practices for Generation with Cache
|
||||
|
||||
Efficient caching is crucial for optimizing the performance of models in various generative tasks,
|
||||
including text generation, translation, summarization and other transformer-based applications.
|
||||
Effective caching helps reduce computation time and improve response rates, especially in real-time or resource-intensive applications.
|
||||
|
||||
Transformers support various caching methods, leveraging "Cache" classes to abstract and manage the caching logic.
|
||||
This document outlines best practices for using these classes to maximize performance and efficiency.
|
||||
Check out all the available `Cache` classes in the [API documentation](./internal/generation_utils).
|
||||
|
||||
## What is Cache and why we should care?
|
||||
|
||||
Imagine you’re having a conversation with someone, and instead of remembering what was said previously, you have to start from scratch every time you respond. This would be slow and inefficient, right? In the world of Transformer models, a similar concept applies, and that's where Caching keys and values come into play. From now on, I'll refer to the concept as KV Cache.
|
||||
|
||||
KV cache is needed to optimize the generation in autoregressive models, where the model predicts text token by token. This process can be slow since the model can generate only one token at a time, and each new prediction is dependent on the previous context. That means, to predict token number 1000 in the generation, you need information from the previous 999 tokens, which comes in the form of some matrix multiplications across the representations of those tokens. But to predict token number 1001, you also need the same information from the first 999 tokens, plus additional information from token number 1000. That is where key-value cache is used to optimize the sequential generation process by storing previous calculations to reuse in subsequent tokens, so they don't need to be computed again.
|
||||
|
||||
More concretely, key-value cache acts as a memory bank for these generative models, where the model stores key-value pairs derived from self-attention layers for previously processed tokens. By storing this information, the model can avoid redundant computations and instead retrieve keys and values of previous tokens from the cache. Note that caching can be used only in inference and should be disabled when training, otherwise it might cause unexpected errors.
|
||||
|
||||
<details>
|
||||
<summary><em>For the Curious Minds Who Like to Dive Deep</em></summary>
|
||||
|
||||
### Under the Hood: How Cache Object Works in Attention Mechanism
|
||||
|
||||
When utilizing a cache object in the input, the Attention module performs several critical steps to integrate past and present information seamlessly.
|
||||
|
||||
The Attention module concatenates the current key-values with the past key-values stored in the cache. This results in attention weights of shape `(new_tokens_length, past_kv_length + new_tokens_length)`. Essentially, the past and current key-values are combined to compute attention scores, ensuring that the model considers both previous context and new input. The concatenated key-values are used to compute the attention scores resulting in attention weights of shape `(new_tokens_length, past_kv_length + new_tokens_length)`.
|
||||
|
||||
Therefore, when iteratively calling `forward()` instead of the `generate()` method, it’s crucial to ensure that the attention mask shape matches the combined length of past and current key-values. The attention mask should have the shape `(batch_size, past_kv_length + new_tokens_length)`. This is usually handled internally when you call `generate()` method. If you want to implement your own generation loop with Cache classes, take this into consideration and prepare the attention mask to hold values to current and past tokens.
|
||||
|
||||
<Tip warning={true}>
|
||||
|
||||
One important concept you need to know when writing your own generation loop, is `cache_position`. In case you want to reuse an already filled Cache object by calling `forward()`, you have to pass in a valid `cache_position` which will indicate the positions of inputs in the sequence. Note that `cache_position` is not affected by padding, and always adds one more position for each token. For example, if key/value cache contains 10 tokens (no matter how many of it is a pad token), the cache position for the next token should be `torch.tensor([10])`.
|
||||
|
||||
</Tip>
|
||||
|
||||
|
||||
See an example below for how to implement your own generation loop.
|
||||
|
||||
```python
|
||||
>>> import torch
|
||||
>>> from transformers import AutoTokenizer, AutoModelForCausalLM, DynamicCache
|
||||
|
||||
>>> model_id = "meta-llama/Llama-2-7b-chat-hf"
|
||||
>>> model = AutoModelForCausalLM.from_pretrained(model_id, torch_dtype=torch.bfloat16, device_map="cuda:0")
|
||||
>>> tokenizer = AutoTokenizer.from_pretrained(model_id)
|
||||
|
||||
>>> past_key_values = DynamicCache()
|
||||
>>> messages = [{"role": "user", "content": "Hello, what's your name."}]
|
||||
>>> inputs = tokenizer.apply_chat_template(messages, add_generation_prompt=True, return_tensors="pt", return_dict=True).to("cuda:0")
|
||||
|
||||
>>> generated_ids = inputs.input_ids
|
||||
>>> cache_position = torch.arange(inputs.input_ids.shape[1], dtype=torch.int64, device="cuda:0")
|
||||
>>> max_new_tokens = 10
|
||||
|
||||
>>> for _ in range(max_new_tokens):
|
||||
... outputs = model(**inputs, cache_position=cache_position, past_key_values=past_key_values, use_cache=True)
|
||||
... # Greedily sample one next token
|
||||
... next_token_ids = outputs.logits[:, -1:].argmax(-1)
|
||||
... generated_ids = torch.cat([generated_ids, next_token_ids], dim=-1)
|
||||
...
|
||||
... # Prepare inputs for the next generation step by leaaving unprocessed tokens, in our case we have only one new token
|
||||
... # and expanding attn mask for the new token, as explained above
|
||||
... attention_mask = inputs["attention_mask"]
|
||||
... attention_mask = torch.cat([attention_mask, attention_mask.new_ones((attention_mask.shape[0], 1))], dim=-1)
|
||||
... inputs = {"input_ids": next_token_ids, "attention_mask": attention_mask}
|
||||
... cache_position = cache_position[-1:] + 1 # add one more position for the next token
|
||||
|
||||
>>> print(tokenizer.batch_decode(generated_ids, skip_special_tokens=True)[0])
|
||||
"[INST] Hello, what's your name. [/INST] Hello! My name is LLaMA,"
|
||||
```
|
||||
|
||||
</details>
|
||||
|
||||
|
||||
|
||||
## Generate with Cache
|
||||
|
||||
In 🤗 Transformers, we support various Cache types to optimize the performance across different models and tasks. By default, all models generate with caching,
|
||||
with the [`~DynamicCache`] class being the default cache for most models. It allows us to dynamically grow cache size, by saving more and more keys and values as we generate. If for some reason you don't want to use caches, you can pass `use_cache=False` into the `generate()` method.
|
||||
|
||||
Refer to the table below to see the difference between cache types and choose the one that suits best for your use-case. Models for which initialization is recommended should be initialized before calling the model and passed to model as a kwarg. In all other cases you can simply define desired `cache_implementation` and we take care of the rest for you.
|
||||
|
||||
| Cache Type | Memory Efficient | Supports torch.compile() | Initialization Recommended | Latency | Long Context Generation |
|
||||
|------------------------|------------------|--------------------------|----------------------------|---------|-------------------------|
|
||||
| Dynamic Cache | No | No | No | Mid | No |
|
||||
| Static Cache | No | Yes | Yes | High | No |
|
||||
| Offloaded Cache | Yes | No | No | Low | Yes |
|
||||
| Offloaded Static Cache | No | Yes | Yes | High | Yes |
|
||||
| Quantized Cache | Yes | No | No | Low | Yes |
|
||||
| Sliding Window Cache | No | Yes | Yes | High | No |
|
||||
| Sink Cache | Yes | No | Yes | Mid | Yes |
|
||||
|
||||
|
||||
These cache classes can be set with a `cache_implementation` argument when generating. To learn about the available options for the cache_implementation flag, please refer to the [API Documentation](./main_classes/text_generation#transformers.GenerationConfig). Now, let's explore each cache type in detail and see how to use them. Note that the below examples are for decoder-only Tranformer-based models. We also support ["Model-Specific Cache"] classes for models such as Mamba or Jamba, keep reading for more details.
|
||||
|
||||
### Quantized Cache
|
||||
|
||||
The key and value cache can occupy a large portion of memory, becoming a [bottleneck for long-context generation](https://huggingface.co/blog/llama31#inference-memory-requirements), especially for Large Language Models.
|
||||
Quantizing the cache when using `generate()` can significantly reduce memory requirements at the cost of speed.
|
||||
|
||||
KV Cache quantization in `transformers` is largely inspired by the paper ["KIVI: A Tuning-Free Asymmetric 2bit Quantization for KV Cache"](https://arxiv.org/abs/2402.02750) and currently supports [`~QuantoQuantizedCache`] and [`~HQQQuantizedCache`] classes. For more information on the inner workings see the paper.
|
||||
|
||||
To enable quantization of the key-value cache, one needs to indicate `cache_implementation="quantized"` in the `generation_config`.
|
||||
Quantization related arguments should be passed to the `generation_config` either as a `dict` or an instance of a [`~QuantizedCacheConfig`] class.
|
||||
One has to indicate which quantization backend to use in the [`~QuantizedCacheConfig`], the default is `quanto`.
|
||||
|
||||
It is recommended to set `axis-key/axis-value` parameters in the cache config to `0` if you're using the `quanto` backend and to `1` if you're using the `HQQ` backend. For other config values, please use the defaults unless you're running out of memory. In that case, you may consider decreasing the residual length.
|
||||
|
||||
<Tip warning={true}>
|
||||
|
||||
Cache quantization can be detrimental in terms of latency if the context length is short and there is enough GPU VRAM available to run without cache quantization. It is recommended to seek balance between memory efficiency and latency.
|
||||
</Tip>
|
||||
|
||||
|
||||
```python
|
||||
>>> import torch
|
||||
>>> from transformers import AutoTokenizer, AutoModelForCausalLM
|
||||
|
||||
>>> tokenizer = AutoTokenizer.from_pretrained("meta-llama/Llama-2-7b-chat-hf")
|
||||
>>> model = AutoModelForCausalLM.from_pretrained("meta-llama/Llama-2-7b-chat-hf", torch_dtype=torch.float16).to("cuda:0")
|
||||
>>> inputs = tokenizer("I like rock music because", return_tensors="pt").to(model.device)
|
||||
|
||||
>>> out = model.generate(**inputs, do_sample=False, max_new_tokens=20, cache_implementation="quantized", cache_config={"nbits": 4, "backend": "quanto"})
|
||||
>>> print(tokenizer.batch_decode(out, skip_special_tokens=True)[0])
|
||||
I like rock music because it's loud and energetic. It's a great way to express myself and rel
|
||||
|
||||
>>> out = model.generate(**inputs, do_sample=False, max_new_tokens=20)
|
||||
>>> print(tokenizer.batch_decode(out, skip_special_tokens=True)[0])
|
||||
I like rock music because it's loud and energetic. I like to listen to it when I'm feeling
|
||||
```
|
||||
|
||||
### Offloaded Cache
|
||||
|
||||
Similarly to KV cache quantization, [`~OffloadedCache`] strategy aims to reduce GPU VRAM usage.
|
||||
It does so by moving the KV cache for most layers to the CPU.
|
||||
As the model's `forward()` method iterates over the layers, this strategy maintains the current layer cache on the GPU.
|
||||
At the same time it asynchronously prefetches the next layer cache as well as sending the previous layer cache back to the CPU.
|
||||
Unlike KV cache quantization, this strategy always produces the same result as the default KV cache implementation.
|
||||
Thus, it can serve as a drop-in replacement or a fallback for it.
|
||||
|
||||
Depending on your model and the characteristics of your generation task (size of context, number of generated tokens, number of beams, etc.)
|
||||
you may notice a small degradation in generation throughput compared to the default KV cache implementation.
|
||||
|
||||
To enable KV cache offloading, pass `cache_implementation="offloaded"` in the `generation_config` or directly to the `generate()` call.
|
||||
Use `cache_implementation="offloaded_static"` for an offloaded static cache (see also [Offloaded Static Cache](#offloaded-static-cache) below).
|
||||
|
||||
```python
|
||||
>>> import torch
|
||||
>>> from transformers import AutoTokenizer, AutoModelForCausalLM
|
||||
>>> ckpt = "microsoft/Phi-3-mini-4k-instruct"
|
||||
|
||||
>>> tokenizer = AutoTokenizer.from_pretrained(ckpt)
|
||||
>>> model = AutoModelForCausalLM.from_pretrained(ckpt, torch_dtype=torch.float16).to("cuda:0")
|
||||
>>> inputs = tokenizer("Fun fact: The shortest", return_tensors="pt").to(model.device)
|
||||
|
||||
>>> out = model.generate(**inputs, do_sample=False, max_new_tokens=23, cache_implementation="offloaded")
|
||||
>>> print(tokenizer.batch_decode(out, skip_special_tokens=True)[0])
|
||||
Fun fact: The shortest war in history was between Britain and Zanzibar on August 27, 1896.
|
||||
|
||||
>>> out = model.generate(**inputs, do_sample=False, max_new_tokens=23)
|
||||
>>> print(tokenizer.batch_decode(out, skip_special_tokens=True)[0])
|
||||
Fun fact: The shortest war in history was between Britain and Zanzibar on August 27, 1896.
|
||||
```
|
||||
|
||||
<Tip warning={true}>
|
||||
|
||||
Cache offloading requires a GPU and can be slower than dynamic KV cache. Use it if you are getting CUDA out of memory errors.
|
||||
|
||||
</Tip>
|
||||
|
||||
The example below shows how KV cache offloading can be used as a fallback strategy.
|
||||
```python
|
||||
>>> import torch
|
||||
>>> from transformers import AutoTokenizer, AutoModelForCausalLM
|
||||
>>> def resilient_generate(model, *args, **kwargs):
|
||||
... oom = False
|
||||
... try:
|
||||
... return model.generate(*args, **kwargs)
|
||||
... except torch.cuda.OutOfMemoryError as e:
|
||||
... print(e)
|
||||
... print("retrying with cache_implementation='offloaded'")
|
||||
... oom = True
|
||||
... if oom:
|
||||
... torch.cuda.empty_cache()
|
||||
... kwargs["cache_implementation"] = "offloaded"
|
||||
... return model.generate(*args, **kwargs)
|
||||
...
|
||||
...
|
||||
>>> ckpt = "microsoft/Phi-3-mini-4k-instruct"
|
||||
>>> tokenizer = AutoTokenizer.from_pretrained(ckpt)
|
||||
>>> model = AutoModelForCausalLM.from_pretrained(ckpt, torch_dtype=torch.float16).to("cuda:0")
|
||||
>>> prompt = ["okay "*1000 + "Fun fact: The most"]
|
||||
>>> inputs = tokenizer(prompt, return_tensors="pt").to(model.device)
|
||||
>>> beams = { "num_beams": 40, "num_beam_groups": 40, "num_return_sequences": 40, "diversity_penalty": 1.0, "max_new_tokens": 23, "early_stopping": True, }
|
||||
>>> out = resilient_generate(model, **inputs, **beams)
|
||||
>>> responses = tokenizer.batch_decode(out[:,-28:], skip_special_tokens=True)
|
||||
```
|
||||
|
||||
On a GPU with 50 GB of RAM, running this code will print
|
||||
```
|
||||
CUDA out of memory. Tried to allocate 4.83 GiB. GPU
|
||||
retrying with cache_implementation='offloaded'
|
||||
```
|
||||
before successfully generating 40 beams.
|
||||
|
||||
|
||||
### Static Cache
|
||||
|
||||
Since the "DynamicCache" dynamically grows with each generation step, it prevents you from taking advantage of JIT optimizations. The [`~StaticCache`] pre-allocates
|
||||
a specific maximum size for the keys and values, allowing you to generate up to the maximum length without having to modify cache size. Check the below usage example.
|
||||
|
||||
For more examples with Static Cache and JIT compilation, take a look at [StaticCache & torchcompile](./llm_optims#static-kv-cache-and-torchcompile)
|
||||
|
||||
```python
|
||||
>>> import torch
|
||||
>>> from transformers import AutoTokenizer, AutoModelForCausalLM
|
||||
|
||||
>>> tokenizer = AutoTokenizer.from_pretrained("meta-llama/Llama-2-7b-chat-hf")
|
||||
>>> model = AutoModelForCausalLM.from_pretrained("meta-llama/Llama-2-7b-chat-hf", torch_dtype=torch.float16, device_map="auto")
|
||||
>>> inputs = tokenizer("Hello, my name is", return_tensors="pt").to(model.device)
|
||||
|
||||
>>> # simply pass the cache implementation="static"
|
||||
>>> out = model.generate(**inputs, do_sample=False, max_new_tokens=20, cache_implementation="static")
|
||||
>>> tokenizer.batch_decode(out, skip_special_tokens=True)[0]
|
||||
"Hello, my name is [Your Name], and I am a [Your Profession] with [Number of Years] of"
|
||||
```
|
||||
|
||||
|
||||
## Offloaded Static Cache
|
||||
|
||||
Like [`~OffloadedCache`] exists for offloading a "DynamicCache", there is also an offloaded static cache. It fully supports
|
||||
JIT optimizations. Just pass `cache_implementation="offloaded_static"` in the `generation_config` or directly to the `generate()` call.
|
||||
This will use the [`~OffloadedStaticCache`] implementation instead.
|
||||
|
||||
```python
|
||||
>>> import torch
|
||||
>>> from transformers import AutoTokenizer, AutoModelForCausalLM
|
||||
|
||||
>>> tokenizer = AutoTokenizer.from_pretrained("meta-llama/Llama-2-7b-chat-hf")
|
||||
>>> model = AutoModelForCausalLM.from_pretrained("meta-llama/Llama-2-7b-chat-hf", torch_dtype=torch.float16, device_map="auto")
|
||||
>>> inputs = tokenizer("Hello, my name is", return_tensors="pt").to(model.device)
|
||||
|
||||
>>> # simply pass the cache implementation="static"
|
||||
>>> out = model.generate(**inputs, do_sample=False, max_new_tokens=20, cache_implementation="offloaded_static")
|
||||
>>> tokenizer.batch_decode(out, skip_special_tokens=True)[0]
|
||||
"Hello, my name is [Your Name], and I am a [Your Profession] with [Number of Years] of"
|
||||
```
|
||||
|
||||
|
||||
### Sliding Window Cache
|
||||
|
||||
As the name suggests, this cache type implements a sliding window over previous keys and values, retaining only the last `sliding_window` tokens. It should be used with models like Mistral that support sliding window attention. Additionally, similar to Static Cache, this one is JIT-friendly and can be used with the same compile tecniques as Static Cache.
|
||||
|
||||
Note that you can use this cache only for models that support sliding window, e.g. Mistral models.
|
||||
|
||||
|
||||
```python
|
||||
>>> import torch
|
||||
>>> from transformers import AutoTokenizer, AutoModelForCausalLM, SinkCache
|
||||
|
||||
>>> tokenizer = AutoTokenizer.from_pretrained("mistralai/Mistral-7B-v0.1")
|
||||
>>> model = AutoModelForCausalLM.from_pretrained("mistralai/Mistral-7B-v0.1", torch_dtype=torch.float16).to("cuda:0")
|
||||
>>> inputs = tokenizer("Yesterday I was on a rock concert and.", return_tensors="pt").to(model.device)
|
||||
|
||||
>>> # can be used by passing in cache implementation
|
||||
>>> out = model.generate(**inputs, do_sample=False, max_new_tokens=30, cache_implementation="sliding_window")
|
||||
>>> tokenizer.batch_decode(out, skip_special_tokens=True)[0]
|
||||
"Yesterday I was on a rock concert and. I was so excited to see my favorite band. I was so excited that I was jumping up and down and screaming. I was so excited that I"
|
||||
```
|
||||
|
||||
### Sink Cache
|
||||
|
||||
Sink Cache was introduced in ["Efficient Streaming Language Models with Attention Sinks"](https://arxiv.org/abs/2309.17453). It allows you to generate long sequences of text ("infinite length" according to the paper) without any fine-tuning. That is achieved by smart handling of previous keys and values, specifically it retains a few initial tokens from the sequence, called "sink tokens". This is based on the observation that these initial tokens attract a significant portion of attention scores during the generation process. Tokens that come after "sink tokens" are discarded on a sliding windowed basis, keeping only the latest `window_size` tokens. By keeping these initial tokens as "attention sinks," the model maintains stable performance even when dealing with very long texts, thus discarding most of the previous knowledge.
|
||||
|
||||
Unlike other cache classes, this one can't be used directly by indicating a `cache_implementation`. You have to initialize the Cache before calling on `generate()` as follows.
|
||||
|
||||
```python
|
||||
>>> import torch
|
||||
>>> from transformers import AutoTokenizer, AutoModelForCausalLM, SinkCache
|
||||
|
||||
>>> tokenizer = AutoTokenizer.from_pretrained("meta-llama/Llama-2-7b-chat-hf")
|
||||
>>> model = AutoModelForCausalLM.from_pretrained("meta-llama/Llama-2-7b-chat-hf", torch_dtype=torch.float16).to("cuda:0")
|
||||
>>> inputs = tokenizer("This is a long story about unicorns, fairies and magic.", return_tensors="pt").to(model.device)
|
||||
|
||||
>>> # get our cache, specify number of sink tokens and window size
|
||||
>>> # Note that window size already includes sink tokens, so has to be larger
|
||||
>>> past_key_values = SinkCache(window_length=256, num_sink_tokens=4)
|
||||
>>> out = model.generate(**inputs, do_sample=False, max_new_tokens=30, past_key_values=past_key_values)
|
||||
>>> tokenizer.batch_decode(out, skip_special_tokens=True)[0]
|
||||
"This is a long story about unicorns, fairies and magic. It is a fantasy world where unicorns and fairies live together in harmony. The story follows a young girl named Lily"
|
||||
```
|
||||
|
||||
### Encoder-Decoder Cache
|
||||
|
||||
The [`~EncoderDecoderCache`] is a wrapper designed to handle the caching needs of encoder-decoder models. This cache type is specifically built to manage both self-attention and cross-attention caches, ensuring storage and retrieval of past key/values required for these complex models. Cool thing about Encoder-Decoder Cache is that you can set different cache types for the encoder and for the decoder, depending on your use case. Currently this cache is only supported in [Whisper](./model_doc/whisper) models but we will be adding more models soon.
|
||||
|
||||
In terms of usage, there is nothing special to be done and calling `generate()` or `forward()` will handle everything for you.
|
||||
|
||||
|
||||
### Model-specific Cache Classes
|
||||
|
||||
Some models require storing previous keys, values, or states in a specific way, and the above cache classes cannot be used. For such cases, we have several specialized cache classes that are designed for specific models. These models only accept their own dedicated cache classes and do not support using any other cache types. Some examples include [`~HybridCache`] for [Gemma2](./model_doc/gemma2) series models or [`~MambaCache`] for [Mamba](./model_doc/mamba) architecture models.
|
||||
|
||||
|
||||
## Iterative Generation with Cache
|
||||
|
||||
We have seen how to use each of the cache types when generating. What if you want to use cache in iterative generation setting, for example in applications like chatbots, where interactions involve multiple turns and continuous back-and-forth exchanges. Iterative generation with cache allows these systems to handle ongoing conversations effectively without reprocessing the entire context at each step. But there are some tips that you should know before you start implementing:
|
||||
|
||||
The general format when doing iterative generation is as below. First you have to initialize an empty cache of the type you want, and you can start feeding in new prompts iteratively. Keeping track of dialogues history and formatting can be done with chat templates, read more on that in [chat_templating](./chat_templating)
|
||||
|
||||
In case you are using Sink Cache, you have to crop your inputs to that maximum length because Sink Cache can generate text longer than its maximum window size, but it expects the first input to not exceed the maximum cache length.
|
||||
|
||||
|
||||
```python
|
||||
>>> import torch
|
||||
>>> from transformers import AutoTokenizer,AutoModelForCausalLM
|
||||
>>> from transformers.cache_utils import (
|
||||
>>> DynamicCache,
|
||||
>>> SinkCache,
|
||||
>>> StaticCache,
|
||||
>>> SlidingWindowCache,
|
||||
>>> QuantoQuantizedCache,
|
||||
>>> QuantizedCacheConfig,
|
||||
>>> )
|
||||
|
||||
>>> model_id = "meta-llama/Llama-2-7b-chat-hf"
|
||||
>>> model = AutoModelForCausalLM.from_pretrained(model_id, torch_dtype=torch.bfloat16, device_map='auto')
|
||||
>>> tokenizer = AutoTokenizer.from_pretrained(model_id)
|
||||
|
||||
>>> user_prompts = ["Hello, what's your name?", "Btw, yesterday I was on a rock concert."]
|
||||
|
||||
>>> past_key_values = DynamicCache()
|
||||
>>> max_cache_length = past_key_values.get_max_length()
|
||||
|
||||
>>> messages = []
|
||||
>>> for prompt in user_prompts:
|
||||
... messages.append({"role": "user", "content": prompt})
|
||||
... inputs = tokenizer.apply_chat_template(messages, add_generation_prompt=True, return_tensors="pt", return_dict=True).to(model.device)
|
||||
... if isinstance(past_key_values, SinkCache):
|
||||
... inputs = {k: v[:, -max_cache_length:] for k, v in inputs.items()}
|
||||
...
|
||||
... input_length = inputs["input_ids"].shape[1]
|
||||
...
|
||||
... outputs = model.generate(**inputs, do_sample=False, max_new_tokens=256, past_key_values=past_key_values)
|
||||
... completion = tokenizer.decode(outputs[0, input_length: ], skip_special_tokens=True)
|
||||
... messages.append({"role": "assistant", "content": completion})
|
||||
|
||||
print(messages)
|
||||
[{'role': 'user', 'content': "Hello, what's your name?"}, {'role': 'assistant', 'content': " Hello! My name is LLaMA, I'm a large language model trained by a team of researcher at Meta AI. 😊"}, {'role': 'user', 'content': 'Btw, yesterday I was on a rock concert.'}, {'role': 'assistant', 'content': ' Oh, cool! That sounds like a lot of fun! 🎉 Did you enjoy the concert? What was the band like? 🤔'}]
|
||||
```
|
||||
|
||||
|
||||
## Re-use Cache to continue generation
|
||||
|
||||
Sometimes you would want to first fill-in cache object with key/values for certain prefix prompt and re-use it several times to generate different sequences from it. In that case you can construct a `Cache` object that will hold the instruction prompt, and re-use it several times with different text sequences.
|
||||
|
||||
```python
|
||||
>>> import copy
|
||||
>>> import torch
|
||||
>>> from transformers import AutoModelForCausalLM, AutoTokenizer, DynamicCache, StaticCache
|
||||
|
||||
>>> model_id = "meta-llama/Llama-2-7b-chat-hf"
|
||||
>>> model = AutoModelForCausalLM.from_pretrained(model_id, torch_dtype=torch.bfloat16, device_map="cuda")
|
||||
>>> tokenizer = AutoTokenizer.from_pretrained(model_id)
|
||||
|
||||
>>> # Init StaticCache with big enough max-length (1024 tokens for the below example)
|
||||
>>> # You can also init a DynamicCache, if that suits you better
|
||||
>>> prompt_cache = StaticCache(config=model.config, max_batch_size=1, max_cache_len=1024, device="cuda", dtype=torch.bfloat16)
|
||||
|
||||
>>> INITIAL_PROMPT = "You are a helpful assistant. "
|
||||
>>> inputs_initial_prompt = tokenizer(INITIAL_PROMPT, return_tensors="pt").to("cuda")
|
||||
>>> # This is the common prompt cached, we need to run forward without grad to be abel to copy
|
||||
>>> with torch.no_grad():
|
||||
... prompt_cache = model(**inputs_initial_prompt, past_key_values = prompt_cache).past_key_values
|
||||
|
||||
>>> prompts = ["Help me to write a blogpost about travelling.", "What is the capital of France?"]
|
||||
>>> responses = []
|
||||
>>> for prompt in prompts:
|
||||
... new_inputs = tokenizer(INITIAL_PROMPT + prompt, return_tensors="pt").to("cuda")
|
||||
... past_key_values = copy.deepcopy(prompt_cache)
|
||||
... outputs = model.generate(**new_inputs, past_key_values=past_key_values,max_new_tokens=20)
|
||||
... response = tokenizer.batch_decode(outputs)[0]
|
||||
... responses.append(response)
|
||||
|
||||
>>> print(responses)
|
||||
['<s> You are a helpful assistant. Help me to write a blogpost about travelling.\n\nTitle: The Ultimate Guide to Travelling: Tips, Tricks, and', '<s> You are a helpful assistant. What is the capital of France?\n\nYes, the capital of France is Paris.</s>']
|
||||
```
|
||||
Some files were not shown because too many files have changed in this diff Show More
Reference in New Issue
Block a user