Compare commits
1 Commits
master
...
master-ver
| Author | SHA1 | Date | |
|---|---|---|---|
| 9a726698cf |
@ -46,7 +46,7 @@ openMind Library目前支持的特性如下:
|
||||
|
||||
| 模型蒸馏 | DeepSeek-R1-Distill系列LLM模型微调 | Open-R1复现 |
|
||||
|:-----------------------------------------------------|:-----------------------------------------------------------------------------|:----------------------------------------------------|
|
||||
| 在研中,详情请见[模型蒸馏](./docs/zh/best_practice/deepseek_r1.md#模型蒸馏)章节 | 在研中,详情请见[DeepSeek-R1-Distill模型微调](./docs/zh/best_practice/deepseek_r1.md#deepseek-r1-distill模型微调)章节 | 在研中,详情请见[基于昇腾NPU复现open-r1](examples/research/open_r1/README.md)文档 |
|
||||
| 在研中,详情请见[模型蒸馏](./docs/zh/best_practice/deepseek_r1.md#模型蒸馏)章节 | 在研中,详情请见[DeepSeek-R1-Distill模型微调](./docs/zh/best_practice/deepseek_r1.md#deepseek-r1-distill模型微调)章节 | 在研中,详情请见[基于昇腾NPU复现open-r1](./examples/research/open_r1/README.md)文档 |
|
||||
|
||||
---
|
||||
|
||||
@ -97,7 +97,8 @@ openMind Library master版本配套说明如下,目前仅支持Linux系统。
|
||||
| MindSpeed(可选) | 1.0.RC2/ | https://gitee.com/ascend/MindSpeed/tree/1.0.RC2/ |
|
||||
| Megatron-LM(可选) | 0.6.0 | https://github.com/NVIDIA/Megatron-LM/releases/tag/core_v0.6.0 |
|
||||
| MindSpore NLP(可选) | 0.4.1 | https://github.com/mindspore-lab/mindnlp/tree/v0.4.1 |
|
||||
| silicondiff_npu(可选) | 2.1.0.post3 | https://pypi.org/project/silicondiff-npu/2.1.0.post3 |
|
||||
| diffusers(可选) | 0.27.0 | https://github.com/huggingface/diffusers/tree/v0.27.0 |
|
||||
| silicondiff_npu(可选) | 2.1.0 | https://pypi.org/project/silicondiff-npu/2.1.0/ |
|
||||
| mindone(可选) | 0.2.0 | https://gitee.com/mindspore-lab/mindone/tree/v0.2.0/ |
|
||||
|
||||
---
|
||||
|
||||
124
docs/en/api_reference/apis/pretrainer_api.md
Normal file
124
docs/en/api_reference/apis/pretrainer_api.md
Normal file
@ -0,0 +1,124 @@
|
||||
# PreTrainer Module APIs
|
||||
|
||||
## openmind.PreTrainer Class
|
||||
|
||||
The `PreTrainer` class provides common functions for pre-training process management.
|
||||
|
||||
**Parameters**
|
||||
|
||||
| Parameter | Type | Description | Default Value |
|
||||
| ---------------- | ------------------------------------------- |---------------|------|
|
||||
| pretrain_args | PreTrainingArguments | Pre-training parameter | - |
|
||||
| accelerator | Accelerator | Accelerate instance| None |
|
||||
| model | torch.nn.Module | Torch model | None |
|
||||
| optimizer | accelerate.utils.MegatronLMOptimizerWrapper | Optimizer | None |
|
||||
| lr_scheduler | accelerate.utils.MegatronLMSchedulerWrapper | Scheduler | None |
|
||||
| train_dataloader | torch.utils.data.DataLoader | Training data loader | None |
|
||||
| eval_dataloader | torch.utils.data.DataLoader | Evaluation data loader | None |
|
||||
|
||||
### train
|
||||
|
||||
Starts pre-training.
|
||||
|
||||
**Prototype**
|
||||
|
||||
```python
|
||||
def train()
|
||||
```
|
||||
|
||||
## openmind.PreTrainingArguments Class
|
||||
|
||||
The `PreTrainingArguments` class configures parameters of a training job, including hyperparameters required during training, model save path, and learning rate.
|
||||
|
||||
**Parameters**
|
||||
|
||||
| Parameter | Type| Description | Default Value for PyTorch |
|
||||
| --------------------------- | ---- |-------------------|-----------------------|
|
||||
| num_training_steps | int | Number of training steps | - |
|
||||
| micro_batch_size | int | Size of a micro batch | - |
|
||||
| dp | int | Degree of parallelism | - |
|
||||
| gradient_accumulation_steps | int | Number of gradient accumulation steps | 1 |
|
||||
| seq_length | int | Maximum length of a sequence | None |
|
||||
| megatron_dataset_flag | bool | Whether the dataset is Magatron-formatted| None |
|
||||
| data_path | str | Dataset path | None |
|
||||
| save_dir | str | Model saving path | None |
|
||||
| save_interval | int | Model saving interval | None |
|
||||
| eval_interval | int | Model evaluation interval | None |
|
||||
| openmind_model_path | str | Model path | None |
|
||||
| dtype | str | Runtime data type | bf16 |
|
||||
| plugin_args | dict | [Accelerate plugin parameter](https://huggingface.co/docs/accelerate/v0.28.0/en/package_reference/megatron_lm#accelerate.utils.MegatronLMPlugin) | None |
|
||||
| dataloader_config | dict | [Loader configuration parameter](https://huggingface.co/docs/accelerate/v0.28.0/en/package_reference/megatron_lm#accelerate.utils.MegatronLMDummyDataLoader) | None |
|
||||
| report_to | str | Accelerate log output object| None |
|
||||
| project_name | str | Project name | "accelerate-megatron" |
|
||||
|
||||
### from_yaml
|
||||
|
||||
Loads configurations from the YAML configuration file.
|
||||
|
||||
**Prototype**
|
||||
|
||||
```python
|
||||
def from_yaml(config_path: str)
|
||||
```
|
||||
|
||||
**Parameters**
|
||||
|
||||
| Parameter | Description | Supported Type|
|
||||
| ----------- |-------------| -------- |
|
||||
| config_path | Path of the YAML configuration file| str |
|
||||
|
||||
### get_mixed_precision
|
||||
|
||||
Obtains the mixed precision type.
|
||||
|
||||
**Prototype**
|
||||
|
||||
```python
|
||||
def get_mixed_precision()
|
||||
```
|
||||
|
||||
### get_torch_dtype
|
||||
|
||||
Obtains the runtime data type.
|
||||
|
||||
**Prototype**
|
||||
|
||||
```python
|
||||
def get_torch_dtype()
|
||||
```
|
||||
|
||||
### get_distributed_train_args
|
||||
|
||||
Obtains distributed pre-training parameters.
|
||||
|
||||
**Prototype**
|
||||
|
||||
```python
|
||||
def get_distributed_train_args()
|
||||
```
|
||||
|
||||
### update_distributed_train_args
|
||||
|
||||
Updates distributed pre-training parameters.
|
||||
|
||||
**Prototype**
|
||||
|
||||
```python
|
||||
def update_distributed_train_args(extra_args: dict)
|
||||
```
|
||||
|
||||
**Parameters**
|
||||
|
||||
| Parameter | Description | Supported Type|
|
||||
| ---------- |-------------| -------- |
|
||||
| extra_args | Additional parameter for distributed pre-training| dict |
|
||||
|
||||
### get_dataloader_config
|
||||
|
||||
Obtains the configuration parameters of the data loader.
|
||||
|
||||
**Prototype**
|
||||
|
||||
```python
|
||||
def get_dataloader_config()
|
||||
```
|
||||
450
docs/en/basic_tutorial/pretrainer.md
Normal file
450
docs/en/basic_tutorial/pretrainer.md
Normal file
@ -0,0 +1,450 @@
|
||||
# Model Pre-training
|
||||
|
||||
## Basic Concepts
|
||||
|
||||
**Pre-training** is a training policy for deep learning models, which is usually performed on a large-scale dataset. The goal of pre-training is to train the model on a related but large task so that the model learns general features and representations. However, with the rapid growth of large model parameters and the amount of training data required, the resource upper limit of a single machine can no longer meet the training requirements, so the concept of distributed training is introduced.
|
||||
|
||||
**Distributed training** means that a deep learning model task is divided into a plurality of subtasks, and training is performed in parallel on multiple computing devices. Distributed training greatly improves the training speed of large models and greatly reduces the overall model training time.
|
||||
|
||||
In this document, PreTrainer implements distributed capabilities of multiple frameworks (Megatron, DeepSpeed, and FSDP) based on Accelerate and provides common functions for pre-training process management.
|
||||
|
||||
## Environment Setup
|
||||
|
||||
```shell
|
||||
torch: 2.1.0
|
||||
transformers: 4.45.2
|
||||
accelerate: 0.28.0
|
||||
deepspeed: 0.15.2
|
||||
megatron_core: 0.4.0rc0
|
||||
```
|
||||
|
||||
### Installing the Megatron-LM Distributed Framework
|
||||
|
||||
To use the Megatron-LM distributed framework, perform the following steps:
|
||||
|
||||
1. Install Megatron. For details, see the [Megatron installation method of MindSpeed](https://gitee.com/ascend/MindSpeed#3-obtain-megatron-lm-and-specify-commit-id.)
|
||||
|
||||
```shell
|
||||
git clone https://github.com/NVIDIA/Megatron-LM.git
|
||||
cd Megatron-LM
|
||||
git checkout bcce6f54e075e3c3374ea67adefe54f3f2da2b07
|
||||
pip install --no-use-pep517 -e . # "--no-use-pep517 -e" can install all Megatron files.
|
||||
```
|
||||
|
||||
2. Install MindSpeed.
|
||||
|
||||
```shell
|
||||
git clone https://gitee.com/ascend/MindSpeed.git
|
||||
cd MindSpeed
|
||||
git checkout origin/1.0.RC1
|
||||
pip install -r requirements.txt
|
||||
pip install -e .
|
||||
```
|
||||
|
||||
3. Use pip to install the openmind_accelerate plugin of the Modelers community.
|
||||
|
||||
```shell
|
||||
#AArch64 platform
|
||||
pip install openmind-accelerate
|
||||
|
||||
#x86 platform
|
||||
pip install openmind-accelerate --extra-index-url https://download.pytorch.org/whl/cpu
|
||||
```
|
||||
|
||||
4. Install Accelerate and DeepSpeed.
|
||||
|
||||
```shell
|
||||
pip install deepspeed==0.15.2
|
||||
pip install accelerate==0.28.0
|
||||
```
|
||||
|
||||
### openMind Library Environment Setup
|
||||
|
||||
```shell
|
||||
#Installation in the AArch64 environment
|
||||
pip install openmind[pt]
|
||||
|
||||
#Installation in the x86 environment
|
||||
pip install openmind[pt] --extra-index-url https://download.pytorch.org/whl/cpu
|
||||
```
|
||||
|
||||
For details about how to install the openMind Library dependency environment, see [openMind Library Installation Guide](../install.md).
|
||||
After the installation is complete, use `pip list` to check the version dependency. If the Accelerate or Transformers version is updated during the installation, update them to the specified version.
|
||||
|
||||
## Quick Start
|
||||
|
||||
[Sample configuration files and startup scripts](https://modelers.cn/models/AI-Research/accelerate_examples/tree/main/examples) are provided for easy access.
|
||||
|
||||
### PreTrainer Use Procedure
|
||||
|
||||
#### Preparing Dataset
|
||||
|
||||
Prepare your own pre-training dataset, for example, [alpaca_en](https://modelers.cn/datasets/HaM/alpaca_en/tree/main) dataset.
|
||||
If you need to use the Megatron-LM distributed framework, see [Megatron Data Processing](https://github.com/NVIDIA/Megatron-LM?tab=readme-ov-file#data-preprocessing).
|
||||
|
||||
#### Preparing a Model
|
||||
|
||||
Prepare a model file, for example, [Llama 2](https://modelers.cn/models/AI_Connect/llama2_7b/tree/main).
|
||||
If you want to use the Megatron-LM distributed framework, you only need to prepare the **config.json** and **tokenizer** files.
|
||||
|
||||
#### Preparing Pre-training Parameters
|
||||
|
||||
The pre-training parameters can be automatically generated by loading the [llama2_config/llama2-megatron-json-dataset.yaml](https://modelers.cn/models/AI-Research/accelerate_examples/blob/main/examples/llama2_config/llama2-megatron-json-dataset.yaml) file. You can fine-tune the sample configuration file of the dataset in JSON format by referring to [here] (#llama2_megatron).
|
||||
|
||||
#### Startup
|
||||
|
||||
- For details about the Accelerate configuration file, see [accelerate_config/accelerate_megatron_config.yaml](https://modelers.cn/models/AI-Research/accelerate_examples/blob/main/examples/accelerate_config/accelerate_megatron_config.yaml).
|
||||
|
||||
```yaml
|
||||
compute_environment: LOCAL_MACHINE
|
||||
debug: false
|
||||
distributed_type: MEGATRON_LM
|
||||
downcast_bf16: 'no'
|
||||
machine_rank: 0
|
||||
main_training_function: main
|
||||
num_machines: 1
|
||||
num_processes: 8
|
||||
rdzv_backend: static
|
||||
same_network: true
|
||||
tpu_env: [ ]
|
||||
tpu_use_cluster: false
|
||||
tpu_use_sudo: false
|
||||
use_cpu: false
|
||||
|
||||
```
|
||||
|
||||
- For details about the model configuration file, see [llama2_config/llama2-megatron-json-dataset.yaml](https://modelers.cn/models/AI-Research/accelerate_examples/blob/main/examples/llama2_config/llama2-megatron-json-dataset.yaml).
|
||||
|
||||
<a id="llama2_megatron"></a>
|
||||
|
||||
```yaml
|
||||
num_training_steps: 1000
|
||||
micro_batch_size: µ_batch_size 4
|
||||
dp: 1
|
||||
gradient_accumulation_steps: &gradient_accumulation_steps 8
|
||||
### The value of **seq_length** must be less than or equal to the value of **max_position_embeddings** in the model weight configuration file **config.json**.
|
||||
seq_length: &seq_length 4096
|
||||
megatron_dataset_flag: False
|
||||
### data_path: Enter the path of the local fine-tuning dataset.
|
||||
data_path: &data_path '/path/to/alpaca_en/alpaca_data_en_52k.json'
|
||||
### Path for saving the fine-tuning model weight
|
||||
save_dir: './saves'
|
||||
save_interval: 10000
|
||||
eval_interval: 10000
|
||||
### openmind_model_path: Enter the path of the local model weight folder.
|
||||
openmind_model_path: '/path/to/llama2-7b-hf'
|
||||
dtype: 'bf16'
|
||||
|
||||
plugin_args:
|
||||
tp_degree: 8
|
||||
pp_degree: 1
|
||||
num_micro_batches: *gradient_accumulation_steps
|
||||
gradient_clipping: 1.0
|
||||
use_distributed_optimizer: False
|
||||
sequence_parallelism: False
|
||||
other_megatron_args:
|
||||
### tokenizer_model: path of the tokenizer.model file in the local model weight file.
|
||||
tokenizer_model: &tokenizer_model '/path/to/llama2-7b-hf/tokenizer.model'
|
||||
tokenizer_type: &tokenizer_type 'Llama2Tokenizer'
|
||||
finetune: False
|
||||
recompute_granularity: "full"
|
||||
recompute_method: "block"
|
||||
recompute_num_layers: 32
|
||||
optimizer: "adam"
|
||||
lr: 1e-5
|
||||
min_lr: 1e-6
|
||||
adam_beta2: 0.95
|
||||
add_bias_linear: False
|
||||
async_tensor_model_parallel_allreduce: False
|
||||
attention_dropout: 0.0
|
||||
attention_softmax_in_fp32: False
|
||||
bias_gelu_fusion: False
|
||||
ffn_hidden_size: 11008
|
||||
hidden_dropout: 0.0
|
||||
init_method_std: 0.01
|
||||
initial_loss_scale: 65536.0
|
||||
lr_decay_style: "cosine"
|
||||
lr_warmup_fraction: 0.01
|
||||
masked_softmax_fusion: False
|
||||
normalization: "RMSNorm"
|
||||
split: &split "100,0,0"
|
||||
swiglu: True
|
||||
untie_embeddings_and_output_weights: True
|
||||
use_flash_attn: False
|
||||
weight_decay: 0.1
|
||||
no_load_optim: True
|
||||
no_load_rng: True
|
||||
eval_iters: &eval_iters 10
|
||||
position_embedding_type: "rope"
|
||||
|
||||
dataloader_config:
|
||||
return_tensors: 'pt'
|
||||
padding: 'max_length'
|
||||
pad_to_multiple_of: *seq_length
|
||||
max_length: *seq_length
|
||||
|
||||
```
|
||||
|
||||
- For details about the pre-training program file, see [train_with_megatron_json_dataset.py](https://modelers.cn/models/AI-Research/accelerate_examples/blob/main/examples/train_with_megatron_json_dataset.py). This Python script cannot be directly run. To run it, download the following repository to obtain the utils code and copy **accelerate_examples/examples/utils** to the same directory as the script.
|
||||
|
||||
```shell
|
||||
git clone https://modelers.cn/AI-Research/accelerate_examples.git
|
||||
cp -r accelerate_examples/examples/utils ./ #: Replace the destination path with the path of the train_with_megatron_json_dataset.py file.
|
||||
```
|
||||
|
||||
```python
|
||||
import os
|
||||
|
||||
import openmind_accelerate
|
||||
from openmind import PreTrainingArguments, PreTrainer
|
||||
|
||||
from utils.config import get_pretrain_config_file
|
||||
from utils.accelerator import make_accelerator
|
||||
from utils.data import make_train_and_eval_dataloader
|
||||
from utils.tokenizer import get_tokenizer
|
||||
|
||||
pretrain_args = PreTrainingArguments.from_yaml(get_pretrain_config_file())
|
||||
|
||||
os.makedirs(pretrain_args.save_dir, exist_ok=True)
|
||||
|
||||
accelerator = make_accelerator(pretrain_args=pretrain_args)
|
||||
|
||||
tokenizer = get_tokenizer(tokenizer_path=pretrain_args.openmind_model_path, use_fast=False)
|
||||
transformer_dataloader_config = pretrain_args.get_dataloader_config()
|
||||
train_dataloader, eval_dataloader = make_train_and_eval_dataloader(
|
||||
dataloader_config=transformer_dataloader_config,
|
||||
micro_batch_size=pretrain_args.micro_batch_size,
|
||||
data_files=pretrain_args.data_path,
|
||||
max_length=pretrain_args.seq_length,
|
||||
tokenizer=tokenizer,
|
||||
accelerator=accelerator
|
||||
)
|
||||
|
||||
pretrainer = PreTrainer(pretrain_args=pretrain_args,
|
||||
train_dataloader=train_dataloader,
|
||||
eval_dataloader=eval_dataloader,
|
||||
)
|
||||
pretrainer.train()
|
||||
```
|
||||
|
||||
After configuring the environment configuration and preparing the configuration file, run the following command to start fine-tuning. Ensure that the training script and configuration file are in the actual local path.
|
||||
|
||||
```shell
|
||||
accelerate launch --config_file accelerate_config/accelerate_megatron_config.yaml train_with_megatron_json_dataset.py --pretrain_config_file llama2_config/llama2-megatron-json-dataset.yaml
|
||||
```
|
||||
|
||||
## Advanced Use
|
||||
|
||||
### Defining Pre-training Parameters
|
||||
|
||||
Before defining PreTrainer, you need to define a PreTrainingArguments class that contains all hyperparameters used by PreTrainer for training and evaluation. You can initialize the pre-training parameters by using the configuration file or directly transferring parameters.
|
||||
|
||||
#### Using the Configuration File
|
||||
|
||||
The pre-training parameters can be automatically generated by loading the YAML file. For more YAML examples, see [Samples Link](https://modelers.cn/models/AI-Research/accelerate_examples/tree/main/examples/llama2_config).
|
||||
|
||||
```python
|
||||
from openmind import PreTrainingArguments
|
||||
|
||||
# Replace the path with a local path.
|
||||
pretrain_args = PreTrainingArguments.from_yaml(
|
||||
"openmind-accelerate/examples/llama2_config/llama2-megatron.yaml"
|
||||
)
|
||||
```
|
||||
|
||||
#### Directly Passing Parameters
|
||||
|
||||
Pre-training parameters can also be instantiated through parameter pass. The initialization process of the pre-trainer for training the Megatron dataset using the Megatron model is as follows.
|
||||
|
||||
For details, see [PreTrainingArguments Description] (#pretrainingarguments Description).
|
||||
|
||||
```python
|
||||
from openmind import PreTrainingArguments
|
||||
|
||||
# Replace the path with a local path.
|
||||
pretrain_args = PreTrainingArguments(
|
||||
megatron_dataset_flag=True,
|
||||
data_path="HaM/alpaca_en",
|
||||
num_training_steps=1000,
|
||||
micro_batch_size=4,
|
||||
dp=1,
|
||||
gradient_accumulation_steps=8,
|
||||
seq_length=2048,
|
||||
)
|
||||
```
|
||||
|
||||
### Pre-training a Model Using the Megatron Framework
|
||||
|
||||
After configuring the pre-training parameters, you can start the Megatron model pre-training.
|
||||
|
||||
- For details about the configuration file for Accelerate and Megatron interconnection, see [accelerate_config/accelerate_megatron_config.yaml](https://modelers.cn/models/AI-Research/accelerate_examples/blob/main/examples/accelerate_config/accelerate_megatron_config.yaml).
|
||||
- For details about how to use the Megatron framework to train the JSON dataset, see [train_with_megatron_json_dataset.py](https://modelers.cn/models/AI-Research/accelerate_examples/blob/main/examples/train_with_megatron_json_dataset.py).
|
||||
- For details about the configuration file of JSON pre-training dataset, see [llama2_config/llama2-megatron-json-dataset.yaml](https://modelers.cn/models/AI-Research/accelerate_examples/blob/main/examples/llama2_config/llama2-megatron-json-dataset.yaml).
|
||||
|
||||
You only need to pass the prepared `train_dataloader` (`eval_dataloader` not necessarily required) to PreTrainer. Then, you can use the custom dataloader to pre-train the model.
|
||||
|
||||
```shell
|
||||
accelerate launch --config_file accelerate_config/accelerate_megatron_config.yaml train_with_megatron_json_dataset.py --pretrain_config_file llama2_config/llama2-megatron-json-dataset.yaml
|
||||
```
|
||||
|
||||
#### (Optional) Customizing the Processing Flow of the Megatron Framework
|
||||
|
||||
##### Customizing Functions
|
||||
|
||||
When using Megatron for pre-training, you can customize any function in datasets_provider, model_provider, get_batch, and loss_function and assign the function pointer to the following attributes. For details about how to implement user-defined functions, see the official sample [pretrain_gpt.py](https://github.com/NVIDIA/Megatron-LM/blob/main/pretrain_gpt.py).
|
||||
|
||||
- `custom_megatron_datasets_provider_function`: provides the training and validation datasets of Megatron.
|
||||
- `custom_get_batch_function`: generates batch data.
|
||||
- `custom_model_provider_function`: builds models.
|
||||
- `custom_loss_function`: returns the loss function.
|
||||
|
||||
```python
|
||||
import openmind_accelerate
|
||||
from openmind import PreTrainingArguments
|
||||
from pretrain_gpt import (
|
||||
train_valid_test_datasets_provider,
|
||||
get_batch as megatron_gpt_get_batch,
|
||||
model_provider as megatron_gpt_model_provider,
|
||||
loss_func as megatron_gpt_loss_func,
|
||||
)
|
||||
|
||||
# Replace the path with a local path.
|
||||
pretrain_args = PreTrainingArguments.from_yaml(
|
||||
"openmind-accelerate/examples/llama2_config/llama2-megatron-json-dataset.yaml"
|
||||
)
|
||||
train_valid_test_datasets_provider.is_distributed = True
|
||||
pretrain_args.update_distributed_train_args(
|
||||
extra_args={
|
||||
"custom_megatron_datasets_provider_function": train_valid_test_datasets_provider,
|
||||
"custom_get_batch_function": megatron_gpt_get_batch,
|
||||
"custom_model_provider_function": megatron_gpt_model_provider,
|
||||
"custom_loss_function": megatron_gpt_loss_func,
|
||||
}
|
||||
)
|
||||
```
|
||||
|
||||
##### Customizing Analytical Model Configuration File
|
||||
|
||||
You can customize the analytical function of the model configuration file based on the format configured for the Accelerate analytical model. The following is the built-in analytical function of the Llama model configuration file in PreTrainer. You can refer to the function as needed.
|
||||
|
||||
```python
|
||||
import openmind_accelerate
|
||||
from accelerate.utils import add_model_config_to_megatron_parser
|
||||
|
||||
|
||||
@add_model_config_to_megatron_parser("llama")
|
||||
def parse_llama_config(megatron_lm_plugin, model, batch_data):
|
||||
model_type_name = "gpt"
|
||||
num_layers = model.config.num_hidden_layers
|
||||
pretraining_flag = True
|
||||
hidden_size = model.config.hidden_size
|
||||
num_attention_heads = model.config.num_attention_heads
|
||||
orig_vocab_size = model.config.vocab_size
|
||||
|
||||
max_position_embeddings = getattr(model.config, "max_position_embeddings")
|
||||
seq_length = getattr(model.config, "max_sequence_length", None)
|
||||
if megatron_lm_plugin.seq_length is None:
|
||||
if seq_length is not None:
|
||||
megatron_lm_plugin.seq_length = seq_length
|
||||
elif megatron_lm_plugin.decoder_seq_length is not None:
|
||||
megatron_lm_plugin.seq_length = megatron_lm_plugin.decoder_seq_length
|
||||
elif batch_data is not None:
|
||||
megatron_lm_plugin.seq_length = batch_data["input_ids"].shape[1]
|
||||
else:
|
||||
megatron_lm_plugin.seq_length = max_position_embeddings
|
||||
|
||||
megatron_lm_plugin.megatron_lm_default_args["return_logits"] = megatron_lm_plugin.return_logits
|
||||
megatron_lm_plugin.megatron_lm_default_args["tokenizer_type"] = "Llama2Tokenizer"
|
||||
megatron_lm_plugin.megatron_lm_default_args["model_type_name"] = model_type_name
|
||||
megatron_lm_plugin.megatron_lm_default_args["num_layers"] = num_layers
|
||||
megatron_lm_plugin.megatron_lm_default_args["pretraining_flag"] = pretraining_flag
|
||||
megatron_lm_plugin.megatron_lm_default_args["hidden_size"] = hidden_size
|
||||
megatron_lm_plugin.megatron_lm_default_args["num_attention_heads"] = num_attention_heads
|
||||
megatron_lm_plugin.megatron_lm_default_args["orig_vocab_size"] = orig_vocab_size
|
||||
megatron_lm_plugin.megatron_lm_default_args["max_position_embeddings"] = max_position_embeddings
|
||||
megatron_lm_plugin.megatron_lm_default_args["seq_length"] = megatron_lm_plugin.seq_length
|
||||
megatron_lm_plugin.megatron_lm_default_args["model_return_dict"] = model.config.return_dict
|
||||
|
||||
```
|
||||
|
||||
### Using Other Frameworks to Pre-train Models
|
||||
|
||||
PreTrainer can implement a multi-framework distributed capability based on Accelerate. In addition to Megatron, PreTrainer also supports the DeepSpeed and FSDP distributed frameworks. The following uses DeepSpeed as an example.
|
||||
After configuring the JSON pre-training parameters, you can start the DeepSpeed model pre-training.
|
||||
|
||||
- For details about the configuration file for Accelerate and DeepSpeed interconnection, see [accelerate_config/accelerate_megatron_config.yaml](https://modelers.cn/models/AI-Research/accelerate_examples/blob/main/examples/accelerate_config/accelerate_deepspeed_config.yaml).
|
||||
- For details about how to use the DeepSpeed framework to train the JSON dataset, see [train_with_deepspeed.py](https://modelers.cn/models/AI-Research/accelerate_examples/blob/main/examples/train_with_deepspeed.py).
|
||||
- For details about the configuration file of JSON pre-training dataset, see [llama2_config/llama2-deepspeed.yaml](https://modelers.cn/models/AI-Research/accelerate_examples/blob/main/examples/llama2_config/llama2-deepspeed.yaml).
|
||||
|
||||
```yaml
|
||||
num_training_steps: 1000
|
||||
micro_batch_size: 1
|
||||
dp: 8
|
||||
gradient_accumulation_steps: 8
|
||||
seq_length: 4096
|
||||
megatron_dataset_flag: False
|
||||
data_path: '/path/to/alpaca_en/alpaca_data_en_52k.json'
|
||||
save_dir: './saves'
|
||||
save_interval: 10000
|
||||
eval_interval: 10000
|
||||
openmind_model_path: '/path/to/llama2-7b-hf'
|
||||
dtype: 'bf16'
|
||||
|
||||
dataloader_config:
|
||||
return_tensors: 'pt'
|
||||
padding: 'max_length'
|
||||
pad_to_multiple_of: 4096
|
||||
max_length: 4096
|
||||
|
||||
### The value of **seq_length**, **max_length**, and **padding** must be less than or equal to the value of **max_position_embeddings** in the model weight configuration file **config.json**.
|
||||
```
|
||||
|
||||
```shell
|
||||
accelerate launch --config_file accelerate_config/accelerate_deepspeed_config.yaml train_with_deepspeed.py --pretrain_config_file llama2_config/llama2-deepspeed.yaml
|
||||
```
|
||||
|
||||
## PreTrainingArguments Description
|
||||
|
||||
| **Name** | **Description** | **Type**| **Default Value**| Mandatory/Optional |
|
||||
|-----------------------------|-----------------------|--------|---------|---------|
|
||||
| num_training_steps | Total number of steps for training a model. | int | - | Mandatory |
|
||||
| micro_batch_size | Batch size of each model instance. | int | - | Mandatory |
|
||||
| dp | Data parallelism | int | - | Mandatory |
|
||||
| gradient_accumulation_steps | Number of gradient steps to be accumulated before model parameters are updated. | int | 1 | Optional |
|
||||
| seq_length | Maximum length of the sequence to be processed. | int | None | Optional |
|
||||
| megatron_dataset_flag | Whether to use a flag of the Megatron dataset. | bool | None | Optional |
|
||||
| data_path | Training dataset path. | str | None | Optional |
|
||||
| save_dir | Output directory to which the checkpoint is to be saved. | str | None | Optional |
|
||||
| save_interval | Iteration interval for saving checkpoints. | int | None | Optional |
|
||||
| eval_interval | Iteration interval for evaluation. | int | None | Optional |
|
||||
| openmind_model_path | Path of the openMind model to be trained. | str | None | Optional |
|
||||
| dtype | Dtype mode of the running model. | str | bf16 | Optional |
|
||||
| plugin_args | [Accelerate plugin parameters](https://huggingface.co/docs/accelerate/v0.28.0/en/package_reference/megatron_lm#accelerate.utils.MegatronLMPlugin) | dict | None | Optional |
|
||||
| dataloader_config | [Dataloader configuration parameters](https://huggingface.co/docs/accelerate/v0.28.0/en/package_reference/megatron_lm#accelerate.utils.MegatronLMDummyDataLoader) | dict | None | Optional |
|
||||
| report_to | Location to which Accelerate logs are reported. | str | None | Optional |
|
||||
| project_name | Project name. | str | None | Optional |
|
||||
|
||||
## PreTrainer Description
|
||||
|
||||
The PreTrainer API creates a Megatron pre-trainer or other pre-trainers based on whether Accelerate uses the Megatron-LM distributed acceleration library (specifically `ACCELERATE_USE_MEGATRON_LM=="true"`).
|
||||
|
||||
### Megatron Pre-trainer
|
||||
|
||||
| No.| Constraint Description |
|
||||
| ---- |-----------------------------------------------------------------------|
|
||||
| 1 | The Megatron dependencies need to be installed. |
|
||||
| 2 | The openmind_accelerate dependencies need to be installed. |
|
||||
| 3 | Megatron manages accumulated gradients. Therefore, the `gradient_accumulation_steps` parameter of Accelerate must be set to **1**.|
|
||||
| 4 | `train_dataloader` needs to be provided during initialization or `data_path` needs to be provided in **PreTrainingArguments**. |
|
||||
| 5 | `model` needs to be provided during initialization or `openmind_model_path` needs to be provided in **PreTrainingArguments**. |
|
||||
|
||||
### Other Pre-trainers
|
||||
|
||||
| No. | Constraint |
|
||||
| ---- |----------------------------------------------------------------|
|
||||
| 1 | `train_dataloader` needs to be provided during initialization. |
|
||||
| 2 | `optimizer` needs to be provided during initialization. |
|
||||
| 3 | `lr_scheduler` needs to be provided during initialization. |
|
||||
| 4 | `model` needs to be provided during initialization or `openmind_model_path` needs to be provided in **PreTrainingArguments**.|
|
||||
|
||||
*Thank community contributors for contributing the llama 2 model and alpaca_en dataset.*
|
||||
@ -14,7 +14,8 @@ The following table describes the version mapping of openMind Library v1.0.0. On
|
||||
| MindSpeed (optional) | 1.0.RC2 | https://gitee.com/ascend/MindSpeed/tree/1.0.RC2/ |
|
||||
| Megatron (optional) | 0.6.0 | https://github.com/NVIDIA/Megatron-LM/releases/tag/core_v0.6.0 |
|
||||
| Mindnlp(optional) | 0.4.1 | https://github.com/mindspore-lab/mindnlp |
|
||||
| silicondiff_npu(optional) | 2.1.0.post3 | https://pypi.org/project/silicondiff-npu/2.1.0.post3 |
|
||||
| diffusers(optional) | 0.27.0 | https://github.com/huggingface/diffusers/tree/v0.27.0 |
|
||||
| silicondiff_npu(optional) | 2.1.0 | https://pypi.org/project/silicondiff-npu/2.1.0/ |
|
||||
|
||||
## Installation Guide
|
||||
|
||||
|
||||
@ -4,6 +4,8 @@ openMind Library is an open-source deep learning development kit. It supports mo
|
||||
|
||||
## openMind Library Features
|
||||
|
||||
+ To cope with the challenges of distributed training of foundation models, openMind Library provides pre-training APIs and acceleration libraries such as MindSpeed and Accelerate to help you quickly and smoothly train foundation models. For details, see [model pre-training](basic_tutorial/pretrainer.md).
|
||||
|
||||
+ openMind Library encapsulates APIs such as Transformers, MindFormers AutoClass, Pipeline, and Trainer, enhances functions, and provides the capability of automatic download and load of models from the Modelers community. In addition, the Ascend NPU affinity feature is added, effectively improves the performance of model training and inference on Ascend NPUs. For details, see [Model Fine-Tuning](basic_tutorial/finetune/overview.md) and [Model Inference](basic_tutorial/pipeline.md).
|
||||
|
||||
+ openMind Library provides simple and easy-to-use command-line interfaces (CLIs) for quickly uploading, downloading, inferring, dialog, and deploying models with low code. For details, see the [command line interface](basic_tutorial/cli.md).
|
||||
|
||||
@ -50,6 +50,13 @@
|
||||
"en": "Data Load"
|
||||
}
|
||||
},
|
||||
{
|
||||
"id": "pretrainer",
|
||||
"label": {
|
||||
"zh": "模型预训练",
|
||||
"en": "Model Pre-training"
|
||||
}
|
||||
},
|
||||
{
|
||||
"id": "train",
|
||||
"label": {
|
||||
@ -336,6 +343,13 @@
|
||||
"en": "Pipelines"
|
||||
}
|
||||
},
|
||||
{
|
||||
"id": "pretrainer_api",
|
||||
"label": {
|
||||
"zh": "PreTrainer",
|
||||
"en": "PreTrainer"
|
||||
}
|
||||
},
|
||||
{
|
||||
"id": "trainer_api",
|
||||
"label": {
|
||||
|
||||
@ -452,8 +452,6 @@ Push to your_organization/your_repo finished
|
||||
| MindIE | [llama2_7b](https://modelers.cn/models/MindIE/llama2_7b) | PyTorch | mindie | Atlas 200T A2 Box16, Atlas 900 A2 PODc |
|
||||
| MindIE | [llama3.1_8b](https://modelers.cn/models/MindIE/llama3.1_8b) | PyTorch | mindie | Atlas 200T A2 Box16, Atlas 900 A2 PODc |
|
||||
|
||||
vLLM推理引擎支持模型清单请参考[vllm-ascend支持模型清单](https://github.com/vllm-project/vllm-ascend/blob/v0.7.3rc2/docs/source/user_guide/supported_models.md)。
|
||||
|
||||
**接口调用示例**
|
||||
|
||||
***LMDeploy***
|
||||
@ -490,28 +488,10 @@ vLLM推理引擎支持模型清单请参考[vllm-ascend支持模型清单](https
|
||||
openmind-cli deploy stop
|
||||
```
|
||||
|
||||
***vLLM***
|
||||
|
||||
- 从魔乐社区上获取模型`AI-Research/Qwen2.5-7B`在默认端口1025上进行部署。
|
||||
|
||||
```shell
|
||||
openmind-cli deploy --model_name_or_path AI-Research/Qwen2.5-7B --backend vllm
|
||||
```
|
||||
|
||||
- 使用本地`Qwen2.5-7B`模型在指定端口1025上进行多卡部署,指定0,1,2,3号卡,指定模型权重和激活的数据类型为bf16。
|
||||
|
||||
```shell
|
||||
ASCEND_RT_VISIBLE_DEVICES=0,1,2,3 openmind-cli deploy \
|
||||
--model_name_or_path /path/to/your/Qwen2.5-7B \
|
||||
--backend vllm \
|
||||
--port 1025 \
|
||||
--backend_config "tensor-parallel-size=4,dtype=bfloat16"
|
||||
```
|
||||
|
||||
**参数列表**
|
||||
|
||||
```shell
|
||||
openmind-cli deploy model_name_or_path [--backend {mindie, lmdeploy, vllm}] [--port server_port] [--world_size world_size] [--device device] [--trust_remote_code {True, False}] [--backend_config vllm_args]
|
||||
openmind-cli deploy model_name_or_path [--backend {mindie, lmdeploy}] [--port server_port] [--world_size world_size] [--npu_device_ids npu_device_ids]
|
||||
```
|
||||
|
||||
或者
|
||||
@ -520,17 +500,12 @@ openmind-cli deploy model_name_or_path [--backend {mindie, lmdeploy, vllm}] [--p
|
||||
openmind-cli deploy stop
|
||||
```
|
||||
|
||||
- **--model_id**(`str`,*可选*,默认为`None`): openMind Library内置模型ID,支持backend为`lmdeploy`或者`vllm`。
|
||||
- **--model_id**(`str`,*可选*,默认为`None`): openMind Library内置模型ID,仅支持backend为lmdeploy。
|
||||
- **--model_name_or_path**(`str`,*可选*,默认为`None`):部署模型路径,支持魔乐社区模型ID或模型权重本地路径。当backend为mindie时,本地的模型来源必须为**下载清单中的模型的本地路径**。
|
||||
- **--backend** (`str`,*可选*,默认为`mindie`):推理引擎,可以选择`mindie`、`lmdeploy`或者`vllm`。
|
||||
- **--backend** (`str`,*可选*,默认为`mindie`):推理引擎,可以选择`mindie`或者`lmdeploy`。
|
||||
- **--port**(`int`,*可选*,默认为`1025`):部署端口。
|
||||
- **--world_size**(`int`,*可选*,默认为`1`):部署使用的npu卡的world_size,在backend为`mindie`时生效。world_size需要与npu_device_ids中指定的卡数目一致。
|
||||
- **--device**(`str`,*可选*,默认为`0`):部署使用的npu卡号,在backend为`mindie`时生效。world_size需要与device中指定的卡数目一致。如果是需要部署多卡,传入格式如"0,1,2,3"。
|
||||
- **--trust_remote_code**(`bool`,*可选*,默认为`False`):是否信任从远程下载的模型权重文件。
|
||||
- **--backend_config**(`str`,*可选*,默认为`None`):在backend为`vllm`时生效,支持传入复数后端自定义参数(不同参数之间使用`,`隔开),格式参考`"tensor-parallel-size=4,dtype=bfloat16"`,支持输入json格式参数(注意使用单引号防止读取错误),格式参考`'rope-scaling={"rope_type":"dynamic","factor":2.0}'`,如:
|
||||
- **tensor-parallel-size**(`int`,*可选*,默认为`1`):张量并行数,注意确保有足够的可用卡数,建议与`ASCEND_RT_VISIBLE_DEVICES`环境变量配套使用在指定卡上多卡部署。
|
||||
- **dtype**(`str`,*可选*,默认为`auto`):模型权重和激活的数据类型,可选`auto`, `half`, `float16`, `bfloat16`, `float`, `float32`。
|
||||
- 更多支持参数见[vllm引擎参数](https://docs.vllm.com.cn/en/latest/serving/engine_args.html).
|
||||
- 使用`stop`命令可以停止MindIE的部署服务。
|
||||
|
||||
**FAQ**
|
||||
@ -546,7 +521,7 @@ chmod -R 750 path/to/model_weights
|
||||
|
||||
3.使用MindIE推理部署功能时,在同一台宿主机上仅支持部署一个MindIE服务。
|
||||
|
||||
4.使用LMDeploy和vLLM部署功能时,用户可通过配置`ASCEND_RT_VISIBLE_DEVICES`环境变量控制使用的npu卡,其中LMDeploy仅支持单卡部署。`ASCEND_RT_VISIBLE_DEVICES`用法请参考[环境变量说明](https://www.hiascend.com/document/detail/zh/canncommercial/800/apiref/envvar/envref_07_0028.html)。
|
||||
4.使用LMDeploy推理部署功能时,当前仅支持单卡部署,且不支持指定部署使用的npu卡号,用户可通过配置`ASCEND_RT_VISIBLE_DEVICES`环境变量控制使用的npu卡。`ASCEND_RT_VISIBLE_DEVICES`用法请参考[环境变量说明](https://www.hiascend.com/document/detail/zh/canncommercial/800/apiref/envvar/envref_07_0028.html)。
|
||||
|
||||
## openmind-cli env接口
|
||||
|
||||
@ -599,7 +574,6 @@ chmod -R 750 path/to/model_weights
|
||||
| load_in_4bit | 支持QLoRA微调时使用4bit精度。 | bool | False | 可选 |
|
||||
| use_dora | 是否使用DoRA。 | bool | False | 可选 |
|
||||
| init_lora_weights | LoRA微调的权重初始化方法。只支持pissa_niter_[num of iters]。 | str | True | 可选 |
|
||||
| sequence_parallel_size | 处理一个训练数据序列的计算设备的数量。 | int | 1 | 可选 |
|
||||
| model_id | 模型ID。 | str | - | 可选 |
|
||||
| model_name_or_path | 模型本地路径或者hub的repo_id。 | str | - | 可选 |
|
||||
| trust_remote_code | 是否信任从远程下载的配置文件。 | bool | False | 可选 |
|
||||
|
||||
124
docs/zh/api_reference/apis/pretrainer_api.md
Normal file
124
docs/zh/api_reference/apis/pretrainer_api.md
Normal file
@ -0,0 +1,124 @@
|
||||
# PreTrainer 模块接口
|
||||
|
||||
## openmind.PreTrainer类
|
||||
|
||||
`PreTrainer`类提供了通用的预训练流程管理功能。
|
||||
|
||||
**参数列表**
|
||||
|
||||
| 参数名 | 类型 | 描述 | 默认值 |
|
||||
| ---------------- | ------------------------------------------- |---------------|------|
|
||||
| pretrain_args | PreTrainingArguments | 预训练参数。 | - |
|
||||
| accelerator | Accelerator | accelerate实例。 | None |
|
||||
| model | torch.nn.Module | torch模型。 | None |
|
||||
| optimizer | accelerate.utils.MegatronLMOptimizerWrapper | 优化器。 | None |
|
||||
| lr_scheduler | accelerate.utils.MegatronLMSchedulerWrapper | 调度器。 | None |
|
||||
| train_dataloader | torch.utils.data.DataLoader | 训练数据加载器。 | None |
|
||||
| eval_dataloader | torch.utils.data.DataLoader | 评估数据加载器。 | None |
|
||||
|
||||
### train
|
||||
|
||||
预训练启动。
|
||||
|
||||
**接口原型**
|
||||
|
||||
```python
|
||||
def train()
|
||||
```
|
||||
|
||||
## openmind.PreTrainingArguments类
|
||||
|
||||
`PreTrainingArguments`类用于配置训练任务的参数,包括训练过程中所需的超参数、模型保存路径和学习率等。
|
||||
|
||||
**参数列表**
|
||||
|
||||
| 参数名 | 类型 | 描述 | PyTorch默认值 |
|
||||
| --------------------------- | ---- |-------------------|-----------------------|
|
||||
| num_training_steps | int | 训练步数。 | - |
|
||||
| micro_batch_size | int | 微批大小。 | - |
|
||||
| dp | int | 并行度。 | - |
|
||||
| gradient_accumulation_steps | int | 梯度累计步数。 | 1 |
|
||||
| seq_length | int | 最大处理序列长度。 | None |
|
||||
| megatron_dataset_flag | bool | 是否未megatron格式数据集。 | None |
|
||||
| data_path | str | 数据集路径。 | None |
|
||||
| save_dir | str | 模型保存路径。 | None |
|
||||
| save_interval | int | 模型保存间隔。 | None |
|
||||
| eval_interval | int | 模型评估间隔。 | None |
|
||||
| openmind_model_path | str | 模型路径。 | None |
|
||||
| dtype | str | 运行时数据类型。 | bf16 |
|
||||
| plugin_args | dict | [Accelerate插件参数。](https://huggingface.co/docs/accelerate/v0.28.0/en/package_reference/megatron_lm#accelerate.utils.MegatronLMPlugin) | None |
|
||||
| dataloader_config | dict | [加载器配置参数。](https://huggingface.co/docs/accelerate/v0.28.0/en/package_reference/megatron_lm#accelerate.utils.MegatronLMDummyDataLoader) | None |
|
||||
| report_to | str | accelerate日志输出对象。 | None |
|
||||
| project_name | str | 项目名称。 | "accelerate-megatron" |
|
||||
|
||||
### from_yaml
|
||||
|
||||
从yaml配置文件加载配置。
|
||||
|
||||
**接口原型**
|
||||
|
||||
```python
|
||||
def from_yaml(config_path: str)
|
||||
```
|
||||
|
||||
**参数列表**
|
||||
|
||||
| 参数名 | 描述 | 支持类型 |
|
||||
| ----------- |-------------| -------- |
|
||||
| config_path | yaml配置文件路径。 | str |
|
||||
|
||||
### get_mixed_precision
|
||||
|
||||
获取混合精度类型。
|
||||
|
||||
**接口原型**
|
||||
|
||||
```python
|
||||
def get_mixed_precision()
|
||||
```
|
||||
|
||||
### get_torch_dtype
|
||||
|
||||
获取运行时数据类型。
|
||||
|
||||
**接口原型**
|
||||
|
||||
```python
|
||||
def get_torch_dtype()
|
||||
```
|
||||
|
||||
### get_distributed_train_args
|
||||
|
||||
获取分布式预训练参数。
|
||||
|
||||
**接口原型**
|
||||
|
||||
```python
|
||||
def get_distributed_train_args()
|
||||
```
|
||||
|
||||
### update_distributed_train_args
|
||||
|
||||
更新分布式预训练参数。
|
||||
|
||||
**接口原型**
|
||||
|
||||
```python
|
||||
def update_distributed_train_args(extra_args: dict)
|
||||
```
|
||||
|
||||
**参数列表**
|
||||
|
||||
| 参数名 | 描述 | 支持类型 |
|
||||
| ---------- |-------------| -------- |
|
||||
| extra_args | 分布式预训练额外参数。 | dict |
|
||||
|
||||
### get_dataloader_config
|
||||
|
||||
获取数据加载器配置参数。
|
||||
|
||||
**接口原型**
|
||||
|
||||
```python
|
||||
def get_dataloader_config()
|
||||
```
|
||||
@ -358,7 +358,7 @@ run_eval(
|
||||
|
||||
## 模型部署
|
||||
|
||||
`openmind-cli deploy`用于在单机环境下部署openai接口服务。目前支持MindIE、LMDeploy和vLLM三种方式提供推理服务。
|
||||
`openmind-cli deploy`用于在单机环境下部署openai接口服务。目前支持MindIE和LMDeploy两种方式提供推理服务。
|
||||
|
||||
此接口仅支持PyTorch框架。
|
||||
|
||||
@ -387,17 +387,6 @@ pip install -e .
|
||||
pip install dlinfer-ascend==0.1.7
|
||||
```
|
||||
|
||||
主要版本配套说明如下:
|
||||
|
||||
| 软件 | 支持版本 |
|
||||
|------------------|---------------------|
|
||||
| torch | 2.3.1 |
|
||||
| torch-npu | 2.3.1 |
|
||||
| lmdeploy | 0.6.4 |
|
||||
| dlinfer-ascend | 0.1.7 |
|
||||
| transformers | 4.47.1 |
|
||||
| accelerate | 1.0.0rc1 |
|
||||
|
||||
#### 接口调用示例
|
||||
|
||||
- 从魔乐社区上获取模型`AI-Research/Qwen2-7B`在默认端口1025上进行部署。
|
||||
@ -488,91 +477,6 @@ pip install dlinfer-ascend==0.1.7
|
||||
openmind-cli deploy stop
|
||||
```
|
||||
|
||||
### vLLM
|
||||
|
||||
#### 环境准备
|
||||
|
||||
基于openMind Library基础环境,vLLM还需要满足以下软件配置要求:
|
||||
|
||||
- Python >= 3.9
|
||||
- CANN == 8.1.RC1
|
||||
- PyTorch == 2.6.0
|
||||
- torch-npu == 2.6.0rc1
|
||||
- vllm == 0.7.3
|
||||
- vllm-ascend == 0.7.3rc2
|
||||
|
||||
确保固件驱动和CANN安装配置无误后,可以执行以下命令安装:
|
||||
|
||||
```shell
|
||||
# 安装vllm和torch
|
||||
pip install vllm==0.7.3
|
||||
pip install torch==2.6.0
|
||||
|
||||
# 安装配套的torchvision, torchaudio和torch-npu
|
||||
pip install torchvision==0.21.0
|
||||
pip install torchaudio==2.6.0
|
||||
pip install torch-npu==2.6.0rc1
|
||||
|
||||
#安装vllm-ascend
|
||||
pip install vllm-ascend==0.7.3rc2
|
||||
```
|
||||
|
||||
更加详细的安装教程可参考[vllm-ascend环境准备教程](https://github.com/vllm-project/vllm-ascend/blob/v0.7.3rc2/docs/source/installation.md)。
|
||||
|
||||
#### 接口调用示例
|
||||
|
||||
- 从魔乐社区上获取模型`AI-Research/Qwen2.5-7B`在默认端口1025上进行部署。
|
||||
|
||||
```shell
|
||||
openmind-cli deploy --model_name_or_path AI-Research/Qwen2.5-7B --backend vllm
|
||||
```
|
||||
|
||||
- 使用本地`Qwen2.5-7B`模型在指定端口1025上进行多卡部署,指定0,1,2,3号卡,指定模型权重和激活的数据类型为bf16。
|
||||
|
||||
```shell
|
||||
ASCEND_RT_VISIBLE_DEVICES=0,1,2,3 openmind-cli deploy \
|
||||
--model_name_or_path /path/to/your/Qwen2.5-7B \
|
||||
--backend vllm \
|
||||
--port 1025 \
|
||||
--backend_config "tensor-parallel-size=4,dtype=bfloat16"
|
||||
```
|
||||
|
||||
#### 交互示例
|
||||
|
||||
部署成功后,可以在同服务器上使用curl进行交互。
|
||||
|
||||
- 查看模型列表`v1/models`
|
||||
|
||||
```shell
|
||||
curl http://127.0.0.1:1025/v1/models | python3 -m json.tool
|
||||
```
|
||||
|
||||
- 文本补全`v1/completions`
|
||||
|
||||
```shell
|
||||
curl http://127.0.0.1:1025/v1/completions \
|
||||
-H "Content-Type: application/json" \
|
||||
-d '{
|
||||
"model": "AI-Research/Qwen2.5-7B",
|
||||
"prompt": "Beijing is a",
|
||||
"max_tokens": 5,
|
||||
"temperature": 0
|
||||
}' | python3 -m json.tool
|
||||
```
|
||||
|
||||
- 对话`v1/chat/completions`
|
||||
|
||||
```shell
|
||||
curl http://127.0.0.1:1025/v1/chat/completions \
|
||||
-H "Content-Type: application/json" \
|
||||
-d '{
|
||||
"model": "AI-Research/Qwen2.5-7B",
|
||||
"messages": [{"role": "user", "content": "Recommend a place for a seaside holiday."}],
|
||||
"max_tokens": 64,
|
||||
"temperature": 0
|
||||
}' | python3 -m json.tool
|
||||
```
|
||||
|
||||
`openmind-cli deploy`的全量参数可以参考[openmind-cli deploy接口](../api_reference/apis/cli_api.md#openmind-cli-deploy接口)。
|
||||
|
||||
同时我们也为您提供了deploy相关SDK接口,您可以通过python脚本形式快速调起评估流程,以下为脚本示例,您可以通过`python deploy_demo.py`调起评估流程:
|
||||
|
||||
@ -8,7 +8,6 @@ openMind Library提供了模型部署的方法,支持用户快速方便地在
|
||||
|
||||
- MindIE
|
||||
- LMDeploy
|
||||
- vLLM
|
||||
|
||||
openMind Library提供命令行接口(command-line interface, CLI),支持用户在shell环境下交互式实现部署流程。
|
||||
|
||||
@ -17,7 +16,7 @@ openMind Library命令行接口内置于openMind Library中,安装openMind Lib
|
||||
## 使用方法和参数配置
|
||||
|
||||
```shell
|
||||
openmind-cli deploy model_name_or_path [--backend {mindie, lmdeploy, vllm}] [--port server_port] [--world_size world_size] [--device device] [--trust_remote_code {True, False}] [--backend_config vllm_args]
|
||||
openmind-cli deploy model_name_or_path [--backend {mindie, lmdeploy}] [--port server_port] [--world_size world_size] [--npu_device_ids npu_device_ids]
|
||||
```
|
||||
|
||||
或者
|
||||
@ -26,17 +25,11 @@ openmind-cli deploy model_name_or_path [--backend {mindie, lmdeploy, vllm}] [--p
|
||||
openmind-cli deploy stop
|
||||
```
|
||||
|
||||
- **--model_id**(`str`,*可选*,默认为`None`): openMind Library内置模型ID,支持backend为`lmdeploy`或者`vllm`。
|
||||
- **model_name_or_path**(`str`,*必选*,默认为`None`):部署模型路径,支持魔乐社区模型ID或模型权重本地路径。当backend为mindie时,本地的模型来源必须为**下载清单中的模型的本地路径**。
|
||||
- **--backend** (`str`,*可选*,默认为`mindie`):推理引擎,可以选择`mindie`、`lmdeploy`或者`vllm`。
|
||||
- **--backend** (`str`,*可选*,默认为`mindie`):推理引擎,可以选择`mindie`或者`lmdeploy`。
|
||||
- **--port**(`int`,*可选*,默认为`1025`):部署端口。
|
||||
- **--world_size**(`int`,*可选*,默认为`1`):部署使用的npu卡的world_size,在backend为`mindie`时生效。world_size需要与npu_device_ids中指定的卡数目一致。
|
||||
- **--device**(`str`,*可选*,默认为`0`):部署使用的npu卡号,在backend为`mindie`时生效。world_size需要与device中指定的卡数目一致。如果是需要部署多卡,传入格式如"0,1,2,3"。
|
||||
- **--trust_remote_code**(`bool`,*可选*,默认为`False`):是否信任从远程下载的模型权重文件。
|
||||
- **--backend_config**(`str`,*可选*,默认为`None`):在backend为`vllm`时生效,支持传入复数后端自定义参数(不同参数之间使用`,`隔开),格式参考`"tensor-parallel-size=4,dtype=bfloat16"`,支持输入json格式参数(注意使用单引号防止读取错误),格式参考`'rope-scaling={"rope_type":"dynamic","factor":2.0}'`,如:
|
||||
- **tensor-parallel-size**(`int`,*可选*,默认为`1`):张量并行数,注意确保有足够的可用卡数,建议与`ASCEND_RT_VISIBLE_DEVICES`环境变量配套使用在指定卡上多卡部署。
|
||||
- **dtype**(`str`,*可选*,默认为`auto`):模型权重和激活的数据类型,可选`auto`, `half`, `float16`, `bfloat16`, `float`, `float32`。
|
||||
- 更多支持参数见[vllm引擎参数](https://docs.vllm.com.cn/en/latest/serving/engine_args.html).
|
||||
- **--world_size**(`int`,*可选*,默认为`4`):部署使用的npu卡的world_size,在backend为`mindie`时生效。world_size需要与npu_device_ids中指定的卡数目一致。
|
||||
- **--npu_device_ids**(`str`,*可选*,默认为`0,1,2,3`):部署使用的npu卡号,在backend为`mindie`时生效。world_size需要与npu_device_ids中指定的卡数目一致。
|
||||
- 使用`stop`命令可以停止MindIE的部署服务。
|
||||
|
||||
## MindIE
|
||||
@ -96,40 +89,6 @@ openmind-cli deploy stop
|
||||
|
||||
## LMDeploy
|
||||
|
||||
### 环境准备
|
||||
|
||||
不同于openMind Library v1.0.0版本默认配套的PyTorch 2.1.0,当前该接口的LMDeploy部署能力依赖于PyTorch 2.3.1版本,即使用该功能需要修改环境中的PyTorch版本。对此,我们强烈建议用户创建新环境进行模型部署,新建环境可参考[openMind Library安装指南](../install.md)。
|
||||
|
||||
在安装LMDeploy之前,请确保环境中存在`setuptools`和`wheel`。另外,可执行以下命令检验torch_npu以及NPU环境是否可用,以确保LMDeploy顺利安装。
|
||||
|
||||
```shell
|
||||
python -c "import torch_npu;print(torch_npu.npu.is_available());"
|
||||
|
||||
'''
|
||||
True
|
||||
'''
|
||||
```
|
||||
|
||||
LMDeploy安装命令如下:
|
||||
|
||||
```shell
|
||||
git clone -b v0.6.4 https://github.com/InternLM/lmdeploy.git
|
||||
cd lmdeploy
|
||||
pip install -e .
|
||||
pip install dlinfer-ascend==0.1.7
|
||||
```
|
||||
|
||||
主要版本配套说明如下:
|
||||
|
||||
| 软件 | 支持版本 |
|
||||
|------------------|---------------------|
|
||||
| torch | 2.3.1 |
|
||||
| torch-npu | 2.3.1 |
|
||||
| lmdeploy | 0.6.4 |
|
||||
| dlinfer-ascend | 0.1.7 |
|
||||
| transformers | 4.47.1 |
|
||||
| accelerate | 1.0.0rc1 |
|
||||
|
||||
### 部署LMDeploy服务示例
|
||||
|
||||
- 从魔乐社区上获取模型`AI-Research/Qwen2-7B`在默认端口1025上进行部署。
|
||||
@ -165,89 +124,4 @@ pip install dlinfer-ascend==0.1.7
|
||||
}'
|
||||
```
|
||||
|
||||
## vLLM
|
||||
|
||||
### 环境准备
|
||||
|
||||
基于openMind Library基础环境,vLLM还需要满足以下软件配置要求:
|
||||
|
||||
- Python >= 3.9
|
||||
- CANN == 8.1.RC1
|
||||
- PyTorch == 2.6.0
|
||||
- torch-npu == 2.6.0rc1
|
||||
- vllm == 0.7.3
|
||||
- vllm-ascend == 0.7.3rc2
|
||||
|
||||
确保固件驱动和CANN安装配置无误后,可以执行以下命令安装:
|
||||
|
||||
```shell
|
||||
# 安装vllm和torch
|
||||
pip install vllm==0.7.3
|
||||
pip install torch==2.6.0
|
||||
|
||||
# 安装配套的torchvision, torchaudio和torch-npu
|
||||
pip install torchvision==0.21.0
|
||||
pip install torchaudio==2.6.0
|
||||
pip install torch-npu==2.6.0rc1
|
||||
|
||||
#安装vllm-ascend
|
||||
pip install vllm-ascend==0.7.3rc2
|
||||
```
|
||||
|
||||
更加详细的安装教程可参考[vllm-ascend环境准备教程](https://github.com/vllm-project/vllm-ascend/blob/v0.7.3rc2/docs/source/installation.md)。
|
||||
|
||||
### 部署vLLM服务示例
|
||||
|
||||
- 从魔乐社区上获取模型`AI-Research/Qwen2.5-7B`在默认端口1025上进行部署。
|
||||
|
||||
```shell
|
||||
openmind-cli deploy --model_name_or_path AI-Research/Qwen2.5-7B --backend vllm
|
||||
```
|
||||
|
||||
- 使用本地`Qwen2.5-7B`模型在指定端口1025上进行多卡部署,指定0,1,2,3号卡,指定模型权重和激活的数据类型为bf16。
|
||||
|
||||
```shell
|
||||
ASCEND_RT_VISIBLE_DEVICES=0,1,2,3 openmind-cli deploy \
|
||||
--model_name_or_path /path/to/your/Qwen2.5-7B \
|
||||
--backend vllm \
|
||||
--port 1025 \
|
||||
--backend_config "tensor-parallel-size=4,dtype=bfloat16"
|
||||
```
|
||||
|
||||
### 交互示例
|
||||
|
||||
部署成功后,可以在同服务器上使用curl进行交互。
|
||||
|
||||
- 查看模型列表`v1/models`
|
||||
|
||||
```shell
|
||||
curl http://127.0.0.1:1025/v1/models | python3 -m json.tool
|
||||
```
|
||||
|
||||
- 文本补全`v1/completions`
|
||||
|
||||
```shell
|
||||
curl http://127.0.0.1:1025/v1/completions \
|
||||
-H "Content-Type: application/json" \
|
||||
-d '{
|
||||
"model": "AI-Research/Qwen2.5-7B",
|
||||
"prompt": "Beijing is a",
|
||||
"max_tokens": 5,
|
||||
"temperature": 0
|
||||
}' | python3 -m json.tool
|
||||
```
|
||||
|
||||
- 对话`v1/chat/completions`
|
||||
|
||||
```shell
|
||||
curl http://127.0.0.1:1025/v1/chat/completions \
|
||||
-H "Content-Type: application/json" \
|
||||
-d '{
|
||||
"model": "AI-Research/Qwen2.5-7B",
|
||||
"messages": [{"role": "user", "content": "Recommend a place for a seaside holiday."}],
|
||||
"max_tokens": 64,
|
||||
"temperature": 0
|
||||
}' | python3 -m json.tool
|
||||
```
|
||||
|
||||
`openmind-cli deploy`的全量参数可以参考[openmind-cli deploy接口](../api_reference/apis/cli_api.md#openmind-cli-deploy接口)。
|
||||
|
||||
@ -27,8 +27,6 @@ $$
|
||||
|
||||
用户可以在[此处](https://www.hiascend.com/document/detail/zh/Pytorch/60RC2/apiref/apilist/ptaoplist_000142.html)查询该融合算子详细文档,在固定shape的场景中,可以较大幅度提升性能。
|
||||
|
||||
对于FA融合算子,当前openmind统一通过torch原生的sdpa接口调用,对于适配过的模型,使能后,sdpa走FA融合算子,不使能则会走transformers实现的eager模式;对于未适配的模型,其行为是默认行为,当前版本默认走sdpa接口,但sdpa的后端为小算子拼接,不保证性能。
|
||||
|
||||
## RMSNorm
|
||||
|
||||
RmsNorm算子是大模型常用的归一化操作,相比LayerNorm算子,其去掉了减去均值的部分 ,其计算公式为:
|
||||
@ -137,5 +135,3 @@ print(output)
|
||||
#
|
||||
# 3. Get enough sleep: Sleep is essential for good health. Aim for 7-9 hours of sleep each night. Establish a regular sleep schedule and create a relaxing bedtime routine to help you fall asleep more easily. Avoid using electronic devices before bed, as the blue light emitted by screens can interfere with your sleep.
|
||||
```
|
||||
|
||||
注:由于transformers默认走sdpa,在外部不论有无使能`apply_fused_kernel`, 均会调用sdpa接口。但是使能后,openmind会对transformers的sdpa attention进行适配,适配后sdpa后端走npu FA融合算子,未适配的情况下,则是走小算子拼接。
|
||||
|
||||
@ -55,8 +55,7 @@ small_eval_dataset = tokenized_datasets["validation"].shuffle(seed=42).select(ra
|
||||
from openmind import TrainingArguments, Trainer, metrics
|
||||
import numpy as np
|
||||
|
||||
# 在4.51.3版本的transformers中,evaluation_strategy参数已更名为eval_strategy, 参见https://github.com/huggingface/transformers/blob/v4.51.3/src/transformers/training_args.py#L239
|
||||
training_args = TrainingArguments(output_dir="test_trainer", eval_strategy="epoch")
|
||||
training_args = TrainingArguments(output_dir="test_trainer", evaluation_strategy="epoch")
|
||||
|
||||
def compute_metrics(eval_pred):
|
||||
logits, labels = eval_pred
|
||||
|
||||
@ -193,7 +193,7 @@ generator = pipeline(task="text-to-image",
|
||||
image = generator(prompt="masterpiece, best quality, Cute dragon creature, pokemon style, night, moonlight, dim lighting",)
|
||||
```
|
||||
|
||||
silicondiff_npu和PyTorch的对应版本如下,当前silicondiff_npu仅支持PyTorch 2.1.0和Python3.10:
|
||||
silicondiff_npu和PyTorch的对应版本如下,当前silicondiff_npu仅支持PyTorch 2.1.0:
|
||||
|
||||
| PyTorch版本 | silicondiff_npu版本 |
|
||||
|-------------|---------------------|
|
||||
|
||||
450
docs/zh/basic_tutorial/pretrainer.md
Normal file
450
docs/zh/basic_tutorial/pretrainer.md
Normal file
@ -0,0 +1,450 @@
|
||||
# 模型预训练
|
||||
|
||||
## 基础概念
|
||||
|
||||
**预训练**是一种深度学习模型训练的策略,通常在大规模的数据集上进行。预训练的目标是通过在一个相关但较大的任务上训练模型,使得模型学习到通用的特征表示。但是随着大模型参数和所需训练数据量的急剧增长,单个机器的资源上限已无法满足训练要求,于是就引出了分布式训练的概念。
|
||||
|
||||
**分布式训练**指的是将深度学习模型任务分解为多个子任务,并在多个计算设备上并行的进行训练。分布式训练极大地提升了大模型的训练速度,可以大幅降低模型训练的总体时间。
|
||||
|
||||
本文档中的PreTrainer是基于Accelerate实现了多框架(Megatron、DeepSpeed以及FSDP)的分布式能力,并提供了通用的预训练流程管理功能。
|
||||
|
||||
## 环境准备
|
||||
|
||||
```shell
|
||||
torch: 2.1.0
|
||||
transformers: 4.45.2
|
||||
accelerate: 0.28.0
|
||||
deepspeed: 0.15.2
|
||||
megatron_core: 0.4.0rc0
|
||||
```
|
||||
|
||||
### 安装Megatron-LM分布式框架
|
||||
|
||||
若用户需要使用Megatron-LM分布式框架,则还需执行以下步骤。
|
||||
|
||||
1. 安装Megatron([参考MindSpeed的Megatron安装方式](https://gitee.com/ascend/MindSpeed#3-获取-megatron-lm-并指定-commit-id))
|
||||
|
||||
```shell
|
||||
git clone https://github.com/NVIDIA/Megatron-LM.git
|
||||
cd Megatron-LM
|
||||
git checkout bcce6f54e075e3c3374ea67adefe54f3f2da2b07
|
||||
pip install --no-use-pep517 -e . # 使用"--no-use-pep517 -e"安装megatron全部文件
|
||||
```
|
||||
|
||||
2. 安装MindSpeed
|
||||
|
||||
```shell
|
||||
git clone https://gitee.com/ascend/MindSpeed.git
|
||||
cd MindSpeed
|
||||
git checkout origin/1.0.RC1
|
||||
pip install -r requirements.txt
|
||||
pip install -e .
|
||||
```
|
||||
|
||||
3. 使用pip安装魔乐社区openmind_accelerate插件
|
||||
|
||||
```shell
|
||||
#aarch64平台
|
||||
pip install openmind-accelerate
|
||||
|
||||
#x86平台
|
||||
pip install openmind-accelerate --extra-index-url https://download.pytorch.org/whl/cpu
|
||||
```
|
||||
|
||||
4. 安装accelerate与deepspeed
|
||||
|
||||
```shell
|
||||
pip install deepspeed==0.15.2
|
||||
pip install accelerate==0.28.0
|
||||
```
|
||||
|
||||
### openMind Library环境准备
|
||||
|
||||
```shell
|
||||
#aarch64环境下安装
|
||||
pip install openmind[pt]
|
||||
|
||||
#x86环境下安装
|
||||
pip install openmind[pt] --extra-index-url https://download.pytorch.org/whl/cpu
|
||||
```
|
||||
|
||||
openMind Library依赖环境安装请参考[openMind Library安装指南](../install.md)。
|
||||
安装完成后请使用`pip list`检查版本依赖,如果在安装上述依赖的时候,accelerate或transformers版本被刷新,请重新刷回指定版本。
|
||||
|
||||
## 快速使用
|
||||
|
||||
我们提供了[样例配置文件和启动脚本](https://modelers.cn/models/AI-Research/accelerate_examples/tree/main/examples),方便用户一键使用。
|
||||
|
||||
### PreTrainer的使用步骤如下所示
|
||||
|
||||
#### 准备数据
|
||||
|
||||
用户需要准备好自己的预训练数据,例如[alpaca_en](https://modelers.cn/datasets/HaM/alpaca_en/tree/main)数据。
|
||||
如果用户需要使用Megatron-LM分布式框架,可参考[Megatron的数据处理方法](https://github.com/NVIDIA/Megatron-LM?tab=readme-ov-file#data-preprocessing) 进行处理。
|
||||
|
||||
#### 准备模型
|
||||
|
||||
用户需要准备好模型文件,例如[llama2模型](https://modelers.cn/models/AI_Connect/llama2_7b/tree/main)。
|
||||
如果用户需要使用Megatron-LM分布式框架,则只需要准备config.json和tokenizer相关文件即可。
|
||||
|
||||
#### 准备预训练参数
|
||||
|
||||
预训练参数可以通过加载 [llama2_config/llama2-megatron-json-dataset.yaml](https://modelers.cn/models/AI-Research/accelerate_examples/blob/main/examples/llama2_config/llama2-megatron-json-dataset.yaml) 文件自动生成,用户可参考[此处](#llama2_megatron)基于json格式微调数据集的样例配置文件:
|
||||
|
||||
#### 启动
|
||||
|
||||
- Accelerate配置文件可参考:[accelerate_config/accelerate_megatron_config.yaml](https://modelers.cn/models/AI-Research/accelerate_examples/blob/main/examples/accelerate_config/accelerate_megatron_config.yaml)
|
||||
|
||||
```yaml
|
||||
compute_environment: LOCAL_MACHINE
|
||||
debug: false
|
||||
distributed_type: MEGATRON_LM
|
||||
downcast_bf16: 'no'
|
||||
machine_rank: 0
|
||||
main_training_function: main
|
||||
num_machines: 1
|
||||
num_processes: 8
|
||||
rdzv_backend: static
|
||||
same_network: true
|
||||
tpu_env: [ ]
|
||||
tpu_use_cluster: false
|
||||
tpu_use_sudo: false
|
||||
use_cpu: false
|
||||
|
||||
```
|
||||
|
||||
- 模型配置文件可参考:[llama2_config/llama2-megatron-json-dataset.yaml](https://modelers.cn/models/AI-Research/accelerate_examples/blob/main/examples/llama2_config/llama2-megatron-json-dataset.yaml)
|
||||
|
||||
<a id="llama2_megatron"></a>
|
||||
|
||||
```yaml
|
||||
num_training_steps: 1000
|
||||
micro_batch_size: µ_batch_size 4
|
||||
dp: 1
|
||||
gradient_accumulation_steps: &gradient_accumulation_steps 8
|
||||
### seq_length需要小于或等于模型权重配置文件config.json中,"max_position_embeddings"字段的值
|
||||
seq_length: &seq_length 4096
|
||||
megatron_dataset_flag: False
|
||||
### data_path请传入本地微调数据集所在路径
|
||||
data_path: &data_path '/path/to/alpaca_en/alpaca_data_en_52k.json'
|
||||
### 微调模型权重保存路径
|
||||
save_dir: './saves'
|
||||
save_interval: 10000
|
||||
eval_interval: 10000
|
||||
### openmind_model_path请传入本地模型权重文件夹所在路径
|
||||
openmind_model_path: '/path/to/llama2-7b-hf'
|
||||
dtype: 'bf16'
|
||||
|
||||
plugin_args:
|
||||
tp_degree: 8
|
||||
pp_degree: 1
|
||||
num_micro_batches: *gradient_accumulation_steps
|
||||
gradient_clipping: 1.0
|
||||
use_distributed_optimizer: False
|
||||
sequence_parallelism: False
|
||||
other_megatron_args:
|
||||
### tokenizer_model请传入本地模型权重文件中,tokenizer.model文件所在路径
|
||||
tokenizer_model: &tokenizer_model '/path/to/llama2-7b-hf/tokenizer.model'
|
||||
tokenizer_type: &tokenizer_type 'Llama2Tokenizer'
|
||||
finetune: False
|
||||
recompute_granularity: "full"
|
||||
recompute_method: "block"
|
||||
recompute_num_layers: 32
|
||||
optimizer: "adam"
|
||||
lr: 1e-5
|
||||
min_lr: 1e-6
|
||||
adam_beta2: 0.95
|
||||
add_bias_linear: False
|
||||
async_tensor_model_parallel_allreduce: False
|
||||
attention_dropout: 0.0
|
||||
attention_softmax_in_fp32: False
|
||||
bias_gelu_fusion: False
|
||||
ffn_hidden_size: 11008
|
||||
hidden_dropout: 0.0
|
||||
init_method_std: 0.01
|
||||
initial_loss_scale: 65536.0
|
||||
lr_decay_style: "cosine"
|
||||
lr_warmup_fraction: 0.01
|
||||
masked_softmax_fusion: False
|
||||
normalization: "RMSNorm"
|
||||
split: &split "100,0,0"
|
||||
swiglu: True
|
||||
untie_embeddings_and_output_weights: True
|
||||
use_flash_attn: False
|
||||
weight_decay: 0.1
|
||||
no_load_optim: True
|
||||
no_load_rng: True
|
||||
eval_iters: &eval_iters 10
|
||||
position_embedding_type: "rope"
|
||||
|
||||
dataloader_config:
|
||||
return_tensors: 'pt'
|
||||
padding: 'max_length'
|
||||
pad_to_multiple_of: *seq_length
|
||||
max_length: *seq_length
|
||||
|
||||
```
|
||||
|
||||
- 预训练程序文件可参考[train_with_megatron_json_dataset.py](https://modelers.cn/models/AI-Research/accelerate_examples/blob/main/examples/train_with_megatron_json_dataset.py),此python脚本不能直接运行,如需运行,请自行下载如下仓库获取utils相关代码,然后将accelerate_examples/examples/utils复制到此脚本同目录下。
|
||||
|
||||
```shell
|
||||
git clone https://modelers.cn/AI-Research/accelerate_examples.git
|
||||
cp -r accelerate_examples/examples/utils ./ # 自行替换目的路径为train_with_megatron_json_dataset.py所在路径
|
||||
```
|
||||
|
||||
```python
|
||||
import os
|
||||
|
||||
import openmind_accelerate
|
||||
from openmind import PreTrainingArguments, PreTrainer
|
||||
|
||||
from utils.config import get_pretrain_config_file
|
||||
from utils.accelerator import make_accelerator
|
||||
from utils.data import make_train_and_eval_dataloader
|
||||
from utils.tokenizer import get_tokenizer
|
||||
|
||||
pretrain_args = PreTrainingArguments.from_yaml(get_pretrain_config_file())
|
||||
|
||||
os.makedirs(pretrain_args.save_dir, exist_ok=True)
|
||||
|
||||
accelerator = make_accelerator(pretrain_args=pretrain_args)
|
||||
|
||||
tokenizer = get_tokenizer(tokenizer_path=pretrain_args.openmind_model_path, use_fast=False)
|
||||
transformer_dataloader_config = pretrain_args.get_dataloader_config()
|
||||
train_dataloader, eval_dataloader = make_train_and_eval_dataloader(
|
||||
dataloader_config=transformer_dataloader_config,
|
||||
micro_batch_size=pretrain_args.micro_batch_size,
|
||||
data_files=pretrain_args.data_path,
|
||||
max_length=pretrain_args.seq_length,
|
||||
tokenizer=tokenizer,
|
||||
accelerator=accelerator
|
||||
)
|
||||
|
||||
pretrainer = PreTrainer(pretrain_args=pretrain_args,
|
||||
train_dataloader=train_dataloader,
|
||||
eval_dataloader=eval_dataloader,
|
||||
)
|
||||
pretrainer.train()
|
||||
```
|
||||
|
||||
在完成上述环境配置以及配置文件准备后,即可通过如下命令启动微调,请确保其中的训练脚本和配置文件为本地实际路径。
|
||||
|
||||
```shell
|
||||
accelerate launch --config_file accelerate_config/accelerate_megatron_config.yaml train_with_megatron_json_dataset.py --pretrain_config_file llama2_config/llama2-megatron-json-dataset.yaml
|
||||
```
|
||||
|
||||
## 进阶使用
|
||||
|
||||
### 定义预训练参数
|
||||
|
||||
在我们定义PreTrainer之前首先需要定义一个PreTrainingArguments类,它将包含PreTrainer用于训练和评估的所有超参数。用户可以通过配置文件或者直接传参初始化预训练参数。
|
||||
|
||||
#### 使用配置文件
|
||||
|
||||
预训练参数可以通过加载yaml文件自动生成,更多yaml样例可参考:[样例链接](https://modelers.cn/models/AI-Research/accelerate_examples/tree/main/examples/llama2_config)。
|
||||
|
||||
```python
|
||||
from openmind import PreTrainingArguments
|
||||
|
||||
# 路径需要替换为本地路径
|
||||
pretrain_args = PreTrainingArguments.from_yaml(
|
||||
"openmind-accelerate/examples/llama2_config/llama2-megatron.yaml"
|
||||
)
|
||||
```
|
||||
|
||||
#### 直接传参
|
||||
|
||||
预训练参数也可以通过传参的方式实例化。使用Megatron模型训练Megatron数据集的预训练器初始化流程如下。
|
||||
|
||||
参数链接请点击:[PreTrainingArguments说明](#pretrainingarguments说明)。
|
||||
|
||||
```python
|
||||
from openmind import PreTrainingArguments
|
||||
|
||||
# 路径需要替换为本地路径
|
||||
pretrain_args = PreTrainingArguments(
|
||||
megatron_dataset_flag=True,
|
||||
data_path="HaM/alpaca_en",
|
||||
num_training_steps=1000,
|
||||
micro_batch_size=4,
|
||||
dp=1,
|
||||
gradient_accumulation_steps=8,
|
||||
seq_length=2048,
|
||||
)
|
||||
```
|
||||
|
||||
### 使用Megatron框架预训练模型
|
||||
|
||||
用户完成预训练参数配置后即可启动Megatron模型预训练。
|
||||
|
||||
- Accelerate对接Megatron的配置文件可参考:[accelerate_config/accelerate_megatron_config.yaml](https://modelers.cn/models/AI-Research/accelerate_examples/blob/main/examples/accelerate_config/accelerate_megatron_config.yaml)
|
||||
- 使用Megatron框架训练Json数据运行示例可参考:[train_with_megatron_json_dataset.py](https://modelers.cn/models/AI-Research/accelerate_examples/blob/main/examples/train_with_megatron_json_dataset.py)。
|
||||
- Json格式数据预训练配置文件示例可参考:[llama2_config/llama2-megatron-json-dataset.yaml](https://modelers.cn/models/AI-Research/accelerate_examples/blob/main/examples/llama2_config/llama2-megatron-json-dataset.yaml)。
|
||||
|
||||
用户只需要将准备好的`train_dataloader`(`eval_dataloader`非必选),传给PreTrainer,即可使用用户自定义的dataloader预训练模型。
|
||||
|
||||
```shell
|
||||
accelerate launch --config_file accelerate_config/accelerate_megatron_config.yaml train_with_megatron_json_dataset.py --pretrain_config_file llama2_config/llama2-megatron-json-dataset.yaml
|
||||
```
|
||||
|
||||
#### 自定义Megatron框架处理流程(可选)
|
||||
|
||||
##### 自定义处理函数
|
||||
|
||||
如下代码所示,PreTrainer接口在使用Megatron预训练时,支持用户根据实际场景按需自定义`datasets_provider`、`model_provider`、`get_batch`和`loss_function`中的任意函数,并将函数指针赋值到如下属性中。自定义函数的实现可参考官方样例[pretrain_gpt.py](https://github.com/NVIDIA/Megatron-LM/blob/main/pretrain_gpt.py)。
|
||||
|
||||
- `custom_megatron_datasets_provider_function`:用于提供Megatron的训练和验证数据集。
|
||||
- `custom_get_batch_function`:用于生成批次数据。
|
||||
- `custom_model_provider_function`:用于构建模型。
|
||||
- `custom_loss_function`:返回损失函数。
|
||||
|
||||
```python
|
||||
import openmind_accelerate
|
||||
from openmind import PreTrainingArguments
|
||||
from pretrain_gpt import (
|
||||
train_valid_test_datasets_provider,
|
||||
get_batch as megatron_gpt_get_batch,
|
||||
model_provider as megatron_gpt_model_provider,
|
||||
loss_func as megatron_gpt_loss_func,
|
||||
)
|
||||
|
||||
# 路径需要替换为本地路径
|
||||
pretrain_args = PreTrainingArguments.from_yaml(
|
||||
"openmind-accelerate/examples/llama2_config/llama2-megatron-json-dataset.yaml"
|
||||
)
|
||||
train_valid_test_datasets_provider.is_distributed = True
|
||||
pretrain_args.update_distributed_train_args(
|
||||
extra_args={
|
||||
"custom_megatron_datasets_provider_function": train_valid_test_datasets_provider,
|
||||
"custom_get_batch_function": megatron_gpt_get_batch,
|
||||
"custom_model_provider_function": megatron_gpt_model_provider,
|
||||
"custom_loss_function": megatron_gpt_loss_func,
|
||||
}
|
||||
)
|
||||
```
|
||||
|
||||
##### 自定义解析模型配置文件
|
||||
|
||||
用户可依据Accelerate解析模型配置的格式,自定义模型配置文件解析函数。以下为PreTrainer内置的llama模型配置文件解析函数,用户可以根据实际情况参考。
|
||||
|
||||
```python
|
||||
import openmind_accelerate
|
||||
from accelerate.utils import add_model_config_to_megatron_parser
|
||||
|
||||
|
||||
@add_model_config_to_megatron_parser("llama")
|
||||
def parse_llama_config(megatron_lm_plugin, model, batch_data):
|
||||
model_type_name = "gpt"
|
||||
num_layers = model.config.num_hidden_layers
|
||||
pretraining_flag = True
|
||||
hidden_size = model.config.hidden_size
|
||||
num_attention_heads = model.config.num_attention_heads
|
||||
orig_vocab_size = model.config.vocab_size
|
||||
|
||||
max_position_embeddings = getattr(model.config, "max_position_embeddings")
|
||||
seq_length = getattr(model.config, "max_sequence_length", None)
|
||||
if megatron_lm_plugin.seq_length is None:
|
||||
if seq_length is not None:
|
||||
megatron_lm_plugin.seq_length = seq_length
|
||||
elif megatron_lm_plugin.decoder_seq_length is not None:
|
||||
megatron_lm_plugin.seq_length = megatron_lm_plugin.decoder_seq_length
|
||||
elif batch_data is not None:
|
||||
megatron_lm_plugin.seq_length = batch_data["input_ids"].shape[1]
|
||||
else:
|
||||
megatron_lm_plugin.seq_length = max_position_embeddings
|
||||
|
||||
megatron_lm_plugin.megatron_lm_default_args["return_logits"] = megatron_lm_plugin.return_logits
|
||||
megatron_lm_plugin.megatron_lm_default_args["tokenizer_type"] = "Llama2Tokenizer"
|
||||
megatron_lm_plugin.megatron_lm_default_args["model_type_name"] = model_type_name
|
||||
megatron_lm_plugin.megatron_lm_default_args["num_layers"] = num_layers
|
||||
megatron_lm_plugin.megatron_lm_default_args["pretraining_flag"] = pretraining_flag
|
||||
megatron_lm_plugin.megatron_lm_default_args["hidden_size"] = hidden_size
|
||||
megatron_lm_plugin.megatron_lm_default_args["num_attention_heads"] = num_attention_heads
|
||||
megatron_lm_plugin.megatron_lm_default_args["orig_vocab_size"] = orig_vocab_size
|
||||
megatron_lm_plugin.megatron_lm_default_args["max_position_embeddings"] = max_position_embeddings
|
||||
megatron_lm_plugin.megatron_lm_default_args["seq_length"] = megatron_lm_plugin.seq_length
|
||||
megatron_lm_plugin.megatron_lm_default_args["model_return_dict"] = model.config.return_dict
|
||||
|
||||
```
|
||||
|
||||
### 使用其他框架预训练模型
|
||||
|
||||
PreTrainer是基于Accelerate实现的多框架分布式能力,所以PreTrainer除了支持Megatron框架,还支持DeepSpeed和FSDP分布式框架。如下以DeepSpeed分布式框架为例:
|
||||
用户完成Json格式预训练参数配置后即可启动DeepSpeed模型预训练。
|
||||
|
||||
- Accelerate对接DeepSpeed的配置文件示例可参考:[accelerate_config/accelerate_deepspeed_config.yaml](https://modelers.cn/models/AI-Research/accelerate_examples/blob/main/examples/accelerate_config/accelerate_deepspeed_config.yaml)。
|
||||
- 使用DeepSpeed框架训练Json数据运行示例可参考:[train_with_deepspeed.py](https://modelers.cn/models/AI-Research/accelerate_examples/blob/main/examples/train_with_deepspeed.py)。
|
||||
- Json格式数据预训练配置文件示例可参考:[llama2_config/llama2-deepspeed.yaml](https://modelers.cn/models/AI-Research/accelerate_examples/blob/main/examples/llama2_config/llama2-deepspeed.yaml)。
|
||||
|
||||
```yaml
|
||||
num_training_steps: 1000
|
||||
micro_batch_size: 1
|
||||
dp: 8
|
||||
gradient_accumulation_steps: 8
|
||||
seq_length: 4096
|
||||
megatron_dataset_flag: False
|
||||
data_path: '/path/to/alpaca_en/alpaca_data_en_52k.json'
|
||||
save_dir: './saves'
|
||||
save_interval: 10000
|
||||
eval_interval: 10000
|
||||
openmind_model_path: '/path/to/llama2-7b-hf'
|
||||
dtype: 'bf16'
|
||||
|
||||
dataloader_config:
|
||||
return_tensors: 'pt'
|
||||
padding: 'max_length'
|
||||
pad_to_multiple_of: 4096
|
||||
max_length: 4096
|
||||
|
||||
### seq_length、max_length以及padding的值均需要小于或等于模型权重配置文件config.json中,"max_position_embeddings"字段的值
|
||||
```
|
||||
|
||||
```shell
|
||||
accelerate launch --config_file accelerate_config/accelerate_deepspeed_config.yaml train_with_deepspeed.py --pretrain_config_file llama2_config/llama2-deepspeed.yaml
|
||||
```
|
||||
|
||||
## PreTrainingArguments说明
|
||||
|
||||
| **参数名** | **描述** | **类型** | **默认值** | 是否可选 |
|
||||
|-----------------------------|-----------------------|--------|---------|---------|
|
||||
| num_training_steps | 训练模型的总步数。 | int | - | 必选 |
|
||||
| micro_batch_size | 每个模型实例的批处理大小。 | int | - | 必选 |
|
||||
| dp | 数据并行度。 | int | - | 必选 |
|
||||
| gradient_accumulation_steps | 在更新模型参数之前要累积的梯度步数。 | int | 1 | 可选 |
|
||||
| seq_length | 要处理的最大序列长度。 | int | None | 可选 |
|
||||
| megatron_dataset_flag | 是否使用Megatron类型数据集的标志。 | bool | None | 可选 |
|
||||
| data_path | 训练数据集的路径。 | str | None | 可选 |
|
||||
| save_dir | 要将检查点保存到的输出目录。 | str | None | 可选 |
|
||||
| save_interval | 检查点保存的迭代间隔。 | int | None | 可选 |
|
||||
| eval_interval | 验证集评估的迭代间隔。 | int | None | 可选 |
|
||||
| openmind_model_path | 待训练的openMind模型的路径。 | str | None | 可选 |
|
||||
| dtype | 运行模型的dtype模式。 | str | bf16 | 可选 |
|
||||
| plugin_args | [Accelerate插件参数。](https://huggingface.co/docs/accelerate/v0.28.0/en/package_reference/megatron_lm#accelerate.utils.MegatronLMPlugin) | dict | None | 可选 |
|
||||
| dataloader_config | [加载器配置参数。](https://huggingface.co/docs/accelerate/v0.28.0/en/package_reference/megatron_lm#accelerate.utils.MegatronLMDummyDataLoader) | dict | None | 可选 |
|
||||
| report_to | Accelerate日志上报到何处。 | str | None | 可选 |
|
||||
| project_name | 项目的名称。 | str | None | 可选 |
|
||||
|
||||
## PreTrainer说明
|
||||
|
||||
PreTrainer接口会根据Accelerate是否使用Megatron-LM分布式加速库(以环境变量`ACCELERATE_USE_MEGATRON_LM=="true"`为依据),来选择创建Megatron预训练器或其他预训练器。
|
||||
|
||||
### Megatron预训练器
|
||||
|
||||
| 序号 | 约束描述 |
|
||||
| ---- |-----------------------------------------------------------------------|
|
||||
| 1 | 需要预先安装Megatron依赖。 |
|
||||
| 2 | 需要预先安装openmind_accelerate插件依赖。 |
|
||||
| 3 | Megatron会自管理累积梯度,所以Accelerate的`gradient_accumulation_steps`参数需要指定为 1。 |
|
||||
| 4 | 初始化时需要提供`train_dataloader`或在PreTrainingArguments里提供`data_path`。 |
|
||||
| 5 | 初始化时需要提供`model`或在PreTrainingArguments里提供`openmind_model_path`。 |
|
||||
|
||||
### 其他预训练器
|
||||
|
||||
| 序号 | 约束描述 |
|
||||
| ---- |----------------------------------------------------------------|
|
||||
| 1 | 初始化时需要提供`train_dataloader`。 |
|
||||
| 2 | 初始化时需要提供`optimizer`。 |
|
||||
| 3 | 初始化时需要提供`lr_scheduler`。 |
|
||||
| 4 | 初始化时需要提供`model`或在PreTrainingArguments里提供`openmind_model_path`。 |
|
||||
|
||||
*感谢社区贡献的 llama2 模型以及 alpaca_en 数据集*
|
||||
@ -291,7 +291,7 @@ Pairwise格式示例数据如下:
|
||||
"file_name(选填)": "dataset.json",
|
||||
"split(选填)": "train",
|
||||
"num_samples(选填)": xxx,
|
||||
"columns(选填)": {
|
||||
"columns": {
|
||||
"prompt": "instruction",
|
||||
"query": "input",
|
||||
"response": "output",
|
||||
@ -321,19 +321,10 @@ Pairwise格式示例数据如下:
|
||||
"split(选填)": "train",
|
||||
"num_samples(选填)": xxx,
|
||||
"formatting": "sharegpt",
|
||||
"columns(选填)": {
|
||||
"columns": {
|
||||
"messages": "conversations",
|
||||
"system": "system",
|
||||
"tools": "tools"
|
||||
},
|
||||
"tags(选填)": {
|
||||
"role_tag": "from",
|
||||
"content_tag": "value",
|
||||
"user_tag": "human",
|
||||
"assistant_tag": "gpt",
|
||||
"observation_tag": "observation",
|
||||
"function_tag": "function_call",
|
||||
"system_tag": "system"
|
||||
}
|
||||
}
|
||||
}
|
||||
@ -351,7 +342,7 @@ Pairwise格式示例数据如下:
|
||||
"split(选填)": "train",
|
||||
"num_samples(选填)": xxx,
|
||||
"formatting(必填)": "text",
|
||||
"columns(选填)": {
|
||||
"columns": {
|
||||
"text_column": "text_key"
|
||||
}
|
||||
}
|
||||
|
||||
@ -1,24 +0,0 @@
|
||||
# 序列并行
|
||||
|
||||
当用户的数据集序列维度增长时,训练内存开销会以 $O$($S^2$) 的速度增长,因此需要针对长序列场景进行特定的优化解决长序列训练场景的需求。`openMind Library`当前支持在`sft`下的Ulysses长序列并行方案,以此解决序列维度扩展问题。
|
||||
|
||||
## Ulysses原理
|
||||
|
||||
Ulysses将各个样本在序列维度上进行切分并分发给各个计算设备,然后在模型的注意力(attention)计算之前,它对已分割的查询(Query)、键(Key)、值(Value)执行all-to-all通讯操作,使得每个计算设备都具备非重叠注意力头的完整序列,此时参与计算的设备可以并行的计算不同的注意力头。在注意力(attention)计算结束后,再次执行all-to-all通讯操作,在注意力头的维度上收集结果,同时在序列维度上进行切分。
|
||||
|
||||
## 配置序列并行
|
||||
|
||||
在yaml文件中配置以下参数:
|
||||
|
||||
```yaml
|
||||
sequence_parallel_size: 4
|
||||
```
|
||||
|
||||
- `sequence_parallel_size`为处理一个训练数据序列的计算设备的数量。默认值为1,表示未开启序列并行。
|
||||
|
||||
当开启序列并行时,需要满足以下几点:
|
||||
|
||||
- 计算设备数量`world_size`可以被`sequence_parallel_size`整除。
|
||||
- 模型注意力头数量`num_attention_heads`可以被`sequence_parallel_size`整除。
|
||||
- `max_length`可以被`sequence_parallel_size` * 8整除。
|
||||
- 设置`use_npu_fusion_attention`参数为True。
|
||||
@ -79,75 +79,6 @@ You are a helpful assistant.<|im_end|>
|
||||
</tr>
|
||||
</thead>
|
||||
<tbody>
|
||||
<!-- Qwen3 -->
|
||||
<tr>
|
||||
<td rowspan="11">Qwen3</td>
|
||||
<td>Qwen3-32B-Chat</td>
|
||||
<td>Models_Ecosystem/Qwen3-32B</td>
|
||||
<td>Qwen/Qwen3-32B</td>
|
||||
<td rowspan="11">qwen</td>
|
||||
<td></td>
|
||||
</tr>
|
||||
<tr>
|
||||
<td>Qwen3-14B-Chat</td>
|
||||
<td>Models_Ecosystem/Qwen3-14B</td>
|
||||
<td>Qwen/Qwen3-14B</td>
|
||||
<td></td>
|
||||
</tr>
|
||||
<tr>
|
||||
<td>Qwen3-14B</td>
|
||||
<td>Models_Ecosystem/Qwen3-14B-Base</td>
|
||||
<td>Qwen/Qwen3-14B-Base</td>
|
||||
<td></td>
|
||||
</tr>
|
||||
<tr>
|
||||
<td>Qwen3-8B-Chat</td>
|
||||
<td>Models_Ecosystem/Qwen3-8B</td>
|
||||
<td>Qwen/Qwen3-8B</td>
|
||||
<td></td>
|
||||
</tr>
|
||||
<tr>
|
||||
<td>Qwen3-8B</td>
|
||||
<td>Models_Ecosystem/Qwen3-8B-Base</td>
|
||||
<td>Qwen/Qwen3-8B-Base</td>
|
||||
<td></td>
|
||||
</tr>
|
||||
<tr>
|
||||
<td>Qwen3-4B-Chat</td>
|
||||
<td>Models_Ecosystem/Qwen3-4B</td>
|
||||
<td>Qwen/Qwen3-4B</td>
|
||||
<td></td>
|
||||
</tr>
|
||||
<tr>
|
||||
<td>Qwen3-4B</td>
|
||||
<td>Models_Ecosystem/Qwen3-4B-Base</td>
|
||||
<td>Qwen/Qwen3-4B-Base</td>
|
||||
<td></td>
|
||||
</tr>
|
||||
<tr>
|
||||
<td>Qwen3-1.7B-Chat</td>
|
||||
<td>Models_Ecosystem/Qwen3-1.7B</td>
|
||||
<td>Qwen/Qwen3-1.7B</td>
|
||||
<td></td>
|
||||
</tr>
|
||||
<tr>
|
||||
<td>Qwen3-1.7B</td>
|
||||
<td>Models_Ecosystem/Qwen3-1.7B-Base</td>
|
||||
<td>Qwen/Qwen3-1.7B-Base</td>
|
||||
<td></td>
|
||||
</tr>
|
||||
<tr>
|
||||
<td>Qwen3-0.6B-Chat</td>
|
||||
<td>Models_Ecosystem/Qwen3-0.6B</td>
|
||||
<td>Qwen/Qwen3-0.6B</td>
|
||||
<td></td>
|
||||
</tr>
|
||||
<tr>
|
||||
<td>Qwen3-0.6B</td>
|
||||
<td>Models_Ecosystem/Qwen3-0.6B-Base</td>
|
||||
<td>Qwen/Qwen3-0.6B-Base</td>
|
||||
<td></td>
|
||||
</tr>
|
||||
<!-- Qwen2.5 -->
|
||||
<tr>
|
||||
<td rowspan="3">Qwen2.5</td>
|
||||
@ -169,15 +100,6 @@ You are a helpful assistant.<|im_end|>
|
||||
<td>Qwen/Qwen2.5-32B</td>
|
||||
<td></td>
|
||||
</tr>
|
||||
<!-- Qwen2.5-VL -->
|
||||
<tr>
|
||||
<td>Qwen2.5-VL</td>
|
||||
<td>Qwen2.5-VL-7B-Instruct</td>
|
||||
<td>PyTorch-NPU/Qwen2.5-VL-7B-Instruct</td>
|
||||
<td>Qwen/Qwen2.5-VL-7B-Instruct</td>
|
||||
<td>qwen2_vl</td>
|
||||
<td></td>
|
||||
</tr>
|
||||
<!-- Qwen2 -->
|
||||
<tr>
|
||||
<td rowspan="3">Qwen2</td>
|
||||
@ -334,6 +256,15 @@ You are a helpful assistant.<|im_end|>
|
||||
<td>deepseek-ai/DeepSeek-R1-Distill-Qwen-1.5B</td>
|
||||
<td></td>
|
||||
</tr>
|
||||
<!-- Qwen2.5-VL -->
|
||||
<tr>
|
||||
<td>Qwen2.5-VL</td>
|
||||
<td>Qwen2.5-VL-7B-Instruct</td>
|
||||
<td>PyTorch-NPU/Qwen2.5-VL-7B-Instruct</td>
|
||||
<td>Qwen/Qwen2.5-VL-7B-Instruct</td>
|
||||
<td>qwen2_vl</td>
|
||||
<td></td>
|
||||
</tr>
|
||||
|
||||
</tbody>
|
||||
</table>
|
||||
@ -382,7 +313,6 @@ export HUB_WHITE_LIST_PATHS=/home/cache_model
|
||||
| load_in_4bit | 支持QLoRA训练时使用4bit精度。 | bool | False | 可选 |
|
||||
| use_dora | 是否使用DoRA。 | bool | False | 可选 |
|
||||
| init_lora_weights | LoRA权重初始化方法。只支持pissa_niter_[number of iters]。 | str | True | 可选 |
|
||||
| sequence_parallel_size | 处理一个训练数据序列的计算设备的数量。 | int | 1 | 可选 |
|
||||
|
||||
LoRA与QLoRA的详细用法请参考[模型量化与导出](./lora_and_merge.md)。
|
||||
|
||||
|
||||
@ -1,9 +1,11 @@
|
||||
# 基于DataTrove的数据工程实践
|
||||
# 在NPU上使用DataTrove进行数据过滤处理
|
||||
|
||||
DataTrove是一个数据处理和分析的工具库,主要用于高效处理大规模数据集。它提供了一系列模块化组件,包括数据读取、去重、过滤和写入等功能,能够灵活地组合成数据处理管道,满足不同场景下的数据处理需求。本教程介绍如何使用DataTrove第三方套件进行数据过滤,包括格式转换、数据去重、敏感词过滤和中文过滤。
|
||||
DataTrove是一个数据处理和分析的工具库,主要用于高效处理大规模数据集。它提供了一系列模块化组件,包括数据读取、去重、过滤和写入等功能,能够灵活地组合成数据处理管道,满足不同场景下的数据处理需求。本教程介绍如何使用DataTrove第三方套件在npu上进行数据过滤,包括格式转换、数据去重、敏感词过滤和中文过滤。
|
||||
|
||||
## 环境准备
|
||||
|
||||
基础环境配置请参考 [环境准备文档](../install.md)。
|
||||
|
||||
```bash
|
||||
pip install datatrove[processing,io]==0.5.0
|
||||
pip install spacy==3.8.6
|
||||
|
||||
@ -1,111 +0,0 @@
|
||||
# 在NPU上使用OpenCompass进行模型评测
|
||||
|
||||
OpenCompass是一个LLM评估平台,它提供全面的大模型评测功能,包括广泛的模型支持、高效的评测速度、主观的评测能力、数据污染检查和丰富的长文本评测能力。本教程介绍如何使用OpenCompass第三方套件在npu上对本地模型完成评测。
|
||||
|
||||
## 环境配置
|
||||
|
||||
### 环境依赖
|
||||
|
||||
| 依赖 | 推荐版本 |
|
||||
|-----------|----------------------------------------------------------------------------------------------------------|
|
||||
| Python | [3.10](https://www.python.org/downloads/) |
|
||||
| CANN | 在研版本* |
|
||||
| torch-npu | 在研版本* |
|
||||
| torch | [2.6.0](https://github.com/pytorch/pytorch/releases/tag/v2.6.0) |
|
||||
|
||||
- *在研版本请联系相关人员获取,获得当前较优的性能。
|
||||
|
||||
### 环境准备
|
||||
|
||||
基础环境配置请参考 [环境准备文档](../install.md) 的前四个步骤。
|
||||
|
||||
```bash
|
||||
git clone https://github.com/open-compass/opencompass.git
|
||||
cd opencompass
|
||||
git checkout -b v0.4.2 tags/0.4.2
|
||||
pip install -e .
|
||||
```
|
||||
|
||||
同时请安装`2.6.0`版本的`torch`和`torch_npu`。
|
||||
|
||||
```bash
|
||||
pip install torch==2.6.0
|
||||
pip install torch_npu-2.6.0.dev*-cp*-cp*-manylinux_*.whl
|
||||
```
|
||||
|
||||
接下来,将基于qwen-2.5-7b-instruct模型和gsm8k数据集进行演示。
|
||||
|
||||
## 模型准备
|
||||
|
||||
可通过带lfs的git 从魔乐社区进行模型下载。
|
||||
|
||||
```bash
|
||||
git clone https://modelers.cn/AI-Research/Qwen2.5-7B-Instruct.git
|
||||
```
|
||||
|
||||
由于模型路径后续会使用到,这里假设下载后模型的位置在 `/model/Qwen2.5-7B-Instruct/`。
|
||||
|
||||
## 数据集准备
|
||||
|
||||
大部分数据集会随着评测的启动自动下载,部分数据集需要手动下载。可通过`opencompass/utils/datasets_info.py`文件查看数据集下载链接,下载后将文件存在`/root/.cache/opencompass/data/`。本示例使用的gsm8k数据集会由OpenCompass自动下载。
|
||||
|
||||
## 启动评测
|
||||
|
||||
可通过以下命令查看或过滤当前可用的模型和数据集配置。
|
||||
|
||||
```bash
|
||||
python tools/list_configs.py llama mmlu
|
||||
```
|
||||
|
||||
- 目前已验证的数据集配置包括`aime2024_gen_6e39a4`、`gpqa_gen_4baadb`、`math_500_gen`、`mmlu_gen_a484b3`、`gsm8k_gen`。其他数据集配置以用户使用为准。
|
||||
|
||||
可通过以下命令启动评测。
|
||||
|
||||
```bash
|
||||
cd opencompass
|
||||
python run.py \
|
||||
--datasets gsm8k_gen \
|
||||
--hf-type chat \
|
||||
--hf-path /model/Qwen2.5-7B-Instruct/ \
|
||||
--tokenizer-kwargs padding_side="left" truncation="left" trust_remote_code="True" \
|
||||
--model-kwargs device_map="auto" \
|
||||
--max-seq-len 2048 \
|
||||
--max-out-len 4096 \
|
||||
--min-out-len 16 \
|
||||
--batch-size 32 \
|
||||
--max-num-workers 4
|
||||
```
|
||||
|
||||
- datasets中可以传入多个数据集,从而一次评估多个数据集。
|
||||
|
||||
若有需要,可通过添加`generation-kwargs`参数,使得模型输出具有一定的随机性。
|
||||
|
||||
```bash
|
||||
--generation-kwargs do_sample="True" temperature=0.7 top_k=50 top_p=0.8
|
||||
```
|
||||
|
||||
## 可视化评估结果
|
||||
|
||||
评估完成后,评估结果表格将打印如下。
|
||||
|
||||
```text
|
||||
dataset version metric mode _hf
|
||||
-------- -------- -------- ------ -----
|
||||
gsm8k 1d7fe4 accuracy gen 80.52
|
||||
|
||||
```
|
||||
|
||||
所有运行输出将定向到`outputs/default/`目录,结构如下。
|
||||
|
||||
```text
|
||||
outputs/default/
|
||||
├── 20230220_183030 # 每个实验一个文件夹
|
||||
│ ├── configs # 用于记录的已转储的配置文件。如果在同一个实验文件夹中重新运行了不同的实验,可能会保留多个配置
|
||||
│ ├── logs # 推理和评估阶段的日志文件
|
||||
│ │ ├── eval
|
||||
│ │ └── infer
|
||||
│ ├── predictions # 每个任务的推理结果
|
||||
│ ├── results # 每个任务的评估结果
|
||||
│ └── summary # 单个实验的汇总评估结果
|
||||
├── ...
|
||||
```
|
||||
@ -15,7 +15,8 @@ openMind Library v1.0.0版本配套说明如下,目前仅支持Linux系统。
|
||||
| MindSpeed(可选) | 1.0.RC2/ | https://gitee.com/ascend/MindSpeed/tree/1.0.RC2/ |
|
||||
| Megatron-LM(可选) | 0.6.0 | https://github.com/NVIDIA/Megatron-LM/releases/tag/core_v0.6.0 |
|
||||
| MindSpore NLP(可选) | 0.4.1 | https://github.com/mindspore-lab/mindnlp/tree/v0.4.1 |
|
||||
| silicondiff_npu(可选) | 2.1.0.post3 | https://pypi.org/project/silicondiff-npu/2.1.0.post3 |
|
||||
| diffusers(可选) | 0.27.0 | https://github.com/huggingface/diffusers/tree/v0.27.0 |
|
||||
| silicondiff_npu(可选) | 2.1.0 | https://pypi.org/project/silicondiff-npu/2.1.0/ |
|
||||
| mindone(可选) | 0.2.0 | https://gitee.com/mindspore-lab/mindone/tree/v0.2.0/ |
|
||||
|
||||
## 安装指导
|
||||
|
||||
@ -4,6 +4,8 @@ openMind Library是一个深度学习开发套件,通过简单易用的API支
|
||||
|
||||
## openMind Library特性
|
||||
|
||||
+ 为了应对大模型分布式训练的挑战,openMind Library提供了预训练接口,支持MindSpeed、Accelerate等加速库,帮助开发者顺畅快速地训练大模型,具体可参考[模型预训练](basic_tutorial/pretrainer.md)章节。
|
||||
|
||||
+ openMind Library基于[transformers库](https://github.com/huggingface/transformers),集成了PyTorch框架下主流第三方工具的功能,提供了一键式的封装的微调命令行接口解决方案,涵盖了从数据处理、权重加载,到低参数训练、量化适配,训练和跟踪的全流程功能,更多细节可查看[模型训练](basic_tutorial/train/overview.md)。
|
||||
|
||||
+ openMind Library对Transformers和MindFormers的AutoClass、Pipeline、Trainer等接口进行封装,并增强了其功能,提供了对应的SDK。还提供了从魔乐社区自动下载和加载模型的能力,同时扩展新增了昇腾NPU亲和的特性,有效提升在昇腾NPU上进行模型训练推理的性能,具体可参考[模型训练](basic_tutorial/train/overview.md)和[模型推理](basic_tutorial/pipeline.md)章节。
|
||||
|
||||
@ -259,7 +259,7 @@ openMind Library提供了一个`Trainer`类来实现训练模型所需功能。
|
||||
per_device_train_batch_size=4,
|
||||
per_device_eval_batch_size=4,
|
||||
num_train_epochs=10,
|
||||
eval_strategy="epoch",
|
||||
evaluation_strategy="epoch",
|
||||
)
|
||||
```
|
||||
|
||||
|
||||
@ -1,113 +1,84 @@
|
||||
# 基于昇腾NPU复现open-r1
|
||||
|
||||
open-r1项目是huggingface官方开源的对DeepSeek-R1模型进行完全开放式复现的项目,是当前的主流复现项目,其目的是构建DeepSeek-R1训练流程缺失的部分,以便每个人都能在此基础上构建复现R1,当前已经有24k+star数。
|
||||
open-r1项目是Hugging Face官方开源的对DeepSeek-R1模型进行完全开放式复现的项目,是当前的主流复现项目,其目的是构建DeepSeek-R1训练流程缺失的部分,以便每个人都能在此基础上构建复现R1,当前已经有23k+star数。
|
||||
|
||||
昇腾已适配完成open-r1项目的重要步骤:打通R1-Zero的GRPO流程,同时支持通过VLLM等生态库实现训练过程中的数据生产,从而验证了通过昇腾训练出DeepSeek-R1-Zero以及DeepSeek-R1模型的可行性。
|
||||
本项目的目的为基于昇腾NPU进行open-r1项目的适配和验证。
|
||||
|
||||
## 环境配置
|
||||

|
||||
|
||||
上图所示为open-r1项目中呈现的3个step,我们对其进行了适配复现:
|
||||
|
||||
step1:蒸馏复刻,使用DeepSeek-R1构造推理思维链数据,并使用小模型进行SFT,我们基于Qwen2.5-7B-Instruct模型和开源的Sky-T1_data_17k在昇腾NPU验证了step1的有效性。具体实验步骤可以参考文档:[在NPU上进行模型蒸馏和微调DeepSeek-R1-Distill系列模型](../../../docs/zh/best_practice/deepseek_r1.md)。
|
||||
|
||||
step2:通过GRPO算法复现R1-Zero流程。我们基于Qwen2.5-7B-Instrct模型在昇腾NPU上进行了验证,可以观察到reward在少数迭代之后快速上升的现象,并且观察到了Aha Moment。
|
||||
|
||||
step3:多阶段训练,从基础模型到RL调优,我们基于Qwen2.5-7B模型和`OpenR1-Math-220k`处理后的数据集进行了SFT与GRPO,在MATH-500上评测结果为:54.8->75.2->79.6。
|
||||
|
||||
下文为具体的环境依赖、执行过程和实验结果。
|
||||
|
||||
**注意:当前版本仍为在研版本,将会持续更新。**
|
||||
|
||||
|
||||
## 1、版本依赖
|
||||
|
||||
### 支持的设备
|
||||
- Atlas A2 训练系列 (Atlas 800T A2, Atlas 900 A2 PoD)
|
||||
|
||||
### 环境依赖
|
||||
| 依赖 | 推荐版本 |
|
||||
|-----------|----------------------------------------------------------------------------------------------------------|
|
||||
| Python | [3.10](https://www.python.org/downloads/) |
|
||||
| CANN | 在研版本* |
|
||||
| NNAL | 在研版本* |
|
||||
| torch-npu | 在研版本* |
|
||||
| torch | [2.6.0](https://github.com/pytorch/pytorch/releases/tag/v2.6.0) |
|
||||
| torchvision | 0.21.0 |
|
||||
### 版本要求
|
||||
| 依赖 | 推荐版本 |
|
||||
|-----------|-------------------------------------------------------------------|
|
||||
| python | [3.10](https://www.python.org/downloads/) |
|
||||
| CANN | 在研版本* |
|
||||
| torch-npu | 在研版本* | |
|
||||
| torch | [2.5.1](https://github.com/pytorch/pytorch/releases/tag/v2.5.1) |
|
||||
|
||||
* *在研版本请联系相关人员获取,获得当前较优的性能。
|
||||
* *在研版本请联系相关人员获取,获得当前较优的性能。如果使用社区版本,可以参考文档[通过社区版本执行open-r1复现使用说明](./README_RC3.md)。
|
||||
|
||||
### 安装vLLM
|
||||
## 2、环境配置
|
||||
|
||||
### 步骤一、安装vLLM
|
||||
|
||||
```shell
|
||||
git clone https://github.com/vllm-project/vllm.git
|
||||
git clone -b v0.7.1 https://github.com/vllm-project/vllm.git
|
||||
cd vllm
|
||||
git checkout 68bb122eb
|
||||
pip install -r requirements/build.txt
|
||||
pip install -r requirements-build.txt
|
||||
VLLM_TARGET_DEVICE=empty pip install -e .
|
||||
```
|
||||
|
||||
### 安装vllm-ascend
|
||||
### 步骤二、安装vllm-ascend
|
||||
|
||||
```shell
|
||||
git clone https://github.com/vllm-project/vllm-ascend.git
|
||||
git clone -b v0.7.1-dev https://github.com/vllm-project/vllm-ascend.git
|
||||
cd vllm-ascend
|
||||
git checkout c3d1a3782
|
||||
COMPILE_CUSTOM_KERNELS=0 pip install -e .
|
||||
```
|
||||
|
||||
### 安装trl
|
||||
|
||||
```shell
|
||||
git clone https://github.com/huggingface/trl.git
|
||||
cd trl
|
||||
git checkout 27adc3016
|
||||
git checkout e8131b99cf199f50a304e6e6fb125a1b95bcc92b
|
||||
pip install -e .
|
||||
```
|
||||
|
||||
### 安装open-r1
|
||||
### 步骤三、安装TRL
|
||||
|
||||
在当前目录执行以下命令:
|
||||
在openmind/examples/research/open_r1目录执行以下命令:
|
||||
```shell
|
||||
cd trl
|
||||
pip install -e .
|
||||
```
|
||||
|
||||
### 步骤四、安装open-r1
|
||||
|
||||
在openmind/examples/research/open_r1目录执行以下命令:
|
||||
```shell
|
||||
git clone https://github.com/huggingface/open-r1.git
|
||||
cd open-r1
|
||||
git checkout e128cd5edcdcb86d577250b14848357e3af807f1
|
||||
# 从本项目中拷贝部分内容至本地open-rl代码仓中
|
||||
cp -r ../recipes/Qwen2.5-7B-Instruct ./recipes/Qwen2.5-7B-Instruct
|
||||
cp ../setup.py ./setup.py
|
||||
pip install -e ".[dev]"
|
||||
```
|
||||
|
||||
## 执行GRPO训练
|
||||
|
||||
### 单机
|
||||
## 3、执行open-r1中的step2:GRPO算法
|
||||
|
||||
在openmind/examples/research/open_r1目录执行以下命令:
|
||||
```shell
|
||||
cd open-r1
|
||||
|
||||
# 在trl路径下执行
|
||||
# 启动推理server
|
||||
trl vllm-serve --model path/to/Qwen2.5-7B-Instruct --tensor_parallel_size 1
|
||||
|
||||
# 在open-r1路径下执行
|
||||
# 启动训练
|
||||
ASCEND_RT_VISIBLE_DEVICES=1,2,3,4,5,6,7 ACCELERATE_LOG_LEVEL=info accelerate launch --config_file recipes/accelerate_configs/zero2.yaml --num_processes 7\
|
||||
ACCELERATE_LOG_LEVEL=info accelerate launch --config_file recipes/accelerate_configs/zero2.yaml --num_processes 7\
|
||||
src/open_r1/grpo.py \
|
||||
--config recipes/Qwen2.5-7B-Instruct/grpo/config_demo.yaml --vllm_server_host 127.0.0.1
|
||||
```
|
||||
|
||||
### 多机
|
||||
|
||||
在主节点执行:
|
||||
|
||||
```shell
|
||||
cd trl
|
||||
|
||||
# 在trl路径下执行
|
||||
# 启动推理server
|
||||
trl vllm-serve --model path/to/Qwen2.5-7B-Instruct --tensor_parallel_size 1
|
||||
|
||||
# 在open-r1路径下执行
|
||||
# 启动训练
|
||||
ASCEND_RT_VISIBLE_DEVICES=1,2,3,4,5,6,7 ACCELERATE_LOG_LEVEL=info accelerate launch --config_file recipes/accelerate_configs/zero2.yaml\
|
||||
--num_processes 14 --num_machines 2 --main_process_ip x.x.x.x(主节点ip) --main_process_port 12345 --machine_rank 0 \
|
||||
src/open_r1/grpo.py \
|
||||
--config recipes/Qwen2.5-7B-Instruct/grpo/config_demo.yaml --vllm_server_host x.x.x.x(主节点ip)
|
||||
```
|
||||
|
||||
在次节点执行:
|
||||
|
||||
```shell
|
||||
|
||||
# 在open-r1路径下执行
|
||||
# 启动训练
|
||||
ACCELERATE_LOG_LEVEL=info accelerate launch --config_file recipes/accelerate_configs/zero2.yaml \
|
||||
--num_processes 14 --num_machines 2 --main_process_ip x.x.x.x(主节点ip) --main_process_port 12345 --machine_rank 1 \
|
||||
src/open_r1/grpo.py \
|
||||
--config recipes/Qwen2.5-7B-Instruct/grpo/config_demo.yaml --vllm_server_host x.x.x.x(主节点ip)
|
||||
--config recipes/Qwen2.5-7B-Instruct/grpo/config_demo.yaml
|
||||
```
|
||||
|
||||
基于Qwen2.5-7B-Instrct模型和MATH-lighteval数据集训练的相关结果图如下:
|
||||
@ -133,5 +104,71 @@ Aha moment
|
||||
| Qwen2.5-7B-Instruct | 41.8 |
|
||||
| Qwen2.5-7B-Instruct + GRPO 30steps | 73 |
|
||||
|
||||
## 4、执行open-r1中的step3:SFT+GRPO算法
|
||||
|
||||
我们基于Qwen2.5-7B模型复现step3,实验结果和启动方式如下:
|
||||
|
||||
**步骤一 SFT**
|
||||
|
||||
我们使用openMind进行SFT过程。
|
||||
|
||||
1、准备数据集
|
||||
|
||||
SFT阶段使用的数据集为从`OpenR1-Math-220k`处理得到的数据集:[openmind/OpenR1-Math-220k_filtered_step3_SFT](https://modelers.cn/datasets/openmind/OpenR1-Math-220k_filtered_step3_SFT)
|
||||
|
||||
2、更新微调配置
|
||||
|
||||
- 微调配置为`examples/qwen2.5/train_sft_qwen2_5_7b_openr1.yaml`。
|
||||
- 若模型在本地,可将`model_id`改为`model_name_or_path`,并将对应值改为模型本地路径, 同时请在yaml文件中增加template字段,值可参见[此处](../../../docs/zh/basic_tutorial/train/train_params.md#模型数据配置模板)设定
|
||||
- 微调后的模型保存在`output_dir`下。
|
||||
- 若需要按照step保存checkpoint,可在yaml文件中添加参数`save_strategy: steps`。
|
||||
|
||||
3、启动微调
|
||||
```shell
|
||||
openmind-cli train openmind/examples/qwen2.5/train_sft_qwen2_5_7b_openr1.yaml
|
||||
```
|
||||
|
||||
4、评测结果
|
||||
|
||||
我们基于MATH-500对比了sft前后的评估数值(base模型加上few-shot1进行评估),结果如下:
|
||||
|
||||
| **模型**| **MATH-500得分**|
|
||||
|---------|----------------|
|
||||
| Qwen2.5-7B | 54.8|
|
||||
| Qwen2.5-7B + SFT | 75.2|
|
||||
|
||||
**步骤二 GRPO**
|
||||
|
||||
1、准备数据集
|
||||
|
||||
GRPO使用的数据集为从`OpenR1-Math-220k`过滤得到的数据集:[openmind/OpenR1-Math-220k_filtered_step3_GRPO](https://modelers.cn/datasets/openmind/OpenR1-Math-220k_filtered_step3_GRPO),通过以下命令将数据集下载到本地。
|
||||
```shell
|
||||
git clone https://modelers.cn/datasets/openmind/OpenR1-Math-220k_filtered_step3_GRPO.git
|
||||
```
|
||||
|
||||
2、更新微调配置
|
||||
|
||||
- 微调配置为`recipes/Qwen2.5-7B-step3/GRPO/config_demo.yaml`。
|
||||
- 需要将`model_name_or_path`和`dataset_name`改为模型和数据集的本地路径。
|
||||
- 模型保存在`output_dir`下。
|
||||
|
||||
3、启动GRPO训练
|
||||
|
||||
```shell
|
||||
ACCELERATE_LOG_LEVEL=info accelerate launch --config_file recipes/accelerate_configs/zero3.yaml --num_processes 7\
|
||||
src/open_r1/grpo.py \
|
||||
--config recipes/Qwen2.5-1.5B-step3/GRPO/config_demo.yaml
|
||||
```
|
||||
|
||||
4、评测结果
|
||||
|
||||
| **模型** | **MATH-500得分** |
|
||||
|-------------------------|----------------|
|
||||
| Qwen2.5-7B | 54.8 |
|
||||
| Qwen2.5-7B + SFT | 75.2 |
|
||||
| Qwen2.5-7B + SFT + GRPO | 79.6 |
|
||||
|
||||
整个流程在MATH-500上的评分提升了24.8
|
||||
|
||||
## FQA
|
||||
- 如果出现 numpy 版本冲突,请安装 1.26.0 版本
|
||||
|
||||
71
examples/research/open_r1/README_RC3.md
Normal file
71
examples/research/open_r1/README_RC3.md
Normal file
@ -0,0 +1,71 @@
|
||||
# 通过社区版本执行open-r1复现
|
||||
|
||||
open-r1项目是huggingface官方开源的对DeepSeek-R1模型进行完全开放式复现的项目,是当前的主流复现项目,其目的是构建DeepSeek-R1训练流程缺失的部分,以便每个人都能在此基础上构建复现R1,当前已经有20k+star数。
|
||||
|
||||
昇腾已适配完成open-r1项目的重要步骤:打通R1-Zero的GRPO流程,同时支持通过VLLM等生态库实现训练过程中的数据生产,从而验证了通过昇腾训练出DeepSeek-R1-Zero以及DeepSeek-R1模型的可行性。
|
||||
|
||||
**注意**:当前版本仍为在研版本,将会持续快速更新
|
||||
|
||||
|
||||
## 环境配置
|
||||
|
||||
### 支持的设备
|
||||
- Atlas A2 训练系列 (Atlas 800T A2, Atlas 900 A2 PoD)
|
||||
|
||||
### 环境依赖
|
||||
| 依赖 | 推荐版本 |
|
||||
|-----------|----------------------------------------------------------------------------------------------------------|
|
||||
| Python | [3.10](https://www.python.org/downloads/) |
|
||||
| CANN | [8.0.beta1](https://www.hiascend.com/developer/download/community/result?module=cann&cann=8.0.0.beta1) |
|
||||
| torch-npu | [2.5.1rc1](https://gitee.com/ascend/pytorch/releases/tag/v6.0.0.alpha001-pytorch2.5.1) |
|
||||
| torch | [2.5.1](https://github.com/pytorch/pytorch/releases/tag/v2.5.1) |
|
||||
|
||||
### 安装vLLM
|
||||
|
||||
```shell
|
||||
git clone https://github.com/vllm-project/vllm.git -b v0.7.1
|
||||
cd vllm
|
||||
pip install -r requirements-build.txt
|
||||
VLLM_TARGET_DEVICE=empty pip install -e .
|
||||
```
|
||||
|
||||
### 安装vllm-ascend
|
||||
|
||||
```shell
|
||||
git clone https://github.com/vllm-project/vllm-ascend.git
|
||||
cd vllm-ascend
|
||||
git checkout 36991b2052db0b33c0f2b84021768a588360b735
|
||||
pip install -e .
|
||||
```
|
||||
|
||||
### 安装trl
|
||||
|
||||
在当前目录执行以下命令:
|
||||
```shell
|
||||
cd trl
|
||||
pip install -e .
|
||||
```
|
||||
|
||||
### 安装open-r1
|
||||
|
||||
在当前目录执行以下命令:
|
||||
```shell
|
||||
cd open-r1
|
||||
pip install -e ".[dev]"
|
||||
```
|
||||
|
||||
## 执行GRPO训练
|
||||
|
||||
```shell
|
||||
cd open-r1
|
||||
|
||||
ACCELERATE_LOG_LEVEL=info accelerate launch --config_file recipes/accelerate_configs/zero3.yaml --num_processes 7\
|
||||
src/open_r1/grpo.py \
|
||||
--config recipes/Qwen2.5-1.5B-Instruct/grpo/config_demo.yaml
|
||||
```
|
||||
|
||||
具体实验效果将在后续持续补充,同时我们也将持续进行性能调优并构建open-r1 step3流程。我们将在本文持续更新,欢迎关注并star。
|
||||
|
||||
|
||||
## FQA
|
||||
- 如果出现 numpy 版本冲突,请安装 1.26.0 版本
|
||||
BIN
examples/research/open_r1/img_open-r1-step.png
Normal file
BIN
examples/research/open_r1/img_open-r1-step.png
Normal file
Binary file not shown.
|
After Width: | Height: | Size: 80 KiB |
201
examples/research/open_r1/open-r1/LICENSE
Normal file
201
examples/research/open_r1/open-r1/LICENSE
Normal file
@ -0,0 +1,201 @@
|
||||
Apache License
|
||||
Version 2.0, January 2004
|
||||
http://www.apache.org/licenses/
|
||||
|
||||
TERMS AND CONDITIONS FOR USE, REPRODUCTION, AND DISTRIBUTION
|
||||
|
||||
1. Definitions.
|
||||
|
||||
"License" shall mean the terms and conditions for use, reproduction,
|
||||
and distribution as defined by Sections 1 through 9 of this document.
|
||||
|
||||
"Licensor" shall mean the copyright owner or entity authorized by
|
||||
the copyright owner that is granting the License.
|
||||
|
||||
"Legal Entity" shall mean the union of the acting entity and all
|
||||
other entities that control, are controlled by, or are under common
|
||||
control with that entity. For the purposes of this definition,
|
||||
"control" means (i) the power, direct or indirect, to cause the
|
||||
direction or management of such entity, whether by contract or
|
||||
otherwise, or (ii) ownership of fifty percent (50%) or more of the
|
||||
outstanding shares, or (iii) beneficial ownership of such entity.
|
||||
|
||||
"You" (or "Your") shall mean an individual or Legal Entity
|
||||
exercising permissions granted by this License.
|
||||
|
||||
"Source" form shall mean the preferred form for making modifications,
|
||||
including but not limited to software source code, documentation
|
||||
source, and configuration files.
|
||||
|
||||
"Object" form shall mean any form resulting from mechanical
|
||||
transformation or translation of a Source form, including but
|
||||
not limited to compiled object code, generated documentation,
|
||||
and conversions to other media types.
|
||||
|
||||
"Work" shall mean the work of authorship, whether in Source or
|
||||
Object form, made available under the License, as indicated by a
|
||||
copyright notice that is included in or attached to the work
|
||||
(an example is provided in the Appendix below).
|
||||
|
||||
"Derivative Works" shall mean any work, whether in Source or Object
|
||||
form, that is based on (or derived from) the Work and for which the
|
||||
editorial revisions, annotations, elaborations, or other modifications
|
||||
represent, as a whole, an original work of authorship. For the purposes
|
||||
of this License, Derivative Works shall not include works that remain
|
||||
separable from, or merely link (or bind by name) to the interfaces of,
|
||||
the Work and Derivative Works thereof.
|
||||
|
||||
"Contribution" shall mean any work of authorship, including
|
||||
the original version of the Work and any modifications or additions
|
||||
to that Work or Derivative Works thereof, that is intentionally
|
||||
submitted to Licensor for inclusion in the Work by the copyright owner
|
||||
or by an individual or Legal Entity authorized to submit on behalf of
|
||||
the copyright owner. For the purposes of this definition, "submitted"
|
||||
means any form of electronic, verbal, or written communication sent
|
||||
to the Licensor or its representatives, including but not limited to
|
||||
communication on electronic mailing lists, source code control systems,
|
||||
and issue tracking systems that are managed by, or on behalf of, the
|
||||
Licensor for the purpose of discussing and improving the Work, but
|
||||
excluding communication that is conspicuously marked or otherwise
|
||||
designated in writing by the copyright owner as "Not a Contribution."
|
||||
|
||||
"Contributor" shall mean Licensor and any individual or Legal Entity
|
||||
on behalf of whom a Contribution has been received by Licensor and
|
||||
subsequently incorporated within the Work.
|
||||
|
||||
2. Grant of Copyright License. Subject to the terms and conditions of
|
||||
this License, each Contributor hereby grants to You a perpetual,
|
||||
worldwide, non-exclusive, no-charge, royalty-free, irrevocable
|
||||
copyright license to reproduce, prepare Derivative Works of,
|
||||
publicly display, publicly perform, sublicense, and distribute the
|
||||
Work and such Derivative Works in Source or Object form.
|
||||
|
||||
3. Grant of Patent License. Subject to the terms and conditions of
|
||||
this License, each Contributor hereby grants to You a perpetual,
|
||||
worldwide, non-exclusive, no-charge, royalty-free, irrevocable
|
||||
(except as stated in this section) patent license to make, have made,
|
||||
use, offer to sell, sell, import, and otherwise transfer the Work,
|
||||
where such license applies only to those patent claims licensable
|
||||
by such Contributor that are necessarily infringed by their
|
||||
Contribution(s) alone or by combination of their Contribution(s)
|
||||
with the Work to which such Contribution(s) was submitted. If You
|
||||
institute patent litigation against any entity (including a
|
||||
cross-claim or counterclaim in a lawsuit) alleging that the Work
|
||||
or a Contribution incorporated within the Work constitutes direct
|
||||
or contributory patent infringement, then any patent licenses
|
||||
granted to You under this License for that Work shall terminate
|
||||
as of the date such litigation is filed.
|
||||
|
||||
4. Redistribution. You may reproduce and distribute copies of the
|
||||
Work or Derivative Works thereof in any medium, with or without
|
||||
modifications, and in Source or Object form, provided that You
|
||||
meet the following conditions:
|
||||
|
||||
(a) You must give any other recipients of the Work or
|
||||
Derivative Works a copy of this License; and
|
||||
|
||||
(b) You must cause any modified files to carry prominent notices
|
||||
stating that You changed the files; and
|
||||
|
||||
(c) You must retain, in the Source form of any Derivative Works
|
||||
that You distribute, all copyright, patent, trademark, and
|
||||
attribution notices from the Source form of the Work,
|
||||
excluding those notices that do not pertain to any part of
|
||||
the Derivative Works; and
|
||||
|
||||
(d) If the Work includes a "NOTICE" text file as part of its
|
||||
distribution, then any Derivative Works that You distribute must
|
||||
include a readable copy of the attribution notices contained
|
||||
within such NOTICE file, excluding those notices that do not
|
||||
pertain to any part of the Derivative Works, in at least one
|
||||
of the following places: within a NOTICE text file distributed
|
||||
as part of the Derivative Works; within the Source form or
|
||||
documentation, if provided along with the Derivative Works; or,
|
||||
within a display generated by the Derivative Works, if and
|
||||
wherever such third-party notices normally appear. The contents
|
||||
of the NOTICE file are for informational purposes only and
|
||||
do not modify the License. You may add Your own attribution
|
||||
notices within Derivative Works that You distribute, alongside
|
||||
or as an addendum to the NOTICE text from the Work, provided
|
||||
that such additional attribution notices cannot be construed
|
||||
as modifying the License.
|
||||
|
||||
You may add Your own copyright statement to Your modifications and
|
||||
may provide additional or different license terms and conditions
|
||||
for use, reproduction, or distribution of Your modifications, or
|
||||
for any such Derivative Works as a whole, provided Your use,
|
||||
reproduction, and distribution of the Work otherwise complies with
|
||||
the conditions stated in this License.
|
||||
|
||||
5. Submission of Contributions. Unless You explicitly state otherwise,
|
||||
any Contribution intentionally submitted for inclusion in the Work
|
||||
by You to the Licensor shall be under the terms and conditions of
|
||||
this License, without any additional terms or conditions.
|
||||
Notwithstanding the above, nothing herein shall supersede or modify
|
||||
the terms of any separate license agreement you may have executed
|
||||
with Licensor regarding such Contributions.
|
||||
|
||||
6. Trademarks. This License does not grant permission to use the trade
|
||||
names, trademarks, service marks, or product names of the Licensor,
|
||||
except as required for reasonable and customary use in describing the
|
||||
origin of the Work and reproducing the content of the NOTICE file.
|
||||
|
||||
7. Disclaimer of Warranty. Unless required by applicable law or
|
||||
agreed to in writing, Licensor provides the Work (and each
|
||||
Contributor provides its Contributions) on an "AS IS" BASIS,
|
||||
WITHOUT WARRANTIES OR CONDITIONS OF ANY KIND, either express or
|
||||
implied, including, without limitation, any warranties or conditions
|
||||
of TITLE, NON-INFRINGEMENT, MERCHANTABILITY, or FITNESS FOR A
|
||||
PARTICULAR PURPOSE. You are solely responsible for determining the
|
||||
appropriateness of using or redistributing the Work and assume any
|
||||
risks associated with Your exercise of permissions under this License.
|
||||
|
||||
8. Limitation of Liability. In no event and under no legal theory,
|
||||
whether in tort (including negligence), contract, or otherwise,
|
||||
unless required by applicable law (such as deliberate and grossly
|
||||
negligent acts) or agreed to in writing, shall any Contributor be
|
||||
liable to You for damages, including any direct, indirect, special,
|
||||
incidental, or consequential damages of any character arising as a
|
||||
result of this License or out of the use or inability to use the
|
||||
Work (including but not limited to damages for loss of goodwill,
|
||||
work stoppage, computer failure or malfunction, or any and all
|
||||
other commercial damages or losses), even if such Contributor
|
||||
has been advised of the possibility of such damages.
|
||||
|
||||
9. Accepting Warranty or Additional Liability. While redistributing
|
||||
the Work or Derivative Works thereof, You may choose to offer,
|
||||
and charge a fee for, acceptance of support, warranty, indemnity,
|
||||
or other liability obligations and/or rights consistent with this
|
||||
License. However, in accepting such obligations, You may act only
|
||||
on Your own behalf and on Your sole responsibility, not on behalf
|
||||
of any other Contributor, and only if You agree to indemnify,
|
||||
defend, and hold each Contributor harmless for any liability
|
||||
incurred by, or claims asserted against, such Contributor by reason
|
||||
of your accepting any such warranty or additional liability.
|
||||
|
||||
END OF TERMS AND CONDITIONS
|
||||
|
||||
APPENDIX: How to apply the Apache License to your work.
|
||||
|
||||
To apply the Apache License to your work, attach the following
|
||||
boilerplate notice, with the fields enclosed by brackets "[]"
|
||||
replaced with your own identifying information. (Don't include
|
||||
the brackets!) The text should be enclosed in the appropriate
|
||||
comment syntax for the file format. We also recommend that a
|
||||
file or class name and description of purpose be included on the
|
||||
same "printed page" as the copyright notice for easier
|
||||
identification within third-party archives.
|
||||
|
||||
Copyright [yyyy] [name of copyright owner]
|
||||
|
||||
Licensed under the Apache License, Version 2.0 (the "License");
|
||||
you may not use this file except in compliance with the License.
|
||||
You may obtain a copy of the License at
|
||||
|
||||
http://www.apache.org/licenses/LICENSE-2.0
|
||||
|
||||
Unless required by applicable law or agreed to in writing, software
|
||||
distributed under the License is distributed on an "AS IS" BASIS,
|
||||
WITHOUT WARRANTIES OR CONDITIONS OF ANY KIND, either express or implied.
|
||||
See the License for the specific language governing permissions and
|
||||
limitations under the License.
|
||||
44
examples/research/open_r1/open-r1/Makefile
Normal file
44
examples/research/open_r1/open-r1/Makefile
Normal file
@ -0,0 +1,44 @@
|
||||
.PHONY: style quality
|
||||
|
||||
# make sure to test the local checkout in scripts and not the pre-installed one (don't use quotes!)
|
||||
export PYTHONPATH = src
|
||||
|
||||
check_dirs := src tests
|
||||
|
||||
style:
|
||||
ruff format --line-length 119 --target-version py310 $(check_dirs) setup.py
|
||||
isort $(check_dirs) setup.py
|
||||
|
||||
quality:
|
||||
ruff check --line-length 119 --target-version py310 $(check_dirs) setup.py
|
||||
isort --check-only $(check_dirs) setup.py
|
||||
flake8 --max-line-length 119 $(check_dirs) setup.py
|
||||
|
||||
test:
|
||||
pytest -sv tests/
|
||||
|
||||
# Evaluation
|
||||
|
||||
evaluate:
|
||||
$(eval PARALLEL_ARGS := $(if $(PARALLEL),$(shell \
|
||||
if [ "$(PARALLEL)" = "data" ]; then \
|
||||
echo "data_parallel_size=$(NUM_GPUS)"; \
|
||||
elif [ "$(PARALLEL)" = "tensor" ]; then \
|
||||
echo "tensor_parallel_size=$(NUM_GPUS)"; \
|
||||
fi \
|
||||
),))
|
||||
$(if $(filter tensor,$(PARALLEL)),export VLLM_WORKER_MULTIPROC_METHOD=spawn &&,) \
|
||||
MODEL_ARGS="pretrained=$(MODEL),dtype=bfloat16,$(PARALLEL_ARGS),max_model_length=32768,gpu_memory_utilisation=0.8" && \
|
||||
lighteval vllm $$MODEL_ARGS "custom|$(TASK)|0|0" \
|
||||
--custom-tasks src/open_r1/evaluate.py \
|
||||
--use-chat-template \
|
||||
--system-prompt="Please reason step by step, and put your final answer within \boxed{}." \
|
||||
--output-dir data/evals/$(MODEL)
|
||||
|
||||
# Example usage:
|
||||
# Single GPU:
|
||||
# make evaluate MODEL=deepseek-ai/DeepSeek-R1-Distill-Qwen-32B TASK=aime24
|
||||
# Data parallel:
|
||||
# make evaluate MODEL=deepseek-ai/DeepSeek-R1-Distill-Qwen-32B TASK=aime24 PARALLEL=data NUM_GPUS=8
|
||||
# Tensor parallel:
|
||||
# make evaluate MODEL=deepseek-ai/DeepSeek-R1-Distill-Qwen-32B TASK=aime24 PARALLEL=tensor NUM_GPUS=8
|
||||
503
examples/research/open_r1/open-r1/README.md
Normal file
503
examples/research/open_r1/open-r1/README.md
Normal file
@ -0,0 +1,503 @@
|
||||
# Open R1
|
||||
|
||||
*A fully open reproduction of DeepSeek-R1. This repo is a work in progress, let's build it together!*
|
||||
|
||||
**Table of Contents**
|
||||
1. [Overview](#overview)
|
||||
2. [Plan of attack](#plan-of-attack)
|
||||
3. [Installation](#installation)
|
||||
4. [Training models](#training-models)
|
||||
- [SFT](#sft)
|
||||
- [GRPO](#grpo)
|
||||
5. [Evaluating models](#evaluating-models)
|
||||
6. [Reproducing Deepseek's evaluation results](#reproducing-deepseeks-evaluation-results)
|
||||
7. [Data generation](#data-generation)
|
||||
- [Generate data from a smol distilled R1 model](#generate-data-from-a-smol-distilled-r1-model)
|
||||
- [Generate data from DeepSeek-R1](#generate-data-from-deepseek-r1)
|
||||
8. [Contributing](#contributing)
|
||||
|
||||
## Overview
|
||||
|
||||
The goal of this repo is to build the missing pieces of the R1 pipeline such that everybody can reproduce and build on top of it. The project is simple by design and mostly consists of:
|
||||
|
||||
|
||||
- `src/open_r1`: contains the scripts to train and evaluate models as well as generate synthetic data:
|
||||
- `grpo.py`: trains a model with GRPO on a given dataset.
|
||||
- `sft.py`: performs a simple SFT of a model on a dataset.
|
||||
- `evaluate.py`: evaluates a model on the R1 benchmarks.
|
||||
- `generate.py`: generates synthetic data from a model using [Distilabel](https://github.com/argilla-io/distilabel).
|
||||
- `Makefile`: contains easy-to-run commands for each step in the R1 pipeline leveraging the scripts above.
|
||||
|
||||
### Plan of attack
|
||||
|
||||
We will use the DeepSeek-R1 [tech report](https://github.com/deepseek-ai/DeepSeek-R1) as a guide, which can roughly be broken down into three main steps:
|
||||
|
||||
* Step 1: replicate the R1-Distill models by distilling a high-quality corpus from DeepSeek-R1.
|
||||
* Step 2: replicate the pure RL pipeline that DeepSeek used to create R1-Zero. This will likely involve curating new, large-scale datasets for math, reasoning, and code.
|
||||
* Step 3: show we can go from base model to RL-tuned via multi-stage training.
|
||||
|
||||
<center>
|
||||
<img src="assets/plan-of-attack.png" width="500">
|
||||
</center>
|
||||
|
||||
|
||||
## Installation
|
||||
|
||||
> [!CAUTION]
|
||||
> Libraries rely on CUDA 12.4. If you see errors related to segmentation faults, double check the version your system is running with `nvcc --version`.
|
||||
|
||||
To run the code in this project, first, create a Python virtual environment using e.g. `uv`.
|
||||
To install `uv`, follow the [UV Installation Guide](https://docs.astral.sh/uv/getting-started/installation/).
|
||||
|
||||
|
||||
```shell
|
||||
uv venv openr1 --python 3.11 && source openr1/bin/activate && uv pip install --upgrade pip --link-mode=copy
|
||||
```
|
||||
|
||||
Next, install vLLM:
|
||||
|
||||
```shell
|
||||
uv pip install vllm==0.7.2 --link-mode=copy
|
||||
```
|
||||
|
||||
This will also install PyTorch `v2.5.1` and it is **very important** to use this version since the vLLM binaries are compiled for it. You can then install the remaining dependencies for your specific use case via `pip install -e .[LIST OF MODES]`. For most contributors, we recommend:
|
||||
|
||||
```shell
|
||||
GIT_LFS_SKIP_SMUDGE=1 uv pip install -e ".[dev]" --link-mode=copy
|
||||
```
|
||||
|
||||
Next, log into your Hugging Face and Weights and Biases accounts as follows:
|
||||
|
||||
```shell
|
||||
huggingface-cli login
|
||||
wandb login
|
||||
```
|
||||
|
||||
Finally, check whether your system has Git LFS installed so that you can load and push models/datasets to the Hugging Face Hub:
|
||||
|
||||
```shell
|
||||
git-lfs --version
|
||||
```
|
||||
|
||||
If it isn't installed, run:
|
||||
|
||||
```shell
|
||||
sudo apt-get install git-lfs
|
||||
```
|
||||
|
||||
## Training models
|
||||
|
||||
We support training models with either DDP or DeepSpeed (ZeRO-2 and ZeRO-3). For example, to run SFT on a dataset distilled from DeepSeek-R1 with reasoning traces such as [open-r1/OpenR1-Math-220k](https://huggingface.co/datasets/open-r1/OpenR1-Math-220k), run:
|
||||
|
||||
```shell
|
||||
# Train via command line
|
||||
accelerate launch --config_file=recipes/accelerate_configs/zero3.yaml src/open_r1/sft.py \
|
||||
--model_name_or_path Qwen/Qwen2.5-1.5B-Instruct \
|
||||
--dataset_name open-r1/OpenR1-Math-220k \
|
||||
--learning_rate 1.0e-5 \
|
||||
--num_train_epochs 1 \
|
||||
--packing \
|
||||
--max_seq_length 16384 \
|
||||
--per_device_train_batch_size 16 \
|
||||
--gradient_checkpointing \
|
||||
--bf16 \
|
||||
--output_dir data/Qwen2.5-1.5B-Open-R1-Distill
|
||||
|
||||
# Train via YAML config
|
||||
accelerate launch --config_file recipes/accelerate_configs/zero3.yaml src/open_r1/sft.py \
|
||||
--config recipes/Qwen2.5-1.5B-Instruct/sft/config_demo.yaml
|
||||
```
|
||||
|
||||
Currently, the following tasks are supported:
|
||||
|
||||
* Supervised Fine-Tuning `sft`
|
||||
* Group Relative Policy Optimization `grpo`
|
||||
|
||||
> [!TIP]
|
||||
> If you scale up/down the number of GPUs, we recommend also scaling up the per-device batch size or number of gradient accumulation steps to keep the global batch size constant.
|
||||
|
||||
By default, these scripts will push each model to your Hugging Face Hub username, i.e. `{username}/{model_name}-{task}`. You can override the parameters in each YAML config by appending them to the command as follows:
|
||||
|
||||
```shell
|
||||
# Change batch size, number of epochs etc
|
||||
accelerate launch --config_file recipes/accelerate_configs/zero3.yaml src/open_r1/sft.py \
|
||||
--config recipes/Qwen2.5-1.5B-Instruct/sft/config_demo.yaml
|
||||
--per_device_train_batch_size=1 --num_train_epochs=5
|
||||
```
|
||||
|
||||
If you also wish to override the Weights and Biases default settings, you can do so as follows:
|
||||
|
||||
```shell
|
||||
accelerate launch --config_file recipes/accelerate_configs/zero3.yaml src/open_r1/sft.py \
|
||||
--config recipes/Qwen2.5-1.5B-Instruct/sft/config_demo.yaml
|
||||
--wandb_entity huggingface --wandb_project open-r1 --run_name Qwen2.5-1.5B-GRPO
|
||||
```
|
||||
|
||||
> [!NOTE]
|
||||
> The training commands below are configured for a node of 8 x H100s (80GB). For different hardware and topologies, you may need to tune the batch size and number of gradient accumulation steps.
|
||||
|
||||
### SFT
|
||||
|
||||
To run SFT on a dataset distilled from DeepSeek-R1 with reasoning traces such as [open-r1/OpenR1-Math-220k](https://huggingface.co/datasets/open-r1/OpenR1-Math-220k), run:
|
||||
|
||||
```shell
|
||||
ACCELERATE_LOG_LEVEL=info accelerate launch --config_file recipes/accelerate_configs/zero3.yaml \
|
||||
src/open_r1/sft.py \
|
||||
--config recipes/Qwen2.5-1.5B-Instruct/sft/config_demo.yaml
|
||||
```
|
||||
|
||||
### GRPO
|
||||
|
||||
To train via the GRPO trainer, we use one GPU to run vLLM for faster generation and the remaining GPUs for training. For example, one a node with 8 GPUs, set `--num_processes` to override the default value in the `accelerate` configs:
|
||||
|
||||
```shell
|
||||
ACCELERATE_LOG_LEVEL=info accelerate launch --config_file recipes/accelerate_configs/zero2.yaml \
|
||||
--num_processes=7 src/open_r1/grpo.py \
|
||||
--config recipes/DeepSeek-R1-Distill-Qwen-1.5B/grpo/config_demo.yaml
|
||||
```
|
||||
|
||||
> [!WARNING]
|
||||
> The chat template used in the distilled DeepSeek models omits the contents of the reasoning block within the `<think>` and `</think>` tags. It also prefills the assistant response with `<think>` which interferes with the format reward function. To handle that, it is important to override the chat template as done in e.g. [recipes/DeepSeek-R1-Distill-Qwen-1.5B/grpo/config_demo.yaml](./recipes/DeepSeek-R1-Distill-Qwen-1.5B/grpo/config_demo.yaml).
|
||||
|
||||
|
||||
We provide a minimal reproducible experiment using GRPO for mathematical reasoning, referencing the approach from [SimpleRL-Reason](https://hkust-nlp.notion.site/simplerl-reason) which uses a 7B model trained on 8K examples. Running this on 8 H100 80G GPU takes about 3 hours:
|
||||
|
||||
```shell
|
||||
ACCELERATE_LOG_LEVEL=info accelerate launch --config_file recipes/accelerate_configs/zero2.yaml \
|
||||
--num_processes=7 src/open_r1/grpo.py \
|
||||
--config recipes/Qwen2.5-Math-7B/grpo/config_simple_rl.yaml
|
||||
```
|
||||
|
||||
Our final [model](https://huggingface.co/Dongwei/Qwen-2.5-7B_Base_Math_smalllr), while using different learning rates, loss functions and reward structures, achieves 69.4% accuracy on MATH-500, demonstrating a 17%+ improvement over the base model.
|
||||
|
||||
#### 👨💻 Training with a code interpreter
|
||||
|
||||
We provide a `code` reward function for executing code generated by the policy during training. Currently, this reward function targets code contests like [Codeforces](https://codeforces.com), where solutions are executed against a set of test cases and the overall success rate is returned as the final reward. To ensure safe execution, we use [E2B](https://e2b.dev) sandboxes, which are fast and cheap to run. To use this reward function, first install the necessary dependencies:
|
||||
|
||||
```shell
|
||||
uv pip install -e '.[code]'
|
||||
```
|
||||
|
||||
Then create a `.env` file and place an API token from E2B within it:
|
||||
|
||||
```
|
||||
E2B_API_KEY="e2b_xxx"
|
||||
```
|
||||
|
||||
Then make sure your dataset contains a `verification_info` column with the following schema (adopted from PrimeIntellect's excellent [datasets](https://huggingface.co/collections/PrimeIntellect/synthetic-1-67a2c399cfdd6c9f7fae0c37) of verifiable problems):
|
||||
|
||||
```python
|
||||
{
|
||||
"language": "python",
|
||||
"test_cases": [
|
||||
{
|
||||
"input": "4\n4\n0001\n1000\n0011\n0111\n3\n010\n101\n0\n2\n00000\n00001\n4\n01\n001\n0001\n00001\n",
|
||||
"output": "1\n3 \n-1\n0\n\n2\n1 2 \n",
|
||||
"type": "stdin_stdout",
|
||||
}
|
||||
],
|
||||
}
|
||||
```
|
||||
|
||||
For example, to train a smol model on Python problems, run:
|
||||
|
||||
```shell
|
||||
ACCELERATE_LOG_LEVEL=info accelerate launch --config_file recipes/accelerate_configs/zero2.yaml \
|
||||
--num_processes=7 src/open_r1/grpo.py \
|
||||
--config recipes/Qwen2.5-1.5B-Instruct/grpo/config_demo_code.yaml
|
||||
```
|
||||
|
||||
### Launching jobs on a Slurm cluster
|
||||
|
||||
If you have access to a Slurm cluster, we provide a `slurm/train.slurm` script that will automatically queue training jobs for you. Here's how you can use it:
|
||||
|
||||
```shell
|
||||
sbatch --job-name=open_r1 --nodes=1 slurm/train.slurm {model_name} {task} {config_suffix} {accelerator}
|
||||
```
|
||||
|
||||
Here `{model_name}` and `{task}` are defined as above, while `{config_suffix}` refers to the specific config and `{accelerator}` refers to the choice of 🤗 Accelerate config in `recipes/accelerate_configs`. If you wish to override the default config parameters, you can provide them by appending a space-separated string like `'--arg1=value1 --arg2=value2'`. Here's a concrete example to run SFT on 1 node of 8 GPUs:
|
||||
|
||||
```shell
|
||||
# Launch on Slurm and override default hyperparameters
|
||||
sbatch --job-name=open_r1 --nodes=1 slurm/train.slurm Qwen2.5-1.5B-Instruct sft demo zero3 '--per_device_train_batch_size=1 --num_train_epochs=5'
|
||||
```
|
||||
|
||||
You can scale the number of nodes by increasing the `--nodes` flag.
|
||||
|
||||
> [!NOTE]
|
||||
> The configuration in `slurm/train.slurm` is optimised for the Hugging Face Compute Cluster and may require tweaking to be adapted to your own compute nodes.
|
||||
|
||||
## Evaluating models
|
||||
|
||||
We use `lighteval` to evaluate models, with custom tasks defined in `src/open_r1/evaluate.py`. For models which fit on a single GPU, run:
|
||||
|
||||
```shell
|
||||
MODEL=deepseek-ai/DeepSeek-R1-Distill-Qwen-1.5B
|
||||
MODEL_ARGS="pretrained=$MODEL,dtype=bfloat16,max_model_length=32768,gpu_memory_utilisation=0.8"
|
||||
OUTPUT_DIR=data/evals/$MODEL
|
||||
|
||||
# AIME 2024
|
||||
TASK=aime24
|
||||
lighteval vllm $MODEL_ARGS "custom|$TASK|0|0" \
|
||||
--custom-tasks src/open_r1/evaluate.py \
|
||||
--use-chat-template \
|
||||
--output-dir $OUTPUT_DIR
|
||||
|
||||
# MATH-500
|
||||
TASK=math_500
|
||||
lighteval vllm $MODEL_ARGS "custom|$TASK|0|0" \
|
||||
--custom-tasks src/open_r1/evaluate.py \
|
||||
--use-chat-template \
|
||||
--output-dir $OUTPUT_DIR
|
||||
|
||||
# GPQA Diamond
|
||||
TASK=gpqa:diamond
|
||||
lighteval vllm $MODEL_ARGS "custom|$TASK|0|0" \
|
||||
--custom-tasks src/open_r1/evaluate.py \
|
||||
--use-chat-template \
|
||||
--output-dir $OUTPUT_DIR
|
||||
```
|
||||
|
||||
> [!IMPORTANT]
|
||||
> You must set `max_model_length=32768` in the `vllm` command to align with the `generation_size` we define per eval. Without this, `lighteval` will throw an error.
|
||||
|
||||
To increase throughput across multiple GPUs, use _data parallel_ as follows:
|
||||
|
||||
```shell
|
||||
NUM_GPUS=8
|
||||
MODEL=deepseek-ai/DeepSeek-R1-Distill-Qwen-1.5B
|
||||
MODEL_ARGS="pretrained=$MODEL,dtype=bfloat16,data_parallel_size=$NUM_GPUS,max_model_length=32768,gpu_memory_utilisation=0.8"
|
||||
TASK=aime24
|
||||
OUTPUT_DIR=data/evals/$MODEL
|
||||
|
||||
lighteval vllm $MODEL_ARGS "custom|$TASK|0|0" \
|
||||
--custom-tasks src/open_r1/evaluate.py \
|
||||
--use-chat-template \
|
||||
--output-dir $OUTPUT_DIR
|
||||
```
|
||||
|
||||
For large models which require sharding across GPUs, use _tensor parallel_ and run:
|
||||
|
||||
```shell
|
||||
NUM_GPUS=8
|
||||
MODEL=deepseek-ai/DeepSeek-R1-Distill-Qwen-32B
|
||||
MODEL_ARGS="pretrained=$MODEL,dtype=bfloat16,tensor_parallel_size=$NUM_GPUS,max_model_length=32768,gpu_memory_utilisation=0.8"
|
||||
TASK=aime24
|
||||
OUTPUT_DIR=data/evals/$MODEL
|
||||
|
||||
export VLLM_WORKER_MULTIPROC_METHOD=spawn
|
||||
lighteval vllm $MODEL_ARGS "custom|$TASK|0|0" \
|
||||
--custom-tasks src/open_r1/evaluate.py \
|
||||
--use-chat-template \
|
||||
--output-dir $OUTPUT_DIR
|
||||
```
|
||||
|
||||
You can also launch an evaluation with `make evaluate`, specifying the model, task, and optionally the parallelism technique and number of GPUs.
|
||||
|
||||
To evaluate on a single GPU:
|
||||
|
||||
```shell
|
||||
make evaluate MODEL=deepseek-ai/DeepSeek-R1-Distill-Qwen-32B TASK=aime24
|
||||
```
|
||||
|
||||
To use Data Parallelism:
|
||||
|
||||
```shell
|
||||
make evaluate MODEL=deepseek-ai/DeepSeek-R1-Distill-Qwen-32B TASK=aime24 PARALLEL=data NUM_GPUS=8
|
||||
```
|
||||
|
||||
To use Tensor Parallelism:
|
||||
|
||||
```shell
|
||||
make evaluate MODEL=deepseek-ai/DeepSeek-R1-Distill-Qwen-32B TASK=aime24 PARALLEL=tensor NUM_GPUS=8
|
||||
```
|
||||
|
||||
## Reproducing Deepseek's evaluation results
|
||||
|
||||
> [!NOTE]
|
||||
> The DeepSeek-R1 paper uses sampling with a temperature of 0.6, a top-p value of 0.95, and 64 responses per query to estimate `pass@1`. Below, we report the results from greedy decoding, which likely explains the small 1-3σ discrepancies between our results and theirs.
|
||||
|
||||
### MATH-500
|
||||
|
||||
We are able to reproduce Deepseek's reported results on the MATH-500 benchmark within ~1-3 standard deviations:
|
||||
|
||||
| Model | MATH-500 (🤗 LightEval) | MATH-500 (DeepSeek Reported) |
|
||||
|:------------------------------|:-----------------------:|:----------------------------:|
|
||||
| DeepSeek-R1-Distill-Qwen-1.5B | 81.2 | 83.9 |
|
||||
| DeepSeek-R1-Distill-Qwen-7B | 91.8 | 92.8 |
|
||||
| DeepSeek-R1-Distill-Qwen-14B | 94.2 | 93.9 |
|
||||
| DeepSeek-R1-Distill-Qwen-32B | 95.0 | 94.3 |
|
||||
| DeepSeek-R1-Distill-Llama-8B | 85.4 | 89.1 |
|
||||
| DeepSeek-R1-Distill-Llama-70B | 93.4 | 94.5 |
|
||||
|
||||
To reproduce these results use the following command:
|
||||
|
||||
```shell
|
||||
NUM_GPUS=1 # Set to 8 for 32B and 70B models
|
||||
MODEL=deepseek-ai/{model_name}
|
||||
MODEL_ARGS="pretrained=$MODEL,dtype=bfloat16,max_model_length=32768,gpu_memory_utilisation=0.8,tensor_parallel_size=$NUM_GPUS"
|
||||
OUTPUT_DIR=data/evals/$MODEL
|
||||
|
||||
lighteval vllm $MODEL_ARGS "custom|math_500|0|0" \
|
||||
--custom-tasks src/open_r1/evaluate.py \
|
||||
--use-chat-template \
|
||||
--output-dir $OUTPUT_DIR
|
||||
```
|
||||
|
||||
Alternatively, you can launch Slurm jobs as follows:
|
||||
|
||||
```shell
|
||||
python scripts/run_benchmarks.py --model-id={model_id} --benchmarks math_500
|
||||
```
|
||||
|
||||
### GPQA Diamond
|
||||
|
||||
We are able to reproduce Deepseek's reported results on the GPQA Diamond benchmark within ~1-3 standard deviations:
|
||||
|
||||
| Model | GPQA Diamond (🤗 LightEval) | GPQA Diamond (DeepSeek Reported) |
|
||||
|:------------------------------|:---------------------------:|:--------------------------------:|
|
||||
| DeepSeek-R1-Distill-Qwen-1.5B | 33.3 | 33.8 |
|
||||
| DeepSeek-R1-Distill-Qwen-7B | 48.4 | 49.1 |
|
||||
| DeepSeek-R1-Distill-Qwen-14B | 55.6 | 59.1 |
|
||||
| DeepSeek-R1-Distill-Qwen-32B | 58.6 | 62.1 |
|
||||
| DeepSeek-R1-Distill-Llama-8B | 51.0 | 49.0 |
|
||||
| DeepSeek-R1-Distill-Llama-70B | 65.2 | 65.2 |
|
||||
|
||||
To reproduce these results use the following command:
|
||||
|
||||
```shell
|
||||
NUM_GPUS=1 # Set to 8 for 32B and 70B models
|
||||
MODEL=deepseek-ai/{model_name}
|
||||
MODEL_ARGS="pretrained=$MODEL,dtype=bfloat16,max_model_length=32768,gpu_memory_utilisation=0.8,tensor_parallel_size=$NUM_GPUS"
|
||||
OUTPUT_DIR=data/evals/$MODEL
|
||||
|
||||
lighteval vllm $MODEL_ARGS "custom|gpqa:diamond|0|0" \
|
||||
--custom-tasks src/open_r1/evaluate.py \
|
||||
--use-chat-template \
|
||||
--output-dir $OUTPUT_DIR
|
||||
```
|
||||
|
||||
```shell
|
||||
python scripts/run_benchmarks.py --model-id={model_id} --benchmarks gpqa
|
||||
```
|
||||
|
||||
### LiveCodeBench
|
||||
|
||||
We are able to reproduce Deepseek's reported results on the LiveCodeBench code generation benchmark within ~1-3 standard deviations:
|
||||
|
||||
| Model | LiveCodeBench (🤗 LightEval) | GPQA Diamond (DeepSeek Reported) |
|
||||
|:------------------------------|:---------------------------:|:--------------------------------:|
|
||||
| DeepSeek-R1-Distill-Qwen-1.5B | 16.3 | 16.9 |
|
||||
| DeepSeek-R1-Distill-Qwen-7B | 36.6 | 37.6 |
|
||||
| DeepSeek-R1-Distill-Qwen-14B | 51.5 | 53.1 |
|
||||
| DeepSeek-R1-Distill-Qwen-32B | 56.6 | 57.2 |
|
||||
| DeepSeek-R1-Distill-Llama-8B | 37.0 | 39.6 |
|
||||
| DeepSeek-R1-Distill-Llama-70B | 54.5 | 57.5 |
|
||||
|
||||
To reproduce these results use the following command:
|
||||
|
||||
```shell
|
||||
NUM_GPUS=1 # Set to 8 for 32B and 70B models, or data_parallel_size=8 with the smaller models for speed
|
||||
MODEL=deepseek-ai/{model_name}
|
||||
MODEL_ARGS="pretrained=$MODEL,dtype=bfloat16,max_model_length=32768,gpu_memory_utilisation=0.8,tensor_parallel_size=$NUM_GPUS,generation_parameters={temperature:0.6,top_p:0.95}"
|
||||
OUTPUT_DIR=data/evals/$MODEL
|
||||
|
||||
lighteval vllm $MODEL_ARGS "extended|lcb:codegeneration|0|0" \
|
||||
--use-chat-template \
|
||||
--output-dir $OUTPUT_DIR
|
||||
```
|
||||
|
||||
```shell
|
||||
python scripts/run_benchmarks.py --model-id={model_id} --benchmarks lcb
|
||||
```
|
||||
|
||||
## Data generation
|
||||
|
||||
### Generate data from a smol distilled R1 model
|
||||
|
||||
The following example can be run in 1xH100.
|
||||
First install the following dependencies:
|
||||
|
||||
```shell
|
||||
uv pip install "distilabel[vllm]>=1.5.2"
|
||||
```
|
||||
|
||||
Now save the following snippet into a file named `pipeline.py` and run it with `python pipeline.py`. It will generate 4 outputs for each of the 10 examples (change the username for the repository to your org/user name):
|
||||
|
||||
```python
|
||||
from datasets import load_dataset
|
||||
from distilabel.models import vLLM
|
||||
from distilabel.pipeline import Pipeline
|
||||
from distilabel.steps.tasks import TextGeneration
|
||||
|
||||
|
||||
prompt_template = """\
|
||||
You will be given a problem. Please reason step by step, and put your final answer within \boxed{}:
|
||||
{{ instruction }}"""
|
||||
|
||||
dataset = load_dataset("AI-MO/NuminaMath-TIR", split="train").select(range(10))
|
||||
|
||||
model_id = "deepseek-ai/DeepSeek-R1-Distill-Qwen-7B" # Exchange with another smol distilled r1
|
||||
|
||||
with Pipeline(
|
||||
name="distill-qwen-7b-r1",
|
||||
description="A pipeline to generate data from a distilled r1 model",
|
||||
) as pipeline:
|
||||
|
||||
llm = vLLM(
|
||||
model=model_id,
|
||||
tokenizer=model_id,
|
||||
extra_kwargs={
|
||||
"tensor_parallel_size": 1,
|
||||
"max_model_len": 8192,
|
||||
},
|
||||
generation_kwargs={
|
||||
"temperature": 0.6,
|
||||
"max_new_tokens": 8192,
|
||||
},
|
||||
)
|
||||
prompt_column = "problem"
|
||||
text_generation = TextGeneration(
|
||||
llm=llm,
|
||||
template=prompt_template,
|
||||
num_generations=4,
|
||||
input_mappings={"instruction": prompt_column} if prompt_column is not None else {}
|
||||
)
|
||||
|
||||
|
||||
if __name__ == "__main__":
|
||||
distiset = pipeline.run(dataset=dataset)
|
||||
distiset.push_to_hub(repo_id="username/numina-deepseek-r1-qwen-7b")
|
||||
```
|
||||
|
||||
Take a look at the sample dataset at [HuggingFaceH4/numina-deepseek-r1-qwen-7b](https://huggingface.co/datasets/HuggingFaceH4/numina-deepseek-r1-qwen-7b).
|
||||
|
||||
|
||||
### Generate data from DeepSeek-R1
|
||||
|
||||
To run the bigger DeepSeek-R1, we used 2 nodes, each with 8×H100 GPUs using the slurm file present in this repo at `slurm/generate.slurm`. First, install the dependencies:
|
||||
|
||||
(for now we need to install the vllm dev wheel that [fixes the R1 cuda graph capture](https://github.com/vllm-project/vllm/commits/221d388cc5a836fa189305785ed7e887cea8b510/csrc/moe/moe_align_sum_kernels.cu))
|
||||
```shell
|
||||
pip install https://wheels.vllm.ai/221d388cc5a836fa189305785ed7e887cea8b510/vllm-1.0.0.dev-cp38-abi3-manylinux1_x86_64.whl --extra-index-url https://download.pytorch.org/whl/cu121
|
||||
|
||||
uv pip install "distilabel[vllm,ray,openai]>=1.5.2"
|
||||
```
|
||||
|
||||
And then run the following command:
|
||||
|
||||
```shell
|
||||
sbatch slurm/generate.slurm \
|
||||
--hf-dataset AI-MO/NuminaMath-TIR \
|
||||
--temperature 0.6 \
|
||||
--prompt-column problem \
|
||||
--model deepseek-ai/DeepSeek-R1 \
|
||||
--hf-output-dataset username/r1-dataset
|
||||
```
|
||||
|
||||
> [!NOTE]
|
||||
> While the job is running, you can setup an SSH tunnel through the cluster login node to access the Ray dashboard from your computer running `ssh -L 8265:ray_ip_head_node:8265 <login_node>`, then browsing `http://localhost:8265`
|
||||
|
||||
## Contributing
|
||||
|
||||
Contributions are welcome. Please refer to https://github.com/huggingface/open-r1/issues/23.
|
||||
BIN
examples/research/open_r1/open-r1/assets/plan-of-attack.png
Normal file
BIN
examples/research/open_r1/open-r1/assets/plan-of-attack.png
Normal file
Binary file not shown.
|
After Width: | Height: | Size: 371 KiB |
@ -0,0 +1,58 @@
|
||||
# Model arguments
|
||||
model_name_or_path: deepseek-ai/DeepSeek-R1-Distill-Qwen-1.5B
|
||||
model_revision: main
|
||||
torch_dtype: bfloat16
|
||||
attn_implementation: flash_attention_2
|
||||
|
||||
# Data training arguments
|
||||
# We edit the DeepSeek chat template to ensure (a) the reasoning block within <think> and </think> is included in the completion and (b) the <think> tag is not part of the prefill so that the format reward works
|
||||
chat_template: "{% if not add_generation_prompt is defined %}{% set add_generation_prompt = false %}{% endif %}{% set ns = namespace(is_first=false, is_tool=false, is_output_first=true, system_prompt='') %}{%- for message in messages %}{%- if message['role'] == 'system' %}{% set ns.system_prompt = message['content'] %}{%- endif %}{%- endfor %}{{bos_token}}{{ns.system_prompt}}{%- for message in messages %}{%- if message['role'] == 'user' %}{%- set ns.is_tool = false -%}{{'<|User|>' + message['content']}}{%- endif %}{%- if message['role'] == 'assistant' and message['content'] is none %}{%- set ns.is_tool = false -%}{%- for tool in message['tool_calls']%}{%- if not ns.is_first %}{{'<|Assistant|><|tool▁calls▁begin|><|tool▁call▁begin|>' + tool['type'] + '<|tool▁sep|>' + tool['function']['name'] + '\\n' + '```json' + '\\n' + tool['function']['arguments'] + '\\n' + '```' + '<|tool▁call▁end|>'}}{%- set ns.is_first = true -%}{%- else %}{{'\\n' + '<|tool▁call▁begin|>' + tool['type'] + '<|tool▁sep|>' + tool['function']['name'] + '\\n' + '```json' + '\\n' + tool['function']['arguments'] + '\\n' + '```' + '<|tool▁call▁end|>'}}{{'<|tool▁calls▁end|><|end▁of▁sentence|>'}}{%- endif %}{%- endfor %}{%- endif %}{%- if message['role'] == 'assistant' and message['content'] is not none %}{%- if ns.is_tool %}{{'<|tool▁outputs▁end|>' + message['content'] + '<|end▁of▁sentence|>'}}{%- set ns.is_tool = false -%}{%- else %}{% set content = message['content'] %}{{'<|Assistant|>' + content + '<|end▁of▁sentence|>'}}{%- endif %}{%- endif %}{%- if message['role'] == 'tool' %}{%- set ns.is_tool = true -%}{%- if ns.is_output_first %}{{'<|tool▁outputs▁begin|><|tool▁output▁begin|>' + message['content'] + '<|tool▁output▁end|>'}}{%- set ns.is_output_first = false %}{%- else %}{{'\\n<|tool▁output▁begin|>' + message['content'] + '<|tool▁output▁end|>'}}{%- endif %}{%- endif %}{%- endfor -%}{% if ns.is_tool %}{{'<|tool▁outputs▁end|>'}}{% endif %}{% if add_generation_prompt and not ns.is_tool %}{{'<|Assistant|>'}}{% endif %}"
|
||||
dataset_name: open-r1/OpenR1-Math-220k
|
||||
dataset_configs:
|
||||
- default
|
||||
system_prompt: "You are a helpful AI Assistant that provides well-reasoned and detailed responses. You first think about the reasoning process as an internal monologue and then provide the user with the answer. Respond in the following format: <think>\n...\n</think>\n<answer>\n...\n</answer>"
|
||||
|
||||
# GRPO trainer config
|
||||
bf16: true
|
||||
use_vllm: true
|
||||
vllm_device: auto
|
||||
vllm_gpu_memory_utilization: 0.7
|
||||
do_eval: false
|
||||
gradient_accumulation_steps: 4
|
||||
gradient_checkpointing: true
|
||||
gradient_checkpointing_kwargs:
|
||||
use_reentrant: false
|
||||
hub_model_id: DeepSeek-R1-Distill-Qwen-1.5B-GRPO
|
||||
hub_strategy: every_save
|
||||
learning_rate: 1.0e-06
|
||||
log_completions: true
|
||||
log_level: info
|
||||
logging_first_step: true
|
||||
logging_steps: 1
|
||||
logging_strategy: steps
|
||||
lr_scheduler_type: cosine_with_min_lr
|
||||
lr_scheduler_kwargs:
|
||||
min_lr_rate: 0.1
|
||||
max_prompt_length: 512
|
||||
max_completion_length: 2048
|
||||
max_steps: -1
|
||||
num_generations: 16
|
||||
num_train_epochs: 1
|
||||
output_dir: data/DeepSeek-R1-Distill-Qwen-1.5B-GRPO
|
||||
overwrite_output_dir: true
|
||||
per_device_eval_batch_size: 16
|
||||
per_device_train_batch_size: 16
|
||||
push_to_hub: true
|
||||
report_to:
|
||||
- wandb
|
||||
reward_funcs:
|
||||
- accuracy
|
||||
- format
|
||||
reward_weights:
|
||||
- 1.0
|
||||
- 1.0
|
||||
save_strategy: "epoch"
|
||||
save_total_limit: 1
|
||||
seed: 42
|
||||
temperature: 0.7
|
||||
warmup_ratio: 0.1
|
||||
@ -0,0 +1,44 @@
|
||||
# To start the training, run the following command:
|
||||
# sbatch -N 4 --job-name=mistral_sft slurm/train.slurm Mistral-Small-24B-Instruct-2501 sft numina zero3
|
||||
|
||||
model_name_or_path: mistralai/Mistral-Small-24B-Instruct-2501
|
||||
model_revision: main
|
||||
torch_dtype: bfloat16
|
||||
attn_implementation: flash_attention_2
|
||||
|
||||
# Data training arguments
|
||||
# dataset_name: yentinglin/s1K-1.1-trl-format
|
||||
dataset_name: yentinglin/OpenR1-Math-220k-trl-format
|
||||
dataset_configs:
|
||||
- all
|
||||
preprocessing_num_workers: 8
|
||||
|
||||
# SFT trainer config
|
||||
bf16: true
|
||||
do_eval: true
|
||||
eval_strategy: no
|
||||
gradient_accumulation_steps: 4
|
||||
gradient_checkpointing: true
|
||||
gradient_checkpointing_kwargs:
|
||||
use_reentrant: false
|
||||
hub_model_id: Mistral-Small-24B-Instruct-2501-Open-R1-Distill
|
||||
hub_strategy: every_save
|
||||
learning_rate: 2.0e-05
|
||||
log_level: info
|
||||
logging_steps: 1
|
||||
logging_strategy: steps
|
||||
lr_scheduler_type: cosine
|
||||
packing: true
|
||||
max_seq_length: 32768
|
||||
max_steps: -1
|
||||
num_train_epochs: 5
|
||||
output_dir: data/Mistral-Small-24B-Instruct-2501-Open-R1-Distill
|
||||
overwrite_output_dir: true
|
||||
per_device_eval_batch_size: 1
|
||||
per_device_train_batch_size: 1
|
||||
push_to_hub: true
|
||||
report_to:
|
||||
- wandb
|
||||
save_strategy: epoch
|
||||
seed: 42
|
||||
warmup_ratio: 0.1
|
||||
@ -0,0 +1,53 @@
|
||||
# Model arguments
|
||||
model_name_or_path: Qwen/Qwen2.5-1.5B-Instruct
|
||||
model_revision: main
|
||||
torch_dtype: bfloat16
|
||||
attn_implementation: eager
|
||||
|
||||
# Data training arguments
|
||||
dataset_name: AI-MO/NuminaMath-TIR
|
||||
dataset_configs:
|
||||
- default
|
||||
system_prompt: "You are a helpful AI Assistant that provides well-reasoned and detailed responses. You first think about the reasoning process as an internal monologue and then provide the user with the answer. Respond in the following format: <think>\n...\n</think>\n<answer>\n...\n</answer>"
|
||||
|
||||
# GRPO trainer config
|
||||
bf16: true
|
||||
use_vllm: true
|
||||
vllm_device: auto
|
||||
vllm_gpu_memory_utilization: 0.7
|
||||
do_eval: false
|
||||
gradient_accumulation_steps: 16
|
||||
gradient_checkpointing: true
|
||||
gradient_checkpointing_kwargs:
|
||||
use_reentrant: false
|
||||
# hub_model_id: Qwen2.5-1.5B-Open-R1-GRPO
|
||||
# hub_strategy: every_save
|
||||
learning_rate: 2.0e-05
|
||||
log_completions: true
|
||||
log_level: info
|
||||
logging_first_step: true
|
||||
logging_steps: 1
|
||||
logging_strategy: steps
|
||||
lr_scheduler_type: cosine
|
||||
max_prompt_length: 512
|
||||
max_completion_length: 1024
|
||||
max_steps: -1
|
||||
num_generations: 7
|
||||
num_train_epochs: 1
|
||||
output_dir: data/Qwen2.5-1.5B-Open-R1-GRPO
|
||||
overwrite_output_dir: true
|
||||
per_device_eval_batch_size: 4
|
||||
per_device_train_batch_size: 2
|
||||
push_to_hub: false
|
||||
report_to:
|
||||
- none
|
||||
reward_funcs:
|
||||
- accuracy
|
||||
- format
|
||||
reward_weights:
|
||||
- 1.0
|
||||
- 1.0
|
||||
save_strategy: "epoch"
|
||||
save_total_limit: 1
|
||||
seed: 42
|
||||
warmup_ratio: 0.1
|
||||
@ -0,0 +1,57 @@
|
||||
# Model arguments
|
||||
model_name_or_path: Qwen/Qwen2.5-1.5B-Instruct
|
||||
model_revision: main
|
||||
torch_dtype: bfloat16
|
||||
attn_implementation: flash_attention_2
|
||||
|
||||
# Data training arguments
|
||||
dataset_name: open-r1/verifiable-coding-problems-python-10k
|
||||
dataset_configs:
|
||||
- default
|
||||
system_prompt: "You are a helpful AI Assistant that provides well-reasoned and detailed responses. You first think about the reasoning process as an internal monologue and then provide the user with the answer. Respond in the following format: <think>\n...\n</think>\n<answer>\n...\n</answer>"
|
||||
|
||||
# GRPO trainer config
|
||||
beta: 0.01
|
||||
bf16: true
|
||||
use_vllm: true
|
||||
vllm_device: auto
|
||||
vllm_gpu_memory_utilization: 0.9
|
||||
do_eval: false
|
||||
gradient_accumulation_steps: 4
|
||||
gradient_checkpointing: true
|
||||
gradient_checkpointing_kwargs:
|
||||
use_reentrant: false
|
||||
hub_model_id: Qwen2.5-1.5B-Open-R1-Code-GRPO
|
||||
hub_strategy: every_save
|
||||
learning_rate: 5.0e-06
|
||||
log_completions: true
|
||||
log_level: info
|
||||
logging_first_step: true
|
||||
logging_steps: 1
|
||||
logging_strategy: steps
|
||||
lr_scheduler_type: cosine_with_min_lr
|
||||
lr_scheduler_kwargs:
|
||||
min_lr_rate: 0.1
|
||||
max_prompt_length: 1024
|
||||
max_completion_length: 2048
|
||||
max_steps: 500
|
||||
num_generations: 14
|
||||
num_train_epochs: 1
|
||||
output_dir: data/Qwen2.5-1.5B-Open-R1-Code-GRPO
|
||||
overwrite_output_dir: true
|
||||
per_device_train_batch_size: 16
|
||||
push_to_hub: true
|
||||
report_to:
|
||||
- wandb
|
||||
reward_funcs:
|
||||
- code
|
||||
- format
|
||||
reward_weights:
|
||||
- 1.0
|
||||
- 0.1
|
||||
save_strategy: "steps"
|
||||
save_steps: 50
|
||||
save_total_limit: 1
|
||||
seed: 42
|
||||
temperature: 1.0
|
||||
warmup_ratio: 0.03
|
||||
@ -0,0 +1,46 @@
|
||||
# Model arguments
|
||||
model_name_or_path: Qwen/Qwen2.5-1.5B-Instruct
|
||||
model_revision: main
|
||||
torch_dtype: bfloat16
|
||||
attn_implementation: flash_attention_2
|
||||
|
||||
# Data training arguments
|
||||
dataset_name: open-r1/OpenR1-Math-220k
|
||||
dataset_configs:
|
||||
- default
|
||||
dataset_num_proc: 48
|
||||
|
||||
# SFT trainer config
|
||||
bf16: true
|
||||
do_eval: false
|
||||
eval_strategy: 'no'
|
||||
gradient_accumulation_steps: 1
|
||||
gradient_checkpointing: true
|
||||
gradient_checkpointing_kwargs:
|
||||
use_reentrant: false
|
||||
hub_model_id: Qwen2.5-1.5B-Open-R1-Distill
|
||||
hub_strategy: every_save
|
||||
learning_rate: 5.0e-05
|
||||
log_level: info
|
||||
logging_steps: 5
|
||||
logging_strategy: steps
|
||||
lr_scheduler_type: cosine_with_min_lr
|
||||
lr_scheduler_kwargs:
|
||||
min_lr_rate: 0.1
|
||||
packing: true
|
||||
max_seq_length: 16384
|
||||
max_steps: -1
|
||||
num_train_epochs: 1
|
||||
output_dir: data/Qwen2.5-1.5B-Open-R1-Distill
|
||||
overwrite_output_dir: true
|
||||
per_device_eval_batch_size: 16
|
||||
per_device_train_batch_size: 16
|
||||
push_to_hub: true
|
||||
report_to:
|
||||
- wandb
|
||||
save_strategy: "steps"
|
||||
save_steps: 100
|
||||
save_total_limit: 1
|
||||
seed: 42
|
||||
use_liger: true
|
||||
warmup_ratio: 0.05
|
||||
@ -0,0 +1,41 @@
|
||||
# Model arguments
|
||||
model_name_or_path: Qwen/Qwen2.5-1.5B-Instruct
|
||||
model_revision: main
|
||||
torch_dtype: bfloat16
|
||||
attn_implementation: eager
|
||||
|
||||
# Data training arguments
|
||||
dataset_name: HuggingFaceH4/Bespoke-Stratos-17k
|
||||
dataset_configs:
|
||||
- all
|
||||
preprocessing_num_workers: 8
|
||||
|
||||
# SFT trainer config
|
||||
bf16: true
|
||||
do_eval: true
|
||||
eval_strategy: steps
|
||||
eval_steps: 100
|
||||
gradient_accumulation_steps: 4
|
||||
gradient_checkpointing: true
|
||||
gradient_checkpointing_kwargs:
|
||||
use_reentrant: false
|
||||
learning_rate: 2.0e-05
|
||||
log_level: info
|
||||
logging_steps: 1
|
||||
logging_strategy: steps
|
||||
lr_scheduler_type: cosine
|
||||
packing: true
|
||||
max_length: 4096
|
||||
max_steps: -1
|
||||
num_train_epochs: 6
|
||||
output_dir: data/Qwen2.5-1.5B-Open-R1-Distill
|
||||
overwrite_output_dir: true
|
||||
packing: true
|
||||
per_device_eval_batch_size: 4
|
||||
per_device_train_batch_size: 2
|
||||
push_to_hub: false
|
||||
report_to:
|
||||
- none
|
||||
save_strategy: "no"
|
||||
seed: 42
|
||||
warmup_ratio: 0.1
|
||||
@ -0,0 +1,50 @@
|
||||
# Model arguments
|
||||
model_name_or_path: path/to/model_sfted
|
||||
model_revision: main
|
||||
torch_dtype: bfloat16
|
||||
attn_implementation: eager
|
||||
|
||||
# Data training arguments
|
||||
dataset_name: path/to/OpenR1-Math-220k_filtered_step3
|
||||
dataset_configs:
|
||||
- train
|
||||
system_prompt: "You are a helpful AI Assistant that provides well-reasoned and detailed responses. You first think about the reasoning process as an internal monologue and then provide the user with the answer. Respond in the following format: <think>\n...\n</think>\n<answer>\n...\n</answer>"
|
||||
|
||||
# GRPO trainer config
|
||||
bf16: true
|
||||
use_vllm: true
|
||||
vllm_device: auto
|
||||
vllm_gpu_memory_utilization: 0.8
|
||||
do_eval: false
|
||||
gradient_accumulation_steps: 8
|
||||
gradient_checkpointing: true
|
||||
gradient_checkpointing_kwargs:
|
||||
use_reentrant: false
|
||||
learning_rate: 3.0e-06
|
||||
log_completions: true
|
||||
log_level: info
|
||||
logging_first_step: true
|
||||
logging_steps: 1
|
||||
logging_strategy: steps
|
||||
lr_scheduler_type: cosine
|
||||
max_prompt_length: 512
|
||||
max_completion_length: 4096
|
||||
max_steps: -1
|
||||
num_generations: 7
|
||||
num_train_epochs: 1
|
||||
output_dir: data/Qwen2.5-7B-Open-R1-step3-GRPO
|
||||
overwrite_output_dir: true
|
||||
per_device_train_batch_size: 1
|
||||
# push_to_hub: true
|
||||
report_to:
|
||||
- none
|
||||
reward_funcs:
|
||||
- accuracy
|
||||
- format
|
||||
reward_weights:
|
||||
- 1.0
|
||||
- 1.0
|
||||
save_strategy: "steps"
|
||||
save_steps: 10
|
||||
seed: 42
|
||||
warmup_ratio: 0.1
|
||||
@ -0,0 +1,55 @@
|
||||
# Model arguments
|
||||
model_name_or_path: Qwen/Qwen2.5-Math-7B
|
||||
model_revision: main
|
||||
torch_dtype: bfloat16
|
||||
attn_implementation: eager
|
||||
|
||||
# Data training arguments
|
||||
dataset_name: DigitalLearningGmbH/MATH-lighteval
|
||||
dataset_configs:
|
||||
- train
|
||||
system_prompt: "You are a helpful AI Assistant, designed to provided well-reasoned and detailed responses. You FIRST think about the reasoning process as an internal monologue and then provide the user with the answer. The reasoning process MUST BE enclosed within <think> and </think> tags."
|
||||
|
||||
# GRPO trainer config
|
||||
bf16: true
|
||||
use_vllm: true
|
||||
vllm_device: auto
|
||||
vllm_gpu_memory_utilization: 0.7
|
||||
do_eval: true
|
||||
eval_strategy: steps
|
||||
eval_steps: 100
|
||||
gradient_accumulation_steps: 8
|
||||
gradient_checkpointing: true
|
||||
gradient_checkpointing_kwargs:
|
||||
use_reentrant: false
|
||||
# hub_model_id: Qwen-2.5-7B-Simple-RL
|
||||
# hub_strategy: every_save
|
||||
learning_rate: 3.0e-06
|
||||
log_completions: true
|
||||
log_level: info
|
||||
logging_first_step: true
|
||||
logging_steps: 1
|
||||
logging_strategy: steps
|
||||
lr_scheduler_type: cosine
|
||||
max_prompt_length: 512
|
||||
max_completion_length: 1024
|
||||
max_steps: -1
|
||||
num_generations: 7
|
||||
num_train_epochs: 1
|
||||
output_dir: data/Qwen-2.5-7B-Simple-RL
|
||||
overwrite_output_dir: true
|
||||
per_device_eval_batch_size: 4
|
||||
per_device_train_batch_size: 4
|
||||
# push_to_hub: true
|
||||
report_to:
|
||||
- none
|
||||
reward_funcs:
|
||||
- accuracy
|
||||
- format
|
||||
reward_weights:
|
||||
- 1.0
|
||||
- 1.0
|
||||
save_strategy: "steps"
|
||||
seed: 42
|
||||
warmup_ratio: 0.1
|
||||
save_steps: 10
|
||||
1
examples/research/open_r1/open-r1/recipes/README.md
Normal file
1
examples/research/open_r1/open-r1/recipes/README.md
Normal file
@ -0,0 +1 @@
|
||||
**TODO:** we will add more recipes in the future, just like alignment-handbook, this is the purpose of adding recipes to this project.
|
||||
@ -0,0 +1,16 @@
|
||||
compute_environment: LOCAL_MACHINE
|
||||
debug: false
|
||||
distributed_type: MULTI_GPU
|
||||
downcast_bf16: 'no'
|
||||
gpu_ids: all
|
||||
machine_rank: 0
|
||||
main_training_function: main
|
||||
mixed_precision: bf16
|
||||
num_machines: 1
|
||||
num_processes: 8
|
||||
rdzv_backend: static
|
||||
same_network: true
|
||||
tpu_env: []
|
||||
tpu_use_cluster: false
|
||||
tpu_use_sudo: false
|
||||
use_cpu: false
|
||||
@ -0,0 +1,21 @@
|
||||
compute_environment: LOCAL_MACHINE
|
||||
debug: false
|
||||
deepspeed_config:
|
||||
deepspeed_multinode_launcher: standard
|
||||
offload_optimizer_device: none
|
||||
offload_param_device: none
|
||||
zero3_init_flag: false
|
||||
zero_stage: 2
|
||||
distributed_type: DEEPSPEED
|
||||
downcast_bf16: 'no'
|
||||
machine_rank: 0
|
||||
main_training_function: main
|
||||
mixed_precision: bf16
|
||||
num_machines: 1
|
||||
num_processes: 8
|
||||
rdzv_backend: static
|
||||
same_network: true
|
||||
tpu_env: []
|
||||
tpu_use_cluster: false
|
||||
tpu_use_sudo: false
|
||||
use_cpu: false
|
||||
@ -0,0 +1,22 @@
|
||||
compute_environment: LOCAL_MACHINE
|
||||
debug: false
|
||||
deepspeed_config:
|
||||
deepspeed_multinode_launcher: standard
|
||||
offload_optimizer_device: none
|
||||
offload_param_device: none
|
||||
zero3_init_flag: true
|
||||
zero3_save_16bit_model: true
|
||||
zero_stage: 3
|
||||
distributed_type: DEEPSPEED
|
||||
downcast_bf16: 'no'
|
||||
machine_rank: 0
|
||||
main_training_function: main
|
||||
mixed_precision: bf16
|
||||
num_machines: 1
|
||||
num_processes: 8
|
||||
rdzv_backend: static
|
||||
same_network: true
|
||||
tpu_env: []
|
||||
tpu_use_cluster: false
|
||||
tpu_use_sudo: false
|
||||
use_cpu: false
|
||||
174
examples/research/open_r1/open-r1/scripts/generate_reasoning.py
Normal file
174
examples/research/open_r1/open-r1/scripts/generate_reasoning.py
Normal file
@ -0,0 +1,174 @@
|
||||
import argparse
|
||||
import asyncio
|
||||
import hashlib
|
||||
import json
|
||||
import os
|
||||
import random
|
||||
from asyncio import Lock
|
||||
from typing import Set
|
||||
|
||||
from datasets import load_dataset
|
||||
from tqdm.asyncio import tqdm
|
||||
|
||||
import aiofiles
|
||||
import aiohttp
|
||||
import uvloop
|
||||
|
||||
|
||||
file_lock = Lock()
|
||||
|
||||
|
||||
async def generate_completion(session, prompt, args):
|
||||
retry_budget = 10
|
||||
while retry_budget > 0:
|
||||
try:
|
||||
await asyncio.sleep(random.uniform(0.0, 0.1))
|
||||
async with session.post(
|
||||
f"http://{args.api_addr}/v1/chat/completions",
|
||||
json={
|
||||
"model": "default",
|
||||
"messages": [{"role": "user", "content": prompt}],
|
||||
"max_tokens": args.max_tokens,
|
||||
"temperature": args.temperature,
|
||||
"top_p": args.top_p,
|
||||
},
|
||||
headers={"Authorization": "Bearer EMPTY"},
|
||||
) as response:
|
||||
return await response.json(content_type=None)
|
||||
except Exception as e:
|
||||
print(f"API error (will retry): {e}")
|
||||
retry_budget -= 1
|
||||
await asyncio.sleep(10)
|
||||
return None
|
||||
|
||||
|
||||
async def process_example(example, session, args, output_file, pbar):
|
||||
prompt = args.prompt_template.format(prompt=example[args.prompt_column])
|
||||
|
||||
try:
|
||||
tasks = [generate_completion(session, prompt, args) for _ in range(args.num_generations)]
|
||||
|
||||
completions = await asyncio.gather(*tasks)
|
||||
|
||||
if any(completion is None for completion in completions):
|
||||
print(f"Error processing example")
|
||||
pbar.update(1)
|
||||
return None
|
||||
|
||||
generations = []
|
||||
finish_reasons = []
|
||||
api_metadata = []
|
||||
|
||||
for completion in completions:
|
||||
generations.append(completion["choices"][0]["message"]["content"])
|
||||
finish_reasons.append(completion["choices"][0]["finish_reason"])
|
||||
api_metadata.append(completion["usage"])
|
||||
|
||||
# Combine original dataset fields with generations
|
||||
result = {
|
||||
**example, # Preserve all original dataset fields
|
||||
"generations": generations,
|
||||
"finish_reasons": finish_reasons,
|
||||
"api_metadata": api_metadata,
|
||||
}
|
||||
|
||||
# Write to file with lock
|
||||
async with file_lock:
|
||||
async with aiofiles.open(output_file, mode="a") as f:
|
||||
await f.write(json.dumps(result) + "\n")
|
||||
await f.flush()
|
||||
|
||||
pbar.set_postfix(active=len(pbar.active_tasks), refresh=False)
|
||||
pbar.update(1)
|
||||
|
||||
return result
|
||||
except Exception as e:
|
||||
print(f"Error processing example: {e}")
|
||||
pbar.update(1)
|
||||
return None
|
||||
|
||||
|
||||
async def load_processed_uuids(output_file, uuid_column):
|
||||
processed_uuids = set()
|
||||
if os.path.exists(output_file):
|
||||
async with aiofiles.open(output_file, mode="r") as f:
|
||||
async for line in f:
|
||||
try:
|
||||
data = json.loads(line)
|
||||
processed_uuids.add(hashlib.md5(str(data[uuid_column]).encode()).hexdigest())
|
||||
except json.JSONDecodeError:
|
||||
continue
|
||||
return processed_uuids
|
||||
|
||||
|
||||
async def main():
|
||||
parser = argparse.ArgumentParser()
|
||||
parser.add_argument("--dataset-name", type=str, required=True)
|
||||
parser.add_argument("--output-file", type=str, required=True)
|
||||
parser.add_argument("--prompt-column", type=str, required=True)
|
||||
parser.add_argument("--uuid-column", type=str, required=True)
|
||||
parser.add_argument("--api-addr", type=str, default="localhost:39876")
|
||||
parser.add_argument("--num-generations", type=int, default=4)
|
||||
parser.add_argument(
|
||||
"--prompt-template",
|
||||
type=str,
|
||||
default="You will be given a problem. Please reason step by step, and put your final answer within \\boxed{{}}:\n{prompt}",
|
||||
)
|
||||
parser.add_argument("--temperature", type=float, default=0.6)
|
||||
parser.add_argument("--top-p", type=float, default=0.95)
|
||||
parser.add_argument("--max-tokens", type=int, default=16384)
|
||||
parser.add_argument("--max-concurrent", type=int, default=1000)
|
||||
args = parser.parse_args()
|
||||
|
||||
dataset = load_dataset(args.dataset_name, split="train").shuffle()
|
||||
processed_uuids = await load_processed_uuids(args.output_file, args.uuid_column)
|
||||
if processed_uuids:
|
||||
print(f"Found {len(processed_uuids)} already processed examples, resuming from there...")
|
||||
|
||||
if not os.path.exists(args.output_file):
|
||||
async with aiofiles.open(args.output_file, mode="w") as f:
|
||||
await f.write("")
|
||||
|
||||
active_tasks: Set[asyncio.Task] = set()
|
||||
|
||||
pbar = tqdm(
|
||||
total=len(dataset) - len(processed_uuids),
|
||||
desc="Generating responses",
|
||||
unit="row",
|
||||
mininterval=2,
|
||||
smoothing=0.0001,
|
||||
)
|
||||
pbar.active_tasks = active_tasks
|
||||
|
||||
async with aiohttp.ClientSession(
|
||||
timeout=aiohttp.ClientTimeout(total=60 * 60),
|
||||
connector=aiohttp.TCPConnector(limit=args.max_concurrent, ttl_dns_cache=300, keepalive_timeout=60 * 60),
|
||||
) as session:
|
||||
for example in dataset:
|
||||
uuid = hashlib.md5(str(example[args.uuid_column]).encode()).hexdigest()
|
||||
if uuid not in processed_uuids:
|
||||
# Wait if we've hit the concurrency limit
|
||||
while len(active_tasks) >= args.max_concurrent:
|
||||
done, active_tasks = await asyncio.wait(active_tasks, return_when=asyncio.FIRST_COMPLETED)
|
||||
for task in done:
|
||||
try:
|
||||
await task
|
||||
except Exception as e:
|
||||
print(f"Task failed: {e}")
|
||||
|
||||
task = asyncio.create_task(process_example(example, session, args, args.output_file, pbar))
|
||||
active_tasks.add(task)
|
||||
task.add_done_callback(active_tasks.discard)
|
||||
|
||||
pbar.set_postfix(active=len(active_tasks), refresh=True)
|
||||
|
||||
# Wait for remaining tasks
|
||||
if active_tasks:
|
||||
await asyncio.gather(*active_tasks, return_exceptions=True)
|
||||
|
||||
pbar.close()
|
||||
|
||||
|
||||
if __name__ == "__main__":
|
||||
uvloop.install()
|
||||
asyncio.run(main())
|
||||
61
examples/research/open_r1/open-r1/scripts/run_benchmarks.py
Normal file
61
examples/research/open_r1/open-r1/scripts/run_benchmarks.py
Normal file
@ -0,0 +1,61 @@
|
||||
# Copyright 2025 The HuggingFace Team. All rights reserved.
|
||||
#
|
||||
# Licensed under the Apache License, Version 2.0 (the "License");
|
||||
# you may not use this file except in compliance with the License.
|
||||
# You may obtain a copy of the License at
|
||||
#
|
||||
# http://www.apache.org/licenses/LICENSE-2.0
|
||||
#
|
||||
# Unless required by applicable law or agreed to in writing, software
|
||||
# distributed under the License is distributed on an "AS IS" BASIS,
|
||||
# WITHOUT WARRANTIES OR CONDITIONS OF ANY KIND, either express or implied.
|
||||
# See the License for the specific language governing permissions and
|
||||
# limitations under the License.
|
||||
from dataclasses import dataclass, field
|
||||
from typing import List, Optional
|
||||
|
||||
from open_r1.utils.evaluation import SUPPORTED_BENCHMARKS, run_benchmark_jobs
|
||||
from open_r1.configs import SFTConfig
|
||||
from trl import ModelConfig, TrlParser
|
||||
|
||||
|
||||
@dataclass
|
||||
class ScriptArguments:
|
||||
model_id: str = field(
|
||||
default="deepseek-ai/DeepSeek-R1-Distill-Qwen-1.5B",
|
||||
metadata={"help": "The Hub model id to push the model to."},
|
||||
)
|
||||
model_revision: str = field(default="main", metadata={"help": "The Hub model branch to push the model to."})
|
||||
trust_remote_code: bool = field(default=False, metadata={"help": "Trust the remote code."})
|
||||
benchmarks: List[str] = field(
|
||||
default_factory=lambda: [], metadata={"help": "The benchmarks to run after training."}
|
||||
)
|
||||
list_benchmarks: bool = field(default=False, metadata={"help": "List all supported benchmarks."})
|
||||
system_prompt: Optional[str] = field(
|
||||
default=None, metadata={"help": "The system prompt to use for the benchmark."}
|
||||
)
|
||||
|
||||
|
||||
def main():
|
||||
parser = TrlParser(ScriptArguments)
|
||||
args = parser.parse_args_and_config()[0]
|
||||
if args.list_benchmarks:
|
||||
print("Supported benchmarks:")
|
||||
for benchmark in SUPPORTED_BENCHMARKS:
|
||||
print(f" - {benchmark}")
|
||||
return
|
||||
benchmark_args = SFTConfig(
|
||||
output_dir="",
|
||||
hub_model_id=args.model_id,
|
||||
hub_model_revision=args.model_revision,
|
||||
benchmarks=args.benchmarks,
|
||||
system_prompt=args.system_prompt,
|
||||
)
|
||||
run_benchmark_jobs(
|
||||
benchmark_args,
|
||||
ModelConfig(model_name_or_path="", model_revision="", trust_remote_code=args.trust_remote_code),
|
||||
)
|
||||
|
||||
|
||||
if __name__ == "__main__":
|
||||
main()
|
||||
55
examples/research/open_r1/open-r1/scripts/upload_details.py
Normal file
55
examples/research/open_r1/open-r1/scripts/upload_details.py
Normal file
@ -0,0 +1,55 @@
|
||||
# coding=utf-8
|
||||
# Copyright 2025 The HuggingFace Inc. team. All rights reserved.
|
||||
#
|
||||
# Licensed under the Apache License, Version 2.0 (the "License");
|
||||
# you may not use this file except in compliance with the License.
|
||||
# You may obtain a copy of the License at
|
||||
#
|
||||
# http://www.apache.org/licenses/LICENSE-2.0
|
||||
#
|
||||
# Unless required by applicable law or agreed to in writing, software
|
||||
# distributed under the License is distributed on an "AS IS" BASIS,
|
||||
# WITHOUT WARRANTIES OR CONDITIONS OF ANY KIND, either express or implied.
|
||||
# See the License for the specific language governing permissions and
|
||||
# limitations under the License.
|
||||
"""
|
||||
Push the details from a LightEval run to the Hub.
|
||||
|
||||
Usage:
|
||||
|
||||
python src/open_r1/utils/upload_details.py \
|
||||
--data_files {path_to_parquet_file} \
|
||||
--hub_repo_id {hub_repo_id} \
|
||||
--config_name {config_name}
|
||||
"""
|
||||
|
||||
from dataclasses import dataclass, field
|
||||
from typing import List
|
||||
|
||||
from datasets import load_dataset
|
||||
from transformers import HfArgumentParser
|
||||
|
||||
|
||||
@dataclass
|
||||
class ScriptArguments:
|
||||
data_files: List[str] = field(default_factory=list)
|
||||
hub_repo_id: str = None
|
||||
config_name: str = None
|
||||
|
||||
|
||||
def main():
|
||||
parser = HfArgumentParser(ScriptArguments)
|
||||
args = parser.parse_args_into_dataclasses()[0]
|
||||
|
||||
if all(file.endswith(".json") for file in args.data_files):
|
||||
ds = load_dataset("json", data_files=args.data_files)
|
||||
elif all(file.endswith(".jsonl") for file in args.data_files):
|
||||
ds = load_dataset("json", data_files=args.data_files)
|
||||
else:
|
||||
ds = load_dataset("parquet", data_files=args.data_files)
|
||||
url = ds.push_to_hub(args.hub_repo_id, config_name=args.config_name, private=True)
|
||||
print(f"Dataset available at: {url}")
|
||||
|
||||
|
||||
if __name__ == "__main__":
|
||||
main()
|
||||
41
examples/research/open_r1/open-r1/setup.cfg
Normal file
41
examples/research/open_r1/open-r1/setup.cfg
Normal file
@ -0,0 +1,41 @@
|
||||
[isort]
|
||||
default_section = FIRSTPARTY
|
||||
ensure_newline_before_comments = True
|
||||
force_grid_wrap = 0
|
||||
include_trailing_comma = True
|
||||
known_first_party = open_r1
|
||||
known_third_party =
|
||||
transformers
|
||||
datasets
|
||||
fugashi
|
||||
git
|
||||
h5py
|
||||
matplotlib
|
||||
nltk
|
||||
numpy
|
||||
packaging
|
||||
pandas
|
||||
psutil
|
||||
pytest
|
||||
rouge_score
|
||||
sacrebleu
|
||||
seqeval
|
||||
sklearn
|
||||
streamlit
|
||||
torch
|
||||
tqdm
|
||||
|
||||
line_length = 119
|
||||
lines_after_imports = 2
|
||||
multi_line_output = 3
|
||||
use_parentheses = True
|
||||
|
||||
[flake8]
|
||||
ignore = E203, E501, E741, W503, W605
|
||||
max-line-length = 119
|
||||
per-file-ignores =
|
||||
# imported but unused
|
||||
__init__.py: F401
|
||||
|
||||
[tool:pytest]
|
||||
doctest_optionflags=NUMBER NORMALIZE_WHITESPACE ELLIPSIS
|
||||
@ -65,7 +65,7 @@ _deps = [
|
||||
"ruff>=0.9.0",
|
||||
"safetensors>=0.3.3",
|
||||
"sentencepiece>=0.1.99",
|
||||
"torch==2.6.0",
|
||||
"torch==2.5.1",
|
||||
"wandb>=0.19.1",
|
||||
]
|
||||
|
||||
30
examples/research/open_r1/open-r1/slurm/README.md
Normal file
30
examples/research/open_r1/open-r1/slurm/README.md
Normal file
@ -0,0 +1,30 @@
|
||||
## Serving DeepSeek-R1 on 2x8 H100 SLURM nodes with SGLang
|
||||
|
||||
1. Set up the environment (adjust for your cuda version):
|
||||
```bash
|
||||
conda create -n sglang124 python=3.11
|
||||
conda activate sglang124
|
||||
|
||||
pip install torch=2.5.1 --index-url https://download.pytorch.org/whl/cu124
|
||||
|
||||
pip install sgl-kernel --force-reinstall --no-deps
|
||||
pip install "sglang[all]>=0.4.2.post4" --find-links https://flashinfer.ai/whl/cu124/torch2.5/flashinfer/
|
||||
```
|
||||
|
||||
2. Run the server and wait for the model to load:
|
||||
```bash
|
||||
sbatch slurm/serve_r1.slurm -m "/fsx/deepseek-r1-checkpoint" -e "sglang124"
|
||||
```
|
||||
|
||||
3. Run the data generation script:
|
||||
```bash
|
||||
python scripts/generate_reasoning.py \
|
||||
--dataset-name "AI-MO/NuminaMath-1.5" \
|
||||
--output-file "numinamath_r1_generations.jsonl" \
|
||||
--prompt-column "problem" \
|
||||
--uuid-column "problem" \
|
||||
--api-addr "<SGLANG_SERVER_ADDRESS>:39877" \
|
||||
--num-generations 2 \
|
||||
--max-tokens 16384 \
|
||||
--max-concurrent 200
|
||||
```
|
||||
89
examples/research/open_r1/open-r1/slurm/evaluate.slurm
Normal file
89
examples/research/open_r1/open-r1/slurm/evaluate.slurm
Normal file
@ -0,0 +1,89 @@
|
||||
#!/bin/bash
|
||||
#SBATCH --ntasks-per-node=1
|
||||
#SBATCH --gres=gpu:8
|
||||
#SBATCH --partition=hopper-prod
|
||||
#SBATCH --output=./logs/%x-%j.out
|
||||
#SBATCH --err=./logs/%x-%j.err
|
||||
#SBATCH --requeue
|
||||
|
||||
# Specific configuration optimized for the Hugging Face Compute Cluster
|
||||
# Be ye warned this may not work on other clusters!
|
||||
module load cuda/12.4
|
||||
|
||||
set -x -e
|
||||
|
||||
source ~/.bashrc
|
||||
source openr1/bin/activate
|
||||
|
||||
TASK_NAME=$1
|
||||
TASKS=$2
|
||||
MODEL_ID=$3
|
||||
MODEL_REVISION=$4
|
||||
# Optional args
|
||||
[ -z "$5"] && TENSOR_PARALLEL=False || TENSOR_PARALLEL=$5
|
||||
[ -z "$6"] && TRUST_REMOTE_CODE=False || TRUST_REMOTE_CODE=$6
|
||||
# $7 is reserved for system_prompt, see line 51
|
||||
NUM_GPUS=$(nvidia-smi -L | wc -l)
|
||||
|
||||
# Set Whether to use tensor parallelism or data parallelism
|
||||
if [ "$TENSOR_PARALLEL" = "True" ]; then
|
||||
# use TP to shard model across NUM_GPUS
|
||||
export VLLM_WORKER_MULTIPROC_METHOD=spawn
|
||||
MODEL_ARGS="pretrained=$MODEL_ID,revision=$MODEL_REVISION,trust_remote_code=$TRUST_REMOTE_CODE,dtype=bfloat16,tensor_parallel_size=$NUM_GPUS,max_model_length=32768,gpu_memory_utilisation=0.8"
|
||||
else
|
||||
MODEL_ARGS="pretrained=$MODEL_ID,revision=$MODEL_REVISION,trust_remote_code=$TRUST_REMOTE_CODE,dtype=bfloat16,data_parallel_size=$NUM_GPUS,max_model_length=32768,gpu_memory_utilisation=0.8"
|
||||
fi
|
||||
|
||||
LM_EVAL_REPO_ID="open-r1/open-r1-eval-leaderboard"
|
||||
MODEL_NAME=$(echo $MODEL_ID | sed 's/\//_/g') # replaces / with _
|
||||
DETAILS_REPO_ID="open-r1/details-$MODEL_NAME"
|
||||
OUTPUT_DIR="eval_results/$MODEL_ID/$MODEL_REVISION/$TASK_NAME"
|
||||
# We need this flag since we run this script from training jobs that use DeepSpeed and the env vars get progated which causes errors during evaluation
|
||||
ACCELERATE_USE_DEEPSPEED=false
|
||||
# Enable fast downloads
|
||||
HF_HUB_ENABLE_HF_TRANSFER=1
|
||||
|
||||
echo "Running lighteval script ..."
|
||||
echo "Eval results will be saved to $OUTPUT_DIR"
|
||||
# Check if "custom" is a substring of TASKS
|
||||
if [[ $TASKS == *"custom"* ]]; then
|
||||
echo "Custom task detected. Running custom task evaluation script ..."
|
||||
lighteval vllm $MODEL_ARGS $TASKS \
|
||||
--custom-tasks "src/open_r1/evaluate.py" \
|
||||
--use-chat-template \
|
||||
--output-dir $OUTPUT_DIR \
|
||||
--save-details \
|
||||
${7:+--system-prompt "$7"}
|
||||
else
|
||||
lighteval vllm $MODEL_ARGS $TASKS \
|
||||
--use-chat-template \
|
||||
--output-dir $OUTPUT_DIR \
|
||||
--save-details \
|
||||
${7:+--system-prompt "$7"}
|
||||
fi
|
||||
|
||||
OUTPUT_FILEPATHS=$(find $OUTPUT_DIR/results/ -type f \( -name "*.json" \))
|
||||
for filepath in $OUTPUT_FILEPATHS; do
|
||||
echo "Uploading $filepath to Hugging Face Hub..."
|
||||
filename=$(basename -- "$filepath")
|
||||
for attempt in {1..20}; do
|
||||
if huggingface-cli upload --repo-type space --private $LM_EVAL_REPO_ID $filepath $OUTPUT_DIR/$filename; then
|
||||
echo "Upload succeeded for $filepath"
|
||||
break
|
||||
else
|
||||
echo "Upload failed for $filepath. Attempt $attempt of 20. Retrying in 5 seconds..."
|
||||
sleep 5
|
||||
fi
|
||||
done
|
||||
done
|
||||
|
||||
echo "Uploading details to Hugging Face Hub..."
|
||||
DETAILS_FILEPATHS=$(find $OUTPUT_DIR/details/ -type f \( -name "*.parquet" \))
|
||||
echo "DETAILS_FILEPATHS: $DETAILS_FILEPATHS"
|
||||
TIMESTAMP=$(date +"%Y-%m-%dT%H-%M-%S")
|
||||
python scripts/upload_details.py --data_files $DETAILS_FILEPATHS --hub_repo_id $DETAILS_REPO_ID --config_name $MODEL_REVISION.$TASK_NAME.$TIMESTAMP
|
||||
|
||||
echo "Cleaning up ..."
|
||||
rm -rf $OUTPUT_DIR
|
||||
|
||||
echo "Done!"
|
||||
@ -0,0 +1,132 @@
|
||||
#!/bin/bash
|
||||
#SBATCH --job-name=r1-vllm
|
||||
#SBATCH --partition=hopper-prod
|
||||
#SBATCH --qos=normal
|
||||
#SBATCH --nodes=4
|
||||
#SBATCH --gpus-per-node=8
|
||||
#SBATCH --exclusive
|
||||
#SBATCH --output=./logs/%x_%j_%n.out
|
||||
#SBATCH --error=./logs/%x_%j_%n.err
|
||||
#SBATCH --time=7-00:00:00
|
||||
#SBATCH --ntasks-per-node=1
|
||||
|
||||
set -exuo pipefail
|
||||
|
||||
MODEL_PATH="deepseek-ai/DeepSeek-R1"
|
||||
CONDA_ENV="vllm7"
|
||||
SERVER_PORT=8000
|
||||
RAY_PORT=6379
|
||||
RAY_DASHBOARD_PORT=8265
|
||||
|
||||
while getopts "m:e:h" opt; do
|
||||
case $opt in
|
||||
m) MODEL_PATH="$OPTARG" ;;
|
||||
e) CONDA_ENV="$OPTARG" ;;
|
||||
h|?) echo "Usage: sbatch $0 [-m MODEL_PATH] [-e CONDA_ENV]"; exit 1 ;;
|
||||
esac
|
||||
done
|
||||
|
||||
# Environment setup
|
||||
module load cuda/12.1
|
||||
source ~/.bashrc
|
||||
source "$CONDA_PREFIX/etc/profile.d/conda.sh"
|
||||
conda activate "$CONDA_ENV" || { echo "Failed to activate conda env $CONDA_ENV"; exit 1; }
|
||||
|
||||
# Get nodes information
|
||||
NODES=($(scontrol show hostnames "$SLURM_JOB_NODELIST"))
|
||||
HEAD_NODE="${NODES[0]}"
|
||||
HEAD_NODE_IP=$(srun --nodes=1 --ntasks=1 -w "$HEAD_NODE" hostname --ip-address)
|
||||
|
||||
echo "SLURM_JOB_ID: $SLURM_JOB_ID"
|
||||
echo "SLURM_JOB_NODELIST: $SLURM_JOB_NODELIST"
|
||||
echo "Head node: $HEAD_NODE ($HEAD_NODE_IP)"
|
||||
|
||||
# Start Ray head node
|
||||
echo "Starting Ray head node at $HEAD_NODE"
|
||||
srun --nodes=1 --ntasks=1 -w "$HEAD_NODE" \
|
||||
ray start --head \
|
||||
--node-ip-address="$HEAD_NODE_IP" \
|
||||
--port=$RAY_PORT \
|
||||
--dashboard-host=0.0.0.0 \
|
||||
--dashboard-port=$RAY_DASHBOARD_PORT \
|
||||
--block &
|
||||
|
||||
sleep 10
|
||||
|
||||
# Start Ray worker nodes
|
||||
WORKER_COUNT=$((SLURM_JOB_NUM_NODES - 1))
|
||||
for ((i = 1; i <= WORKER_COUNT; i++)); do
|
||||
WORKER_NODE="${NODES[$i]}"
|
||||
echo "Starting Ray worker $i at $WORKER_NODE"
|
||||
srun --nodes=1 --ntasks=1 -w "$WORKER_NODE" \
|
||||
ray start --address "$HEAD_NODE_IP:$RAY_PORT" \
|
||||
--block &
|
||||
sleep 5
|
||||
done
|
||||
|
||||
echo "Waiting for Ray cluster to initialize..."
|
||||
sleep 60
|
||||
|
||||
# Start vLLM server
|
||||
echo "Starting vLLM server..."
|
||||
RAY_ADDRESS="http://$HEAD_NODE_IP:$RAY_DASHBOARD_PORT" ray job submit \
|
||||
--working-dir src/open_r1 \
|
||||
--no-wait \
|
||||
--job-id vllm-server \
|
||||
-- vllm serve "$MODEL_PATH" \
|
||||
--tensor-parallel-size 8 \
|
||||
--pipeline-parallel-size 4 \
|
||||
--gpu-memory-utilization 0.90 \
|
||||
--max-model-len 32768 \
|
||||
--max-num-batched-tokens 262144 \
|
||||
--max-num-seqs 128 \
|
||||
--max-seq-len-to-capture 32768 \
|
||||
--enable-chunked-prefill true \
|
||||
--preemption-mode recompute \
|
||||
--swap-space 128 \
|
||||
--trust-remote-code \
|
||||
--distributed-executor-backend ray
|
||||
|
||||
# Wait for server with timeout
|
||||
TIMEOUT=3600 # 1h
|
||||
START_TIME=$(date +%s)
|
||||
echo "Waiting for vLLM server (http://$HEAD_NODE_IP:$SERVER_PORT)..."
|
||||
|
||||
while true; do
|
||||
if curl -s -o /dev/null -w "%{http_code}" "http://$HEAD_NODE_IP:$SERVER_PORT/health" >/dev/null 2>&1; then
|
||||
echo "Server is ready at http://$HEAD_NODE_IP:$SERVER_PORT"
|
||||
break
|
||||
fi
|
||||
|
||||
CURRENT_TIME=$(date +%s)
|
||||
if [ $((CURRENT_TIME - START_TIME)) -gt $TIMEOUT ]; then
|
||||
echo "Error: Server failed to start within $TIMEOUT seconds"
|
||||
exit 1
|
||||
fi
|
||||
|
||||
echo "Still waiting... ($(($CURRENT_TIME - $START_TIME)) seconds elapsed)"
|
||||
sleep 60
|
||||
done
|
||||
|
||||
echo "Checking available models..."
|
||||
curl "http://$HEAD_NODE_IP:$SERVER_PORT/v1/models"
|
||||
sleep 10
|
||||
|
||||
echo "Executing sanity check..."
|
||||
curl "http://$HEAD_NODE_IP:$SERVER_PORT/v1/completions" \
|
||||
-H "Content-Type: application/json" \
|
||||
-d "{
|
||||
\"model\": \"default\",
|
||||
\"prompt\": \"<|begin▁of▁sentence|><|User|>hi, how are you?<|Assistant|>\",
|
||||
\"max_tokens\": 2048,
|
||||
\"temperature\": 0.6
|
||||
}"
|
||||
|
||||
# Keep the job running with health checks
|
||||
while true; do
|
||||
if ! curl -s -o /dev/null "http://$HEAD_NODE_IP:$SERVER_PORT/health"; then
|
||||
echo "Error: Server health check failed"
|
||||
exit 1
|
||||
fi
|
||||
sleep 300
|
||||
done
|
||||
244
examples/research/open_r1/open-r1/slurm/generate.slurm
Normal file
244
examples/research/open_r1/open-r1/slurm/generate.slurm
Normal file
@ -0,0 +1,244 @@
|
||||
#!/bin/bash
|
||||
#SBATCH --job-name=deepseek-r1-generation
|
||||
#SBATCH --partition=hopper-prod
|
||||
#SBATCH --qos=normal
|
||||
#SBATCH --nodes=2
|
||||
#SBATCH --exclusive
|
||||
#SBATCH --gpus-per-node=8
|
||||
#SBATCH --output=./logs/%x-%j.out
|
||||
#SBATCH --err=./logs/%x-%j.err
|
||||
#SBATCH --time=04-00:00:00
|
||||
|
||||
# Parse command line arguments
|
||||
while [[ $# -gt 0 ]]; do
|
||||
case $1 in
|
||||
--hf-dataset)
|
||||
HF_DATASET="$2"
|
||||
shift 2
|
||||
;;
|
||||
--hf-dataset-config)
|
||||
HF_DATASET_CONFIG="$2"
|
||||
shift 2
|
||||
;;
|
||||
--hf-dataset-split)
|
||||
HF_DATASET_SPLIT="$2"
|
||||
shift 2
|
||||
;;
|
||||
--prompt-column)
|
||||
PROMPT_COLUMN="$2"
|
||||
shift 2
|
||||
;;
|
||||
--prompt-template)
|
||||
PROMPT_TEMPLATE="$2"
|
||||
shift 2
|
||||
;;
|
||||
--model)
|
||||
MODEL="$2"
|
||||
shift 2
|
||||
;;
|
||||
--temperature)
|
||||
TEMPERATURE="$2"
|
||||
shift 2
|
||||
;;
|
||||
--top-p)
|
||||
TOP_P="$2"
|
||||
shift 2
|
||||
;;
|
||||
--max-new-tokens)
|
||||
MAX_NEW_TOKENS="$2"
|
||||
shift 2
|
||||
;;
|
||||
--num-generations)
|
||||
NUM_GENERATIONS="$2"
|
||||
shift 2
|
||||
;;
|
||||
--input-batch-size)
|
||||
INPUT_BATCH_SIZE="$2"
|
||||
shift 2
|
||||
;;
|
||||
--client-replicas)
|
||||
CLIENT_REPLICAS="$2"
|
||||
shift 2
|
||||
;;
|
||||
--timeout)
|
||||
TIMEOUT="$2"
|
||||
shift 2
|
||||
;;
|
||||
--retries)
|
||||
RETRIES="$2"
|
||||
shift 2
|
||||
;;
|
||||
--hf-output-dataset)
|
||||
HF_OUTPUT_DATASET="$2"
|
||||
shift 2
|
||||
;;
|
||||
--private)
|
||||
PRIVATE="true"
|
||||
shift
|
||||
;;
|
||||
*)
|
||||
echo "Unknown parameter: $1"
|
||||
exit 1
|
||||
;;
|
||||
esac
|
||||
done
|
||||
|
||||
if [ -z "$MODEL" ] || [ -z "$HF_DATASET" ]; then
|
||||
echo "Error: --model and --hf-dataset are required parameters"
|
||||
exit 1
|
||||
fi
|
||||
|
||||
# Set default values for optional parameters
|
||||
HF_DATASET_SPLIT=${HF_DATASET_SPLIT:-"train"}
|
||||
PROMPT_COLUMN=${PROMPT_COLUMN:-"prompt"}
|
||||
PROMPT_TEMPLATE=${PROMPT_TEMPLATE:-"{{ instruction }}"}
|
||||
MAX_NEW_TOKENS=${MAX_NEW_TOKENS:-8192}
|
||||
NUM_GENERATIONS=${NUM_GENERATIONS:-1}
|
||||
INPUT_BATCH_SIZE=${INPUT_BATCH_SIZE:-64}
|
||||
CLIENT_REPLICAS=${CLIENT_REPLICAS:-1}
|
||||
TIMEOUT=${TIMEOUT:-900}
|
||||
RETRIES=${RETRIES:-0}
|
||||
PRIVATE=${PRIVATE:-"false"}
|
||||
|
||||
# Print all input arguments
|
||||
echo "Input arguments:"
|
||||
echo "MODEL: $MODEL"
|
||||
echo "HF_DATASET: $HF_DATASET"
|
||||
echo "HF_DATASET_CONFIG: $HF_DATASET_CONFIG"
|
||||
echo "HF_DATASET_SPLIT: $HF_DATASET_SPLIT"
|
||||
echo "PROMPT_COLUMN: $PROMPT_COLUMN"
|
||||
echo "PROMPT_TEMPLATE: $PROMPT_TEMPLATE"
|
||||
echo "TEMPERATURE: $TEMPERATURE"
|
||||
echo "TOP_P: $TOP_P"
|
||||
echo "MAX_NEW_TOKENS: $MAX_NEW_TOKENS"
|
||||
echo "NUM_GENERATIONS: $NUM_GENERATIONS"
|
||||
echo "INPUT_BATCH_SIZE: $INPUT_BATCH_SIZE"
|
||||
echo "CLIENT_REPLICAS: $CLIENT_REPLICAS"
|
||||
echo "TIMEOUT: $TIMEOUT"
|
||||
echo "RETRIES: $RETRIES"
|
||||
echo "HF_OUTPUT_DATASET: $HF_OUTPUT_DATASET"
|
||||
echo "PRIVATE: $PRIVATE"
|
||||
echo "-------------------"
|
||||
|
||||
set -ex
|
||||
|
||||
module load cuda/12.4
|
||||
|
||||
export LD_LIBRARY_PATH=.venv/lib/python3.11/site-packages/nvidia/nvjitlink/lib
|
||||
|
||||
echo "SLURM_JOB_ID: $SLURM_JOB_ID"
|
||||
echo "SLURM_JOB_NODELIST: $SLURM_JOB_NODELIST"
|
||||
|
||||
source openr1/bin/activate
|
||||
|
||||
# Getting the node names
|
||||
nodes=$(scontrol show hostnames "$SLURM_JOB_NODELIST")
|
||||
nodes_array=($nodes)
|
||||
|
||||
# Get the IP address of the head node
|
||||
head_node=${nodes_array[0]}
|
||||
head_node_ip=$(srun --nodes=1 --ntasks=1 -w "$head_node" hostname --ip-address)
|
||||
|
||||
# Start Ray head node
|
||||
port=6379
|
||||
ip_head=$head_node_ip:$port
|
||||
export ip_head
|
||||
echo "IP Head: $ip_head"
|
||||
|
||||
echo "Starting HEAD at $head_node"
|
||||
srun --nodes=1 --ntasks=1 -w "$head_node" \
|
||||
ray start --head --node-ip-address="$head_node_ip" --port=$port \
|
||||
--dashboard-host=0.0.0.0 \
|
||||
--dashboard-port=8265 \
|
||||
--block &
|
||||
|
||||
# Give some time to head node to start...
|
||||
sleep 10
|
||||
|
||||
# Start Ray worker nodes
|
||||
worker_num=$((SLURM_JOB_NUM_NODES - 1))
|
||||
|
||||
# Start from 1 (0 is head node)
|
||||
for ((i = 1; i <= worker_num; i++)); do
|
||||
node_i=${nodes_array[$i]}
|
||||
echo "Starting WORKER $i at $node_i"
|
||||
srun --nodes=1 --ntasks=1 -w "$node_i" \
|
||||
ray start --address "$ip_head" \
|
||||
--block &
|
||||
sleep 5
|
||||
done
|
||||
|
||||
# Give some time to the Ray cluster to gather info
|
||||
echo "Waiting a bit for Ray cluster to gather node info..."
|
||||
sleep 60
|
||||
|
||||
# Run vllm
|
||||
RAY_ADDRESS="http://$head_node_ip:8265" ray job submit \
|
||||
--working-dir src/open_r1 \
|
||||
--no-wait \
|
||||
--job-id vllm-server \
|
||||
-- vllm serve $MODEL \
|
||||
--tensor-parallel-size $SLURM_GPUS_PER_NODE \
|
||||
--pipeline-parallel-size $SLURM_JOB_NUM_NODES \
|
||||
--gpu-memory-utilization=0.85 \
|
||||
--max-model-len 16384 \
|
||||
--enable-chunked-prefill \
|
||||
--trust-remote-code \
|
||||
--distributed-executor-backend ray
|
||||
|
||||
# wait for vllm to load the model
|
||||
echo "Waiting for vLLM (http://$head_node_ip:8000) server to be up..."
|
||||
|
||||
# wait for vllm to load and serve the model
|
||||
while true; do
|
||||
if curl -s -o /dev/null -w "%{http_code}" http://$head_node_ip:8000 >/dev/null 2>&1; then
|
||||
echo "Received response from http://$head_node_ip:8000"
|
||||
break
|
||||
else
|
||||
echo "Still waiting... (Press Ctrl+C to cancel)"
|
||||
sleep 60
|
||||
fi
|
||||
done
|
||||
|
||||
echo "Checking available models..."
|
||||
curl http://$head_node_ip:8000/v1/models
|
||||
|
||||
echo "Executing sanity check..."
|
||||
curl http://$head_node_ip:8000/v1/completions \
|
||||
-H "Content-Type: application/json" \
|
||||
-d "{
|
||||
\"model\": \"$MODEL\",
|
||||
\"prompt\": \"<|begin▁of▁sentence|><|User|>hi, how are you?<|Assistant|>\",
|
||||
\"max_tokens\": 2048,
|
||||
\"temperature\": 0.6
|
||||
}"
|
||||
|
||||
# Finally submit the job to the cluster
|
||||
echo "Submitting job to ray cluster..."
|
||||
RAY_ADDRESS="http://$head_node_ip:8265" ray job submit \
|
||||
--working-dir src/open_r1 \
|
||||
--job-id generate \
|
||||
-- python -u generate.py \
|
||||
--model "$MODEL" \
|
||||
--hf-dataset "$HF_DATASET" \
|
||||
${HF_DATASET_CONFIG:+--hf-dataset-config "$HF_DATASET_CONFIG"} \
|
||||
--hf-dataset-split "$HF_DATASET_SPLIT" \
|
||||
--prompt-column "$PROMPT_COLUMN" \
|
||||
--prompt-template "$PROMPT_TEMPLATE" \
|
||||
${TEMPERATURE:+--temperature "$TEMPERATURE"} \
|
||||
${TOP_P:+--top-p "$TOP_P"} \
|
||||
--max-new-tokens "$MAX_NEW_TOKENS" \
|
||||
--num-generations "$NUM_GENERATIONS" \
|
||||
--input-batch-size "$INPUT_BATCH_SIZE" \
|
||||
--client-replicas "$CLIENT_REPLICAS" \
|
||||
--timeout "$TIMEOUT" \
|
||||
--retries "$RETRIES" \
|
||||
${HF_OUTPUT_DATASET:+--hf-output-dataset "$HF_OUTPUT_DATASET"} \
|
||||
${PRIVATE:+--private} \
|
||||
--vllm-server-url "http://$head_node_ip:8000/v1"
|
||||
|
||||
mkdir -p ray_logs
|
||||
|
||||
echo "Downloading Ray job logs..."
|
||||
RAY_ADDRESS="http://$head_node_ip:8265" ray job logs --job-id vllm-server > ray_logs/vllm-server-${SLURM_JOB_ID}.log
|
||||
RAY_ADDRESS="http://$head_node_ip:8265" ray job logs --job-id generate > ray_logs/generate-${SLURM_JOB_ID}.log
|
||||
109
examples/research/open_r1/open-r1/slurm/serve_r1.slurm
Normal file
109
examples/research/open_r1/open-r1/slurm/serve_r1.slurm
Normal file
@ -0,0 +1,109 @@
|
||||
#!/bin/bash
|
||||
#SBATCH --job-name=r1-server
|
||||
#SBATCH --partition=hopper-prod
|
||||
#SBATCH --qos=normal
|
||||
#SBATCH --nodes=2
|
||||
#SBATCH --gpus-per-node=8
|
||||
#SBATCH --exclusive
|
||||
#SBATCH --output=./logs/%x_%j_%n.out
|
||||
#SBATCH --error=./logs/%x_%j_%n.err
|
||||
#SBATCH --time=7-00:00:00
|
||||
#SBATCH --ntasks-per-node=1
|
||||
|
||||
set -exuo pipefail
|
||||
|
||||
MODEL_PATH="deepseek-ai/DeepSeek-R1"
|
||||
CONDA_ENV="sglang124"
|
||||
ROUTER_ADDRESS=""
|
||||
SERVER_PORT=39877
|
||||
DIST_PORT=45000
|
||||
|
||||
# TODO: Adjust these variables to your cluster configuration
|
||||
export OUTLINES_CACHE_DIR=/scratch/serve_r1/ocache/
|
||||
export TRITON_HOME=/scratch/serve_r1/triton/
|
||||
export GLOO_SOCKET_IFNAME="enp71s0"
|
||||
export NCCL_SOCKET_IFNAME="enp71s0"
|
||||
|
||||
while getopts "m:e:r:h" opt; do
|
||||
case $opt in
|
||||
m) MODEL_PATH="$OPTARG" ;;
|
||||
e) CONDA_ENV="$OPTARG" ;;
|
||||
r) ROUTER_ADDRESS="$OPTARG" ;;
|
||||
h|?) echo "Usage: sbatch $0 [-m MODEL_PATH] [-e CONDA_ENV] [-r ROUTER_ADDRESS]"; exit 1 ;;
|
||||
esac
|
||||
done
|
||||
|
||||
# TODO: Environment setup, adjust to your cluster configuration
|
||||
module load cuda/12.4
|
||||
source ~/.bashrc
|
||||
source "$CONDA_PREFIX/etc/profile.d/conda.sh"
|
||||
conda activate "$CONDA_ENV" || { echo "Failed to activate conda env $CONDA_ENV"; exit 1; }
|
||||
|
||||
FIRST_NODE=$(scontrol show hostnames "$SLURM_JOB_NODELIST" | head -n1)
|
||||
FIRST_NODE_IP=$(srun --nodes=1 --ntasks=1 -w "$FIRST_NODE" hostname --ip-address)
|
||||
|
||||
# Launch servers synchronously across all nodes
|
||||
# (--max-running-requests=56 is rough estimate to avoid too many evicted/preempted 16k-long requests)
|
||||
srun --nodes=2 --ntasks=2 --ntasks-per-node=1 \
|
||||
bash -c "python -m sglang.launch_server \
|
||||
--model-path '$MODEL_PATH' \
|
||||
--tp 16 \
|
||||
--dist-init-addr '$FIRST_NODE_IP:$DIST_PORT' \
|
||||
--nnodes 2 \
|
||||
--node-rank \$SLURM_PROCID \
|
||||
--port '$SERVER_PORT' \
|
||||
--host 0.0.0.0 \
|
||||
--trust-remote-code \
|
||||
--max-running-requests 56 \
|
||||
--context-length 32768" &
|
||||
|
||||
# Wait for server with timeout
|
||||
TIMEOUT=3600 # 1h, but model loading should take ~30min
|
||||
START_TIME=$(date +%s)
|
||||
echo "Waiting for SGLang server (http://$FIRST_NODE_IP:$SERVER_PORT)..."
|
||||
|
||||
while true; do
|
||||
if curl -s -o /dev/null -w "%{http_code}" "http://$FIRST_NODE_IP:$SERVER_PORT/health" >/dev/null 2>&1; then
|
||||
echo "Server is ready at http://$FIRST_NODE_IP:$SERVER_PORT"
|
||||
break
|
||||
fi
|
||||
|
||||
CURRENT_TIME=$(date +%s)
|
||||
if [ $((CURRENT_TIME - START_TIME)) -gt $TIMEOUT ]; then
|
||||
echo "Error: Server failed to start within $TIMEOUT seconds"
|
||||
exit 1
|
||||
fi
|
||||
|
||||
echo "Still waiting... ($(($CURRENT_TIME - $START_TIME)) seconds elapsed)"
|
||||
sleep 60
|
||||
done
|
||||
|
||||
# Register with router only if address was provided
|
||||
if [ -n "$ROUTER_ADDRESS" ]; then
|
||||
echo "Registering with router at $ROUTER_ADDRESS..."
|
||||
curl -X POST "http://$ROUTER_ADDRESS/add_worker?url=http://$FIRST_NODE_IP:$SERVER_PORT" || true
|
||||
sleep 10
|
||||
fi
|
||||
|
||||
echo "Checking available models..."
|
||||
curl "http://$FIRST_NODE_IP:$SERVER_PORT/v1/models"
|
||||
sleep 10
|
||||
|
||||
echo "Executing sanity check..."
|
||||
curl "http://$FIRST_NODE_IP:$SERVER_PORT/v1/completions" \
|
||||
-H "Content-Type: application/json" \
|
||||
-d "{
|
||||
\"model\": \"default\",
|
||||
\"prompt\": \"<|begin▁of▁sentence|><|User|>hi, how are you?<|Assistant|>\",
|
||||
\"max_tokens\": 2048,
|
||||
\"temperature\": 0.6
|
||||
}"
|
||||
|
||||
# Keep the job running with health checks
|
||||
while true; do
|
||||
if ! curl -s -o /dev/null "http://$FIRST_NODE_IP:$SERVER_PORT/health"; then
|
||||
echo "Error: Server health check failed"
|
||||
exit 1
|
||||
fi
|
||||
sleep 300
|
||||
done
|
||||
45
examples/research/open_r1/open-r1/slurm/serve_router.slurm
Normal file
45
examples/research/open_r1/open-r1/slurm/serve_router.slurm
Normal file
@ -0,0 +1,45 @@
|
||||
#!/bin/bash
|
||||
#SBATCH --job-name=r1-router
|
||||
#SBATCH --partition=hopper-cpu
|
||||
#SBATCH --qos=high
|
||||
#SBATCH --nodes=1
|
||||
#SBATCH --cpus-per-task=8
|
||||
#SBATCH --mem-per-cpu=1875m
|
||||
#SBATCH --output=./logs/%x_%j_%n.out
|
||||
#SBATCH --error=./logs/%x_%j_%n.err
|
||||
#SBATCH --time=30-00:00:00
|
||||
#SBATCH --requeue
|
||||
|
||||
set -exuo pipefail
|
||||
|
||||
# TODO: Adjust these variables to your cluster configuration
|
||||
CONDA_ENV="sglang124"
|
||||
ROUTER_PORT=39876
|
||||
|
||||
trap 'scontrol requeue ${SLURM_JOB_ID}; exit 15' SIGUSR1
|
||||
|
||||
while getopts "e:h" opt; do
|
||||
case $opt in
|
||||
e) CONDA_ENV="$OPTARG" ;;
|
||||
h|?) echo "Usage: sbatch $0 [-e CONDA_ENV]"; exit 1 ;;
|
||||
esac
|
||||
done
|
||||
|
||||
# TODO: Environment setup, adjust to your cluster configuration
|
||||
source ~/.bashrc
|
||||
source "$CONDA_PREFIX/etc/profile.d/conda.sh"
|
||||
conda activate "$CONDA_ENV" || { echo "Failed to activate conda env $CONDA_ENV"; exit 1; }
|
||||
|
||||
python -m sglang_router.launch_router \
|
||||
--port "$ROUTER_PORT" \
|
||||
--host 0.0.0.0 \
|
||||
--worker-startup-timeout-secs 300
|
||||
|
||||
# Keep the job running with health checks
|
||||
while true; do
|
||||
if ! curl -s -o /dev/null "http://localhost:$ROUTER_PORT/health"; then
|
||||
echo "Error: Router health check failed"
|
||||
exit 1
|
||||
fi
|
||||
sleep 300
|
||||
done
|
||||
94
examples/research/open_r1/open-r1/slurm/train.slurm
Normal file
94
examples/research/open_r1/open-r1/slurm/train.slurm
Normal file
@ -0,0 +1,94 @@
|
||||
#!/bin/bash
|
||||
#SBATCH --job-name=open-r1-sft
|
||||
#SBATCH --ntasks-per-node=1
|
||||
#SBATCH --exclusive
|
||||
#SBATCH --gres=gpu:8
|
||||
#SBATCH --partition=hopper-prod # Adjust this for your cluster
|
||||
#SBATCH --output=./logs/%x-%j.out
|
||||
#SBATCH --err=./logs/%x-%j.err
|
||||
#SBATCH --requeue
|
||||
|
||||
# Specific configuration optimized for the Hugging Face Compute Cluster
|
||||
# Be ye warned this may not work on other clusters!
|
||||
module load cuda/12.4
|
||||
|
||||
|
||||
set -x -e
|
||||
|
||||
source ~/.bashrc
|
||||
source openr1/bin/activate
|
||||
echo "START TIME: $(date)"
|
||||
|
||||
MODEL=$1
|
||||
TASK=$2
|
||||
CONFIG_SUFFIX=$3
|
||||
ACCELERATOR=$4
|
||||
OPTIONAL_ARGS=$5
|
||||
|
||||
# Training setup
|
||||
NUM_NODES=$SLURM_NNODES
|
||||
GPUS_PER_NODE=8
|
||||
WORLD_SIZE=$(($NUM_NODES*$GPUS_PER_NODE))
|
||||
# Due to conflicts between Accelerate's DeepSpeed configs and Transformers' TrainingArguments, we need to parse the gradient accumulation steps from the config file to ensure they match
|
||||
CONFIG_FILE=recipes/$MODEL/$TASK/config_$CONFIG_SUFFIX.yaml
|
||||
GRAD_ACC_STEPS=$(grep 'gradient_accumulation_steps' $CONFIG_FILE | awk '{print $2}')
|
||||
USE_VLLM=$(grep 'use_vllm:\s*true' $CONFIG_FILE) # Match "use_vllm: true" (with optional whitespace)
|
||||
|
||||
if [ -n "$USE_VLLM" ]; then # Check if USE_VLLM is *not* empty (found)
|
||||
WORLD_SIZE=$(($WORLD_SIZE-1))
|
||||
fi
|
||||
|
||||
# Split the string into individual arguments
|
||||
IFS=' ' read -ra ARGS <<< "$OPTIONAL_ARGS"
|
||||
|
||||
# Loop through the arguments and find the one with "--gradient_accumulation_steps"
|
||||
for arg in "${ARGS[@]}"; do
|
||||
if [[ "$arg" == "--gradient_accumulation_steps="* ]]; then
|
||||
# Extract the value after the equals sign
|
||||
GRAD_ACC_STEPS="${arg#*=}"
|
||||
break # Exit the loop once we find the desired argument
|
||||
fi
|
||||
done
|
||||
|
||||
echo "Gradient accumulation steps: $GRAD_ACC_STEPS"
|
||||
# so processes know who to talk to
|
||||
MASTER_ADDR=$(scontrol show hostnames $SLURM_JOB_NODELIST | head -n 1)
|
||||
MASTER_PORT=6000
|
||||
|
||||
export CMD=" \
|
||||
src/open_r1/$TASK.py --config $CONFIG_FILE $OPTIONAL_ARGS
|
||||
"
|
||||
|
||||
export LAUNCHER="HF_HUB_ENABLE_HF_TRANSFER=1 ACCELERATE_LOG_LEVEL=info TRANSFORMERS_VERBOSITY=info accelerate launch \
|
||||
--config_file recipes/accelerate_configs/$ACCELERATOR.yaml \
|
||||
--gradient_accumulation_steps $GRAD_ACC_STEPS \
|
||||
--num_machines $NUM_NODES \
|
||||
--num_processes $WORLD_SIZE \
|
||||
--main_process_ip $MASTER_ADDR \
|
||||
--main_process_port $MASTER_PORT \
|
||||
--machine_rank \$SLURM_PROCID \
|
||||
--rdzv_conf "rdzv_backend=c10d,rdzv_endpoint=$MASTER_ADDR:$MASTER_PORT" \
|
||||
--max_restarts 1 \
|
||||
--role \$(hostname -s): \
|
||||
--tee 3 \
|
||||
"
|
||||
|
||||
# force crashing on nccl issues like hanging broadcast
|
||||
export NCCL_ASYNC_ERROR_HANDLING=1
|
||||
# export NCCL_DEBUG=INFO
|
||||
# export NCCL_DEBUG_SUBSYS=COLL
|
||||
# export NCCL_SOCKET_NTHREADS=1
|
||||
# export NCCL_NSOCKS_PERTHREAD=1
|
||||
# export CUDA_LAUNCH_BLOCKING=1
|
||||
|
||||
# srun error handling:
|
||||
# --wait=60: wait 60 sec after the first task terminates before terminating all remaining tasks
|
||||
# --kill-on-bad-exit=1: terminate a step if any task exits with a non-zero exit code
|
||||
SRUN_ARGS=" \
|
||||
--wait=60 \
|
||||
--kill-on-bad-exit=1 \
|
||||
"
|
||||
|
||||
clear; srun $SRUN_ARGS --jobid $SLURM_JOB_ID bash -c "$LAUNCHER --role \$SLURMD_NODENAME: $CMD" 2>&1
|
||||
|
||||
echo "END TIME: $(date)"
|
||||
13
examples/research/open_r1/open-r1/src/open_r1/__init__.py
Normal file
13
examples/research/open_r1/open-r1/src/open_r1/__init__.py
Normal file
@ -0,0 +1,13 @@
|
||||
# Copyright 2025 The HuggingFace Team. All rights reserved.
|
||||
#
|
||||
# Licensed under the Apache License, Version 2.0 (the "License");
|
||||
# you may not use this file except in compliance with the License.
|
||||
# You may obtain a copy of the License at
|
||||
#
|
||||
# http://www.apache.org/licenses/LICENSE-2.0
|
||||
#
|
||||
# Unless required by applicable law or agreed to in writing, software
|
||||
# distributed under the License is distributed on an "AS IS" BASIS,
|
||||
# WITHOUT WARRANTIES OR CONDITIONS OF ANY KIND, either express or implied.
|
||||
# See the License for the specific language governing permissions and
|
||||
# limitations under the License.
|
||||
85
examples/research/open_r1/open-r1/src/open_r1/configs.py
Normal file
85
examples/research/open_r1/open-r1/src/open_r1/configs.py
Normal file
@ -0,0 +1,85 @@
|
||||
# coding=utf-8
|
||||
# Copyright 2025 The HuggingFace Team. All rights reserved.
|
||||
#
|
||||
# Licensed under the Apache License, Version 2.0 (the "License");
|
||||
# you may not use this file except in compliance with the License.
|
||||
# You may obtain a copy of the License at
|
||||
#
|
||||
# http://www.apache.org/licenses/LICENSE-2.0
|
||||
#
|
||||
# Unless required by applicable law or agreed to in writing, software
|
||||
# distributed under the License is distributed on an "AS IS" BASIS,
|
||||
# WITHOUT WARRANTIES OR CONDITIONS OF ANY KIND, either express or implied.
|
||||
# See the License for the specific language governing permissions and
|
||||
# limitations under the License.
|
||||
|
||||
from dataclasses import dataclass, field
|
||||
from typing import Optional
|
||||
|
||||
import trl
|
||||
|
||||
|
||||
# TODO: add the shared options with a mixin to reduce code duplication
|
||||
@dataclass
|
||||
class GRPOConfig(trl.GRPOConfig):
|
||||
"""
|
||||
args for callbacks, benchmarks etc
|
||||
"""
|
||||
|
||||
benchmarks: list[str] = field(
|
||||
default_factory=lambda: [], metadata={"help": "The benchmarks to run after training."}
|
||||
)
|
||||
callbacks: list[str] = field(
|
||||
default_factory=lambda: [], metadata={"help": "The callbacks to run during training."}
|
||||
)
|
||||
chat_template: Optional[str] = field(default=None, metadata={"help": "The chat template to use."})
|
||||
system_prompt: Optional[str] = field(
|
||||
default=None,
|
||||
metadata={"help": "The optional system prompt to use."},
|
||||
)
|
||||
hub_model_revision: Optional[str] = field(
|
||||
default="main", metadata={"help": "The Hub model branch to push the model to."}
|
||||
)
|
||||
overwrite_hub_revision: bool = field(default=False, metadata={"help": "Whether to overwrite the Hub revision."})
|
||||
push_to_hub_revision: bool = field(default=False, metadata={"help": "Whether to push to a Hub revision/branch."})
|
||||
wandb_entity: Optional[str] = field(
|
||||
default=None,
|
||||
metadata={"help": ("The entity to store runs under.")},
|
||||
)
|
||||
wandb_project: Optional[str] = field(
|
||||
default=None,
|
||||
metadata={"help": ("The project to store runs under.")},
|
||||
)
|
||||
|
||||
|
||||
@dataclass
|
||||
class SFTConfig(trl.SFTConfig):
|
||||
"""
|
||||
args for callbacks, benchmarks etc
|
||||
"""
|
||||
|
||||
benchmarks: list[str] = field(
|
||||
default_factory=lambda: [], metadata={"help": "The benchmarks to run after training."}
|
||||
)
|
||||
callbacks: list[str] = field(
|
||||
default_factory=lambda: [], metadata={"help": "The callbacks to run during training."}
|
||||
)
|
||||
chat_template: Optional[str] = field(default=None, metadata={"help": "The chat template to use."})
|
||||
system_prompt: Optional[str] = field(
|
||||
default=None,
|
||||
metadata={"help": "The optional system prompt to use for benchmarking."},
|
||||
)
|
||||
hub_model_revision: Optional[str] = field(
|
||||
default="main",
|
||||
metadata={"help": "The Hub model branch to push the model to."},
|
||||
)
|
||||
overwrite_hub_revision: bool = field(default=False, metadata={"help": "Whether to overwrite the Hub revision."})
|
||||
push_to_hub_revision: bool = field(default=False, metadata={"help": "Whether to push to a Hub revision/branch."})
|
||||
wandb_entity: Optional[str] = field(
|
||||
default=None,
|
||||
metadata={"help": ("The entity to store runs under.")},
|
||||
)
|
||||
wandb_project: Optional[str] = field(
|
||||
default=None,
|
||||
metadata={"help": ("The project to store runs under.")},
|
||||
)
|
||||
165
examples/research/open_r1/open-r1/src/open_r1/evaluate.py
Normal file
165
examples/research/open_r1/open-r1/src/open_r1/evaluate.py
Normal file
@ -0,0 +1,165 @@
|
||||
# Copyright 2025 The HuggingFace Team. All rights reserved.
|
||||
#
|
||||
# Licensed under the Apache License, Version 2.0 (the "License");
|
||||
# you may not use this file except in compliance with the License.
|
||||
# You may obtain a copy of the License at
|
||||
#
|
||||
# http://www.apache.org/licenses/LICENSE-2.0
|
||||
#
|
||||
# Unless required by applicable law or agreed to in writing, software
|
||||
# distributed under the License is distributed on an "AS IS" BASIS,
|
||||
# WITHOUT WARRANTIES OR CONDITIONS OF ANY KIND, either express or implied.
|
||||
# See the License for the specific language governing permissions and
|
||||
# limitations under the License.
|
||||
|
||||
"""Custom evaluation tasks for LightEval."""
|
||||
|
||||
import random
|
||||
|
||||
from lighteval.metrics.dynamic_metrics import (
|
||||
ExprExtractionConfig,
|
||||
IndicesExtractionConfig,
|
||||
LatexExtractionConfig,
|
||||
multilingual_extractive_match_metric,
|
||||
)
|
||||
from lighteval.tasks.lighteval_task import LightevalTaskConfig
|
||||
from lighteval.tasks.requests import Doc
|
||||
from lighteval.utils.language import Language
|
||||
|
||||
|
||||
latex_gold_metric = multilingual_extractive_match_metric(
|
||||
language=Language.ENGLISH,
|
||||
fallback_mode="first_match",
|
||||
precision=5,
|
||||
gold_extraction_target=(LatexExtractionConfig(),),
|
||||
# Match boxed first before trying other regexes
|
||||
pred_extraction_target=(ExprExtractionConfig(), LatexExtractionConfig(boxed_match_priority=0)),
|
||||
aggregation_function=max,
|
||||
)
|
||||
|
||||
expr_gold_metric = multilingual_extractive_match_metric(
|
||||
language=Language.ENGLISH,
|
||||
fallback_mode="first_match",
|
||||
precision=5,
|
||||
gold_extraction_target=(ExprExtractionConfig(),),
|
||||
# Match boxed first before trying other regexes
|
||||
pred_extraction_target=(ExprExtractionConfig(), LatexExtractionConfig(boxed_match_priority=0)),
|
||||
aggregation_function=max,
|
||||
)
|
||||
|
||||
gpqa_metric = multilingual_extractive_match_metric(
|
||||
language=Language.ENGLISH,
|
||||
gold_extraction_target=[IndicesExtractionConfig(prefix_for_extraction="NativeLetters")],
|
||||
pred_extraction_target=[IndicesExtractionConfig(prefix_for_extraction="NativeLetters")],
|
||||
precision=5,
|
||||
)
|
||||
|
||||
|
||||
def prompt_fn(line, task_name: str = None):
|
||||
"""Assumes the model is either prompted to emit \\boxed{answer} or does so automatically"""
|
||||
return Doc(
|
||||
task_name=task_name,
|
||||
query=line["problem"],
|
||||
choices=[line["solution"]],
|
||||
gold_index=0,
|
||||
)
|
||||
|
||||
|
||||
def aime_prompt_fn(line, task_name: str = None):
|
||||
return Doc(
|
||||
task_name=task_name,
|
||||
query=line["problem"],
|
||||
choices=[line["answer"]],
|
||||
gold_index=0,
|
||||
)
|
||||
|
||||
|
||||
def gpqa_prompt_fn(line, task_name: str = None):
|
||||
"""Prompt template adapted from simple-evals: https://github.com/openai/simple-evals/blob/83ed7640a7d9cd26849bcb3340125002ef14abbe/common.py#L14"""
|
||||
gold_index = random.randint(0, 3)
|
||||
choices = [line["Incorrect Answer 1"], line["Incorrect Answer 2"], line["Incorrect Answer 3"]]
|
||||
choices.insert(gold_index, line["Correct Answer"])
|
||||
query_template = "Answer the following multiple choice question. The last line of your response should be of the following format: 'Answer: $LETTER' (without quotes) where LETTER is one of ABCD. Think step by step before answering.\n\n{Question}\n\nA) {A}\nB) {B}\nC) {C}\nD) {D}"
|
||||
query = query_template.format(A=choices[0], B=choices[1], C=choices[2], D=choices[3], Question=line["Question"])
|
||||
|
||||
return Doc(
|
||||
task_name=task_name,
|
||||
query=query,
|
||||
choices=["A", "B", "C", "D"],
|
||||
gold_index=gold_index,
|
||||
instruction=query,
|
||||
)
|
||||
|
||||
|
||||
# Define tasks
|
||||
aime24 = LightevalTaskConfig(
|
||||
name="aime24",
|
||||
suite=["custom"],
|
||||
prompt_function=aime_prompt_fn,
|
||||
hf_repo="HuggingFaceH4/aime_2024",
|
||||
hf_subset="default",
|
||||
hf_avail_splits=["train"],
|
||||
evaluation_splits=["train"],
|
||||
few_shots_split=None,
|
||||
few_shots_select=None,
|
||||
generation_size=32768,
|
||||
metric=[expr_gold_metric],
|
||||
version=1,
|
||||
)
|
||||
aime25 = LightevalTaskConfig(
|
||||
name="aime25",
|
||||
suite=["custom"],
|
||||
prompt_function=aime_prompt_fn,
|
||||
hf_repo="yentinglin/aime_2025",
|
||||
hf_subset="default",
|
||||
hf_avail_splits=["train"],
|
||||
evaluation_splits=["train"],
|
||||
few_shots_split=None,
|
||||
few_shots_select=None,
|
||||
generation_size=32768,
|
||||
metric=[expr_gold_metric],
|
||||
version=1,
|
||||
)
|
||||
math_500 = LightevalTaskConfig(
|
||||
name="math_500",
|
||||
suite=["custom"],
|
||||
prompt_function=prompt_fn,
|
||||
hf_repo="HuggingFaceH4/MATH-500",
|
||||
hf_subset="default",
|
||||
hf_avail_splits=["test"],
|
||||
evaluation_splits=["test"],
|
||||
few_shots_split=None,
|
||||
few_shots_select=None,
|
||||
generation_size=32768,
|
||||
metric=[latex_gold_metric],
|
||||
version=1,
|
||||
)
|
||||
gpqa_diamond = LightevalTaskConfig(
|
||||
name="gpqa:diamond",
|
||||
suite=["custom"],
|
||||
prompt_function=gpqa_prompt_fn,
|
||||
hf_repo="Idavidrein/gpqa",
|
||||
hf_subset="gpqa_diamond",
|
||||
hf_avail_splits=["train"],
|
||||
evaluation_splits=["train"],
|
||||
few_shots_split=None,
|
||||
few_shots_select=None,
|
||||
generation_size=32768, # needed for reasoning models like R1
|
||||
metric=[gpqa_metric],
|
||||
stop_sequence=[], # no stop sequence, will use eos token
|
||||
trust_dataset=True,
|
||||
version=1,
|
||||
)
|
||||
|
||||
|
||||
# Add tasks to the table
|
||||
TASKS_TABLE = []
|
||||
TASKS_TABLE.append(aime24)
|
||||
TASKS_TABLE.append(aime25)
|
||||
TASKS_TABLE.append(math_500)
|
||||
TASKS_TABLE.append(gpqa_diamond)
|
||||
|
||||
# MODULE LOGIC
|
||||
if __name__ == "__main__":
|
||||
print([t["name"] for t in TASKS_TABLE])
|
||||
print(len(TASKS_TABLE))
|
||||
208
examples/research/open_r1/open-r1/src/open_r1/generate.py
Normal file
208
examples/research/open_r1/open-r1/src/open_r1/generate.py
Normal file
@ -0,0 +1,208 @@
|
||||
# Copyright 2025 The HuggingFace Team. All rights reserved.
|
||||
#
|
||||
# Licensed under the Apache License, Version 2.0 (the "License");
|
||||
# you may not use this file except in compliance with the License.
|
||||
# You may obtain a copy of the License at
|
||||
#
|
||||
# http://www.apache.org/licenses/LICENSE-2.0
|
||||
#
|
||||
# Unless required by applicable law or agreed to in writing, software
|
||||
# distributed under the License is distributed on an "AS IS" BASIS,
|
||||
# WITHOUT WARRANTIES OR CONDITIONS OF ANY KIND, either express or implied.
|
||||
# See the License for the specific language governing permissions and
|
||||
# limitations under the License.
|
||||
|
||||
from typing import Optional
|
||||
|
||||
from distilabel.llms import OpenAILLM
|
||||
from distilabel.pipeline import Pipeline
|
||||
from distilabel.steps import StepResources
|
||||
from distilabel.steps.tasks import TextGeneration
|
||||
|
||||
|
||||
def build_distilabel_pipeline(
|
||||
model: str,
|
||||
base_url: str = "http://localhost:8000/v1",
|
||||
prompt_column: Optional[str] = None,
|
||||
prompt_template: str = "{{ instruction }}",
|
||||
temperature: Optional[float] = None,
|
||||
top_p: Optional[float] = None,
|
||||
max_new_tokens: int = 8192,
|
||||
num_generations: int = 1,
|
||||
input_batch_size: int = 64,
|
||||
client_replicas: int = 1,
|
||||
timeout: int = 900,
|
||||
retries: int = 0,
|
||||
) -> Pipeline:
|
||||
generation_kwargs = {"max_new_tokens": max_new_tokens}
|
||||
|
||||
if temperature is not None:
|
||||
generation_kwargs["temperature"] = temperature
|
||||
|
||||
if top_p is not None:
|
||||
generation_kwargs["top_p"] = top_p
|
||||
|
||||
with Pipeline().ray() as pipeline:
|
||||
TextGeneration(
|
||||
llm=OpenAILLM(
|
||||
base_url=base_url,
|
||||
api_key="something",
|
||||
model=model,
|
||||
timeout=timeout,
|
||||
max_retries=retries,
|
||||
generation_kwargs=generation_kwargs,
|
||||
),
|
||||
template=prompt_template,
|
||||
input_mappings={"instruction": prompt_column} if prompt_column is not None else {},
|
||||
input_batch_size=input_batch_size,
|
||||
num_generations=num_generations,
|
||||
group_generations=True,
|
||||
resources=StepResources(replicas=client_replicas),
|
||||
)
|
||||
|
||||
return pipeline
|
||||
|
||||
|
||||
if __name__ == "__main__":
|
||||
import argparse
|
||||
|
||||
from datasets import load_dataset
|
||||
|
||||
parser = argparse.ArgumentParser(description="Run distilabel pipeline for generating responses with DeepSeek R1")
|
||||
parser.add_argument(
|
||||
"--hf-dataset",
|
||||
type=str,
|
||||
required=True,
|
||||
help="HuggingFace dataset to load",
|
||||
)
|
||||
parser.add_argument(
|
||||
"--hf-dataset-config",
|
||||
type=str,
|
||||
required=False,
|
||||
help="Dataset config to use",
|
||||
)
|
||||
parser.add_argument(
|
||||
"--hf-dataset-split",
|
||||
type=str,
|
||||
default="train",
|
||||
help="Dataset split to use",
|
||||
)
|
||||
parser.add_argument(
|
||||
"--prompt-column",
|
||||
type=str,
|
||||
default="prompt",
|
||||
)
|
||||
parser.add_argument(
|
||||
"--prompt-template",
|
||||
type=str,
|
||||
default="{{ instruction }}",
|
||||
help="Template string for formatting prompts.",
|
||||
)
|
||||
parser.add_argument(
|
||||
"--model",
|
||||
type=str,
|
||||
required=True,
|
||||
help="Model name to use for generation",
|
||||
)
|
||||
parser.add_argument(
|
||||
"--vllm-server-url",
|
||||
type=str,
|
||||
default="http://localhost:8000/v1",
|
||||
help="URL of the vLLM server",
|
||||
)
|
||||
parser.add_argument(
|
||||
"--temperature",
|
||||
type=float,
|
||||
help="Temperature for generation",
|
||||
)
|
||||
parser.add_argument(
|
||||
"--top-p",
|
||||
type=float,
|
||||
help="Top-p value for generation",
|
||||
)
|
||||
parser.add_argument(
|
||||
"--max-new-tokens",
|
||||
type=int,
|
||||
default=8192,
|
||||
help="Maximum number of new tokens to generate",
|
||||
)
|
||||
parser.add_argument(
|
||||
"--num-generations",
|
||||
type=int,
|
||||
default=1,
|
||||
help="Number of generations per problem",
|
||||
)
|
||||
parser.add_argument(
|
||||
"--input-batch-size",
|
||||
type=int,
|
||||
default=64,
|
||||
help="Batch size for input processing",
|
||||
)
|
||||
parser.add_argument(
|
||||
"--client-replicas",
|
||||
type=int,
|
||||
default=1,
|
||||
help="Number of client replicas for parallel processing",
|
||||
)
|
||||
parser.add_argument(
|
||||
"--timeout",
|
||||
type=int,
|
||||
default=600,
|
||||
help="Request timeout in seconds (default: 600)",
|
||||
)
|
||||
parser.add_argument(
|
||||
"--retries",
|
||||
type=int,
|
||||
default=0,
|
||||
help="Number of retries for failed requests (default: 0)",
|
||||
)
|
||||
parser.add_argument(
|
||||
"--hf-output-dataset",
|
||||
type=str,
|
||||
required=False,
|
||||
help="HuggingFace repo to push results to",
|
||||
)
|
||||
parser.add_argument(
|
||||
"--private",
|
||||
action="store_true",
|
||||
help="Whether to make the output dataset private when pushing to HF Hub",
|
||||
)
|
||||
|
||||
args = parser.parse_args()
|
||||
|
||||
print("\nRunning with arguments:")
|
||||
for arg, value in vars(args).items():
|
||||
print(f" {arg}: {value}")
|
||||
print()
|
||||
|
||||
print(f"Loading '{args.hf_dataset}' (config: {args.hf_dataset_config}, split: {args.hf_dataset_split}) dataset...")
|
||||
dataset = load_dataset(args.hf_dataset, args.hf_dataset_config, split=args.hf_dataset_split)
|
||||
print("Dataset loaded!")
|
||||
|
||||
pipeline = build_distilabel_pipeline(
|
||||
model=args.model,
|
||||
base_url=args.vllm_server_url,
|
||||
prompt_template=args.prompt_template,
|
||||
prompt_column=args.prompt_column,
|
||||
temperature=args.temperature,
|
||||
top_p=args.top_p,
|
||||
max_new_tokens=args.max_new_tokens,
|
||||
num_generations=args.num_generations,
|
||||
input_batch_size=args.input_batch_size,
|
||||
client_replicas=args.client_replicas,
|
||||
timeout=args.timeout,
|
||||
retries=args.retries,
|
||||
)
|
||||
|
||||
print("Running generation pipeline...")
|
||||
distiset = pipeline.run(
|
||||
dataset=dataset,
|
||||
dataset_batch_size=args.input_batch_size * 1000,
|
||||
use_cache=False,
|
||||
)
|
||||
print("Generation pipeline finished!")
|
||||
|
||||
if args.hf_output_dataset:
|
||||
print(f"Pushing resulting dataset to '{args.hf_output_dataset}'...")
|
||||
distiset.push_to_hub(args.hf_output_dataset, private=args.private)
|
||||
print("Dataset pushed!")
|
||||
267
examples/research/open_r1/open-r1/src/open_r1/grpo.py
Normal file
267
examples/research/open_r1/open-r1/src/open_r1/grpo.py
Normal file
@ -0,0 +1,267 @@
|
||||
# Copyright 2025 The HuggingFace Team. All rights reserved.
|
||||
#
|
||||
# Licensed under the Apache License, Version 2.0 (the "License");
|
||||
# you may not use this file except in compliance with the License.
|
||||
# You may obtain a copy of the License at
|
||||
#
|
||||
# http://www.apache.org/licenses/LICENSE-2.0
|
||||
#
|
||||
# Unless required by applicable law or agreed to in writing, software
|
||||
# distributed under the License is distributed on an "AS IS" BASIS,
|
||||
# WITHOUT WARRANTIES OR CONDITIONS OF ANY KIND, either express or implied.
|
||||
# See the License for the specific language governing permissions and
|
||||
# limitations under the License.
|
||||
|
||||
import logging
|
||||
import os
|
||||
import sys
|
||||
from dataclasses import dataclass, field
|
||||
|
||||
import datasets
|
||||
import torch
|
||||
import transformers
|
||||
from datasets import load_dataset
|
||||
from transformers import set_seed
|
||||
from transformers.trainer_utils import get_last_checkpoint
|
||||
|
||||
from open_r1.configs import GRPOConfig
|
||||
from open_r1.rewards import (
|
||||
accuracy_reward,
|
||||
code_reward,
|
||||
format_reward,
|
||||
get_cosine_scaled_reward,
|
||||
get_repetition_penalty_reward,
|
||||
len_reward,
|
||||
reasoning_steps_reward,
|
||||
)
|
||||
from open_r1.utils import get_tokenizer
|
||||
from open_r1.utils.callbacks import get_callbacks
|
||||
from open_r1.utils.wandb_logging import init_wandb_training
|
||||
from trl import GRPOTrainer, ModelConfig, ScriptArguments, TrlParser, get_peft_config
|
||||
|
||||
|
||||
logger = logging.getLogger(__name__)
|
||||
|
||||
|
||||
@dataclass
|
||||
class GRPOScriptArguments(ScriptArguments):
|
||||
"""
|
||||
Script arguments for the GRPO training script.
|
||||
|
||||
Args:
|
||||
reward_funcs (`list[str]`):
|
||||
List of reward functions. Possible values: 'accuracy', 'format', 'format_deepseek', 'reasoning_steps', 'cosine', 'repetition_penalty', 'length'.
|
||||
cosine_min_value_wrong (`float`):
|
||||
Minimum reward for cosine scaling for wrong answers.
|
||||
cosine_max_value_wrong (`float`):
|
||||
Maximum reward for cosine scaling for wrong answers.
|
||||
cosine_min_value_correct (`float`):
|
||||
Minimum reward for cosine scaling for correct answers.
|
||||
cosine_max_value_correct (`float`):
|
||||
Maximum reward for cosine scaling for correct answers.
|
||||
cosine_max_len (`int`):
|
||||
Maximum length for cosine scaling.
|
||||
"""
|
||||
|
||||
reward_funcs: list[str] = field(
|
||||
default_factory=lambda: ["accuracy", "format"],
|
||||
metadata={
|
||||
"help": "List of reward functions. Possible values: 'accuracy', 'format', 'format_deepseek', 'reasoning_steps', 'cosine', 'repetition_penalty', 'length'"
|
||||
},
|
||||
)
|
||||
cosine_min_value_wrong: float = field(
|
||||
default=0.0,
|
||||
metadata={"help": "Minimum reward for wrong answers"},
|
||||
)
|
||||
cosine_max_value_wrong: float = field(
|
||||
default=-0.5,
|
||||
metadata={"help": "Maximum reward for wrong answers"},
|
||||
)
|
||||
cosine_min_value_correct: float = field(
|
||||
default=0.5,
|
||||
metadata={"help": "Minimum reward for correct answers"},
|
||||
)
|
||||
cosine_max_value_correct: float = field(
|
||||
default=1.0,
|
||||
metadata={"help": "Maximum reward for correct answers"},
|
||||
)
|
||||
cosine_max_len: int = field(
|
||||
default=1000,
|
||||
metadata={"help": "Maximum length for scaling"},
|
||||
)
|
||||
repetition_n_grams: int = field(
|
||||
default=3,
|
||||
metadata={"help": "Number of n-grams for repetition penalty reward"},
|
||||
)
|
||||
repetition_max_penalty: float = field(
|
||||
default=-1.0,
|
||||
metadata={"help": "Maximum (negative) penalty for for repetition penalty reward"},
|
||||
)
|
||||
|
||||
|
||||
def main(script_args, training_args, model_args):
|
||||
# Set seed for reproducibility
|
||||
set_seed(training_args.seed)
|
||||
|
||||
###############
|
||||
# Setup logging
|
||||
###############
|
||||
logging.basicConfig(
|
||||
format="%(asctime)s - %(levelname)s - %(name)s - %(message)s",
|
||||
datefmt="%Y-%m-%d %H:%M:%S",
|
||||
handlers=[logging.StreamHandler(sys.stdout)],
|
||||
)
|
||||
log_level = training_args.get_process_log_level()
|
||||
logger.setLevel(log_level)
|
||||
datasets.utils.logging.set_verbosity(log_level)
|
||||
transformers.utils.logging.set_verbosity(log_level)
|
||||
transformers.utils.logging.enable_default_handler()
|
||||
transformers.utils.logging.enable_explicit_format()
|
||||
|
||||
# Log on each process a small summary
|
||||
logger.warning(
|
||||
f"Process rank: {training_args.local_rank}, device: {training_args.device}, n_gpu: {training_args.n_gpu}"
|
||||
+ f" distributed training: {bool(training_args.local_rank != -1)}, 16-bits training: {training_args.fp16}"
|
||||
)
|
||||
logger.info(f"Model parameters {model_args}")
|
||||
logger.info(f"Script parameters {script_args}")
|
||||
logger.info(f"Training parameters {training_args}")
|
||||
|
||||
# Check for last checkpoint
|
||||
last_checkpoint = None
|
||||
if os.path.isdir(training_args.output_dir):
|
||||
last_checkpoint = get_last_checkpoint(training_args.output_dir)
|
||||
if last_checkpoint is not None and training_args.resume_from_checkpoint is None:
|
||||
logger.info(f"Checkpoint detected, resuming training at {last_checkpoint=}.")
|
||||
|
||||
if "wandb" in training_args.report_to:
|
||||
init_wandb_training(training_args)
|
||||
|
||||
# Load the dataset
|
||||
dataset = load_dataset(script_args.dataset_name, name=script_args.dataset_config)
|
||||
|
||||
################
|
||||
# Load tokenizer
|
||||
################
|
||||
tokenizer = get_tokenizer(model_args, training_args)
|
||||
|
||||
# Get reward functions
|
||||
REWARD_FUNCS_REGISTRY = {
|
||||
"accuracy": accuracy_reward,
|
||||
"format": format_reward,
|
||||
"reasoning_steps": reasoning_steps_reward,
|
||||
"cosine": get_cosine_scaled_reward(
|
||||
min_value_wrong=script_args.cosine_min_value_wrong,
|
||||
max_value_wrong=script_args.cosine_max_value_wrong,
|
||||
min_value_correct=script_args.cosine_min_value_correct,
|
||||
max_value_correct=script_args.cosine_max_value_correct,
|
||||
max_len=script_args.cosine_max_len,
|
||||
),
|
||||
"repetition_penalty": get_repetition_penalty_reward(
|
||||
ngram_size=script_args.repetition_n_grams,
|
||||
max_penalty=script_args.repetition_max_penalty,
|
||||
),
|
||||
"length": len_reward,
|
||||
"code": code_reward,
|
||||
}
|
||||
reward_funcs = [REWARD_FUNCS_REGISTRY[func] for func in script_args.reward_funcs]
|
||||
|
||||
# Format into conversation
|
||||
def make_conversation(example):
|
||||
prompt = []
|
||||
|
||||
if training_args.system_prompt is not None:
|
||||
prompt.append({"role": "system", "content": training_args.system_prompt})
|
||||
|
||||
prompt.append({"role": "user", "content": example["problem"]})
|
||||
return {"prompt": prompt}
|
||||
|
||||
dataset = dataset.map(make_conversation)
|
||||
|
||||
for split in dataset:
|
||||
if "messages" in dataset[split].column_names:
|
||||
dataset[split] = dataset[split].remove_columns("messages")
|
||||
|
||||
logger.info("*** Initializing model kwargs ***")
|
||||
torch_dtype = (
|
||||
model_args.torch_dtype if model_args.torch_dtype in ["auto", None] else getattr(torch, model_args.torch_dtype)
|
||||
)
|
||||
model_kwargs = dict(
|
||||
revision=model_args.model_revision,
|
||||
trust_remote_code=model_args.trust_remote_code,
|
||||
attn_implementation=model_args.attn_implementation,
|
||||
torch_dtype=torch_dtype,
|
||||
use_cache=False if training_args.gradient_checkpointing else True,
|
||||
)
|
||||
training_args.model_init_kwargs = model_kwargs
|
||||
|
||||
#############################
|
||||
# Initialize the GRPO trainer
|
||||
#############################
|
||||
trainer = GRPOTrainer(
|
||||
model=model_args.model_name_or_path,
|
||||
reward_funcs=reward_funcs,
|
||||
args=training_args,
|
||||
train_dataset=dataset[script_args.dataset_train_split],
|
||||
eval_dataset=dataset[script_args.dataset_test_split] if training_args.eval_strategy != "no" else None,
|
||||
peft_config=get_peft_config(model_args),
|
||||
callbacks=get_callbacks(training_args, model_args),
|
||||
processing_class=tokenizer,
|
||||
)
|
||||
|
||||
###############
|
||||
# Training loop
|
||||
###############
|
||||
logger.info("*** Train ***")
|
||||
checkpoint = None
|
||||
if training_args.resume_from_checkpoint is not None:
|
||||
checkpoint = training_args.resume_from_checkpoint
|
||||
elif last_checkpoint is not None:
|
||||
checkpoint = last_checkpoint
|
||||
train_result = trainer.train(resume_from_checkpoint=checkpoint)
|
||||
metrics = train_result.metrics
|
||||
metrics["train_samples"] = len(dataset[script_args.dataset_train_split])
|
||||
trainer.log_metrics("train", metrics)
|
||||
trainer.save_metrics("train", metrics)
|
||||
trainer.save_state()
|
||||
|
||||
##################################
|
||||
# Save model and create model card
|
||||
##################################
|
||||
logger.info("*** Save model ***")
|
||||
trainer.save_model(training_args.output_dir)
|
||||
logger.info(f"Model saved to {training_args.output_dir}")
|
||||
|
||||
# Save everything else on main process
|
||||
kwargs = {
|
||||
"dataset_name": script_args.dataset_name,
|
||||
"tags": ["open-r1"],
|
||||
}
|
||||
if trainer.accelerator.is_main_process:
|
||||
trainer.create_model_card(**kwargs)
|
||||
# Restore k,v cache for fast inference
|
||||
trainer.model.config.use_cache = True
|
||||
trainer.model.config.save_pretrained(training_args.output_dir)
|
||||
|
||||
##########
|
||||
# Evaluate
|
||||
##########
|
||||
if training_args.do_eval:
|
||||
logger.info("*** Evaluate ***")
|
||||
metrics = trainer.evaluate()
|
||||
metrics["eval_samples"] = len(dataset[script_args.dataset_test_split])
|
||||
trainer.log_metrics("eval", metrics)
|
||||
trainer.save_metrics("eval", metrics)
|
||||
|
||||
#############
|
||||
# push to hub
|
||||
#############
|
||||
if training_args.push_to_hub:
|
||||
logger.info("Pushing to hub...")
|
||||
trainer.push_to_hub(**kwargs)
|
||||
|
||||
|
||||
if __name__ == "__main__":
|
||||
parser = TrlParser((GRPOScriptArguments, GRPOConfig, ModelConfig))
|
||||
script_args, training_args, model_args = parser.parse_args_and_config()
|
||||
main(script_args, training_args, model_args)
|
||||
353
examples/research/open_r1/open-r1/src/open_r1/rewards.py
Normal file
353
examples/research/open_r1/open-r1/src/open_r1/rewards.py
Normal file
@ -0,0 +1,353 @@
|
||||
"""Reward functions for GRPO training."""
|
||||
# This project includes modifications to the original codebase:
|
||||
# All email addresses and personal identifiers have been removed.
|
||||
|
||||
import json
|
||||
import math
|
||||
import re
|
||||
from typing import Dict
|
||||
|
||||
from latex2sympy2_extended import NormalizationConfig
|
||||
from math_verify import LatexExtractionConfig, parse, verify
|
||||
|
||||
from .utils import is_e2b_available
|
||||
|
||||
|
||||
if is_e2b_available():
|
||||
from dotenv import load_dotenv
|
||||
from e2b_code_interpreter import Sandbox
|
||||
|
||||
load_dotenv()
|
||||
|
||||
|
||||
def accuracy_reward(completions, solution, **kwargs):
|
||||
"""Reward function that checks if the completion is the same as the ground truth."""
|
||||
contents = [completion[0]["content"] for completion in completions]
|
||||
rewards = []
|
||||
for content, sol in zip(contents, solution):
|
||||
gold_parsed = parse(
|
||||
sol,
|
||||
extraction_mode="first_match",
|
||||
extraction_config=[LatexExtractionConfig()],
|
||||
)
|
||||
if len(gold_parsed) != 0:
|
||||
# We require the answer to be provided in correct latex (no malformed operators)
|
||||
answer_parsed = parse(
|
||||
content,
|
||||
extraction_config=[
|
||||
LatexExtractionConfig(
|
||||
normalization_config=NormalizationConfig(
|
||||
nits=False,
|
||||
malformed_operators=False,
|
||||
basic_latex=True,
|
||||
equations=True,
|
||||
boxed="all",
|
||||
units=True,
|
||||
),
|
||||
# Ensures that boxed is tried first
|
||||
boxed_match_priority=0,
|
||||
try_extract_without_anchor=False,
|
||||
)
|
||||
],
|
||||
extraction_mode="first_match",
|
||||
)
|
||||
# Reward 1 if the content is the same as the ground truth, 0 otherwise
|
||||
reward = float(verify(answer_parsed, gold_parsed))
|
||||
else:
|
||||
# If the gold solution is not parseable, we reward 1 to skip this example
|
||||
reward = 1.0
|
||||
print("Failed to parse gold solution: ", sol)
|
||||
rewards.append(reward)
|
||||
|
||||
return rewards
|
||||
|
||||
|
||||
def format_reward(completions, **kwargs):
|
||||
"""Reward function that checks if the reasoning process is enclosed within <think> and </think> tags, while the final answer is enclosed within <answer> and </answer> tags."""
|
||||
pattern = r"^<think>.*?</think>\s*<answer>.*?</answer>$"
|
||||
completion_contents = [completion[0]["content"] for completion in completions]
|
||||
matches = [re.match(pattern, content, re.DOTALL | re.MULTILINE) for content in completion_contents]
|
||||
return [1.0 if match else 0.0 for match in matches]
|
||||
|
||||
|
||||
def reasoning_steps_reward(completions, **kwargs):
|
||||
r"""Reward function that checks for clear step-by-step reasoning.
|
||||
Regex pattern:
|
||||
Step \d+: - matches "Step 1:", "Step 2:", etc.
|
||||
^\d+\. - matches numbered lists like "1.", "2.", etc. at start of line
|
||||
\n- - matches bullet points with hyphens
|
||||
\n\* - matches bullet points with asterisks
|
||||
First,|Second,|Next,|Finally, - matches transition words
|
||||
"""
|
||||
pattern = r"(Step \d+:|^\d+\.|\n-|\n\*|First,|Second,|Next,|Finally,)"
|
||||
completion_contents = [completion[0]["content"] for completion in completions]
|
||||
matches = [len(re.findall(pattern, content)) for content in completion_contents]
|
||||
|
||||
# Magic nubmer 3 to encourage 3 steps and more, otherwise partial reward
|
||||
return [min(1.0, count / 3) for count in matches]
|
||||
|
||||
|
||||
def len_reward(completions: list[Dict[str, str]], solutions: list[str], **kwargs) -> float:
|
||||
"""Compute length-based rewards to discourage overthinking and promote token efficiency.
|
||||
|
||||
Args:
|
||||
completions: List of model completions
|
||||
solutions: List of ground truth solutions
|
||||
|
||||
Returns:
|
||||
List of rewards where:
|
||||
- For correct answers: reward = 0.5 - (len - min_len)/(max_len - min_len)
|
||||
- For incorrect answers: reward = min(0, 0.5 - (len - min_len)/(max_len - min_len))
|
||||
"""
|
||||
contents = [completion[0]["content"] for completion in completions]
|
||||
|
||||
# First check correctness of answers
|
||||
correctness = []
|
||||
for content, sol in zip(contents, solutions):
|
||||
gold_parsed = parse(
|
||||
sol,
|
||||
extraction_mode="first_match",
|
||||
extraction_config=[LatexExtractionConfig()],
|
||||
)
|
||||
if len(gold_parsed) == 0:
|
||||
# Skip unparseable examples
|
||||
correctness.append(True) # Treat as correct to avoid penalizing
|
||||
print("Failed to parse gold solution: ", sol)
|
||||
continue
|
||||
|
||||
answer_parsed = parse(
|
||||
content,
|
||||
extraction_config=[
|
||||
LatexExtractionConfig(
|
||||
normalization_config=NormalizationConfig(
|
||||
nits=False,
|
||||
malformed_operators=False,
|
||||
basic_latex=True,
|
||||
equations=True,
|
||||
boxed=True,
|
||||
units=True,
|
||||
),
|
||||
boxed_match_priority=0,
|
||||
try_extract_without_anchor=False,
|
||||
)
|
||||
],
|
||||
extraction_mode="first_match",
|
||||
)
|
||||
correctness.append(verify(answer_parsed, gold_parsed))
|
||||
|
||||
# Calculate lengths
|
||||
lengths = [len(content) for content in contents]
|
||||
min_len = min(lengths)
|
||||
max_len = max(lengths)
|
||||
|
||||
# If all responses have the same length, return zero rewards
|
||||
if max_len == min_len:
|
||||
return [0.0] * len(completions)
|
||||
|
||||
rewards = []
|
||||
for length, is_correct in zip(lengths, correctness):
|
||||
lambda_val = 0.5 - (length - min_len) / (max_len - min_len)
|
||||
|
||||
if is_correct:
|
||||
reward = lambda_val
|
||||
else:
|
||||
reward = min(0, lambda_val)
|
||||
|
||||
rewards.append(float(reward))
|
||||
|
||||
return rewards
|
||||
|
||||
|
||||
def get_cosine_scaled_reward(
|
||||
min_value_wrong: float = -1.0,
|
||||
max_value_wrong: float = -0.5,
|
||||
min_value_correct: float = 0.5,
|
||||
max_value_correct: float = 1.0,
|
||||
max_len: int = 1000,
|
||||
):
|
||||
def cosine_scaled_reward(completions, solution, **kwargs):
|
||||
"""Reward function that scales based on completion length using a cosine schedule.
|
||||
|
||||
Shorter correct solutions are rewarded more than longer ones.
|
||||
Longer incorrect solutions are penalized less than shorter ones.
|
||||
|
||||
Args:
|
||||
completions: List of model completions
|
||||
solution: List of ground truth solutions
|
||||
|
||||
This function is parameterized by the following arguments:
|
||||
min_value_wrong: Minimum reward for wrong answers
|
||||
max_value_wrong: Maximum reward for wrong answers
|
||||
min_value_correct: Minimum reward for correct answers
|
||||
max_value_correct: Maximum reward for correct answers
|
||||
max_len: Maximum length for scaling
|
||||
"""
|
||||
contents = [completion[0]["content"] for completion in completions]
|
||||
rewards = []
|
||||
|
||||
for content, sol in zip(contents, solution):
|
||||
gold_parsed = parse(sol, extraction_mode="first_match", extraction_config=[LatexExtractionConfig()])
|
||||
if len(gold_parsed) == 0:
|
||||
rewards.append(1.0) # Skip unparseable examples
|
||||
print("Failed to parse gold solution: ", sol)
|
||||
continue
|
||||
|
||||
answer_parsed = parse(
|
||||
content,
|
||||
extraction_config=[
|
||||
LatexExtractionConfig(
|
||||
normalization_config=NormalizationConfig(
|
||||
nits=False,
|
||||
malformed_operators=False,
|
||||
basic_latex=True,
|
||||
equations=True,
|
||||
boxed=True,
|
||||
units=True,
|
||||
),
|
||||
boxed_match_priority=0,
|
||||
try_extract_without_anchor=False,
|
||||
)
|
||||
],
|
||||
extraction_mode="first_match",
|
||||
)
|
||||
|
||||
is_correct = verify(answer_parsed, gold_parsed)
|
||||
gen_len = len(content)
|
||||
|
||||
# Apply cosine scaling based on length
|
||||
progress = gen_len / max_len
|
||||
cosine = math.cos(progress * math.pi)
|
||||
|
||||
if is_correct:
|
||||
min_value = min_value_correct
|
||||
max_value = max_value_correct
|
||||
else:
|
||||
# Swap min/max for incorrect answers
|
||||
min_value = max_value_wrong
|
||||
max_value = min_value_wrong
|
||||
|
||||
reward = min_value + 0.5 * (max_value - min_value) * (1.0 + cosine)
|
||||
rewards.append(float(reward))
|
||||
|
||||
return rewards
|
||||
|
||||
return cosine_scaled_reward
|
||||
|
||||
|
||||
def get_repetition_penalty_reward(ngram_size: int, max_penalty: float):
|
||||
"""
|
||||
Args:
|
||||
ngram_size: size of the n-grams
|
||||
max_penalty: Maximum (negative) penalty for wrong answers
|
||||
"""
|
||||
if max_penalty > 0:
|
||||
raise ValueError(f"max_penalty {max_penalty} should not be positive")
|
||||
|
||||
def zipngram(text: str, ngram_size: int):
|
||||
words = text.lower().split()
|
||||
return zip(*[words[i:] for i in range(ngram_size)])
|
||||
|
||||
def repetition_penalty_reward(completions, **kwargs) -> float:
|
||||
"""
|
||||
Args:
|
||||
completions: List of model completions
|
||||
"""
|
||||
|
||||
contents = [completion[0]["content"] for completion in completions]
|
||||
rewards = []
|
||||
for completion in contents:
|
||||
if completion == "":
|
||||
rewards.append(0.0)
|
||||
continue
|
||||
if len(completion.split()) < ngram_size:
|
||||
rewards.append(0.0)
|
||||
continue
|
||||
|
||||
ngrams = set()
|
||||
total = 0
|
||||
for ng in zipngram(completion, ngram_size):
|
||||
ngrams.add(ng)
|
||||
total += 1
|
||||
|
||||
scaling = 1 - len(ngrams) / total
|
||||
reward = scaling * max_penalty
|
||||
rewards.append(reward)
|
||||
return rewards
|
||||
|
||||
return repetition_penalty_reward
|
||||
|
||||
|
||||
def extract_code(completion: str) -> str:
|
||||
pattern = re.compile(r"```python\n(.*?)```", re.DOTALL)
|
||||
matches = pattern.findall(completion)
|
||||
extracted_answer = matches[-1] if len(matches) >= 1 else ""
|
||||
return extracted_answer
|
||||
|
||||
|
||||
def code_reward(completions, **kwargs) -> list[float]:
|
||||
"""Reward function that evaluates code snippets using the E2B code interpreter.
|
||||
|
||||
Assumes the dataset contains a `verification_info` column with test cases.
|
||||
"""
|
||||
if not is_e2b_available():
|
||||
raise ImportError(
|
||||
"E2B is not available and required for this reward function. Please install E2B with "
|
||||
"`pip install e2b-code-interpreter` and add an API key to a `.env` file."
|
||||
)
|
||||
|
||||
rewards = []
|
||||
try:
|
||||
"""Returns a reward function that evaluates code snippets in a sandbox."""
|
||||
evaluation_script_template = """
|
||||
import subprocess
|
||||
import json
|
||||
|
||||
def evaluate_code(code, test_cases):
|
||||
passed = 0
|
||||
total = len(test_cases)
|
||||
exec_timeout = 5
|
||||
|
||||
for case in test_cases:
|
||||
process = subprocess.run(
|
||||
["python3", "-c", code],
|
||||
input=case["input"],
|
||||
text=True,
|
||||
capture_output=True,
|
||||
timeout=exec_timeout
|
||||
)
|
||||
|
||||
if process.returncode != 0: # Error in execution
|
||||
continue
|
||||
|
||||
output = process.stdout.strip()
|
||||
if output.strip() == case["output"].strip():
|
||||
passed += 1
|
||||
|
||||
success_rate = (passed / total)
|
||||
return success_rate
|
||||
|
||||
code_snippet = {code}
|
||||
test_cases = json.loads({test_cases})
|
||||
|
||||
evaluate_code(code_snippet, test_cases)
|
||||
"""
|
||||
code_snippets = [extract_code(completion[-1]["content"]) for completion in completions]
|
||||
verification_info = kwargs["verification_info"]
|
||||
scripts = [
|
||||
evaluation_script_template.format(
|
||||
code=json.dumps(code), test_cases=json.dumps(json.dumps(info["test_cases"]))
|
||||
)
|
||||
for code, info in zip(code_snippets, verification_info)
|
||||
]
|
||||
with Sandbox(timeout=30, request_timeout=3) as sbx:
|
||||
for script in scripts:
|
||||
execution = sbx.run_code(script, language=verification_info["language"])
|
||||
try:
|
||||
output = float(execution.text)
|
||||
except (TypeError, ValueError):
|
||||
output = 0.0
|
||||
rewards.append(output)
|
||||
except Exception as e:
|
||||
print(f"Error from E2B executor: {e}")
|
||||
rewards = [0.0] * len(completions)
|
||||
return rewards
|
||||
198
examples/research/open_r1/open-r1/src/open_r1/sft.py
Normal file
198
examples/research/open_r1/open-r1/src/open_r1/sft.py
Normal file
@ -0,0 +1,198 @@
|
||||
# Copyright 2025 The HuggingFace Team. All rights reserved.
|
||||
#
|
||||
# Licensed under the Apache License, Version 2.0 (the "License");
|
||||
# you may not use this file except in compliance with the License.
|
||||
# You may obtain a copy of the License at
|
||||
#
|
||||
# http://www.apache.org/licenses/LICENSE-2.0
|
||||
#
|
||||
# Unless required by applicable law or agreed to in writing, software
|
||||
# distributed under the License is distributed on an "AS IS" BASIS,
|
||||
# WITHOUT WARRANTIES OR CONDITIONS OF ANY KIND, either express or implied.
|
||||
# See the License for the specific language governing permissions and
|
||||
# limitations under the License.
|
||||
|
||||
"""
|
||||
Supervised fine-tuning script for decoder language models.
|
||||
|
||||
Usage:
|
||||
|
||||
# One 1 node of 8 x H100s
|
||||
accelerate launch --config_file=recipes/accelerate_configs/zero3.yaml src/open_r1/sft.py \
|
||||
--model_name_or_path Qwen/Qwen2.5-1.5B-Instruct \
|
||||
--dataset_name HuggingFaceH4/Bespoke-Stratos-17k \
|
||||
--learning_rate 2.0e-5 \
|
||||
--num_train_epochs 1 \
|
||||
--packing \
|
||||
--max_seq_length 4096 \
|
||||
--per_device_train_batch_size 2 \
|
||||
--gradient_accumulation_steps 8 \
|
||||
--gradient_checkpointing \
|
||||
--bf16 \
|
||||
--logging_steps 5 \
|
||||
--eval_strategy steps \
|
||||
--eval_steps 100 \
|
||||
--output_dir data/Qwen2.5-1.5B-Open-R1-Distill
|
||||
"""
|
||||
|
||||
import logging
|
||||
import os
|
||||
import sys
|
||||
|
||||
import datasets
|
||||
import torch
|
||||
import transformers
|
||||
from datasets import load_dataset
|
||||
from transformers import set_seed
|
||||
from transformers.trainer_utils import get_last_checkpoint
|
||||
|
||||
from open_r1.configs import SFTConfig
|
||||
from open_r1.utils import get_tokenizer
|
||||
from open_r1.utils.callbacks import get_callbacks
|
||||
from open_r1.utils.wandb_logging import init_wandb_training
|
||||
from trl import (
|
||||
ModelConfig,
|
||||
ScriptArguments,
|
||||
SFTTrainer,
|
||||
TrlParser,
|
||||
get_kbit_device_map,
|
||||
get_peft_config,
|
||||
get_quantization_config,
|
||||
)
|
||||
|
||||
|
||||
logger = logging.getLogger(__name__)
|
||||
|
||||
|
||||
def main(script_args, training_args, model_args):
|
||||
# Set seed for reproducibility
|
||||
set_seed(training_args.seed)
|
||||
|
||||
###############
|
||||
# Setup logging
|
||||
###############
|
||||
logging.basicConfig(
|
||||
format="%(asctime)s - %(levelname)s - %(name)s - %(message)s",
|
||||
datefmt="%Y-%m-%d %H:%M:%S",
|
||||
handlers=[logging.StreamHandler(sys.stdout)],
|
||||
)
|
||||
log_level = training_args.get_process_log_level()
|
||||
logger.setLevel(log_level)
|
||||
datasets.utils.logging.set_verbosity(log_level)
|
||||
transformers.utils.logging.set_verbosity(log_level)
|
||||
transformers.utils.logging.enable_default_handler()
|
||||
transformers.utils.logging.enable_explicit_format()
|
||||
|
||||
logger.info(f"Model parameters {model_args}")
|
||||
logger.info(f"Script parameters {script_args}")
|
||||
logger.info(f"Training parameters {training_args}")
|
||||
|
||||
# Check for last checkpoint
|
||||
last_checkpoint = None
|
||||
if os.path.isdir(training_args.output_dir):
|
||||
last_checkpoint = get_last_checkpoint(training_args.output_dir)
|
||||
if last_checkpoint is not None and training_args.resume_from_checkpoint is None:
|
||||
logger.info(f"Checkpoint detected, resuming training at {last_checkpoint=}.")
|
||||
|
||||
if "wandb" in training_args.report_to:
|
||||
init_wandb_training(training_args)
|
||||
|
||||
################
|
||||
# Load datasets
|
||||
################
|
||||
dataset = load_dataset(script_args.dataset_name, name=script_args.dataset_config)
|
||||
|
||||
################
|
||||
# Load tokenizer
|
||||
################
|
||||
tokenizer = get_tokenizer(model_args, training_args)
|
||||
tokenizer.pad_token = tokenizer.eos_token
|
||||
|
||||
###################
|
||||
# Model init kwargs
|
||||
###################
|
||||
logger.info("*** Initializing model kwargs ***")
|
||||
torch_dtype = (
|
||||
model_args.torch_dtype if model_args.torch_dtype in ["auto", None] else getattr(torch, model_args.torch_dtype)
|
||||
)
|
||||
quantization_config = get_quantization_config(model_args)
|
||||
model_kwargs = dict(
|
||||
revision=model_args.model_revision,
|
||||
trust_remote_code=model_args.trust_remote_code,
|
||||
attn_implementation=model_args.attn_implementation,
|
||||
torch_dtype=torch_dtype,
|
||||
use_cache=False if training_args.gradient_checkpointing else True,
|
||||
device_map=get_kbit_device_map() if quantization_config is not None else None,
|
||||
quantization_config=quantization_config,
|
||||
)
|
||||
training_args.model_init_kwargs = model_kwargs
|
||||
|
||||
############################
|
||||
# Initialize the SFT Trainer
|
||||
############################
|
||||
trainer = SFTTrainer(
|
||||
model=model_args.model_name_or_path,
|
||||
args=training_args,
|
||||
train_dataset=dataset[script_args.dataset_train_split],
|
||||
eval_dataset=dataset[script_args.dataset_test_split] if training_args.eval_strategy != "no" else None,
|
||||
processing_class=tokenizer,
|
||||
peft_config=get_peft_config(model_args),
|
||||
callbacks=get_callbacks(training_args, model_args),
|
||||
)
|
||||
|
||||
###############
|
||||
# Training loop
|
||||
###############
|
||||
logger.info("*** Train ***")
|
||||
checkpoint = None
|
||||
if training_args.resume_from_checkpoint is not None:
|
||||
checkpoint = training_args.resume_from_checkpoint
|
||||
elif last_checkpoint is not None:
|
||||
checkpoint = last_checkpoint
|
||||
train_result = trainer.train(resume_from_checkpoint=checkpoint)
|
||||
metrics = train_result.metrics
|
||||
metrics["train_samples"] = len(dataset[script_args.dataset_train_split])
|
||||
trainer.log_metrics("train", metrics)
|
||||
trainer.save_metrics("train", metrics)
|
||||
trainer.save_state()
|
||||
|
||||
##################################
|
||||
# Save model and create model card
|
||||
##################################
|
||||
logger.info("*** Save model ***")
|
||||
trainer.save_model(training_args.output_dir)
|
||||
logger.info(f"Model saved to {training_args.output_dir}")
|
||||
|
||||
# Save everything else on main process
|
||||
kwargs = {
|
||||
"dataset_name": script_args.dataset_name,
|
||||
"tags": ["open-r1"],
|
||||
}
|
||||
if trainer.accelerator.is_main_process:
|
||||
trainer.create_model_card(**kwargs)
|
||||
# Restore k,v cache for fast inference
|
||||
trainer.model.config.use_cache = True
|
||||
trainer.model.config.save_pretrained(training_args.output_dir)
|
||||
|
||||
##########
|
||||
# Evaluate
|
||||
##########
|
||||
if training_args.do_eval:
|
||||
logger.info("*** Evaluate ***")
|
||||
metrics = trainer.evaluate()
|
||||
metrics["eval_samples"] = len(dataset[script_args.dataset_test_split])
|
||||
trainer.log_metrics("eval", metrics)
|
||||
trainer.save_metrics("eval", metrics)
|
||||
|
||||
#############
|
||||
# push to hub
|
||||
#############
|
||||
if training_args.push_to_hub:
|
||||
logger.info("Pushing to hub...")
|
||||
trainer.push_to_hub(**kwargs)
|
||||
|
||||
|
||||
if __name__ == "__main__":
|
||||
parser = TrlParser((ScriptArguments, SFTConfig, ModelConfig))
|
||||
script_args, training_args, model_args = parser.parse_args_and_config()
|
||||
main(script_args, training_args, model_args)
|
||||
@ -0,0 +1,5 @@
|
||||
from .import_utils import is_e2b_available
|
||||
from .model_utils import get_tokenizer
|
||||
|
||||
|
||||
__all__ = ["get_tokenizer", "is_e2b_available"]
|
||||
@ -0,0 +1,86 @@
|
||||
#!/usr/bin/env python
|
||||
# coding=utf-8
|
||||
# Copyright 2025 The HuggingFace Inc. team. All rights reserved.
|
||||
#
|
||||
# Licensed under the Apache License, Version 2.0 (the "License");
|
||||
# you may not use this file except in compliance with the License.
|
||||
# You may obtain a copy of the License at
|
||||
#
|
||||
# http://www.apache.org/licenses/LICENSE-2.0
|
||||
#
|
||||
# Unless required by applicable law or agreed to in writing, software
|
||||
# distributed under the License is distributed on an "AS IS" BASIS,
|
||||
# WITHOUT WARRANTIES OR CONDITIONS OF ANY KIND, either express or implied.
|
||||
# See the License for the specific language governing permissions and
|
||||
# limitations under the License.
|
||||
|
||||
import subprocess
|
||||
from typing import List
|
||||
|
||||
from transformers import TrainerCallback
|
||||
from transformers.trainer_callback import TrainerControl, TrainerState
|
||||
from transformers.training_args import TrainingArguments
|
||||
|
||||
from .evaluation import run_benchmark_jobs
|
||||
from .hub import push_to_hub_revision
|
||||
|
||||
|
||||
def is_slurm_available() -> bool:
|
||||
# returns true if a slurm queueing system is available
|
||||
try:
|
||||
subprocess.run(["sinfo"], check=True, stdout=subprocess.PIPE, stderr=subprocess.PIPE)
|
||||
return True
|
||||
except FileNotFoundError:
|
||||
return False
|
||||
|
||||
|
||||
class DummyConfig:
|
||||
def __init__(self, **kwargs):
|
||||
for k, v in kwargs.items():
|
||||
setattr(self, k, v)
|
||||
|
||||
|
||||
class PushToHubRevisionCallback(TrainerCallback):
|
||||
def __init__(self, model_config) -> None:
|
||||
self.model_config = model_config
|
||||
|
||||
def on_save(self, args: TrainingArguments, state: TrainerState, control: TrainerControl, **kwargs):
|
||||
if state.is_world_process_zero:
|
||||
global_step = state.global_step
|
||||
|
||||
# WARNING: if you use dataclasses.replace(args, ...) the accelerator dist state will be broken, so I do this workaround
|
||||
# Also if you instantiate a new SFTConfig, the accelerator dist state will be broken
|
||||
dummy_config = DummyConfig(
|
||||
hub_model_id=args.hub_model_id,
|
||||
hub_model_revision=f"{args.hub_model_revision}-step-{global_step:09d}",
|
||||
output_dir=f"{args.output_dir}/checkpoint-{global_step}",
|
||||
system_prompt=args.system_prompt,
|
||||
)
|
||||
|
||||
future = push_to_hub_revision(
|
||||
dummy_config, extra_ignore_patterns=["*.pt"]
|
||||
) # don't push the optimizer states
|
||||
|
||||
if is_slurm_available():
|
||||
dummy_config.benchmarks = args.benchmarks
|
||||
|
||||
def run_benchmark_callback(_):
|
||||
print(f"Checkpoint {global_step} pushed to hub.")
|
||||
run_benchmark_jobs(dummy_config, self.model_config)
|
||||
|
||||
future.add_done_callback(run_benchmark_callback)
|
||||
|
||||
|
||||
CALLBACKS = {
|
||||
"push_to_hub_revision": PushToHubRevisionCallback,
|
||||
}
|
||||
|
||||
|
||||
def get_callbacks(train_config, model_config) -> List[TrainerCallback]:
|
||||
callbacks = []
|
||||
for callback_name in train_config.callbacks:
|
||||
if callback_name not in CALLBACKS:
|
||||
raise ValueError(f"Callback {callback_name} not found in CALLBACKS.")
|
||||
callbacks.append(CALLBACKS[callback_name](model_config))
|
||||
|
||||
return callbacks
|
||||
@ -0,0 +1,106 @@
|
||||
import subprocess
|
||||
from typing import TYPE_CHECKING, Dict, Union
|
||||
|
||||
from .hub import get_gpu_count_for_vllm, get_param_count_from_repo_id
|
||||
|
||||
|
||||
if TYPE_CHECKING:
|
||||
from trl import GRPOConfig, SFTConfig, ModelConfig
|
||||
|
||||
import os
|
||||
|
||||
|
||||
# We need a special environment setup to launch vLLM from within Slurm training jobs.
|
||||
# - Reference code: https://github.com/huggingface/brrr/blob/c55ba3505686d690de24c7ace6487a5c1426c0fd/brrr/lighteval/one_job_runner.py#L105
|
||||
# - Slack thread: https://huggingface.slack.com/archives/C043JTYE1MJ/p1726566494958269
|
||||
user_home_directory = os.path.expanduser("~")
|
||||
VLLM_SLURM_PREFIX = [
|
||||
"env",
|
||||
"-i",
|
||||
"bash",
|
||||
"-c",
|
||||
f"for f in /etc/profile.d/*.sh; do source $f; done; export HOME={user_home_directory}; sbatch ",
|
||||
]
|
||||
|
||||
|
||||
def register_lighteval_task(
|
||||
configs: Dict[str, str], eval_suite: str, task_name: str, task_list: str, num_fewshot: int = 0
|
||||
):
|
||||
"""Registers a LightEval task configuration.
|
||||
|
||||
- Core tasks can be added from this table: https://github.com/huggingface/lighteval/blob/main/src/lighteval/tasks/tasks_table.jsonl
|
||||
- Custom tasks that require their own metrics / scripts, should be stored in scripts/evaluation/extended_lighteval_tasks
|
||||
|
||||
Args:
|
||||
configs (Dict[str, str]): The dictionary to store the task configuration.
|
||||
eval_suite (str, optional): The evaluation suite.
|
||||
task_name (str): The name of the task.
|
||||
task_list (str): The comma-separated list of tasks in the format "extended|{task_name}|{num_fewshot}|0" or "lighteval|{task_name}|{num_fewshot}|0".
|
||||
num_fewshot (int, optional): The number of few-shot examples. Defaults to 0.
|
||||
is_custom_task (bool, optional): Whether the task is a custom task. Defaults to False.
|
||||
"""
|
||||
# Format task list in lighteval format
|
||||
task_list = ",".join(f"{eval_suite}|{task}|{num_fewshot}|0" for task in task_list.split(","))
|
||||
configs[task_name] = task_list
|
||||
|
||||
|
||||
LIGHTEVAL_TASKS = {}
|
||||
|
||||
register_lighteval_task(LIGHTEVAL_TASKS, "custom", "math_500", "math_500", 0)
|
||||
register_lighteval_task(LIGHTEVAL_TASKS, "custom", "aime24", "aime24", 0)
|
||||
register_lighteval_task(LIGHTEVAL_TASKS, "custom", "aime25", "aime25", 0)
|
||||
register_lighteval_task(LIGHTEVAL_TASKS, "custom", "gpqa", "gpqa:diamond", 0)
|
||||
register_lighteval_task(LIGHTEVAL_TASKS, "extended", "lcb", "lcb:codegeneration", 0)
|
||||
|
||||
|
||||
def get_lighteval_tasks():
|
||||
return list(LIGHTEVAL_TASKS.keys())
|
||||
|
||||
|
||||
SUPPORTED_BENCHMARKS = get_lighteval_tasks()
|
||||
|
||||
|
||||
def run_lighteval_job(
|
||||
benchmark: str, training_args: Union["SFTConfig", "GRPOConfig"], model_args: "ModelConfig"
|
||||
) -> None:
|
||||
task_list = LIGHTEVAL_TASKS[benchmark]
|
||||
model_name = training_args.hub_model_id
|
||||
model_revision = training_args.hub_model_revision
|
||||
# For large models >= 30b params or those running the MATH benchmark, we need to shard them across the GPUs to avoid OOM
|
||||
num_gpus = get_gpu_count_for_vllm(model_name, model_revision)
|
||||
if get_param_count_from_repo_id(model_name) >= 30_000_000_000:
|
||||
tensor_parallel = True
|
||||
else:
|
||||
tensor_parallel = False
|
||||
|
||||
cmd = VLLM_SLURM_PREFIX.copy()
|
||||
cmd_args = [
|
||||
f"--gres=gpu:{num_gpus}",
|
||||
f"--job-name=or1_{benchmark}_{model_name.split('/')[-1]}_{model_revision}",
|
||||
"slurm/evaluate.slurm",
|
||||
benchmark,
|
||||
f'"{task_list}"',
|
||||
model_name,
|
||||
model_revision,
|
||||
f"{tensor_parallel}",
|
||||
f"{model_args.trust_remote_code}",
|
||||
]
|
||||
if training_args.system_prompt is not None:
|
||||
cmd_args.append(f"--system_prompt={training_args.system_prompt}")
|
||||
cmd[-1] += " " + " ".join(cmd_args)
|
||||
subprocess.run(cmd, check=True)
|
||||
|
||||
|
||||
def run_benchmark_jobs(training_args: Union["SFTConfig", "GRPOConfig"], model_args: "ModelConfig") -> None:
|
||||
benchmarks = training_args.benchmarks
|
||||
if len(benchmarks) == 1 and benchmarks[0] == "all":
|
||||
benchmarks = get_lighteval_tasks()
|
||||
# Evaluate on all supported benchmarks. Later we may want to include a `chat` option
|
||||
# that just evaluates on `ifeval` and `mt_bench` etc.
|
||||
|
||||
for benchmark in benchmarks:
|
||||
print(f"Launching benchmark `{benchmark}`")
|
||||
if benchmark in get_lighteval_tasks():
|
||||
run_lighteval_job(benchmark, training_args, model_args)
|
||||
else:
|
||||
raise ValueError(f"Unknown benchmark {benchmark}")
|
||||
131
examples/research/open_r1/open-r1/src/open_r1/utils/hub.py
Normal file
131
examples/research/open_r1/open-r1/src/open_r1/utils/hub.py
Normal file
@ -0,0 +1,131 @@
|
||||
#!/usr/bin/env python
|
||||
# coding=utf-8
|
||||
# Copyright 2025 The HuggingFace Inc. team. All rights reserved.
|
||||
#
|
||||
# Licensed under the Apache License, Version 2.0 (the "License");
|
||||
# you may not use this file except in compliance with the License.
|
||||
# You may obtain a copy of the License at
|
||||
#
|
||||
# http://www.apache.org/licenses/LICENSE-2.0
|
||||
#
|
||||
# Unless required by applicable law or agreed to in writing, software
|
||||
# distributed under the License is distributed on an "AS IS" BASIS,
|
||||
# WITHOUT WARRANTIES OR CONDITIONS OF ANY KIND, either express or implied.
|
||||
# See the License for the specific language governing permissions and
|
||||
# limitations under the License.
|
||||
|
||||
import logging
|
||||
import re
|
||||
from concurrent.futures import Future
|
||||
|
||||
from transformers import AutoConfig
|
||||
|
||||
from huggingface_hub import (
|
||||
create_branch,
|
||||
create_repo,
|
||||
get_safetensors_metadata,
|
||||
list_repo_commits,
|
||||
list_repo_files,
|
||||
list_repo_refs,
|
||||
repo_exists,
|
||||
upload_folder,
|
||||
)
|
||||
from trl import GRPOConfig, SFTConfig
|
||||
|
||||
|
||||
logger = logging.getLogger(__name__)
|
||||
|
||||
|
||||
def push_to_hub_revision(training_args: SFTConfig | GRPOConfig, extra_ignore_patterns=[]) -> Future:
|
||||
"""Pushes the model to branch on a Hub repo."""
|
||||
|
||||
# Create a repo if it doesn't exist yet
|
||||
repo_url = create_repo(repo_id=training_args.hub_model_id, private=True, exist_ok=True)
|
||||
# Get initial commit to branch from
|
||||
initial_commit = list_repo_commits(training_args.hub_model_id)[-1]
|
||||
# Now create the branch we'll be pushing to
|
||||
create_branch(
|
||||
repo_id=training_args.hub_model_id,
|
||||
branch=training_args.hub_model_revision,
|
||||
revision=initial_commit.commit_id,
|
||||
exist_ok=True,
|
||||
)
|
||||
logger.info(f"Created target repo at {repo_url}")
|
||||
logger.info(f"Pushing to the Hub revision {training_args.hub_model_revision}...")
|
||||
ignore_patterns = ["checkpoint-*", "*.pth"]
|
||||
ignore_patterns.extend(extra_ignore_patterns)
|
||||
future = upload_folder(
|
||||
repo_id=training_args.hub_model_id,
|
||||
folder_path=training_args.output_dir,
|
||||
revision=training_args.hub_model_revision,
|
||||
commit_message=f"Add {training_args.hub_model_revision} checkpoint",
|
||||
ignore_patterns=ignore_patterns,
|
||||
run_as_future=True,
|
||||
)
|
||||
logger.info(f"Pushed to {repo_url} revision {training_args.hub_model_revision} successfully!")
|
||||
|
||||
return future
|
||||
|
||||
|
||||
def check_hub_revision_exists(training_args: SFTConfig | GRPOConfig):
|
||||
"""Checks if a given Hub revision exists."""
|
||||
if repo_exists(training_args.hub_model_id):
|
||||
if training_args.push_to_hub_revision is True:
|
||||
# First check if the revision exists
|
||||
revisions = [rev.name for rev in list_repo_refs(training_args.hub_model_id).branches]
|
||||
# If the revision exists, we next check it has a README file
|
||||
if training_args.hub_model_revision in revisions:
|
||||
repo_files = list_repo_files(
|
||||
repo_id=training_args.hub_model_id, revision=training_args.hub_model_revision
|
||||
)
|
||||
if "README.md" in repo_files and training_args.overwrite_hub_revision is False:
|
||||
raise ValueError(
|
||||
f"Revision {training_args.hub_model_revision} already exists. "
|
||||
"Use --overwrite_hub_revision to overwrite it."
|
||||
)
|
||||
|
||||
|
||||
def get_param_count_from_repo_id(repo_id: str) -> int:
|
||||
"""Function to get model param counts from safetensors metadata or find patterns like 42m, 1.5b, 0.5m or products like 8x7b in a repo ID."""
|
||||
try:
|
||||
metadata = get_safetensors_metadata(repo_id)
|
||||
return list(metadata.parameter_count.values())[0]
|
||||
except Exception:
|
||||
# Pattern to match products (like 8x7b) and single values (like 42m)
|
||||
pattern = r"((\d+(\.\d+)?)(x(\d+(\.\d+)?))?)([bm])"
|
||||
matches = re.findall(pattern, repo_id.lower())
|
||||
|
||||
param_counts = []
|
||||
for full_match, number1, _, _, number2, _, unit in matches:
|
||||
if number2: # If there's a second number, it's a product
|
||||
number = float(number1) * float(number2)
|
||||
else: # Otherwise, it's a single value
|
||||
number = float(number1)
|
||||
|
||||
if unit == "b":
|
||||
number *= 1_000_000_000 # Convert to billion
|
||||
elif unit == "m":
|
||||
number *= 1_000_000 # Convert to million
|
||||
|
||||
param_counts.append(number)
|
||||
|
||||
if len(param_counts) > 0:
|
||||
# Return the largest number
|
||||
return int(max(param_counts))
|
||||
else:
|
||||
# Return -1 if no match found
|
||||
return -1
|
||||
|
||||
|
||||
def get_gpu_count_for_vllm(model_name: str, revision: str = "main", num_gpus: int = 8) -> int:
|
||||
"""vLLM enforces a constraint that the number of attention heads must be divisible by the number of GPUs and 64 must be divisible by the number of GPUs.
|
||||
This function calculates the number of GPUs to use for decoding based on the number of attention heads in the model.
|
||||
"""
|
||||
config = AutoConfig.from_pretrained(model_name, revision=revision, trust_remote_code=True)
|
||||
# Get number of attention heads
|
||||
num_heads = config.num_attention_heads
|
||||
# Reduce num_gpus so that num_heads is divisible by num_gpus and 64 is divisible by num_gpus
|
||||
while num_heads % num_gpus != 0 or 64 % num_gpus != 0:
|
||||
logger.info(f"Reducing num_gpus from {num_gpus} to {num_gpus - 1} to make num_heads divisible by num_gpus")
|
||||
num_gpus -= 1
|
||||
return num_gpus
|
||||
@ -0,0 +1,23 @@
|
||||
# Copyright 2025 The HuggingFace Team. All rights reserved.
|
||||
#
|
||||
# Licensed under the Apache License, Version 2.0 (the "License");
|
||||
# you may not use this file except in compliance with the License.
|
||||
# You may obtain a copy of the License at
|
||||
#
|
||||
# http://www.apache.org/licenses/LICENSE-2.0
|
||||
#
|
||||
# Unless required by applicable law or agreed to in writing, software
|
||||
# distributed under the License is distributed on an "AS IS" BASIS,
|
||||
# WITHOUT WARRANTIES OR CONDITIONS OF ANY KIND, either express or implied.
|
||||
# See the License for the specific language governing permissions and
|
||||
# limitations under the License.
|
||||
|
||||
from transformers.utils.import_utils import _is_package_available
|
||||
|
||||
|
||||
# Use same as transformers.utils.import_utils
|
||||
_e2b_available = _is_package_available("e2b")
|
||||
|
||||
|
||||
def is_e2b_available() -> bool:
|
||||
return _e2b_available
|
||||
@ -0,0 +1,26 @@
|
||||
from transformers import AutoTokenizer, PreTrainedTokenizer
|
||||
|
||||
from trl import ModelConfig
|
||||
|
||||
from ..configs import GRPOConfig, SFTConfig
|
||||
|
||||
|
||||
DEFAULT_CHAT_TEMPLATE = "{% for message in messages %}\n{% if message['role'] == 'user' %}\n{{ '<|user|>\n' + message['content'] + eos_token }}\n{% elif message['role'] == 'system' %}\n{{ '<|system|>\n' + message['content'] + eos_token }}\n{% elif message['role'] == 'assistant' %}\n{{ '<|assistant|>\n' + message['content'] + eos_token }}\n{% endif %}\n{% if loop.last and add_generation_prompt %}\n{{ '<|assistant|>' }}\n{% endif %}\n{% endfor %}"
|
||||
|
||||
|
||||
def get_tokenizer(
|
||||
model_args: ModelConfig, training_args: SFTConfig | GRPOConfig, auto_set_chat_template: bool = True
|
||||
) -> PreTrainedTokenizer:
|
||||
"""Get the tokenizer for the model."""
|
||||
tokenizer = AutoTokenizer.from_pretrained(
|
||||
model_args.model_name_or_path,
|
||||
revision=model_args.model_revision,
|
||||
trust_remote_code=model_args.trust_remote_code,
|
||||
)
|
||||
|
||||
if training_args.chat_template is not None:
|
||||
tokenizer.chat_template = training_args.chat_template
|
||||
elif auto_set_chat_template and tokenizer.get_chat_template() is None:
|
||||
tokenizer.chat_template = DEFAULT_CHAT_TEMPLATE
|
||||
|
||||
return tokenizer
|
||||
@ -0,0 +1,11 @@
|
||||
import os
|
||||
|
||||
|
||||
def init_wandb_training(training_args):
|
||||
"""
|
||||
Helper function for setting up Weights & Biases logging tools.
|
||||
"""
|
||||
if training_args.wandb_entity is not None:
|
||||
os.environ["WANDB_ENTITY"] = training_args.wandb_entity
|
||||
if training_args.wandb_project is not None:
|
||||
os.environ["WANDB_PROJECT"] = training_args.wandb_project
|
||||
0
examples/research/open_r1/open-r1/tests/__init__.py
Normal file
0
examples/research/open_r1/open-r1/tests/__init__.py
Normal file
317
examples/research/open_r1/open-r1/tests/test_rewards.py
Normal file
317
examples/research/open_r1/open-r1/tests/test_rewards.py
Normal file
@ -0,0 +1,317 @@
|
||||
import unittest
|
||||
|
||||
from open_r1.rewards import (
|
||||
accuracy_reward,
|
||||
format_reward,
|
||||
get_cosine_scaled_reward,
|
||||
get_repetition_penalty_reward,
|
||||
len_reward,
|
||||
reasoning_steps_reward,
|
||||
)
|
||||
|
||||
|
||||
class TestRewards(unittest.TestCase):
|
||||
def test_accuracy_reward_correct_answer(self):
|
||||
"""Test accuracy_reward with a correct answer."""
|
||||
completion = [[{"content": r"\boxed{\frac{63}{400}}"}]]
|
||||
solution = [r"\frac{63}{400}"]
|
||||
|
||||
rewards = accuracy_reward(completion, solution)
|
||||
self.assertEqual(rewards[0], 1.0)
|
||||
|
||||
def test_accuracy_reward_wrong_answer(self):
|
||||
"""Test accuracy_reward with an incorrect answer."""
|
||||
completion = [[{"content": r"\boxed{\frac{64}{400}}"}]]
|
||||
solution = [r"\frac{63}{400}"]
|
||||
|
||||
rewards = accuracy_reward(completion, solution)
|
||||
self.assertEqual(rewards[0], 0.0)
|
||||
|
||||
def test_format_reward_correct(self):
|
||||
"""Test format_reward with correct format."""
|
||||
completion = [[{"content": "<think>Some reasoning</think><answer>The answer</answer>"}]]
|
||||
rewards = format_reward(completion)
|
||||
self.assertEqual(rewards[0], 1.0)
|
||||
|
||||
def test_format_reward_incorrect(self):
|
||||
"""Test format_reward with incorrect format."""
|
||||
incorrect_formats = [
|
||||
"<think>Only thinking</think>",
|
||||
"<answer>Only answer</answer>",
|
||||
"No tags at all",
|
||||
"<think>Missing closing</think><answer>Missing closing",
|
||||
"<think>Wrong order</answer><answer>Wrong order</think>",
|
||||
]
|
||||
|
||||
for fmt in incorrect_formats:
|
||||
completion = [[{"content": fmt}]]
|
||||
rewards = format_reward(completion)
|
||||
self.assertEqual(rewards[0], 0.0)
|
||||
|
||||
def test_reasoning_steps_reward(self):
|
||||
"""Test reasoning_steps_reward with various formats."""
|
||||
test_cases = [
|
||||
# Full credit cases (3 or more steps)
|
||||
("Step 1: First step\nStep 2: Second step\nStep 3: Third step", 1.0),
|
||||
("First, we do this.\nSecond, we do that.\nFinally, we conclude.", 1.0),
|
||||
# Partial credit cases (less than 3 steps)
|
||||
("Step 1: Only step", 1 / 3),
|
||||
("First, we do this.\nFinally, we conclude.", 2 / 3),
|
||||
# No credit case
|
||||
("Just plain text without any clear steps", 0.0),
|
||||
]
|
||||
|
||||
for content, expected_reward in test_cases:
|
||||
completion = [[{"content": content}]]
|
||||
rewards = reasoning_steps_reward(completion)
|
||||
self.assertAlmostEqual(rewards[0], expected_reward)
|
||||
|
||||
def test_multiple_completions(self):
|
||||
"""Test handling multiple completions at once."""
|
||||
completions = [[{"content": r"\boxed{\frac{63}{400}}"}], [{"content": r"\boxed{\frac{64}{400}}"}]]
|
||||
solutions = [r"\frac{63}{400}", r"\frac{63}{400}"]
|
||||
|
||||
rewards = accuracy_reward(completions, solutions)
|
||||
self.assertEqual(len(rewards), 2)
|
||||
self.assertEqual(rewards[0], 1.0)
|
||||
self.assertEqual(rewards[1], 0.0)
|
||||
|
||||
def test_cosine_scaled_reward(self):
|
||||
"""Test cosine_scaled_reward with various cases."""
|
||||
# Test parameters
|
||||
test_params = {
|
||||
"min_value_wrong": -1.0,
|
||||
"max_value_wrong": -0.5,
|
||||
"min_value_correct": 0.5,
|
||||
"max_value_correct": 1.0,
|
||||
"max_len": 100,
|
||||
}
|
||||
|
||||
test_cases = [
|
||||
# Correct answers with different lengths
|
||||
(r"\boxed{\frac{63}{400}}", r"\frac{63}{400}", 20, 0.943), # Short correct answer
|
||||
(r"\boxed{\frac{63}{400}}", r"\frac{63}{400}", 80, 0.547), # Long correct answer
|
||||
# Wrong answers with different lengths
|
||||
(r"\boxed{\frac{64}{400}}", r"\frac{63}{400}", 20, -0.942), # Short wrong answer
|
||||
(r"\boxed{\frac{64}{400}}", r"\frac{63}{400}", 80, -0.547), # Long wrong answer
|
||||
]
|
||||
|
||||
for content, solution, content_len, expected_reward in test_cases:
|
||||
# Pad content to desired length
|
||||
padded_content = content + " " * (content_len - len(content))
|
||||
completion = [[{"content": padded_content}]]
|
||||
|
||||
rewards = get_cosine_scaled_reward(**test_params)(completion, [solution])
|
||||
self.assertAlmostEqual(rewards[0], expected_reward, places=2)
|
||||
|
||||
def test_format_reward_specific_multiline(self):
|
||||
"""Test format_reward with a specific multiline input."""
|
||||
inputs = "<think>\nI will count each distinct object in the image:\n1. Purple scooter\n2. Red bicycle\n3. Green motorcycle\n4. Gray sedan\n5. Yellow school bus\n6. Small green double-decker bus\n7. Small red car\n8. Small purple car\n9. Small gray dirt bike\n\nThere are 9 distinct objects in total.\n</think>\n<answer>9</answer>"
|
||||
completion = [[{"content": inputs}]]
|
||||
rewards = format_reward(completion)
|
||||
self.assertEqual(rewards[0], 1.0)
|
||||
|
||||
def test_same_length_responses(self):
|
||||
"""Test len_reward when all responses have the same length."""
|
||||
completions = [[{"content": r"\boxed{\frac{63}{400}}"}], [{"content": r"\boxed{\frac{64}{400}}"}]]
|
||||
solutions = [r"\frac{63}{400}", r"\frac{63}{400}"]
|
||||
|
||||
rewards = len_reward(completions, solutions)
|
||||
self.assertEqual(rewards, [0.0, 0.0])
|
||||
|
||||
def test_different_lengths_correct_answers(self):
|
||||
"""Test len_reward with different length correct answers."""
|
||||
completions = [
|
||||
[{"content": r"\boxed{\frac{63}{400}}"}], # shorter
|
||||
[{"content": r"\boxed{\frac{63}{400}} " + "x" * 10}], # longer
|
||||
]
|
||||
solutions = [r"\frac{63}{400}", r"\frac{63}{400}"]
|
||||
|
||||
rewards = len_reward(completions, solutions)
|
||||
self.assertGreater(rewards[0], rewards[1]) # shorter answer should get higher reward
|
||||
self.assertAlmostEqual(rewards[0], 0.5) # shortest correct answer gets maximum reward
|
||||
|
||||
def test_different_lengths_incorrect_answers(self):
|
||||
"""Test len_reward with different length incorrect answers."""
|
||||
completions = [
|
||||
[{"content": r"\boxed{\frac{64}{400}}"}], # shorter
|
||||
[{"content": r"\boxed{\frac{64}{400}} " + "x" * 10}], # longer
|
||||
]
|
||||
solutions = [r"\frac{63}{400}", r"\frac{63}{400}"]
|
||||
|
||||
rewards = len_reward(completions, solutions)
|
||||
self.assertLessEqual(rewards[0], 0.0) # incorrect answers should get non-positive rewards
|
||||
self.assertLessEqual(rewards[1], 0.0)
|
||||
self.assertGreater(rewards[0], rewards[1]) # shorter answer should still be penalized less
|
||||
|
||||
def test_mixed_correctness(self):
|
||||
"""Test len_reward with mix of correct and incorrect answers of different lengths."""
|
||||
completions = [
|
||||
[{"content": r"\boxed{\frac{63}{400}}"}], # correct, shorter
|
||||
[{"content": r"\boxed{\frac{63}{400}} " + "x" * 10}], # correct, longer
|
||||
[{"content": r"\boxed{\frac{64}{400}}"}], # incorrect, shorter
|
||||
[{"content": r"\boxed{\frac{64}{400}} " + "x" * 10}], # incorrect, longer
|
||||
]
|
||||
solutions = [r"\frac{63}{400}"] * 4
|
||||
|
||||
rewards = len_reward(completions, solutions)
|
||||
|
||||
# Shortest correct answer should get positive reward
|
||||
self.assertGreater(rewards[0], 0.0)
|
||||
|
||||
# Longer correct answer might get negative reward:
|
||||
self.assertGreater(rewards[2], rewards[1])
|
||||
self.assertGreaterEqual(rewards[1], rewards[3])
|
||||
|
||||
# Incorrect answers should get non-positive rewards
|
||||
self.assertLessEqual(rewards[2], 0.0)
|
||||
self.assertLessEqual(rewards[3], 0.0)
|
||||
|
||||
# Shorter answers should get better rewards within their correctness category
|
||||
self.assertGreater(rewards[0], rewards[1]) # correct answers
|
||||
self.assertGreater(rewards[2], rewards[3]) # incorrect answers
|
||||
|
||||
def test_unparseable_solution(self):
|
||||
"""Test len_reward with unparseable solution."""
|
||||
completions = [[{"content": r"\boxed{answer}"}], [{"content": r"\boxed{answer} " + "x" * 10}]]
|
||||
solutions = ["unparseable_latex", "unparseable_latex"]
|
||||
|
||||
rewards = len_reward(completions, solutions)
|
||||
self.assertGreater(rewards[0], rewards[1]) # shorter answer should still get better reward
|
||||
self.assertAlmostEqual(rewards[0], 0.5) # treated as correct, shortest gets maximum reward
|
||||
|
||||
|
||||
class TestRepetitionPenaltyReward(unittest.TestCase):
|
||||
def test_positive_max_penalty_raises_value_error(self):
|
||||
with self.assertRaises(ValueError):
|
||||
get_repetition_penalty_reward(ngram_size=2, max_penalty=1.0)
|
||||
with self.assertRaisesRegex(ValueError, "max_penalty 1.5 should not be positive"):
|
||||
get_repetition_penalty_reward(ngram_size=2, max_penalty=1.5)
|
||||
|
||||
def test_no_repetition(self):
|
||||
reward_fn = get_repetition_penalty_reward(ngram_size=2, max_penalty=-1.0)
|
||||
completions = [[{"content": "this is a test sentence"}]]
|
||||
rewards = reward_fn(completions)
|
||||
self.assertEqual(rewards, [0.0])
|
||||
|
||||
def test_full_repetition(self):
|
||||
reward_fn = get_repetition_penalty_reward(ngram_size=2, max_penalty=-1.0)
|
||||
completions = [[{"content": "this this this this this"}]]
|
||||
|
||||
rewards = reward_fn(completions)
|
||||
# (1 - 1/4) * -1 = -0.75
|
||||
self.assertEqual(rewards, [-0.75])
|
||||
|
||||
def test_partial_repetition(self):
|
||||
reward_fn = get_repetition_penalty_reward(ngram_size=2, max_penalty=-1.0)
|
||||
completions = [[{"content": "this is a this is a test"}]]
|
||||
|
||||
rewards = reward_fn(completions)
|
||||
# Unique 2-grams: (this, is), (is, a), (a, this), (a, test). 4 unique out of 6 total
|
||||
# (1 - 4/6) * -1 = -1/3 = -0.3333...
|
||||
self.assertAlmostEqual(rewards[0], -1 / 3)
|
||||
|
||||
def test_multiple_completions(self):
|
||||
reward_fn = get_repetition_penalty_reward(ngram_size=3, max_penalty=-0.5)
|
||||
completions = [
|
||||
[{"content": "this is a test"}],
|
||||
[{"content": "test test test test"}],
|
||||
]
|
||||
|
||||
rewards = reward_fn(completions)
|
||||
# Completion 1: (this, is, a), (is, a, test) -> 2 unique / 2 total -> (1 - 2/2) * -0.5 = 0
|
||||
# Completion 2: (test, test, test) -> 1 unique / 2 total -> (1 - 1/2) * -0.5 = -0.25
|
||||
self.assertAlmostEqual(rewards[0], 0.0)
|
||||
self.assertAlmostEqual(rewards[1], -0.25)
|
||||
|
||||
def test_empty_completion(self):
|
||||
reward_fn = get_repetition_penalty_reward(ngram_size=2, max_penalty=-1.0)
|
||||
completions = [[{"content": ""}]]
|
||||
rewards = reward_fn(completions)
|
||||
self.assertEqual(rewards, [0.0])
|
||||
|
||||
def test_different_ngram_size(self):
|
||||
reward_fn = get_repetition_penalty_reward(ngram_size=3, max_penalty=-2.0)
|
||||
completions = [[{"content": "this is a this is a test"}]]
|
||||
|
||||
rewards = reward_fn(completions)
|
||||
self.assertAlmostEqual(rewards[0], -0.4)
|
||||
|
||||
def test_mixed_case(self):
|
||||
reward_fn = get_repetition_penalty_reward(ngram_size=2, max_penalty=-1.0)
|
||||
completions = [
|
||||
[{"content": "This is A Test"}],
|
||||
[{"content": "this IS a test"}],
|
||||
]
|
||||
|
||||
rewards = reward_fn(completions)
|
||||
# both completions should produce the same reward, because the text gets lowercased
|
||||
self.assertAlmostEqual(rewards[0], rewards[1])
|
||||
|
||||
def test_one_word_completion(self):
|
||||
reward_fn = get_repetition_penalty_reward(ngram_size=3, max_penalty=-1.0)
|
||||
completions = [[{"content": "word"}]]
|
||||
|
||||
rewards = reward_fn(completions)
|
||||
self.assertEqual(rewards, [0.0])
|
||||
|
||||
def test_two_word_completion(self):
|
||||
reward_fn = get_repetition_penalty_reward(ngram_size=3, max_penalty=-1.0)
|
||||
completions = [[{"content": "two words"}]]
|
||||
|
||||
rewards = reward_fn(completions)
|
||||
self.assertEqual(rewards, [0.0])
|
||||
|
||||
def test_three_word_completion(self):
|
||||
reward_fn = get_repetition_penalty_reward(ngram_size=3, max_penalty=-1.0)
|
||||
completions = [[{"content": "three different words"}]]
|
||||
|
||||
rewards = reward_fn(completions)
|
||||
self.assertEqual(rewards, [0.0])
|
||||
|
||||
def test_three_word_repetition_completion(self):
|
||||
reward_fn = get_repetition_penalty_reward(ngram_size=3, max_penalty=-1.0)
|
||||
completions = [[{"content": "word word word word"}]]
|
||||
|
||||
rewards = reward_fn(completions)
|
||||
self.assertEqual(rewards, [-0.5])
|
||||
|
||||
def test_four_word_completion_with_repetition(self):
|
||||
reward_fn = get_repetition_penalty_reward(ngram_size=3, max_penalty=-1.0)
|
||||
completions = [[{"content": "one two one two"}]]
|
||||
|
||||
rewards = reward_fn(completions)
|
||||
# ngrams are (one two one) (two one two). unique is 2 and count is 2, therefore (1-1) * -1.
|
||||
self.assertEqual(rewards, [0.0])
|
||||
|
||||
def test_five_word_completion_with_repetition(self):
|
||||
reward_fn = get_repetition_penalty_reward(ngram_size=3, max_penalty=-0.5)
|
||||
completions = [[{"content": "A B C A B"}]]
|
||||
|
||||
rewards = reward_fn(completions)
|
||||
# (A B C) (B C A) (C A B). unique is 3. count is 3 (1-1) * -.5 = 0
|
||||
self.assertEqual(rewards, [0.0])
|
||||
|
||||
def test_six_word_completion_with_repetition(self):
|
||||
reward_fn = get_repetition_penalty_reward(ngram_size=3, max_penalty=-1.0)
|
||||
completions = [[{"content": "A B C A B C"}]]
|
||||
|
||||
rewards = reward_fn(completions)
|
||||
self.assertEqual(rewards, [-0.25])
|
||||
|
||||
def test_long_completion_with_repetition(self):
|
||||
reward_fn = get_repetition_penalty_reward(ngram_size=3, max_penalty=-1.0)
|
||||
completions = [[{"content": "A B C A B C E F G A B C A B C"}]]
|
||||
rewards = reward_fn(completions)
|
||||
self.assertAlmostEqual(rewards[0], -0.3846, places=4)
|
||||
|
||||
def test_long_completion_without_repetition(self):
|
||||
reward_fn = get_repetition_penalty_reward(ngram_size=3, max_penalty=-1.0)
|
||||
completions = [[{"content": "A B C D E F G H I J K L"}]]
|
||||
|
||||
rewards = reward_fn(completions)
|
||||
self.assertEqual(rewards, [0.0])
|
||||
|
||||
|
||||
if __name__ == "__main__":
|
||||
unittest.main()
|
||||
17
examples/research/open_r1/trl/.pre-commit-config.yaml
Normal file
17
examples/research/open_r1/trl/.pre-commit-config.yaml
Normal file
@ -0,0 +1,17 @@
|
||||
repos:
|
||||
- repo: https://github.com/astral-sh/ruff-pre-commit
|
||||
rev: v0.6.3
|
||||
hooks:
|
||||
- id: ruff
|
||||
types_or: [ python, pyi ]
|
||||
args: [ --fix ]
|
||||
- id: ruff-format
|
||||
types_or: [ python, pyi ]
|
||||
|
||||
# - repo: https://github.com/codespell-project/codespell
|
||||
# rev: v2.1.0
|
||||
# hooks:
|
||||
# - id: codespell
|
||||
# args:
|
||||
# - --ignore-words-list=nd,reacher,thist,ths,magent,ba
|
||||
# - --skip=docs/css/termynal.css,docs/js/termynal.js
|
||||
34
examples/research/open_r1/trl/CITATION.cff
Normal file
34
examples/research/open_r1/trl/CITATION.cff
Normal file
@ -0,0 +1,34 @@
|
||||
cff-version: 1.2.0
|
||||
title: 'TRL: Transformer Reinforcement Learning'
|
||||
message: >-
|
||||
If you use this software, please cite it using the
|
||||
metadata from this file.
|
||||
type: software
|
||||
authors:
|
||||
- given-names: Leandro
|
||||
family-names: von Werra
|
||||
- given-names: Younes
|
||||
family-names: Belkada
|
||||
- given-names: Lewis
|
||||
family-names: Tunstall
|
||||
- given-names: Edward
|
||||
family-names: Beeching
|
||||
- given-names: Tristan
|
||||
family-names: Thrush
|
||||
- given-names: Nathan
|
||||
family-names: Lambert
|
||||
- given-names: Shengyi
|
||||
family-names: Huang
|
||||
- given-names: Kashif
|
||||
family-names: Rasul
|
||||
- given-names: Quentin
|
||||
family-names: Gallouédec
|
||||
repository-code: 'https://github.com/huggingface/trl'
|
||||
abstract: "With trl you can train transformer language models with Proximal Policy Optimization (PPO). The library is built on top of the transformers library by \U0001F917 Hugging Face. Therefore, pre-trained language models can be directly loaded via transformers. At this point, most decoder and encoder-decoder architectures are supported."
|
||||
keywords:
|
||||
- rlhf
|
||||
- deep-learning
|
||||
- pytorch
|
||||
- transformers
|
||||
license: Apache-2.0
|
||||
version: 0.15
|
||||
133
examples/research/open_r1/trl/CODE_OF_CONDUCT.md
Normal file
133
examples/research/open_r1/trl/CODE_OF_CONDUCT.md
Normal file
@ -0,0 +1,133 @@
|
||||
|
||||
# Contributor Covenant Code of Conduct
|
||||
|
||||
## Our Pledge
|
||||
|
||||
We as members, contributors, and leaders pledge to make participation in our
|
||||
community a harassment-free experience for everyone, regardless of age, body
|
||||
size, visible or invisible disability, ethnicity, sex characteristics, gender
|
||||
identity and expression, level of experience, education, socio-economic status,
|
||||
nationality, personal appearance, race, caste, color, religion, or sexual
|
||||
identity and orientation.
|
||||
|
||||
We pledge to act and interact in ways that contribute to an open, welcoming,
|
||||
diverse, inclusive, and healthy community.
|
||||
|
||||
## Our Standards
|
||||
|
||||
Examples of behavior that contributes to a positive environment for our
|
||||
community include:
|
||||
|
||||
* Demonstrating empathy and kindness toward other people
|
||||
* Being respectful of differing opinions, viewpoints, and experiences
|
||||
* Giving and gracefully accepting constructive feedback
|
||||
* Accepting responsibility and apologizing to those affected by our mistakes,
|
||||
and learning from the experience
|
||||
* Focusing on what is best not just for us as individuals, but for the overall
|
||||
community
|
||||
|
||||
Examples of unacceptable behavior include:
|
||||
|
||||
* The use of sexualized language or imagery, and sexual attention or advances of
|
||||
any kind
|
||||
* Trolling, insulting or derogatory comments, and personal or political attacks
|
||||
* Public or private harassment
|
||||
* Publishing others' private information, such as a physical or email address,
|
||||
without their explicit permission
|
||||
* Other conduct which could reasonably be considered inappropriate in a
|
||||
professional setting
|
||||
|
||||
## Enforcement Responsibilities
|
||||
|
||||
Community leaders are responsible for clarifying and enforcing our standards of
|
||||
acceptable behavior and will take appropriate and fair corrective action in
|
||||
response to any behavior that they deem inappropriate, threatening, offensive,
|
||||
or harmful.
|
||||
|
||||
Community leaders have the right and responsibility to remove, edit, or reject
|
||||
comments, commits, code, wiki edits, issues, and other contributions that are
|
||||
not aligned to this Code of Conduct, and will communicate reasons for moderation
|
||||
decisions when appropriate.
|
||||
|
||||
## Scope
|
||||
|
||||
This Code of Conduct applies within all community spaces, and also applies when
|
||||
an individual is officially representing the community in public spaces.
|
||||
Examples of representing our community include using an official e-mail address,
|
||||
posting via an official social media account, or acting as an appointed
|
||||
representative at an online or offline event.
|
||||
|
||||
## Enforcement
|
||||
|
||||
Instances of abusive, harassing, or otherwise unacceptable behavior may be
|
||||
reported to the community leaders responsible for enforcement at
|
||||
feedback@huggingface.co.
|
||||
All complaints will be reviewed and investigated promptly and fairly.
|
||||
|
||||
All community leaders are obligated to respect the privacy and security of the
|
||||
reporter of any incident.
|
||||
|
||||
## Enforcement Guidelines
|
||||
|
||||
Community leaders will follow these Community Impact Guidelines in determining
|
||||
the consequences for any action they deem in violation of this Code of Conduct:
|
||||
|
||||
### 1. Correction
|
||||
|
||||
**Community Impact**: Use of inappropriate language or other behavior deemed
|
||||
unprofessional or unwelcome in the community.
|
||||
|
||||
**Consequence**: A private, written warning from community leaders, providing
|
||||
clarity around the nature of the violation and an explanation of why the
|
||||
behavior was inappropriate. A public apology may be requested.
|
||||
|
||||
### 2. Warning
|
||||
|
||||
**Community Impact**: A violation through a single incident or series of
|
||||
actions.
|
||||
|
||||
**Consequence**: A warning with consequences for continued behavior. No
|
||||
interaction with the people involved, including unsolicited interaction with
|
||||
those enforcing the Code of Conduct, for a specified period of time. This
|
||||
includes avoiding interactions in community spaces as well as external channels
|
||||
like social media. Violating these terms may lead to a temporary or permanent
|
||||
ban.
|
||||
|
||||
### 3. Temporary Ban
|
||||
|
||||
**Community Impact**: A serious violation of community standards, including
|
||||
sustained inappropriate behavior.
|
||||
|
||||
**Consequence**: A temporary ban from any sort of interaction or public
|
||||
communication with the community for a specified period of time. No public or
|
||||
private interaction with the people involved, including unsolicited interaction
|
||||
with those enforcing the Code of Conduct, is allowed during this period.
|
||||
Violating these terms may lead to a permanent ban.
|
||||
|
||||
### 4. Permanent Ban
|
||||
|
||||
**Community Impact**: Demonstrating a pattern of violation of community
|
||||
standards, including sustained inappropriate behavior, harassment of an
|
||||
individual, or aggression toward or disparagement of classes of individuals.
|
||||
|
||||
**Consequence**: A permanent ban from any sort of public interaction within the
|
||||
community.
|
||||
|
||||
## Attribution
|
||||
|
||||
This Code of Conduct is adapted from the [Contributor Covenant][homepage],
|
||||
version 2.1, available at
|
||||
[https://www.contributor-covenant.org/version/2/1/code_of_conduct.html][v2.1].
|
||||
|
||||
Community Impact Guidelines were inspired by
|
||||
[Mozilla's code of conduct enforcement ladder][Mozilla CoC].
|
||||
|
||||
For answers to common questions about this code of conduct, see the FAQ at
|
||||
[https://www.contributor-covenant.org/faq][FAQ]. Translations are available at
|
||||
[https://www.contributor-covenant.org/translations][translations].
|
||||
|
||||
[homepage]: https://www.contributor-covenant.org
|
||||
[v2.1]: https://www.contributor-covenant.org/version/2/1/code_of_conduct.html
|
||||
[Mozilla CoC]: https://github.com/mozilla/diversity
|
||||
[FAQ]: https://www.contributor-covenant.org/faq
|
||||
[translations]: https://www.contributor-covenant.org/translations
|
||||
459
examples/research/open_r1/trl/CONTRIBUTING.md
Normal file
459
examples/research/open_r1/trl/CONTRIBUTING.md
Normal file
@ -0,0 +1,459 @@
|
||||
# How to contribute to TRL?
|
||||
|
||||
Everyone is welcome to contribute, and we value everybody's contribution. Code
|
||||
contributions are not the only way to help the community. Answering questions, helping
|
||||
others, and improving the documentation are also immensely valuable.
|
||||
|
||||
It also helps us if you spread the word! Reference the library in blog posts
|
||||
about the awesome projects it made possible, shout out on Twitter every time it has
|
||||
helped you, or simply ⭐️ the repository to say thank you.
|
||||
|
||||
However you choose to contribute, please be mindful and respect our
|
||||
[code of conduct](https://github.com/huggingface/trl/blob/main/CODE_OF_CONDUCT.md).
|
||||
|
||||
**This guide was heavily inspired by the awesome [scikit-learn guide to contributing](https://github.com/scikit-learn/scikit-learn/blob/main/CONTRIBUTING.md).**
|
||||
|
||||
## Ways to contribute
|
||||
|
||||
There are several ways you can contribute to TRL:
|
||||
|
||||
* Fix outstanding issues with the existing code.
|
||||
* Submit issues related to bugs or desired new features.
|
||||
* Implement trainers for new post-training algorithms.
|
||||
* Contribute to the examples or the documentation.
|
||||
|
||||
If you don't know where to start, there is a special [Good First
|
||||
Issue](https://github.com/huggingface/trl/labels/%F0%9F%91%B6%20good%20first%20issue) listing. It will give you a list of
|
||||
open issues that are beginner-friendly and help you start contributing to open-source. The best way to do that is to open a Pull Request and link it to the issue that you'd like to work on. We try to give priority to opened PRs as we can easily track the progress of the fix, and if the contributor does not have time anymore, someone else can take the PR over.
|
||||
|
||||
For something slightly more challenging, you can also take a look at the [Good Second Issue](https://github.com/huggingface/trl/labels/Good%20Second%20Issue) list. In general though, if you feel like you know what you're doing, go for it and we'll help you get there! 🚀
|
||||
|
||||
> All contributions are equally valuable to the community. 🥰
|
||||
|
||||
Before you start contributing make sure you have installed all the dev tools:
|
||||
|
||||
```bash
|
||||
pip install -e .[dev]
|
||||
```
|
||||
|
||||
## Fixing outstanding issues
|
||||
|
||||
If you notice an issue with the existing code and have a fix in mind, feel free to [start contributing](#submitting-a-pull-request-pr) and open a Pull Request!
|
||||
|
||||
## Submitting a bug-related issue or feature request
|
||||
|
||||
Do your best to follow these guidelines when submitting a bug-related issue or a feature request. It will make it easier for us to come back to you quickly and with good feedback.
|
||||
|
||||
### Did you find a bug?
|
||||
|
||||
The TRL library is robust and reliable thanks to users who report the problems they encounter.
|
||||
|
||||
Before you report an issue, we would really appreciate it if you could **make sure the bug was not
|
||||
already reported** (use the search bar on GitHub under Issues). Your issue should also be related to bugs in the library itself, and not your code.
|
||||
|
||||
Once you've confirmed the bug hasn't already been reported, please include the following information in your issue so we can quickly resolve it:
|
||||
|
||||
* Your **OS type and version**, **Python**, **PyTorch**, **TRL** and **Transformers** versions.
|
||||
* A short, self-contained, code snippet that allows us to reproduce the bug in
|
||||
less than 30s.
|
||||
* The *full* traceback if an exception is raised.
|
||||
* Attach any other additional information, like screenshots, you think may help.
|
||||
|
||||
To get the OS and software versions automatically, run the following command:
|
||||
|
||||
```bash
|
||||
trl env
|
||||
```
|
||||
|
||||
### Do you want a new feature?
|
||||
|
||||
If there is a new feature you'd like to see in TRL, please open an issue and describe:
|
||||
|
||||
1. What is the *motivation* behind this feature? Is it related to a problem or frustration with the library? Is it a feature related to something you need for a project? Is it something you worked on and think it could benefit the community?
|
||||
|
||||
Whatever it is, we'd love to hear about it!
|
||||
|
||||
2. Describe your requested feature in as much detail as possible. The more you can tell us about it, the better we'll be able to help you.
|
||||
3. Provide a *code snippet* that demonstrates the feature's usage.
|
||||
4. If the feature is related to a paper, please include a link.
|
||||
|
||||
If your issue is well written we're already 80% of the way there by the time you create it.
|
||||
|
||||
## Do you want to implement a new trainer?
|
||||
|
||||
New post-training methods are published frequently and those that satisfy the following criteria are good candidates to be integrated into TRL:
|
||||
|
||||
* **Simplicity:** Does the new method achieve similar performance as prior methods, but with less complexity? A good example is Direct Preference Optimization (DPO) [[Rafailov et al, 2023]](https://huggingface.co/papers/2305.18290), which provided a simpler and compelling alternative to RLHF methods.
|
||||
* **Efficiency:** Does the new method provide a significant improvement in training efficiency? A good example is Odds Ratio Preference Optimization (ORPO) [[Hong et al, 2023]](https://huggingface.co/papers/2403.07691), which utilizes a similar objective as DPO but requires half the GPU VRAM.
|
||||
|
||||
Methods that only provide incremental improvements at the expense of added complexity or compute costs are unlikely to be included in TRL.
|
||||
|
||||
If you want to implement a trainer for a new post-training method, first open an issue and provide the following information:
|
||||
|
||||
* A short description of the method and a link to the paper.
|
||||
* Link to the implementation if it is open-sourced.
|
||||
* Link to model weights trained with the method if they are available.
|
||||
|
||||
Based on the community and maintainer feedback, the next step will be to implement the trainer and config classes. See the following examples for inspiration:
|
||||
|
||||
* Paired preference optimisation: [`dpo_trainer.py`](./trl/trainer/dpo_trainer.py) and [`dpo_config.py`](./trl/trainer/dpo_config.py)
|
||||
* RL-based optimisation: [`rloo_trainer.py](./trl/trainer/rloo_trainer.py) and [`rloo_config.py](./trl/trainer/rloo_config.py)
|
||||
* Online optimisation: [`online_dpo_trainer.py`](./trl/trainer/online_dpo_trainer.py) and [`online_dpo_config.py`](./trl/trainer/online_dpo_config.py)
|
||||
|
||||
## Do you want to add documentation?
|
||||
|
||||
We're always looking for improvements to the documentation that make it more clear and accurate. Please let us know how the documentation can be improved, such as typos, dead links, and any missing, unclear, or inaccurate content... We'll be happy to make the changes or help you contribute if you're interested!
|
||||
|
||||
## Submitting a pull request (PR)
|
||||
|
||||
Before writing code, we strongly advise you to search through the existing PRs or
|
||||
issues to make sure that nobody is already working on the same thing. If you are
|
||||
unsure, it is always a good idea to open an issue to get some feedback.
|
||||
|
||||
You will need basic `git` proficiency to be able to contribute to
|
||||
TRL. `git` is not the easiest tool to use but it has the greatest
|
||||
manual. Type `git --help` in a shell and enjoy. If you prefer books, [Pro
|
||||
Git](https://git-scm.com/book/en/v2) is a very good reference.
|
||||
|
||||
Follow these steps to start contributing:
|
||||
|
||||
1. Fork the [repository](https://github.com/huggingface/trl) by
|
||||
clicking on the 'Fork' button on the repository's page. This creates a copy of the code
|
||||
under your GitHub user account.
|
||||
|
||||
2. Clone your fork to your local disk, and add the base repository as a remote. The following command
|
||||
assumes you have your public SSH key uploaded to GitHub. See the following guide for more
|
||||
[information](https://docs.github.com/en/repositories/creating-and-managing-repositories/cloning-a-repository).
|
||||
|
||||
```bash
|
||||
$ git clone git@github.com:<your Github handle>/trl.git
|
||||
$ cd trl
|
||||
$ git remote add upstream https://github.com/huggingface/trl.git
|
||||
```
|
||||
|
||||
3. Create a new branch to hold your development changes, and do this for every new PR you work on.
|
||||
|
||||
Start by synchronizing your `main` branch with the `upstream/main` branch (more details in the [GitHub Docs](https://docs.github.com/en/github/collaborating-with-issues-and-pull-requests/syncing-a-fork)):
|
||||
|
||||
```bash
|
||||
$ git checkout main
|
||||
$ git fetch upstream
|
||||
$ git merge upstream/main
|
||||
```
|
||||
|
||||
Once your `main` branch is synchronized, create a new branch from it:
|
||||
|
||||
```bash
|
||||
$ git checkout -b a-descriptive-name-for-my-changes
|
||||
```
|
||||
|
||||
**Do not** work on the `main` branch.
|
||||
|
||||
4. Set up a development environment by running the following command in a conda or a virtual environment you've created for working on this library:
|
||||
|
||||
```bash
|
||||
$ pip install -e .[dev]
|
||||
```
|
||||
|
||||
(If TRL was already installed in the virtual environment, remove
|
||||
it with `pip uninstall trl` before reinstalling it.)
|
||||
|
||||
Alternatively, if you are using [Visual Studio Code](https://code.visualstudio.com/Download), the fastest way to get set up is by using
|
||||
the provided Dev Container. Documentation on how to get started with dev containers is available [here](https://code.visualstudio.com/docs/remote/containers).
|
||||
|
||||
5. Develop the features on your branch.
|
||||
|
||||
As you work on the features, you should make sure that the test suite
|
||||
passes. You should run the tests impacted by your changes like this (see
|
||||
below an explanation regarding the environment variable):
|
||||
|
||||
```bash
|
||||
$ pytest tests/<TEST_TO_RUN>.py
|
||||
```
|
||||
|
||||
> For the following commands leveraging the `make` utility, we recommend using the WSL system when running on
|
||||
> Windows. More information [here](https://docs.microsoft.com/en-us/windows/wsl/about).
|
||||
|
||||
You can also run the full suite with the following command.
|
||||
|
||||
```bash
|
||||
$ make test
|
||||
```
|
||||
|
||||
TRL relies on `ruff` for maintaining consistent code formatting across its source files. Before submitting any PR, you should apply automatic style corrections and run code verification checks.
|
||||
|
||||
We provide a `precommit` target in the `Makefile` that simplifies this process by running all required checks and optimizations on only the files modified by your PR.
|
||||
|
||||
To apply these checks and corrections in one step, use:
|
||||
|
||||
```bash
|
||||
$ make precommit
|
||||
```
|
||||
|
||||
This command runs the following:
|
||||
- Executes `pre-commit` hooks to automatically fix style issues with `ruff` and other tools.
|
||||
- Runs additional scripts such as adding copyright information.
|
||||
|
||||
If you prefer to apply the style corrections separately or review them individually, the `pre-commit` hook will handle the formatting for the files in question.
|
||||
|
||||
Once you're happy with your changes, add changed files using `git add` and
|
||||
make a commit with `git commit` to record your changes locally:
|
||||
|
||||
```bash
|
||||
$ git add modified_file.py
|
||||
$ git commit
|
||||
```
|
||||
|
||||
Please write [good commit messages](https://chris.beams.io/posts/git-commit/).
|
||||
|
||||
It is a good idea to sync your copy of the code with the original
|
||||
repository regularly. This way you can quickly account for changes:
|
||||
|
||||
```bash
|
||||
$ git fetch upstream
|
||||
$ git rebase upstream/main
|
||||
```
|
||||
|
||||
Push the changes to your account using:
|
||||
|
||||
```bash
|
||||
$ git push -u origin a-descriptive-name-for-my-changes
|
||||
```
|
||||
|
||||
6. Once you are satisfied (**and the checklist below is happy too**), go to the
|
||||
webpage of your fork on GitHub. Click on 'Pull request' to send your changes
|
||||
to the project maintainers for review.
|
||||
|
||||
7. It's ok if maintainers ask you for changes. It happens to core contributors too! To ensure everyone can review your changes in the pull request, work on your local branch and push the updates to your fork. They will automatically appear in the pull request.
|
||||
|
||||
|
||||
### Checklist
|
||||
|
||||
1. The title of your pull request should be a summary of its contribution;
|
||||
2. If your pull request addresses an issue, please mention the issue number in
|
||||
the pull request description to make sure they are linked (and people
|
||||
consulting the issue know you are working on it);
|
||||
3. To indicate a work in progress please prefix the title with `[WIP]`, or mark
|
||||
the PR as a draft PR. These are useful to avoid duplicated work, and to differentiate
|
||||
it from PRs ready to be merged;
|
||||
4. Make sure existing tests pass;
|
||||
5. Add high-coverage tests. No quality testing = no merge.
|
||||
|
||||
|
||||
### Tests
|
||||
|
||||
An extensive test suite is included to test the library behavior and several examples. Library tests can be found in
|
||||
the [tests folder](https://github.com/huggingface/trl/tree/main/tests).
|
||||
|
||||
We use `pytest` to run the tests. From the root of the
|
||||
repository here's how to run tests with `pytest` for the library:
|
||||
|
||||
```bash
|
||||
$ python -m pytest -sv ./tests
|
||||
```
|
||||
|
||||
That's how `make test` is implemented (without the `pip install` line)!
|
||||
|
||||
You can specify a smaller set of tests to test only the feature
|
||||
you're working on.
|
||||
|
||||
### Default values guidelines
|
||||
|
||||
1. **Use defaults when appropriate**:
|
||||
|
||||
Provide default values unless the parameter's value varies significantly by use case. For example, datasets or models should not have defaults, but parameters like `learning_rate` should.
|
||||
|
||||
2. **Prioritize proven defaults**:
|
||||
|
||||
Default values should align with those recommended in the original paper or method. Alternatives require strong evidence of superior performance in most cases.
|
||||
|
||||
3. **Ensure safety and predictability**:
|
||||
|
||||
Defaults must be safe, expected and reliable. Avoid settings that could lead to surprising outcomes, such as excessive memory usage or poor performance in edge cases.
|
||||
|
||||
4. **Balance consistency and flexibility**:
|
||||
|
||||
Aim for consistent defaults across similar functions or methods. However, consistency should not be preferred to point 2 or 3.
|
||||
|
||||
5. **Opt-in for new features**:
|
||||
|
||||
Do not enable new features or improvements (e.g., novel loss functions) by default. Users should explicitly opt-in to use these.
|
||||
|
||||
### Writing documentation
|
||||
|
||||
High-quality documentation is crucial for maintaining a project that is easy to use, understand, and extend. When adding new features, ensure they are thoroughly documented to maintain consistency and clarity throughout the project.
|
||||
|
||||
To illustrate what good documentation looks like, here’s an example of a well-documented function:
|
||||
|
||||
````python
|
||||
def replicate_str(string: str, n: int, sep: str = " ") -> str:
|
||||
r"""
|
||||
Replicate a string `n` times with a separator.
|
||||
|
||||
Args:
|
||||
string (`str`):
|
||||
String to replicate.
|
||||
n (`int`):
|
||||
Number of times to replicate the string.
|
||||
sep (`str`, *optional*, defaults to `" "`):
|
||||
Separator to use between each replication.
|
||||
|
||||
Returns:
|
||||
`str`: The replicated string.
|
||||
|
||||
Examples:
|
||||
```python
|
||||
>>> replicate_str("hello", 3)
|
||||
"hello hello hello"
|
||||
>>> replicate_str("hello", 3, sep=", ")
|
||||
"hello, hello, hello"
|
||||
```
|
||||
"""
|
||||
return sep.join([string] * n)
|
||||
````
|
||||
|
||||
* **Line Wrapping:** Applied a consistent line wrap at column 120 to improve readability.
|
||||
* **Definite Articles:** Removed definite articles where possible to streamline language. (Eg: Changed "The string to replicate" to "String to replicate")
|
||||
* **Type Annotations:**
|
||||
* Always include type definitions, indicating if a parameter is optional and specifying the default value.
|
||||
* Note that `Optional` means that the value can be `None`, and `*optional*` means that it is not required for the user to pass a value.
|
||||
E.g., for arguments that can't be `None` and aren't required:
|
||||
|
||||
```python
|
||||
foo (`int`, *optional*, defaults to `4`):
|
||||
```
|
||||
|
||||
For arguments that can be `None` and are required:
|
||||
|
||||
```python
|
||||
foo (`Optional[int]`):
|
||||
```
|
||||
|
||||
for arguments that can be `None` and aren't required:
|
||||
|
||||
```python
|
||||
foo (`Optional[int]`, *optional*, defaults to `None`):
|
||||
```
|
||||
|
||||
* **String Defaults:**
|
||||
* Ensured that default string values are wrapped in double quotes:
|
||||
|
||||
```python
|
||||
defaults to `"foo"`
|
||||
```
|
||||
|
||||
* **Dictionary Typing:**
|
||||
* Replaced generic `dict` type hints with more explicit `dict[str, Any]` to clarify expected key-value pairs.
|
||||
* **Default Value Formatting:**
|
||||
* Consistently surrounded default values with backticks for improved formatting:
|
||||
|
||||
```python
|
||||
defaults to `4`
|
||||
```
|
||||
|
||||
* **Sub-sectioning:** When the number of arguments is large, consider breaking them into sub-sections for better readability.
|
||||
|
||||
```python
|
||||
def calculate_statistics(data: list[float], precision: int = 2, include_variance: bool = False) -> dict[str, float]:
|
||||
r"""
|
||||
Calculates basic statistics for a given dataset.
|
||||
|
||||
Args:
|
||||
> Data inputs
|
||||
|
||||
data (`list[float]`):
|
||||
A list of numerical values to analyze.
|
||||
|
||||
> Configuration parameters
|
||||
|
||||
precision (`int`, *optional*, defaults to `2`):
|
||||
Number of decimal places to round the results.
|
||||
include_variance (`bool`, *optional*, defaults to `False`):
|
||||
Whether to include the variance of the dataset in the results.
|
||||
|
||||
Returns:
|
||||
`dict[str, float]`:
|
||||
A dictionary containing calculated statistics such as mean, median, and optionally variance.
|
||||
"""
|
||||
...
|
||||
```
|
||||
|
||||
### Deprecation and backward compatibility
|
||||
|
||||
Our approach to deprecation and backward compatibility is flexible and based on the feature’s usage and impact. Each deprecation is carefully evaluated, aiming to balance innovation with user needs.
|
||||
|
||||
When a feature or component is marked for deprecation, its use will emit a warning message. This warning will include:
|
||||
|
||||
- **Transition Guidance**: Instructions on how to migrate to the alternative solution or replacement.
|
||||
- **Removal Version**: The target version when the feature will be removed, providing users with a clear timeframe to transition.
|
||||
|
||||
Example:
|
||||
|
||||
```python
|
||||
warnings.warn(
|
||||
"The `Trainer.foo` method is deprecated and will be removed in version 0.14.0. "
|
||||
"Please use the `Trainer.bar` class instead.",
|
||||
FutureWarning,
|
||||
)
|
||||
```
|
||||
|
||||
The deprecation and removal schedule is based on each feature's usage and impact, with examples at two extremes:
|
||||
|
||||
- **Experimental or Low-Use Features**: For a feature that is experimental or has limited usage, backward compatibility may not be maintained between releases. Users should therefore anticipate potential breaking changes from one version to the next.
|
||||
|
||||
- **Widely-Used Components**: For a feature with high usage, we aim for a more gradual transition period of approximately **5 months**, generally scheduling deprecation around **5 minor releases** after the initial warning.
|
||||
|
||||
These examples represent the two ends of a continuum. The specific timeline for each feature will be determined individually, balancing innovation with user stability needs.
|
||||
|
||||
### Working with warnings
|
||||
|
||||
Warnings play a critical role in guiding users toward resolving potential issues, but they should be used thoughtfully to avoid unnecessary noise. Unlike logging, which provides informational context or operational details, warnings signal conditions that require attention and action. Overusing warnings can dilute their importance, leading users to ignore them entirely.
|
||||
|
||||
#### Definitions
|
||||
|
||||
- **Correct**: An operation is correct if it is valid, follows the intended approach, and aligns with the current best practices or guidelines within the codebase. This is the recommended or intended way to perform the operation.
|
||||
- **Supported**: An operation is supported if it is technically valid and works within the current codebase, but it may not be the most efficient, optimal, or recommended way to perform the task. This includes deprecated features or legacy approaches that still work but may be phased out in the future.
|
||||
|
||||
#### Choosing the right message
|
||||
|
||||
- **Correct → No warning**:
|
||||
If the operation is fully valid and expected, no message should be issued. The system is working as intended, so no warning is necessary.
|
||||
|
||||
- **Correct but deserves attention → No warning, possibly a log message**:
|
||||
When an operation is correct but uncommon or requires special attention, providing an informational message can be helpful. This keeps users informed without implying any issue. If available, use the logger to output this message. Example:
|
||||
|
||||
```python
|
||||
logger.info("This is an informational message about a rare but correct operation.")
|
||||
```
|
||||
|
||||
- **Correct but very likely a mistake → Warning with option to disable**:
|
||||
In rare cases, you may want to issue a warning for a correct operation that’s very likely a mistake. In such cases, you must provide an option to suppress the warning. This can be done with a flag in the function. Example:
|
||||
|
||||
```python
|
||||
def my_function(foo, bar, _warn=True):
|
||||
if foo == bar:
|
||||
if _warn:
|
||||
warnings.warn("foo and bar are the same, this is likely a mistake. Ignore this warning by setting `_warn=False`.")
|
||||
# Do something
|
||||
```
|
||||
|
||||
- **Supported but not correct → Warning**:
|
||||
If the operation is technically supported but is deprecated, suboptimal, or could cause future issues (e.g., conflicting arguments), a warning should be raised. This message should be actionable, meaning it must explain how to resolve the issue. Example:
|
||||
|
||||
```python
|
||||
def my_function(foo, bar):
|
||||
if foo and bar:
|
||||
warnings.warn("Both `foo` and `bar` were provided, but only one is allowed. Ignoring `foo`. Please pass only one of these arguments.")
|
||||
# Do something
|
||||
```
|
||||
|
||||
- **Not supported → Exception**:
|
||||
If the operation is invalid or unsupported, raise an exception. This indicates that the operation cannot be performed and requires immediate attention. Example:
|
||||
|
||||
```python
|
||||
def my_function(foo, bar):
|
||||
if foo and bar:
|
||||
raise ValueError("Both `foo` and `bar` were provided, but only one is allowed. Please pass only one of these arguments.")
|
||||
```
|
||||
|
||||
By following this classification, you ensure that warnings, information, and exceptions are used appropriately, providing clear guidance to the user without cluttering the system with unnecessary messages.
|
||||
201
examples/research/open_r1/trl/LICENSE
Normal file
201
examples/research/open_r1/trl/LICENSE
Normal file
@ -0,0 +1,201 @@
|
||||
Apache License
|
||||
Version 2.0, January 2004
|
||||
http://www.apache.org/licenses/
|
||||
|
||||
TERMS AND CONDITIONS FOR USE, REPRODUCTION, AND DISTRIBUTION
|
||||
|
||||
1. Definitions.
|
||||
|
||||
"License" shall mean the terms and conditions for use, reproduction,
|
||||
and distribution as defined by Sections 1 through 9 of this document.
|
||||
|
||||
"Licensor" shall mean the copyright owner or entity authorized by
|
||||
the copyright owner that is granting the License.
|
||||
|
||||
"Legal Entity" shall mean the union of the acting entity and all
|
||||
other entities that control, are controlled by, or are under common
|
||||
control with that entity. For the purposes of this definition,
|
||||
"control" means (i) the power, direct or indirect, to cause the
|
||||
direction or management of such entity, whether by contract or
|
||||
otherwise, or (ii) ownership of fifty percent (50%) or more of the
|
||||
outstanding shares, or (iii) beneficial ownership of such entity.
|
||||
|
||||
"You" (or "Your") shall mean an individual or Legal Entity
|
||||
exercising permissions granted by this License.
|
||||
|
||||
"Source" form shall mean the preferred form for making modifications,
|
||||
including but not limited to software source code, documentation
|
||||
source, and configuration files.
|
||||
|
||||
"Object" form shall mean any form resulting from mechanical
|
||||
transformation or translation of a Source form, including but
|
||||
not limited to compiled object code, generated documentation,
|
||||
and conversions to other media types.
|
||||
|
||||
"Work" shall mean the work of authorship, whether in Source or
|
||||
Object form, made available under the License, as indicated by a
|
||||
copyright notice that is included in or attached to the work
|
||||
(an example is provided in the Appendix below).
|
||||
|
||||
"Derivative Works" shall mean any work, whether in Source or Object
|
||||
form, that is based on (or derived from) the Work and for which the
|
||||
editorial revisions, annotations, elaborations, or other modifications
|
||||
represent, as a whole, an original work of authorship. For the purposes
|
||||
of this License, Derivative Works shall not include works that remain
|
||||
separable from, or merely link (or bind by name) to the interfaces of,
|
||||
the Work and Derivative Works thereof.
|
||||
|
||||
"Contribution" shall mean any work of authorship, including
|
||||
the original version of the Work and any modifications or additions
|
||||
to that Work or Derivative Works thereof, that is intentionally
|
||||
submitted to Licensor for inclusion in the Work by the copyright owner
|
||||
or by an individual or Legal Entity authorized to submit on behalf of
|
||||
the copyright owner. For the purposes of this definition, "submitted"
|
||||
means any form of electronic, verbal, or written communication sent
|
||||
to the Licensor or its representatives, including but not limited to
|
||||
communication on electronic mailing lists, source code control systems,
|
||||
and issue tracking systems that are managed by, or on behalf of, the
|
||||
Licensor for the purpose of discussing and improving the Work, but
|
||||
excluding communication that is conspicuously marked or otherwise
|
||||
designated in writing by the copyright owner as "Not a Contribution."
|
||||
|
||||
"Contributor" shall mean Licensor and any individual or Legal Entity
|
||||
on behalf of whom a Contribution has been received by Licensor and
|
||||
subsequently incorporated within the Work.
|
||||
|
||||
2. Grant of Copyright License. Subject to the terms and conditions of
|
||||
this License, each Contributor hereby grants to You a perpetual,
|
||||
worldwide, non-exclusive, no-charge, royalty-free, irrevocable
|
||||
copyright license to reproduce, prepare Derivative Works of,
|
||||
publicly display, publicly perform, sublicense, and distribute the
|
||||
Work and such Derivative Works in Source or Object form.
|
||||
|
||||
3. Grant of Patent License. Subject to the terms and conditions of
|
||||
this License, each Contributor hereby grants to You a perpetual,
|
||||
worldwide, non-exclusive, no-charge, royalty-free, irrevocable
|
||||
(except as stated in this section) patent license to make, have made,
|
||||
use, offer to sell, sell, import, and otherwise transfer the Work,
|
||||
where such license applies only to those patent claims licensable
|
||||
by such Contributor that are necessarily infringed by their
|
||||
Contribution(s) alone or by combination of their Contribution(s)
|
||||
with the Work to which such Contribution(s) was submitted. If You
|
||||
institute patent litigation against any entity (including a
|
||||
cross-claim or counterclaim in a lawsuit) alleging that the Work
|
||||
or a Contribution incorporated within the Work constitutes direct
|
||||
or contributory patent infringement, then any patent licenses
|
||||
granted to You under this License for that Work shall terminate
|
||||
as of the date such litigation is filed.
|
||||
|
||||
4. Redistribution. You may reproduce and distribute copies of the
|
||||
Work or Derivative Works thereof in any medium, with or without
|
||||
modifications, and in Source or Object form, provided that You
|
||||
meet the following conditions:
|
||||
|
||||
(a) You must give any other recipients of the Work or
|
||||
Derivative Works a copy of this License; and
|
||||
|
||||
(b) You must cause any modified files to carry prominent notices
|
||||
stating that You changed the files; and
|
||||
|
||||
(c) You must retain, in the Source form of any Derivative Works
|
||||
that You distribute, all copyright, patent, trademark, and
|
||||
attribution notices from the Source form of the Work,
|
||||
excluding those notices that do not pertain to any part of
|
||||
the Derivative Works; and
|
||||
|
||||
(d) If the Work includes a "NOTICE" text file as part of its
|
||||
distribution, then any Derivative Works that You distribute must
|
||||
include a readable copy of the attribution notices contained
|
||||
within such NOTICE file, excluding those notices that do not
|
||||
pertain to any part of the Derivative Works, in at least one
|
||||
of the following places: within a NOTICE text file distributed
|
||||
as part of the Derivative Works; within the Source form or
|
||||
documentation, if provided along with the Derivative Works; or,
|
||||
within a display generated by the Derivative Works, if and
|
||||
wherever such third-party notices normally appear. The contents
|
||||
of the NOTICE file are for informational purposes only and
|
||||
do not modify the License. You may add Your own attribution
|
||||
notices within Derivative Works that You distribute, alongside
|
||||
or as an addendum to the NOTICE text from the Work, provided
|
||||
that such additional attribution notices cannot be construed
|
||||
as modifying the License.
|
||||
|
||||
You may add Your own copyright statement to Your modifications and
|
||||
may provide additional or different license terms and conditions
|
||||
for use, reproduction, or distribution of Your modifications, or
|
||||
for any such Derivative Works as a whole, provided Your use,
|
||||
reproduction, and distribution of the Work otherwise complies with
|
||||
the conditions stated in this License.
|
||||
|
||||
5. Submission of Contributions. Unless You explicitly state otherwise,
|
||||
any Contribution intentionally submitted for inclusion in the Work
|
||||
by You to the Licensor shall be under the terms and conditions of
|
||||
this License, without any additional terms or conditions.
|
||||
Notwithstanding the above, nothing herein shall supersede or modify
|
||||
the terms of any separate license agreement you may have executed
|
||||
with Licensor regarding such Contributions.
|
||||
|
||||
6. Trademarks. This License does not grant permission to use the trade
|
||||
names, trademarks, service marks, or product names of the Licensor,
|
||||
except as required for reasonable and customary use in describing the
|
||||
origin of the Work and reproducing the content of the NOTICE file.
|
||||
|
||||
7. Disclaimer of Warranty. Unless required by applicable law or
|
||||
agreed to in writing, Licensor provides the Work (and each
|
||||
Contributor provides its Contributions) on an "AS IS" BASIS,
|
||||
WITHOUT WARRANTIES OR CONDITIONS OF ANY KIND, either express or
|
||||
implied, including, without limitation, any warranties or conditions
|
||||
of TITLE, NON-INFRINGEMENT, MERCHANTABILITY, or FITNESS FOR A
|
||||
PARTICULAR PURPOSE. You are solely responsible for determining the
|
||||
appropriateness of using or redistributing the Work and assume any
|
||||
risks associated with Your exercise of permissions under this License.
|
||||
|
||||
8. Limitation of Liability. In no event and under no legal theory,
|
||||
whether in tort (including negligence), contract, or otherwise,
|
||||
unless required by applicable law (such as deliberate and grossly
|
||||
negligent acts) or agreed to in writing, shall any Contributor be
|
||||
liable to You for damages, including any direct, indirect, special,
|
||||
incidental, or consequential damages of any character arising as a
|
||||
result of this License or out of the use or inability to use the
|
||||
Work (including but not limited to damages for loss of goodwill,
|
||||
work stoppage, computer failure or malfunction, or any and all
|
||||
other commercial damages or losses), even if such Contributor
|
||||
has been advised of the possibility of such damages.
|
||||
|
||||
9. Accepting Warranty or Additional Liability. While redistributing
|
||||
the Work or Derivative Works thereof, You may choose to offer,
|
||||
and charge a fee for, acceptance of support, warranty, indemnity,
|
||||
or other liability obligations and/or rights consistent with this
|
||||
License. However, in accepting such obligations, You may act only
|
||||
on Your own behalf and on Your sole responsibility, not on behalf
|
||||
of any other Contributor, and only if You agree to indemnify,
|
||||
defend, and hold each Contributor harmless for any liability
|
||||
incurred by, or claims asserted against, such Contributor by reason
|
||||
of your accepting any such warranty or additional liability.
|
||||
|
||||
END OF TERMS AND CONDITIONS
|
||||
|
||||
APPENDIX: How to apply the Apache License to your work.
|
||||
|
||||
To apply the Apache License to your work, attach the following
|
||||
boilerplate notice, with the fields enclosed by brackets "[]"
|
||||
replaced with your own identifying information. (Don't include
|
||||
the brackets!) The text should be enclosed in the appropriate
|
||||
comment syntax for the file format. We also recommend that a
|
||||
file or class name and description of purpose be included on the
|
||||
same "printed page" as the copyright notice for easier
|
||||
identification within third-party archives.
|
||||
|
||||
Copyright [yyyy] [name of copyright owner]
|
||||
|
||||
Licensed under the Apache License, Version 2.0 (the "License");
|
||||
you may not use this file except in compliance with the License.
|
||||
You may obtain a copy of the License at
|
||||
|
||||
http://www.apache.org/licenses/LICENSE-2.0
|
||||
|
||||
Unless required by applicable law or agreed to in writing, software
|
||||
distributed under the License is distributed on an "AS IS" BASIS,
|
||||
WITHOUT WARRANTIES OR CONDITIONS OF ANY KIND, either express or implied.
|
||||
See the License for the specific language governing permissions and
|
||||
limitations under the License.
|
||||
6
examples/research/open_r1/trl/MANIFEST.in
Normal file
6
examples/research/open_r1/trl/MANIFEST.in
Normal file
@ -0,0 +1,6 @@
|
||||
include settings.ini
|
||||
include LICENSE
|
||||
include CONTRIBUTING.md
|
||||
include README.md
|
||||
recursive-exclude * __pycache__
|
||||
include trl/templates/*.md
|
||||
32
examples/research/open_r1/trl/Makefile
Normal file
32
examples/research/open_r1/trl/Makefile
Normal file
@ -0,0 +1,32 @@
|
||||
.PHONY: test precommit common_tests slow_tests test_examples tests_gpu
|
||||
|
||||
check_dirs := examples tests trl
|
||||
|
||||
ACCELERATE_CONFIG_PATH = `pwd`/examples/accelerate_configs
|
||||
COMMAND_FILES_PATH = `pwd`/commands
|
||||
|
||||
test:
|
||||
python -m pytest -n auto --dist=loadfile -s -v --reruns 5 --reruns-delay 1 --only-rerun '(OSError|Timeout|HTTPError.*502|HTTPError.*504||not less than or equal to 0.01)' ./tests/
|
||||
|
||||
precommit:
|
||||
pre-commit run --all-files
|
||||
python scripts/add_copyrights.py
|
||||
|
||||
tests_gpu:
|
||||
python -m pytest tests/test_* $(if $(IS_GITHUB_CI),--report-log "common_tests.log",)
|
||||
|
||||
slow_tests:
|
||||
python -m pytest tests/slow/test_* $(if $(IS_GITHUB_CI),--report-log "slow_tests.log",)
|
||||
|
||||
test_examples:
|
||||
touch temp_results_sft_tests.txt
|
||||
for file in $(ACCELERATE_CONFIG_PATH)/*.yaml; do \
|
||||
TRL_ACCELERATE_CONFIG=$${file} bash $(COMMAND_FILES_PATH)/run_sft.sh; \
|
||||
echo $$?','$${file} >> temp_results_sft_tests.txt; \
|
||||
done
|
||||
|
||||
touch temp_results_dpo_tests.txt
|
||||
for file in $(ACCELERATE_CONFIG_PATH)/*.yaml; do \
|
||||
TRL_ACCELERATE_CONFIG=$${file} bash $(COMMAND_FILES_PATH)/run_dpo.sh; \
|
||||
echo $$?','$${file} >> temp_results_dpo_tests.txt; \
|
||||
done
|
||||
206
examples/research/open_r1/trl/README.md
Normal file
206
examples/research/open_r1/trl/README.md
Normal file
@ -0,0 +1,206 @@
|
||||
# TRL - Transformer Reinforcement Learning
|
||||
|
||||
<div style="text-align: center">
|
||||
<img src="https://huggingface.co/datasets/trl-lib/documentation-images/resolve/main/trl_banner_dark.png" alt="TRL Banner">
|
||||
</div>
|
||||
|
||||
<hr> <br>
|
||||
|
||||
<h3 align="center">
|
||||
<p>A comprehensive library to post-train foundation models</p>
|
||||
</h3>
|
||||
|
||||
<p align="center">
|
||||
<a href="https://github.com/huggingface/trl/blob/main/LICENSE"><img alt="License" src="https://img.shields.io/github/license/huggingface/trl.svg?color=blue"></a>
|
||||
<a href="https://huggingface.co/docs/trl/index"><img alt="Documentation" src="https://img.shields.io/website/http/huggingface.co/docs/trl/index.svg?down_color=red&down_message=offline&up_color=blue&up_message=online"></a>
|
||||
<a href="https://github.com/huggingface/trl/releases"><img alt="GitHub release" src="https://img.shields.io/github/release/huggingface/trl.svg"></a>
|
||||
</p>
|
||||
|
||||
## Overview
|
||||
|
||||
TRL is a cutting-edge library designed for post-training foundation models using advanced techniques like Supervised Fine-Tuning (SFT), Proximal Policy Optimization (PPO), and Direct Preference Optimization (DPO). Built on top of the [🤗 Transformers](https://github.com/huggingface/transformers) ecosystem, TRL supports a variety of model architectures and modalities, and can be scaled-up across various hardware setups.
|
||||
|
||||
## Highlights
|
||||
|
||||
- **Efficient and scalable**:
|
||||
- Leverages [🤗 Accelerate](https://github.com/huggingface/accelerate) to scale from single GPU to multi-node clusters using methods like DDP and DeepSpeed.
|
||||
- Full integration with [`PEFT`](https://github.com/huggingface/peft) enables training on large models with modest hardware via quantization and LoRA/QLoRA.
|
||||
- Integrates [Unsloth](https://github.com/unslothai/unsloth) for accelerating training using optimized kernels.
|
||||
|
||||
- **Command Line Interface (CLI)**: A simple interface lets you fine-tune and interact with models without needing to write code.
|
||||
|
||||
- **Trainers**: Various fine-tuning methods are easily accessible via trainers like [`SFTTrainer`](https://huggingface.co/docs/trl/sft_trainer), [`DPOTrainer`](https://huggingface.co/docs/trl/dpo_trainer), [`RewardTrainer`](https://huggingface.co/docs/trl/reward_trainer), [`ORPOTrainer`](https://huggingface.co/docs/trl/orpo_trainer) and more.
|
||||
|
||||
- **AutoModels**: Use pre-defined model classes like [`AutoModelForCausalLMWithValueHead`](https://huggingface.co/docs/trl/models#trl.AutoModelForCausalLMWithValueHead) to simplify reinforcement learning (RL) with LLMs.
|
||||
|
||||
## Installation
|
||||
|
||||
### Python Package
|
||||
|
||||
Install the library using `pip`:
|
||||
|
||||
```bash
|
||||
pip install trl
|
||||
```
|
||||
|
||||
### From source
|
||||
|
||||
If you want to use the latest features before an official release, you can install TRL from source:
|
||||
|
||||
```bash
|
||||
pip install git+https://github.com/huggingface/trl.git
|
||||
```
|
||||
|
||||
### Repository
|
||||
|
||||
If you want to use the examples you can clone the repository with the following command:
|
||||
|
||||
```bash
|
||||
git clone https://github.com/huggingface/trl.git
|
||||
```
|
||||
|
||||
## Command Line Interface (CLI)
|
||||
|
||||
You can use the TRL Command Line Interface (CLI) to quickly get started with Supervised Fine-tuning (SFT) and Direct Preference Optimization (DPO), or vibe check your model with the chat CLI:
|
||||
|
||||
**SFT:**
|
||||
|
||||
```bash
|
||||
trl sft --model_name_or_path Qwen/Qwen2.5-0.5B \
|
||||
--dataset_name trl-lib/Capybara \
|
||||
--output_dir Qwen2.5-0.5B-SFT
|
||||
```
|
||||
|
||||
**DPO:**
|
||||
|
||||
```bash
|
||||
trl dpo --model_name_or_path Qwen/Qwen2.5-0.5B-Instruct \
|
||||
--dataset_name argilla/Capybara-Preferences \
|
||||
--output_dir Qwen2.5-0.5B-DPO
|
||||
```
|
||||
|
||||
**Chat:**
|
||||
|
||||
```bash
|
||||
trl chat --model_name_or_path Qwen/Qwen2.5-0.5B-Instruct
|
||||
```
|
||||
|
||||
Read more about CLI in the [relevant documentation section](https://huggingface.co/docs/trl/main/en/clis) or use `--help` for more details.
|
||||
|
||||
## How to use
|
||||
|
||||
For more flexibility and control over training, TRL provides dedicated trainer classes to post-train language models or PEFT adapters on a custom dataset. Each trainer in TRL is a light wrapper around the 🤗 Transformers trainer and natively supports distributed training methods like DDP, DeepSpeed ZeRO, and FSDP.
|
||||
|
||||
### `SFTTrainer`
|
||||
|
||||
Here is a basic example of how to use the `SFTTrainer`:
|
||||
|
||||
```python
|
||||
from trl import SFTConfig, SFTTrainer
|
||||
from datasets import load_dataset
|
||||
|
||||
dataset = load_dataset("trl-lib/Capybara", split="train")
|
||||
|
||||
training_args = SFTConfig(output_dir="Qwen/Qwen2.5-0.5B-SFT")
|
||||
trainer = SFTTrainer(
|
||||
args=training_args,
|
||||
model="Qwen/Qwen2.5-0.5B",
|
||||
train_dataset=dataset,
|
||||
)
|
||||
trainer.train()
|
||||
```
|
||||
|
||||
### `RewardTrainer`
|
||||
|
||||
Here is a basic example of how to use the `RewardTrainer`:
|
||||
|
||||
```python
|
||||
from trl import RewardConfig, RewardTrainer
|
||||
from datasets import load_dataset
|
||||
from transformers import AutoModelForSequenceClassification, AutoTokenizer
|
||||
|
||||
tokenizer = AutoTokenizer.from_pretrained("Qwen/Qwen2.5-0.5B-Instruct")
|
||||
model = AutoModelForSequenceClassification.from_pretrained(
|
||||
"Qwen/Qwen2.5-0.5B-Instruct", num_labels=1
|
||||
)
|
||||
model.config.pad_token_id = tokenizer.pad_token_id
|
||||
|
||||
dataset = load_dataset("trl-lib/ultrafeedback_binarized", split="train")
|
||||
|
||||
training_args = RewardConfig(output_dir="Qwen2.5-0.5B-Reward", per_device_train_batch_size=2)
|
||||
trainer = RewardTrainer(
|
||||
args=training_args,
|
||||
model=model,
|
||||
processing_class=tokenizer,
|
||||
train_dataset=dataset,
|
||||
)
|
||||
trainer.train()
|
||||
```
|
||||
|
||||
### `GRPOTrainer`
|
||||
|
||||
`GRPOTrainer` implements the [Group Relative Policy Optimization (GRPO) algorithm](https://huggingface.co/papers/2402.03300) that is more memory-efficient than PPO and was used to train [Deepseek AI's R1](https://huggingface.co/deepseek-ai/DeepSeek-R1).
|
||||
|
||||
```python
|
||||
from datasets import load_dataset
|
||||
from trl import GRPOConfig, GRPOTrainer
|
||||
|
||||
dataset = load_dataset("trl-lib/tldr", split="train")
|
||||
|
||||
# Dummy reward function: rewards completions that are close to 20 characters
|
||||
def reward_len(completions, **kwargs):
|
||||
return [-abs(20 - len(completion)) for completion in completions]
|
||||
|
||||
training_args = GRPOConfig(output_dir="Qwen2-0.5B-GRPO", logging_steps=10)
|
||||
trainer = GRPOTrainer(
|
||||
model="Qwen/Qwen2-0.5B-Instruct",
|
||||
reward_funcs=reward_len,
|
||||
args=training_args,
|
||||
train_dataset=dataset,
|
||||
)
|
||||
trainer.train()
|
||||
```
|
||||
|
||||
### `DPOTrainer`
|
||||
|
||||
`DPOTrainer` implements the popular [Direct Preference Optimization (DPO) algorithm](https://huggingface.co/papers/2305.18290) that was used to post-train Llama 3 and many other models. Here is a basic example of how to use the `DPOTrainer`:
|
||||
|
||||
```python
|
||||
from datasets import load_dataset
|
||||
from transformers import AutoModelForCausalLM, AutoTokenizer
|
||||
from trl import DPOConfig, DPOTrainer
|
||||
|
||||
model = AutoModelForCausalLM.from_pretrained("Qwen/Qwen2.5-0.5B-Instruct")
|
||||
tokenizer = AutoTokenizer.from_pretrained("Qwen/Qwen2.5-0.5B-Instruct")
|
||||
dataset = load_dataset("trl-lib/ultrafeedback_binarized", split="train")
|
||||
training_args = DPOConfig(output_dir="Qwen2.5-0.5B-DPO")
|
||||
trainer = DPOTrainer(model=model, args=training_args, train_dataset=dataset, processing_class=tokenizer)
|
||||
trainer.train()
|
||||
```
|
||||
|
||||
## Development
|
||||
|
||||
If you want to contribute to `trl` or customize it to your needs make sure to read the [contribution guide](https://github.com/huggingface/trl/blob/main/CONTRIBUTING.md) and make sure you make a dev install:
|
||||
|
||||
```bash
|
||||
git clone https://github.com/huggingface/trl.git
|
||||
cd trl/
|
||||
pip install -e .[dev]
|
||||
```
|
||||
|
||||
## Citation
|
||||
|
||||
```bibtex
|
||||
@misc{vonwerra2022trl,
|
||||
author = {Leandro von Werra and Younes Belkada and Lewis Tunstall and Edward Beeching and Tristan Thrush and Nathan Lambert and Shengyi Huang and Kashif Rasul and Quentin Gallouédec},
|
||||
title = {TRL: Transformer Reinforcement Learning},
|
||||
year = {2020},
|
||||
publisher = {GitHub},
|
||||
journal = {GitHub repository},
|
||||
howpublished = {\url{https://github.com/huggingface/trl}}
|
||||
}
|
||||
```
|
||||
|
||||
## License
|
||||
|
||||
This repository's source code is available under the [Apache-2.0 License](LICENSE).
|
||||
58
examples/research/open_r1/trl/commands/run_dpo.sh
Normal file
58
examples/research/open_r1/trl/commands/run_dpo.sh
Normal file
@ -0,0 +1,58 @@
|
||||
#!/bin/bash
|
||||
# This script runs an SFT example end-to-end on a tiny model using different possible configurations
|
||||
# but defaults to QLoRA + PEFT
|
||||
OUTPUT_DIR="test_dpo/"
|
||||
MODEL_NAME="trl-internal-testing/tiny-Qwen2ForCausalLM-2.5"
|
||||
DATASET_NAME="trl-internal-testing/hh-rlhf-helpful-base-trl-style"
|
||||
MAX_STEPS=5
|
||||
BATCH_SIZE=2
|
||||
SEQ_LEN=128
|
||||
|
||||
# Handle extra arguments in case one passes accelerate configs.
|
||||
EXTRA_ACCELERATE_ARGS=""
|
||||
EXTRA_TRAINING_ARGS="""--use_peft \
|
||||
--load_in_4bit
|
||||
"""
|
||||
|
||||
# This is a hack to get the number of available GPUs
|
||||
NUM_GPUS=2
|
||||
|
||||
if [[ "${TRL_ACCELERATE_CONFIG}" == "" ]]; then
|
||||
EXTRA_ACCELERATE_ARGS=""
|
||||
else
|
||||
EXTRA_ACCELERATE_ARGS="--config_file $TRL_ACCELERATE_CONFIG"
|
||||
# For DeepSpeed configs we need to set the `--fp16` flag to comply with our configs exposed
|
||||
# on `examples/accelerate_configs` and our runners do not support bf16 mixed precision training.
|
||||
if [[ $TRL_ACCELERATE_CONFIG == *"deepspeed"* ]]; then
|
||||
EXTRA_TRAINING_ARGS="--fp16"
|
||||
else
|
||||
echo "Keeping QLoRA + PEFT"
|
||||
fi
|
||||
fi
|
||||
|
||||
|
||||
CMD="""
|
||||
accelerate launch $EXTRA_ACCELERATE_ARGS \
|
||||
--num_processes $NUM_GPUS \
|
||||
--mixed_precision 'fp16' \
|
||||
`pwd`/trl/scripts/dpo.py \
|
||||
--model_name_or_path $MODEL_NAME \
|
||||
--dataset_name $DATASET_NAME \
|
||||
--output_dir $OUTPUT_DIR \
|
||||
--max_steps $MAX_STEPS \
|
||||
--per_device_train_batch_size $BATCH_SIZE \
|
||||
--max_length $SEQ_LEN \
|
||||
$EXTRA_TRAINING_ARGS
|
||||
"""
|
||||
|
||||
echo "Starting program..."
|
||||
|
||||
{ # try
|
||||
echo $CMD
|
||||
eval "$CMD"
|
||||
} || { # catch
|
||||
# save log for exception
|
||||
echo "Operation Failed!"
|
||||
exit 1
|
||||
}
|
||||
exit 0
|
||||
59
examples/research/open_r1/trl/commands/run_sft.sh
Normal file
59
examples/research/open_r1/trl/commands/run_sft.sh
Normal file
@ -0,0 +1,59 @@
|
||||
#!/bin/bash
|
||||
# This script runs an SFT example end-to-end on a tiny model using different possible configurations
|
||||
# but defaults to QLoRA + PEFT
|
||||
OUTPUT_DIR="test_sft/"
|
||||
MODEL_NAME="trl-internal-testing/tiny-Qwen2ForCausalLM-2.5"
|
||||
DATASET_NAME="stanfordnlp/imdb"
|
||||
MAX_STEPS=5
|
||||
BATCH_SIZE=2
|
||||
SEQ_LEN=128
|
||||
|
||||
|
||||
# Handle extra arguments in case one passes accelerate configs.
|
||||
EXTRA_ACCELERATE_ARGS=""
|
||||
EXTRA_TRAINING_ARGS="""--use_peft \
|
||||
--load_in_4bit
|
||||
"""
|
||||
|
||||
# Set your number of GPUs here
|
||||
NUM_GPUS=2
|
||||
|
||||
if [[ "${TRL_ACCELERATE_CONFIG}" == "" ]]; then
|
||||
EXTRA_ACCELERATE_ARGS=""
|
||||
else
|
||||
EXTRA_ACCELERATE_ARGS="--config_file $TRL_ACCELERATE_CONFIG"
|
||||
# For DeepSpeed configs we need to set the `--fp16` flag to comply with our configs exposed
|
||||
# on `examples/accelerate_configs` and our runners do not support bf16 mixed precision training.
|
||||
if [[ $TRL_ACCELERATE_CONFIG == *"deepspeed"* ]]; then
|
||||
EXTRA_TRAINING_ARGS="--fp16"
|
||||
else
|
||||
echo "Keeping QLoRA + PEFT"
|
||||
fi
|
||||
fi
|
||||
|
||||
|
||||
CMD="""
|
||||
accelerate launch $EXTRA_ACCELERATE_ARGS \
|
||||
--num_processes $NUM_GPUS \
|
||||
--mixed_precision 'fp16' \
|
||||
`pwd`/trl/scripts/sft.py \
|
||||
--model_name $MODEL_NAME \
|
||||
--dataset_name $DATASET_NAME \
|
||||
--output_dir $OUTPUT_DIR \
|
||||
--max_steps $MAX_STEPS \
|
||||
--per_device_train_batch_size $BATCH_SIZE \
|
||||
--max_length $SEQ_LEN \
|
||||
$EXTRA_TRAINING_ARGS
|
||||
"""
|
||||
|
||||
echo "Starting program..."
|
||||
|
||||
{ # try
|
||||
echo $CMD
|
||||
eval "$CMD"
|
||||
} || { # catch
|
||||
# save log for exception
|
||||
echo "Operation Failed!"
|
||||
exit 1
|
||||
}
|
||||
exit 0
|
||||
@ -0,0 +1,66 @@
|
||||
# Builds GPU docker image of PyTorch
|
||||
# Uses multi-staged approach to reduce size
|
||||
# Stage 1
|
||||
# Use base conda image to reduce time
|
||||
FROM continuumio/miniconda3:latest AS compile-image
|
||||
# Specify py version
|
||||
ENV PYTHON_VERSION=3.10
|
||||
# Install apt libs - copied from https://github.com/huggingface/accelerate/blob/main/docker/accelerate-gpu/Dockerfile
|
||||
RUN apt-get update && \
|
||||
apt-get install -y curl git wget software-properties-common git-lfs && \
|
||||
apt-get clean && \
|
||||
rm -rf /var/lib/apt/lists*
|
||||
|
||||
# Install audio-related libraries
|
||||
RUN apt-get update && \
|
||||
apt install -y ffmpeg
|
||||
|
||||
RUN apt install -y libsndfile1-dev
|
||||
RUN git lfs install
|
||||
|
||||
# Create our conda env - copied from https://github.com/huggingface/accelerate/blob/main/docker/accelerate-gpu/Dockerfile
|
||||
RUN conda create --name trl python=${PYTHON_VERSION} ipython jupyter pip
|
||||
RUN python3 -m pip install --no-cache-dir --upgrade pip
|
||||
|
||||
# Below is copied from https://github.com/huggingface/accelerate/blob/main/docker/accelerate-gpu/Dockerfile
|
||||
# We don't install pytorch here yet since CUDA isn't available
|
||||
# instead we use the direct torch wheel
|
||||
ENV PATH /opt/conda/envs/trl/bin:$PATH
|
||||
# Activate our bash shell
|
||||
RUN chsh -s /bin/bash
|
||||
SHELL ["/bin/bash", "-c"]
|
||||
|
||||
# Stage 2
|
||||
FROM nvidia/cuda:12.2.2-devel-ubuntu22.04 AS build-image
|
||||
COPY --from=compile-image /opt/conda /opt/conda
|
||||
ENV PATH /opt/conda/bin:$PATH
|
||||
|
||||
RUN chsh -s /bin/bash
|
||||
SHELL ["/bin/bash", "-c"]
|
||||
RUN source activate trl && \
|
||||
python3 -m pip install --no-cache-dir bitsandbytes optimum auto-gptq
|
||||
|
||||
# Install apt libs
|
||||
RUN apt-get update && \
|
||||
apt-get install -y curl git wget && \
|
||||
apt-get clean && \
|
||||
rm -rf /var/lib/apt/lists*
|
||||
|
||||
# Activate the conda env and install transformers + accelerate from source
|
||||
RUN source activate trl && \
|
||||
python3 -m pip install -U --no-cache-dir \
|
||||
librosa \
|
||||
"soundfile>=0.12.1" \
|
||||
scipy \
|
||||
transformers \
|
||||
accelerate \
|
||||
peft \
|
||||
trl[test]@git+https://github.com/huggingface/trl
|
||||
|
||||
RUN source activate trl && \
|
||||
pip freeze | grep trl
|
||||
|
||||
RUN echo "source activate trl" >> ~/.profile
|
||||
|
||||
# Activate the virtualenv
|
||||
CMD ["/bin/bash"]
|
||||
@ -0,0 +1,66 @@
|
||||
# Builds GPU docker image of PyTorch
|
||||
# Uses multi-staged approach to reduce size
|
||||
# Stage 1
|
||||
# Use base conda image to reduce time
|
||||
FROM continuumio/miniconda3:latest AS compile-image
|
||||
# Specify py version
|
||||
ENV PYTHON_VERSION=3.10
|
||||
# Install apt libs - copied from https://github.com/huggingface/accelerate/blob/main/docker/accelerate-gpu/Dockerfile
|
||||
RUN apt-get update && \
|
||||
apt-get install -y curl git wget software-properties-common git-lfs && \
|
||||
apt-get clean && \
|
||||
rm -rf /var/lib/apt/lists*
|
||||
|
||||
# Install audio-related libraries
|
||||
RUN apt-get update && \
|
||||
apt install -y ffmpeg
|
||||
|
||||
RUN apt install -y libsndfile1-dev
|
||||
RUN git lfs install
|
||||
|
||||
# Create our conda env - copied from https://github.com/huggingface/accelerate/blob/main/docker/accelerate-gpu/Dockerfile
|
||||
RUN conda create --name trl python=${PYTHON_VERSION} ipython jupyter pip
|
||||
RUN python3 -m pip install --no-cache-dir --upgrade pip
|
||||
|
||||
# Below is copied from https://github.com/huggingface/accelerate/blob/main/docker/accelerate-gpu/Dockerfile
|
||||
# We don't install pytorch here yet since CUDA isn't available
|
||||
# instead we use the direct torch wheel
|
||||
ENV PATH /opt/conda/envs/trl/bin:$PATH
|
||||
# Activate our bash shell
|
||||
RUN chsh -s /bin/bash
|
||||
SHELL ["/bin/bash", "-c"]
|
||||
|
||||
# Stage 2
|
||||
FROM nvidia/cuda:12.2.2-devel-ubuntu22.04 AS build-image
|
||||
COPY --from=compile-image /opt/conda /opt/conda
|
||||
ENV PATH /opt/conda/bin:$PATH
|
||||
|
||||
RUN chsh -s /bin/bash
|
||||
SHELL ["/bin/bash", "-c"]
|
||||
RUN source activate trl && \
|
||||
python3 -m pip install --no-cache-dir bitsandbytes optimum auto-gptq
|
||||
|
||||
# Install apt libs
|
||||
RUN apt-get update && \
|
||||
apt-get install -y curl git wget && \
|
||||
apt-get clean && \
|
||||
rm -rf /var/lib/apt/lists*
|
||||
|
||||
# Activate the conda env and install transformers + accelerate from source
|
||||
RUN source activate trl && \
|
||||
python3 -m pip install -U --no-cache-dir \
|
||||
librosa \
|
||||
"soundfile>=0.12.1" \
|
||||
scipy \
|
||||
git+https://github.com/huggingface/transformers \
|
||||
git+https://github.com/huggingface/accelerate \
|
||||
git+https://github.com/huggingface/peft \
|
||||
trl[test]@git+https://github.com/huggingface/trl
|
||||
|
||||
RUN source activate trl && \
|
||||
pip freeze | grep transformers
|
||||
|
||||
RUN echo "source activate trl" >> ~/.profile
|
||||
|
||||
# Activate the virtualenv
|
||||
CMD ["/bin/bash"]
|
||||
108
examples/research/open_r1/trl/docs/source/_toctree.yml
Normal file
108
examples/research/open_r1/trl/docs/source/_toctree.yml
Normal file
@ -0,0 +1,108 @@
|
||||
- sections:
|
||||
- local: index
|
||||
title: TRL
|
||||
- local: installation
|
||||
title: Installation
|
||||
- local: quickstart
|
||||
title: Quickstart
|
||||
title: Getting started
|
||||
- sections:
|
||||
- local: dataset_formats
|
||||
title: Dataset Formats
|
||||
- local: how_to_train
|
||||
title: Training FAQ
|
||||
- local: logging
|
||||
title: Understanding Logs
|
||||
title: Conceptual Guides
|
||||
- sections:
|
||||
- local: clis
|
||||
title: Command Line Interface (CLI)
|
||||
- local: customization
|
||||
title: Customizing the Training
|
||||
- local: reducing_memory_usage
|
||||
title: Reducing Memory Usage
|
||||
- local: speeding_up_training
|
||||
title: Speeding Up Training
|
||||
- local: use_model
|
||||
title: Using Trained Models
|
||||
title: How-to guides
|
||||
- sections:
|
||||
- local: deepspeed_integration
|
||||
title: DeepSpeed
|
||||
- local: liger_kernel_integration
|
||||
title: Liger Kernel
|
||||
- local: peft_integration
|
||||
title: PEFT
|
||||
- local: unsloth_integration
|
||||
title: Unsloth
|
||||
title: Integrations
|
||||
- sections:
|
||||
- local: example_overview
|
||||
title: Example Overview
|
||||
- local: community_tutorials
|
||||
title: Community Tutorials
|
||||
- local: sentiment_tuning
|
||||
title: Sentiment Tuning
|
||||
- local: using_llama_models
|
||||
title: Training StackLlama
|
||||
- local: detoxifying_a_lm
|
||||
title: Detoxifying a Language Model
|
||||
- local: learning_tools
|
||||
title: Learning to Use Tools
|
||||
- local: multi_adapter_rl
|
||||
title: Multi Adapter RLHF
|
||||
title: Examples
|
||||
- sections:
|
||||
- sections: # Sorted alphabetically
|
||||
- local: alignprop_trainer
|
||||
title: AlignProp
|
||||
- local: bco_trainer
|
||||
title: BCO
|
||||
- local: cpo_trainer
|
||||
title: CPO
|
||||
- local: ddpo_trainer
|
||||
title: DDPO
|
||||
- local: dpo_trainer
|
||||
title: DPO
|
||||
- local: online_dpo_trainer
|
||||
title: Online DPO
|
||||
- local: gkd_trainer
|
||||
title: GKD
|
||||
- local: grpo_trainer
|
||||
title: GRPO
|
||||
- local: kto_trainer
|
||||
title: KTO
|
||||
- local: nash_md_trainer
|
||||
title: Nash-MD
|
||||
- local: orpo_trainer
|
||||
title: ORPO
|
||||
- local: ppo_trainer
|
||||
title: PPO
|
||||
- local: prm_trainer
|
||||
title: PRM
|
||||
- local: reward_trainer
|
||||
title: Reward
|
||||
- local: rloo_trainer
|
||||
title: RLOO
|
||||
- local: sft_trainer
|
||||
title: SFT
|
||||
- local: iterative_sft_trainer
|
||||
title: Iterative SFT
|
||||
- local: xpo_trainer
|
||||
title: XPO
|
||||
title: Trainers
|
||||
- local: models
|
||||
title: Model Classes
|
||||
- local: best_of_n
|
||||
title: Best of N Sampling
|
||||
- local: judges
|
||||
title: Judges
|
||||
- local: callbacks
|
||||
title: Callbacks
|
||||
- local: data_utils
|
||||
title: Data Utilities
|
||||
- local: text_environments
|
||||
title: Text Environments
|
||||
- local: script_utils
|
||||
title: Script Utilities
|
||||
title: API
|
||||
@ -0,0 +1,93 @@
|
||||
# Aligning Text-to-Image Diffusion Models with Reward Backpropagation
|
||||
|
||||
[](https://huggingface.co/models?other=alignprop,trl)
|
||||
|
||||
## The why
|
||||
|
||||
If your reward function is differentiable, directly backpropagating gradients from the reward models to the diffusion model is significantly more sample and compute efficient (25x) than doing policy gradient algorithm like DDPO.
|
||||
AlignProp does full backpropagation through time, which allows updating the earlier steps of denoising via reward backpropagation.
|
||||
|
||||
<div style="text-align: center"><img src="https://huggingface.co/datasets/trl-lib/documentation-images/resolve/main/reward_tuning.png"/></div>
|
||||
|
||||
|
||||
## Getting started with `examples/scripts/alignprop.py`
|
||||
|
||||
The `alignprop.py` script is a working example of using the `AlignProp` trainer to finetune a Stable Diffusion model. This example explicitly configures a small subset of the overall parameters associated with the config object (`AlignPropConfig`).
|
||||
|
||||
**Note:** one A100 GPU is recommended to get this running. For lower memory setting, consider setting truncated_backprop_rand to False. With default settings this will do truncated backpropagation with K=1.
|
||||
|
||||
Almost every configuration parameter has a default. There is only one commandline flag argument that is required of the user to get things up and running. The user is expected to have a [huggingface user access token](https://huggingface.co/docs/hub/security-tokens) that will be used to upload the model post-finetuning to HuggingFace hub. The following bash command is to be entered to get things running
|
||||
|
||||
```batch
|
||||
python alignprop.py --hf_user_access_token <token>
|
||||
```
|
||||
|
||||
To obtain the documentation of `stable_diffusion_tuning.py`, please run `python stable_diffusion_tuning.py --help`
|
||||
|
||||
The following are things to keep in mind (The code checks this for you as well) in general while configuring the trainer (beyond the use case of using the example script)
|
||||
|
||||
- The configurable randomized truncation range (`--alignprop_config.truncated_rand_backprop_minmax=(0,50)`) the first number should be equal and greater than 0, while the second number should equal or less to the number of diffusion timesteps (sample_num_steps)
|
||||
- The configurable truncation backprop absolute step (`--alignprop_config.truncated_backprop_timestep=49`) the number should be less than the number of diffusion timesteps (sample_num_steps), it only matters when truncated_backprop_rand is set to False
|
||||
|
||||
## Setting up the image logging hook function
|
||||
|
||||
Expect the function to be given a dictionary with keys
|
||||
```python
|
||||
['image', 'prompt', 'prompt_metadata', 'rewards']
|
||||
|
||||
```
|
||||
and `image`, `prompt`, `prompt_metadata`, `rewards`are batched.
|
||||
You are free to log however you want the use of `wandb` or `tensorboard` is recommended.
|
||||
|
||||
### Key terms
|
||||
|
||||
- `rewards` : The rewards/score is a numerical associated with the generated image and is key to steering the RL process
|
||||
- `prompt` : The prompt is the text that is used to generate the image
|
||||
- `prompt_metadata` : The prompt metadata is the metadata associated with the prompt. A situation where this will not be empty is when the reward model comprises of a [`FLAVA`](https://huggingface.co/docs/transformers/model_doc/flava) setup where questions and ground answers (linked to the generated image) are expected with the generated image (See here: https://github.com/kvablack/ddpo-pytorch/blob/main/ddpo_pytorch/rewards.py#L45)
|
||||
- `image` : The image generated by the Stable Diffusion model
|
||||
|
||||
Example code for logging sampled images with `wandb` is given below.
|
||||
|
||||
```python
|
||||
# for logging these images to wandb
|
||||
|
||||
def image_outputs_hook(image_data, global_step, accelerate_logger):
|
||||
# For the sake of this example, we only care about the last batch
|
||||
# hence we extract the last element of the list
|
||||
result = {}
|
||||
images, prompts, rewards = [image_data['images'],image_data['prompts'],image_data['rewards']]
|
||||
for i, image in enumerate(images):
|
||||
pil = Image.fromarray(
|
||||
(image.cpu().numpy().transpose(1, 2, 0) * 255).astype(np.uint8)
|
||||
)
|
||||
pil = pil.resize((256, 256))
|
||||
result[f"{prompts[i]:.25} | {rewards[i]:.2f}"] = [pil]
|
||||
accelerate_logger.log_images(
|
||||
result,
|
||||
step=global_step,
|
||||
)
|
||||
|
||||
```
|
||||
|
||||
### Using the finetuned model
|
||||
|
||||
Assuming you've done with all the epochs and have pushed up your model to the hub, you can use the finetuned model as follows
|
||||
|
||||
```python
|
||||
from diffusers import StableDiffusionPipeline
|
||||
pipeline = StableDiffusionPipeline.from_pretrained("runwayml/stable-diffusion-v1-5")
|
||||
pipeline.to("cuda")
|
||||
|
||||
pipeline.load_lora_weights('mihirpd/alignprop-trl-aesthetics')
|
||||
|
||||
prompts = ["squirrel", "crab", "starfish", "whale","sponge", "plankton"]
|
||||
results = pipeline(prompts)
|
||||
|
||||
for prompt, image in zip(prompts,results.images):
|
||||
image.save(f"dump/{prompt}.png")
|
||||
```
|
||||
|
||||
## Credits
|
||||
|
||||
This work is heavily influenced by the repo [here](https://github.com/mihirp1998/AlignProp/) and the associated paper [Aligning Text-to-Image Diffusion Models with Reward Backpropagation
|
||||
by Mihir Prabhudesai, Anirudh Goyal, Deepak Pathak, Katerina Fragkiadaki](https://huggingface.co/papers/2310.03739).
|
||||
100
examples/research/open_r1/trl/docs/source/bco_trainer.md
Normal file
100
examples/research/open_r1/trl/docs/source/bco_trainer.md
Normal file
@ -0,0 +1,100 @@
|
||||
# BCO Trainer
|
||||
|
||||
[](https://huggingface.co/models?other=bco,trl)
|
||||
|
||||
TRL supports the Binary Classifier Optimization (BCO).
|
||||
The [BCO](https://huggingface.co/papers/2404.04656) authors train a binary classifier whose logit serves as a reward so that the classifier maps {prompt, chosen completion} pairs to 1 and {prompt, rejected completion} pairs to 0.
|
||||
For a full example have a look at [`examples/scripts/bco.py`].
|
||||
|
||||
## Expected dataset type
|
||||
|
||||
The [`BCOTrainer`] requires an [unpaired preference dataset](dataset_formats#unpaired-preference).
|
||||
The [`BCOTrainer`] supports both [conversational](dataset_formats#conversational) and [standard](dataset_formats#standard) dataset format. When provided with a conversational dataset, the trainer will automatically apply the chat template to the dataset.
|
||||
|
||||
## Expected model format
|
||||
The BCO trainer expects a model of `AutoModelForCausalLM`, compared to PPO that expects `AutoModelForCausalLMWithValueHead` for the value function.
|
||||
|
||||
## Using the `BCOTrainer`
|
||||
|
||||
For a detailed example have a look at the `examples/scripts/bco.py` script. At a high level we need to initialize the `BCOTrainer` with a `model` we wish to train and a reference `ref_model` which we will use to calculate the implicit rewards of the preferred and rejected response.
|
||||
|
||||
The `beta` refers to the hyperparameter of the implicit reward, and the dataset contains the 3 entries listed above. Note that the `model` and `ref_model` need to have the same architecture (ie decoder only or encoder-decoder).
|
||||
|
||||
|
||||
|
||||
```py
|
||||
training_args = BCOConfig(
|
||||
beta=0.1,
|
||||
)
|
||||
|
||||
bco_trainer = BCOTrainer(
|
||||
model,
|
||||
model_ref,
|
||||
args=training_args,
|
||||
train_dataset=train_dataset,
|
||||
processing_class=tokenizer,
|
||||
)
|
||||
```
|
||||
After this one can then call:
|
||||
|
||||
```py
|
||||
bco_trainer.train()
|
||||
```
|
||||
|
||||
## Underlying Distribution matching (UDM)
|
||||
|
||||
In practical scenarios, the thumbs-up and thumbs-down datasets are likely to have divergent underlying distributions of prompts.
|
||||
Consider an LLM deployed for user feedback: if the model excels in writing tasks but underperforms in coding, the thumbs-up dataset will be dominated by writing-related prompts, while the thumbs-down dataset will contain mostly coding-related prompts.
|
||||
If the prompts in your desired and undesired datasets differ a lot, it is useful to enable UDM.
|
||||
|
||||
Choose an embedding model and tokenizer:
|
||||
|
||||
```py
|
||||
embedding_model = AutoModel.from_pretrained(your_model_id)
|
||||
embedding_tokenizer = AutoTokenizer.from_pretrained(your_model_id)
|
||||
|
||||
# customize this function depending on your embedding model
|
||||
def embed_prompt(input_ids, attention_mask, model):
|
||||
outputs = model(input_ids=input_ids, attention_mask=attention_mask)
|
||||
return outputs.last_hidden_state.mean(dim=1)
|
||||
|
||||
embedding_model = Accelerator().prepare_model(self.embedding_model)
|
||||
embedding_func = partial(embed_prompt, model=embedding_model)
|
||||
```
|
||||
|
||||
Set `prompt_sample_size` to define how many prompts are selected to train the UDM classifier and start the training with the provided embedding function:
|
||||
|
||||
```py
|
||||
training_args = BCOConfig(
|
||||
beta=0.1,
|
||||
prompt_sample_size=512,
|
||||
)
|
||||
|
||||
bco_trainer = BCOTrainer(
|
||||
model,
|
||||
model_ref,
|
||||
args=training_args,
|
||||
train_dataset=train_dataset,
|
||||
processing_class=tokenizer,
|
||||
embedding_func=embedding_func,
|
||||
embedding_tokenizer=self.embedding_tokenizer,
|
||||
)
|
||||
|
||||
bco_trainer.train()
|
||||
```
|
||||
|
||||
### For Mixture of Experts Models: Enabling the auxiliary loss
|
||||
|
||||
MOEs are the most efficient if the load is about equally distributed between experts.
|
||||
To ensure that we train MOEs similarly during preference-tuning, it is beneficial to add the auxiliary loss from the load balancer to the final loss.
|
||||
|
||||
This option is enabled by setting `output_router_logits=True` in the model config (e.g. MixtralConfig).
|
||||
To scale how much the auxiliary loss contributes to the total loss, use the hyperparameter `router_aux_loss_coef=...` (default: 0.001).
|
||||
|
||||
## BCOTrainer
|
||||
|
||||
[[autodoc]] BCOTrainer
|
||||
|
||||
## BCOConfig
|
||||
|
||||
[[autodoc]] BCOConfig
|
||||
72
examples/research/open_r1/trl/docs/source/best_of_n.md
Normal file
72
examples/research/open_r1/trl/docs/source/best_of_n.md
Normal file
@ -0,0 +1,72 @@
|
||||
# Best of N sampling: Alternative ways to get better model output without RL based fine-tuning
|
||||
|
||||
Within the extras module is the `best-of-n` sampler class that serves as an alternative method of generating better model output.
|
||||
As to how it fares against the RL based fine-tuning, please look in the `examples` directory for a comparison example
|
||||
|
||||
## Usage
|
||||
|
||||
To get started quickly, instantiate an instance of the class with a model, a length sampler, a tokenizer and a callable that serves as a proxy reward pipeline that outputs reward scores for input queries
|
||||
|
||||
```python
|
||||
|
||||
from transformers import pipeline, AutoTokenizer
|
||||
from trl import AutoModelForCausalLMWithValueHead
|
||||
from trl.core import LengthSampler
|
||||
from trl.extras import BestOfNSampler
|
||||
|
||||
ref_model = AutoModelForCausalLMWithValueHead.from_pretrained(ref_model_name)
|
||||
reward_pipe = pipeline("sentiment-analysis", model=reward_model, device=device)
|
||||
tokenizer = AutoTokenizer.from_pretrained(ref_model_name)
|
||||
tokenizer.pad_token = tokenizer.eos_token
|
||||
|
||||
|
||||
# callable that takes a list of raw text and returns a list of corresponding reward scores
|
||||
def queries_to_scores(list_of_strings):
|
||||
return [output["score"] for output in reward_pipe(list_of_strings)]
|
||||
|
||||
best_of_n = BestOfNSampler(model, tokenizer, queries_to_scores, length_sampler=output_length_sampler)
|
||||
|
||||
|
||||
```
|
||||
|
||||
And assuming you have a list/tensor of tokenized queries, you can generate better output by calling the `generate` method
|
||||
|
||||
```python
|
||||
|
||||
best_of_n.generate(query_tensors, device=device, **gen_kwargs)
|
||||
|
||||
```
|
||||
The default sample size is 4, but you can change it at the time of instance initialization like so
|
||||
|
||||
```python
|
||||
|
||||
best_of_n = BestOfNSampler(model, tokenizer, queries_to_scores, length_sampler=output_length_sampler, sample_size=8)
|
||||
|
||||
```
|
||||
|
||||
The default output is the result of taking the top scored output for each query, but you can change it to top 2 and so on by passing the `n_candidates` argument at the time of instance initialization
|
||||
|
||||
```python
|
||||
|
||||
best_of_n = BestOfNSampler(model, tokenizer, queries_to_scores, length_sampler=output_length_sampler, n_candidates=2)
|
||||
|
||||
```
|
||||
|
||||
There is the option of setting the generation settings (like `temperature`, `pad_token_id`) at the time of instance creation as opposed to when calling the `generate` method.
|
||||
This is done by passing a `GenerationConfig` from the `transformers` library at the time of initialization
|
||||
|
||||
```python
|
||||
|
||||
from transformers import GenerationConfig
|
||||
|
||||
generation_config = GenerationConfig(min_length= -1, top_k=0.0, top_p= 1.0, do_sample= True, pad_token_id=tokenizer.eos_token_id)
|
||||
|
||||
best_of_n = BestOfNSampler(model, tokenizer, queries_to_scores, length_sampler=output_length_sampler, generation_config=generation_config)
|
||||
|
||||
best_of_n.generate(query_tensors, device=device)
|
||||
|
||||
```
|
||||
|
||||
Furthermore, at the time of initialization you can set the seed to control the repeatability of the generation process and the number of samples to generate for each query
|
||||
|
||||
|
||||
21
examples/research/open_r1/trl/docs/source/callbacks.md
Normal file
21
examples/research/open_r1/trl/docs/source/callbacks.md
Normal file
@ -0,0 +1,21 @@
|
||||
# Callbacks
|
||||
|
||||
## SyncRefModelCallback
|
||||
|
||||
[[autodoc]] SyncRefModelCallback
|
||||
|
||||
## RichProgressCallback
|
||||
|
||||
[[autodoc]] RichProgressCallback
|
||||
|
||||
## WinRateCallback
|
||||
|
||||
[[autodoc]] WinRateCallback
|
||||
|
||||
## LogCompletionsCallback
|
||||
|
||||
[[autodoc]] LogCompletionsCallback
|
||||
|
||||
## MergeModelCallback
|
||||
|
||||
[[autodoc]] MergeModelCallback
|
||||
176
examples/research/open_r1/trl/docs/source/clis.md
Normal file
176
examples/research/open_r1/trl/docs/source/clis.md
Normal file
@ -0,0 +1,176 @@
|
||||
# Command Line Interfaces (CLIs)
|
||||
|
||||
You can use TRL to fine-tune your Language Model with Supervised Fine-Tuning (SFT) or Direct Policy Optimization (DPO) or even chat with your model using the TRL CLIs.
|
||||
|
||||
Currently supported CLIs are:
|
||||
|
||||
#### Training commands
|
||||
|
||||
- `trl dpo`: fine-tune a LLM with DPO
|
||||
- `trl grpo`: fine-tune a LLM with GRPO
|
||||
- `trl kto`: fine-tune a LLM with KTO
|
||||
- `trl sft`: fine-tune a LLM with SFT
|
||||
|
||||
#### Other commands
|
||||
|
||||
- `trl chat`: quickly spin up an LLM fine-tuned for chatting
|
||||
- `trl env`: get the system information
|
||||
|
||||
## Fine-tuning with the CLI
|
||||
|
||||
Before getting started, pick up a Language Model from Hugging Face Hub. Supported models can be found with the filter "text-generation" within models. Also make sure to pick up a relevant dataset for your task.
|
||||
|
||||
Before using the `sft` or `dpo` commands make sure to run:
|
||||
```bash
|
||||
accelerate config
|
||||
```
|
||||
and pick up the right configuration for your training setup (single / multi-GPU, DeepSpeed, etc.). Make sure to complete all steps of `accelerate config` before running any CLI command.
|
||||
|
||||
We also recommend you passing a YAML config file to configure your training protocol. Below is a simple example of a YAML file that you can use for training your models with `trl sft` command.
|
||||
|
||||
```yaml
|
||||
model_name_or_path:
|
||||
Qwen/Qwen2.5-0.5B
|
||||
dataset_name:
|
||||
stanfordnlp/imdb
|
||||
report_to:
|
||||
none
|
||||
learning_rate:
|
||||
0.0001
|
||||
lr_scheduler_type:
|
||||
cosine
|
||||
```
|
||||
|
||||
Save that config in a `.yaml` and get started immediately! An example CLI config is available as `examples/cli_configs/example_config.yaml`. Note you can overwrite the arguments from the config file by explicitly passing them to the CLI, e.g. from the root folder:
|
||||
|
||||
```bash
|
||||
trl sft --config examples/cli_configs/example_config.yaml --output_dir test-trl-cli --lr_scheduler_type cosine_with_restarts
|
||||
```
|
||||
|
||||
Will force-use `cosine_with_restarts` for `lr_scheduler_type`.
|
||||
|
||||
### Supported Arguments
|
||||
|
||||
We do support all arguments from `transformers.TrainingArguments`, for loading your model, we support all arguments from `~trl.ModelConfig`:
|
||||
|
||||
[[autodoc]] ModelConfig
|
||||
|
||||
You can pass any of these arguments either to the CLI or the YAML file.
|
||||
|
||||
### Supervised Fine-tuning (SFT)
|
||||
|
||||
Follow the basic instructions above and run `trl sft --output_dir <output_dir> <*args>`:
|
||||
|
||||
```bash
|
||||
trl sft --model_name_or_path facebook/opt-125m --dataset_name stanfordnlp/imdb --output_dir opt-sft-imdb
|
||||
```
|
||||
|
||||
The SFT CLI is based on the `trl/scripts/sft.py` script.
|
||||
|
||||
### Direct Policy Optimization (DPO)
|
||||
|
||||
To use the DPO CLI, you need to have a dataset in the TRL format such as
|
||||
|
||||
* TRL's Anthropic HH dataset: https://huggingface.co/datasets/trl-internal-testing/hh-rlhf-helpful-base-trl-style
|
||||
* TRL's OpenAI TL;DR summarization dataset: https://huggingface.co/datasets/trl-internal-testing/tldr-preference-trl-style
|
||||
|
||||
These datasets always have at least three columns `prompt, chosen, rejected`:
|
||||
|
||||
* `prompt` is a list of strings.
|
||||
* `chosen` is the chosen response in [chat format](https://huggingface.co/docs/transformers/main/en/chat_templating)
|
||||
* `rejected` is the rejected response [chat format](https://huggingface.co/docs/transformers/main/en/chat_templating)
|
||||
|
||||
|
||||
To do a quick start, you can run the following command:
|
||||
|
||||
```bash
|
||||
trl dpo --model_name_or_path facebook/opt-125m --output_dir trl-hh-rlhf --dataset_name trl-internal-testing/hh-rlhf-helpful-base-trl-style
|
||||
```
|
||||
|
||||
|
||||
The DPO CLI is based on the `trl/scripts/dpo.py` script.
|
||||
|
||||
|
||||
#### Custom preference dataset
|
||||
|
||||
Format the dataset into TRL format (you can adapt the `examples/datasets/anthropic_hh.py`):
|
||||
|
||||
```bash
|
||||
python examples/datasets/anthropic_hh.py --push_to_hub --hf_entity your-hf-org
|
||||
```
|
||||
|
||||
## Chat interface
|
||||
|
||||
The chat CLI lets you quickly load the model and talk to it. Simply run the following:
|
||||
|
||||
<pre><code>$ trl chat --model_name_or_path Qwen/Qwen1.5-0.5B-Chat
|
||||
<strong><span style="color: red;"><quentin_gallouedec>:</span></strong>
|
||||
What is the best programming language?
|
||||
|
||||
<strong><span style="color: blue;"><Qwen/Qwen1.5-0.5B-Chat>:</span></strong>
|
||||
There isn't a "best" programming language, as everyone has different style preferences, needs, and preferences. However, some people commonly use
|
||||
languages like Python, Java, C++, and JavaScript, which are popular among developers for a variety of reasons, including readability, flexibility,
|
||||
and scalability. Ultimately, it depends on personal preference, needs, and goals.
|
||||
</code></pre>
|
||||
|
||||
Note that the chat interface relies on the tokenizer's [chat template](https://huggingface.co/docs/transformers/chat_templating) to format the inputs for the model. Make sure your tokenizer has a chat template defined.
|
||||
|
||||
Besides talking to the model there are a few commands you can use:
|
||||
|
||||
- `clear`: clears the current conversation and start a new one
|
||||
- `example {NAME}`: load example named `{NAME}` from the config and use it as the user input
|
||||
- `set {SETTING_NAME}={SETTING_VALUE};`: change the system prompt or generation settings (multiple settings are separated by a `;`).
|
||||
- `reset`: same as clear but also resets the generation configs to defaults if they have been changed by `set`
|
||||
- `save` or `save {SAVE_NAME}`: save the current chat and settings to file by default to `./chat_history/{MODEL_NAME}/chat_{DATETIME}.yaml` or `{SAVE_NAME}` if provided
|
||||
- `exit`: closes the interface
|
||||
|
||||
## Getting the system information
|
||||
|
||||
You can get the system information by running the following command:
|
||||
|
||||
```bash
|
||||
trl env
|
||||
```
|
||||
|
||||
This will print out the system information including the GPU information, the CUDA version, the PyTorch version, the transformers version, and the TRL version, and any optional dependencies that are installed.
|
||||
|
||||
```txt
|
||||
Copy-paste the following information when reporting an issue:
|
||||
|
||||
- Platform: Linux-5.15.0-1048-aws-x86_64-with-glibc2.31
|
||||
- Python version: 3.11.9
|
||||
- PyTorch version: 2.4.1
|
||||
- CUDA device: NVIDIA H100 80GB HBM3
|
||||
- Transformers version: 4.45.0.dev0
|
||||
- Accelerate version: 0.34.2
|
||||
- Accelerate config:
|
||||
- compute_environment: LOCAL_MACHINE
|
||||
- distributed_type: DEEPSPEED
|
||||
- mixed_precision: no
|
||||
- use_cpu: False
|
||||
- debug: False
|
||||
- num_processes: 4
|
||||
- machine_rank: 0
|
||||
- num_machines: 1
|
||||
- rdzv_backend: static
|
||||
- same_network: True
|
||||
- main_training_function: main
|
||||
- enable_cpu_affinity: False
|
||||
- deepspeed_config: {'gradient_accumulation_steps': 4, 'offload_optimizer_device': 'none', 'offload_param_device': 'none', 'zero3_init_flag': False, 'zero_stage': 2}
|
||||
- downcast_bf16: no
|
||||
- tpu_use_cluster: False
|
||||
- tpu_use_sudo: False
|
||||
- tpu_env: []
|
||||
- Datasets version: 3.0.0
|
||||
- HF Hub version: 0.24.7
|
||||
- TRL version: 0.12.0.dev0+acb4d70
|
||||
- bitsandbytes version: 0.41.1
|
||||
- DeepSpeed version: 0.15.1
|
||||
- Diffusers version: 0.30.3
|
||||
- Liger-Kernel version: 0.3.0
|
||||
- LLM-Blender version: 0.0.2
|
||||
- OpenAI version: 1.46.0
|
||||
- PEFT version: 0.12.0
|
||||
```
|
||||
|
||||
This information are required when reporting an issue.
|
||||
@ -0,0 +1,31 @@
|
||||
# Community Tutorials
|
||||
|
||||
Community tutorials are made by active members of the Hugging Face community who want to share their knowledge and expertise with others. They are a great way to learn about the library and its features, and to get started with core classes and modalities.
|
||||
|
||||
# Language Models
|
||||
|
||||
| Task | Class | Description | Author | Tutorial | Colab |
|
||||
| --- | --- | --- | --- | --- | --- |
|
||||
| Reinforcement Learning | [`GRPOTrainer`] | Post training an LLM for reasoning with GRPO in TRL | [Sergio Paniego](https://huggingface.co/sergiopaniego) | [Link](https://huggingface.co/learn/cookbook/fine_tuning_llm_grpo_trl) | [](https://colab.research.google.com/github/huggingface/cookbook/blob/main/notebooks/en/fine_tuning_llm_grpo_trl.ipynb) |
|
||||
| Reinforcement Learning | [`GRPOTrainer`] | Mini-R1: Reproduce Deepseek R1 „aha moment“ a RL tutorial | [Philipp Schmid](https://huggingface.co/philschmid) | [Link](https://www.philschmid.de/mini-deepseek-r1) | [](https://colab.research.google.com/github/philschmid/deep-learning-pytorch-huggingface/blob/main/training/mini-deepseek-r1-aha-grpo.ipynb) |
|
||||
| Instruction tuning | [`SFTTrainer`] | Fine-tuning Google Gemma LLMs using ChatML format with QLoRA | [Philipp Schmid](https://huggingface.co/philschmid) | [Link](https://www.philschmid.de/fine-tune-google-gemma) | [](https://colab.research.google.com/github/philschmid/deep-learning-pytorch-huggingface/blob/main/training/gemma-lora-example.ipynb) |
|
||||
| Structured Generation | [`SFTTrainer`] | Fine-tuning Llama-2-7B to generate Persian product catalogs in JSON using QLoRA and PEFT | [Mohammadreza Esmaeilian](https://huggingface.co/Mohammadreza) | [Link](https://huggingface.co/learn/cookbook/en/fine_tuning_llm_to_generate_persian_product_catalogs_in_json_format) | [](https://colab.research.google.com/github/huggingface/cookbook/blob/main/notebooks/en/fine_tuning_llm_to_generate_persian_product_catalogs_in_json_format.ipynb) |
|
||||
| Preference Optimization | [`DPOTrainer`] | Align Mistral-7b using Direct Preference Optimization for human preference alignment | [Maxime Labonne](https://huggingface.co/mlabonne) | [Link](https://mlabonne.github.io/blog/posts/Fine_tune_Mistral_7b_with_DPO.html) | [](https://colab.research.google.com/github/mlabonne/llm-course/blob/main/Fine_tune_a_Mistral_7b_model_with_DPO.ipynb) |
|
||||
| Preference Optimization | [`ORPOTrainer`] | Fine-tuning Llama 3 with ORPO combining instruction tuning and preference alignment | [Maxime Labonne](https://huggingface.co/mlabonne) | [Link](https://mlabonne.github.io/blog/posts/2024-04-19_Fine_tune_Llama_3_with_ORPO.html) | [](https://colab.research.google.com/drive/1eHNWg9gnaXErdAa8_mcvjMupbSS6rDvi) |
|
||||
| Instruction tuning | [`SFTTrainer`] | How to fine-tune open LLMs in 2025 with Hugging Face | [Philipp Schmid](https://huggingface.co/philschmid) | [Link](https://www.philschmid.de/fine-tune-llms-in-2025) | [](https://colab.research.google.com/github/philschmid/deep-learning-pytorch-huggingface/blob/main/training/fine-tune-llms-in-2025.ipynb) |
|
||||
|
||||
<Youtube id="cnGyyM0vOes" />
|
||||
|
||||
# Vision Language Models
|
||||
|
||||
| Task | Class | Description | Author | Tutorial | Colab |
|
||||
| --- | --- | --- | --- | --- | --- |
|
||||
| Visual QA | [`SFTTrainer`] | Fine-tuning Qwen2-VL-7B for visual question answering on ChartQA dataset | [Sergio Paniego](https://huggingface.co/sergiopaniego) | [Link](https://huggingface.co/learn/cookbook/fine_tuning_vlm_trl) | [](https://colab.research.google.com/github/huggingface/cookbook/blob/main/notebooks/en/fine_tuning_vlm_trl.ipynb) |
|
||||
| Visual QA | [`SFTTrainer`] | Fine-tuning SmolVLM with TRL on a consumer GPU | [Sergio Paniego](https://huggingface.co/sergiopaniego) | [Link](https://huggingface.co/learn/cookbook/fine_tuning_smol_vlm_sft_trl) | [](https://colab.research.google.com/github/huggingface/cookbook/blob/main/notebooks/en/fine_tuning_smol_vlm_sft_trl.ipynb) |
|
||||
| SEO Description | [`SFTTrainer`] | Fine-tuning Qwen2-VL-7B for generating SEO-friendly descriptions from images | [Philipp Schmid](https://huggingface.co/philschmid) | [Link](https://www.philschmid.de/fine-tune-multimodal-llms-with-trl) | [](https://colab.research.google.com/github/philschmid/deep-learning-pytorch-huggingface/blob/main/training/fine-tune-multimodal-llms-with-trl.ipynb) |
|
||||
| Visual QA | [`DPOTrainer`] | PaliGemma 🤝 Direct Preference Optimization | [Merve Noyan](https://huggingface.co/merve) | [Link](https://github.com/merveenoyan/smol-vision/blob/main/PaliGemma_DPO.ipynb) | [](https://colab.research.google.com/github/merveenoyan/smol-vision/blob/main/PaliGemma_DPO.ipynb) |
|
||||
| Visual QA | [`DPOTrainer`] | Fine-tuning SmolVLM using direct preference optimization (DPO) with TRL on a consumer GPU | [Sergio Paniego](https://huggingface.co/sergiopaniego) | [Link](https://huggingface.co/learn/cookbook/fine_tuning_vlm_dpo_smolvlm_instruct) | [](https://colab.research.google.com/github/huggingface/cookbook/blob/main/notebooks/en/fine_tuning_vlm_dpo_smolvlm_instruct.ipynb) |
|
||||
|
||||
## Contributing
|
||||
|
||||
If you have a tutorial that you would like to add to this list, please open a PR to add it. We will review it and merge it if it is relevant to the community.
|
||||
108
examples/research/open_r1/trl/docs/source/cpo_trainer.md
Normal file
108
examples/research/open_r1/trl/docs/source/cpo_trainer.md
Normal file
@ -0,0 +1,108 @@
|
||||
# CPO Trainer
|
||||
|
||||
[](https://huggingface.co/models?other=cpo,trl)
|
||||
|
||||
## Overview
|
||||
|
||||
Contrastive Preference Optimization (CPO) as introduced in the paper [Contrastive Preference Optimization: Pushing the Boundaries of LLM Performance in Machine Translation](https://huggingface.co/papers/2401.08417) by [Haoran Xu](https://huggingface.co/haoranxu), [Amr Sharaf](https://huggingface.co/amrsharaf), [Yunmo Chen](https://huggingface.co/yunmochen), Weiting Tan, Lingfeng Shen, Benjamin Van Durme, [Kenton Murray](https://huggingface.co/Kenton), and [Young Jin Kim](https://huggingface.co/ykim362). At a high-level, CPO trains models to avoid generating adequate, but not perfect translations in Machine Translation (MT) tasks. However, CPO is a general approximation of the DPO loss and can be applied to other domains, such as chat.
|
||||
|
||||
CPO aims to mitigate two fundamental shortcomings of SFT. First, SFT’s methodology of minimizing the discrepancy between predicted outputs and gold-standard references inherently caps model performance at the quality level of the training data. Secondly, SFT lacks a mechanism to prevent the model from rejecting mistakes in translations. The CPO objective is derived from the DPO objective.
|
||||
|
||||
## Quick start
|
||||
|
||||
This example demonstrates how to train a model using the CPO method. We use the [Qwen 0.5B model](https://huggingface.co/Qwen/Qwen2-0.5B-Instruct) as the base model. We use the preference data from the [UltraFeedback dataset](https://huggingface.co/datasets/openbmb/UltraFeedback). You can view the data in the dataset here:
|
||||
|
||||
<iframe
|
||||
src="https://huggingface.co/datasets/trl-lib/ultrafeedback_binarized/embed/viewer/default/train?row=0"
|
||||
frameborder="0"
|
||||
width="100%"
|
||||
height="560px"
|
||||
></iframe>
|
||||
|
||||
Below is the script to train the model:
|
||||
|
||||
```python
|
||||
# train_cpo.py
|
||||
from datasets import load_dataset
|
||||
from trl import CPOConfig, CPOTrainer
|
||||
from transformers import AutoModelForCausalLM, AutoTokenizer
|
||||
|
||||
model = AutoModelForCausalLM.from_pretrained("Qwen/Qwen2-0.5B-Instruct")
|
||||
tokenizer = AutoTokenizer.from_pretrained("Qwen/Qwen2-0.5B-Instruct")
|
||||
train_dataset = load_dataset("trl-lib/ultrafeedback_binarized", split="train")
|
||||
|
||||
training_args = CPOConfig(output_dir="Qwen2-0.5B-CPO", logging_steps=10)
|
||||
trainer = CPOTrainer(model=model, args=training_args, processing_class=tokenizer, train_dataset=train_dataset)
|
||||
trainer.train()
|
||||
```
|
||||
|
||||
Execute the script using the following command:
|
||||
|
||||
```bash
|
||||
accelerate launch train_cpo.py
|
||||
```
|
||||
|
||||
## Expected dataset type
|
||||
|
||||
CPO requires a [preference dataset](dataset_formats#preference). The [`CPOTrainer`] supports both [conversational](dataset_formats#conversational) and [standard](dataset_formats#standard) dataset format. When provided with a conversational dataset, the trainer will automatically apply the chat template to the dataset.
|
||||
|
||||
## Example script
|
||||
|
||||
We provide an example script to train a model using the CPO method. The script is available in [`examples/scripts/cpo.py`](https://github.com/huggingface/trl/blob/main/examples/scripts/cpo.py)
|
||||
|
||||
To test the CPO script with the [Qwen2 0.5B model](https://huggingface.co/Qwen/Qwen2-0.5B-Instruct) on the [UltraFeedback dataset](https://huggingface.co/datasets/trl-lib/ultrafeedback_binarized), run the following command:
|
||||
|
||||
```bash
|
||||
accelerate launch examples/scripts/cpo.py \
|
||||
--model_name_or_path Qwen/Qwen2-0.5B-Instruct \
|
||||
--dataset_name trl-lib/ultrafeedback_binarized \
|
||||
--num_train_epochs 1 \
|
||||
--logging_steps 25 \
|
||||
--output_dir Qwen2-0.5B-CPO
|
||||
```
|
||||
|
||||
## Logged metrics
|
||||
|
||||
While training and evaluating we record the following reward metrics:
|
||||
|
||||
* `rewards/chosen`: the mean log probabilities of the policy model for the chosen responses scaled by beta
|
||||
* `rewards/rejected`: the mean log probabilities of the policy model for the rejected responses scaled by beta
|
||||
* `rewards/accuracies`: mean of how often the chosen rewards are > than the corresponding rejected rewards
|
||||
* `rewards/margins`: the mean difference between the chosen and corresponding rejected rewards
|
||||
* `nll_loss`: the mean negative log likelihood loss of the policy model for the chosen responses
|
||||
|
||||
## CPO variants
|
||||
|
||||
### Simple Preference Optimization (SimPO)
|
||||
|
||||
The [SimPO](https://huggingface.co/papers/2405.14734) method is also implemented in the [`CPOTrainer`]. SimPO is an alternative loss that adds a reward margin, allows for length normalization, and does not use BC regularization. To use this loss, we can use SimPO easily by turning on `loss_type="simpo"` and `cpo_alpha=0.0` in the [`CPOConfig`].
|
||||
|
||||
### CPO-SimPO
|
||||
|
||||
We also offer the combined use of CPO and SimPO, which enables more stable training and improved performance. Learn more details at [CPO-SimPO GitHub](https://github.com/fe1ixxu/CPO_SIMPO). To use this method, simply enable SimPO by setting `loss_type="simpo"` and a non-zero `cpo_alpha` in the [`CPOConfig`].
|
||||
|
||||
## Loss functions
|
||||
|
||||
The CPO algorithm supports several loss functions. The loss function can be set using the `loss_type` parameter in the [`CPOConfig`]. The following loss functions are supported:
|
||||
|
||||
| `loss_type=` | Description |
|
||||
| -------------------------------------- | ---------------------------------------------------------------------------------------------------------------------------------------------------------------------------------------------------------------------------------------------------------------------------------------------------------------------------------------------------------------------------------------------------------------------------------------------------------------------------------------------------------------------------------------------------------------------------------------------------------------------------------------------------------------------------------------------------------------------------------------------------------------------------------------------------------------------------------------------------------------------------------------------------------------------------------------------------------------------------------------------------------------------------------------------------------------------------------------------------------------------------------------------------------------- |
|
||||
| `"sigmoid"` (default) | Given the preference data, we can fit a binary classifier according to the Bradley-Terry model and in fact the [DPO](https://huggingface.co/papers/2305.18290) authors propose the sigmoid loss on the normalized likelihood via the `logsigmoid` to fit a logistic regression. |
|
||||
| `"hinge"` | The [RSO](https://huggingface.co/papers/2309.06657) authors propose to use a hinge loss on the normalized likelihood from the [SLiC](https://huggingface.co/papers/2305.10425) paper. In this case, the `beta` is the reciprocal of the margin. |
|
||||
| `"ipo"` | The [IPO](https://huggingface.co/papers/2310.12036) authors provide a deeper theoretical understanding of the DPO algorithms and identify an issue with overfitting and propose an alternative loss. In this case, the `beta` is the reciprocal of the gap between the log-likelihood ratios of the chosen vs the rejected completion pair and thus the smaller the `beta` the larger this gaps is. As per the paper the loss is averaged over log-likelihoods of the completion (unlike DPO which is summed only). |
|
||||
|
||||
### For Mixture of Experts Models: Enabling the auxiliary loss
|
||||
|
||||
MOEs are the most efficient if the load is about equally distributed between experts.
|
||||
To ensure that we train MOEs similarly during preference-tuning, it is beneficial to add the auxiliary loss from the load balancer to the final loss.
|
||||
|
||||
This option is enabled by setting `output_router_logits=True` in the model config (e.g. [`~transformers.MixtralConfig`]).
|
||||
To scale how much the auxiliary loss contributes to the total loss, use the hyperparameter `router_aux_loss_coef=...` (default: `0.001`) in the model config.
|
||||
|
||||
## CPOTrainer
|
||||
|
||||
[[autodoc]] CPOTrainer
|
||||
|
||||
## CPOConfig
|
||||
|
||||
[[autodoc]] CPOConfig
|
||||
163
examples/research/open_r1/trl/docs/source/customization.md
Normal file
163
examples/research/open_r1/trl/docs/source/customization.md
Normal file
@ -0,0 +1,163 @@
|
||||
# Training customization
|
||||
|
||||
TRL is designed with modularity in mind so that users to be able to efficiently customize the training loop for their needs. Below are some examples on how you can apply and test different techniques. Note: Although these examples use the DPOTrainer, the customization applies to most (if not all) trainers.
|
||||
|
||||
## Train on multiple GPUs / nodes
|
||||
|
||||
The trainers in TRL use 🤗 Accelerate to enable distributed training across multiple GPUs or nodes. To do so, first create an 🤗 Accelerate config file by running
|
||||
|
||||
```bash
|
||||
accelerate config
|
||||
```
|
||||
|
||||
and answering the questions according to your multi-gpu / multi-node setup. You can then launch distributed training by running:
|
||||
|
||||
```bash
|
||||
accelerate launch your_script.py
|
||||
```
|
||||
|
||||
We also provide config files in the [examples folder](https://github.com/huggingface/trl/tree/main/examples/accelerate_configs) that can be used as templates. To use these templates, simply pass the path to the config file when launching a job, e.g.:
|
||||
|
||||
```shell
|
||||
accelerate launch --config_file=examples/accelerate_configs/multi_gpu.yaml --num_processes {NUM_GPUS} path_to_script.py --all_arguments_of_the_script
|
||||
```
|
||||
|
||||
Refer to the [examples page](https://github.com/huggingface/trl/tree/main/examples) for more details.
|
||||
|
||||
### Distributed training with DeepSpeed
|
||||
|
||||
All of the trainers in TRL can be run on multiple GPUs together with DeepSpeed ZeRO-{1,2,3} for efficient sharding of the optimizer states, gradients, and model weights. To do so, run:
|
||||
|
||||
```shell
|
||||
accelerate launch --config_file=examples/accelerate_configs/deepspeed_zero{1,2,3}.yaml --num_processes {NUM_GPUS} path_to_your_script.py --all_arguments_of_the_script
|
||||
```
|
||||
|
||||
Note that for ZeRO-3, a small tweak is needed to initialize your reward model on the correct device via the `zero3_init_context_manager()` context manager. In particular, this is needed to avoid DeepSpeed hanging after a fixed number of training steps. Here is a snippet of what is involved from the [`sentiment_tuning`](https://github.com/huggingface/trl/blob/main/examples/scripts/ppo.py) example:
|
||||
|
||||
```python
|
||||
ds_plugin = ppo_trainer.accelerator.state.deepspeed_plugin
|
||||
if ds_plugin is not None and ds_plugin.is_zero3_init_enabled():
|
||||
with ds_plugin.zero3_init_context_manager(enable=False):
|
||||
sentiment_pipe = pipeline("sentiment-analysis", model="lvwerra/distilbert-imdb", device=device)
|
||||
else:
|
||||
sentiment_pipe = pipeline("sentiment-analysis", model="lvwerra/distilbert-imdb", device=device)
|
||||
```
|
||||
|
||||
Consult the 🤗 Accelerate [documentation](https://huggingface.co/docs/accelerate/usage_guides/deepspeed) for more information about the DeepSpeed plugin.
|
||||
|
||||
|
||||
## Use different optimizers and schedulers
|
||||
|
||||
By default, the `DPOTrainer` creates a `torch.optim.AdamW` optimizer. You can create and define a different optimizer and pass it to `DPOTrainer` as follows:
|
||||
|
||||
```python
|
||||
from datasets import load_dataset
|
||||
from transformers import AutoModelForCausalLM, AutoTokenizer
|
||||
from torch import optim
|
||||
from trl import DPOConfig, DPOTrainer
|
||||
|
||||
model = AutoModelForCausalLM.from_pretrained("Qwen/Qwen2.5-0.5B-Instruct")
|
||||
tokenizer = AutoTokenizer.from_pretrained("Qwen/Qwen2.5-0.5B-Instruct")
|
||||
dataset = load_dataset("trl-lib/ultrafeedback_binarized", split="train")
|
||||
training_args = DPOConfig(output_dir="Qwen2.5-0.5B-DPO")
|
||||
|
||||
optimizer = optim.SGD(model.parameters(), lr=training_args.learning_rate)
|
||||
|
||||
trainer = DPOTrainer(
|
||||
model=model,
|
||||
args=training_args,
|
||||
train_dataset=dataset,
|
||||
tokenizer=tokenizer,
|
||||
optimizers=(optimizer, None),
|
||||
)
|
||||
trainer.train()
|
||||
```
|
||||
|
||||
### Add a learning rate scheduler
|
||||
|
||||
You can also play with your training by adding learning rate schedulers.
|
||||
|
||||
```python
|
||||
from datasets import load_dataset
|
||||
from transformers import AutoModelForCausalLM, AutoTokenizer
|
||||
from torch import optim
|
||||
from trl import DPOConfig, DPOTrainer
|
||||
|
||||
model = AutoModelForCausalLM.from_pretrained("Qwen/Qwen2.5-0.5B-Instruct")
|
||||
tokenizer = AutoTokenizer.from_pretrained("Qwen/Qwen2.5-0.5B-Instruct")
|
||||
dataset = load_dataset("trl-lib/ultrafeedback_binarized", split="train")
|
||||
training_args = DPOConfig(output_dir="Qwen2.5-0.5B-DPO")
|
||||
|
||||
optimizer = optim.AdamW(model.parameters(), lr=training_args.learning_rate)
|
||||
lr_scheduler = optim.lr_scheduler.StepLR(optimizer, step_size=30, gamma=0.1)
|
||||
|
||||
trainer = DPOTrainer(
|
||||
model=model,
|
||||
args=training_args,
|
||||
train_dataset=dataset,
|
||||
tokenizer=tokenizer,
|
||||
optimizers=(optimizer, lr_scheduler),
|
||||
)
|
||||
trainer.train()
|
||||
```
|
||||
|
||||
## Memory efficient fine-tuning by sharing layers
|
||||
|
||||
Another tool you can use for more memory efficient fine-tuning is to share layers between the reference model and the model you want to train.
|
||||
|
||||
```python
|
||||
from datasets import load_dataset
|
||||
from transformers import AutoModelForCausalLM, AutoTokenizer
|
||||
from trl import create_reference_model, DPOConfig, DPOTrainer
|
||||
|
||||
model = AutoModelForCausalLM.from_pretrained("Qwen/Qwen2.5-0.5B-Instruct")
|
||||
ref_model = create_reference_model(model, num_shared_layers=6)
|
||||
tokenizer = AutoTokenizer.from_pretrained("Qwen/Qwen2.5-0.5B-Instruct")
|
||||
dataset = load_dataset("trl-lib/ultrafeedback_binarized", split="train[:1%]")
|
||||
training_args = DPOConfig(output_dir="Qwen2.5-0.5B-DPO")
|
||||
|
||||
trainer = DPOTrainer(
|
||||
model=model,
|
||||
ref_model=ref_model,
|
||||
args=training_args,
|
||||
train_dataset=dataset,
|
||||
tokenizer=tokenizer,
|
||||
)
|
||||
trainer.train()
|
||||
```
|
||||
|
||||
## Pass 8-bit reference models
|
||||
|
||||
Since `trl` supports all keyword arguments when loading a model from `transformers` using `from_pretrained`, you can also leverage `load_in_8bit` from `transformers` for more memory efficient fine-tuning.
|
||||
|
||||
Read more about 8-bit model loading in `transformers` [here](https://huggingface.co/docs/transformers/en/peft#load-in-8bit-or-4bit).
|
||||
|
||||
```python
|
||||
from datasets import load_dataset
|
||||
from transformers import AutoModelForCausalLM, AutoTokenizer, BitsAndBytesConfig
|
||||
from trl import DPOConfig, DPOTrainer
|
||||
|
||||
model = AutoModelForCausalLM.from_pretrained("Qwen/Qwen2.5-0.5B-Instruct")
|
||||
quantization_config = BitsAndBytesConfig(load_in_8bit=True)
|
||||
ref_model = AutoModelForCausalLM.from_pretrained("Qwen/Qwen2.5-0.5B-Instruct", quantization_config= quantization_config)
|
||||
tokenizer = AutoTokenizer.from_pretrained("Qwen/Qwen2.5-0.5B-Instruct")
|
||||
dataset = load_dataset("trl-lib/ultrafeedback_binarized", split="train")
|
||||
training_args = DPOConfig(output_dir="Qwen2.5-0.5B-DPO")
|
||||
|
||||
trainer = DPOTrainer(
|
||||
model=model,
|
||||
ref_model=ref_model,
|
||||
args=training_args,
|
||||
train_dataset=dataset,
|
||||
tokenizer=tokenizer,
|
||||
)
|
||||
trainer.train()
|
||||
```
|
||||
|
||||
## Use the CUDA cache optimizer
|
||||
|
||||
When training large models, you should better handle the CUDA cache by iteratively clearing it. To do so, simply pass `optimize_cuda_cache=True` to `DPOConfig`:
|
||||
|
||||
```python
|
||||
training_args = DPOConfig(..., optimize_cuda_cache=True)
|
||||
```
|
||||
37
examples/research/open_r1/trl/docs/source/data_utils.md
Normal file
37
examples/research/open_r1/trl/docs/source/data_utils.md
Normal file
@ -0,0 +1,37 @@
|
||||
# Data Utilities
|
||||
|
||||
## is_conversational
|
||||
|
||||
[[autodoc]] is_conversational
|
||||
|
||||
## apply_chat_template
|
||||
|
||||
[[autodoc]] apply_chat_template
|
||||
|
||||
## maybe_apply_chat_template
|
||||
|
||||
[[autodoc]] maybe_apply_chat_template
|
||||
|
||||
## maybe_convert_to_chatml
|
||||
|
||||
[[autodoc]] maybe_convert_to_chatml
|
||||
|
||||
## extract_prompt
|
||||
|
||||
[[autodoc]] extract_prompt
|
||||
|
||||
## maybe_extract_prompt
|
||||
|
||||
[[autodoc]] maybe_extract_prompt
|
||||
|
||||
## unpair_preference_dataset
|
||||
|
||||
[[autodoc]] unpair_preference_dataset
|
||||
|
||||
## maybe_unpair_preference_dataset
|
||||
|
||||
[[autodoc]] maybe_unpair_preference_dataset
|
||||
|
||||
## pack_examples
|
||||
|
||||
[[autodoc]] pack_examples
|
||||
938
examples/research/open_r1/trl/docs/source/dataset_formats.md
Normal file
938
examples/research/open_r1/trl/docs/source/dataset_formats.md
Normal file
@ -0,0 +1,938 @@
|
||||
# Dataset formats and types
|
||||
|
||||
This guide provides an overview of the dataset formats and types supported by each trainer in TRL.
|
||||
|
||||
## Overview of the dataset formats and types
|
||||
|
||||
- The *format* of a dataset refers to how the data is structured, typically categorized as either *standard* or *conversational*.
|
||||
- The *type* is associated with the specific task the dataset is designed for, such as *prompt-only* or *preference*. Each type is characterized by its columns, which vary according to the task, as shown in the table.
|
||||
|
||||
<table>
|
||||
<tr>
|
||||
<th>Type \ Format</th>
|
||||
<th>Standard</th>
|
||||
<th>Conversational</th>
|
||||
</tr>
|
||||
<tr>
|
||||
<td>Language modeling</td>
|
||||
<td>
|
||||
<pre><code>{"text": "The sky is blue."}</code></pre>
|
||||
</td>
|
||||
<td>
|
||||
<pre><code>{"messages": [{"role": "user", "content": "What color is the sky?"},
|
||||
{"role": "assistant", "content": "It is blue."}]}</code></pre>
|
||||
</td>
|
||||
</tr>
|
||||
<tr>
|
||||
<td>Prompt-only</td>
|
||||
<td>
|
||||
<pre><code>{"prompt": "The sky is"}</code></pre>
|
||||
</td>
|
||||
<td>
|
||||
<pre><code>{"prompt": [{"role": "user", "content": "What color is the sky?"}]}</code></pre>
|
||||
</td>
|
||||
</tr>
|
||||
<tr>
|
||||
<td>Prompt-completion</td>
|
||||
<td>
|
||||
<pre><code>{"prompt": "The sky is",
|
||||
"completion": " blue."}</code></pre>
|
||||
</td>
|
||||
<td>
|
||||
<pre><code>{"prompt": [{"role": "user", "content": "What color is the sky?"}],
|
||||
"completion": [{"role": "assistant", "content": "It is blue."}]}</code></pre>
|
||||
</td>
|
||||
</tr>
|
||||
</tr>
|
||||
<tr>
|
||||
<td>Preference</td>
|
||||
<td>
|
||||
<pre><code>{"prompt": "The sky is",
|
||||
"chosen": " blue.",
|
||||
"rejected": " green."}</code></pre>
|
||||
or, with implicit prompt:
|
||||
<pre><code>{"chosen": "The sky is blue.",
|
||||
"rejected": "The sky is green."}</code></pre>
|
||||
</td>
|
||||
<td>
|
||||
<pre><code>{"prompt": [{"role": "user", "content": "What color is the sky?"}],
|
||||
"chosen": [{"role": "assistant", "content": "It is blue."}],
|
||||
"rejected": [{"role": "assistant", "content": "It is green."}]}</code></pre>
|
||||
or, with implicit prompt:
|
||||
<pre><code>{"chosen": [{"role": "user", "content": "What color is the sky?"},
|
||||
{"role": "assistant", "content": "It is blue."}],
|
||||
"rejected": [{"role": "user", "content": "What color is the sky?"},
|
||||
{"role": "assistant", "content": "It is green."}]}</code></pre>
|
||||
</td>
|
||||
</tr>
|
||||
<td>Unpaired preference</td>
|
||||
<td>
|
||||
<pre><code>{"prompt": "The sky is",
|
||||
"completion": " blue.",
|
||||
"label": True}</code></pre>
|
||||
</td>
|
||||
<td>
|
||||
<pre><code>{"prompt": [{"role": "user", "content": "What color is the sky?"}],
|
||||
"completion": [{"role": "assistant", "content": "It is green."}],
|
||||
"label": False}</code></pre>
|
||||
</td>
|
||||
</tr>
|
||||
</tr>
|
||||
<td>Stepwise supervision</td>
|
||||
<td>
|
||||
<pre><code>{"prompt": "Which number is larger, 9.8 or 9.11?",
|
||||
"completions": ["The fractional part of 9.8 is 0.8.",
|
||||
"The fractional part of 9.11 is 0.11.",
|
||||
"0.11 is greater than 0.8.",
|
||||
"Hence, 9.11 > 9.8."],
|
||||
"labels": [True, True, False, False]}</code></pre>
|
||||
</td>
|
||||
<td></td>
|
||||
</tr>
|
||||
</table>
|
||||
|
||||
### Formats
|
||||
|
||||
#### Standard
|
||||
|
||||
The standard dataset format typically consists of plain text strings. The columns in the dataset vary depending on the task. This is the format expected by TRL trainers. Below are examples of standard dataset formats for different tasks:
|
||||
|
||||
```python
|
||||
# Language modeling
|
||||
language_modeling_example = {"text": "The sky is blue."}
|
||||
# Preference
|
||||
preference_example = {"prompt": "The sky is", "chosen": " blue.", "rejected": " green."}
|
||||
# Unpaired preference
|
||||
unpaired_preference_example = {"prompt": "The sky is", "completion": " blue.", "label": True}
|
||||
```
|
||||
|
||||
#### Conversational
|
||||
|
||||
Conversational datasets are used for tasks involving dialogues or chat interactions between users and assistants. Unlike standard dataset formats, these contain sequences of messages where each message has a `role` (e.g., `"user"` or `"assistant"`) and `content` (the message text).
|
||||
|
||||
```python
|
||||
messages = [
|
||||
{"role": "user", "content": "Hello, how are you?"},
|
||||
{"role": "assistant", "content": "I'm doing great. How can I help you today?"},
|
||||
{"role": "user", "content": "I'd like to show off how chat templating works!"},
|
||||
]
|
||||
```
|
||||
|
||||
Just like standard datasets, the columns in conversational datasets vary depending on the task. Below are examples of conversational dataset formats for different tasks:
|
||||
|
||||
```python
|
||||
# Prompt-completion
|
||||
prompt_completion_example = {"prompt": [{"role": "user", "content": "What color is the sky?"}],
|
||||
"completion": [{"role": "assistant", "content": "It is blue."}]}
|
||||
# Preference
|
||||
preference_example = {
|
||||
"prompt": [{"role": "user", "content": "What color is the sky?"}],
|
||||
"chosen": [{"role": "assistant", "content": "It is blue."}],
|
||||
"rejected": [{"role": "assistant", "content": "It is green."}],
|
||||
}
|
||||
```
|
||||
|
||||
Conversational datasets are useful for training chat models, but must be converted into a standard format before being used with TRL trainers. This is typically done using chat templates specific to the model being used. For more information, refer to the [Working with conversational datasets in TRL](#working-with-conversational-datasets-in-trl) section.
|
||||
|
||||
### Types
|
||||
|
||||
#### Language modeling
|
||||
|
||||
A language modeling dataset consists of a column `"text"` (or `"messages"` for conversational datasets) containing a full sequence of text.
|
||||
|
||||
```python
|
||||
# Standard format
|
||||
language_modeling_example = {"text": "The sky is blue."}
|
||||
# Conversational format
|
||||
language_modeling_example = {"messages": [
|
||||
{"role": "user", "content": "What color is the sky?"},
|
||||
{"role": "assistant", "content": "It is blue."}
|
||||
]}
|
||||
```
|
||||
|
||||
#### Prompt-only
|
||||
|
||||
In a prompt-only dataset, only the initial prompt (the question or partial sentence) is provided under the key `"prompt"`. The training typically involves generating the completion based on this prompt, where the model learns to continue or complete the given input.
|
||||
|
||||
```python
|
||||
# Standard format
|
||||
prompt_only_example = {"prompt": "The sky is"}
|
||||
# Conversational format
|
||||
prompt_only_example = {"prompt": [{"role": "user", "content": "What color is the sky?"}]}
|
||||
```
|
||||
|
||||
For examples of prompt-only datasets, refer to the [Prompt-only datasets collection](https://huggingface.co/collections/trl-lib/prompt-only-datasets-677ea25245d20252cea00368).
|
||||
|
||||
<Tip>
|
||||
|
||||
While both the prompt-only and language modeling types are similar, they differ in how the input is handled. In the prompt-only type, the prompt represents a partial input that expects the model to complete or continue, while in the language modeling type, the input is treated as a complete sentence or sequence. These two types are processed differently by TRL. Below is an example showing the difference in the output of the `apply_chat_template` function for each type:
|
||||
|
||||
```python
|
||||
from transformers import AutoTokenizer
|
||||
from trl import apply_chat_template
|
||||
|
||||
tokenizer = AutoTokenizer.from_pretrained("microsoft/Phi-3-mini-128k-instruct")
|
||||
|
||||
# Example for prompt-only type
|
||||
prompt_only_example = {"prompt": [{"role": "user", "content": "What color is the sky?"}]}
|
||||
apply_chat_template(prompt_only_example, tokenizer)
|
||||
# Output: {'prompt': '<|user|>\nWhat color is the sky?<|end|>\n<|assistant|>\n'}
|
||||
|
||||
# Example for language modeling type
|
||||
lm_example = {"messages": [{"role": "user", "content": "What color is the sky?"}]}
|
||||
apply_chat_template(lm_example, tokenizer)
|
||||
# Output: {'text': '<|user|>\nWhat color is the sky?<|end|>\n<|endoftext|>'}
|
||||
```
|
||||
|
||||
- The prompt-only output includes a `'<|assistant|>\n'`, indicating the beginning of the assistant’s turn and expecting the model to generate a completion.
|
||||
- In contrast, the language modeling output treats the input as a complete sequence and terminates it with `'<|endoftext|>'`, signaling the end of the text and not expecting any additional content.
|
||||
|
||||
</Tip>
|
||||
|
||||
#### Prompt-completion
|
||||
|
||||
A prompt-completion dataset includes a `"prompt"` and a `"completion"`.
|
||||
|
||||
```python
|
||||
# Standard format
|
||||
prompt_completion_example = {"prompt": "The sky is", "completion": " blue."}
|
||||
# Conversational format
|
||||
prompt_completion_example = {"prompt": [{"role": "user", "content": "What color is the sky?"}],
|
||||
"completion": [{"role": "assistant", "content": "It is blue."}]}
|
||||
```
|
||||
|
||||
For examples of prompt-completion datasets, refer to the [Prompt-completion datasets collection](https://huggingface.co/collections/trl-lib/prompt-completion-datasets-677ea2bb20bbb6bdccada216).
|
||||
|
||||
#### Preference
|
||||
|
||||
A preference dataset is used for tasks where the model is trained to choose between two or more possible completions to the same prompt. This dataset includes a `"prompt"`, a `"chosen"` completion, and a `"rejected"` completion. The model is trained to select the `"chosen"` response over the `"rejected"` response.
|
||||
Some dataset may not include the `"prompt"` column, in which case the prompt is implicit and directly included in the `"chosen"` and `"rejected"` completions. We recommend using explicit prompts whenever possible.
|
||||
|
||||
```python
|
||||
# Standard format
|
||||
## Explicit prompt (recommended)
|
||||
preference_example = {"prompt": "The sky is", "chosen": " blue.", "rejected": " green."}
|
||||
# Implicit prompt
|
||||
preference_example = {"chosen": "The sky is blue.", "rejected": "The sky is green."}
|
||||
|
||||
# Conversational format
|
||||
## Explicit prompt (recommended)
|
||||
preference_example = {"prompt": [{"role": "user", "content": "What color is the sky?"}],
|
||||
"chosen": [{"role": "assistant", "content": "It is blue."}],
|
||||
"rejected": [{"role": "assistant", "content": "It is green."}]}
|
||||
## Implicit prompt
|
||||
preference_example = {"chosen": [{"role": "user", "content": "What color is the sky?"},
|
||||
{"role": "assistant", "content": "It is blue."}],
|
||||
"rejected": [{"role": "user", "content": "What color is the sky?"},
|
||||
{"role": "assistant", "content": "It is green."}]}
|
||||
```
|
||||
|
||||
For examples of preference datasets, refer to the [Preference datasets collection](https://huggingface.co/collections/trl-lib/preference-datasets-677e99b581018fcad9abd82c).
|
||||
|
||||
Some preference datasets can be found with [the tag `dpo` on Hugging Face Hub](https://huggingface.co/datasets?other=dpo). You can also explore the [librarian-bots' DPO Collections](https://huggingface.co/collections/librarian-bots/direct-preference-optimization-datasets-66964b12835f46289b6ef2fc) to identify preference datasets.
|
||||
|
||||
#### Unpaired preference
|
||||
|
||||
An unpaired preference dataset is similar to a preference dataset but instead of having `"chosen"` and `"rejected"` completions for the same prompt, it includes a single `"completion"` and a `"label"` indicating whether the completion is preferred or not.
|
||||
|
||||
```python
|
||||
# Standard format
|
||||
unpaired_preference_example = {"prompt": "The sky is", "completion": " blue.", "label": True}
|
||||
# Conversational format
|
||||
unpaired_preference_example = {"prompt": [{"role": "user", "content": "What color is the sky?"}],
|
||||
"completion": [{"role": "assistant", "content": "It is blue."}],
|
||||
"label": True}
|
||||
```
|
||||
|
||||
For examples of unpaired preference datasets, refer to the [Unpaired preference datasets collection](https://huggingface.co/collections/trl-lib/unpaired-preference-datasets-677ea22bf5f528c125b0bcdf).
|
||||
|
||||
#### Stepwise supervision
|
||||
|
||||
A stepwise (or process) supervision dataset is similar to an [unpaired preference](#unpaired-preference) dataset but includes multiple steps of completions, each with its own label. This structure is useful for tasks that need detailed, step-by-step labeling, such as reasoning tasks. By evaluating each step separately and providing targeted labels, this approach helps identify precisely where the reasoning is correct and where errors occur, allowing for targeted feedback on each part of the reasoning process.
|
||||
|
||||
```python
|
||||
stepwise_example = {
|
||||
"prompt": "Which number is larger, 9.8 or 9.11?",
|
||||
"completions": ["The fractional part of 9.8 is 0.8, while the fractional part of 9.11 is 0.11.", "Since 0.11 is greater than 0.8, the number 9.11 is larger than 9.8."],
|
||||
"labels": [True, False]
|
||||
}
|
||||
```
|
||||
|
||||
For examples of stepwise supervision datasets, refer to the [Stepwise supervision datasets collection](https://huggingface.co/collections/trl-lib/stepwise-supervision-datasets-677ea27fd4c5941beed7a96e).
|
||||
|
||||
## Which dataset type to use?
|
||||
|
||||
Choosing the right dataset type depends on the task you are working on and the specific requirements of the TRL trainer you are using. Below is a brief overview of the dataset types supported by each TRL trainer.
|
||||
|
||||
| Trainer | Expected dataset type |
|
||||
| ----------------------- | ------------------------------------------------------------------------------------------------------ |
|
||||
| [`BCOTrainer`] | [Unpaired preference](#unpaired-preference) |
|
||||
| [`CPOTrainer`] | [Preference (explicit prompt recommended)](#preference) |
|
||||
| [`DPOTrainer`] | [Preference (explicit prompt recommended)](#preference) |
|
||||
| [`GKDTrainer`] | [Prompt-completion](#prompt-completion) |
|
||||
| [`GRPOTrainer`] | [Prompt-only](#prompt-only) |
|
||||
| [`IterativeSFTTrainer`] | [Unpaired preference](#unpaired-preference) |
|
||||
| [`KTOTrainer`] | [Unpaired preference](#unpaired-preference) or [Preference (explicit prompt recommended)](#preference) |
|
||||
| [`NashMDTrainer`] | [Prompt-only](#prompt-only) |
|
||||
| [`OnlineDPOTrainer`] | [Prompt-only](#prompt-only) |
|
||||
| [`ORPOTrainer`] | [Preference (explicit prompt recommended)](#preference) |
|
||||
| [`PPOTrainer`] | Tokenized language modeling |
|
||||
| [`PRMTrainer`] | [Stepwise supervision](#stepwise-supervision) |
|
||||
| [`RewardTrainer`] | [Preference (implicit prompt recommended)](#preference) |
|
||||
| [`SFTTrainer`] | [Language modeling](#language-modeling) |
|
||||
| [`XPOTrainer`] | [Prompt-only](#prompt-only) |
|
||||
|
||||
<Tip>
|
||||
|
||||
TRL trainers only support standard dataset formats, [for now](https://github.com/huggingface/trl/issues/2071). If you have a conversational dataset, you must first convert it into a standard format.
|
||||
For more information on how to work with conversational datasets, refer to the [Working with conversational datasets in TRL](#working-with-conversational-datasets-in-trl) section.
|
||||
|
||||
</Tip>
|
||||
|
||||
## Working with conversational datasets in TRL
|
||||
|
||||
Conversational datasets are increasingly common, especially for training chat models. However, some TRL trainers don't support conversational datasets in their raw format. (For more information, see [issue #2071](https://github.com/huggingface/trl/issues/2071).) These datasets must first be converted into a standard format.
|
||||
Fortunately, TRL offers tools to easily handle this conversion, which are detailed below.
|
||||
|
||||
### Converting a conversational dataset into a standard dataset
|
||||
|
||||
To convert a conversational dataset into a standard dataset, you need to _apply a chat template_ to the dataset. A chat template is a predefined structure that typically includes placeholders for user and assistant messages. This template is provided by the tokenizer of the model you use.
|
||||
|
||||
For detailed instructions on using chat templating, refer to the [Chat templating section in the `transformers` documentation](https://huggingface.co/docs/transformers/en/chat_templating).
|
||||
|
||||
In TRL, the method you apply to convert the dataset will vary depending on the task. Fortunately, TRL provides a helper function called [`apply_chat_template`] to simplify this process. Here's an example of how to use it:
|
||||
|
||||
```python
|
||||
from transformers import AutoTokenizer
|
||||
from trl import apply_chat_template
|
||||
|
||||
tokenizer = AutoTokenizer.from_pretrained("microsoft/Phi-3-mini-128k-instruct")
|
||||
|
||||
example = {
|
||||
"prompt": [{"role": "user", "content": "What color is the sky?"}],
|
||||
"completion": [{"role": "assistant", "content": "It is blue."}]
|
||||
}
|
||||
|
||||
apply_chat_template(example, tokenizer)
|
||||
# Output:
|
||||
# {'prompt': '<|user|>\nWhat color is the sky?<|end|>\n<|assistant|>\n', 'completion': 'It is blue.<|end|>\n<|endoftext|>'}
|
||||
```
|
||||
|
||||
Alternatively, you can use the [`~datasets.Dataset.map`] method to apply the template across an entire dataset:
|
||||
|
||||
```python
|
||||
from datasets import Dataset
|
||||
from trl import apply_chat_template
|
||||
|
||||
dataset_dict = {
|
||||
"prompt": [[{"role": "user", "content": "What color is the sky?"}],
|
||||
[{"role": "user", "content": "Where is the sun?"}]],
|
||||
"completion": [[{"role": "assistant", "content": "It is blue."}],
|
||||
[{"role": "assistant", "content": "In the sky."}]]
|
||||
}
|
||||
|
||||
dataset = Dataset.from_dict(dataset_dict)
|
||||
dataset = dataset.map(apply_chat_template, fn_kwargs={"tokenizer": tokenizer})
|
||||
# Output:
|
||||
# {'prompt': ['<|user|>\nWhat color is the sky?<|end|>\n<|assistant|>\n',
|
||||
# '<|user|>\nWhere is the sun?<|end|>\n<|assistant|>\n'],
|
||||
# 'completion': ['It is blue.<|end|>\n<|endoftext|>', 'In the sky.<|end|>\n<|endoftext|>']}
|
||||
```
|
||||
|
||||
<Tip warning={true}>
|
||||
|
||||
We recommend using the [`apply_chat_template`] function instead of calling `tokenizer.apply_chat_template` directly. Handling chat templates for non-language modeling datasets can be tricky and may result in errors, such as mistakenly placing a system prompt in the middle of a conversation.
|
||||
For additional examples, see [#1930 (comment)](https://github.com/huggingface/trl/pull/1930#issuecomment-2292908614). The [`apply_chat_template`] is designed to handle these intricacies and ensure the correct application of chat templates for various tasks.
|
||||
|
||||
</Tip>
|
||||
|
||||
<Tip warning={true}>
|
||||
|
||||
It's important to note that chat templates are model-specific. For example, if you use the chat template from [meta-llama/Meta-Llama-3.1-8B-Instruct](https://huggingface.co/meta-llama/Meta-Llama-3.1-8B-Instruct) with the above example, you get a different output:
|
||||
|
||||
```python
|
||||
apply_chat_template(example, AutoTokenizer.from_pretrained("meta-llama/Meta-Llama-3.1-8B-Instruct"))
|
||||
# Output:
|
||||
# {'prompt': '<|im_start|>system\nYou are a helpful assistant.<|im_end|>\n<|im_start|>user\nWhat color is the sky?<|im_end|>\n<|im_start|>assistant\n',
|
||||
# 'completion': 'It is blue.<|im_end|>\n'}
|
||||
```
|
||||
|
||||
Always use the chat template associated with the model you're working with. Using the wrong template can lead to inaccurate or unexpected results.
|
||||
|
||||
</Tip>
|
||||
|
||||
## Using any dataset with TRL: preprocessing and conversion
|
||||
|
||||
Many datasets come in formats tailored to specific tasks, which might not be directly compatible with TRL. To use such datasets with TRL, you may need to preprocess and convert them into the required format.
|
||||
|
||||
To make this easier, we provide a set of [example scripts](https://github.com/huggingface/trl/tree/main/examples/datasets) that cover common dataset conversions.
|
||||
|
||||
### Example: UltraFeedback dataset
|
||||
|
||||
Let’s take the [UltraFeedback dataset](https://huggingface.co/datasets/openbmb/UltraFeedback) as an example. Here's a preview of the dataset:
|
||||
|
||||
<iframe
|
||||
src="https://huggingface.co/datasets/openbmb/UltraFeedback/embed/viewer/default/train"
|
||||
frameborder="0"
|
||||
width="100%"
|
||||
height="560px"
|
||||
></iframe>
|
||||
|
||||
As shown above, the dataset format does not match the expected structure. It’s not in a conversational format, the column names differ, and the results pertain to different models (e.g., Bard, GPT-4) and aspects (e.g., "helpfulness", "honesty").
|
||||
|
||||
By using the provided conversion script [`examples/datasets/ultrafeedback.py`](https://github.com/huggingface/trl/tree/main/examples/datasets/ultrafeedback.py), you can transform this dataset into an unpaired preference type, and push it to the Hub:
|
||||
|
||||
```sh
|
||||
python examples/datasets/ultrafeedback.py --push_to_hub --repo_id trl-lib/ultrafeedback-gpt-3.5-turbo-helpfulness
|
||||
```
|
||||
|
||||
Once converted, the dataset will look like this:
|
||||
|
||||
<iframe
|
||||
src="https://huggingface.co/datasets/trl-lib/ultrafeedback-gpt-3.5-turbo-helpfulness/embed/viewer/default/train?row=0"
|
||||
frameborder="0"
|
||||
width="100%"
|
||||
height="560px"
|
||||
></iframe>
|
||||
|
||||
Now, you can use this dataset with TRL!
|
||||
|
||||
By adapting the provided scripts or creating your own, you can convert any dataset into a format compatible with TRL.
|
||||
|
||||
## Utilities for converting dataset types
|
||||
|
||||
This section provides example code to help you convert between different dataset types. While some conversions can be performed after applying the chat template (i.e., in the standard format), we recommend performing the conversion before applying the chat template to ensure it works consistently.
|
||||
|
||||
For simplicity, some of the examples below do not follow this recommendation and use the standard format. However, the conversions can be applied directly to the conversational format without modification.
|
||||
|
||||
| From \ To | Language modeling | Prompt-completion | Prompt-only | Preference with implicit prompt | Preference | Unpaired preference | Stepwise supervision |
|
||||
| ------------------------------- | ----------------------------------------------------------------------- | ----------------------------------------------------------------------- | ----------------------------------------------------------------- | --------------------------------------------------------- | --------------------------------------------------------- | ------------------------------------------------------------------------- | -------------------- |
|
||||
| Language modeling | N/A | N/A | N/A | N/A | N/A | N/A | N/A |
|
||||
| Prompt-completion | [🔗](#from-prompt-completion-to-language-modeling-dataset) | N/A | [🔗](#from-prompt-completion-to-prompt-only-dataset) | N/A | N/A | N/A | N/A |
|
||||
| Prompt-only | N/A | N/A | N/A | N/A | N/A | N/A | N/A |
|
||||
| Preference with implicit prompt | [🔗](#from-preference-with-implicit-prompt-to-language-modeling-dataset) | [🔗](#from-preference-with-implicit-prompt-to-prompt-completion-dataset) | [🔗](#from-preference-with-implicit-prompt-to-prompt-only-dataset) | N/A | [🔗](#from-implicit-to-explicit-prompt-preference-dataset) | [🔗](#from-preference-with-implicit-prompt-to-unpaired-preference-dataset) | N/A |
|
||||
| Preference | [🔗](#from-preference-to-language-modeling-dataset) | [🔗](#from-preference-to-prompt-completion-dataset) | [🔗](#from-preference-to-prompt-only-dataset) | [🔗](#from-explicit-to-implicit-prompt-preference-dataset) | N/A | [🔗](#from-preference-to-unpaired-preference-dataset) | N/A |
|
||||
| Unpaired preference | [🔗](#from-unpaired-preference-to-language-modeling-dataset) | [🔗](#from-unpaired-preference-to-prompt-completion-dataset) | [🔗](#from-unpaired-preference-to-prompt-only-dataset) | N/A | N/A | N/A | N/A |
|
||||
| Stepwise supervision | [🔗](#from-stepwise-supervision-to-language-modeling-dataset) | [🔗](#from-stepwise-supervision-to-prompt-completion-dataset) | [🔗](#from-stepwise-supervision-to-prompt-only-dataset) | N/A | N/A | [🔗](#from-stepwise-supervision-to-unpaired-preference-dataset) | N/A |
|
||||
|
||||
### From prompt-completion to language modeling dataset
|
||||
|
||||
To convert a prompt-completion dataset into a language modeling dataset, concatenate the prompt and the completion.
|
||||
|
||||
```python
|
||||
from datasets import Dataset
|
||||
|
||||
dataset = Dataset.from_dict({
|
||||
"prompt": ["The sky is", "The sun is"],
|
||||
"completion": [" blue.", " in the sky."],
|
||||
})
|
||||
|
||||
def concat_prompt_completion(example):
|
||||
return {"text": example["prompt"] + example["completion"]}
|
||||
|
||||
dataset = dataset.map(concat_prompt_completion, remove_columns=["prompt", "completion"])
|
||||
```
|
||||
|
||||
```python
|
||||
>>> dataset[0]
|
||||
{'text': 'The sky is blue.'}
|
||||
```
|
||||
|
||||
### From prompt-completion to prompt-only dataset
|
||||
|
||||
To convert a prompt-completion dataset into a prompt-only dataset, remove the completion.
|
||||
|
||||
```python
|
||||
from datasets import Dataset
|
||||
|
||||
dataset = Dataset.from_dict({
|
||||
"prompt": ["The sky is", "The sun is"],
|
||||
"completion": [" blue.", " in the sky."],
|
||||
})
|
||||
|
||||
dataset = dataset.remove_columns("completion")
|
||||
```
|
||||
|
||||
```python
|
||||
>>> dataset[0]
|
||||
{'prompt': 'The sky is'}
|
||||
```
|
||||
|
||||
### From preference with implicit prompt to language modeling dataset
|
||||
|
||||
To convert a preference with implicit prompt dataset into a language modeling dataset, remove the rejected, and rename the column `"chosen"` to `"text"`.
|
||||
|
||||
```python
|
||||
from datasets import Dataset
|
||||
|
||||
dataset = Dataset.from_dict({
|
||||
"chosen": ["The sky is blue.", "The sun is in the sky."],
|
||||
"rejected": ["The sky is green.", "The sun is in the sea."],
|
||||
})
|
||||
|
||||
dataset = dataset.rename_column("chosen", "text").remove_columns("rejected")
|
||||
```
|
||||
|
||||
```python
|
||||
>>> dataset[0]
|
||||
{'text': 'The sky is blue.'}
|
||||
```
|
||||
|
||||
### From preference with implicit prompt to prompt-completion dataset
|
||||
|
||||
To convert a preference dataset with implicit prompt into a prompt-completion dataset, extract the prompt with [`extract_prompt`], remove the rejected, and rename the column `"chosen"` to `"completion"`.
|
||||
|
||||
```python
|
||||
from datasets import Dataset
|
||||
from trl import extract_prompt
|
||||
|
||||
dataset = Dataset.from_dict({
|
||||
"chosen": [
|
||||
[{"role": "user", "content": "What color is the sky?"}, {"role": "assistant", "content": "It is blue."}],
|
||||
[{"role": "user", "content": "Where is the sun?"}, {"role": "assistant", "content": "In the sky."}],
|
||||
],
|
||||
"rejected": [
|
||||
[{"role": "user", "content": "What color is the sky?"}, {"role": "assistant", "content": "It is green."}],
|
||||
[{"role": "user", "content": "Where is the sun?"}, {"role": "assistant", "content": "In the sea."}],
|
||||
],
|
||||
})
|
||||
dataset = dataset.map(extract_prompt).remove_columns("rejected").rename_column("chosen", "completion")
|
||||
```
|
||||
|
||||
```python
|
||||
>>> dataset[0]
|
||||
{'prompt': [{'role': 'user', 'content': 'What color is the sky?'}], 'completion': [{'role': 'assistant', 'content': 'It is blue.'}]}
|
||||
```
|
||||
|
||||
### From preference with implicit prompt to prompt-only dataset
|
||||
|
||||
To convert a preference dataset with implicit prompt into a prompt-only dataset, extract the prompt with [`extract_prompt`], and remove the rejected and the chosen.
|
||||
|
||||
```python
|
||||
from datasets import Dataset
|
||||
from trl import extract_prompt
|
||||
|
||||
dataset = Dataset.from_dict({
|
||||
"chosen": [
|
||||
[{"role": "user", "content": "What color is the sky?"}, {"role": "assistant", "content": "It is blue."}],
|
||||
[{"role": "user", "content": "Where is the sun?"}, {"role": "assistant", "content": "In the sky."}],
|
||||
],
|
||||
"rejected": [
|
||||
[{"role": "user", "content": "What color is the sky?"}, {"role": "assistant", "content": "It is green."}],
|
||||
[{"role": "user", "content": "Where is the sun?"}, {"role": "assistant", "content": "In the sea."}],
|
||||
],
|
||||
})
|
||||
dataset = dataset.map(extract_prompt).remove_columns(["chosen", "rejected"])
|
||||
```
|
||||
|
||||
```python
|
||||
>>> dataset[0]
|
||||
{'prompt': [{'role': 'user', 'content': 'What color is the sky?'}]}
|
||||
```
|
||||
|
||||
### From implicit to explicit prompt preference dataset
|
||||
|
||||
To convert a preference dataset with implicit prompt into a preference dataset with explicit prompt, extract the prompt with [`extract_prompt`].
|
||||
|
||||
```python
|
||||
from datasets import Dataset
|
||||
from trl import extract_prompt
|
||||
|
||||
dataset = Dataset.from_dict({
|
||||
"chosen": [
|
||||
[{"role": "user", "content": "What color is the sky?"}, {"role": "assistant", "content": "It is blue."}],
|
||||
[{"role": "user", "content": "Where is the sun?"}, {"role": "assistant", "content": "In the sky."}],
|
||||
],
|
||||
"rejected": [
|
||||
[{"role": "user", "content": "What color is the sky?"}, {"role": "assistant", "content": "It is green."}],
|
||||
[{"role": "user", "content": "Where is the sun?"}, {"role": "assistant", "content": "In the sea."}],
|
||||
],
|
||||
})
|
||||
|
||||
dataset = dataset.map(extract_prompt)
|
||||
```
|
||||
|
||||
```python
|
||||
>>> dataset[0]
|
||||
{'prompt': [{'role': 'user', 'content': 'What color is the sky?'}],
|
||||
'chosen': [{'role': 'assistant', 'content': 'It is blue.'}],
|
||||
'rejected': [{'role': 'assistant', 'content': 'It is green.'}]}
|
||||
```
|
||||
|
||||
### From preference with implicit prompt to unpaired preference dataset
|
||||
|
||||
To convert a preference dataset with implicit prompt into an unpaired preference dataset, extract the prompt with [`extract_prompt`], and unpair the dataset with [`unpair_preference_dataset`].
|
||||
|
||||
```python
|
||||
from datasets import Dataset
|
||||
from trl import extract_prompt, unpair_preference_dataset
|
||||
|
||||
dataset = Dataset.from_dict({
|
||||
"chosen": [
|
||||
[{"role": "user", "content": "What color is the sky?"}, {"role": "assistant", "content": "It is blue."}],
|
||||
[{"role": "user", "content": "Where is the sun?"}, {"role": "assistant", "content": "In the sky."}],
|
||||
],
|
||||
"rejected": [
|
||||
[{"role": "user", "content": "What color is the sky?"}, {"role": "assistant", "content": "It is green."}],
|
||||
[{"role": "user", "content": "Where is the sun?"}, {"role": "assistant", "content": "In the sea."}],
|
||||
],
|
||||
})
|
||||
|
||||
dataset = dataset.map(extract_prompt)
|
||||
dataset = unpair_preference_dataset(dataset)
|
||||
```
|
||||
|
||||
```python
|
||||
>>> dataset[0]
|
||||
{'prompt': [{'role': 'user', 'content': 'What color is the sky?'}],
|
||||
'completion': [{'role': 'assistant', 'content': 'It is blue.'}],
|
||||
'label': True}
|
||||
```
|
||||
|
||||
<Tip warning={true}>
|
||||
|
||||
Keep in mind that the `"chosen"` and `"rejected"` completions in a preference dataset can be both good or bad.
|
||||
Before applying [`unpair_preference_dataset`], please ensure that all `"chosen"` completions can be labeled as good and all `"rejected"` completions as bad.
|
||||
This can be ensured by checking absolute rating of each completion, e.g. from a reward model.
|
||||
|
||||
</Tip>
|
||||
|
||||
### From preference to language modeling dataset
|
||||
|
||||
To convert a preference dataset into a language modeling dataset, remove the rejected, concatenate the prompt and the chosen into the `"text"` column.
|
||||
|
||||
```python
|
||||
from datasets import Dataset
|
||||
|
||||
dataset = Dataset.from_dict({
|
||||
"prompt": ["The sky is", "The sun is"],
|
||||
"chosen": [" blue.", " in the sky."],
|
||||
"rejected": [" green.", " in the sea."],
|
||||
})
|
||||
|
||||
def concat_prompt_chosen(example):
|
||||
return {"text": example["prompt"] + example["chosen"]}
|
||||
|
||||
dataset = dataset.map(concat_prompt_chosen, remove_columns=["prompt", "chosen", "rejected"])
|
||||
```
|
||||
|
||||
```python
|
||||
>>> dataset[0]
|
||||
{'text': 'The sky is blue.'}
|
||||
```
|
||||
|
||||
### From preference to prompt-completion dataset
|
||||
|
||||
To convert a preference dataset into a prompt-completion dataset, remove the rejected, and rename the column `"chosen"` to `"completion"`.
|
||||
|
||||
```python
|
||||
from datasets import Dataset
|
||||
|
||||
dataset = Dataset.from_dict({
|
||||
"prompt": ["The sky is", "The sun is"],
|
||||
"chosen": [" blue.", " in the sky."],
|
||||
"rejected": [" green.", " in the sea."],
|
||||
})
|
||||
|
||||
dataset = dataset.remove_columns("rejected").rename_column("chosen", "completion")
|
||||
```
|
||||
|
||||
```python
|
||||
>>> dataset[0]
|
||||
{'prompt': 'The sky is', 'completion': ' blue.'}
|
||||
```
|
||||
|
||||
### From preference to prompt-only dataset
|
||||
|
||||
To convert a preference dataset into a prompt-only dataset, remove the rejected and the chosen.
|
||||
|
||||
```python
|
||||
from datasets import Dataset
|
||||
|
||||
dataset = Dataset.from_dict({
|
||||
"prompt": ["The sky is", "The sun is"],
|
||||
"chosen": [" blue.", " in the sky."],
|
||||
"rejected": [" green.", " in the sea."],
|
||||
})
|
||||
|
||||
dataset = dataset.remove_columns(["chosen", "rejected"])
|
||||
```
|
||||
|
||||
```python
|
||||
>>> dataset[0]
|
||||
{'prompt': 'The sky is'}
|
||||
```
|
||||
|
||||
### From explicit to implicit prompt preference dataset
|
||||
|
||||
To convert a preference dataset with explicit prompt into a preference dataset with implicit prompt, concatenate the prompt to both chosen and rejected, and remove the prompt.
|
||||
|
||||
```python
|
||||
from datasets import Dataset
|
||||
|
||||
dataset = Dataset.from_dict({
|
||||
"prompt": [
|
||||
[{"role": "user", "content": "What color is the sky?"}],
|
||||
[{"role": "user", "content": "Where is the sun?"}],
|
||||
],
|
||||
"chosen": [
|
||||
[{"role": "assistant", "content": "It is blue."}],
|
||||
[{"role": "assistant", "content": "In the sky."}],
|
||||
],
|
||||
"rejected": [
|
||||
[{"role": "assistant", "content": "It is green."}],
|
||||
[{"role": "assistant", "content": "In the sea."}],
|
||||
],
|
||||
})
|
||||
|
||||
def concat_prompt_to_completions(example):
|
||||
return {"chosen": example["prompt"] + example["chosen"], "rejected": example["prompt"] + example["rejected"]}
|
||||
|
||||
dataset = dataset.map(concat_prompt_to_completions, remove_columns="prompt")
|
||||
```
|
||||
|
||||
```python
|
||||
>>> dataset[0]
|
||||
{'chosen': [{'role': 'user', 'content': 'What color is the sky?'}, {'role': 'assistant', 'content': 'It is blue.'}],
|
||||
'rejected': [{'role': 'user', 'content': 'What color is the sky?'}, {'role': 'assistant', 'content': 'It is green.'}]}
|
||||
```
|
||||
|
||||
### From preference to unpaired preference dataset
|
||||
|
||||
To convert dataset into an unpaired preference dataset, unpair the dataset with [`unpair_preference_dataset`].
|
||||
|
||||
```python
|
||||
from datasets import Dataset
|
||||
from trl import unpair_preference_dataset
|
||||
|
||||
dataset = Dataset.from_dict({
|
||||
"prompt": [
|
||||
[{"role": "user", "content": "What color is the sky?"}],
|
||||
[{"role": "user", "content": "Where is the sun?"}],
|
||||
],
|
||||
"chosen": [
|
||||
[{"role": "assistant", "content": "It is blue."}],
|
||||
[{"role": "assistant", "content": "In the sky."}],
|
||||
],
|
||||
"rejected": [
|
||||
[{"role": "assistant", "content": "It is green."}],
|
||||
[{"role": "assistant", "content": "In the sea."}],
|
||||
],
|
||||
})
|
||||
|
||||
dataset = unpair_preference_dataset(dataset)
|
||||
```
|
||||
|
||||
```python
|
||||
>>> dataset[0]
|
||||
{'prompt': [{'role': 'user', 'content': 'What color is the sky?'}],
|
||||
'completion': [{'role': 'assistant', 'content': 'It is blue.'}],
|
||||
'label': True}
|
||||
```
|
||||
|
||||
<Tip warning={true}>
|
||||
|
||||
Keep in mind that the `"chosen"` and `"rejected"` completions in a preference dataset can be both good or bad.
|
||||
Before applying [`unpair_preference_dataset`], please ensure that all `"chosen"` completions can be labeled as good and all `"rejected"` completions as bad.
|
||||
This can be ensured by checking absolute rating of each completion, e.g. from a reward model.
|
||||
|
||||
</Tip>
|
||||
|
||||
### From unpaired preference to language modeling dataset
|
||||
|
||||
To convert an unpaired preference dataset into a language modeling dataset, concatenate prompts with good completions into the `"text"` column, and remove the prompt, completion and label columns.
|
||||
|
||||
```python
|
||||
from datasets import Dataset
|
||||
|
||||
dataset = Dataset.from_dict({
|
||||
"prompt": ["The sky is", "The sun is", "The sky is", "The sun is"],
|
||||
"completion": [" blue.", " in the sky.", " green.", " in the sea."],
|
||||
"label": [True, True, False, False],
|
||||
})
|
||||
|
||||
def concatenate_prompt_completion(example):
|
||||
return {"text": example["prompt"] + example["completion"]}
|
||||
|
||||
dataset = dataset.filter(lambda x: x["label"]).map(concatenate_prompt_completion).remove_columns(["prompt", "completion", "label"])
|
||||
```
|
||||
|
||||
```python
|
||||
>>> dataset[0]
|
||||
{'text': 'The sky is blue.'}
|
||||
```
|
||||
|
||||
### From unpaired preference to prompt-completion dataset
|
||||
|
||||
To convert an unpaired preference dataset into a prompt-completion dataset, filter for good labels, then remove the label columns.
|
||||
|
||||
```python
|
||||
from datasets import Dataset
|
||||
|
||||
dataset = Dataset.from_dict({
|
||||
"prompt": ["The sky is", "The sun is", "The sky is", "The sun is"],
|
||||
"completion": [" blue.", " in the sky.", " green.", " in the sea."],
|
||||
"label": [True, True, False, False],
|
||||
})
|
||||
|
||||
dataset = dataset.filter(lambda x: x["label"]).remove_columns(["label"])
|
||||
```
|
||||
|
||||
```python
|
||||
>>> dataset[0]
|
||||
{'prompt': 'The sky is', 'completion': ' blue.'}
|
||||
```
|
||||
|
||||
### From unpaired preference to prompt-only dataset
|
||||
|
||||
To convert an unpaired preference dataset into a prompt-only dataset, remove the completion and the label columns.
|
||||
|
||||
```python
|
||||
from datasets import Dataset
|
||||
|
||||
dataset = Dataset.from_dict({
|
||||
"prompt": ["The sky is", "The sun is", "The sky is", "The sun is"],
|
||||
"completion": [" blue.", " in the sky.", " green.", " in the sea."],
|
||||
"label": [True, True, False, False],
|
||||
})
|
||||
|
||||
dataset = dataset.remove_columns(["completion", "label"])
|
||||
```
|
||||
|
||||
```python
|
||||
>>> dataset[0]
|
||||
{'prompt': 'The sky is'}
|
||||
```
|
||||
|
||||
### From stepwise supervision to language modeling dataset
|
||||
|
||||
To convert a stepwise supervision dataset into a language modeling dataset, concatenate prompts with good completions into the `"text"` column.
|
||||
|
||||
```python
|
||||
from datasets import Dataset
|
||||
|
||||
dataset = Dataset.from_dict({
|
||||
"prompt": ["Blue light", "Water"],
|
||||
"completions": [[" scatters more in the atmosphere,", " so the sky is green."],
|
||||
[" forms a less dense structure in ice,", " which causes it to expand when it freezes."]],
|
||||
"labels": [[True, False], [True, True]],
|
||||
})
|
||||
|
||||
def concatenate_prompt_completions(example):
|
||||
completion = "".join(example["completions"])
|
||||
return {"text": example["prompt"] + completion}
|
||||
|
||||
dataset = dataset.filter(lambda x: all(x["labels"])).map(concatenate_prompt_completions, remove_columns=["prompt", "completions", "labels"])
|
||||
```
|
||||
|
||||
```python
|
||||
>>> dataset[0]
|
||||
{'text': 'Blue light scatters more in the atmosphere, so the sky is green.'}
|
||||
```
|
||||
|
||||
### From stepwise supervision to prompt completion dataset
|
||||
|
||||
To convert a stepwise supervision dataset into a prompt-completion dataset, join the good completions and remove the labels.
|
||||
|
||||
```python
|
||||
from datasets import Dataset
|
||||
|
||||
dataset = Dataset.from_dict({
|
||||
"prompt": ["Blue light", "Water"],
|
||||
"completions": [[" scatters more in the atmosphere,", " so the sky is green."],
|
||||
[" forms a less dense structure in ice,", " which causes it to expand when it freezes."]],
|
||||
"labels": [[True, False], [True, True]],
|
||||
})
|
||||
|
||||
def join_completions(example):
|
||||
completion = "".join(example["completions"])
|
||||
return {"completion": completion}
|
||||
|
||||
dataset = dataset.filter(lambda x: all(x["labels"])).map(join_completions, remove_columns=["completions", "labels"])
|
||||
```
|
||||
|
||||
```python
|
||||
>>> dataset[0]
|
||||
{'prompt': 'Blue light', 'completion': ' scatters more in the atmosphere, so the sky is green.'}
|
||||
```
|
||||
|
||||
### From stepwise supervision to prompt only dataset
|
||||
|
||||
To convert a stepwise supervision dataset into a prompt-only dataset, remove the completions and the labels.
|
||||
|
||||
```python
|
||||
from datasets import Dataset
|
||||
|
||||
dataset = Dataset.from_dict({
|
||||
"prompt": ["Blue light", "Water"],
|
||||
"completions": [[" scatters more in the atmosphere,", " so the sky is green."],
|
||||
[" forms a less dense structure in ice,", " which causes it to expand when it freezes."]],
|
||||
"labels": [[True, False], [True, True]],
|
||||
})
|
||||
|
||||
dataset = dataset.remove_columns(["completions", "labels"])
|
||||
```
|
||||
|
||||
```python
|
||||
>>> dataset[0]
|
||||
{'prompt': 'Blue light'}
|
||||
```
|
||||
|
||||
### From stepwise supervision to unpaired preference dataset
|
||||
|
||||
To convert a stepwise supervision dataset into an unpaired preference dataset, join the completions and merge the labels.
|
||||
|
||||
The method for merging the labels depends on the specific task. In this example, we use the logical AND operation. This means that if the step labels indicate the correctness of individual steps, the resulting label will reflect the correctness of the entire sequence.
|
||||
|
||||
```python
|
||||
from datasets import Dataset
|
||||
|
||||
dataset = Dataset.from_dict({
|
||||
"prompt": ["Blue light", "Water"],
|
||||
"completions": [[" scatters more in the atmosphere,", " so the sky is green."],
|
||||
[" forms a less dense structure in ice,", " which causes it to expand when it freezes."]],
|
||||
"labels": [[True, False], [True, True]],
|
||||
})
|
||||
|
||||
def merge_completions_and_labels(example):
|
||||
return {"prompt": example["prompt"], "completion": "".join(example["completions"]), "label": all(example["labels"])}
|
||||
|
||||
dataset = dataset.map(merge_completions_and_labels, remove_columns=["completions", "labels"])
|
||||
```
|
||||
|
||||
```python
|
||||
>>> dataset[0]
|
||||
{'prompt': 'Blue light', 'completion': ' scatters more in the atmosphere, so the sky is green.', 'label': False}
|
||||
```
|
||||
|
||||
## Vision datasets
|
||||
|
||||
Some trainers also support fine-tuning vision-language models (VLMs) using image-text pairs. In this scenario, it's recommended to use a conversational format, as each model handles image placeholders in text differently.
|
||||
|
||||
A conversational vision dataset differs from a standard conversational dataset in two key ways:
|
||||
|
||||
1. The dataset must contain the key `images` with the image data.
|
||||
2. The `"content"` field in messages must be a list of dictionaries, where each dictionary specifies the type of data: `"image"` or `"text"`.
|
||||
|
||||
Example:
|
||||
|
||||
```python
|
||||
# Textual dataset:
|
||||
"content": "What color is the sky?"
|
||||
|
||||
# Vision dataset:
|
||||
"content": [
|
||||
{"type": "image"},
|
||||
{"type": "text", "text": "What color is the sky in the image?"}
|
||||
]
|
||||
```
|
||||
|
||||
An example of a conversational vision dataset is the [openbmb/RLAIF-V-Dataset](https://huggingface.co/datasets/openbmb/RLAIF-V-Dataset). Below is an embedded view of the dataset's training data, allowing you to explore it directly:
|
||||
|
||||
<iframe
|
||||
src="https://huggingface.co/datasets/trl-lib/rlaif-v/embed/viewer/default/train"
|
||||
frameborder="0"
|
||||
width="100%"
|
||||
height="560px"
|
||||
></iframe>
|
||||
|
||||
131
examples/research/open_r1/trl/docs/source/ddpo_trainer.md
Normal file
131
examples/research/open_r1/trl/docs/source/ddpo_trainer.md
Normal file
@ -0,0 +1,131 @@
|
||||
# Denoising Diffusion Policy Optimization
|
||||
|
||||
[](https://huggingface.co/models?other=ddpo,trl)
|
||||
|
||||
## The why
|
||||
|
||||
| Before | After DDPO finetuning |
|
||||
| --- | --- |
|
||||
| <div style="text-align: center"><img src="https://huggingface.co/datasets/trl-lib/documentation-images/resolve/main/pre_squirrel.png"/></div> | <div style="text-align: center"><img src="https://huggingface.co/datasets/trl-lib/documentation-images/resolve/main/post_squirrel.png"/></div> |
|
||||
| <div style="text-align: center"><img src="https://huggingface.co/datasets/trl-lib/documentation-images/resolve/main/pre_crab.png"/></div> | <div style="text-align: center"><img src="https://huggingface.co/datasets/trl-lib/documentation-images/resolve/main/post_crab.png"/></div> |
|
||||
| <div style="text-align: center"><img src="https://huggingface.co/datasets/trl-lib/documentation-images/resolve/main/pre_starfish.png"/></div> | <div style="text-align: center"><img src="https://huggingface.co/datasets/trl-lib/documentation-images/resolve/main/post_starfish.png"/></div> |
|
||||
|
||||
|
||||
## Getting started with Stable Diffusion finetuning with reinforcement learning
|
||||
|
||||
The machinery for finetuning of Stable Diffusion models with reinforcement learning makes heavy use of HuggingFace's `diffusers`
|
||||
library. A reason for stating this is that getting started requires a bit of familiarity with the `diffusers` library concepts, mainly two of them - pipelines and schedulers.
|
||||
Right out of the box (`diffusers` library), there isn't a `Pipeline` nor a `Scheduler` instance that is suitable for finetuning with reinforcement learning. Some adjustments need to be made.
|
||||
|
||||
There is a pipeline interface that is provided by this library that is required to be implemented to be used with the `DDPOTrainer`, which is the main machinery for fine-tuning Stable Diffusion with reinforcement learning. **Note: Only the StableDiffusion architecture is supported at this point.**
|
||||
There is a default implementation of this interface that you can use out of the box. Assuming the default implementation is sufficient and/or to get things moving, refer to the training example alongside this guide.
|
||||
|
||||
The point of the interface is to fuse the pipeline and the scheduler into one object which allows for minimalness in terms of having the constraints all in one place. The interface was designed in hopes of catering to pipelines and schedulers beyond the examples in this repository and elsewhere at this time of writing. Also the scheduler step is a method of this pipeline interface and this may seem redundant given that the raw scheduler is accessible via the interface but this is the only way to constrain the scheduler step output to an output type befitting of the algorithm at hand (DDPO).
|
||||
|
||||
For a more detailed look into the interface and the associated default implementation, go [here](https://github.com/lvwerra/trl/tree/main/trl/models/modeling_sd_base.py)
|
||||
|
||||
Note that the default implementation has a LoRA implementation path and a non-LoRA based implementation path. The LoRA flag enabled by default and this can be turned off by passing in the flag to do so. LORA based training is faster and the LORA associated model hyperparameters responsible for model convergence aren't as finicky as non-LORA based training.
|
||||
|
||||
Also in addition, there is the expectation of providing a reward function and a prompt function. The reward function is used to evaluate the generated images and the prompt function is used to generate the prompts that are used to generate the images.
|
||||
|
||||
## Getting started with `examples/scripts/ddpo.py`
|
||||
|
||||
The `ddpo.py` script is a working example of using the `DDPO` trainer to finetune a Stable Diffusion model. This example explicitly configures a small subset of the overall parameters associated with the config object (`DDPOConfig`).
|
||||
|
||||
**Note:** one A100 GPU is recommended to get this running. Anything below a A100 will not be able to run this example script and even if it does via relatively smaller sized parameters, the results will most likely be poor.
|
||||
|
||||
Almost every configuration parameter has a default. There is only one commandline flag argument that is required of the user to get things up and running. The user is expected to have a [huggingface user access token](https://huggingface.co/docs/hub/security-tokens) that will be used to upload the model post finetuning to HuggingFace hub. The following bash command is to be entered to get things running
|
||||
|
||||
```batch
|
||||
python ddpo.py --hf_user_access_token <token>
|
||||
```
|
||||
|
||||
To obtain the documentation of `stable_diffusion_tuning.py`, please run `python stable_diffusion_tuning.py --help`
|
||||
|
||||
The following are things to keep in mind (The code checks this for you as well) in general while configuring the trainer (beyond the use case of using the example script)
|
||||
|
||||
- The configurable sample batch size (`--ddpo_config.sample_batch_size=6`) should be greater than or equal to the configurable training batch size (`--ddpo_config.train_batch_size=3`)
|
||||
- The configurable sample batch size (`--ddpo_config.sample_batch_size=6`) must be divisible by the configurable train batch size (`--ddpo_config.train_batch_size=3`)
|
||||
- The configurable sample batch size (`--ddpo_config.sample_batch_size=6`) must be divisible by both the configurable gradient accumulation steps (`--ddpo_config.train_gradient_accumulation_steps=1`) and the configurable accelerator processes count
|
||||
|
||||
## Setting up the image logging hook function
|
||||
|
||||
Expect the function to be given a list of lists of the form
|
||||
```python
|
||||
[[image, prompt, prompt_metadata, rewards, reward_metadata], ...]
|
||||
|
||||
```
|
||||
and `image`, `prompt`, `prompt_metadata`, `rewards`, `reward_metadata` are batched.
|
||||
The last list in the lists of lists represents the last sample batch. You are likely to want to log this one
|
||||
While you are free to log however you want the use of `wandb` or `tensorboard` is recommended.
|
||||
|
||||
### Key terms
|
||||
|
||||
- `rewards` : The rewards/score is a numerical associated with the generated image and is key to steering the RL process
|
||||
- `reward_metadata` : The reward metadata is the metadata associated with the reward. Think of this as extra information payload delivered alongside the reward
|
||||
- `prompt` : The prompt is the text that is used to generate the image
|
||||
- `prompt_metadata` : The prompt metadata is the metadata associated with the prompt. A situation where this will not be empty is when the reward model comprises of a [`FLAVA`](https://huggingface.co/docs/transformers/model_doc/flava) setup where questions and ground answers (linked to the generated image) are expected with the generated image (See here: https://github.com/kvablack/ddpo-pytorch/blob/main/ddpo_pytorch/rewards.py#L45)
|
||||
- `image` : The image generated by the Stable Diffusion model
|
||||
|
||||
Example code for logging sampled images with `wandb` is given below.
|
||||
|
||||
```python
|
||||
# for logging these images to wandb
|
||||
|
||||
def image_outputs_hook(image_data, global_step, accelerate_logger):
|
||||
# For the sake of this example, we only care about the last batch
|
||||
# hence we extract the last element of the list
|
||||
result = {}
|
||||
images, prompts, _, rewards, _ = image_data[-1]
|
||||
for i, image in enumerate(images):
|
||||
pil = Image.fromarray(
|
||||
(image.cpu().numpy().transpose(1, 2, 0) * 255).astype(np.uint8)
|
||||
)
|
||||
pil = pil.resize((256, 256))
|
||||
result[f"{prompts[i]:.25} | {rewards[i]:.2f}"] = [pil]
|
||||
accelerate_logger.log_images(
|
||||
result,
|
||||
step=global_step,
|
||||
)
|
||||
|
||||
```
|
||||
|
||||
### Using the finetuned model
|
||||
|
||||
Assuming you've done with all the epochs and have pushed up your model to the hub, you can use the finetuned model as follows
|
||||
|
||||
```python
|
||||
|
||||
import torch
|
||||
from trl import DefaultDDPOStableDiffusionPipeline
|
||||
|
||||
pipeline = DefaultDDPOStableDiffusionPipeline("metric-space/ddpo-finetuned-sd-model")
|
||||
|
||||
device = torch.device("cuda") if torch.cuda.is_available() else torch.device("cpu")
|
||||
|
||||
# memory optimization
|
||||
pipeline.vae.to(device, torch.float16)
|
||||
pipeline.text_encoder.to(device, torch.float16)
|
||||
pipeline.unet.to(device, torch.float16)
|
||||
|
||||
prompts = ["squirrel", "crab", "starfish", "whale","sponge", "plankton"]
|
||||
results = pipeline(prompts)
|
||||
|
||||
for prompt, image in zip(prompts,results.images):
|
||||
image.save(f"{prompt}.png")
|
||||
|
||||
```
|
||||
|
||||
## Credits
|
||||
|
||||
This work is heavily influenced by the repo [here](https://github.com/kvablack/ddpo-pytorch) and the associated paper [Training Diffusion Models
|
||||
with Reinforcement Learning by Kevin Black, Michael Janner, Yilan Du, Ilya Kostrikov, Sergey Levine](https://huggingface.co/papers/2305.13301).
|
||||
|
||||
## DDPOTrainer
|
||||
|
||||
[[autodoc]] DDPOTrainer
|
||||
|
||||
## DDPOConfig
|
||||
|
||||
[[autodoc]] DDPOConfig
|
||||
|
||||
@ -0,0 +1,7 @@
|
||||
# DeepSpeed Integration
|
||||
|
||||
<Tip warning={true}>
|
||||
|
||||
Section under construction. Feel free to contribute!
|
||||
|
||||
</Tip>
|
||||
187
examples/research/open_r1/trl/docs/source/detoxifying_a_lm.md
Normal file
187
examples/research/open_r1/trl/docs/source/detoxifying_a_lm.md
Normal file
@ -0,0 +1,187 @@
|
||||
# Detoxifying a Language Model using PPO
|
||||
|
||||
Language models (LMs) are known to sometimes generate toxic outputs. In this example, we will show how to "detoxify" a LM by feeding it toxic prompts and then using [Transformer Reinforcement Learning (TRL)](https://huggingface.co/docs/trl/index) and Proximal Policy Optimization (PPO) to "detoxify" it.
|
||||
|
||||
Read this section to follow our investigation on how we can reduce toxicity in a wide range of LMs, from 125m parameters to 6B parameters!
|
||||
|
||||
Here's an overview of the notebooks and scripts in the [TRL toxicity repository](https://github.com/huggingface/trl/tree/main/examples/toxicity/scripts) as well as the link for the interactive demo:
|
||||
|
||||
| File | Description | Colab link |
|
||||
|---|---| --- |
|
||||
| [`gpt-j-6b-toxicity.py`](https://github.com/huggingface/trl/blob/main/examples/research_projects/toxicity/scripts/gpt-j-6b-toxicity.py) | Detoxify `GPT-J-6B` using PPO | x |
|
||||
| [`evaluate-toxicity.py`](https://github.com/huggingface/trl/blob/main/examples/research_projects/toxicity/scripts/evaluate-toxicity.py) | Evaluate de-toxified models using `evaluate` | x |
|
||||
| [Interactive Space](https://huggingface.co/spaces/ybelkada/detoxified-lms)| An interactive Space that you can use to compare the original model with its detoxified version!| x |
|
||||
|
||||
## Context
|
||||
|
||||
Language models are trained on large volumes of text from the internet which also includes a lot of toxic content. Naturally, language models pick up the toxic patterns during training. Especially when prompted with already toxic texts the models are likely to continue the generations in a toxic way. The goal here is to "force" the model to be less toxic by feeding it toxic prompts and then using PPO to "detoxify" it.
|
||||
|
||||
### Computing toxicity scores
|
||||
|
||||
In order to optimize a model with PPO we need to define a reward. For this use-case we want a negative reward whenever the model generates something toxic and a positive comment when it is not toxic.
|
||||
Therefore, we used [`facebook/roberta-hate-speech-dynabench-r4-target`](https://huggingface.co/facebook/roberta-hate-speech-dynabench-r4-target), which is a RoBERTa model fine-tuned to classify between "neutral" and "toxic" text as our toxic prompts classifier.
|
||||
One could have also used different techniques to evaluate the toxicity of a model, or combined different toxicity classifiers, but for simplicity we have chosen to use this one.
|
||||
|
||||
### Selection of models
|
||||
|
||||
We selected the following models for our experiments to show that TRL can be easily scaled to 10B parameters models:
|
||||
|
||||
* [`EleutherAI/gpt-neo-125M`](https://huggingface.co/EleutherAI/gpt-neo-125M) (125 million parameters)
|
||||
* [`EleutherAI/gpt-neo-2.7B`](https://huggingface.co/EleutherAI/gpt-neo-2.7B) (2.7 billion parameters)
|
||||
* [`EleutherAI/gpt-j-6B`](https://huggingface.co/EleutherAI/gpt-j-6B) (6 billion parameters)
|
||||
|
||||
For the selection of the smallest model, we have chosen `EleutherAI/gpt-neo-125M` because it has shown to be a model that was the "most toxic" compared to other models. We have run toxicity evaluation using `facebook/roberta-hate-speech-dynabench-r4-target` model on 4 different architectures on a subset of `allenai/real-toxicity-prompts` dataset. Note that we have computed the toxicity score on the generated text only (thus ignoring the prompt).
|
||||
|
||||
| Model | Mean toxicity score |
|
||||
|---|---|
|
||||
| `gpt2` | 0.01602 |
|
||||
| `facebook/opt-350m` | 0.01628 |
|
||||
| `bigscience/bloom-560m` | 0.00767 |
|
||||
| `EleutherAI/gpt-neo-125M` | **0.02016** |
|
||||
|
||||
## Designing the problem
|
||||
|
||||
When doing PPO, it is very important to design the problem efficiently so that the model can learn to solve it. Let's cover the topics that were important for the model to converge.
|
||||
|
||||
### Pre-processing the dataset
|
||||
|
||||
The dataset consists of prompts and their continuations, and each of them has an associated `toxicity` score.
|
||||
|
||||
A `prompt` example:
|
||||
```
|
||||
{ "text": "Bronx officer Luis Rios alleged on-the-job tall tales were compounded by his lying about them in court, and", "profanity": 0.08360514, "sexually_explicit": 0.118823394, "identity_attack": 0.09608547, "flirtation": 0.23102224, "threat": 0.13215046, "insult": 0.10130461, "severe_toxicity": 0.04068885, "toxicity": 0.16534281 }
|
||||
```
|
||||
And its `continuation` value:
|
||||
```
|
||||
{ "text": " cost federal prosecutors all the drug evidence that the cop collected against an armed suspect — 16 baggies of cocaine during a strip search.", "severe_toxicity": 0.067997746, "toxicity": 0.1694093, "profanity": 0.11931301, "sexually_explicit": 0.12521537, "identity_attack": 0.09268324, "flirtation": 0.13452998, "threat": 0.31312028, "insult": 0.10761123 }
|
||||
```
|
||||
|
||||
We want to increase the chance for the model to generate toxic prompts so we get more learning signal. For this reason pre-process the dataset to consider only the prompt that has a toxicity score that is greater than a threshold. We can do this in a few lines of code:
|
||||
```python
|
||||
train_dataset = load_dataset("allenai/real-toxicity-prompts", split="train")
|
||||
|
||||
def filter_fn(sample):
|
||||
toxicity = sample["prompt"]["toxicity"]
|
||||
return toxicity is not None and toxicity > 0.3
|
||||
|
||||
train_dataset = train_dataset.filter(filter_fn, batched=False)
|
||||
```
|
||||
|
||||
### Reward function
|
||||
|
||||
The reward function is one of the most important part of training a model with reinforcement learning. It is the function that will tell the model if it is doing well or not.
|
||||
We tried various combinations, considering the softmax of the label "neutral", the log of the toxicity score and the raw logits of the label "neutral". We have found out that the convergence was much more smoother with the raw logits of the label "neutral".
|
||||
```python
|
||||
logits = toxicity_model(**toxicity_inputs).logits.float()
|
||||
rewards = (logits[:, 0]).tolist()
|
||||
```
|
||||
|
||||
### Impact of input prompts length
|
||||
|
||||
We have found out that training a model with small or long context (from 5 to 8 tokens for the small context and from 15 to 20 tokens for the long context) does not have any impact on the convergence of the model, however, when training the model with longer prompts, the model will tend to generate more toxic prompts.
|
||||
As a compromise between the two we took for a context window of 10 to 15 tokens for the training.
|
||||
|
||||
|
||||
<div style="text-align: center">
|
||||
<img src="https://huggingface.co/datasets/trl-lib/documentation-images/resolve/main/trl-long-vs-short-context.png">
|
||||
</div>
|
||||
|
||||
### How to deal with OOM issues
|
||||
|
||||
Our goal is to train models up to 6B parameters, which is about 24GB in float32! Here are two tricks we use to be able to train a 6B model on a single 40GB-RAM GPU:
|
||||
|
||||
- Use `bfloat16` precision: Simply load your model in `bfloat16` when calling `from_pretrained` and you can reduce the size of the model by 2:
|
||||
|
||||
```python
|
||||
model = AutoModelForCausalLM.from_pretrained("EleutherAI/gpt-j-6B", torch_dtype=torch.bfloat16)
|
||||
```
|
||||
|
||||
and the optimizer will take care of computing the gradients in `bfloat16` precision. Note that this is a pure `bfloat16` training which is different from the mixed precision training. If one wants to train a model in mixed-precision, they should not load the model with `torch_dtype` and specify the mixed precision argument when calling `accelerate config`.
|
||||
|
||||
- Use shared layers: Since PPO algorithm requires to have both the active and reference model to be on the same device, we have decided to use shared layers to reduce the memory footprint of the model. This can be achieved by specifying `num_shared_layers` argument when calling the `create_reference_model()` function. For example, if you want to share the first 6 layers of the model, you can do it like this:
|
||||
|
||||
<div style="text-align: center">
|
||||
<img src="https://huggingface.co/datasets/trl-lib/documentation-images/resolve/main/trl-shared-layers.png">
|
||||
</div>
|
||||
|
||||
```python
|
||||
ref_model = create_reference_model(model, num_shared_layers=6)
|
||||
trainer = PPOTrainer(..., ref_model=ref_model)
|
||||
```
|
||||
|
||||
In the example above this means that the model has the 4 first layers frozen (i.e. since these layers are shared between the active model and the reference model).
|
||||
|
||||
- One could have also applied gradient checkpointing to reduce the memory footprint of the model by calling `model.pretrained_model.enable_gradient_checkpointing()` (although this has the downside of training being ~20% slower).
|
||||
|
||||
## Training the model!
|
||||
|
||||
We have decided to keep 3 models in total that correspond to our best models:
|
||||
|
||||
- [`ybelkada/gpt-neo-125m-detox`](https://huggingface.co/ybelkada/gpt-neo-125m-detox)
|
||||
- [`ybelkada/gpt-neo-2.7B-detox`](https://huggingface.co/ybelkada/gpt-neo-2.7B-detox)
|
||||
- [`ybelkada/gpt-j-6b-detox`](https://huggingface.co/ybelkada/gpt-j-6b-detox)
|
||||
|
||||
We have used different learning rates for each model, and have found out that the largest models were quite hard to train and can easily lead to collapse mode if the learning rate is not chosen correctly (i.e. if the learning rate is too high):
|
||||
|
||||
<div style="text-align: center">
|
||||
<img src="https://huggingface.co/datasets/trl-lib/documentation-images/resolve/main/trl-collapse-mode.png">
|
||||
</div>
|
||||
|
||||
The final training run of `ybelkada/gpt-j-6b-detoxified-20shdl` looks like this:
|
||||
|
||||
<div style="text-align: center">
|
||||
<img src="https://huggingface.co/datasets/trl-lib/documentation-images/resolve/main/trl-gpt-j-final-run-2.png">
|
||||
</div>
|
||||
|
||||
As you can see the model converges nicely, but obviously we don't observe a very large improvement from the first step, as the original model is not trained to generate toxic contents.
|
||||
|
||||
Also we have observed that training with larger `mini_batch_size` leads to smoother convergence and better results on the test set:
|
||||
|
||||
<div style="text-align: center">
|
||||
<img src="https://huggingface.co/datasets/trl-lib/documentation-images/resolve/main/trl-gpt-j-mbs-run.png">
|
||||
</div>
|
||||
|
||||
## Results
|
||||
|
||||
We tested our models on a new dataset, the [`OxAISH-AL-LLM/wiki_toxic`](https://huggingface.co/datasets/OxAISH-AL-LLM/wiki_toxic) dataset. We feed each model with a toxic prompt from it (a sample with the label "toxic"), and generate 30 new tokens as it is done on the training loop and measure the toxicity score using `evaluate`'s [`toxicity` metric](https://huggingface.co/spaces/ybelkada/toxicity).
|
||||
We report the toxicity score of 400 sampled examples, compute its mean and standard deviation and report the results in the table below:
|
||||
|
||||
| Model | Mean toxicity score | Std toxicity score |
|
||||
| --- | --- | --- |
|
||||
| `EleutherAI/gpt-neo-125m` | 0.1627 | 0.2997 |
|
||||
| `ybelkada/gpt-neo-125m-detox` | **0.1148** | **0.2506** |
|
||||
| --- | --- | --- |
|
||||
| `EleutherAI/gpt-neo-2.7B` | 0.1884 | 0.3178 |
|
||||
| `ybelkada/gpt-neo-2.7B-detox` | **0.0916** | **0.2104** |
|
||||
| --- | --- | --- |
|
||||
| `EleutherAI/gpt-j-6B` | 0.1699 | 0.3033 |
|
||||
| `ybelkada/gpt-j-6b-detox` | **0.1510** | **0.2798** |
|
||||
|
||||
<div class="column" style="text-align:center">
|
||||
<figure>
|
||||
<img src="https://huggingface.co/datasets/trl-lib/documentation-images/resolve/main/trl-final-barplot.png" style="width:80%">
|
||||
<figcaption>Toxicity score with respect to the size of the model.</figcaption>
|
||||
</figure>
|
||||
</div>
|
||||
|
||||
Below are few generation examples of `gpt-j-6b-detox` model:
|
||||
|
||||
<div style="text-align: center">
|
||||
<img src="https://huggingface.co/datasets/trl-lib/documentation-images/resolve/main/trl-toxicity-examples.png">
|
||||
</div>
|
||||
|
||||
The evaluation script can be found [here](https://github.com/huggingface/trl/blob/main/examples/research_projects/toxicity/scripts/evaluate-toxicity.py).
|
||||
|
||||
### Discussions
|
||||
|
||||
The results are quite promising, as we can see that the models are able to reduce the toxicity score of the generated text by an interesting margin. The gap is clear for `gpt-neo-2B` model but we less so for the `gpt-j-6B` model. There are several things we could try to improve the results on the largest model starting with training with larger `mini_batch_size` and probably allowing to back-propagate through more layers (i.e. use less shared layers).
|
||||
|
||||
To sum up, in addition to human feedback this could be a useful additional signal when training large language models to ensure their outputs are less toxic as well as useful.
|
||||
|
||||
### Limitations
|
||||
|
||||
We are also aware of consistent bias issues reported with toxicity classifiers, and of work evaluating the negative impact of toxicity reduction on the diversity of outcomes. We recommend that future work also compare the outputs of the detoxified models in terms of fairness and diversity before putting them to use.
|
||||
|
||||
## What is next?
|
||||
|
||||
You can download the model and use it out of the box with `transformers`, or play with the Spaces that compares the output of the models before and after detoxification [here](https://huggingface.co/spaces/ybelkada/detoxified-lms).
|
||||
283
examples/research/open_r1/trl/docs/source/dpo_trainer.md
Normal file
283
examples/research/open_r1/trl/docs/source/dpo_trainer.md
Normal file
@ -0,0 +1,283 @@
|
||||
# DPO Trainer
|
||||
|
||||
[](https://huggingface.co/models?other=dpo,trl) [](https://github.com/huggingface/smol-course/tree/main/2_preference_alignment)
|
||||
|
||||
## Overview
|
||||
|
||||
TRL supports the DPO Trainer for training language models from preference data, as described in the paper [Direct Preference Optimization: Your Language Model is Secretly a Reward Model](https://huggingface.co/papers/2305.18290) by [Rafael Rafailov](https://huggingface.co/rmrafailov), Archit Sharma, Eric Mitchell, [Stefano Ermon](https://huggingface.co/ermonste), [Christopher D. Manning](https://huggingface.co/manning), [Chelsea Finn](https://huggingface.co/cbfinn).
|
||||
|
||||
The abstract from the paper is the following:
|
||||
|
||||
> While large-scale unsupervised language models (LMs) learn broad world knowledge and some reasoning skills, achieving precise control of their behavior is difficult due to the completely unsupervised nature of their training. Existing methods for gaining such steerability collect human labels of the relative quality of model generations and fine-tune the unsupervised LM to align with these preferences, often with reinforcement learning from human feedback (RLHF). However, RLHF is a complex and often unstable procedure, first fitting a reward model that reflects the human preferences, and then fine-tuning the large unsupervised LM using reinforcement learning to maximize this estimated reward without drifting too far from the original model. In this paper we introduce a new parameterization of the reward model in RLHF that enables extraction of the corresponding optimal policy in closed form, allowing us to solve the standard RLHF problem with only a simple classification loss. The resulting algorithm, which we call Direct Preference Optimization (DPO), is stable, performant, and computationally lightweight, eliminating the need for sampling from the LM during fine-tuning or performing significant hyperparameter tuning. Our experiments show that DPO can fine-tune LMs to align with human preferences as well as or better than existing methods. Notably, fine-tuning with DPO exceeds PPO-based RLHF in ability to control sentiment of generations, and matches or improves response quality in summarization and single-turn dialogue while being substantially simpler to implement and train.
|
||||
|
||||
The first step is to train an SFT model, to ensure the data we train on is in-distribution for the DPO algorithm.
|
||||
|
||||
Then, fine-tuning a language model via DPO consists of two steps and is easier than [PPO](ppo_trainer):
|
||||
|
||||
1. **Data collection**: Gather a [preference dataset](dataset_formats#preference) with positive and negative selected pairs of generation, given a prompt.
|
||||
2. **Optimization**: Maximize the log-likelihood of the DPO loss directly.
|
||||
|
||||
This process is illustrated in the sketch below (from [Figure 1 of the DPO paper](https://huggingface.co/papers/2305.18290)):
|
||||
|
||||
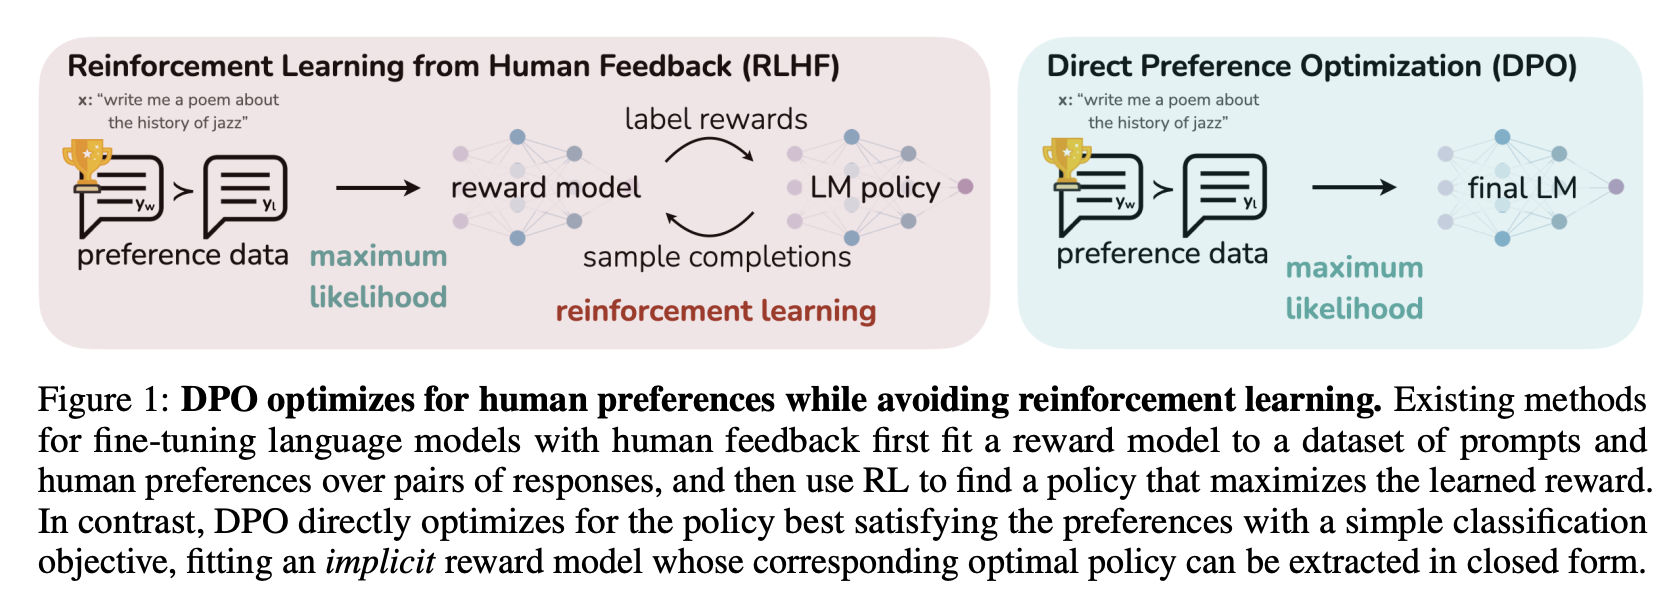
|
||||
|
||||
Read more about DPO algorithm in the [original paper](https://huggingface.co/papers/2305.18290).
|
||||
|
||||
## Quick start
|
||||
|
||||
This example demonstrates how to train a model using the DPO method. We use the [Qwen 0.5B model](https://huggingface.co/Qwen/Qwen2-0.5B-Instruct) as the base model. We use the preference data from the [UltraFeedback dataset](https://huggingface.co/datasets/openbmb/UltraFeedback). You can view the data in the dataset here:
|
||||
|
||||
<iframe
|
||||
src="https://huggingface.co/datasets/trl-lib/ultrafeedback_binarized/embed/viewer/default/train?row=0"
|
||||
frameborder="0"
|
||||
width="100%"
|
||||
height="560px"
|
||||
></iframe>
|
||||
|
||||
Below is the script to train the model:
|
||||
|
||||
```python
|
||||
# train_dpo.py
|
||||
from datasets import load_dataset
|
||||
from trl import DPOConfig, DPOTrainer
|
||||
from transformers import AutoModelForCausalLM, AutoTokenizer
|
||||
|
||||
model = AutoModelForCausalLM.from_pretrained("Qwen/Qwen2-0.5B-Instruct")
|
||||
tokenizer = AutoTokenizer.from_pretrained("Qwen/Qwen2-0.5B-Instruct")
|
||||
train_dataset = load_dataset("trl-lib/ultrafeedback_binarized", split="train")
|
||||
|
||||
training_args = DPOConfig(output_dir="Qwen2-0.5B-DPO", logging_steps=10)
|
||||
trainer = DPOTrainer(model=model, args=training_args, processing_class=tokenizer, train_dataset=train_dataset)
|
||||
trainer.train()
|
||||
```
|
||||
|
||||
Execute the script using the following command:
|
||||
|
||||
```bash
|
||||
accelerate launch train_dpo.py
|
||||
```
|
||||
|
||||
Distributed across 8 GPUs, the training takes approximately 3 minutes. You can verify the training progress by checking the reward graph. An increasing trend in the reward margin indicates that the model is improving and generating better responses over time.
|
||||
|
||||

|
||||
|
||||
To see how the [trained model](https://huggingface.co/trl-lib/Qwen2-0.5B-DPO) performs, you can use the [TRL Chat CLI](clis#chat-interface).
|
||||
|
||||
<pre><code>$ trl chat --model_name_or_path trl-lib/Qwen2-0.5B-DPO
|
||||
<strong><span style="color: red;"><quentin_gallouedec>:</span></strong>
|
||||
What is the best programming language?
|
||||
|
||||
<strong><span style="color: blue;"><trl-lib/Qwen2-0.5B-DPO>:</span></strong>
|
||||
The best programming language for specific applications can vary depending on the use case and knowledge level of the programmer. Here are some general factors that can be used as input to choose the best programming language:
|
||||
|
||||
<strong><span style="color: green;">1</span></strong> Ease of use: Some programming languages are more user-friendly than others, such as Python, Java, or Ruby. Python is popular due to its simplicity and great scalability.
|
||||
<strong><span style="color: green;">2</span></strong> Versatility: The ability to work with a wide range of data structures and frameworks can define the language as versatile.
|
||||
<strong><span style="color: green;">3</span></strong> Ease of learning: Different programming languages have different learning curves, so users must be willing to take some time to master one.
|
||||
<strong><span style="color: green;">4</span></strong> Community support: The broader community of developers and enthusiasts in the selected programming language can provide great support and resources.
|
||||
<strong><span style="color: green;">5</span></strong> Reusability: Languages that emphasize code reuse and can be easily modifiable can be more suitable for software development.
|
||||
|
||||
The best programming language based on these factors is subjective and depends on what the programmer intends to accomplish.
|
||||
</code></pre>
|
||||
|
||||
## Expected dataset type
|
||||
|
||||
DPO requires a [preference dataset](dataset_formats#preference). The [`DPOTrainer`] supports both [conversational](dataset_formats#conversational) and [standard](dataset_formats#standard) dataset formats. When provided with a conversational dataset, the trainer will automatically apply the chat template to the dataset.
|
||||
|
||||
Although the [`DPOTrainer`] supports both explicit and implicit prompts, we recommend using explicit prompts. If provided with an implicit prompt dataset, the trainer will automatically extract the prompt from the `"chosen"` and `"rejected"` columns. For more information, refer to the [preference style](dataset_formats#preference) section.
|
||||
|
||||
### Special considerations for vision-language models
|
||||
|
||||
The [`DPOTrainer`] supports fine-tuning vision-language models (VLMs). For these models, a vision dataset is required. To learn more about the specific format for vision datasets, refer to the [Vision dataset format](dataset_formats#vision-datasets) section.
|
||||
|
||||
Additionally, unlike standard text-based models where a `tokenizer` is used, for VLMs, you should replace the `tokenizer` with a `processor`.
|
||||
|
||||
```diff
|
||||
- model = AutoModelForCausalLM.from_pretrained(model_id)
|
||||
+ model = AutoModelForVision2Seq.from_pretrained(model_id)
|
||||
|
||||
- tokenizer = AutoTokenizer.from_pretrained(model_id)
|
||||
+ processor = AutoProcessor.from_pretrained(model_id)
|
||||
|
||||
trainer = DPOTrainer(
|
||||
model,
|
||||
args=training_args,
|
||||
train_dataset=train_dataset,
|
||||
- processing_class=tokenizer,
|
||||
+ processing_class=processor,
|
||||
)
|
||||
```
|
||||
|
||||
For a complete example of fine-tuning a vision-language model, refer to the script in [`examples/scripts/dpo_vlm.py`](https://github.com/huggingface/trl/blob/main/examples/scripts/dpo_vlm.py).
|
||||
|
||||
|
||||
## Example script
|
||||
|
||||
We provide an example script to train a model using the DPO method. The script is available in [`trl/scripts/dpo.py`](https://github.com/huggingface/trl/blob/main/trl/scripts/dpo.py)
|
||||
|
||||
To test the DPO script with the [Qwen2 0.5B model](https://huggingface.co/Qwen/Qwen2-0.5B-Instruct) on the [UltraFeedback dataset](https://huggingface.co/datasets/trl-lib/ultrafeedback_binarized), run the following command:
|
||||
|
||||
```bash
|
||||
accelerate launch trl/scripts/dpo.py \
|
||||
--model_name_or_path Qwen/Qwen2-0.5B-Instruct \
|
||||
--dataset_name trl-lib/ultrafeedback_binarized \
|
||||
--num_train_epochs 1 \
|
||||
--logging_steps 25 \
|
||||
--output_dir Qwen2-0.5B-DPO
|
||||
```
|
||||
|
||||
## Logged metrics
|
||||
|
||||
While training and evaluating we record the following reward metrics:
|
||||
|
||||
- `rewards/chosen`: the mean difference between the log probabilities of the policy model and the reference model for the chosen responses scaled by beta
|
||||
- `rewards/rejected`: the mean difference between the log probabilities of the policy model and the reference model for the rejected responses scaled by beta
|
||||
- `rewards/accuracies`: mean of how often the chosen rewards are > than the corresponding rejected rewards
|
||||
- `rewards/margins`: the mean difference between the chosen and corresponding rejected rewards
|
||||
|
||||
## Loss functions
|
||||
|
||||
The DPO algorithm supports several loss functions. The loss function can be set using the `loss_type` parameter in the [`DPOConfig`]. The following loss functions are supported:
|
||||
|
||||
| `loss_type=` | Description |
|
||||
| -------------------------------------- | ---------------------------------------------------------------------------------------------------------------------------------------------------------------------------------------------------------------------------------------------------------------------------------------------------------------------------------------------------------------------------------------------------------------------------------------------------------------------------------------------------------------------------------------------------------------------------------------------------------------------------------------------------------------------------------------------------------------------------------------------------------------------------------------------------------------------------------------------------------------------------------------------------------------------------------------------------------------------------------------------------------------------------------------------------------------------------------------------------------------------------------------------------------------- |
|
||||
| `"sigmoid"` (default) | Given the preference data, we can fit a binary classifier according to the Bradley-Terry model and in fact the [DPO](https://huggingface.co/papers/2305.18290) authors propose the sigmoid loss on the normalized likelihood via the `logsigmoid` to fit a logistic regression. |
|
||||
| `"hinge"` | The [RSO](https://huggingface.co/papers/2309.06657) authors propose to use a hinge loss on the normalized likelihood from the [SLiC](https://huggingface.co/papers/2305.10425) paper. In this case, the `beta` is the reciprocal of the margin. |
|
||||
| `"ipo"` | The [IPO](https://huggingface.co/papers/2310.12036) authors provide a deeper theoretical understanding of the DPO algorithms and identify an issue with overfitting and propose an alternative loss. In this case, the `beta` is the reciprocal of the gap between the log-likelihood ratios of the chosen vs the rejected completion pair and thus the smaller the `beta` the larger this gaps is. As per the paper the loss is averaged over log-likelihoods of the completion (unlike DPO which is summed only). |
|
||||
| `"exo_pair"` | The [EXO](https://huggingface.co/papers/2402.00856) authors propose to minimize the reverse KL instead of the negative log-sigmoid loss of DPO which corresponds to forward KL. Setting non-zero `label_smoothing` (default `1e-3`) leads to a simplified version of EXO on pair-wise preferences (see Eqn. (16) of the [EXO paper](https://huggingface.co/papers/2402.00856)). The full version of EXO uses `K>2` completions generated by the SFT policy, which becomes an unbiased estimator of the PPO objective (up to a constant) when `K` is sufficiently large. |
|
||||
| `"nca_pair"` | The [NCA](https://huggingface.co/papers/2402.05369) authors shows that NCA optimizes the absolute likelihood for each response rather than the relative likelihood. |
|
||||
| `"robust"` | The [Robust DPO](https://huggingface.co/papers/2403.00409) authors propose an unbiased estimate of the DPO loss that is robust to preference noise in the data. Like in cDPO, it assumes that the preference labels are noisy with some probability. In this approach, the `label_smoothing` parameter in the [`DPOConfig`] is used to model the probability of existing label noise. To apply this conservative loss, set `label_smoothing` to a value greater than 0.0 (between 0.0 and 0.5; the default is 0.0) |
|
||||
| `"bco_pair"` | The [BCO](https://huggingface.co/papers/2404.04656) authors train a binary classifier whose logit serves as a reward so that the classifier maps {prompt, chosen completion} pairs to 1 and {prompt, rejected completion} pairs to 0. For unpaired data, we recommend the dedicated [`BCOTrainer`]. |
|
||||
| `"sppo_hard"` | The [SPPO](https://huggingface.co/papers/2405.00675) authors claim that SPPO is capable of solving the Nash equilibrium iteratively by pushing the chosen rewards to be as large as 1/2 and the rejected rewards to be as small as -1/2 and can alleviate data sparsity issues. The implementation approximates this algorithm by employing hard label probabilities, assigning 1 to the winner and 0 to the loser. |
|
||||
| `"aot"` or `loss_type="aot_pair"` | The [AOT](https://huggingface.co/papers/2406.05882) authors propose to use Distributional Preference Alignment Via Optimal Transport. Traditionally, the alignment algorithms use paired preferences at a sample level, which does not ensure alignment on the distributional level. AOT, on the other hand, can align LLMs on paired or unpaired preference data by making the reward distribution of the positive samples stochastically dominant in the first order on the distribution of negative samples. Specifically, `loss_type="aot"` is appropriate for paired datasets, where each prompt has both chosen and rejected responses; `loss_type="aot_pair"` is for unpaired datasets. In a nutshell, `loss_type="aot"` ensures that the log-likelihood ratio of chosen to rejected of the aligned model has higher quantiles than that ratio for the reference model. `loss_type="aot_pair"` ensures that the chosen reward is higher on all quantiles than the rejected reward. Note that in both cases quantiles are obtained via sorting. To fully leverage the advantages of the AOT algorithm, it is important to maximize the per-GPU batch size. |
|
||||
| `"apo_zero"` or `loss_type="apo_down"` | The [APO](https://huggingface.co/papers/2408.06266) method introduces an "anchored" version of the alignment objective. There are two variants: `apo_zero` and `apo_down`. The `apo_zero` loss increases the likelihood of winning outputs while decreasing the likelihood of losing outputs, making it suitable when the model is less performant than the winning outputs. On the other hand, `apo_down` decreases the likelihood of both winning and losing outputs, but with a stronger emphasis on reducing the likelihood of losing outputs. This variant is more effective when the model is better than the winning outputs. |
|
||||
| `"discopop"` | The [DiscoPOP](https://huggingface.co/papers/2406.08414) paper uses LLMs to discover more efficient offline preference optimization losses. In the paper the proposed DiscoPOP loss (which is a log-ratio modulated loss) outperformed other optimization losses on different tasks (IMDb positive text generation, Reddit TLDR summarization, and Alpaca Eval 2.0). |
|
||||
|
||||
### Label smoothing
|
||||
|
||||
The [cDPO](https://ericmitchell.ai/cdpo.pdf) is a tweak on the DPO loss where we assume that the preference labels are noisy with some probability. In this approach, the `label_smoothing` parameter in the [`DPOConfig`] is used to model the probability of existing label noise. To apply this conservative loss, set `label_smoothing` to a value greater than 0.0 (between 0.0 and 0.5; the default is 0.0).
|
||||
|
||||
### Syncing the reference model
|
||||
|
||||
The [TR-DPO](https://huggingface.co/papers/2404.09656) paper suggests syncing the reference model weights after every `ref_model_sync_steps` steps of SGD with weight `ref_model_mixup_alpha` during DPO training. To toggle this callback use the `sync_ref_model=True` in the [`DPOConfig`].
|
||||
|
||||
### RPO loss
|
||||
|
||||
The [RPO](https://huggingface.co/papers/2404.19733) paper implements an iterative preference tuning algorithm using a loss related to the RPO loss in this [paper](https://huggingface.co/papers/2405.16436) that essentially consists of a weighted SFT loss on the chosen preferences together with the DPO loss. To use this loss, set the `rpo_alpha` in the [`DPOConfig`] to an appropriate value. The paper suggests setting this weight to `1.0`.
|
||||
|
||||
### WPO loss
|
||||
|
||||
The [WPO](https://huggingface.co/papers/2406.11827) paper adapts off-policy data to resemble on-policy data more closely by reweighting preference pairs according to their probability under the current policy. To use this method, set the `use_weighting` flag to `True` in the [`DPOConfig`].
|
||||
|
||||
### For Mixture of Experts Models: Enabling the auxiliary loss
|
||||
|
||||
MOEs are the most efficient if the load is about equally distributed between experts.
|
||||
To ensure that we train MOEs similarly during preference-tuning, it is beneficial to add the auxiliary loss from the load balancer to the final loss.
|
||||
|
||||
This option is enabled by setting `output_router_logits=True` in the model config (e.g. [`~transformers.MixtralConfig`]).
|
||||
To scale how much the auxiliary loss contributes to the total loss, use the hyperparameter `router_aux_loss_coef=...` (default: `0.001`) in the model config.
|
||||
|
||||
## Accelerate DPO fine-tuning using `unsloth`
|
||||
|
||||
You can further accelerate QLoRA / LoRA (2x faster, 60% less memory) using the [`unsloth`](https://github.com/unslothai/unsloth) library that is fully compatible with `SFTTrainer`. Currently `unsloth` supports only Llama (Yi, TinyLlama, Qwen, Deepseek etc) and Mistral architectures. Some benchmarks for DPO listed below:
|
||||
|
||||
| GPU | Model | Dataset | 🤗 | 🤗 + Flash Attention 2 | 🦥 Unsloth | 🦥 VRAM saved |
|
||||
| -------- | --------- | ---------- | --- | --------------------- | --------- | ------------ |
|
||||
| A100 40G | Zephyr 7b | Ultra Chat | 1x | 1.24x | **1.88x** | -11.6% |
|
||||
| Tesla T4 | Zephyr 7b | Ultra Chat | 1x | 1.09x | **1.55x** | -18.6% |
|
||||
|
||||
First install `unsloth` according to the [official documentation](https://github.com/unslothai/unsloth). Once installed, you can incorporate unsloth into your workflow in a very simple manner; instead of loading `AutoModelForCausalLM`, you just need to load a `FastLanguageModel` as follows:
|
||||
|
||||
```diff
|
||||
from datasets import load_dataset
|
||||
from trl import DPOConfig, DPOTrainer
|
||||
- from transformers import AutoModelForCausalLM, AutoTokenizer
|
||||
+ from unsloth import FastLanguageModel
|
||||
|
||||
- model = AutoModelForCausalLM.from_pretrained("Qwen/Qwen2-0.5B-Instruct")
|
||||
- tokenizer = AutoTokenizer.from_pretrained("Qwen/Qwen2-0.5B-Instruct")
|
||||
+ model, tokenizer = FastLanguageModel.from_pretrained("Qwen/Qwen2-0.5B-Instruct")
|
||||
+ model = FastLanguageModel.get_peft_model(model)
|
||||
train_dataset = load_dataset("trl-lib/ultrafeedback_binarized", split="train")
|
||||
|
||||
- training_args = DPOConfig(output_dir="Qwen2-0.5B-DPO", logging_steps=10)
|
||||
+ training_args = DPOConfig(output_dir="Qwen2-0.5B-DPO", logging_steps=10, bf16=True)
|
||||
trainer = DPOTrainer(model=model, args=training_args, processing_class=tokenizer, train_dataset=train_dataset)
|
||||
trainer.train()
|
||||
|
||||
```
|
||||
|
||||
The saved model is fully compatible with Hugging Face's transformers library. Learn more about unsloth in their [official repository](https://github.com/unslothai/unsloth).
|
||||
|
||||
## Reference model considerations with PEFT
|
||||
|
||||
You have three main options (plus several variants) for how the reference model works when using PEFT, assuming the model that you would like to further enhance with DPO was tuned using (Q)LoRA.
|
||||
|
||||
1. Simply create two instances of the model, each loading your adapter - works fine but is very inefficient.
|
||||
2. Merge the adapter into the base model, create another adapter on top, then leave the `ref_model` param null, in which case DPOTrainer will unload the adapter for reference inference - efficient, but has potential downsides discussed below.
|
||||
3. Load the adapter twice with different names, then use `set_adapter` during training to swap between the adapter being DPO'd and the reference adapter - slightly less efficient compared to 2 (~adapter size VRAM overhead), but avoids the pitfalls.
|
||||
|
||||
### Downsides to merging QLoRA before DPO (approach 2)
|
||||
|
||||
As suggested by [Benjamin Marie](https://medium.com/@bnjmn_marie/dont-merge-your-lora-adapter-into-a-4-bit-llm-65b6da287997), the best option for merging QLoRA adapters is to first dequantize the base model, then merge the adapter. Something similar to [this script](https://github.com/jondurbin/qlora/blob/main/qmerge.py).
|
||||
|
||||
However, after using this approach, you will have an unquantized base model. Therefore, to use QLoRA for DPO, you will need to re-quantize the merged model or use the unquantized merge (resulting in higher memory demand).
|
||||
|
||||
### Using option 3 - load the adapter twice
|
||||
|
||||
To avoid the downsides with option 2, you can load your fine-tuned adapter into the model twice, with different names, and set the model/ref adapter names in [`DPOTrainer`].
|
||||
|
||||
For example:
|
||||
|
||||
```python
|
||||
# Load the base model.
|
||||
bnb_config = BitsAndBytesConfig(
|
||||
load_in_4bit=True,
|
||||
llm_int8_threshold=6.0,
|
||||
llm_int8_has_fp16_weight=False,
|
||||
bnb_4bit_compute_dtype=torch.bfloat16,
|
||||
bnb_4bit_use_double_quant=True,
|
||||
bnb_4bit_quant_type="nf4",
|
||||
)
|
||||
model = AutoModelForCausalLM.from_pretrained(
|
||||
"mistralai/mixtral-8x7b-v0.1",
|
||||
load_in_4bit=True,
|
||||
quantization_config=bnb_config,
|
||||
attn_implementation="flash_attention_2",
|
||||
torch_dtype=torch.bfloat16,
|
||||
device_map="auto",
|
||||
)
|
||||
model.config.use_cache = False
|
||||
|
||||
# Load the adapter.
|
||||
model = PeftModel.from_pretrained(
|
||||
model,
|
||||
"/path/to/peft",
|
||||
is_trainable=True,
|
||||
adapter_name="train",
|
||||
)
|
||||
# Load the adapter a second time, with a different name, which will be our reference model.
|
||||
model.load_adapter("/path/to/peft", adapter_name="reference")
|
||||
|
||||
# Initialize the trainer, without a ref_model param.
|
||||
training_args = DPOConfig(
|
||||
model_adapter_name="train",
|
||||
ref_adapter_name="reference",
|
||||
)
|
||||
dpo_trainer = DPOTrainer(
|
||||
model,
|
||||
args=training_args,
|
||||
...
|
||||
)
|
||||
```
|
||||
|
||||
## DPOTrainer
|
||||
|
||||
[[autodoc]] DPOTrainer
|
||||
|
||||
## DPOConfig
|
||||
|
||||
[[autodoc]] DPOConfig
|
||||
|
||||
## DataCollatorForPreference
|
||||
|
||||
[[autodoc]] trainer.dpo_trainer.DataCollatorForPreference
|
||||
@ -0,0 +1,78 @@
|
||||
# Examples
|
||||
|
||||
|
||||
## Introduction
|
||||
|
||||
The examples should work in any of the following settings (with the same script):
|
||||
- single GPU
|
||||
- multi GPUS (using PyTorch distributed mode)
|
||||
- multi GPUS (using DeepSpeed ZeRO-Offload stages 1, 2, & 3)
|
||||
- fp16 (mixed-precision), fp32 (normal precision), or bf16 (bfloat16 precision)
|
||||
|
||||
To run it in each of these various modes, first initialize the accelerate
|
||||
configuration with `accelerate config`
|
||||
|
||||
**NOTE to train with a 4-bit or 8-bit model**, please run
|
||||
|
||||
```bash
|
||||
pip install --upgrade trl[quantization]
|
||||
```
|
||||
|
||||
|
||||
## Accelerate Config
|
||||
For all the examples, you'll need to generate a 🤗 Accelerate config file with:
|
||||
|
||||
```shell
|
||||
accelerate config # will prompt you to define the training configuration
|
||||
```
|
||||
|
||||
Then, it is encouraged to launch jobs with `accelerate launch`!
|
||||
|
||||
|
||||
# Maintained Examples
|
||||
|
||||
Scripts can be used as examples of how to use TRL trainers. They are located in the [`trl/scripts`](https://github.com/huggingface/trl/blob/main/trl/scripts) directory. Additionally, we provide examples in the [`examples/scripts`](https://github.com/huggingface/trl/blob/main/examples/scripts) directory. These examples are maintained and tested regularly.
|
||||
|
||||
| File | Description |
|
||||
| ----------------------------------------------------------------------------------------------------------------------------- | ----------------------------------------------------------------------------------------------------------------------------------------------------------------------------------------------------------------------------------------------------------------------------------------------------------------------------------------------------------------------------------------------------------------------------------------------------------------- |
|
||||
| [`examples/scripts/alignprop.py`](https://github.com/huggingface/trl/blob/main/examples/scripts/alignprop.py) | This script shows how to use the [`AlignPropTrainer`] to fine-tune a diffusion model. |
|
||||
| [`examples/scripts/bco.py`](https://github.com/huggingface/trl/blob/main/examples/scripts/bco.py) | This script shows how to use the [`KTOTrainer`] with the BCO loss to fine-tune a model to increase instruction-following, truthfulness, honesty and helpfulness using the [openbmb/UltraFeedback](https://huggingface.co/datasets/openbmb/UltraFeedback) dataset. |
|
||||
| [`examples/scripts/cpo.py`](https://github.com/huggingface/trl/blob/main/examples/scripts/cpo.py) | This script shows how to use the [`CPOTrainer`] to fine-tune a model to increase helpfulness and harmlessness using the [Anthropic/hh-rlhf](https://huggingface.co/datasets/Anthropic/hh-rlhf) dataset. |
|
||||
| [`examples/scripts/ddpo.py`](https://github.com/huggingface/trl/blob/main/examples/scripts/ddpo.py) | This script shows how to use the [`DDPOTrainer`] to fine-tune a stable diffusion model using reinforcement learning. |
|
||||
| [`examples/scripts/dpo_vlm.py`](https://github.com/huggingface/trl/blob/main/examples/scripts/dpo_vlm.py) | This script shows how to use the [`DPOTrainer`] to fine-tune a Vision Language Model to reduce hallucinations using the [openbmb/RLAIF-V-Dataset](https://huggingface.co/datasets/openbmb/RLAIF-V-Dataset) dataset. |
|
||||
| [`examples/scripts/orpo.py`](https://github.com/huggingface/trl/blob/main/examples/scripts/orpo.py) | This script shows how to use the [`ORPOTrainer`] to fine-tune a model to increase helpfulness and harmlessness using the [Anthropic/hh-rlhf](https://huggingface.co/datasets/Anthropic/hh-rlhf) dataset. |
|
||||
| [`examples/scripts/ppo/ppo.py`](https://github.com/huggingface/trl/blob/main/examples/scripts/ppo/ppo.py) | This script shows how to use the [`PPOTrainer`] to fine-tune a model to improve its ability to continue text with positive sentiment or physically descriptive language |
|
||||
| [`examples/scripts/ppo/ppo_tldr.py`](https://github.com/huggingface/trl/blob/main/examples/scripts/ppo/ppo_tldr.py) | This script shows how to use the [`PPOTrainer`] to fine-tune a model to improve its ability to generate TL;DR summaries. |
|
||||
| [`examples/scripts/reward_modeling.py`](https://github.com/huggingface/trl/blob/main/examples/scripts/reward_modeling.py) | This script shows how to use the [`RewardTrainer`] to train a reward model on your own dataset. |
|
||||
| [`examples/scripts/sft_vlm.py`](https://github.com/huggingface/trl/blob/main/examples/scripts/sft_vlm.py) | This script shows how to use the [`SFTTrainer`] to fine-tune a Vision Language Model in a chat setting. The script has only been tested with [LLaVA 1.5](https://huggingface.co/llava-hf/llava-1.5-7b-hf), [LLaVA 1.6](https://huggingface.co/llava-hf/llava-v1.6-mistral-7b-hf), and [Llama-3.2-11B-Vision-Instruct](https://huggingface.co/meta-llama/Llama-3.2-11B-Vision-Instruct) models so users may see unexpected behaviour in other model architectures. |
|
||||
|
||||
Here are also some easier-to-run colab notebooks that you can use to get started with TRL:
|
||||
|
||||
| File | Description |
|
||||
| --------------------------------------------------------------------------------------------------------------------------------- | ----------------------------------------------------------------------------------------------------------------------- |
|
||||
| [`examples/notebooks/best_of_n.ipynb`](https://github.com/huggingface/trl/tree/main/examples/notebooks/best_of_n.ipynb) | This notebook demonstrates how to use the "Best of N" sampling strategy using TRL when fine-tuning your model with PPO. |
|
||||
| [`examples/notebooks/gpt2-sentiment.ipynb`](https://github.com/huggingface/trl/tree/main/examples/notebooks/gpt2-sentiment.ipynb) | This notebook demonstrates how to reproduce the GPT2 imdb sentiment tuning example on a jupyter notebook. |
|
||||
| [`examples/notebooks/gpt2-control.ipynb`](https://github.com/huggingface/trl/tree/main/examples/notebooks/gpt2-control.ipynb) | This notebook demonstrates how to reproduce the GPT2 sentiment control example on a jupyter notebook. |
|
||||
|
||||
|
||||
We also have some other examples that are less maintained but can be used as a reference:
|
||||
1. **[research_projects](https://github.com/huggingface/trl/tree/main/examples/research_projects)**: Check out this folder to find the scripts used for some research projects that used TRL (LM de-toxification, Stack-Llama, etc.)
|
||||
|
||||
|
||||
## Distributed training
|
||||
|
||||
All of the scripts can be run on multiple GPUs by providing the path of an 🤗 Accelerate config file when calling `accelerate launch`. To launch one of them on one or multiple GPUs, run the following command (swapping `{NUM_GPUS}` with the number of GPUs in your machine and `--all_arguments_of_the_script` with your arguments.)
|
||||
|
||||
```shell
|
||||
accelerate launch --config_file=examples/accelerate_configs/multi_gpu.yaml --num_processes {NUM_GPUS} path_to_script.py --all_arguments_of_the_script
|
||||
```
|
||||
|
||||
You can also adjust the parameters of the 🤗 Accelerate config file to suit your needs (e.g. training in mixed precision).
|
||||
|
||||
### Distributed training with DeepSpeed
|
||||
|
||||
Most of the scripts can be run on multiple GPUs together with DeepSpeed ZeRO-{1,2,3} for efficient sharding of the optimizer states, gradients, and model weights. To do so, run following command (swapping `{NUM_GPUS}` with the number of GPUs in your machine, `--all_arguments_of_the_script` with your arguments, and `--deepspeed_config` with the path to the DeepSpeed config file such as `examples/deepspeed_configs/deepspeed_zero1.yaml`):
|
||||
|
||||
```shell
|
||||
accelerate launch --config_file=examples/accelerate_configs/deepspeed_zero{1,2,3}.yaml --num_processes {NUM_GPUS} path_to_script.py --all_arguments_of_the_script
|
||||
```
|
||||
98
examples/research/open_r1/trl/docs/source/gkd_trainer.md
Normal file
98
examples/research/open_r1/trl/docs/source/gkd_trainer.md
Normal file
@ -0,0 +1,98 @@
|
||||
# Generalized Knowledge Distillation Trainer
|
||||
|
||||
[](https://huggingface.co/models?other=gkd,trl)
|
||||
|
||||
## Overview
|
||||
|
||||
Generalized Knowledge Distillation (GKD) was proposed in [On-Policy Distillation of Language Models: Learning from Self-Generated Mistakes](https://huggingface.co/papers/2306.13649) by Rishabh Agarwal, Nino Vieillard, Yongchao Zhou, Piotr Stanczyk, Sabela Ramos, Matthieu Geist, and Olivier Bachem.
|
||||
|
||||
The abstract from the paper is the following:
|
||||
|
||||
> Knowledge distillation (KD) is widely used for compressing a teacher model to reduce its inference cost and memory footprint, by training a smaller student model. However, current KD methods for auto-regressive sequence models suffer from distribution mismatch between output sequences seen during training and those generated by the student during inference. To address this issue, we introduce Generalized Knowledge Distillation (GKD). Instead of solely relying on a fixed set of output sequences, GKD trains the student on its self-generated output sequences by leveraging feedback from the teacher on such sequences. Unlike supervised KD approaches, GKD also offers the flexibility to employ alternative loss functions between the student and teacher, which can be useful when the student lacks the expressivity to mimic the teacher's distribution. Furthermore, GKD facilitates the seamless integration of distillation with RL fine-tuning (RLHF). We demonstrate the efficacy of GKD for distilling auto-regressive language models on summarization, translation, and arithmetic reasoning tasks, and task-agnostic distillation for instruction-tuning.
|
||||
|
||||
|
||||
The key aspects of GKD are:
|
||||
1. It addresses the train-inference distribution mismatch in auto-regressive sequence models by training the student model on its self-generated output sequences.
|
||||
2. GKD allows flexibility in choosing different divergence measures between student and teacher models via the generalized Jensen-Shannon Divergence (JSD), which can be useful when the student lacks the capacity to fully mimic the teacher.
|
||||
|
||||
This post-training method was contributed by [Kashif Rasul](https://huggingface.co/kashif) and [Lewis Tunstall](https://huggingface.co/lewtun).
|
||||
|
||||
## Usage tips
|
||||
|
||||
The [`GKDTrainer`] is a wrapper around the [`SFTTrainer`] class that takes in a teacher model argument. It needs three parameters to be set via the [`GKDConfig`] namely:
|
||||
* `lmbda`: controls the student data fraction, i.e., the proportion of on-policy student-generated outputs. When `lmbda=0.0`, the loss reduces to supervised JSD where the student is trained with the token-level probabilities of the teacher. When `lmbda=1.0`, the loss reduces to on-policy JSD, where the student generates output sequences and token-specific feedback on these sequences from the teacher. For values in between [0, 1] it is random between the two based on the `lmbda` value for each batch.
|
||||
* `seq_kd`: controls whether to perform Sequence-Level KD (can be viewed as supervised FT on teacher-generated out). When `seq_kd=True` and `lmbda=0.0`, the loss reduces to supervised JSD, where the teacher generates output sequences and the student receives token-specific feedback on these sequences from the teacher.
|
||||
* `beta`: controls the interpolation in the generalized Jensen-Shannon Divergence. When `beta=0.0` the loss approximates forward KL divergence, while for `beta=1.0` the loss approximates reverse KL divergence. For values in between [0, 1] it interpolates between the two.
|
||||
|
||||
The authors find that on-policy data (high `lmbda`) performs better and the optimal `beta` varied depending on the task and evaluation method.
|
||||
|
||||
> [!WARNING]
|
||||
> Make sure that `attn_implementation="flash_attention_2"` when training [Gemma models](https://huggingface.co/models?other=gemma2). Otherwise you will encounter NaNs in the logits due to the [soft capping technique](https://huggingface.co/blog/gemma2#soft-capping-and-attention-implementations) adopted by this architecture.
|
||||
|
||||
The basic API is as follows:
|
||||
|
||||
```python
|
||||
from datasets import Dataset
|
||||
from trl import GKDConfig, GKDTrainer
|
||||
from transformers import (
|
||||
AutoModelForCausalLM,
|
||||
AutoTokenizer,
|
||||
)
|
||||
|
||||
NUM_DUMMY_SAMPLES = 100
|
||||
|
||||
tokenizer = AutoTokenizer.from_pretrained("Qwen/Qwen2-0.5B-Instruct")
|
||||
# The model to optimise
|
||||
model = AutoModelForCausalLM.from_pretrained("Qwen/Qwen2-0.5B-Instruct")
|
||||
# The teacher model to calculate the KL divergence against
|
||||
teacher_model = AutoModelForCausalLM.from_pretrained("Qwen/Qwen2-1.5B-Instruct")
|
||||
|
||||
train_dataset = Dataset.from_dict(
|
||||
{
|
||||
"messages": [
|
||||
[
|
||||
{"role": "user", "content": "Hi, how are you?"},
|
||||
{"role": "assistant", "content": "I'm great thanks"},
|
||||
]
|
||||
]
|
||||
* NUM_DUMMY_SAMPLES
|
||||
}
|
||||
)
|
||||
eval_dataset = Dataset.from_dict(
|
||||
{
|
||||
"messages": [
|
||||
[
|
||||
{"role": "user", "content": "What colour is the sky?"},
|
||||
{"role": "assistant", "content": "The sky is blue"},
|
||||
]
|
||||
]
|
||||
* NUM_DUMMY_SAMPLES
|
||||
}
|
||||
)
|
||||
|
||||
training_args = GKDConfig(output_dir="gkd-model", per_device_train_batch_size=1)
|
||||
trainer = GKDTrainer(
|
||||
model=model,
|
||||
teacher_model=teacher_model,
|
||||
args=training_args,
|
||||
processing_class=tokenizer,
|
||||
train_dataset=train_dataset,
|
||||
eval_dataset=eval_dataset,
|
||||
)
|
||||
trainer.train()
|
||||
```
|
||||
|
||||
### Expected dataset type
|
||||
|
||||
The dataset should be formatted as a list of "messages" where each message is a list of dictionaries with the following keys:
|
||||
* `role`: either `system`, `assistant` or `user`
|
||||
* `content`: the message content
|
||||
|
||||
|
||||
## GKDTrainer
|
||||
|
||||
[[autodoc]] GKDTrainer
|
||||
|
||||
## GKDConfig
|
||||
|
||||
[[autodoc]] GKDConfig
|
||||
Some files were not shown because too many files have changed in this diff Show More
Reference in New Issue
Block a user